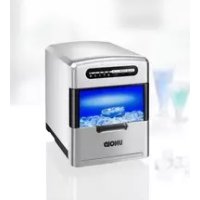
Edel 48955 - Ice Maker UNOLD - Free user manual and instructions
Find the device manual for free Edel 48955 UNOLD in PDF.
Download the instructions for your Ice Maker in PDF format for free! Find your manual Edel 48955 - UNOLD and take your electronic device back in hand. On this page are published all the documents necessary for the use of your device. Edel 48955 by UNOLD.
USER MANUAL Edel 48955 UNOLD
SAFETY INFORMATION TECHNICAL SPECIFICATIONS Please read the following instructions and keep them on hand for later reference. Instructions for persons in the household
1. The appliance can be used
by children 8 years and older and by persons with limited physical, sensory or mental abilities or with lack of expe
rience or limited knowledge, if they are supervised by a person who is responsible for their safety or they have been instructed with regard to safe use of the appli
ance and have understood the dangers that can result from use of the appliance. The appliance is not a toy. Children should only clean and maintain the appliance under supervision.
2. Children under the age of 3
should stay away from the
EXPLANATION OF SYMBOLS
This symbol denotes a possible hazard which could cause injury or damage to the appliance. Caution: risk of fire. This symbol indicates a possible fire hazard. This symbol indicates a potential burning hazard. Please be especially careful at all times here.23 appliance or they must be under constant supervision.
3. Children between the ages
of 3 and 8 should only switch the appliance on and off when it is in its normal intended operating position, they are supervised or have been instructed relative to safe use of the appliance and have understood the hazards that can result from using the product. Children between 3 and 8 years of age should neither connect or operate the appliance, nor should they clean or main
4. Keep the appliance out of
the reach of children. Requirements imposed on the set- up location and for the operation of the appliance
5. Only connect the appliance
to an AC power supply with voltage corresponding to the voltage specified on the rat
6. This appliance must not be
operated with an external timer or a remote control system.
ance or the power cord in water or other liquids.
8. Do not clean the appliance or
power cord in a dishwasher.
9. The appliance is intended
for household use only, or for similar areas of use, such as, kitchenettes in businesses, offices or other workplaces, Use by guests in hotels, motels or other lodgings, in private guest houses or holiday homes.
10. Never touch the appliance or
power cord with wet hands.
11. For safety reasons, never
place the appliance on hot surfaces, a metal tray or on a wet surface.
12. Do not place the appliance
or power cord near open flames during operation.
13. Always use the ice cube
maker on a level, unclut
14. Maintain a distance of at
least 15 cm from other objects to ensure sufficient ventilation of the appliance.
15. Do not use any electrical
devices in the interior of the appliance, unless they have been recommended by the manufacturer.
16. Ensure that the power cord
does not hang over the edge of the counter top or table, since this can cause acci
dents, for example if small children pull on the cord.24
17. Do not operate or store the
ice cube maker outdoors.
18. Use the appliance only after
it has been properly assem
19. Fill the water tank only with
the interior of the appliance, to avoid injuries.
21. After unpacking, do not
operate the appliance for at least two hours, to prevent damage to the compressor.
22. Do not switch the appliance
on and off repeatedly, since this can damage the com
pressor. Therefore, the appli- ance should be operated for at least three minutes.
23. Switch off the appliance and
unplug it from the power supply before moving it, to prevent damage to the appli
the appliance with accesso
ries of other manufacturers or brands.
25. Unplug the mains plug from
the electrical outlet after use and before cleaning. Never leave the appliance unat
tended when the mains plug is plugged in.
26. Clean the appliance after
27. Never attempt to repair the
appliance yourself, since this can result in electric shock.
28. Check the appliance, the
plug and the power cord reg
ularly for wear or damage. In case of damage to the power cord or other parts, please send the appliance for inspection and repair to our customer service depart
ment. Unauthorised repairs can result in serious hazards for the user and void the warranty.
29. If the power cord of this
appliance is damaged, it must be replaced by the manufacturer or by the man
ufacturer’s customer service organisation, or by a person with similar qualifications, to prevent hazards.
30. Unplug the appliance from
the power supply after use and prior to cleaning. Never leave the appliance unat
tended when it is plugged in to the power supply.
31. Clean the appliance after
32. Never attempt to repair the
appliance yourself, since this can result in electric shock.
33. Check the appliance, the
plug and the power cord reg
Never open the housing of the appliance. This can result in electric shock. After unpacking, please do not operate the appliance for at least two hours and open the ice container. The coolant in the appliance must first settle, otherwise the compressor could be damaged. Only fill the appliance with clean drinking water. Never use water with additives or other liquid food products. These clog the lines in the appliance and can damage the appliance.
Warning: Do not store explosive substances such as aerosol
cans with a flammable propellant in this appliance.
Warning: Keep ventilation openings, in the appliance enclosure
or in the built-in structure, clear of obstruction
Warning: Do not use mechanical devices or other means to
accelerate the defrosting process, other than those recommended by the manufacturer
Warning: Do not damage the refrigerant circuit.
Warning: Do not use electrical appliances inside the food
storage compartments of the appliance, unless they are of the type recommended by the manufacturer. The compressor can become extremely hot in operation – danger of burn injuries! The manufacturer will not be liable in the event of improper or incorrect use or if repairs are carried out by unauthorized third parties. ularly for wear or damage. In case of damage to the power cord or other parts, please send the appliance for inspection and repair to our after sales service. Unau
thorized repairs can result in serious risks to the user and void the warranty.
34. If the supply cord is dam
aged, it must be replaced by the manufacturer or its service agent or a similarly qualified person in order to avoid a hazard.26 BEFORE USING THE APPLIANCE FOR THE FIRST TIME When unpacking the appliance and removing the packaging material, make sure not to tilt the appliance more than 45°, to prevent damage to the com- pressor inside the appliance.
1. Remove all packaging materials
and any transport safeguards. Keep packaging materials away from children – danger of suffo- cation!
2. Check whether all listed acces-
sory parts are present.
3. Clean all parts with a damp
cloth, as described in the section „Cleaning and care“.
4. Check to make sure that all parts
are assembled correctly and the appliance is stable and level.
5. Check whether the residual water
drain on the rear of the appliance is closed with the sealing cap.
6. Now connect the power cord to
the back of the appliance.
7. Connect the appliance to the
1 Symbol rotates: Ice cubes are being produced Symbol flashes: Fault 2 TIME ON The currently set start time TIME OFF The currently set switch-off time 3 Time display 4 SET Set time or timer 5 TIME Display time or timer 6 OFF Switch off the device/end or interrupt the making of ice cubes 7 ON Switch on appliance/start making ice cubes Without picture: 8 Symbol – container Ice cube container full 9 Symbol – water tap Water tank empty Your new ice cube maker has a touch screen operating element. This means that all settings on the device are made directly via the display. To do this, lightly tap the desired button. In this regard, note that the settings must be made promptly via the buttons. If you wait for longer than 3 seconds between touching buttons the current entry will be cancelled and the appliance will revert to its original status. However, the settings made up to that point in time will be saved.28
display once to set the hours: To do this, now press the „SET“ button until the desired time in hours is reached.
2. To set the minutes, press the
„TIME“ button twice, and then press the „SET“ button until the desired time in minutes is reached.
3. Press the „TIME“ button to save
the set time. Setting the timer Switch-on time:
times in succession. Each of the set times will be displayed. Switching the timer on or off
1. Please only use drinking water to
produce ice cubes. Do not use any additives, flavourings or similar items, such items can contami- nate the appliance. The water used should not be cooler than 7°C and it should not be warmer than 35°C. In addition, you obtain the best results when the appli- ance is working in an ambient temperature of 15°C to maximum 38°C.
2. Tip: As a rule the appliance pro-
duces slightly opaque ice cubes, which however does not impair the quality of the ice cubes. This is due to the especially fast freez- ing process. To get crystal clear ice cubes, use drinking water, which has been boiled and cooled beforehand. DRAINING WATER
1. To drain the water from the appli-
ance, please proceed as follows: Switch off the appliance and unplug it from the electrical outlet.
2. Hold the appliance over a suffi-
ciently large bowl or the kitchen sink or place it on the edge of the countertop.
3. Remove the cap on the
residual water drain (5) on the rear of the appliance by turning it counter clockwise.
4. Wait until the water has drained
completely from the appliance and then seal the water drain again.
5. In this process make sure not to
tilt the appliance too far, to pre- vent damage to the compressor.30
1. Caution: Do not use the first ice
cubes that have been produced with the appliance. Dispose of these ice cubes; they may contain production residues.
2. Prepare the appliance as
described in the section “Before using the appliance the first time”.
3. Remove the ice container (4)
from the appliance by pulling it forward.
4. Fill the provided measuring cup
with fresh, clean water.
5. Pour the water into the water
tank (see illustration). At least a maximum of 1.8 litres must be filled into the appliance. Please pay attention to the respective minimum and maximum mark on the left side of the water tank.
6. Do not fill water past the Max
marking to prevent water from running out.
7. Slide the ice container back into
8. Press the On button to start
making ice cubes immediately. If you have activated the timer, you do not need to press any button; the appliance will start automatically at the specified time.
9. The appliance starts to make ice
cubes. The first ice cubes that are made do not have the selected size, since it takes several minutes before the appliance reaches the right operating temperature. Therefore, the first ice cubes are somewhat smaller.
10. If the pump in the appliance
should not transport any water for a longer period of time, switch off the appliance, and allow a few drops of water to drip out via the residual drain. Then restart the process.
11. Depending on water and ambient
temperature the ice cubes will be ready in approx. 6 to 18 minutes. Note: At the beginning of ice cube making process, for technical reasons the ice cubes are still small and of different sizes.
12. You can interrupt the making of
ice cubes any time by pressing the „OFF“ button.
13. If you have programmed the
appliance via the timer, you do not need to press any button, the31 appliance stops making ice cubes automatically at the set time.
14. Caution: If you interrupt the
process, the excess water runs back into the water tank. The ice cubes that are still attached to the cooling linkage will drop off into the ice container after a while, and can then be taken out.
15. When the ice container is full this
symbol (8) lights up and a signal tone sounds.
17. Remove the ice container and
empty it. Insert the ice container back into the appliance. Please note that you must hold the ice container slightly slanted when inserting it in the appliance.
19. In addition, the ice cube maker
automatically checks the water level in the water tank. If the water level is too low, this symbol (9) lights up:
20. The appliance automatically stops
making ice cubes. Top up water as described above; in this process pay attention to the MAX mark and do not overfill the appliance.
the water tank is blocked due to overly-large ice cubes. Switch off the appliance and wait until the ice cubes have melted slightly. Then proceed with production of the ice cubes (however, wait at least 3 minutes before proceeding, to prevent appliance damage).
23. Please remember not to leave the
ice cubes in the ice container too long, since they will melt. If you do not wish to use the ice cubes right away, you can store them in the freezer.
24. After use, please leave the ice
cube maker open to prevent the formation of mould or bacteria. The water must be changed af- ter 24 hours at the latest, for reasons of hygiene.32
Before cleaning, always turn off the appliance and unplug it from the electrical outlet.
1. Do not immerse the appliance
and power cord in water or other liquids or wash them in the dish- washer.
2. Wipe off the ice cube maker with
a damp cloth inside and out. To do this, it is best to use a mixture of water and a little household vinegar.
3. You can clean the ice container
with a little warm dishwashing water. The ice container is not dishwasher-safe!
4. Please clean the water tank thor-
oughly with a damp cloth and then dry it with a lint-free cloth.
5. Do not use any abrasive scour-
ing agents, steel wool, metallic objects, hot cleaning agents or disinfectants.
6. After use, please leave the ice
cube maker open to prevent the formation of mould or bacteria.
7. The appliance and power plug
must be completely dry before the appliance can be operated again.
8. When completely dry, store the
completely dried ice cube maker in a dry and safe place so that it is protected from dust, impact, heat and moisture.33 TROUBLESHOOTING Problem Cause Solution The compressor hums very loudly. The voltage is too low. Switch off the appliance and check whether it is connected to a 220- 240 V~ electrical outlet. No indicator lamp lights up when you plug the appliance into the wall socket. The appliance is not connected correctly. Check to make sure that the plug was inserted correctly into the wall socket. A component is defec- tive. Contact our customer service department. Ice cubes stick to- gether The water is too cold The ambient tempera- ture is too cool Fill the water tank with lukewarm water. The symbol is il- luminated. Ice cubes that are too large are blocking the water tank Switch off the appli- ance and wait until the ice cubes have melted slightly. Then proceed with the ice cube making process.34
WASTE DISPOSAL / ENVIRONMENTAL PROTECTION
Our appliances are produced on a high quality level for a long lifetime. Regular maintenance and expert repairs by our after-sales service can extend the useful life of the appliance. If an appliance is defective and repair is not possible we ask you to follow the following instructions for disposal. Do not dispose this appliance together with your standard household waste. Please bring this product to an approved collection point for recycling of electric and electronic products. By separate collection and disposal of waste products you help to protect natural resources and ensure, that the product is disposed in an adequate way to protect health and environment. We grant a 24 months guarantee, and in case of commercial use a 12 months guarantee, starting from the date of purchase for any damage demonstrably due to manufacturing defects and when the appliance has been used according to its intended use. Within the warranty period we will remedy defective materials or workmanship through repair or replacement, at our option. Our warranty terms apply only to appliances sold in Germany and Austria. For other countries, please contact the re- sponsible importer. In the event of a claim for remedy of defects, please send the appliance to our after sales service, properly packaged and postage paid, together with a copy of the automatically generated sales receipt, which must show the date of purchase, and a description of the defect. If the defect is covered by the warranty, the customer will be reimbursed for the shipping costs only in Germany and Austria. The warranty does not cover damage from normal wear, improper handling and failure to comply with the maintenance and care instructions. The warranty is void if repairs or modifications are made to the appliance by third parties. Any claims of the end consumer vis-à-vis the retailer are not limited by this warranty. The instruction booklet is also available for download: www.unold.de GUARANTEE CONDITIONS Coolant used: R600a35