
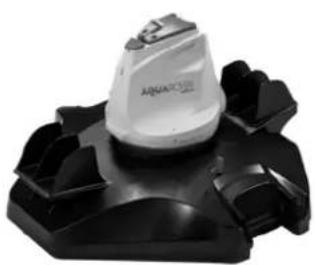
Flowclear 58623 - Pool robot vacuum BESTWAY - Free user manual and instructions
Find the device manual for free Flowclear 58623 BESTWAY in PDF.

| Product Type | Robotic pool vacuum |
| Brand | Bestway |
| Model | Flowclear 58623 |
| Usage | Automatic pool floor cleaning |
| Power supply | Rechargeable Li-ion battery with external adapter and charging station |
| Charging time | Approximately 5 to 6 hours (first full charge) |
| Charge indicator | Red LED (charging) / Green LED (charged) |
| Maximum operating depth | 3 meters |
| Recommended water temperature | 5°C to 35°C |
| Filtration type | Debris compartment with removable filter cover |
| Movement mechanism | Water ejection propulsion, 180° swiveling head with side fin |
| Main functions | Random pool floor cleaning, debris suction, automatic direction change |
| Electrical safety | Mandatory use with a residual-current device (GFCI/RCD) |
| Usage precautions | Do not use when people or animals are in the water |
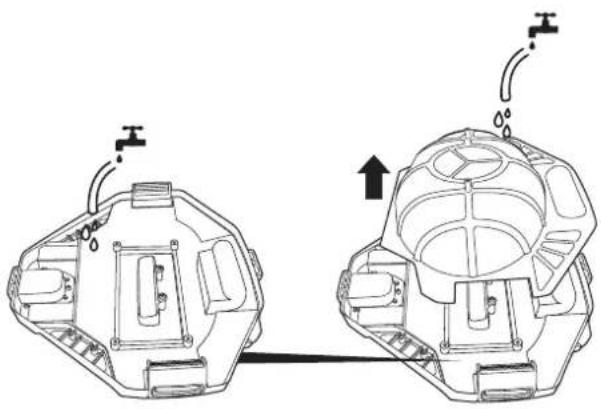
| Routine maintenance | Clean the debris compartment and rinse the filter with fresh water |
| Storage | In a dry, ventilated place, away from sunlight and frost (10-25°C) |
| Available spare parts | Float, side fin, shock-absorbing ring, filter cover, etc. |
| Warranty | Contact Bestway support for details |
| Box contents | Robot, charging station, external adapter, float, hook, user manual |
Frequently Asked Questions - Flowclear 58623 BESTWAY
User questions about Flowclear 58623 BESTWAY
0 question about this device. Answer the ones you know or ask your own.
Ask a new question about this device
Download the instructions for your Pool robot vacuum in PDF format for free! Find your manual Flowclear 58623 - BESTWAY and take your electronic device back in hand. On this page are published all the documents necessary for the use of your device. Flowclear 58623 by BESTWAY.
USER MANUAL Flowclear 58623 BESTWAY
58623
OWNER'S MANUAL
bestwaycorp.com/support
Visit Bestway YouTube channel YouTube

OWNER'S MANUAL
Visit Bestway YouTube channel YouTube
IMPORTANT SAFETY INSTRUCTIONS
When installing and using this electrical equipment, basic safety precautions should always be followed, including the following:
READ AND FOLLOW ALL INSTRUCTIONS
WARNING
- This is not a TOY. Children should be kept out of reach from this robot and its accessories.
- Never allow children to operate this product.
- This robot is not intended for use by someone with reduced physical, sensory or mental capabilities or a lack of experience and knowledge unless they have been given instructions concerning the appliance and are under supervision of the person responsible for their safety.
-
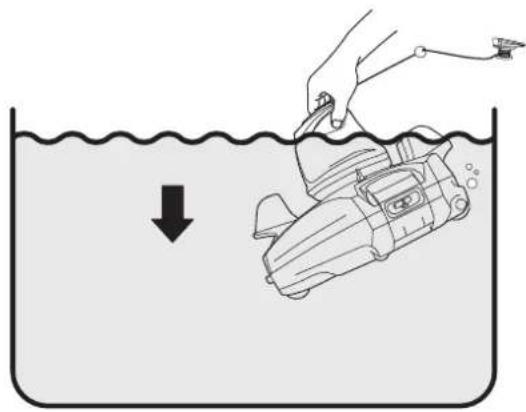
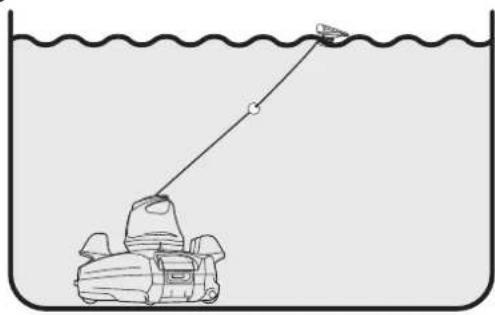
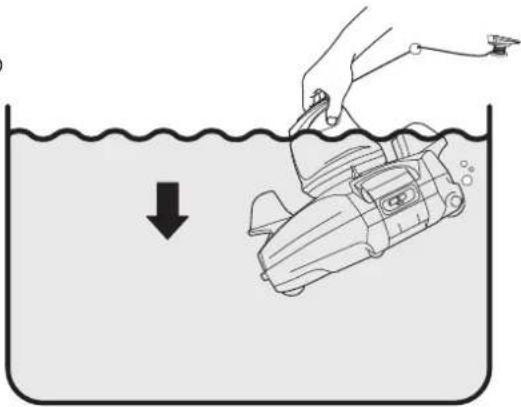
Make sure the robot is fully immersed in the water before operation. The minimum water level required to operate the robot must reach above the swivel head of the robot. Operating the robot when it is not immersed in the water correctly could damage the unit and void the warranty as a result.
-
Maximum operating depth in water is 3 meters (10 ft.).
- Operating water temperature: 5^ C ( 41^ F) - 35^ C ( 95^ F).
- Only use the detachable supply unit (external adaptor) provided with this robot to charge the battery.
- D□C Detachable supply unit (external adaptor).
- This appliance is not intended for use by persons (including children) with reduced physical, sensory or mental capabilities, or lack of experience and knowledge, unless they have been given supervision or instruction concerning use of the appliance by a person responsible for their safety. Children should be supervised to ensure that they do not play with the appliance.
- Connect the external adaptor to a power source through a residential current device (RCD) / a ground fault circuit interrupter (GFCI). If in doubt, consult a qualified professional electrician.
- Do not use this robot if any damage is detected.
- Replace damaged parts as soon as possible. Only use parts certified by the distributor or manufacturer.
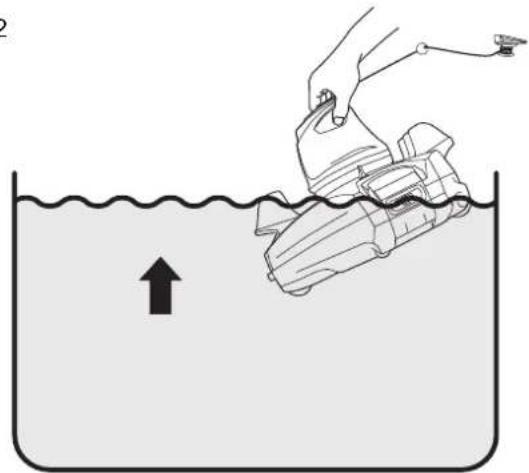
- Turn off the robot, disconnect the external adaptor from the power source, and unplug the external adaptor from the charging base, before detaching the robot from the charging base.
- Disconnect the robot from the supply mains and make sure the robot is power OFF prior to servicing it such as cleaning the filter and swivel smoothing-ring.
- The battery installed is a rechargeable Li-ion battery pack. Never attempt to replace it.
- The robot is only to be recharged with external adaptor and charging base delivered with this product.
- DO NOT handle the robot, external
adaptor and charging base while it is charging with wet limbs and without shoes.
- You should not operate this robot when people/pets are present in the water.
- DO NOT use this robot without an intact filter in place, otherwise your warranty will be voided as a result.
- Suction entrapment hazard: This robot generates suction. Do not allow hair, body, and any loose parts of your clothing to make contact with the suction hole of the robot during its operation.
- Never insert body parts, clothing and other objects into the openings and moving parts of the robot.
- DO NOT use this robot to pick up any toxic substance, flammable and combustible liquids such as gasoline, and in the presence of explosive or flammable fumes.
- Under no circumstances should you attempt to disassemble the robot and replace the impeller, motor, and battery by yourself.
- Never insert fingers and any object to touch the impeller.
- This robot shall not be used by children.
- The battery must be removed from the robot before it is scrapped.
- This robot contains a battery that are only to be removed by skilled persons.
- The robot must be disconnected from the supply mains as the battery is removed.
- For detail regarding battery dsiposal, refer to the section "Battery Disposal" in this manual.
- The battery must be disposed safely in accordance with local ordinances or regulations.
- The robot contains a maintenance-free, rechargeable lithium-ion battery pack, which must be disposed properly. Recycling is required; please contact your local authorities for more
information.
- External adaptor and charging base:
- Never use the external adaptor and charging base for anything other than charging the battery of the robot that is supplied in the same pack.
- The external adaptor and charging base should not be used outdoors, nor should it be exposed to rain, humidity, any liquid or heat.
- The transformer (or external adaptor) is to be located outside zone 1.
- Keep the external adaptor and charging base out of reach of children.
- Never use the external adaptor and charging base if any damage is detected.
- DO NOT handle the external adaptor and charging base with wet hands.
- Keep the external adaptor disconnected from power when it is not in use.
- Never attempt to open the external adaptor.
- If the supply cord is damaged, it must be replaced by the manufacturer, its service agent or an equally-qualified person in order to prevent hazards of any kind.
- Make sure the robot is completely dry before charging.
CAUTION!
- This robot is designed for underwater use only; it is not an all-purpose vacuum cleaner. DO NOT attempt to use it to clean anything other than your pool.
- Use only original accessories delivered with this product.
- DO NOT use this robot right after pool-shocking. It is recommended to first leave the pool circulating for at least 24-48 hours.
- If you are planning on using the robot in a saltwater pool, make sure all salt are
dissolved before placing it into the water.
- It is not recommended to use this robot with another automatic cleaner/cleaner simultaneously.
- Avoid picking up hard, sharp objects with this product which may damage the robot and filter.
- To avoid damaging the external adaptor and charging base, do not attempt to carry the robot by the cable of external adaptor or pull the cable to disconnect it from the power source and charging base.
- Charge the robot indoors in a clean, dry area with good ventilation and away from sunlight.
- DO NOT leave the robot charged for over 10 hours.
- If the robot will not be used for an extended period, detach it from the charging base and use a damp cloth to clean and dry the robot and its accessories. Make sure to charge the robot to about 30% to 50% of the battery capacity before it is stored. Store in a well-ventilated area away from sunlight, heat, ignition sources, pool chemicals, and children. Recharge the robot every three months.
- All actions concerning the disassembly of the swivel head (ie. battery disposal) can only be carried by an authorized technician.
Above warnings and cautions are not intended to incorporate all possible instances for risks and / or severe injuries. Pool / spa owners should always exercise extra caution and common sense when utilizing the product.
SAVE THESE INSTRUCTIONS
Part List
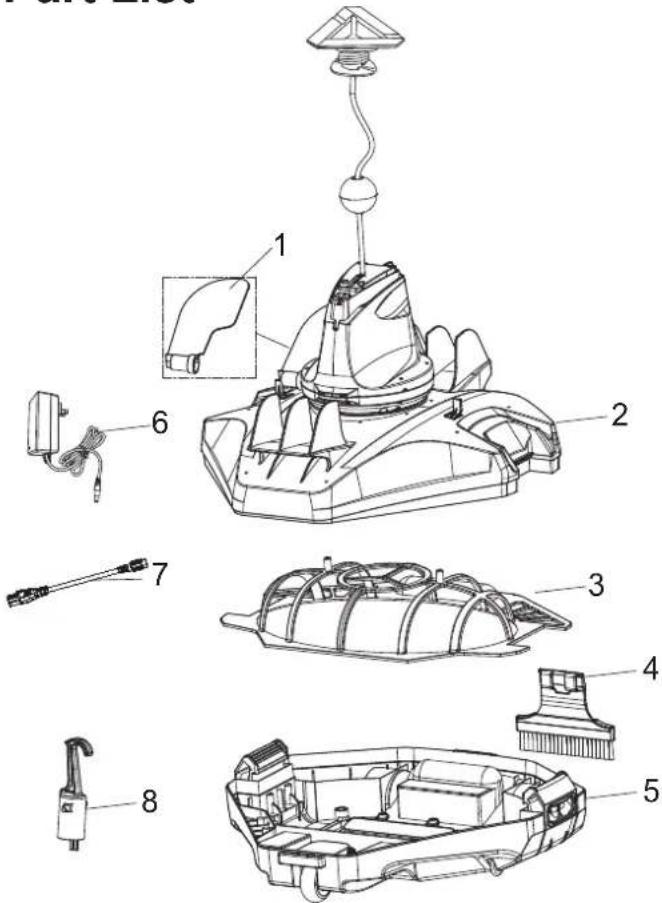
| Part No. | Part Code QTY | |
| 1 | P05700 | 1 |
| 2 | P05626 | 1 |
| 3 | P05628 | 1 |
| 4 | P05632 | 1 |
| 5 | P05627 | 1 |
| 6 | P05697 | 1 |
| 7 | P03880 | 1 |
| 8 | P03879 | 1 |
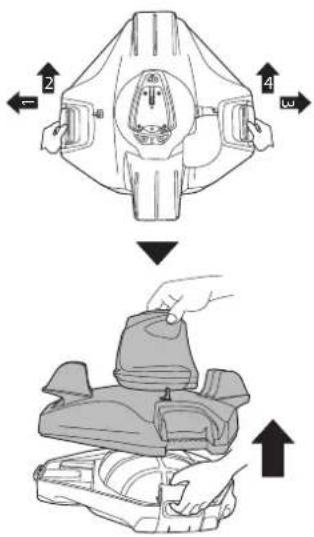
The robot has a water-propelling nozzle at the bottom of the swivel head. Water is first sucked in through the suction mouth at the bottom of the robot, which then goes through the filter and is discharged via the propelling nozzle. Water jetting from the nozzle propels the robot forward. Once the robot stops against an obstacle such as the pool wall, its side flap sways and its swivel head turns 180°, allowing the robot to move in the opposite direction. The robot moves in a generally straight pattern in one direction and in an arc pattern in the other direction. The robot vacuums the pool bottom as it moves, collecting debris in its compartment.
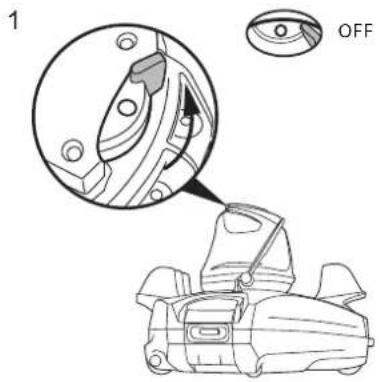
Assembly and Operation
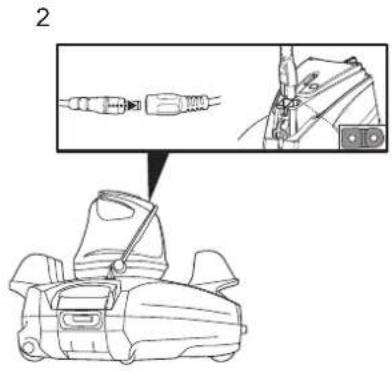
WARNING For Charging
- Use only the original external adaptor and provided charging cable.
• Make sure the robot and the charger port are clean and dry before set-up.
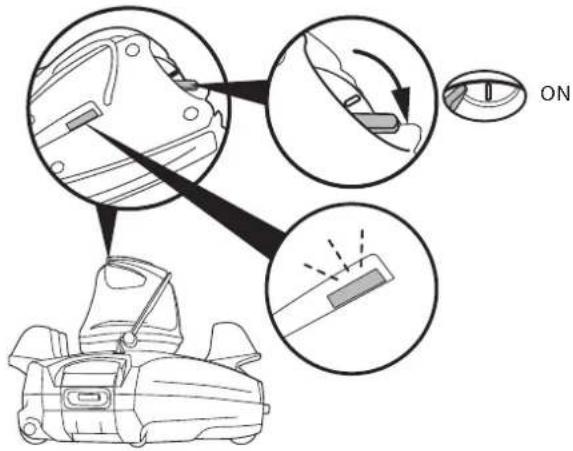
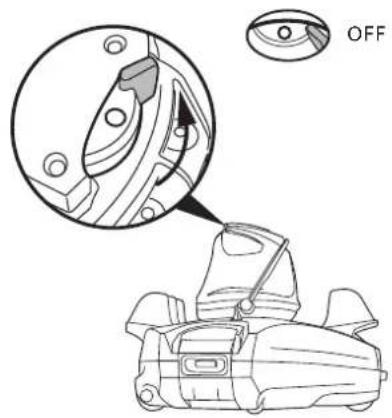
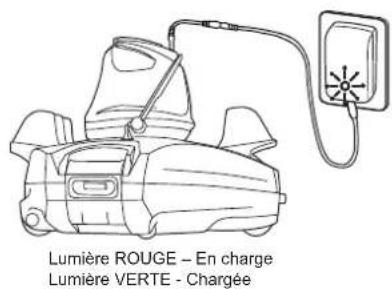
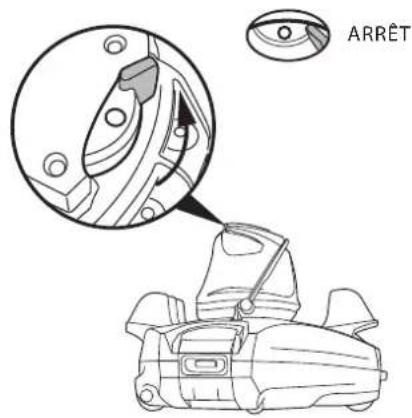
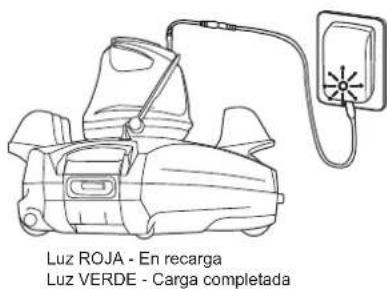
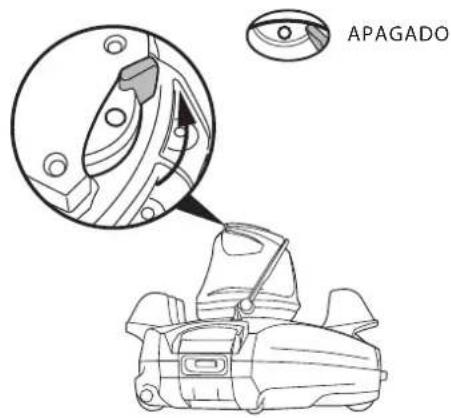
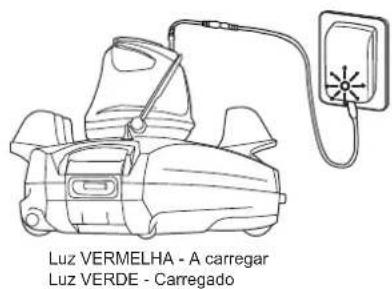
• Make sure that the robot is turned off by sliding the switch to OFF position prior to charging. - Fully charge the robot (about 5-6 hrs) before using it for the first time
• Power indicator light: No light - Power off / no power
Light - Power on
Blinking light - Battery power will cease within 10 minutes.
Note: Once the robot begins charging, the indicator light on the external adaptor will turn red. When the robot is almost fully charged, the indicator light will turn green.

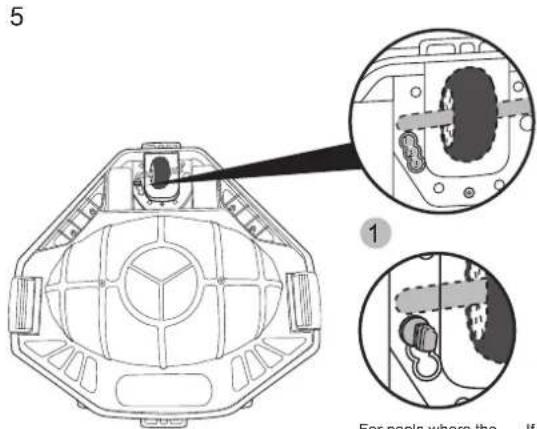
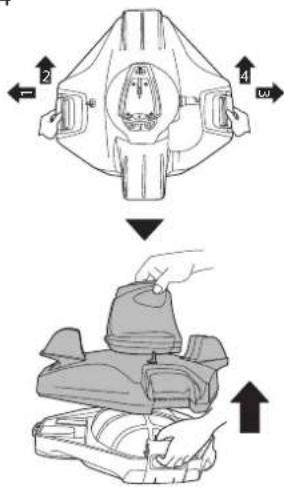
For pools where the
shortest length is
3 meters or above
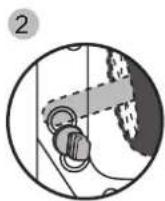
If the robot does not cover the
entire pool with either pin position 4 or 3, try this setting. If the situation
For 3, try this setting. If the situation persists, deploy the robot from a
different location.

For pools where the
shortest length is 3
meters or below.
(Factory setting)
natural_image
Technical line drawing of a mechanical device with a lever and base (no text or symbols)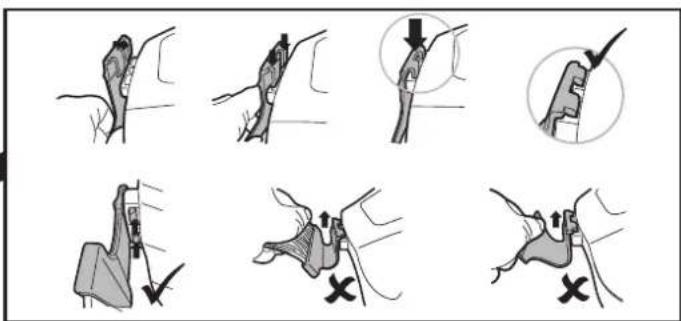
natural_image
Diagram of a cable being inserted into a wire, showing rope routing and a pointed tip (no text or symbols)
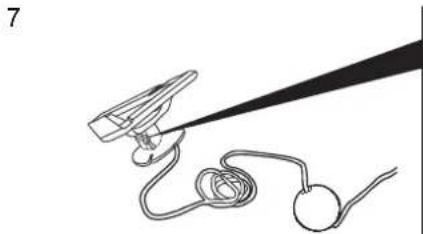
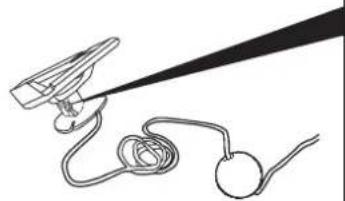
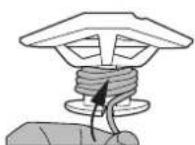
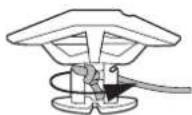
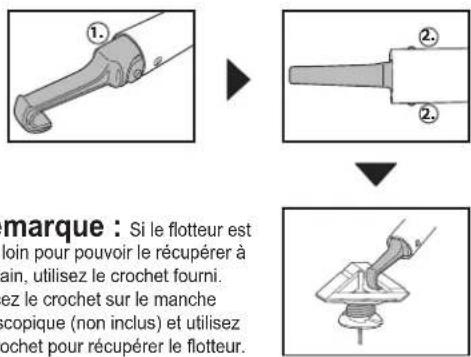
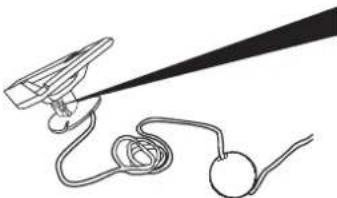
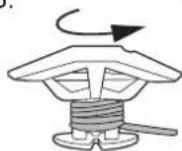
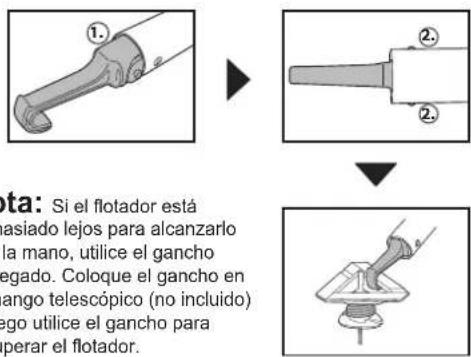
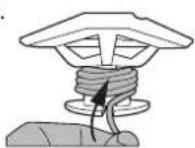
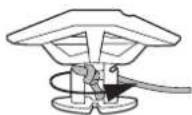
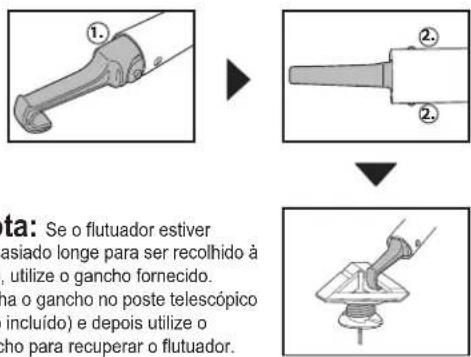
Note: Pry to detach the float cover and release the rope from the float to the depth of pool water plus about 0.5 m (19.7 in.).
8
9
natural_image
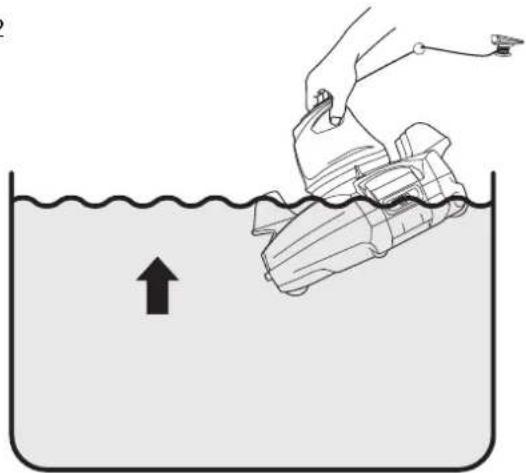
Illustration of a hand pulling a small boat into a beaker with an arrow indicating downward motion (no text or symbols)10

natural_image
Simple line drawing of a small boat pulling a fishing rod into a container with a wavy line above (no text or symbols)11

12
natural_image
Illustration of a hand placing a plastic bag into a container with an upward arrow, no text or symbols present13
14

15

natural_image
Technical line drawing of a mechanical assembly with two views showing internal components and fluid flow indicators (no text or symbols)
natural_image
Line drawing of a hand holding a device with a checkmark icon (no text or symbols on the device itself)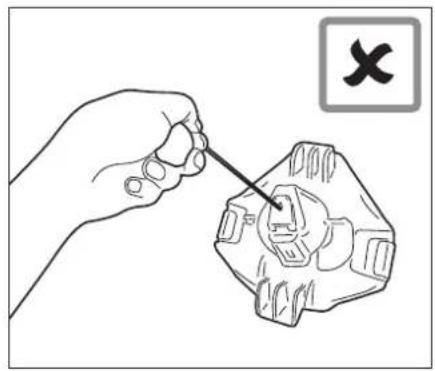
natural_image
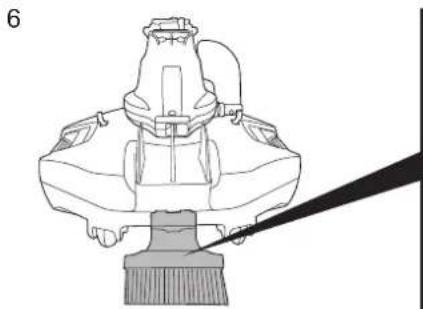
Illustration of a hand using a tool to adjust or repair a mechanical component (no text or symbols present)Flap replacement

natural_image
Line drawing of a mechanical component with a highlighted circular detail (no text or symbols)
natural_image
Line drawing of a mechanical component with a handle and arrow indicating direction (no text or symbols)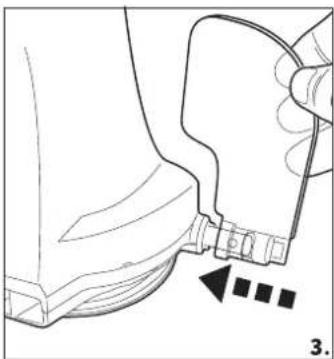
natural_image
Technical line drawing of a mechanical component with a close-up view showing a detail (no text or symbols)
natural_image
Technical line drawing of a mechanical component with a highlighted circular detail (no text or symbols)Maintenance and Storage
- Battery discharges on its own during storage. Make sure to fully-charge the robot before storage.
- You must re-charge the battery at least once every three months when it is not in use.
- Unplug the external adaptor from the socket and then unplug the charging cable from the external adaptor and robot.
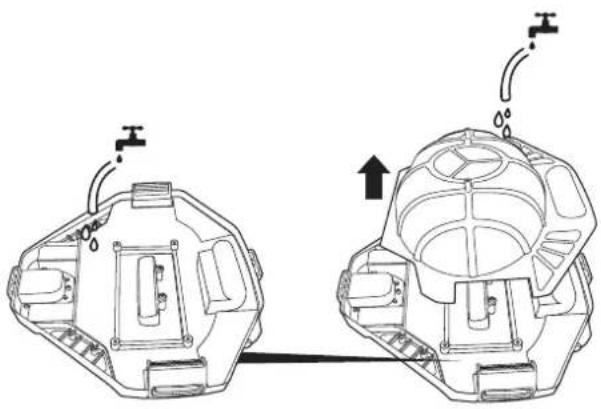
- Detach accessories from the robot. If necessary, rinse the robot and accessories with fresh water. DO NOT use detergent.
- Be sure to drain the water from the robot before storing it.
- Use a damp cloth to clean and dry the robot and its accessories.
- Store them in a well-ventilated area away from sunlight, heat, ignition sources, pool chemicals and from children. Ambient temperature for storage should be
10°C - 25°C (50°F - 77°F). NOTE: A higher storage temperature may reduce the battery life.
How to remove the battery pack
Recommended tools (not included): Screwdriver.
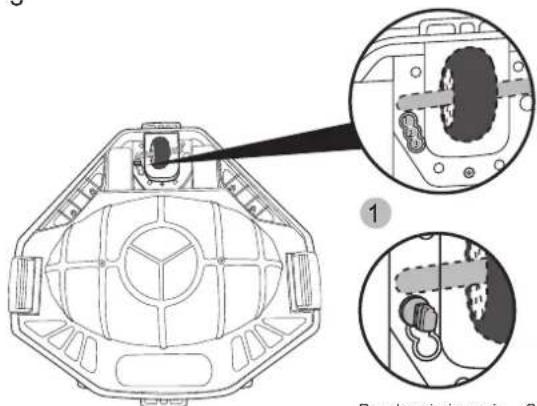
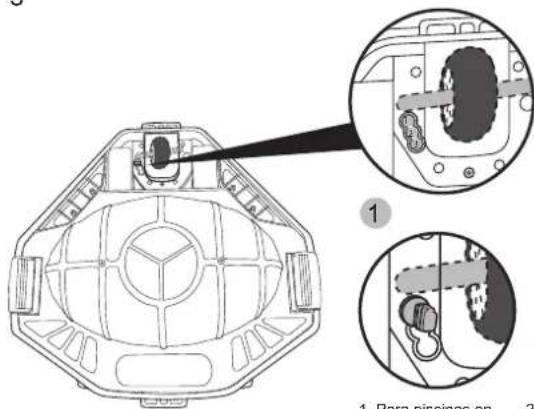
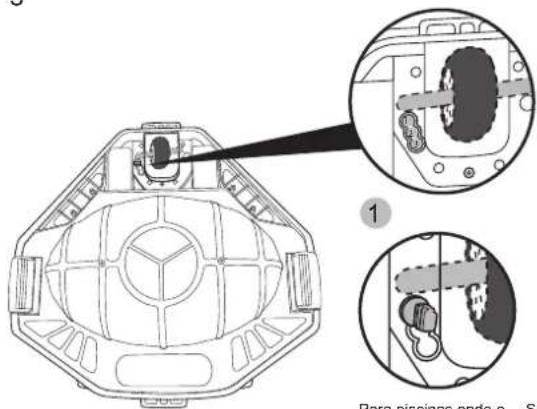
- Release the top cover (preassembled with the swivel head). Turn the cover up side down and release the swivel head by turning its bottom locking plate counter-clockwise. Remove the swivel smoothing-ring.
natural_image
Close-up of a white and black mechanical component with no visible text or symbols
natural_image
Hand inserting a small component into a mechanical housing (no text or symbols visible)
natural_image
Hand pressing a circular component on a mechanical component (no visible text or symbols)
natural_image
Hand holding a cylindrical mechanical component with a central hole, no visible text or symbols- Use the screwdriver to unscrew the 4 screws located on the bottom of the head to release the bottom plate at first. Use the screwdriver to unscrew all the screws on the base as shown. Remove the impeller and then pry up the base and remove it to expose head inside.
natural_image
Close-up of a mechanical component with arrows indicating direction (no text or symbols visible)
natural_image
Mechanical component with arrows indicating assembly or movement (no visible text or symbols)
natural_image
Close-up of a mechanical component with central bore and mounting holes (no visible text or symbols)
natural_image
Close-up of a mechanical component with internal wiring and housing (no visible text or symbols)- Remove the battery pack to expose the PCBA. To detach the battery connection wire, press the clip on the connector and then pull it out. NOTE: Wrap the connector immediately with insulating tape in order to avoid short circuit caused by contact of both wire terminals.
natural_image
Close-up of a mechanical component with internal components and mounting base (no visible text or symbols)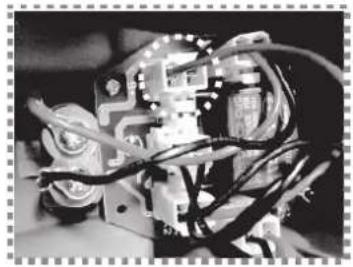
natural_image
Close-up of a mechanical or electronic component with wires and components, no visible text or symbols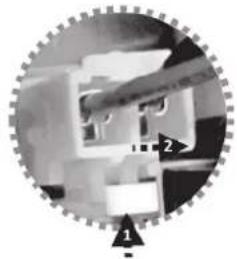
natural_image
Close-up of a mechanical assembly with gear and component (no visible text or symbols)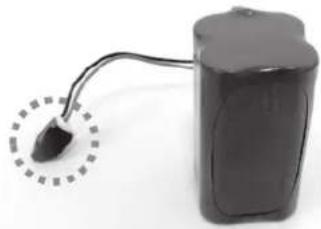
natural_image
Black cylindrical battery with a curved cable inserted, showing a small black plug inserted into the top (no text or symbols visible)TROUBLESHOOTING
| Problem | Possible Cause | Solution |
| Robot does not capture the debris | Battery is running out Charge the robot again. | |
| Impeller is jammed | Power off the robot and inspect the hole under the swivel head to see if the impeller is jammed by large debris. For assistance, please visit the support section on our website, www.bestwaycorp.com.WARNING! Make sure the robot is off before the unit is serviced. | |
| Suction mouth is clogged | Remove clogged objects from the suction mouth. | |
| Impeller is broken | For assistance, please visit the support section on our website, www.bestwaycorp.com. | |
| Debris compartment is full | Clean both debris compartment and filter cover. | |
| Robot stopped moving in the middle of pool but swivel head is still turning | Robot stopped by obstacle or large creases in the pool liner. | Check to see that if there is anything obstructing the cleaner.Remove the obstacle. |
| Robot is stopped by suction from the main drain of pool floor | Turn off the filtration system as instructed in manual. | |
| Swivel head rotates repeatedly | Air trapped inside the robot | The swivel head may rotate repeatedly for a few minutes once the robot sinks to the pool bottom.This phenomenon will stop once the air trapped inside the robot is gradually discharged and the robot will begin to move regularly. |
| Robot does not cover the entire pool | Debris compartment is full | Clean the debris compartment |
| Operation time is shorter as expected | Clean the filter compartment and recharge the robot for 6 hrs | |
| Moving direction is interrupted by water circulation generated by filtration system | Turn off the filtration system (as instructed in filtration manual) at least 15 minutes before robot operation. | |
| Wheel is jammed | Check and remove debris from the wheel. | |
| Position of locking pin is not set properly. | Follow instruction to adjust the locking pin position. | |
| Algae renders the pool floor slippery which results in the robot going in circles. | Scrub the pool bottom and robot wheels to remove the algae | |
| Robot moves along the pool wall | Position of locking pin-is not set properly / robot facing direction is wrong at beginning. | Follow instruction to adjust locking pin setting. Make sure that robot's front/back faces the pool wall at beginning. |
| Robot moves slowly or does not move at all. | Debris compartment is full or filter cover is clogged. | Clean the debris compartment. Flush the screen with water to remove small particles. If brush is deem necessary, use a soft brush to clean the screen gently.Note: make sure that the filter cover is In place before next operation |
| Remove clogged objects from the suction mouthSuction mouth is clog | ||
| Impeller is jammed | Power off the robot and inspect the hole under the swivel head to see if the impeller is jammed by large debris. For assistance, please visit the support section on our website, www.bestwaycorp.com.WARNING! Make sure the robot is off before the unit is serviced. | |
| Swivel head does not turn or turn noticeably slowly | Side flap does not come up. | Check and remove any debris that hinders the movement of the flap. |
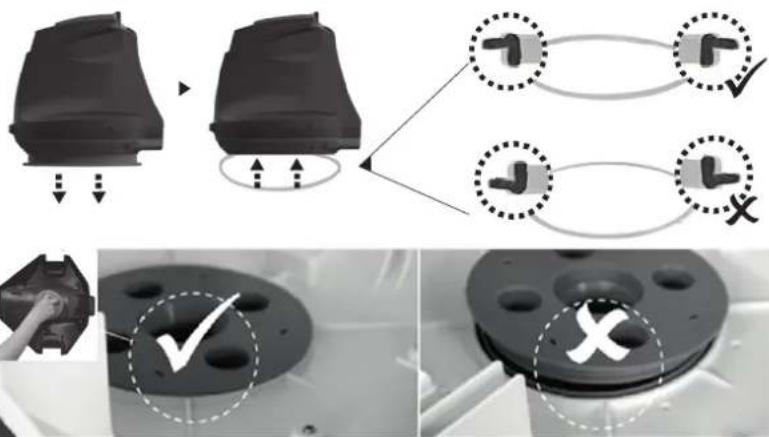
| Swivel head bottom is jammed | Detach the swivel head and smoothening-ring in accordance with instructions of section "How to remove the battery pack" from the manual, then:- Remove trapped debris- Verify the smoothening-ring and bottom plate are installed correctly (refer to below diagrams)- Inspect the smoothening-ring for potential damages and wear and tear. Replace with a new one if necessary | |
 | ||
| Debris escapes from the robot | Suction mouth's flap (at cleaner bottom) is damaged | Suction mouth's flap works like a door to prevent the debris from escaping from the debris compartment.For assistance, please visit the support section on our website, www.bestwaycorp.com. |
| Debris clogged at suction mouth and prevents the flap to close. | Remove clogged debris from the suction mouth. | |
| Debris leaks outside at the filter cover | Filter cover net is damaged | Replace with a new filter cover.For assistance, please visit the support section on our website, www.bestwaycorp.com. |
| Round float sinks | Float is broken and water leaks in | Replace with a new float.For assistance, please visit the support section on our website, www.bestwaycorp.com. |
| Robot operation lasts shorter than advertised | Battery is not fully charged | Charge the robot for at least 6 hrs. |
| Robot cannot be charged / recharged | Battery is damaged | For assistance, please visit the support section on our website, www.bestwaycorp.com.WARNING!DO NOT replace the battery by yourself. This could result in severe or fatal injuries and the warranty will be voided as a result. |
| Charging base is not completely connected with external adaptor and robot. | Make sure that the charger base is connected with external adaptor and robot properly and completely.Refer to instruction manual. | |
| External adaptor is out of order | For assistance, please visit the support section on our website, www.bestwaycorp.com.WARNING! Using the wrong external adaptor will result in damaging the robot / battery and voiding the warranty as a result. | |

| Pièce N° Code de la Q.TÉ | ||
| 1 | P05700 | 1 |
| 2 | P05626 | 1 |
| 3 | P05628 | 1 |
| 4 | P05632 | 1 |
| 5 | P05627 | 1 |
| 6 | P05697 | 1 |
| 7 | P03880 | 1 |
| 8 | P03879 | 1 |
natural_image
Line drawing of a car seatbelt with connector details (no text or symbols)3
5
natural_image
Line drawing of a cleaning brush with a broom and lever (no text or symbols)
7
natural_image
Simple line drawing of a mechanical device with a string and coiled cable (no text or symbols)1.2.

4.
9

natural_image
Illustration of a hand pulling a small boat into a beaker with an arrow indicating downward motion (no text or symbols)10
natural_image
Simple line drawing of a boat pulling a fishing rod into a container (no text or symbols)11
natural_image
Illustration of a hand using a tool to lift a submerged object in a liquid container (no text or symbols)13
14
15
natural_image
Technical line drawing of a mechanical assembly with two views showing internal components and fluid flow indicators (no text or symbols)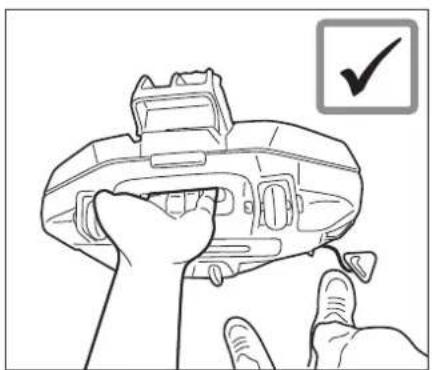
natural_image
Line drawing of a hand holding a device with a checkmark icon (no text or symbols on the device itself)
natural_image
Illustration of a hand using a tool to adjust or repair a mechanical component (no text or symbols present)natural_image
Medical illustration showing a surgical procedure with an arrow pointing to a component (no text or labels present)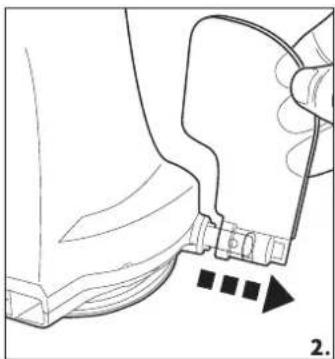
natural_image
Line drawing of a mechanical component with a handle and arrow indicating direction (no text or symbols)
natural_image
Technical line drawing of a mechanical component with a handle and arrow indicator (no text or symbols)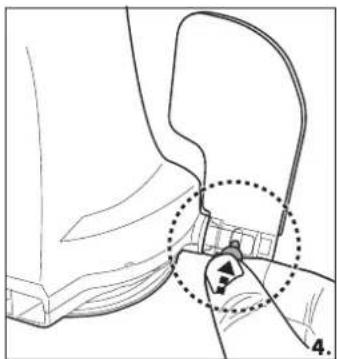
natural_image
Technical line drawing of a mechanical component with a highlighted section (no text or symbols)natural_image
Close-up of a white and black mechanical component with a metallic clip (no visible text or symbols)
natural_image
Hand inserting a circular component into a mechanical housing (no text or symbols visible)
natural_image
Hand pressing a circular button on a mechanical component (no text or symbols visible)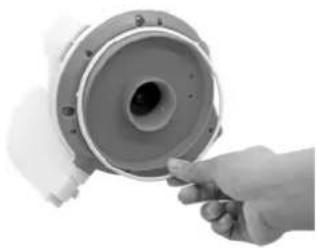
natural_image
Hand pointing at a mechanical component with a circular housing (no visible text or symbols)natural_image
Close-up of a mechanical component with arrows pointing to features (no visible text or symbols)
natural_image
Mechanical component with arrows indicating assembly or movement (no visible text or symbols)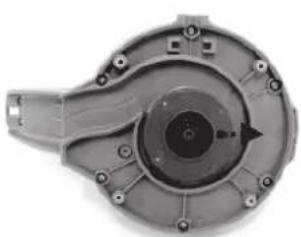
natural_image
Mechanical component with central bore and mounting holes (no visible text or symbols)
natural_image
Interior view of a mechanical assembly with exposed internal components and mounting holes (no visible text or symbols)natural_image
Close-up of a mechanical device with internal components and a central display (no visible text or symbols)
natural_image
Close-up of an electronic circuit board with wires and components (no visible text or symbols)
natural_image
Circular mechanical assembly diagram with gear and housing components (no visible text or symbols)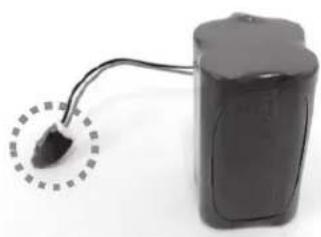
natural_image
Electric battery with a small black plug inserted into its side, connected to a cable (no visible text or symbols)Dépannage
natural_image
Technical line drawing of a mechanical device with a close-up inset showing cable fastening (no text or symbols)3

5-6 h
4
5
natural_image
Technical line drawing of a mechanical device with a lever and base (no text or symbols)
7
natural_image
Simple line drawing of a mechanical device with a string and rope, no text or symbols present-
-
-
4.

9
ENCENDIDO
natural_image
Illustration of a hand pulling a small boat into a beaker with a downward arrow indicating fluid flow (no text or symbols)10

natural_image
Simple line drawing of a boat pulling a small boat in water (no text or symbols)11
12
natural_image
Illustration of a hand pulling a plastic bag into a beaker with an upward arrow, no text or symbols present13
14

15
natural_image
Technical line drawing of a mechanical assembly with two views showing internal components and fluid flow indicators (no text or symbols)
natural_image
Line drawing of a hand holding a device with a checkmark icon (no text or symbols on the device itself)
natural_image
Illustration of a hand using a tool to adjust or repair a mechanical component (no text or symbols present)natural_image
Medical illustration showing a surgical procedure with an arrow pointing to a component (no text or labels present)
natural_image
Line drawing of a mechanical component with a handle and arrow indicating direction (no text or symbols)
natural_image
Technical line drawing of a mechanical component with a handle and arrow indicator (no text or symbols)
natural_image
Technical line drawing of a mechanical component with a highlighted section (no text or symbols)natural_image
Close-up of a white and black mechanical component with no visible text or symbols
natural_image
Hand inserting a small component into a mechanical housing (no text or symbols visible)
natural_image
Hand placing a circular component into a mechanical housing (no text or symbols visible)
natural_image
Hand holding a mechanical component with a circular housing and bolted joints (no visible text or symbols)natural_image
Close-up of a mechanical component with arrows indicating assembly or movement (no visible text or symbols)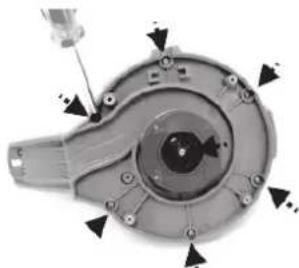
natural_image
Mechanical component with arrows indicating assembly or adjustment points (no visible text or symbols)
natural_image
Close-up of a mechanical component with central bore and mounting holes (no visible text or symbols)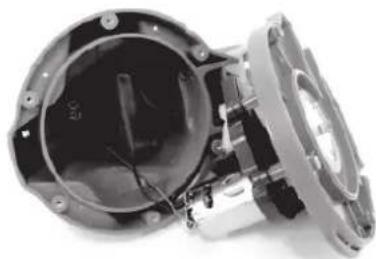
natural_image
Close-up of a mechanical assembly with internal components and wiring (no visible text or symbols)natural_image
Close-up of a mechanical device with internal components and wiring (no visible text or symbols)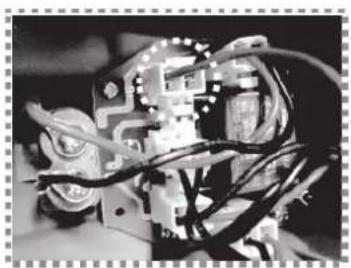
natural_image
Close-up of an electronic circuit board with wires and components (no visible text or symbols)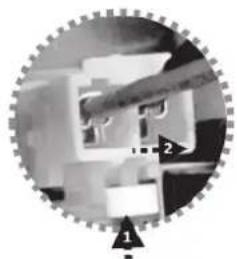
natural_image
Circular mechanical component with gear-like structure and labeled points (1, 2), no readable text or symbols beyond labels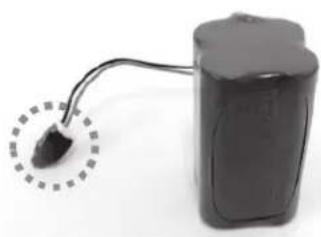
natural_image
Electric battery with a small plug inserted into its side, shown with wiring (no visible text or symbols)| N.° Peça Código da QTD | ||
| 1 | P05700 | 1 |
| 2 | P05626 | 1 |
| 3 | P05628 | 1 |
| 4 | P05632 | 1 |
| 5 | P05627 | 1 |
| 6 | P05697 | 1 |
| 7 | P03880 | 1 |
| 8 | P03879 | 1 |
natural_image
Technical line drawing of a car seatbelt device with connector details (no text or symbols)3

5-6 h
4

5
natural_image
Line drawing of a cleaning or cleaning device with a brush and lever (no text or symbols)
7

natural_image
Simple line drawing of a mechanical device with a string and coiled cable (no text or symbols)-

-
-

4.
natural_image
Illustration of a hand pulling a small boat into a beaker with an arrow indicating downward motion (no text or symbols)10

natural_image
Simple line drawing of a small boat pulling a fishing rod into a container with wavy lines above (no text or symbols)11
natural_image
Illustration of a hand using a tool to lift a submerged object in a liquid container (no text or symbols)13

14

15

natural_image
Technical line drawing of a mechanical assembly with two views showing internal components and fluid flow indicators (no text or symbols)
natural_image
Line drawing of a hand holding a device with a checkmark icon (no text or symbols on the device itself)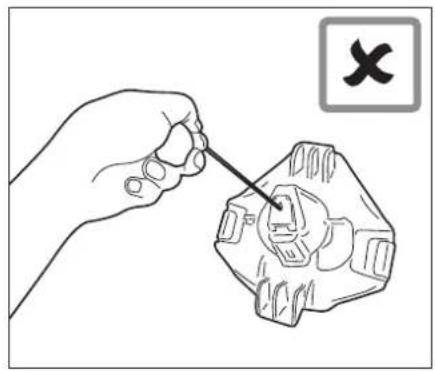
natural_image
Illustration of a hand using a screwdriver to adjust a mechanical component (no text or symbols present)Substituição da aba
natural_image
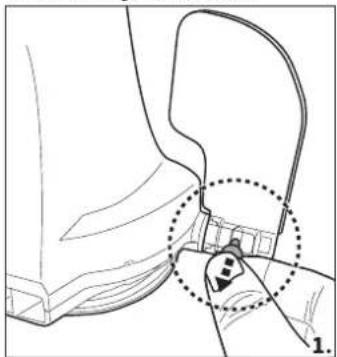
Line drawing of a mechanical component with a dotted circle highlighting a feature, labeled '1.' (no text or symbols present)
natural_image
Line drawing of a mechanical component with a handle and arrow indicating direction (no text or symbols)
natural_image
Technical line drawing of a mechanical component with a close-up view showing a fastener or clamp (no text or symbols present)
natural_image
Technical line drawing of a mechanical component with a highlighted section (no text or symbols)natural_image
Close-up of a white and black mechanical component with no visible text or symbols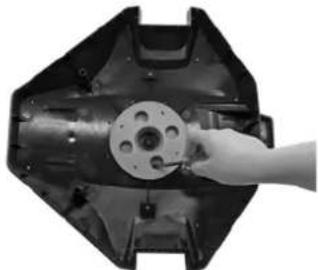
natural_image
Hand holding a mechanical component inside a black plastic housing (no visible text or symbols)
natural_image
Hand pressing a circular component on a mechanical part (no visible text or symbols)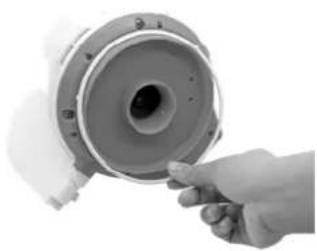
natural_image
Hand holding a cylindrical mechanical component with a central hole, no visible text or symbolsnatural_image
Close-up of a mechanical component with arrows indicating assembly or movement (no visible text or symbols)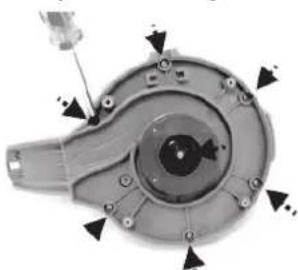
natural_image
Mechanical component with mounting holes and a screwdriver (no visible text or symbols)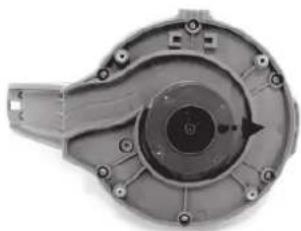
natural_image
Mechanical component with central bore and mounting holes (no visible text or symbols)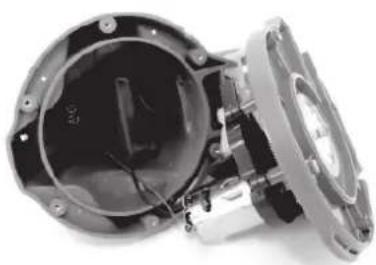
natural_image
Close-up of a mechanical assembly with internal components and mounting holes (no visible text or symbols)natural_image
Close-up of a mechanical device with internal components and a central display (no visible text or symbols)
natural_image
Close-up of an electronic circuit board with wires and components (no visible text or symbols)
natural_image
Close-up of a mechanical gear assembly with no visible text or symbols
natural_image
Electric battery with a small plug inserted into its side, connected to a cable (no visible text or symbols)For support please visit us at:
bestwaycorp.com/support
©2020 Bestway Inflatables & Material Corp.
All rights reserved/Tous droits réservés/Todos los derechos reservados/Alle Rechte vorbehalten/Tutti i diritti riservati
®TM Trademarks used in some countries under license to/
Bestway Inflatables & Material Corp., No.3065 Cao An Road, Shanghai, 201812, China.
Manufactured, distributed and represented in the European Union by/
Bestway (USA) Inc., 3411 E. Harbour Drive, Phoenix, Arizona 85034, United States of America
Tel: +86 21 69135588 (For U.S. and Canada)
Distributed in Australia & New Zealand by Bestway Australia Pty Ltd, Unit 2/98-104 Carnarvon St Silverwater, NSW 2128, Australia
Tel: Australia: (+61) 29 0371 388; New Zealand: 0800 142 101
Exported by/Exporté par/Exportado por/Exportiert von/Esportato da
Bestway (Hong Kong) International Ltd./Bestway Enterprise Company Limited
Suite 713, 7/Floor, East Wing, Tsim Sha Tsui Centre, 66 Mody Road, Kowloon, Hong Kong
www.bestwaycorp.com
Brand : BESTWAY
Model : Flowclear 58623
Category : Pool robot vacuum