
TSTAK DWST17510 - Radio DEWALT - Free user manual and instructions
Find the device manual for free TSTAK DWST17510 DEWALT in PDF.
| Product Type | Jobsite Radio Charger |
| Brand | DeWalt |
| Model | TSTAK DWST17510 |
| Weight | 5.9 kg (without battery) |
| Mains Power Supply | AC/DC Adapter 100-240 V, 50/60 Hz, output 24 V DC, 2 A |
| Compatible Batteries | DEWALT Li-ion battery packs 12 V Max, 20 V Max, FLEXVOLT (up to 9 Ah) |
| Battery Charge Time | 90 to 300 minutes depending on capacity |
| Operating Time | Up to 8 hours on a 20 V Max 5 Ah battery |
| Audio Power | 45 W (Class D) |
| Maximum Sound Level | 100 dB at 1 m |
| Audio Sources | AM/FM Radio, Bluetooth, 3.5 mm auxiliary input |
| Station Memory | 12 FM presets and 12 AM |
| Connectivity | Bluetooth 2,402-2,480 MHz, USB port 5 V/2.1 A |
| Display | Illuminated color LCD screen |
| Protection Rating | IP54 (dust and light rain resistant) |
| Design | TSTAK system compatible, rugged, vertical or horizontal use |
| Maintenance | Clean with a dry cloth; do not use solvents |
| Safety | Double insulation, battery electronic protection, auto shut-off |
| Warranty | 3-year limited DEWALT (excluding accessories) |
| Included Accessories | AC/DC power adapter; battery and charger sold separately |
Frequently Asked Questions - TSTAK DWST17510 DEWALT
User questions about TSTAK DWST17510 DEWALT
0 question about this device. Answer the ones you know or ask your own.
Ask a new question about this device
Download the instructions for your Radio in PDF format for free! Find your manual TSTAK DWST17510 - DEWALT and take your electronic device back in hand. On this page are published all the documents necessary for the use of your device. TSTAK DWST17510 by DEWALT.
USER MANUAL TSTAK DWST17510 DEWALT
English INSTRUCTION MANUAL 4
Espanol MANUAL DE INSTRUCCIONES 26
Francais MODE D'EMPLOI 48
DEWALT® TSTAK® CONNECT RADIO+CHARGER
The DEWALT® TSTAK® CONNECT RADIO + CHARGER includes a built-in AM and FM radio, Bluetooth® support, 3.5mm AUX connector port to play audio/music from an external appliance, and an intuitive application for remote controlling the system via a Bluetooth®-enabled smartphone or tablet. The system includes charging capabilities for DEWALT® slide pack batteries. The TSTAK® CONNECT RADIO + CHARGER will charge most DEWALT® Li-ion batteries. Batteries sold separately.
KEY FEATURES
- AM/FM-stereo with manual/auto scanning and memory preset of stations
- Favorites – preset digital stations. 12 FM and 12 AM stations.
- Bluetooth® connectivity
- 3.5mm Auxiliary input jack for connecting external audio devices
• USB power/charging port (5V/2.1A)
• Large Color LCD illuminated display - Illuminated, soft-touch buttons
- Four mid-range speakers, a subwoofer and an assisted bass resonator for rich sound performance
• Volume control and sound tone adjustment - Heavy-duty design
- Compatible with the TSTAK® storage system
• Water and dust resistant – IP54 tested - iOS and Android mobile app for complete remote control of the appliance
TECHNICAL DATA
| POWER SUPPLY UNIT (AC/DC POWER ADAPTOR) | |
| Power input 100-240VAC 50-60 Hz (Class II) | |
| Power output 24 VDC | |
| Current output 2 A | |
| Weight 0.66 lb. (0.3 kg) | |
| APPLIANCE | |
| Power input 24 VDC | |
| Power output USB charge (5V/2.1A) | |
| Networked standby mode standby mode power consumption | < 3W |
| Time for switching on the automatic network standby power management function | < 20 mins |
| IP rating IP54* | |
| Weight 13.2 lb. (5.9 kg) not including battery pack | |
| Stacking weight (gross) 132 lb. (60 kg) | |
| BATTERY PACK CHARGER | |
| Battery packs voltage | 12 VDC / 20 VDC (including XR® FLEXVOLT® Battery Packs) |
| Battery type | Lithium-ion Slider Packs 12V Max and 20V Max**, FLEXVOLT® Battery Packs. |
| Approx. charging time 90-300 min | |
| Charge current 1.5A | |
| AUDIO CHARACTERISTICS | |
| Audio source | Bluetooth®, AM/FM Radio, 3.5mm Auxiliary input jack |
| Sound SPL 100 dB @ 1 m | |
| Sound power 45 W (class D) | |
| Operation time | 8 hours (approx.) for a fully-charged Premium 20V Max Lithium-ion battery pack |
| BLUETOOTH® CHARACTERISTICS | |
| Operating Frequency 2402-2480 MHz | |
| Transmit 4dBm max | |
*Help protect from work-site dust, debris and light rain
** indicating 18.2V when inserted into tool.
DEFINITIONS: SAFETY GUIDELINES
The definitions below describe the level of severity for each signal word. Please read the manual and pay attention to these symbols.
Danger: Indicates an imminently hazardous situation which, if not avoided, will result in death or serious injury.
Warning: Indicates a potentially hazardous situation which, if not avoided, could result in death or serious injury.
Caution: Indicates a potentially hazardous situation which, if not avoided, may result in minor or moderate injury!
⚠️ Notice: Indicates a practice not related to personal injury which, if not avoided, may result in property damage.

WARNING: Read all safety warnings and all instructions. Failure to follow the warnings and instructions may result in electric shock, fire and/or serious injury.

WARNING: To reduce the risk of injury, read the instruction manual entirely. NOTE: Product WARNING labels are located on the bottom of the appliance.
IF YOU HAVE ANY QUESTIONS OR COMMENTS ABOUT THIS OR ANY DEWALT® TOOL, CALL TOLL FREE AT: 1-800-DEWALT (1-800-433-9258)
IMPORTANT SAFETY INSTRUCTIONS – SAVE THESE INSTRUCTIONS, DANGER – TO REDUCE THE RISK OF FIRE OR ELECTRIC SHOCK, CAREFULLY FOLLOW THESE INSTRUCTIONS
- Read these instructions.
- Keep these instructions.
- Pay attention and follow all warnings.
- Follow all instructions.
- DO NOT use this appliance near water.
- This appliance shall not be exposed to direct water and no objects filled with liquids, such as bottles, shall be placed on the appliance.
- Clean only with a dry cloth.
- Do not block any ventilation openings.
- To protect the appliance from water or dust, always close the compartment cover, and the rubber cover of the DC power input port.
- Use in accordance with the manufacturer's instructions.
- DO NOT place near any naked flame sources, such as lighted candles, heat sources such as radiators, heat registers, stoves or other apparatus (including amplifiers) that produce heat.
- Protect the power cord from being walked on or pinched particularly at plug and receptacle.
- Only use attachments/accessories specified by the manufacturer.
- When a cart is used, use caution when moving the cart/appliance combination to avoid injury from tip-over. Use only with a cart, stand, tripod, bracket, or table specified by the manufacturer, or sold with the apparatus.

-
The AC/DC power adaptor should only be used as the power source for the appliance and for battery charging. To disconnect the appliance completely, the AC/DC power adaptor should be disconnected from the outlet.
-
Unplug this appliance during lightning storms or when unused for long periods of time.
-
The AC/DC power adaptor should be easily accessible and not obstructed while in use.
-
Refer all servicing to qualified service personnel. Servicing is required when the appliance has been damaged in any way, such as power-supply cord or plug is damaged, liquid or direct rain has reached the connectors, the appliance has been exposed to extensive moisture, does not operate normally, or has been dropped and does not operate.
-
This appliance is not intended for use by persons (including children) with reduced physical, sensory or mental capabilities, or lack of experience and knowledge, unless they have been given supervision or instruction concerning use of the appliance by a person responsible for their safety.
-
Children should be supervised to ensure that they DO NOT play with the appliance.
-
Use only with specifically designated DEWALT ^® battery packs (see Important Safety Instructions for All Battery Packs below for DEWALT ^® -approved battery packs). Use of any battery packs other than those approved by DEWALT may create a risk of injury and fire.
-
The apparatus should only be used in moderate climates.
-
For connection to supply not in the U.S.A., use an attachment plug adapter of the proper configuration for the power outlet.
-
Additional Warnings symbols and Labels:
The lightning flash with arrow head within a triangle is intended to tell the user that parts inside the product are a risk of electric shock to persons.
The exclamation point within a triangle is intended to tell the user that important operating and servicing instructions are in the user manual supplied with the appliance.
☐ The double insulation symbol (a square within a square) indicates a Class II electrical appliance and is intended to alert qualified service personnel to use only identical replacement parts in this appliance.
IC RSS210: This device complies with Industry Canada Licence-exempt RSS-210. Operation is subject to the following two conditions: (1) this device may not cause interference, and (2) this device must accept any interference, including interference that may cause undesired operation of the device.
FCC This appliance complies with the Federal Communications Commission regulations. Warning: Modifications not expressly approved by the manufacturer could void the user authority to operate the equipment under FCC Rules. Disconnect the battery pack from the appliance before making any adjustments, changing accessories, or storing appliance. Such preventive safety measures reduce the risk of starting the appliance accidentally.
-
When battery pack is not in use, keep it away from other metal objects, like paper clips, coins, keys, nails, screws or other small metal objects, that can make a connection from one terminal to another. Shorting the battery terminals together may cause burns or a fire.
-
Under abusive conditions, liquid may be ejected from the battery; avoid contact. If contact accidentally occurs, flush with water. If liquid contacts eyes, additionally seek medical help. Liquid ejected from the battery may cause irritation or burns.
LIST OF STANDARDS
The DEWALT ^® TSTAK ^® CONNECT RADIO + CHARGER complies with the following standards:
• ANSI/UL60065:2015 Ed.8
• CAN/CSA-C22.2 No. 60065:2016 Ed.2
• ANSI/UL1310 (6th Edition rev. December 12, 2014)
• CSA C22.2 No.223-M91 (Rev. September 2013)
• IC RSS210: Issue 9: 2016
• ICES-003, Issue 6: 2016
• UL 2595:2015 Ed.2
• FCC part 15 Certification: 2016 (ANSI C63.10 :2013)
• FCC ID: YJ7DWST17510
• IC: 9082A-DWST17510
FCC
- This device complies with Part 15 of the FCC Rules. Operation is subject to the following two conditions:
(1). This device may not cause harmful interference, and (2). This device must accept any interference received, including interference that may cause undesired operation. - Changes or modifications not expressly approved by the party responsible for compliance could void the user's authority to operate the equipment.
- This equipment has been tested and found to comply with the limits for a Class B digital device, pursuant to Part 15 of the FCC Rules. These limits are designed to provide reasonable protection against harmful interference in a residential installation. This equipment generates, uses, and can radiate radio frequency energy and, if not installed and used in accordance with the instructions, may cause harmful interference to radio communications. However, there is no guarantee that interference will not occur in a particular installation. If this equipment does cause harmful interference to radio or television reception, which can be determined by turning the equipment off and on, the user is encouraged to try to correct the interference by one of the following measures:
- Reorient or relocate the receiving antenna.
- Increase the separation between the equipment and receiver.
- Connect the equipment to an outlet on a circuit different from that to which the receiver is connected.
- Consult the dealer or an experienced radio/TV technician for help.
⚠ WARNING: To reduce the risk of fire or electric shock, DO NOT expose this appliance to direct rain or moisture. Use only in dry locations.
WARNING: To prevent electric shock, match the wide blade of the adaptor plug to the wide slot of the outlet and fully insert.
LIST OF SYMBOLS
The labels on this appliance may include the following symbols:
V Volts
A Amperes
Watts
h hours
--- Direct current
Class II Construction (double insulated)
Hz hertz
min minutes
☐ Class II Construction (double insulated)
ETL Testing Laboratories symbol
Safety alert symbol
Read all documentation
BATTERIES AND CHARGERS
The battery pack is not fully charged out of the carton. Before using the battery pack and charger, read the safety instructions below and then follow charging procedures outlined.
When ordering replacement battery packs, be sure to include the catalog number and voltage. The TSTAK® CONNECT RADIO + CHARGER is to be used only with DEWALT® DCB series 12VDC/20VDC Li-ion rechargeable battery packs, including DEWALT® XR® FLEXVOLT® battery packs of up to 9Ah. Use of any other battery packs or any non-rechargeable batteries may create a risk of injury or fire. Your radio is a DEWALT charger. Be sure to read all safety instructions before using your charger. Recharge only with the TSTAK® CONNECT RADIO integrated charger, or equivalent. A charger that is suitable for one type of battery pack may create a risk of fire when used with another battery pack.
READ ALL INSTRUCTIONS
IMPORTANT SAFETY INSTRUCTIONS FOR ALL BATTERY PACKS
WARNING: Read all safety warnings and all instructions for the battery pack, charger and power tool. Failure to follow the warnings and instructions may result in electric shock, fire and/or serious injury.
- Do not charge or use the battery pack in explosive atmospheres, such as in the presence of flammable liquids, gases or dust. Inserting or removing the battery pack from the charger may ignite the dust or fumes.
- NEVER force the battery pack into the charger. DO NOT modify the battery pack in any way to fit into a non-compatible charger as battery pack may rupture causing serious personal injury.
- Charge the battery packs only in designated DEWALT ^ chargers.
- DO NOT splash or immerse in water or other liquids.
- Do not store or use the appliance and battery pack in locations where the temperature may reach or exceed 104°F (40°C) (such as outside sheds or metal buildings in summer). For best life store battery packs in a cool, dry location.
NOTE: Do not store the battery packs in a tool with the trigger switch locked on. Never tape the trigger switch in the ON position.
- The AC/DC adaptor shall not be exposed to dripping or splashing, and no objects filled with liquids, such as vases, shall be placed on apparatus.
WARNING: Fire hazard. Never attempt to open the battery pack for any reason. If the battery pack case is cracked or damaged, do not insert into the charger. Do not crush, drop or damage the battery pack. Do not use a battery pack or charger that has received a sharp blow, been dropped, run over or damaged in any way (e.g., pierced with a nail, hit with a hammer, stepped on). Damaged battery packs should be returned to the service center for recycling.
SPECIFIC SAFETY INSTRUCTIONS FOR LITHIUM ION (LI-ION)
- Do not incinerate the battery pack even if it is severely damaged or is completely worn out. The battery pack can explode in a fire. Toxic fumes and materials are created when lithium ion battery packs are burned.
- If battery contents come into contact with the skin, immediately wash area with mild soap and water. If battery liquid gets into the eye, rinse water over the open eye for 15 minutes or until irritation ceases. Additionally, seek medical attention. The battery electrolyte is composed of a mixture of liquid organic carbonates and lithium salts.
- Contents of opened battery cells may cause respiratory irritation. Provide fresh air. If symptoms persist, seek medical attention.
- Do not expose a battery pack or appliance to fire or excessive temperature. Exposure to fire or temperature above 265 °F (130 °C) may cause explosion.
WARNING: Burn hazard. Battery liquid may be flammable if exposed to spark or flame.
TRANSPORTATION
WARNING: Fire hazard. Do not store or carry the battery pack so that metal objects can contact exposed battery terminals. For example, do not place the battery pack in aprons, pockets, toolboxes, product kit boxes, drawers, etc., with loose nails, screws, keys, etc. Transporting batteries can possibly cause fires if the battery terminals inadvertently come in contact with conductive materials such as keys, coins, hand tools and the like. The US Department of Transportation Hazardous Material Regulations (HMR) actually prohibits transporting batteries in commerce or on airplanes (e.g., packed in suitcases and carry-on luggage) UNLESS they are properly protected from short circuits. So, when transporting individual battery packs, make sure that the battery terminals are protected and well insulated from materials that could contact them and cause a short circuit.
SHIPPING THE DEWALT® FLEXVOLT® BATTERY
The DEWALT® FLEXVOLT® battery has two modes: Use and Shipping.
- Use Mode: When the FLEXVOLT ^ battery stands alone or is in a DEWALT ^ 20V Max* product, it will operate as a 20V Max* battery. When the FLEXVOLT ^ battery is in a 60V Max** or a 120V Max* (two 60V Max** batteries) product, it will operate as a 60V Max** battery.
- Shipping Mode: When the cap is attached to the FLEXVOLT ^ battery, the battery is in Shipping Mode. Strings of cells are electrically disconnected within the pack resulting in three batteries with a lower watt hour (Wh) rating as compared to one battery with a higher Watt hour rating. This increased quantity of three batteries with the lower watt hour rating can exempt the pack from certain shipping regulations that are imposed upon the higher Watt hour batteries. The battery label indicates two-Watt Hour Ratings (see example). Depending on how the battery is shipped, the appropriate Whr rating must be used to determine the applicable shipping requirements. If utilizing the shipping cap, the pack will be considered 3 batteries at the Whr indicated for “Shipping”. If shipping without the cap or in a tool, the pack will be considered one battery at the Watt hour rating indicated next to “Use”.
* indicating 18.2V when inserted into tool.
** indicating 54V when inserted into tool.
Example of Use and Shipping Label Marking
USE: 120 Wh Shipping: 3 x 40 h
For example, shipping Wh rating might indicate 3 x 40 Wh, meaning 3 batteries of 40-Watt hours each. The Use Wh rating might indicate 120-Watt hour (1 battery implied).
STORAGE RECOMMENDATIONS
- The best storage place is one that is cool and dry, away from direct sunlight and excess heat or cold.
- For long-term storage, it is recommended to store a fully charged battery pack in a cool dry place out of the charger for optimal results.
Note: Battery packs should not be stored completely depleted of charge. The battery pack will need to be recharged before use.

THE RBRC™ SEAL
The RBRC ^™ (Rechargeable Battery Recycling Corporation) seal on the nickel cadmium, nickel metal hydride or lithium ion batteries (or battery packs) indicate that the costs to recycle these batteries (or battery packs) at the end of their useful life have already been paid by DEWALT ^® . In some areas, it is illegal to place spent nickel cadmium, nickel metal hydride or lithium ion batteries in the trash or municipal solid waste stream, and the RBRC program provides an environmentally conscious alternative.
RBRC™, in cooperation with DEWALT® and other battery users, has established programs in the United States and Canada to facilitate the collection of spent nickel cadmium, nickel metal hydride or lithium ion batteries. Help protect our environment and conserve natural resources by returning the spent nickel cadmium, nickel metal hydride or lithium ion batteries to an authorized DEWALT® service center or to your local retailer for recycling. You may also contact your local recycling center for information on where to drop off the spent battery.
RBRC ^™ is a registered trademark of the Rechargeable Battery Recycling Corporation.
IMPORTANT SAFETY INSTRUCTIONS FOR ALL BATTERY CHARGERS

WARNING: Read all safety warnings and all instructions for the battery pack, charger and power tool. Failure to follow the warnings and instructions may result in electric shock, fire and/or serious injury.
SAVE THESE INSTRUCTIONS: This manual contains important safety and operating instructions for battery chargers.
- DO NOT attempt to charge the battery pack with any charger other than a compatible DEWALT® charger. The charger and battery pack are specifically designed to work together.
- This charger is not intended for any uses other than charging designated DEWALT ^® rechargeable batteries. Any other uses may result in risk of fire, electric shock or electrocution.
- Do not expose the charger to direct water source and DO NOT immerse in water.
- Pull by the plug rather than the cord when disconnecting the charger. This will reduce the risk of damage to the electric plug and cord.
- Make sure that the cord is located so that it will not be stepped on, tripped over or otherwise subjected to damage or stress.
- Do not use an extension cord unless it is absolutely necessary. Use of improper extension cord could result in risk of fire, electric shock or electrocution.
- When operating a charger outdoors, always provide a dry location and use an extension cord suitable for outdoor use. Use of a cord suitable for outdoor use reduces the risk of electric shock.
- An extension cord must have adequate wire size (AWG or American Wire Gauge) for safety. The smaller the gauge number of the wire, the greater the capacity of the cable, that is, 16 gauge has more capacity than 18 gauge. An undersized cord will cause a drop in line voltage resulting in loss of power and overheating. When using more than one extension to make up the total length, be sure each individual extension contains at least the minimum wire size. The following table shows the correct size to use depending on cord length and nameplate ampere rating. If in doubt, use the next heavier gauge. The lower the gauge number, the heavier the cord.
Minimum Gauge for Cord Sets
| Volts Total Length of Card in Feet (meters) | |||||
| 120 V 25 (7.6) 50 (15.2) 100 (30.5) 200 (61.0) | 50 (45.7) | ||||
| 240 V 50 (15.2) 100 (30.5) 200 (61.0) | 300 (91.4) | ||||
| Ampere Rating | American Wire Gauge | ||||
| More Than | Not More Than | ||||
| 0 | 6 | 18 16 16 | 14 | ||
| 6 10 18 16 14 12 | |||||
| 10 | 12 16 16 14 12 | ||||
| 12 | 16 14 12 | Not Recommended | |||
- Do not place any object on top of the charger. Place the charger in a position away from any heat source.
- Do not operate the charger with a damaged cord or plug.
- Do not operate the charger if it has received a sharp blow, been dropped or otherwise damaged in any way. Take it to an authorized service center.
- Do not disassemble the charger; take it to an authorized service center when service or repair is required. Incorrect reassembly may result in a risk of electric shock, electrocution or fire.
- Disconnect the charger from the outlet before attempting any cleaning. This will reduce the risk of electric shock. Removing the battery pack will not reduce this risk.
- Disconnect the battery pack from the appliance before making any adjustments, changing accessories, or storing appliance.
• NEVER attempt to connect 2 chargers together. - The charger is designed to operate on standard 240-100VAC household electric power. Do not attempt to use it with any other voltage.
⚠ WARNING: Shock hazard. Do not allow any liquid to get inside the charger. Electric shock may result.
WARNING: Burn hazard. Do not submerge the battery pack in any liquid or allow any liquid to enter the battery pack. Never attempt to open the battery pack for any reason. If the plastic housing of the battery pack breaks or cracks, return to a service center for recycling.
CAUTION: Burn hazard. To reduce the risk of injury, charge only DEWALT® rechargeable battery packs. Other types of batteries may overheat and burst resulting in personal injury and property damage.
NOTICE: When battery pack is not in use, keep it away from other metal objects. Alternatively, with the charger plugged into the power supply, the charger can be shorted or ignited by foreign material. Foreign materials or metal objects of a conductive nature, such as, but not limited to, grinding dust, metal chips, steel wool, aluminum foil or any buildup of metallic particles should be kept away from the charger cavities at all times.
Always unplug the AC/DC power adaptor from the outlet and remove the battery pack from the battery pack receptacle before attempting to clean the charger.
CHARGING
The TSTAK® CONNECT RADIO + CHARGER can only charge DEWALT® DCB series 12V MAX/20V MAX Lithium-ion rechargeable battery packs, including DEWALT® XR® FLEXVOLT® Battery packs up to 9Ah. Use of any other battery packs or any non-rechargeable batteries may create a risk of injury or fire. Be sure to read all safety instructions before using this appliance for charging your battery pack.
Note: To ensure maximum performance and life of lithium-ion battery packs, charge the battery pack fully before first use.
IMPORTANT CHARGING NOTES
- Longest life and best performance can be obtained if the battery pack is charged when room temperature is between 65^ F and 75^ F (18-24°C). DO NOT charge the battery pack below 40^ F ( 4.5^ C), or above 104^ F ( 40^ C). This is important and will prevent serious damage to the battery pack.
- The charger and battery pack may become warm to the touch while charging. This is a normal condition and does not indicate a problem. To facilitate the cooling of the battery pack after use, avoid placing the charger or battery pack in a warm environment such as in a metal shed or an uninsulated trailer.
- A cold battery pack will charge at about half the rate of a warm battery pack. The battery pack will charge at that slower rate throughout the entire charging cycle and will not return to maximum charge rate even if the battery pack warms.
If the battery pack does not charge properly:
a. Make sure power source is working by plugging a different appliance to the same source
b. Check to see if receptacle is connected to a light switch which turns power off when you turn out the lights
c. Move the charger and battery pack to a location where the surrounding air temperature is approximately 65–75°F (18-24°C)
d. If charging problems persist, take the battery pack and charger to your local service center.
-
The battery pack should be recharged when it fails to produce sufficient power on jobs which were easily done previously. DO NOT CONTINUE to use the pack under these conditions. You may also charge a partially used pack with no adverse effect on the battery pack.
-
Foreign materials of a conductive nature such as, but not limited to, grinding dust, metal chips, steel wool, aluminum foil, or any buildup of metallic particles should be kept away from charger cavities. Always unplug the charger from the power supply before attempting to clean.
-
Do not freeze or immerse the charger in water or any other liquid.
WARNING: Shock hazard. Don't allow any liquid to get inside the charger. Electric shock may result.
WARNING: Burn hazard. Do not submerge the battery pack in any liquid or allow any liquid to enter the battery pack. Never attempt to open the battery pack for any reason. If the plastic housing of the battery pack breaks or cracks, return to a service center for recycling.
CAUTION: Danger of explosion if battery is incorrectly replaced. Replace only with the same or equivalent type.
CHARGING A BATTERY PACK
The TSTAK® CONNECT RADIO + CHARGER includes a large storage compartment. This compartment also stores and protects the AC/DC power adaptor when not in-use.
- Open the compartment to take out the AC/DC power adaptor (see Figure 1 and Figure 3).
- Plug the charger AC/DC power adaptor into an appropriate outlet and connect it to the TSTAK® CONNECT RADIO + CHARGER power-in port before inserting the battery pack. The Mains Adaptor indicator LED will light in red.
. 3 Open the appliance cover by releasing its locking latch.
- Insert the battery pack (not included) into the radio, making sure the pack is securely held in the receptacle (Figure 4). The battery indicator LED will blink continuously, indicating that battery charging is in process.
The AC adaptor LED lights in red. The battery LED will light in accordance with battery charging status (Green, Yellow, Red).
Note: Close the cover and check it is tightly closed.
- The charging completion will be indicated by a steady battery indicator LED. The pack is fully charged and may be used at this time or left in the charger.
HOT/COLD PACK DELAY
When the charger detects a battery pack that is too hot or too cold, it automatically starts a Hot/Cold Pack Delay, suspending charging until the battery pack has reached an appropriate temperature. The charger then automatically switches to the pack charging mode. This feature ensures maximum battery pack life.
ELECTRONIC PROTECTION SYSTEM
Li-Ion tools are designed with an Electronic Protection System that will protect the battery pack against overloading, overheating or deep discharge. The tool will automatically turn off if the Electronic Protection System engages. If this occurs, place the lithium-ion battery pack on the charger until it is fully charged.
LED INDICATORS
  | |
| A three-color LED indicates the battery pack status | |
| Green Battery pack is fully charged | |
| Yellow Battery pack is partially charged | |
| Red Battery pack needs to be charged | |
| Slow Blink & Mains Adaptor LED is on | Battery is charging |
| Fast Red Blink Error / Faulty battery pack | |
###  | |
| A red LED indicates battery Mains Adaptor | |
| red Mains Adaptor Connected | |
| When the appliance is turned ON | |
| When charging a battery pack, a large battery image is displayed in the center of the LCD screen showing the battery pack charging status. | |
 | Green Battery icon will be displayed ONLY when the unit is fully charged |
 | When the unit is powered by battery, the unit will display battery empty icon for 3 seconds and then turn off automatically |
  | Hot DelayThis charger has a hot delay feature: when the charger detects a battery that is hot, the red icon is shown and it automatically starts a delay, suspending charging until the battery has cooled, and the icon turns blue. After the battery has cooled down, the charger automatically switches to the pack charging mode. This feature ensures maximum battery life. |
 | Faulty Battery PacksThis charger will not charge a faulty battery pack. The charger will indicate faulty battery pack by displaying an X on the LCD battery image. If this occurs, re-insert the battery pack into the charger. If the problem persists, try a different battery pack to determine if the charger is working properly. If the new pack charges correctly, then the original pack is defective and should be returned to a service center or other collection site for recycling. If the new battery pack elicits the same trouble indication as the original, have the charger and the battery pack tested at an authorized service center.NOTE: This could also mean a problem with a charger. |
⚠ WARNING: To reduce the risk of injury, turn the appliance off and disconnect it from the power outlet when not in use and when making repairs. Do not attempt to disassemble the unit; take it to an authorized service center when service or repair is required.
SAVE THESE INSTRUCTIONS FOR FUTURE REFERENCE
APPLIANCE DESCRIPTION
Figure 1. Front View
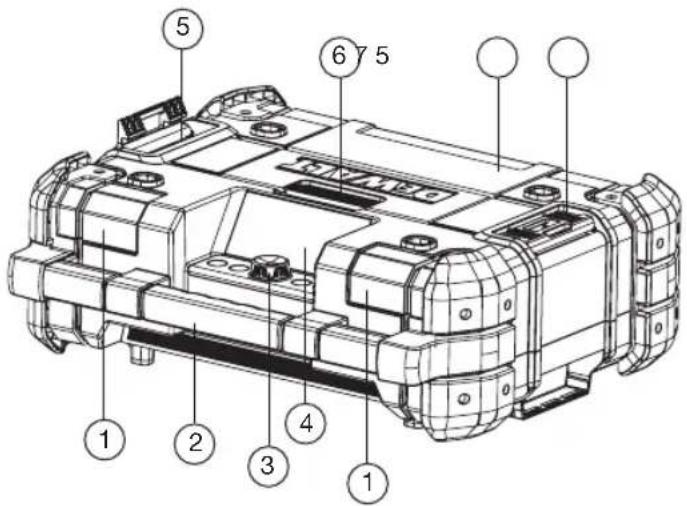
- Front speakers (2x)
.2 Carrying handle
.3 Control panel
.4 LCD Display Screen
.5 Stacking latches (2x)
.6 Compartment latch
.7 Compartment cover
- To open the compartment, release the cover locking latch and open it.
- To reach the battery pack receptacle, open the compartment top cover.
- To close the compartment, push the cover down until it is locked in place.
Note: When correctly closed, the compartment helps protect its contents from dust, debris and light rain.
Figure 2. Rear View
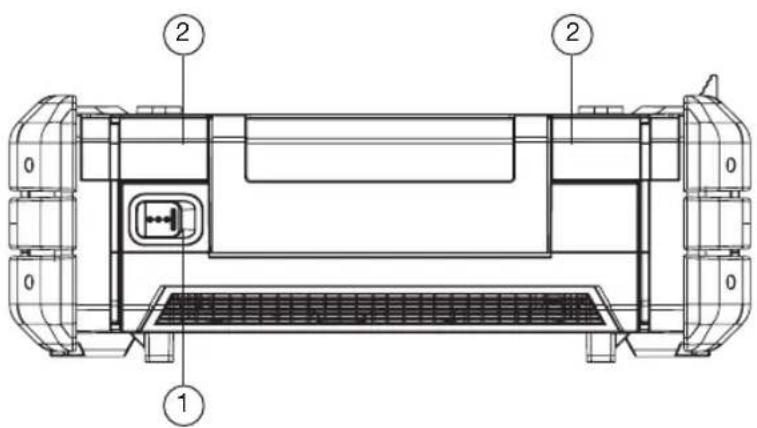
.1 Power-in port (24 VDC)
.2 Rear speakers (2x)
Figure 3. Storage Compartment
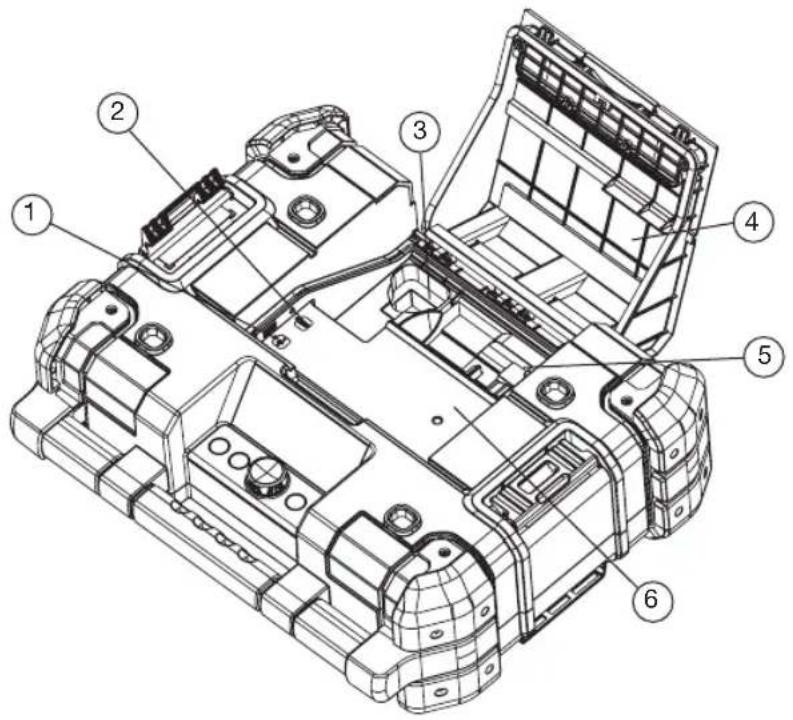
.1 USB power/charging port
.2 Auxiliary jack (3.5 mm)
.3 AC/DC power adaptor compartment
. 4 Compartment cover
.5 Battery Palsrael
Guide Dog Centerck
Receptacle
.6 Storage space
Figure 4. Control Panel
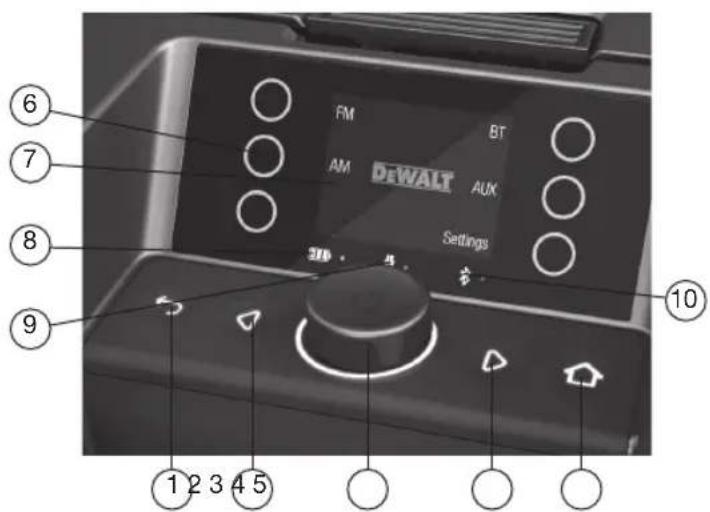
.1 Back button
. 2 Left button
.3 Select dial
4. Right button
5. Home button
6. Touch buttons
7. LCD display screen
8. Battery LED
9. Main adaptor LED
10. Bluetooth ® LED


OPERATION
The TSTAK® CONNECT RADIO + CHARGER can be operated from the appliance itself or controlled by a Bluetooth®-enabled mobile device (iOS or Android) using a dedicated application.
THE TSTAK® CONNECT RADIO + CHARGER UNIT
The TSTAK ^® CONNECT RADIO + CHARGER is equipped with flash memory for storing 12 AM and 12 FM radio stations, and up to 6 paired Bluetooth ^® devices.
NOTE: The appliance will operate when connected to the AC/DC power adaptor and/or when a charged battery pack is inserted.
NOTE: When the TSTAK CONNECT RADIO + CHARGER is connected by the supplied power chord to a wall outlet, it automatically charges the installed battery. When unplugged, the appliance will automatically switch to operating off the battery and can run up to 8 hours on a fully charged 5Ah 20V MAX Lithium-ion battery. Using batteries of lower voltage and amp hours will yield less run time.
This appliance can be operated in the vertical or horizontal position.
USER INTERFACE AND BUTTONS
The front panel includes an LCD screen with on-screen touch- buttons. Below the screen is a selection dial button and four pushbuttons.
SELECTION DIAL AND PUSHBUTTONS

Selection Dial (this button has multiple functions)

Back button

Left button

Right button

Home button
ON SCREEN DISPLAY
The LCD display, and the resistive touch-buttons on both sides, change function according to the mode of operation. The various functions are explained in the mode sections below.
POWERING ON AND OFF
Press the Selection Dial to turn on the appliance. It starts up on the last selected audio source. Press the Selection Dial for 3 seconds. The appliance turns off.
VOLUME ADJUSTMENT

Warning: Excessive sound level can damage hearing.
NOTE: The volume is set and saved separately for each of the audio source types.
Turn the Selection Dial clockwise to increase the volume. Turn it counterclockwise to reduce volume. A volume bar is displayed showing the volume level.
HOME BUTTON
Press the Home button 📋 display the home screen.
The home screen includes icons for selecting the audio source (AM/FM/Bluetooth®/AUX), and for accessing the Settings menu.
NOTE: The screen automatically returns to the last playing mode screen after about 30 seconds of no activity.
SELECTING THE AUDIO SOURCE
Press the touch buttons to select the audio source (AM, FM, Bluetooth® or AUX).
BACK BUTTON
After entering any one of the screens, press the Back button to return to the previous screen.
LEFT AND RIGHT BUTTONS

When in FM or AM audio source, pressing the Left or Right button moves between channels 1–6 and 7-12 and to the list of channels. They move between these screens rotationally. For more information see the AM and FM modes section.
AM AND FM MODES
The TSTAK® CONNECT RADIO + CHARGER can be tuned to AM and FM radio frequencies with the option of saving up to twelve (12) AM preset stations (favorites) and twelve (12) FM preset stations (favorites). After setting and saving the favorites, selecting a preset station instantly changes the frequency to the desired station. The screen displays the station name and after two seconds, the station frequency.
To move between the first six stations and the next six stations, push the Left or Right button. Press any of the touch buttons to select one of the preset stations.
To see a list of the preset stations, press the Right button to the setting tab and rotate it to scroll through the preset stations. Press the Selection Dial to select a specific preset station.
AM/FM RADIO
Setting the AM/FM preset stations can be performed by Auto Scan or by Manual Scan. To select the scan type:
- Press the audio source (AM or FM).
- Press the Selection Dial 🙏 to enter the AM or FM settings screen.
- Press the touch button to the left or right of the type of scan to perform.
Auto Seek:
- Select Auto Scan. The stations are automatically scanned, until a station with strong and clear reception is reached.
- Once a desired station is reached, press and hold the touch button of the desired preset number. A message Saved Preset # flashes, and the station number lights in yellow. The station is stored in the displayed Favorites number (#).
- Rotate the Selection Dial to scan to the next station.
a. Rotate clockwise to scan up the frequencies.
b. Rotate counterclockwise to scan down the frequencies.
- Repeat steps 2 and 3 to set additional favorite stations.
Manual Seek:
.1 Select Manual Scan.
. 2 Rotate the Selection Dial to search for the next station.
- Rotate clockwise to go up the frequencies.
- Rotate counterclockwise to go down the frequencies.
- Once a desired station is reached, press and hold the touch button of the desired preset number. A message Saved Preset # flashes, and the station number lights in yellow.
IMPORTANT RADIO NOTES
- Reception will vary depending on location and strength of radio signal.
- Playing the radio while connected to certain generators may cause background noise.
EXTERNAL DEVICES (BLUETOOTH®/AUX)
The TSTAK® CONNECT RADIO + CHARGER can be used to play sound from an external device through its built-in speakers via two connection options:
- Bluetooth ®
• 3.5mm Auxiliary input jack
NOTE: The compartment can also be used to store, protect and charge portable audio devices, such as a smartphone or MP3 player. The USB power port can charge/power most devices that have a USB connection (5V/2.1A).
BLUETOOTH® MODE
The TSTAK ^® CONNECT RADIO + CHARGER can connect to Bluetooth ^® enabled audio devices. The Bluetooth ^® mode can store up to 6 paired users.
Bluetooth ^® LED
| A blue LED indicates the Bluetooth® status | |
| Blue Bluetooth connected to Mobile App | |
| Off Not connected (light does not need to be on for connecting to the device) |
Connecting to Bluetooth®
- Press the Home button and select BT as the audio source.
.2 Press the Bluetooth ✉ touch button to disconnect any other connected device.
.3 Enable Bluetooth ^® discovery on the audio device you wish to connect.
.4 Scan for the TSTAK ^® CONNECT RADIO + CHARGER, display name: TSTAK_XXXX (where XXXX is an identifier of the device) and select it.
Once paired and connected, the connected device name is displayed on the screen.
Disconnecting the Connected Device
From the Bluetooth ^® screen press the Bluetooth ^® ✕ touch button. The Bluetooth ^® ✕ LED changes from yellow to gray.
Changing the Connected Device
.1 From the Bluetooth ^® screen, press the settings touch button. A list of all recognized mobile devices appears.
2. Press the touch button next to the required user name. The device will be discovered and connected (if Bluetooth ^® is enabled on the audio device).
Playing Audio through Bluetooth®
Any audio (as music) stored on a mobile device that is connected via Bluetooth ^® to the TSTAK ^® CONNECT RADIO + CHARGER can be streamed from the connected device to the TSTAK ^® CONNECT RADIO + CHARGER.
After connecting a mobile device via Bluetooth® do one of the following:
- Press the Selection Dial to play the last played song.
The song name is displayed on the screen. - Press the Left or Right buttons 🏠️ to move up/down your songs (audio) list.
CONNECTING AN AUXILIARY AUDIO DEVICE
- Connect a 3.5 mm audio cable (not provided) between the 3.5mm Auxiliary input jack and the output jack of your audio device.
- Press AUX as the audio source. The screen displays an AUX figure.
.3 Operate the audio through the connected device.
APPLIANCE SETTINGS
.1 Press the Home button

.2 Press the Settings touch button
Settings to the following can be performed: System, Sound, Display, Bluetooth ^® , AM and FM.
SYSTEM SETTINGS
The system settings screen includes configuring the following options: Language, Sys Beep, Sleep and Sys Reset. Press the touch button of the function you wish to modify.
Language
Enables changing the interface language.
- Rotate the Selection-Dial to choose the display language and push to select
.2 Press the Back ➕ button to return to the settings screen.
System Beep
Enables setting the system to sound a beep when a touch button is pressed.
- Press a touch button, ON or OFF, to select if a beep sound should be heard or not.
.2 Press the Back ➕ button to return to the settings screen.
Sleep
Allows setting the option of having the system stop playing after a set duration, when the system is in AUX mode.
AUX Sleep: press a touch button to select if ON or OFF.
Sleep Duration: press the touch buttons of the plus or minus steps to increase or decrease the value. The duration can be set to: 0 (sleep is disabled), 3, 5, 10, 15, 30, 60 or 120 minutes.
System Reset
To restore the appliance to its factory default settings. Selecting Sys Reset displays an approval message: "Are you sure you want to Restore to default?"
- Pressing the Yes touch button: all settings are restored to factory values.
- Pressing the Cancel touch button: goes back to the Setting System screen.
SOUND SETTINGS
Sound preferences can be adjusted by changing the equalization of the Bass, Treble and Mid-Range.
.1 Press the touch buttons of the plus + or minus - signs to increase or decrease the level.
.2 Press the Back 📋 button to return to the settings screen.
DISPLAY SETTINGS
The display Brightness and Auto Dim Display can be adjusted. In addition, you can select how Flip Display operates when the appliance is positioned vertically.
.1 Press the touch buttons of the plus screen Brightness level.
+ or minus signs to increase or decrease the
.2 Press the touch buttons of the plus
or minus signs to set the Auto Dim duration, after and touch buttons turn off and the display is dimmed. (vs on), 60, 30, 15, 10, 5, 3 or 120 minutes.
which the backlight of the buttons and touch buttons turn off and the display is dimmed. The duration can be set to: 0 (always on), 60, 30, 15, 10, 5, 3 or 120 minutes.
-
Press the touch buttons of the AUTO or Manual 📋 sign to select if the display flips automatically when the appliance is standing vertically.
-
Press the Back button to return to the settings screen.
BLUETOOTH® SETTING
Selecting Bluetooth ^® opens the Bluetooth ^® settings screen for selecting which mobile device to connect. For details, see Bluetooth ^® Mode above.
AM SETTING
Selecting AM opens the AM settings screen for selecting between: Auto Seek or Manual Seek. For details, see AM/FM Radio above.
TROUBLESHOOTING
WEAK BATTERY PACKS
Weak batteries will continue to function but should not be expected to perform as well. When the appliance is powered by a battery pack and its charging level falls below 20%, the low battery indicator is displayed.
BATTERY PACK PROTECTION
To protect the life of the battery pack, the appliance will shut off when the battery's charging level becomes too low. If this happens, connect the TSTAK® CONNECT RADIO + CHARGER to an outlet with the AC/DC power adaptor and charge the battery pack.
MUSIC STOPS
When dropping the appliance in its vertical position the battery pack may disconnect from its receptacle. If the music is operated by the battery pack, the music will stop. To resume, open the cover and reposition the battery pack.
MAINTENANCE
WARNING: To reduce the risk of injury, turn appliance off and disconnect it from power source before performing any maintenance procedures or when making repairs. DO NOT attempt to disassemble the unit; take it to an authorized service center when service or repair is required.
CLEANING
WARNING: Disconnect the charger from the AC outlet before cleaning. Dirt and grease may be removed from the exterior of the appliance using a dry cloth or soft non-metallic brush.
WARNING: Blow out dirt and dust with clean, dry air at least once a week. To minimize the risk of eye injury, always wear ANSI Z87.1 approved eye protection when performing this.
WARNING: Never use solvents or other harsh chemicals for cleaning the non-metallic parts of the appliance. These chemicals may weaken the plastic materials used in these parts. NEVER let any liquid get inside the appliance; NEVER immerse any part of the appliance into a liquid.
ACCESSORIES
WARNING: Since accessories, other than those offered by DEWALT, have not been tested with this appliance, use of other such accessories could be hazardous. To reduce the risk of injury, only DEWALT® accessories should be used with this appliance.
Accessories for use with the TSTAK® CONNECT RADIO + CHARGER are available at extra cost from your local dealer or authorized service center. If you need assistance in locating any accessory, please contact DEWALT® Industrial Tool Co. at: 701 East Joppa Road, Baltimore, MD 21286, call 1-800-4-DEWALT (1-800-433-9258) or visit our website: www.dewalt.com.
REPAIRS
The battery packs are not serviceable.
To assure product SAFETY and RELIABILITY, any repairs, maintenance and adjustment should be performed by a DEWALT® factory service center, a DEWALT® authorized service center or other qualified service personnel. Always use identical replacement parts.
REGISTAR ONLINE
Thank you for your purchase. Register your product now for:
- WARRANTY SERVICE: Registering your product will help you obtain more efficient warranty service in case there is a problem with your product.
- CONFIRMATION OF OWNERSHIP: In case of an insurance loss, such as fire, flood or theft, your registration of ownership will serve as your proof of purchase.
FOR YOUR SAFETY: Registering your product will allow us to contact you in the unlikely event a safety notification is required under the Federal Consumer Safety Act.
Register online at www.dewalt.com/register.
THREE YEAR LIMITED WARRANTY
DEWALT will repair, without charge, any defects due to faulty materials or workmanship for three years from the date of purchase. This warranty does not cover part failure due to normal wear or abuse. For further detail of warranty coverage and warranty repair information, visit www.dewalt.com or call 1-800-4-DEWALT (1-800-433-9258). This warranty does not apply to accessories or damage caused where repairs have been made or attempted by others. This warranty gives you specific legal rights and you may have other rights which vary in certain states or provinces. In addition to the warranty, this DEWALT® product is covered by our:
1 YEAR FREE SERVICE
DEWALT will maintain the product and replace worn parts caused by normal use, for free, any time during the first year after purchase.
DEWALT® BATTERY PACKS
Product warranty voided if the battery pack is tampered with in any way. DEWALT is not responsible for any injury caused by tampering and may prosecute warranty fraud fully permitted by law.
90 DAY MONEY BACK GUARANTEE
If you are not completely satisfied with the performance of your DEWALT® TSTAK® CONNECTED RADIO, for any reason, you can return it within 90 days from the date of purchase with a receipt for a full refund – no questions asked.
LATIN AMERICA: This warranty does not apply to products sold in Latin America. For products sold in Latin America, see country specific warranty information, call the local company or see website for warranty information.
FREE WARNING LABEL REPLACEMENT: If your warning labels become illegible or are missing, call 1-800-4-DEWALT (1-800-433-9258) for a free replacement.
(APR15) Part No. DWST17510 Copyright © 2018 DEWALT®
The Bluetooth ^® word mark and logos are registered trademarks owned by Bluetooth SIG, Inc. and any use of such marks by DeWalt is under license.
Android ^® is a registered trademark of Google LLC.
IOS is a trademark or registered trademark of Cisco in the U.S. and other countries and is used under license by Apple Inc.
RADIO + CARGADOR CONNECT TSTAK® DE DEWALT®
- Parlantes delanteros (2x)
. 2 Manija para transportarlo
.3 Panel de control
. 4 Pantalla de LCD
GARANTIE DE SATISFACTION OU REMBOURSEMENT DE 90 JOURS
(APR15) Part No. DWST17510
Copyright © 2018 DEWALT

DEWALT Industrial Tool Co., 701 East Joppa Road, Baltimore, MD 21286 1-800-4-DEWALT (1-800-433-9258) www.dewalt.com V1.0
15320 04/2018
- DEWALT® TSTAK® CONNECT RADIO+CHARGER
- KEY FEATURES
- DEFINITIONS: SAFETY GUIDELINES
- IMPORTANT SAFETY INSTRUCTIONS – SAVE THESE INSTRUCTIONS, DANGER – TO REDUCE THE RISK OF FIRE OR ELECTRIC SHOCK, CAREFULLY FOLLOW THESE INSTRUCTIONS
- LIST OF STANDARDS
- FCC
- LIST OF SYMBOLS
- BATTERIES AND CHARGERS
- READ ALL INSTRUCTIONS
- IMPORTANT SAFETY INSTRUCTIONS FOR ALL BATTERY PACKS
- SPECIFIC SAFETY INSTRUCTIONS FOR LITHIUM ION (LI-ION)
- TRANSPORTATION
- SHIPPING THE DEWALT® FLEXVOLT® BATTERY
- STORAGE RECOMMENDATIONS
- THE RBRC™ SEAL
- IMPORTANT SAFETY INSTRUCTIONS FOR ALL BATTERY CHARGERS
- CHARGING
- IMPORTANT CHARGING NOTES
- CHARGING A BATTERY PACK
- HOT/COLD PACK DELAY
- ELECTRONIC PROTECTION SYSTEM
- SAVE THESE INSTRUCTIONS FOR FUTURE REFERENCE
- APPLIANCE DESCRIPTION
- OPERATION
- THE TSTAK® CONNECT RADIO + CHARGER UNIT
- USER INTERFACE AND BUTTONS
- SELECTION DIAL AND PUSHBUTTONS
- ON SCREEN DISPLAY
- POWERING ON AND OFF
- VOLUME ADJUSTMENT
- HOME BUTTON
- SELECTING THE AUDIO SOURCE
- BACK BUTTON
- LEFT AND RIGHT BUTTONS
- AM AND FM MODES
- AM/FM RADIO
- Auto Seek:
- Manual Seek:
- IMPORTANT RADIO NOTES
- EXTERNAL DEVICES (BLUETOOTH®/AUX)
- BLUETOOTH® MODE
- Connecting to Bluetooth®
- Disconnecting the Connected Device
- Changing the Connected Device
- Playing Audio through Bluetooth®
- CONNECTING AN AUXILIARY AUDIO DEVICE
- APPLIANCE SETTINGS
- SYSTEM SETTINGS
- Language
- System Beep
- Sleep
- System Reset
- SOUND SETTINGS
- DISPLAY SETTINGS
- BLUETOOTH® SETTING
- AM SETTING
- TROUBLESHOOTING
- WEAK BATTERY PACKS
- BATTERY PACK PROTECTION
- MUSIC STOPS
- MAINTENANCE
- CLEANING
- ACCESSORIES
- REPAIRS
- REGISTAR ONLINE
- THREE YEAR LIMITED WARRANTY
- YEAR FREE SERVICE
- DEWALT® BATTERY PACKS
- DAY MONEY BACK GUARANTEE
- RADIO + CARGADOR CONNECT TSTAK® DE DEWALT®
- GARANTIE DE SATISFACTION OU REMBOURSEMENT DE 90 JOURS
Brand : DEWALT
Model : TSTAK DWST17510
Category : Radio