
IWS10EQ - Subwoofer ELAC - Free user manual and instructions
Find the device manual for free IWS10EQ ELAC in PDF.
| Product Type | In-wall powered subwoofer |
| Brand | ELAC |
| Model | IWS10EQ |
| Speaker | 10-inch, high-excursion paper cone diaphragm |
| Frequency Response | 28 Hz to 150 Hz |
| Adjustable Crossover Frequency | 50 Hz to 150 Hz |
| Amplifier Type | BASH (Class A/B with Class D regulation) |
| RMS Power | 400 Watts |
| Standby Power Consumption | 1 Watt |
| Inputs | 2 x RCA (Left, Right/LFE) |
| Connectivity | Ethernet, 12V Trigger, RS-232 |
| Control | ELAC In Wall Sub Control mobile app (iOS/Android) via Bluetooth or Ethernet |
| DSP | Yes, with AutoEQ and Cavity Volume Correction (CVC) |
| Installation | In-wall |
| Colors | White / Black (subwoofer and amplifier) |
| Included Accessories | AC power cord, mounting template, magnetic grille |
| Warranty (North America) | 3 years subwoofer and speaker, 1 year amplifier |
| Maintenance | Clean with a soft, dry cloth; do not use abrasive products |
| Safety | Do not open the enclosure; disconnect before cleaning; use on a stable surface |
Frequently Asked Questions - IWS10EQ ELAC
User questions about IWS10EQ ELAC
0 question about this device. Answer the ones you know or ask your own.
Ask a new question about this device
Download the instructions for your Subwoofer in PDF format for free! Find your manual IWS10EQ - ELAC and take your electronic device back in hand. On this page are published all the documents necessary for the use of your device. IWS10EQ by ELAC.
USER MANUAL IWS10EQ ELAC
IW-S10EQ IN-WALL POWERED SUBWOOFER
natural_image
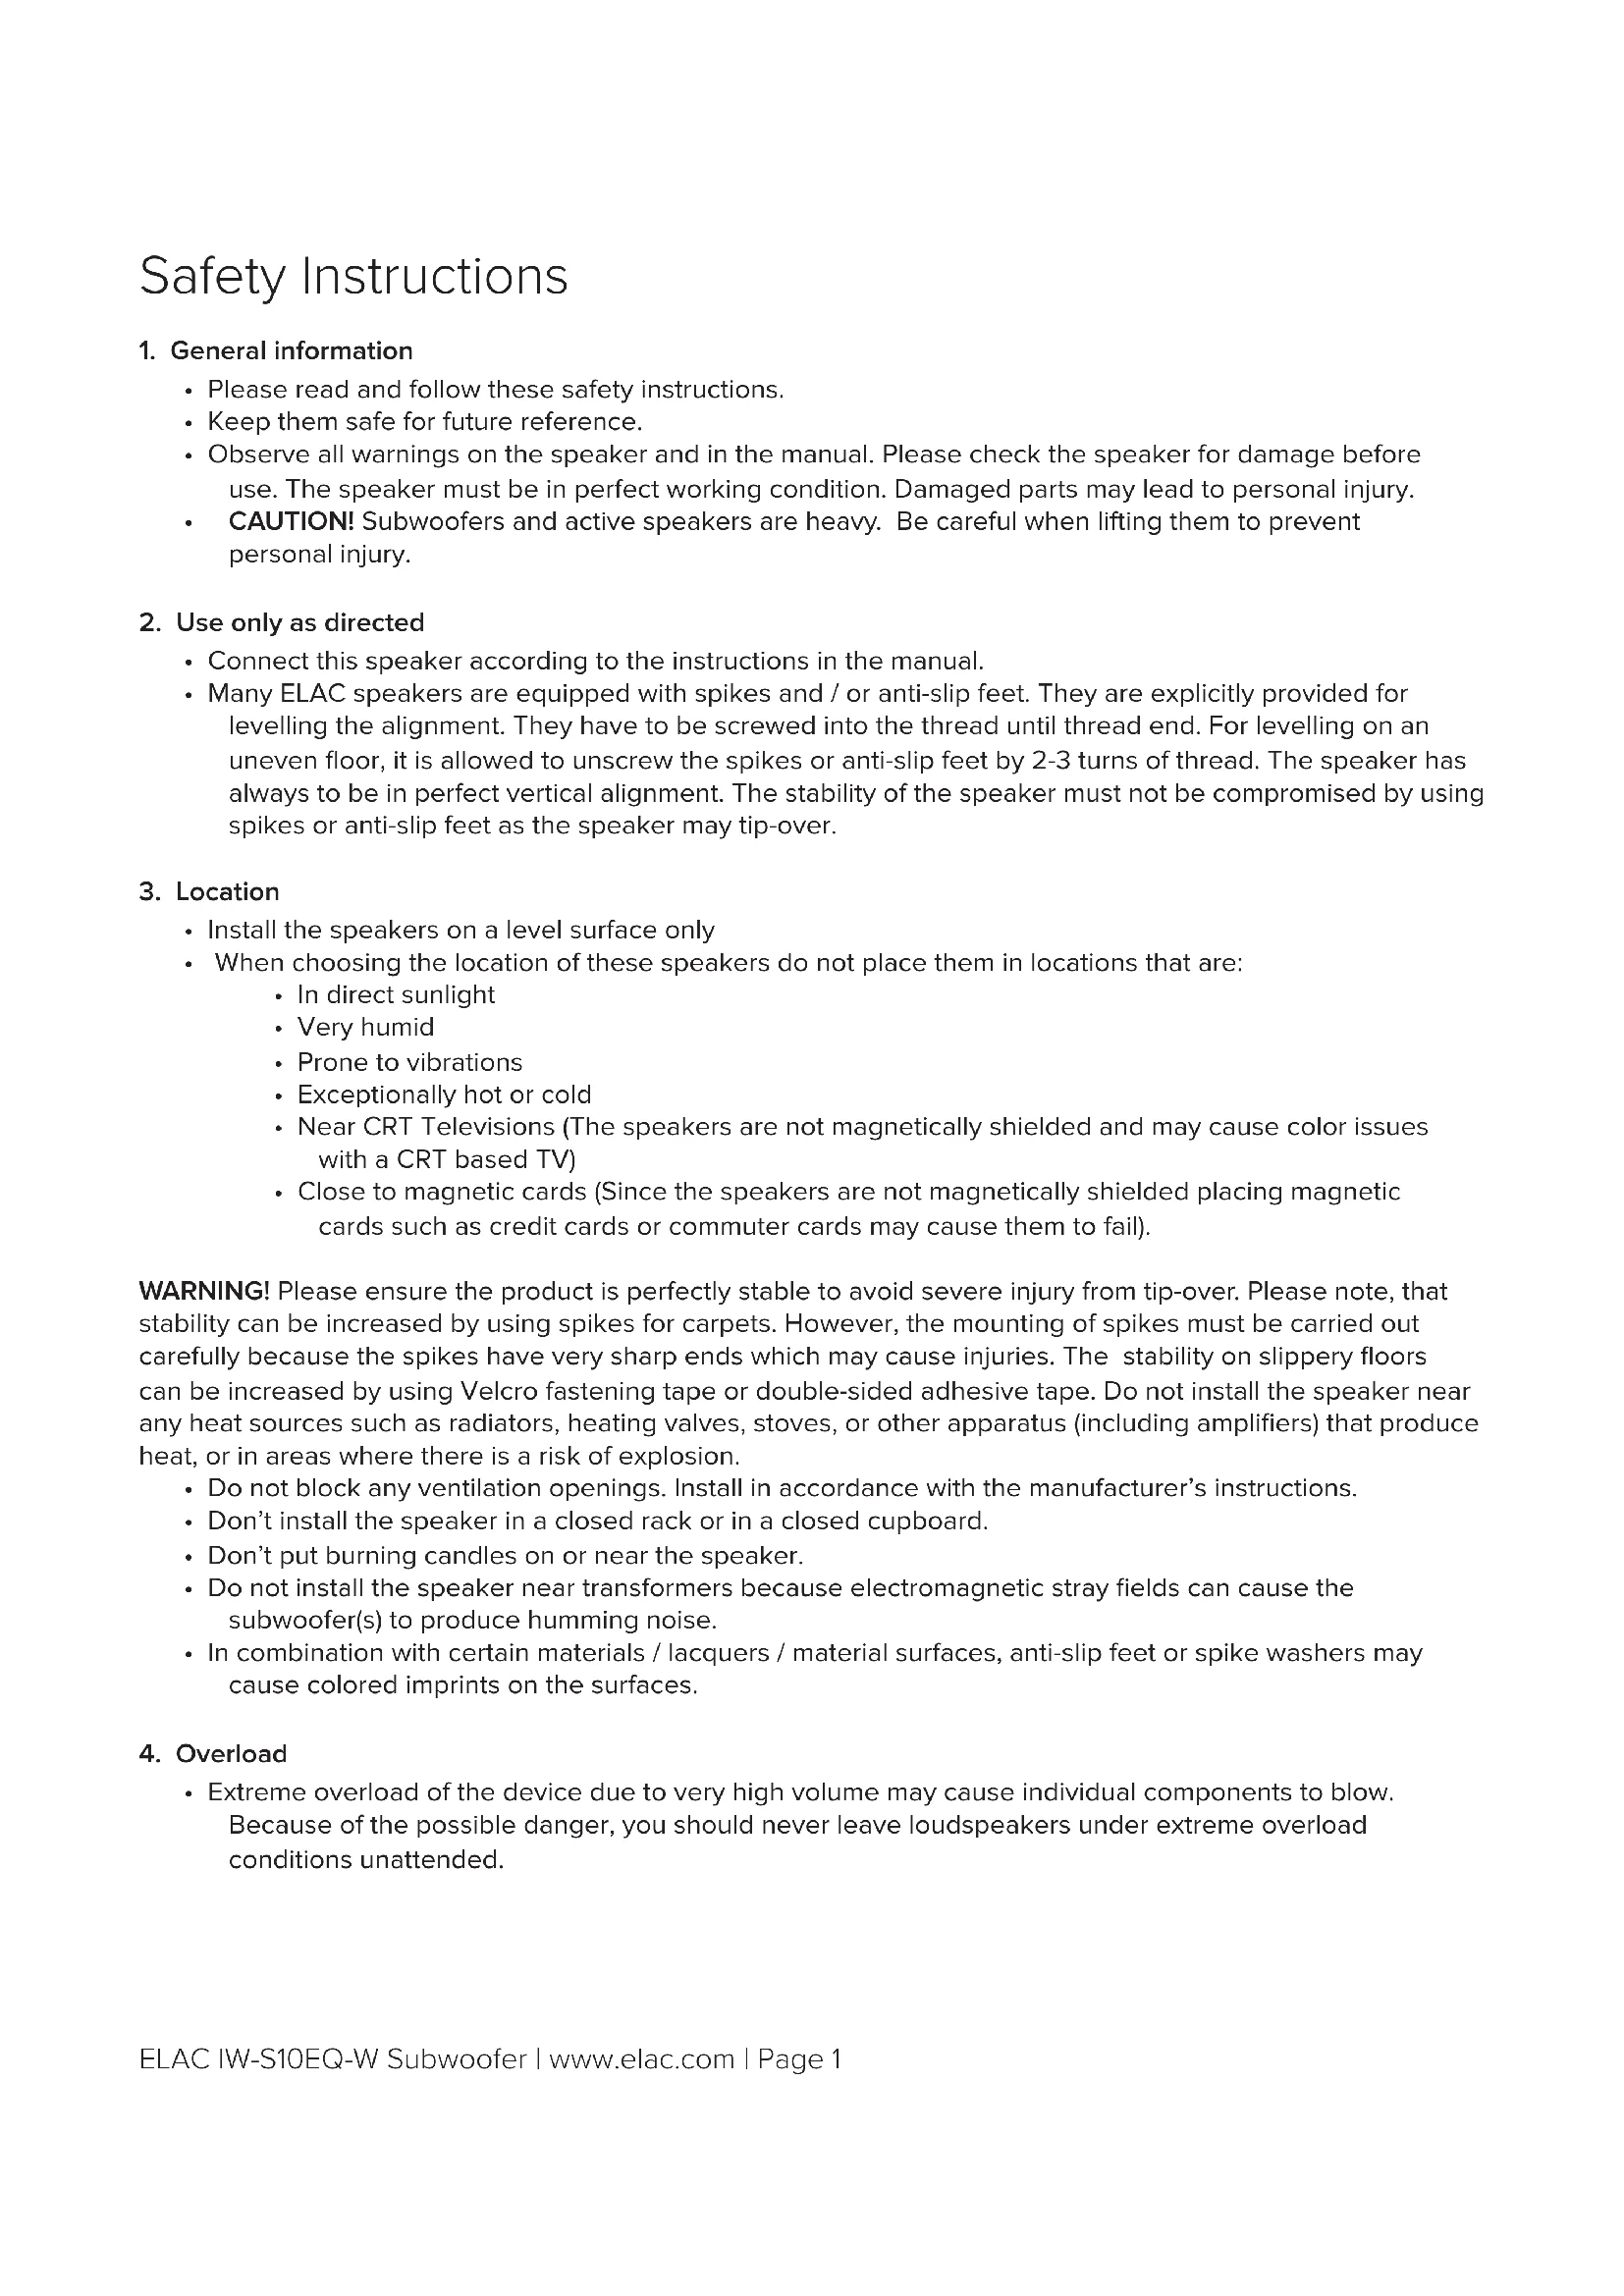
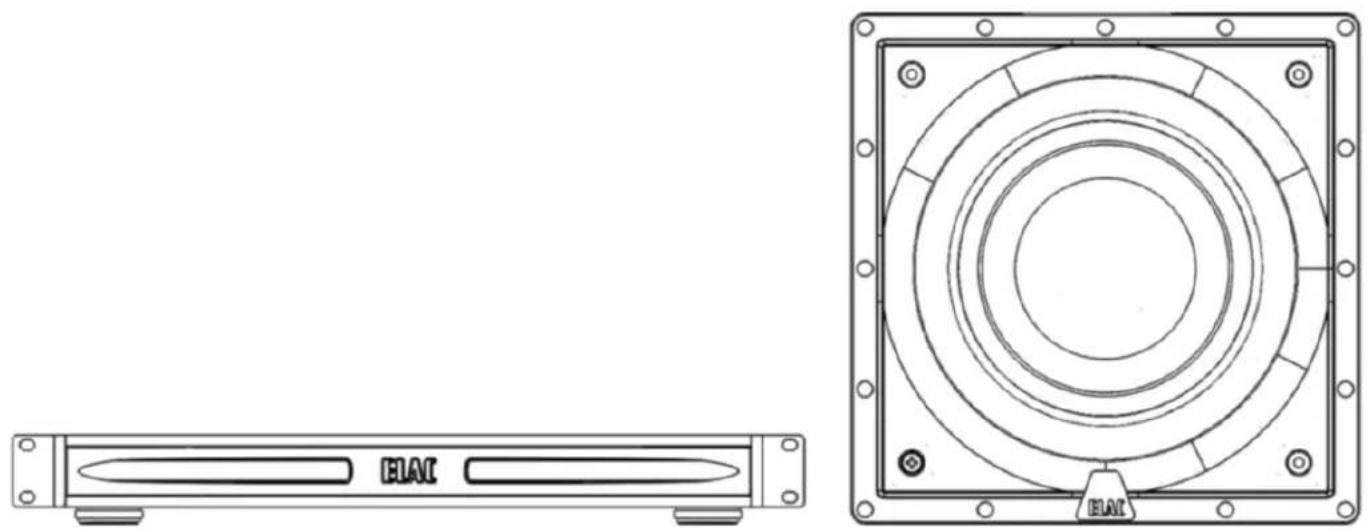
Technical line drawing of an electronic device with front panel and top view (no text or symbols)IW-S10EQ Powered Subwoofer
OPERATING INSTRUCTIONS
Safety Instructions
1. General information
- Please read and follow these safety instructions.
- Keep them safe for future reference.
- Observe all warnings on the speaker and in the manual. Please check the speaker for damage before use. The speaker must be in perfect working condition. Damaged parts may lead to personal injury.
- CAUTION! Subwoofers and active speakers are heavy. Be careful when lifting them to prevent personal injury.
2. Use only as directed
- Connect this speaker according to the instructions in the manual.
- Many ELAC speakers are equipped with spikes and / or anti-slip feet. They are explicitly provided for levelling the alignment. They have to be screwed into the thread until thread end. For levelling on an uneven floor, it is allowed to unscrew the spikes or anti-slip feet by 2-3 turns of thread. The speaker has always to be in perfect vertical alignment. The stability of the speaker must not be compromised by using spikes or anti-slip feet as the speaker may tip-over.
3. Location
• Install the speakers on a level surface only
- When choosing the location of these speakers do not place them in locations that are:
• In direct sunlight
- Very humid
- Prone to vibrations
• Exceptionally hot or cold
- Near CRT Televisions (The speakers are not magnetically shielded and may cause color issues with a CRT based TV)
- Close to magnetic cards (Since the speakers are not magnetically shielded placing magnetic cards such as credit cards or commuter cards may cause them to fail).
WARNING! Please ensure the product is perfectly stable to avoid severe injury from tip-over. Please note, that stability can be increased by using spikes for carpets. However, the mounting of spikes must be carried out carefully because the spikes have very sharp ends which may cause injuries. The stability on slippery floors can be increased by using Velcro fastening tape or double-sided adhesive tape. Do not install the speaker near any heat sources such as radiators, heating valves, stoves, or other apparatus (including amplifiers) that produce heat, or in areas where there is a risk of explosion.
- Do not block any ventilation openings. Install in accordance with the manufacturer's instructions.
- Don't install the speaker in a closed rack or in a closed cupboard.
- Don't put burning candles on or near the speaker.
- Do not install the speaker near transformers because electromagnetic stray fields can cause the subwoofer(s) to produce humming noise.
- In combination with certain materials / lacquers / material surfaces, anti-slip feet or spike washers may cause colored imprints on the surfaces.
4. Overload
- Extreme overload of the device due to very high volume may cause individual components to blow. Because of the possible danger, you should never leave loudspeakers under extreme overload conditions unattended.
5. Service
- DANGER! Do not open the cabinet because the components and conductors may carry dangerous levels of electricity! Servicing to be carried out by qualified service personnel only.
- Servicing is required when the loudspeaker has been damaged in any way, such as damage to the power supply cord or the plug, or when liquid has been spilled or objects have fallen into the loudspeaker, the speaker has been exposed to rain or moisture, does not operate normally, or has been dropped. To reduce the risk of electric shock, do not open the loudspeaker. Servicing to be carried out by qualified service personnel only.

6. Fuse links
- Various faults in subwoofers or active speakers may cause the fuse to blow. If the fuse blows, only replace it with the correct fuse type and rating as shown on the rear of the loudspeaker on the fuse holder. A second fuse is included with the device (in the fuse holder beneath the mains socket).
7. Cleaning
NOTE: Clean only with soft, smooth cloth or with dust brush. Do not use scouring agents, alcohol, benzene, furniture polish or other agents for cleaning! Modern furniture is often coated with multiple varnishes and plastics which can be treated with chemical agents. Some of these agents contain substances which degrade or soften the rubber feet. Therefore we advise you to place an anti-slip mat underneath the loudspeaker.
8. Volume
- CAUTION! Continuous high volume may cause severe damage to your hearing. Please listen responsibly.
9. Disposal
- The packaging is made from recyclable materials. Dispose of this in an environmentally friendly manner. At end of product life do not dispose of the speaker(s) with standard household waste. The speaker must be recycled in accordance with local legislation. Ask your local government for further information on recycling as the device contains valuable raw materials. Disable the speaker before disposal.
10. Power
- This subwoofer is only intended to be connected to voltages that are listed on the rear panel of the cabinet. Connection to any other voltage may cause irreversible damage to the subwoofer and will void the warranty. Use of plug adapters is not recommended because they may allow connection to voltages other than those printed on the back of this subwoofer.
Philosophy
Thank you for purchasing this ELAC product.
When we started in 1926, ELAC has always strived to achieve the very best. This holds true as much today as it did back then.
Your new ELAC speakers are built to the highest standards using high-quality components that are carefully constructed to deliver the best-in-class sound quality. They are developed by a passionate group of individuals whose soul purpose is to bring a new dimension of sound quality into your home. Enjoy!
Before Use
- Avoid damage to the speakers and other components:
- Unbox the subwoofer and amplifier carefully to avoid physical damage
- Keep your equipment turned off before connecting interconnects or speaker cables
- Check to ensure power cable is pushed in and secured to avoid electrical shock and injury.
BASH Technology
The BASH® technology implemented in the amplifier module of the ELAC subwoofer features power reserves with much lower levels of distortion. This is achieved by using an audiophile class A/B power amplifier whose supply voltage is regulated by a class D amplifier circuit to prevent any unnecessary power losses and to obtain the efficiency of a class D amplifier.
Since the audio signal is amplified in the analog domain, the high-frequency interference typical of digital amplifiers is eliminated. This design results in a low-noise amplifier with lower electromagnetic interference emissions. The absence of crossover distortion, which is a problem in traditional class D designs where the switching speed of the transistors is limited, yields further improvement in total harmonic distortion.
CVC (Cabinet Volume Correction)
When a subwoofer is mounted into a cavity wall or a ceiling its low frequency performance is influenced by the volume of the airspace behind the driver. As this volume is generally unknown the driver will no longer perform optimally as designed.
The AutoEQ function of our app incorporates a new unique process (patent applied for) that allows the amp/driver to measure the volume of the airspace and hence its influence upon the performance, and automatically correct the driver response to get back to the reference designed response.
As a result the driver will now have the same performance regardless of what wall it is mounted in, taking the guess work out of installation.
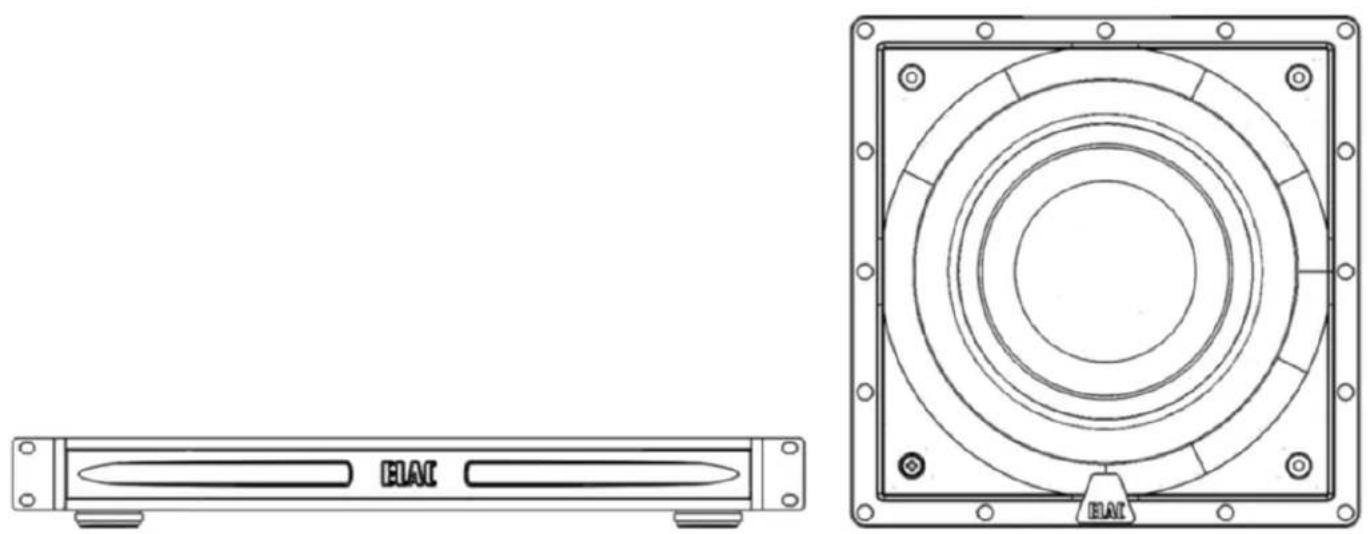
Controls and Indicators
- RCA Line In — The line level connection is used to connect the subwoofer to your pre-amp/AV receiver.
- Speaker Level In—This connection is used when your receiver does not have a SUB or analog outputs.
- Subwoofer Speaker Output—This connection is used to connect to the included in-wall subwoofer.
- Ethernet Connection— This connection is used to connect the amplifier to your home network for app control and 3rd party controllers.
- RS-232 —This connection is used to connect the amplifier to your 3rd party controllers. 12V Trigger—For use with devices with 12V Triggers
- AC Inlet — This inlet is a standard IEC power jack. Use the supplied power cord to connect the subwoofer to an available AC outlet.
- Primary Power Switch—This switch is used to turn on/off primary power to the amplifier
- Power LED—This light will illuminate when the unit is powered on.
- Link LED—The light will flash when communicating over ethernet or Bluetooth.
Running Speaker Wires
- For shorter distances up to 25 feet, 14 gauge speaker wire will be sufficient. For longer distances, 12 gauge speaker wire should be used. The speaker terminals will accommodate up to a 12 gauge speaker wire. Leave two feet of extra speaker wire at the speaker end to make installation easier. Do not use nails, staples or other metal objects to secure the speaker wire. The resulting short-circuit could affect your system's performance & could also damage components in your system, especially the amplifier. To minimize interference & external hum keep the speaker wires away from other electrical wires and cables.
natural_image
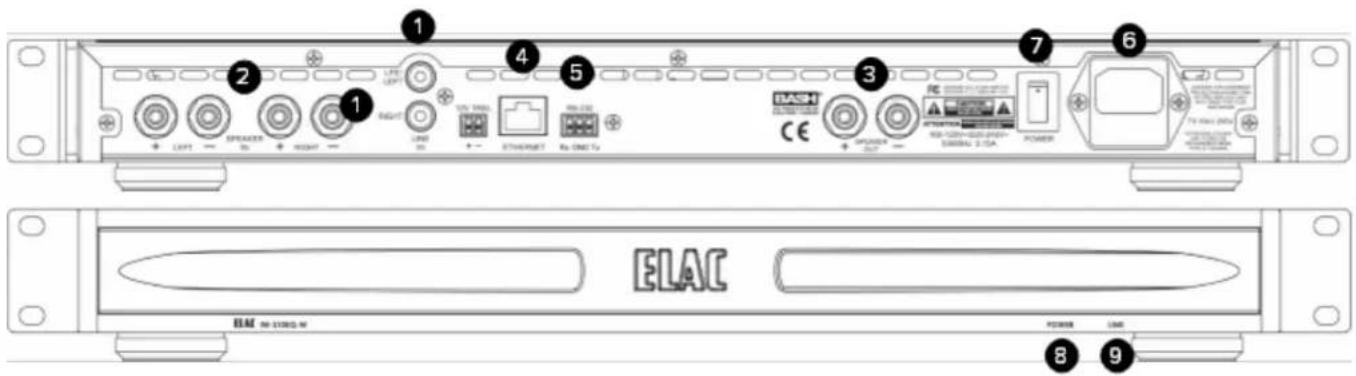
Technical line drawing of a mechanical assembly with two views: front view and side view (no text or symbols)Mounting the speaker
- Yes, you will be cutting a hole in the wall. With the right tools and a little extra preparation & care, installing these in-wall speakers can be quick and easy.
- Carefully cut out the hole drawn on the paper template. (Note: the inside rectangle (or circle) of the template can be used to shield the woofer while you paint the frame.)
- Next, position the template where you have chosen to mount the speaker and trace along the inside edge. Make your cuts along this line. A utility knife will make clean cuts in drywall. A keyhole saw or electric jigsaw may also be used. Do your best to keep the cuts neat, however the frame will overlap the hole to hide any rough edges.
- At this point, with the wall open, run the speaker cables into position leaving about two feet of extra cable exposed at the opening. Strip the ends of the cable back by approximately 14 inch (6mm) to expose the bare wire.
INSTALLATION - continued
- Attach the speaker cables to the speaker terminals, observing the correct polarity
- Remove the grille from the speaker frame. The grille is held on by magnetic attraction. To remove simply hold the edge of the grille and gently pull toward you.
- With the grille removed, the speaker can be inserted into the mounting hole. First make sure all the tabs are rotated inwards and then connect the speaker wires. The connector posts are spring loaded so the bare ends of the speaker wire can be pushed into the holes on the side of the post after the end cap is depressed. Once inserted the end cap can be released and the wire will be held firm. Make sure no stray strands of wire are exposed that could short across between the two posts.
- Use a Phillips head screwdriver – Turn each mounting screw clockwise to rotate the quick-turn mounting bracket into place. Further turning of the screw will tighten the mounting bracket until it is firmly against the wall. DO NOT over-tighten the screw to prevent breakage of the mounting bracket.
- When the speaker is mounted firmly in place, replace the magnetic grill.
Connecting the Subwoofer Amplifier
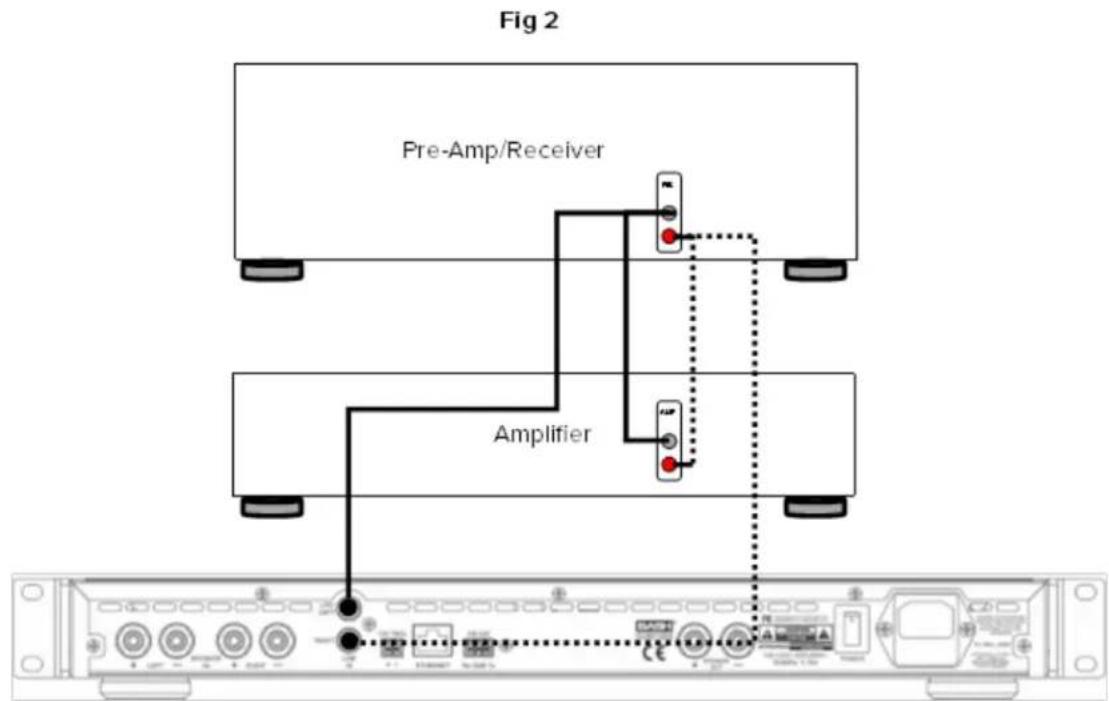
- If you are connecting the subwoofer to an AV receiver or pre-Amp with a dedicated subwoofer or LFE output, connect a RCA cable (not supplied) from the LFE/Subwoofer output on the AV Receiver/Pre-Amp to the Right RCA input on the subwoofer (Fig 1).
- If you are connecting the subwoofer to a pre-amp or receiver without a dedicated LFE/Subwoofer output, connect a set of stereo RCA connectors from pre-outs on the pre-amp to the left and right RCA inputs on the subwoofer. If you are using a pre-amp with only one set of pre-outs, use a splitter for each output on the pre-amp and connect two sets of stereo RCA cables to both the amplifier and to the subwoofer (Fig 2).

- Connecting the subwoofer amplifier to your home network allows the phone based setup application to communicate over wi-fi even when the subwoofer amplifier is in another room in your home. It will also allow for 3rd party controllers to communicate with the amplifier.
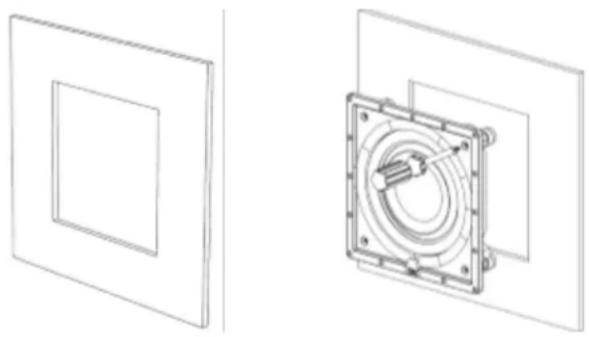
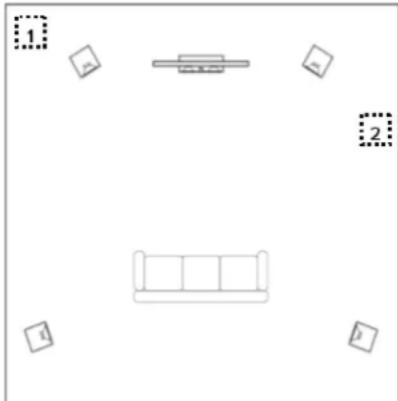
Subwoofer Placement
Finding the proper placement for your subwoofer can take some trial and error, however here are a few basic tips to get you started. In most cases the best position for the subwoofer is in the front corner (1) of the room. Placing a subwoofer in a corner excites most room modes and offers the best chance of avoiding a null area (a part of the room that experiences an acoustic reduction in bass).
If placing the subwoofer in the corners creates an abnormal amount of bass, you can try moving the subwoofer to one of the side walls (2) near the front of the room.
If possible the best option is to move the subwoofer around the room and find the location that sounds the best from your normal listening position. There are many test discs you can purchase that provide the correct test signals for helping find this optimum location.
Note: The PHASE and DELAY functions built into the subwoofer will also help if you experience any placement issues.
natural_image
Simple line drawing of a sofa with two boxes and one sofa, no text or symbols presentControlling Your Subwoofer—App Required
Your ELAC subwoofer incorporates an advanced, digital control system. Conventional analog rotary potentiometers and switches have been replaced by a digital signal processor (DSP), which enables you to adjust your subwoofer conveniently and accurately from the listening position. All parameters, such as volume, cut-off frequency, phase, etc., as well as the automatic calibration functions, can be adjusted with the help of our free smart phone APP.
The digital control system also eliminates the possibility of unwanted changes to controls and settings.
Note: A Bluetooth 4.0 low-energy Android or iOS device or ethernet connection is required to set up and operate this subwoofer.
You can download the "ELAC In Wall Sub Control" APP from the Apple® App Store® or Google® Play Store®.


Please follow the directions on the next page for configuring the subwoofer for your room environment.
Note: In case your mobile device needs a 4 digit code during the subwoofer-pairing procedure, please use "0000"
Using the In Wall Sub App
After installing and connecting the in-wall subwoofer and amplifier you must use the ELAC "In Wall Sub Control" app to properly setup and configure the subwoofer.
Download the ELAC "In Wall Sub Control" App from either the Google Play store or Apple App Store.
Launch the application and you should see the available devices (Either Bluetooth or Ethernet).
Select the device from the menu and the Home screen should be displayed.
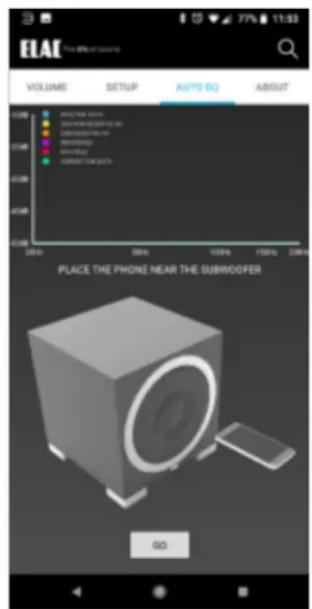
From here select Auto EQ and follow the on-screen instructions. The process is necessary for the subwoofer to properly compensate for the internal volume of the wall and perform room equalization.
After this process you can now adjust level, phase, and filters.
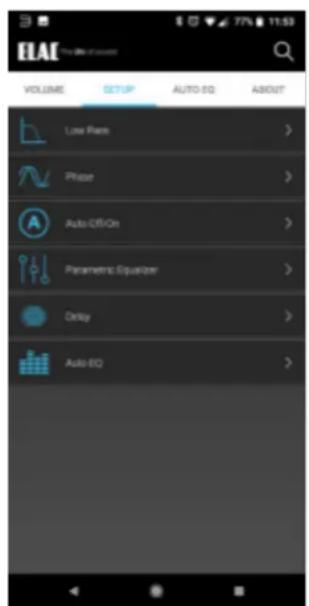
Setup Screen
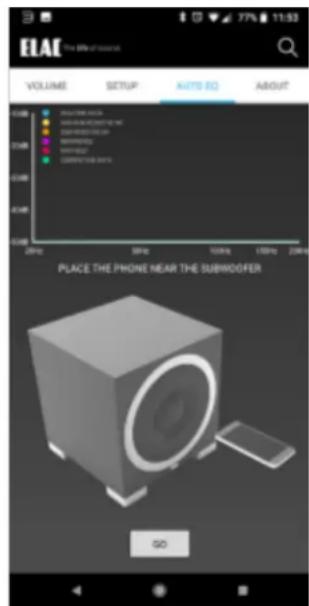
Auto EQ Screen
Configure Network and other Settings
The IW-S10EQ subwoofer amplifiers default network setting is DHCP. You can assign the unit a static IP address in the network section of the WEB GUI.
To access the WEBGUI please connect the unit to your home network via the Ethernet Jack on the rear of the unit. Power on the amplifier and wait for it to boot up.
Download our iOS/Android “ELAC In Wall Sub Control” app on your phone or tablet and launch it. The app should find the amplifier and display its IP address (Fig 1). Type this IP address into a browser on your computer. If prompted, the default username and password are admin and admin. From the WEBGUI you can update firmware, adjust network settings and default modes. (Fig 2 & 3)
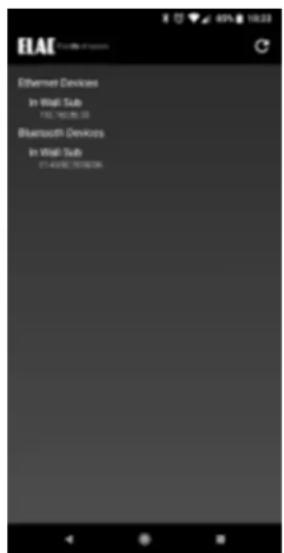
Fig 1
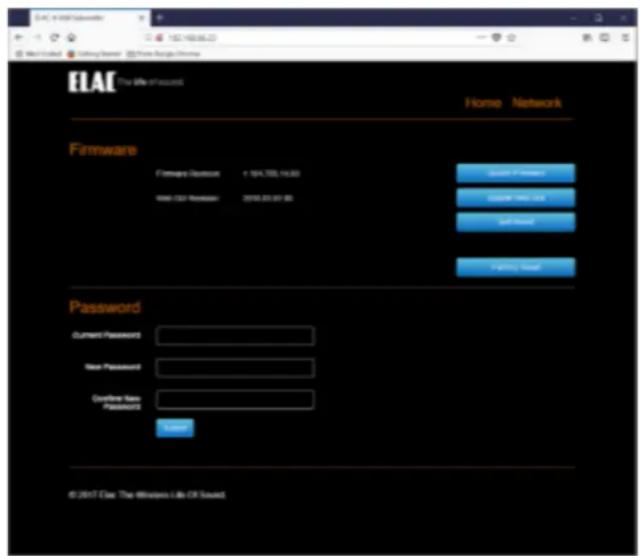
Fig 2
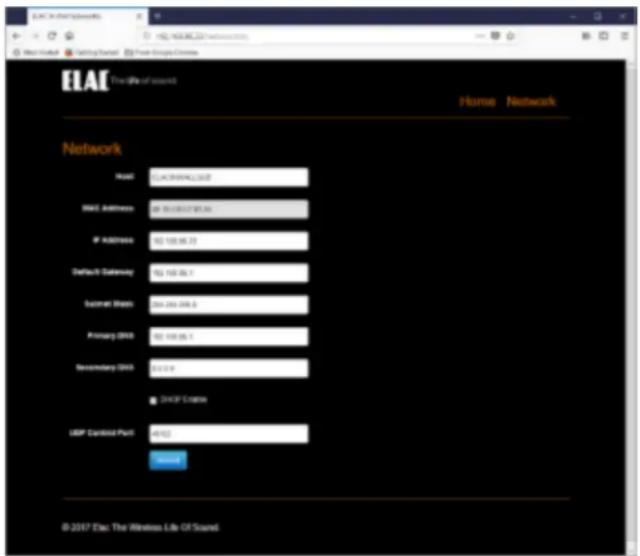
Fig 3
Updating Firmware
To update the firmware of the IW-S10EQ amplifier follow the below instructions.
Download the latest firmware from www.elac.com/firmware. Save this file to your desktop and unzip the hex file.
Type in the IP address for the subwoofer amplifier as explained in the “Configure network settings” section of this manual.
- Click on the Update Firmware button (This will open up the file browser on your computer)
- Select the hex file that you downloaded and select open. The update process will begin immediately.
- The URL in the browser will update itself to display success when complete.
- Click on the Soft Reset button. After rebooting the firmware update is complete.
SPECIFICATIONS
| Speaker Type Powered Subwoofer System | |
| Woofer 10” high excursion doped paper cone | |
| Frequency Response 28Hz to 150Hz | |
| Crossover Frequency 50Hz to 150Hz | |
| Amplifier Type BASH | |
| Maximum Amplifier Power 400 Watts (RMS) | |
| App Controlled Yes (iOS and Android) | |
| DSP Yes | |
| Standby Power Consumption 1 Watt | |
| Inputs 2 x RCA (L,R/LFE) | |
| Data Connection Ethernet, 12v Trigger, RS232 | |
| Cabinet Finish Speaker / Amp | White / Black |
| Accessories Included | AC Power Cord / Template |
ELAC Americas Inc.
North America Limited Liability Warranty
Powered Subwoofers
ELAC Americas Inc. warrants to the original purchaser that this product be free from defects and or workmanship for a period of 3 (Three) years on the cabinet and speaker driver and 1 (One) year on the amplifier from the original date of purchase. During this time period, repair or replacement of parts will be free of charge to the original owner (See below limitations). Shipping to and return from the repair center will be the responsibility of the original purchaser.
Limitations
- Warranty begins on the date of original purchase from an authorized ELAC Americas Inc. dealer.
- Product is warranted only if used in home applications. Commercial use of this product is not warranted.
- Product that has been modified or altered in anyway will not be warranted.
- Product that has been abused or subjected to faulty equipment will not be warranted.
- Products with defaced or removed serial numbers will not be warranted.
If service is required
In the event that service is required, please contact ELAC America at 888-541-0996 or at customerservice@elac.us to arrange for service or replacement. You will be responsible to provide proof of purchase (Copy or original sales receipt). Shipping to and from our repair center will be the responsibility of the original purchaser.
Warranty Outside of North America
This warranty applies to products purchased in the United States and Canada. For warranty claims outside of North America please contact the local dealer/distributor in the country of purchase.
IW-S10EQ AKTIVER IN-WALL SUBWOOFER
natural_image
Technical line drawing of a device front panel and its top view (no text or symbols)IW-IW-S10EQ Aktiver Subwoofer
BEDIENUNGSANLEITUNG
Sicherheitshinweise
1. Allgemeines
CVC (Cabinet Volume Correction)
natural_image
Simple 3D line drawing of a square frame with no text or symbols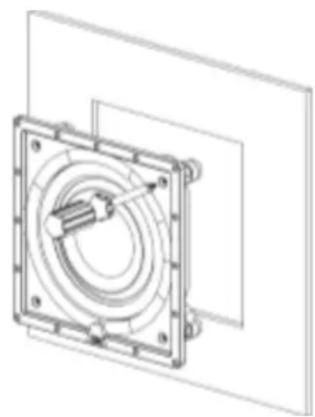
natural_image
Technical line drawing of a mechanical assembly with concentric rings and mounting holes (no text or symbols)natural_image
Simple layout diagram with furniture and numbered boxes (no text or symbols)Setup Screen
Auto EQ Screen
Fig 3
natural_image
Technical line drawing of a device front panel and its top view (no text or symbols)natural_image
Technical line drawing of a mechanical component with two views: front view and side view (no text or symbols)natural_image
Simple line drawing of a sofa with four windows and a table, no text or symbols presentFig 2
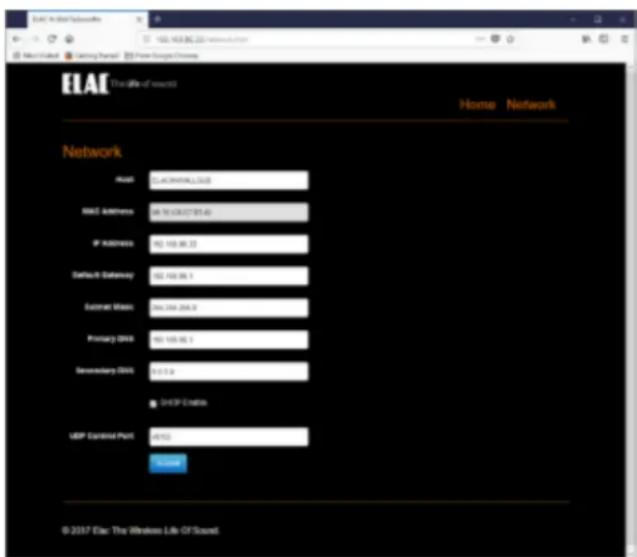
Fig 3
