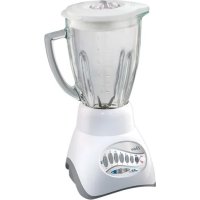
6805 - Blender OSTER - Free user manual and instructions
Find the device manual for free 6805 OSTER in PDF.



| Product Type | Blender |
| Brand | Oster |
| Model | 6805 |
| Container Capacity | 1.5 L (6 cups) |
| Container Material | Durable glass, dishwasher safe |
| Control Type | Speed slider and Pulse button |
| Number of Speeds | 12 speeds (1 to 12) |
| Main Functions | Blend, chop, crush, liquefy, crush ice, Pulse, Easy Clean |
| Motor Technology | ALL-METAL DRIVE® for increased durability |
| Safety Feature | Leak-proof lid, Off button stop, unplug after use |
| Maintenance | Removable parts (container, blade, gasket, ring) dishwasher safe; motor base cleaned with damp sponge |
| Easy Cleaning | Easy Clean function: hot water and detergent, 10 to 15 seconds |
| Warranty | 2 years from date of purchase |
| Usage | Household use only |
| Country of Manufacture | United States |
Frequently Asked Questions - 6805 OSTER
User questions about 6805 OSTER
0 question about this device. Answer the ones you know or ask your own.
Ask a new question about this device
Download the instructions for your Blender in PDF format for free! Find your manual 6805 - OSTER and take your electronic device back in hand. On this page are published all the documents necessary for the use of your device. 6805 by OSTER.
USER MANUAL 6805 OSTER
natural_image
Illustration of two modern blender units with labeled buttons (no text or symbols on the main objects)MODELS/ MODÈLES MODELOS
6805 & 6826
INSTRUCTION MANUAL
BLENDER
PLEASE READ ALL INSTRUCTIONS BEFORE USING THIS APPLIANCE
MANUEL D'INSTRUCTIONS
MÉLANGEUR
LIRE TOUTES LES INSTRUCTIONS AVANT D'UTILIZER CET APPAREIL
MANUAL DE INSTRUÇÕES
LIQUIDIFICADORA
LEIA TODAS AS INSTRUÇÕES ANTES DE USAR ESTE APARELHO
IMPORTANT SAFEGUAR
When using electrical appliances, basic safety precautions should be followed, including the following:
READ ALL INSTRUCTIONS BEFORE USE.
- Press OFF "O" button and unplug cord from outlet when not in use or before cleaning.
-
To protect against risk of electrical shock, do not immerse the cord, plug or motor base in water or other liquids.
-
DO NOT let cord hang over edge of table or counter or touch hot surfaces.
-
Never leave appliance unattended when in use.
-
Children should be supervised to ensure that they do not play with the appliance.
-
Avoid contact with moving parts. Keep hands and utensils out of jar while blending to prevent personal injury or damage to the blender. A rubber spatula may be used only when the blender is not running.
-
The blade is sharp. Handle with care. Care shall be taken when handling the sharp cutting blades, emptying the bowl and during cleaning.
-
Always put the lid on the jar before operating the blender.
-
DO NOT operate any appliance with a damaged cord or plug or after the appliance malfunctions or is dropped or damaged in any manner. Return the appliance to the nearest Authorised Appliance Service Centre for examination, repair or electrical or mechanical adjustment.
-
DO NOT use outdoors or for commercial purposes; this appliance is for household use only.
-
Use this appliance for its intended use as described in this manual.
-
Hot Foods: Open feeder cap to vent steam. Make sure to tilt feeder cap away from you when opening it. Keep hands away from the lid opening to prevent possible burns. When working with hot liquids, remove feeder cap and start blending at a low speed then move to a faster speed.
-
To reduce the risk of injury, never place cutter-assembly blades on base without jar properly attached.
-
Always operate on a flat surface.
-
Always disconnect the blender from the supply if it is left unattended and before assembling, disassembling or cleaning.
-
The use of attachments, not made by manufacturer, including canning or ordinary jar and processing assembly parts, is not recommended by Sunbeam Products, Inc., doing business as Jarden Consumer Solutions, and may cause risk of injury to persons.
-
DO NOT operate blender continuously for more than 3 minutes.
-
This appliance is not intended for use by persons (including children) with reduced physical, sensory or mental capabilities, or lack of experience and knowledge, unless they have been given supervision or instruction concerning use of the appliance by a person responsible for their safety.
THIS PRODUCT IS FOR HOUSEHOLD USE ONLY.
The maximum rating marked on the product is based on the attachment that draws the greatest load. Other attachments may draw less power.
POWER CORD INSTRUCTIONS
Please follow the instructions below to ensure the safe use of the power cord
• DO NOT use an extension cord with this product.
- DO NOT pull, twist or otherwise abuse the power cord.
- If the supply cord is damaged, it must be replaced by the manufacturer, its service agent, similarly qualified persons in order to avoid a hazard.
SAVE THESE INSTRUCT
FITTING A REPLACEMENT PLUG FOR U.K. AND IRELAND ONLY
If the plug is not suitable for the socket outlets in your home, it can be removed and replaced by a plug of the correct type. Please refer to "Installation of a plug" below.
Installation of a plug Applicable to U.K. and Ireland.
WARNING - THIS APPLIANCE MUST BE EARTHED.
NOTE: If the terminals in the plug are not marked or if you are unsure or in doubt about the installation of the plug please contact a qualified electrician. If a 5A 3-pin plug is fitted, it must be an ASTA approved plug, conforming to BS1363 standard. Replacement 5A fuses must be BSI or ASTA BS1362 approved.
The wires in the mains lead are coloured as such:
Please note that the colour of these mains wires may not correspond with the colour markings that identify the terminals in your plug.
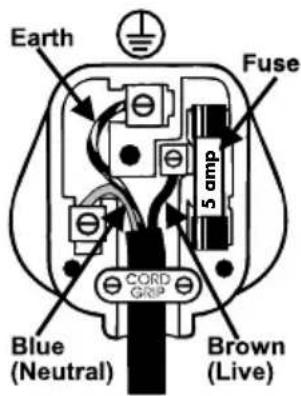
Please proceed as follows:
The wire which is coloured GREEN AND YELLOW must be connected to the terminal which is marked with the letter "E" or by the earth symbol ⏻ or coloured GREEN or GREEN AND YELLOW.
The BROWN coloured wire must be connected to the terminal, which is marked with the letter "L" or is coloured RED.
The BLUE coloured wire must be connected to the terminal, which is marked with the letter "N" or is coloured BLACK.
DESCRIPTION OF THE APPLIANCE
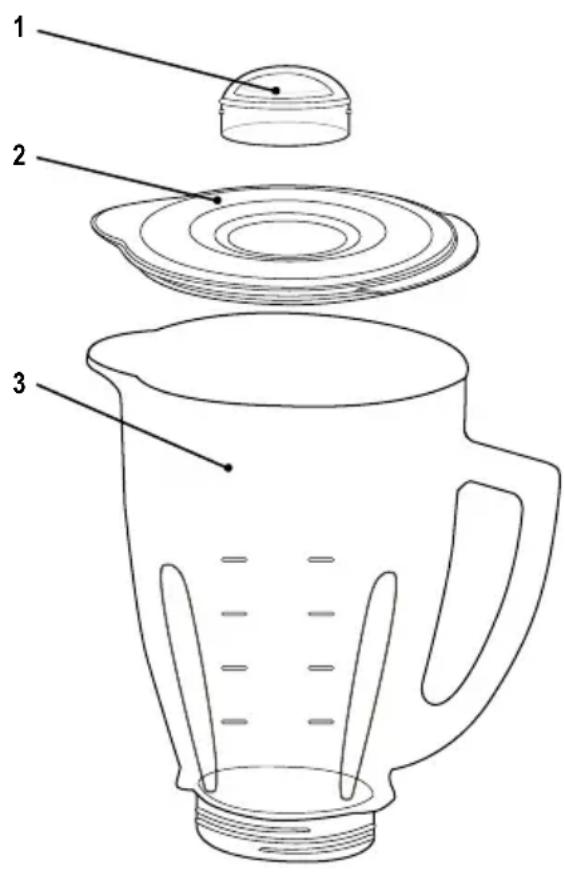
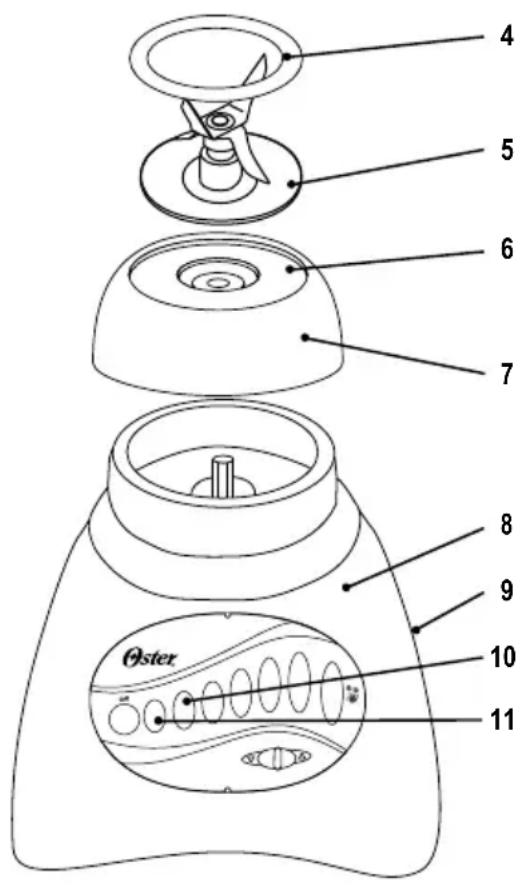
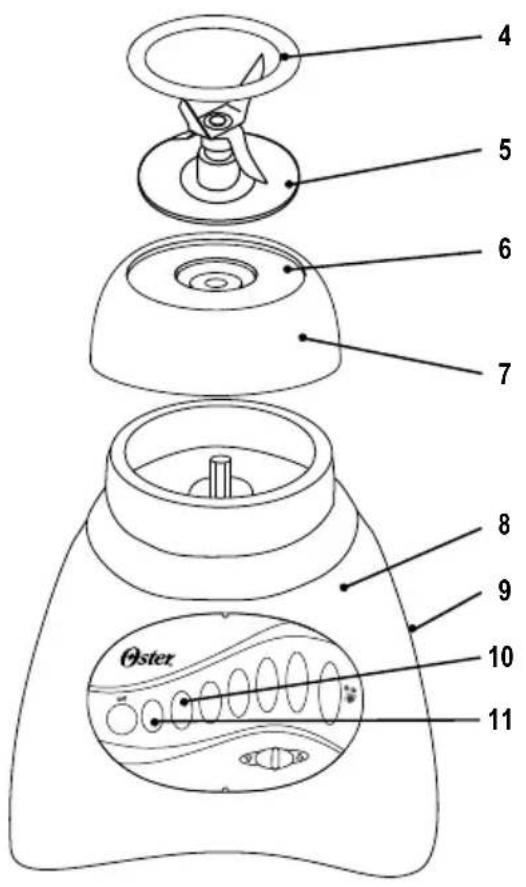
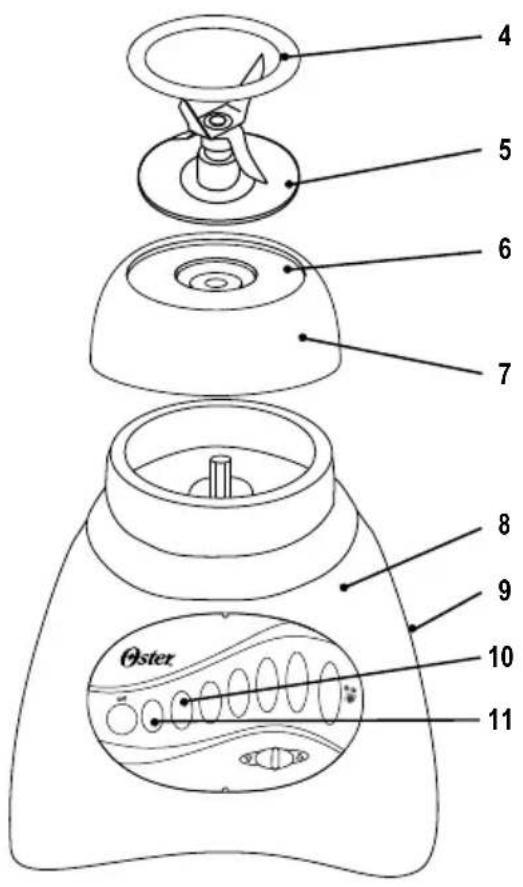
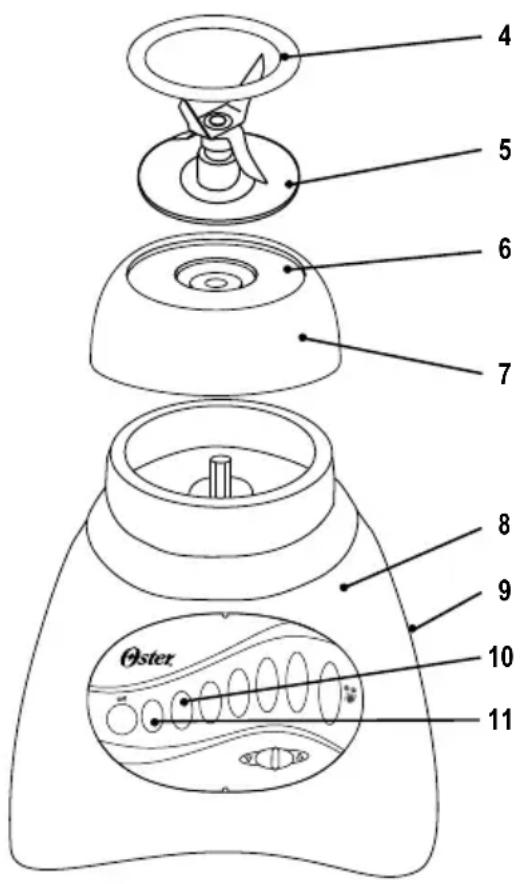
- Feeder Cap for adding ingredients while blending
- Leak proof Lid
- 6-Cup (1.5 L) Dishwasher Safe/Scratch Resistant Glass Jar
- Sealing Ring for tight seal
- Ice Crush Blade pulverizes ice for smooth frozen drinks
-
Threaded Bottom Disc
-
Collar for stability from countertop to refrigerator to table
- Powerful Motor with exclusive ALL-METAL DRIVE ^® system for extra durability
- Convenient Cord Storage
- Easy-Clean Feature – quickly cleans jars in between batches
- Pulse for precise blending control
INSTRUCTIONS FOR USE
ASSEMBLING YOUR BLENDER
natural_image
Line drawing of a mechanical component with a cylindrical top and flange base (no text or symbols)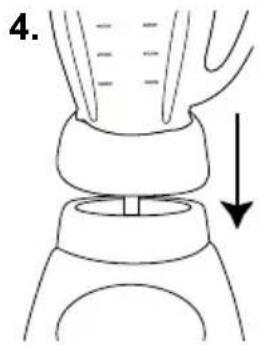
natural_image
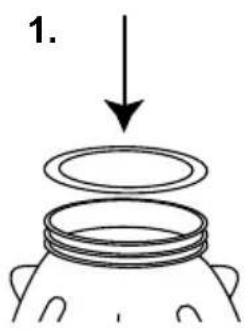
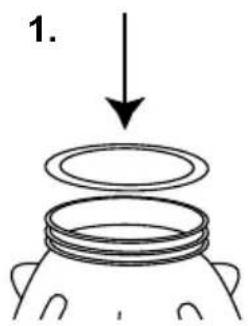
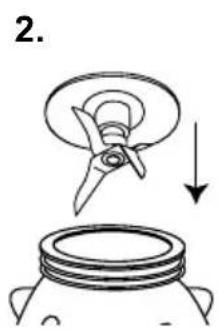
Diagram of a mechanical component with a downward arrow indicating a process or movement (no text or symbols present)- Turn Jar upside down so the small opening is at the top. Place Sealing Ring over Jar opening.
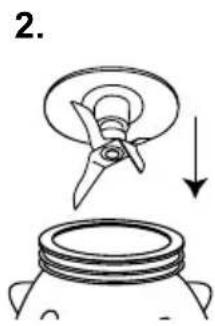
- Place Blade into Jar.
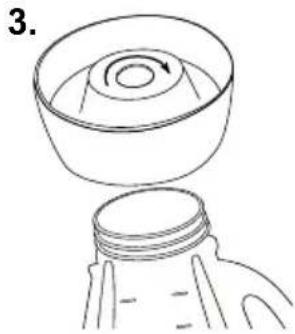
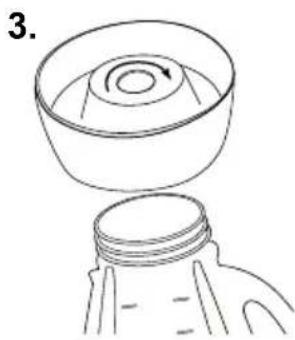
- Snap Threaded Bottom Disc and Collar together. Place Collar over Blade and Jar. (Note: If there are slots on top of Collar, line them up with notches on Jar.) Place the Collar on Jar and turn the Threaded Bottom Disc clockwise to tighten.
- Place Jar assembly onto base.
SELECTING THE SPEED
Slide switch to ▲ High or ▼ Low.
Push desired speed and blend ingredients to desired consistency.
Push OFF "O" to stop the Blender and turn Blender off.
To use PULSE, select ▲ High or ▼ Low. Push PULSE and hold down for desired length of time. Release PULSE and allow Blade to stop. Repeat cycle as desired.
TIP: Refer to the "Guide For Processing Foods in Blender" for information on processing foods.
SPEED CHART
In the table below you will find a typical application for each speed to better guide you when using your Blender.
12 SPEED
| SPEED RANGE SELECTION | ▼ LOW ▲ HIGH | ||||||||||
| SPEED | 1 2 3 | 4 | 5 | 6 | 7 8 9 10 11 12 | ||||||
| PULSE | |||||||||||
| FUNCTION | easy clean | puree | cream chop | whip mix | grate blend shred grind liquefy | ice crush | |||||
BLENDING TIPS
• Put liquids in the Jar first, unless a recipe says otherwise.
- Crushing ice: Crush 6 ice cubes or approximately 2 cups of ice at a time.
- This Blender has been designed to gently process foods when operating at low speeds. If blades do not rotate during operation, simply choose a higher speed.
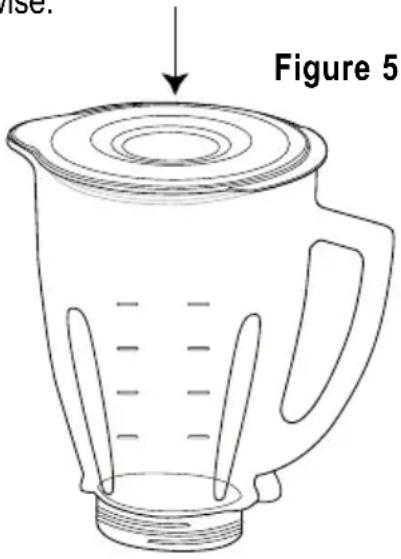
- Do not remove the Lid while in use. Remove Feeder Cap to add smaller ingredients. (Figure 5)
- Cut all firm fruits and vegetables, cooked meats, fish and seafood into pieces no larger than 1/2 inch (1.8 cm) to 1 inch (2.5 cm). Cut all kinds of cheeses into pieces no larger than 1/2 inch (1.8 cm).
- This Blender will not mash potatoes, whip egg whites or substitute dairy toppings, mix stiff dough or grind raw meat.
GUIDE FOR PROCESSING FOODS IN BLENDER
| FOOD | PROCESSED QUANTITY | UNPROCESSED QUANTITY | SPECIAL INSTRUCTIONS |
| Breadcrumbs 1/2-cup | (125 ml) 1 slice, torn times | in 8 pieces Pulse 1 – 4 | |
| Celery | 3/4-cup (200 ml) | 1-cup (250 ml) of 1-inch (2.5 cm) pieces | Pulse 2 – 3 times |
| Cheese, Cheddar | 1-cup (250 ml) | 1-cup (250 ml) of 1-inch (2.5 cm) pieces | Pulse 2 times |
| Cheese, Swiss | 1-cup (250 ml) 1-cup (250 ml) Pulse 5 times of 1-inch (2.5 cm) pieces | ||
| Cheese, Hard or Semi-Hard | 1-cup (250 ml) | 1-cup (250 ml) of 1-inch (2.5 cm) pieces | Chop continuously |
| Coffee Beans | 1-cup (250 ml) | 1-cup (250 ml) | Grind 45 seconds for percolators and 60 seconds for drip |
| Cookies, Wafer | 1/2-cup (125 ml) | 10 wafers Pulse 3 times | |
| Crackers, Graham | 1/2-cup (125 ml) | 8 crackers Pulse 3 times | |
| Peppers | 2/3-cup (150 ml) | 1-cup (250 ml) | Pulse 1 time |
| Meat, Boneless, Cooked | 1-cup (250 ml) | 1-cup (250 ml) of 1-inch (2.5 cm) pieces | Chop continuously |
| Nuts, almonds, peanuts, pecans, walnuts | 1-cup (250 ml) 1-cup (250 ml) Pulse 2 – 4 times | ||
CARING FOR YOUR BLENDER AFTER USE
IMPORTANT: PRESS OFF "O" BUTTON, UNPLUG BEFORE CLEANING BASE and DO NOT IMMERSE THE BLENDER BASE IN WATER OR ANY OTHER LIQUIDS.
Use a damp, soft sponge with mild detergent to clean the outside of the Blender base. All parts except for the Blender base are dishwasher safe. Collar and Threaded Bottom Disc are top rack dishwasher safe ONLY. Collar and Threaded Bottom Disc can be separated for cleaning. Hold Collar with both hands and press down on top of Disc with thumbs. Place Sealing Ring in bottom basket of dishwasher. You can also wash the parts in warm, soapy water. Rinse well and dry.
EASY CLEAN
Pour 3 cups of warm water in the Blender Jar. Add 1 – 2 drops of liquid dishwashing detergent. Select Easy Clean. Blend detergent for 10 – 15 seconds. Empty Jar of soapy water into sink. Rinse Jar thoroughly with clean water. Note: Easy Clean is not a substitute for regular cleaning described above. It is especially important to disassemble and thoroughly clean your Blender when processing milk, dairy products, meats, seafood and eggs.
STORING YOUR BLENDER
After cleaning, reassemble Blade to Jar with Sealing Ring and Collar. Store Blender with Cover ajar to prevent container odor.
EUROPE GUARANTEE
Please keep your receipt as this will be required for any claims under this guarantee.
This appliance is guaranteed for 2 years after your purchase as described in this document.
During this guaranteed period, if in the unlikely event the appliance no longer functions due to a design or manufacturing fault, please take it back to the place of purchase, with your till receipt and a copy of this guarantee.
The rights and benefits under this guarantee are additional to your statutory rights, which are not affected by this guarantee. Only Holmes Products (Europe) Ltd. (“Holmes”) has the right to change these terms.
Holmes undertakes within the guarantee period to repair or replace the appliance, or any part of appliance found to be not working properly free of charge provided that:
• you promptly notify the place of purchase or Holmes of the problem; and
• the appliance has not been altered in any way or subjected to damage, misuse, abuse, repairor alteration by a person other than a person authorised by Holmes.
Faults that occur through, improper use, damage, abuse, use with incorrect voltage, acts of nature, events beyond the control of Holmes, repair or alteration by a person other than a person authorised by Holmes or failure to follow instructions for use are not covered by this guarantee. Additionally, normal wear and tear, including, but not limited to, minor discoloration and scratches are not covered by this guarantee.
The rights under this guarantee shall only apply to the original purchaser and shall not extend to commercial or communal use.
If your appliance includes a country-specific guarantee or warranty insert please refer to the terms and conditions of such guarantee or warranty in place of this guarantee or contact your local authorised dealer for more information.
This marking indicates that this product should not be disposed with other household wastes and should be disposed separately throughout the EU. To prevent possible harm to the environment or human health from uncontrolled waste disposal due to the presence of hazardous substances within the product, recycle it responsibly to promote the sustainable reuse of materials and resources. To return your used device, please use the return and collection systems available to you or contact the retailer where the product was purchased. They can take this product for environmentally safe recycling.
Holmes Products (Europe) Limited
1 Francis Grove
London
SW19 4DT
UK
IMPORTANTES MESURES DE SÉCURITÉ
natural_image
Line drawing of a mechanical component with a cylindrical top and flanged base (no text or symbols)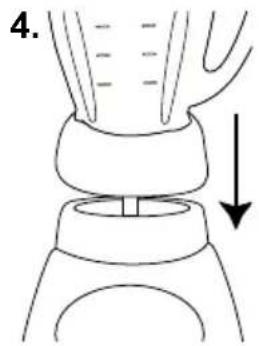
Holmes Products (Europe) Limited
1 Francis Grove
London
SW19 4DT
UK
PRECAUCIONES IMPORTANTES
natural_image
Line drawing of a mechanical component with a cylindrical top and flanged base (no text or symbols)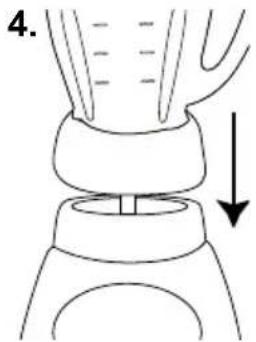
natural_image
Diagram of a mechanical component with an arrow indicating downward motion (no text or symbols present)Holmes Products (Europe) Limited
1 Francis Grove
London
SW19 4DT
Reino Unido
PRECAUÇÕES IMPORTANTES
INSTRUÇÕES PARA O USO
MONTAGEM DO COPO
natural_image
Line drawing of a mechanical component with a circular top and flange, shown from an exploded view (no text or symbols)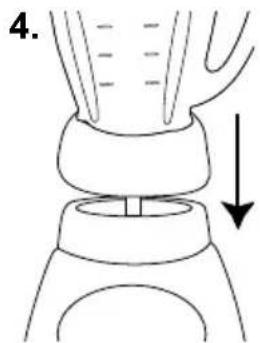
Holmes Products (Europe) Limited
1 Francis Grove
London
SW19 4DT
UK
Oster®
© 2012 Sunbeam Products, Inc. doing business as Jarden Consumer Solutions. All rights reserved. Distributed by Holmes Products (Europe) Ltd., 1 Francis Grove, London SW19 4DT, United Kingdom.
- IMPORTANT SAFEGUAR
- READ ALL INSTRUCTIONS BEFORE USE.
- THIS PRODUCT IS FOR HOUSEHOLD USE ONLY.
- POWER CORD INSTRUCTIONS
- FITTING A REPLACEMENT PLUG FOR U.K. AND IRELAND ONLY
- WARNING - THIS APPLIANCE MUST BE EARTHED.
- DESCRIPTION OF THE APPLIANCE
- INSTRUCTIONS FOR USE
- ASSEMBLING YOUR BLENDER
- SELECTING THE SPEED
- SPEED CHART
- SPEED
- BLENDING TIPS
- CARING FOR YOUR BLENDER AFTER USE
- IMPORTANT: PRESS OFF "O" BUTTON, UNPLUG BEFORE CLEANING BASE and DO NOT IMMERSE THE BLENDER BASE IN WATER OR ANY OTHER LIQUIDS.
- EASY CLEAN
- STORING YOUR BLENDER
- EUROPE GUARANTEE
- IMPORTANTES MESURES DE SÉCURITÉ
- PRECAUCIONES IMPORTANTES
- PRECAUÇÕES IMPORTANTES
- INSTRUÇÕES PARA O USO
- MONTAGEM DO COPO
- Oster®
Brand : OSTER
Model : 6805
Category : Blender