CLVA50 - Dishwasher Casselin - Free user manual and instructions
Find the device manual for free CLVA50 Casselin in PDF.

| Product type | Professional dishwasher (glasswasher) |
| Brand | Casselin |
| Model | CLVA50 |
| Use | For washing plates, glasses, cups and cutlery in catering |
| Electrical connection | Fixed connection, cable cross-section min 2.5 mm², type H07RN-F, multipole magnetothermal differential switch |
| Water supply | Pressure min 150 kPa (1.5 bar), max 400 kPa (4 bar), flow rate min 15 L/min, water temperature between 55 and 60°C |
| Wash temperature | 55°C (wash tank) |
| Rinse temperature | 85°C (heating tank) |
| Hydraulic connection | Valve tap with non-return valve, flexible hose, gravity or pump drain |
| Capacity | 1 standard basket (plates, glasses, cutlery) |
| Functions | Washing, rinsing, regeneration (if equipped), drain pump (option), automatic cycle |
| Controls | Line button, cycle button, regeneration button, drain pump button, indicator lights |
| Material | Stainless steel (tank and surfaces) |
| Safety | Mandatory grounding, safety thermostats, automatic stop when door open |
| Routine maintenance | Clean tank filters and pump daily, periodic descaling |
| Periodic maintenance | Every 2-3 days: clean rotating arms, nozzles, tank |
| Regeneration | Use 250 g of coarse cooking salt, cycle of about 20 min |
| Rinse dispenser | Peristaltic or pressure, adjustable from 1 to 3 cc per cycle |
| Warranty | Warranty void in case of unauthorized intervention or non-original parts |
| General information | Manufactured by CASSELIN SAS, 185A rue Louise Labbé, 69970 Chaponnay, France |
Frequently Asked Questions - CLVA50 Casselin
User questions about CLVA50 Casselin
0 question about this device. Answer the ones you know or ask your own.
Ask a new question about this device
Download the instructions for your Dishwasher in PDF format for free! Find your manual CLVA50 - Casselin and take your electronic device back in hand. On this page are published all the documents necessary for the use of your device. CLVA50 by Casselin.
USER MANUAL CLVA50 Casselin
natural_image
Exterior view of a stainless steel laboratory oven with control panel and blue lid (no visible text or symbols)CLV35 - CLV35AD - CLV35PV
CLV40 - CLV40PV- CLV40PVAD
CLVA50-CLVA50PV-CLVA50PVAD
CASSELIN SAS
natural_image
Exterior view of a stainless steel laboratory oven with control panel and blue lid (no visible text or symbols)CLV35 - CLV35AD - CLV35PV
CLV40 - CLV40PV- CLV40PVAD
CLVA50-CLVA50PV-CLVA50PVAD
cassLin
SOMMAIRE
A. Installation 14
1 Introduction 15
2 Installation 15
3 Plumbing and electric connexion 16
B. Using 17
- Introduction 18
2 Preparing the appliance 18
3 Checking and controls 18
4 Operating 20
5 Cleaning and care 21
A.INSTALLATION
text_image
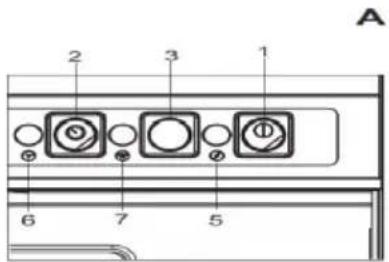
A 2 3 1 6 7 51 - Line activation button
2- Regenerating cycle starting button
3- Draining pump button
5- Connecting light control
6- Cycle light control
7- Heating element control light
cassLin
text_image
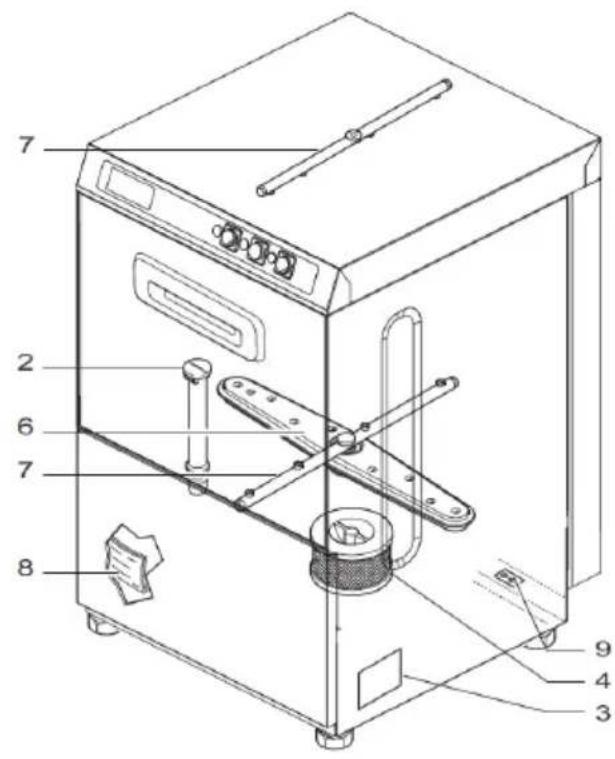
Technical diagram of a washing machine with numbered parts labeled for identification.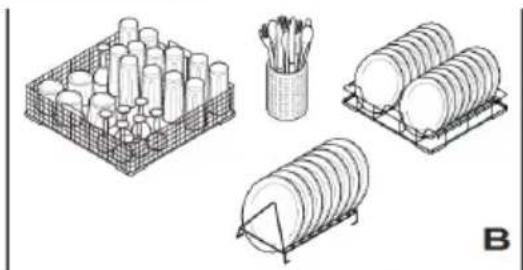
natural_image
Illustration of four different storage or packaging items: a grid rack, a cup holder, a cylindrical container, and a triangular stand (no text or symbols)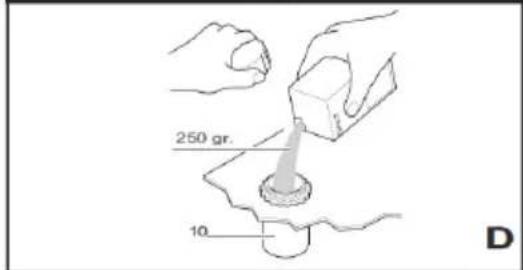
text_image
250 gr. 10 D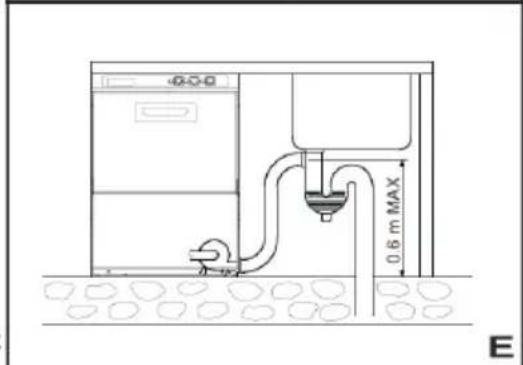
text_image
0.6 m MAX E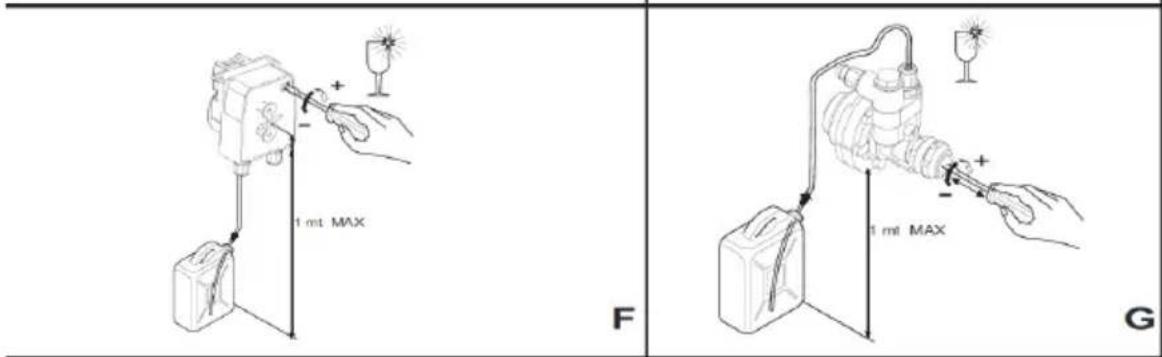
text_image
1 mt MAX F 1 mt MAX G1. Introduction
The dishwasher has been conceived in conformity with the following norms:
Low voltage directive 73/23/CEE
EN 60335-1 Electric Appliances Security
EN 60335-52 Particular norms regarding dishwasher for catering
Please take note of this user's manual before installing and using your appliance.
Keep this operating manual for reference with your appliance: it has been drawn up for your
cassLin
own and other people's safety and to ensure a perfect use of the appliance.
If the appliance is sold or transferred to someone else, ensure that the manual is with it.
Read this operating manual completely before installing and working with the appliance.
We do no accept any responsibility for damages due to non observance of these operating instructions.
Safety instructions are dedicated to avoid mistakes, and provide important information for insuring safe installation, use and maintenance of the appliance. Consequently the appliance must be used for the purpose for which it was expressly designed. Any other use is considered to be improper and consequently dangerous. The appliance is conceived according to the current technical rules. It must be used in close buildings, only by one responsible person.
Non-compliance with using instructions can lead to serious injuries or damage to the appliance. We take no responsibility for damages due to violations of the operating instructions. Any intervention work on your appliance must be performed by qualified professionals.
This appliance has been conceived for fixed connexion.
Never let packaging such as plastic bag, polystyrene, nails... accessible to children.
2. Installation
Immediately contact your dealer if you have found damage resulting from transport. In case of packaging damaged you can refuse the parcel or accept it but with the mention of the damage on the delivery document.
Unpack the appliance with all its accessories. Check the contents for completeness and possible damages.
The damages will be considered receivable if a detailed claim is send to the dealer within the intended deadlines
Screw adjustable feet under the base in the threaded parts reserved for this purpose. Put the machine in place, ensuring that it is level ed by rotating adjustable feet. The appliance can be installed under the counter, in this case the side and rear walls may join the wall or adjacent appliance but it must be left a distance of 2 cm at least in the upper part.
To avoid possible damage to the normal ex-haust steam, ensure that the adjacent material to the machine does not deteriorate on its contact.
Before connecting the machine to the water and power supply check the conformity with the information written on the data plate (C-3) carefully take into account during the various stages of the installation. Parts supplied by the manufacturer were only able to ensure full compliance of our machines with data schemas, any repairs must be made with original parts . Repairs carried out by non -qualified technician and with non -original spare parts wil I invalidate the warranty.
3. Plumbing and electric connexion
Water supply
Before connecting the appliance, make sure that there is a gate valve between the appliance and the water mains in order to be able to shut off the water supply when necessary or in case of repair. Your appliance is fitted with a non -return valve placed on the water supply line, in conformity to the EN50084 normative.
Version 270114
cassLin
Minimum water supply pressure, measured at the machine water intake during final rinsing (flow pressure) must not be less than 150kPa (1.5bar) or more than 400Kpa (4bar) even when other taps are opened on the same line. To prevent pressure or load drops, we recommend that each appliance should have its own supply pipeline, that is sufficiently short and of adequate size. It the static pressure is higher than 4bar then a pressure reducer must be installed upstream from the supply pipeline. The supply pipeline to the machine must not have a flow rate that is less than 15l/min. make sure that the supply water temperature is equal to the values given in technical sheet.
To obtain good washing results, we recommend that the hardness of the supplied water being within 7 and 12°F. If it is higher than 12°F and the appliance has no built-in water softener, we recommend installing a water softener upstream from the fill-up solenoid valve, rated for 5- °F residual hardness.
Good results depend on compliance with these values. Use a flexible hose to connect the fill-up solenoid valve to the supply water tap. The inlet hose must be in conformity with all current National or Regional regulations.
Draining
The drain pipe must be connected to a sump or a siphon. Make sure that the drain pipelines in the wash area are not blocked and that they afford a quick water outflow. The wall drain pipe must withstand a minimum temperature or 70^ C. This appliance has a gravity drain therefore the outlet of dishwasher should be lower than the tank inlet. If the machine is equipped with a pump, the position of the connection can be on the wall, but in any case it cannot be placed higher than the height shown in Fig. E.
Electrical connections
AN EFFICIENT EARTHING SYSTEM IN ACCORDANCE WITH NORMATIVES IN FORCE GARANTIES THE SAFETY OF THE APPLIANCE AND ITS O PERATOR. This is an essential requirement that must be checked and if any doubt have the entire electric system checked by the professionally qualified technician. WE CANNOT BE RESPONSIBLE FOR ANY DAMAGE DUE TO BAD EARTHING CONNEXION. It is forbidden to use plug adapters, multi-plugs and extensions cords. Check that the electric power supplied is in accordance with the technical specifications (C3). The appliance must be connected to an equipotential system, in accordance with local regulations. Connect using the clamp with the mark located on the back base of the appliance (C9) and using a terminal conform to a 10mm 2 sections as mentioned in norm CEI64.8. Connection to electric mains must be done using a multipolar magneto thermic differential switch rated with a contact gap equal to or greater than 3mm.
When selecting the type and size of the power cable, bear in mind the distance between the appliance and the power point, the installed power indicated on the ratings label (C3) and the mains voltage. The cross section of the cables must not be less than 2,5mm ^2 . Avoid any strain on the power cable.
Use a H07RN-Fcable if the power cable needs to be replaced connecting it to the terminal box placed on the back of the appliance. The installation must be in conformity to CEI 67.8 (IEC364) Normative. Check high limit thermostat of heater F-B3 (if provided) by pressing the
cassLin
manual reset button. The appliance is set with a heating temperature of 85^ C. You can change it by turning the screw of thermostat. The installation must be conformed to the normative CEI64.8 (IEC 364).
Safety instructions
The skilled personnel performing the installation and the electric connections are requested to instruct the user about the functions of the appliance and the safety indications to respect.
A practical demonstration of how to use the appliance must be performed to the final user and the written instructions for use must be given to the user.
The appliance is delivered with written instructions that must be kept with the appliance. (Installation drawing with the relevant dimensions and electrical connections, technical sheet, wiring diagram, sheet with noise level)
B.USING
1. Introduction
Please take note of this user's manual before installing and using your appliance.
Keep this operating manual for reference with your appliance: it has been drawn up for your own and other people's safety and to ensure a perfect use of the appliance.
If the appliance is sold or transferred to someone else, ensure that the manual is with it.
Read this operating manual completely before installing and working with the appliance.
We do not accept any responsibility for damages due to non-observance of these operating instructions.
Safety instructions are dedicated to avoid mistakes, and provide important information for insuring safe installation, use and maintenance of the appliance. Consequently the appliance must be used for the purpose for which it was expressly designed. Any other use is considered to be improper and consequently dangerous. The appliance is conceived according to the current technical rules. It must be used in close buildings, only by one responsible person.
Non-compliance with using instructions can lead to serious injuries or damage to the appliance. We take no responsibility for damages due to violations of the operating instructions. Any intervention work on your appliance must be performed by qualified professionals.
This appliance has been conceived for fixed connexion.
Never let packaging such as plastic bag, polystyrene, nails...accessible to children.
IMPORTANT
This appliance is not intended to be used by persons (including children) with impaired physical, sensorial or mental abilities and/or insufficient experience or knowledge, unless they are supervised by a person responsible for their safety or have been instructed in the proper use of the appliance by this person.
Forbidden to children
Children should be supervised in order to make sure that they don't play with the appliance.
Keep the appliance out of reach of people of these groups.
The appliance must be used only inside closed building
cassLin
Following the technical sheet install adapted electrical, water and drain lines in the area where the appliance will be placed.
A few basic rules must be observed when using the appliance:
- Never remove it from its original installation site.
- Make sure the water supply gate valve is opened before starting the appliance.
- Never wash the appliance with direct or high pressure water jets.
- Never use corrosive products, acids, steel wool or steel brushes.
- At the end of the daily work session, disconnect the main power turning off the appliance using the main switch upstream from it.
- Never let your appliance in an environment with temperature under 0°C.
The manufacturer waives all liability for any injury to persons or damage to property due to:
• Disregard of these instructions:
- Maintenance, regulations or repairs not performed by professionally qualified persons.
• Any modifications, fitted devices or dispensers which could alter the original operation of the appliance.
- Once the appliance is off and disconnected from the main supply only a qualified technician can dismantle the panels.
2. Preparing the appliance
Open the water tap and turn on the main switch ups stream from the machine. Close the door and press the line button (A1): the LED (A5) lights. The machine automatically fills with water and when the level in the tank is reached, the boiler heating element engages. When the water reaches the good temperature, the heating element will turn off and the heating element of the tank will go on. Activation of resistance is indicated by the light (A7). A few minutes later, the machine is ready for use. After a few minutes the appliance will be ready for use. The LE D (A7) will switch off and you can press the start button (A2). The cycle light (A6) will switch on.
3. Checking and control
Operating temperatures
The water supply temperature should be between 55^ C and 60^ C. The temperature of the water in the wash tank is regulated by a thermostat settled at about 55^ C. This temperature ensures the proper action of the chemicals content in industrial detergents. The boiler temperature, set by a thermostat, is at about 85^ C. The appliance is fitted with a device that ensures the correct rinsing temperature. If the temperature of the water supply is below that indicated in the technical data, the appliance will pause during short washing cycles until the good rinsing temperature is reached.
Rinse aid dispenser
During the washing, the rinse aid dispenser is enabled to inject the rinse aid in the boiler. The rinse aid dispenser and its feed tube must be filled before using the appliance. To do this, make sure that the rinse aid tank is full. To fill the plastic rinse aid feed tube only: make the machine perform an empty washing cycle. Push on/off cycle button (A1) with short sequences
cassLin
spaced out of 10sec during the washing cycle until the tube is full. technician to calibrate.
Contact an qualified
Bluish marks on the dishes and foam in the wash tank are due to excessive quantity of rinsing agent. If the dishes are covered with droplets of water and dry rather slowly, the amount of rinsing agent is insufficient. In this case soak the dishes for some minutes before placing them in the machine.
Hydraulic rinse-aid dispenser
The hydraulic rinse -aid dispenser is activated during each rinsing phase to inject a certain quantity of rinse -aid into the boiler (1c to 3cc) which is equivalent to a length of about 8ccm to 24cm in the feed tube. The quantity of liquid may be regulated by turning the regulation screw on the front as shown on (F). If the screw is completely turned in the quantity corresponds to 1cc. When installed for the first time the dispenser must be prepared by filling the feed tube by continuously pressing the regulation screw.
IMPORTANT: the minimum working pressure, measured at the connection of the water mains of the appliance during final rinsing (flow pressure) must never be under 1.8Bar even when other machines or taps are opened on the same water supply line.
Rinsing agent dispenser (if fitted)
During the rinsing stage, the rinsing agent dispenser will be activated to inject the rinsing agent into the boiler. Before starting the cycle, the dispenser and the associated supply tube must be filled. So make sure that the cup of the rinsing agent container is full of liquid.
Checks
Before starting to use the machine,
• Check the water level and its temperature.
- Check the rinsing agent level
• Check the temperature of the water supply
- Check the washing agents (supply tube filled, tank hoes not obstructed)
When filling the wash tank the first time, the water must stop entering when its level is 1cm from the top level of the overflow plug filter (C2).
Water must be dispended at high pressure, from all the sprayers. T he rotary wash (C6) and rinsing arms (C7) must be free to rotate due to pressure of water.
The washing and rinsing water temperatures must correspond to the temperatures indicated in paragraph 3 Operating temperatures.
With every wash cycle the dispensers must draw the proper amount of rinsing agent. Check the level of the liquid in the container and, if necessary, fill it up.
The pump filter must be clean. (C4)
When the wash cycle is finished, the perfect ly clean dishes must dry almost instantly by evaporation the moment the basket is removed from the appliance..
4. OPERATING
casselin
Instruction for use
Place the basket in the tank, close the door. The cycle length can be noticed on the data sheet. For the model without automatic detergent dosing device, pour the recommended dose of industrial no -foam detergent into the tank. If using powdered detergent we recommend pouring regularly into the tank not in the same place. The powder must be an industrial foam power. Press « Start » button (A -2). Wash cycle indicator light (A -6) comes on and the appliance performs a full wash cycle. When indicator light (A -6) goes off, the wash cycle is completed. Remove the basket from the appliance and expose it to the air to dry for a few seconds. When the machine is running, don't open the door. Always use protective gloves.
Place cups and glasses upside down in the baskets ( 5B). The appliance is equipped with different types of basket, specially designed for stocking that can stack. Place the dessert plates in the special basket with supports, making sure that the plate face upwards. Place cutlery and coffee spoons with their handles facing down. Never place silverware and stainless steel that can be corroded. To save on detergent and electricity only wash when the baskets are full, but do not overload them. Do not stack dishes . WE RECOMMEND PRE CLIEANING THE DISHES IN ORDER TO MINIMISE MAINTENACE. The quality of final wash results will be greatly improved by first removing food particles, lemon peels, toothpicks, olive pits ,etc... which could partially clog the tank filter and impair washing efficiency. We recommend washing the dishes before food particles dry on their surface. It is good practice, when dried food scraps are involved, to first soak the dishes in soapy water before introducing them into the machine.
Drain pump (optional)
Let the line button (A1) on position I. Take the overflow pipe (C2) off the drain hole. Leave the drain filter (C4) in position and the door opened. Push the drain pump button A3 and keep it pushed until the tank is completely empty. Release the drain pump button and switch the machine off pushing on the line button A1 on position O. Now it is possible to close the door. If the current is not switched off using the line button, when closing the door the tank will start filling again automatically.
Regeneration
Only for appliances equipped with this accessories.
Let the machine drain completely removing the overflow C2. Press the main button A1 on O position. Remove the wash pump filter and pour 250g of coarse kitchen salt in the salt container D10. Press start regeneration button A2 for a few seconds until cycle indicator light A6 remains lilt. After 20minutes indicator light A6 goes off indicating the regeneration cycle has been completed. It is recommended the regeneration been performed during the rest periods.
cassLin
5. CLEANING AND CARE
Routine maintenance
The appliance must be cleaned inside at least twice a day or whenever there are solid particles in the wash pump filter C4. Drain the water by un plugin the over flow C2. For appliance equipped with drain pump, remove the overflow, press A 3 until the tank is completely empty, push main button A1 on O position. When the machine is completely empty, remove filters and clean them. Clean the tank and remove any small residues and solid particles. Make sure that the rotary wash arms C6 are free to rotate. If the nozzle holes are clogged by solid particles, remove them care fully with a fine tipped tool. Leave the appliance door open for the entire period. To avoid oxidation or chemical attack hazards in general, the steel surfaces must be kept thoroughly cleaned.
NEVER USE THE APPLIANCE WITHOUT THE PUMP PROTECTION FILTER.
Periodic maintenance (every 2-3 days)
NOTICE: no direct washing via water jets. Neither jet under pressure
In order to avoid any possibility of water invasion that can invalidate the good running of the appliance and the security for use and the warranty it is recommended:
- Drain the water completely from the appliance as described below
- Turn the appliance off by pushing the button (A-1) (position "0").
- Turn off the electric power supply by disconnecting the main switch installed upstream from the appliance.
- Remove the pump filter and drain filter and clean them.
• Dismantle the upper and lower rinsing arms by removing them from the rotary pivots. - Check and clean them.
- Dismantle the upper and lower washing arms by removing them from the rotary pivots.
- Check and clean them.
• Thoroughly clean the tank. - Replace all the parts that were removed proceeding in the reverse order.
- Let the door opened when the appliance is not in use for a long period.
- Clean external surfaces with soap and water. Rinse and dry them with care.
•
NOTICE: Never clean it with steel shavings, wool or brushes.
Lime deposits and scale will build up on the inner surfaces of the boiler tank, the pipelines and tank due to calcium and magnesium salts present in the water. These scales and deposits can prejudice proper appliance operation. The appliance must be periodically descaled and we recommend that this operation been done by a qualified technician.
If the machine fails to operate correctly or breaks down, disconnect it from the electricity mains and call a qualified service center
cassLin
Machine Idle
Whenever the appliance will be inactive for a long period of time, we recommend:
• Fill the machine with water (no detergent)
• Make a few wash cycles without any dishes
- Drain the machine
Repeat these steps until the drained water is clean and free of any residues of dirt or detergent. Grease steel surfaces with Vaseline oil if the machine will be inactive for long periods. Have an expert drain all the water out from the boiler and the internal circuits to avoid the danger of ice formation.
Sterilisation
At least once a week, sterilize the machine by using specific disinfectants, finishing with repeated rinsing for several minutes (fill the tank without the over-flow)
NOTICE: once the appliance unplug ged only a performing technician can dismantle the panels.
Waste Electronic and Electric Equipment
To avoid any abuse and dangers and to fit the rules of the concerned countries before disposing of the used appliance you must remove main electric cable.