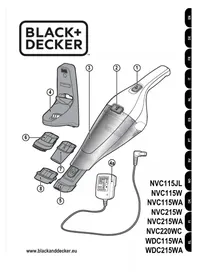
AV1250LA - Hand vacuum cleaner BLACK & DECKER - Free user manual and instructions
Find the device manual for free AV1250LA BLACK & DECKER in PDF.

User questions about AV1250LA BLACK & DECKER
0 question about this device. Answer the ones you know or ask your own.
Ask a new question about this device
Download the instructions for your Hand vacuum cleaner in PDF format for free! Find your manual AV1250LA - BLACK & DECKER and take your electronic device back in hand. On this page are published all the documents necessary for the use of your device. AV1250LA by BLACK & DECKER.
USER MANUAL AV1250LA BLACK & DECKER
natural_image
Technical line drawing of a mechanical assembly with no visible text or symbolsCATALOG NUMBER
PAD1200
Thank you for choosing Black & Decker! To register your new product, go to www.BlackandDecker.com/NewOwner
PLEASE READ BEFORE RETURNING THIS PRODUCT FOR ANY REASON.
If you have a question or experience a problem with your Black & Decker purchase, go to http://www.blackanddecker.com/instantanswers
If you can't find the answer or do not have access to the Internet,
call 1-800-544-6986 from 8 a.m. to 5 p.m. EST Mon. - Fri. to speak with an agent.
Please have the catalog number available when you call.
SAVE THIS MANUAL FOR FUTURE REFERENCE.
VEA EL ESPANOL EN LA CONTRAPORTADA.
It is important for you to read and understand this manual.
The information it contains relates to protecting YOUR SAFETY and PREVENTING PROBLEMS. The symbols below are used to help you recognize this information.
⚠️ DANGER: Indicates an imminently hazardous situation which, if not avoided, will result in death or serious injury.
⚠ WARNING: Indicates a potentially hazardous situation which, if not avoided, could result in death or serious injury.
⚠️ CAUTION: Indicates a potentially hazardous situation which, if not avoided, may result in minor or moderate injury.
NOTICE: Used without the safety alert symbol indicates potentially hazardous situation which, if not avoided, may result in property damage.
IMPORTANT SAFETY INSTRUCTIONS
When using an electrical appliances, basic precautions should always be followed, including the following:
READ ALL INSTRUCTIONS BEFORE USING THE APPLIANCE.
⚠ WARNING: Read all safety warnings and all instructions. Failure to follow the warnings and instructions listed below may result in electric shock, fire and/or serious injury.
⚠ WARNING: Some household dust contains chemicals known to the State of California to cause cancer, birth defects or other reproductive harm such as asbestos and lead in lead based paint.
⚠ WARNING: To reduce the risk of fire, electrical shock or injury:
- The intended use is described in this manual. The use of any accessory or attachment or the performance of any operation with this appliance other than those recommended in this instruction manual may present a risk of personal injury.
- Do not allow to be used as a toy. Close supervision is necessary when any appliance is used by or near children.
- Keep children and animals at a safe distance when using this appliance.
- Never pull the power lead to disconnect the plug from the cigarette lighter socket. Keep the lead away from heat, oil and sharp edges.
- Be careful not to pinch the lead in the vehicle's doors, windows or levers.
- Do not use automotive vac to pick up liquids, toxic substances, flammable or combustible liquids such as gasoline or use in areas where they may be present.
- Do not operate in the presence of explosives and/or flammable fumes or liquids.
- Do not operate any appliance with a damaged cord or after the appliance malfunctions, is left outdoors, dropped into water or is damaged in any manner. Return the appliance to any authorized service facility.
- Keep hair, loose clothing, and all parts of body away from openings and moving parts.
- Do not insert accessories when unit is running.
- Do not put any object into unit openings. Do not use with any openings blocked; keep free of dust, lint, hair, and anything that may reduce air flow.
- Do not operate the unit without a filter in place. Replace a damaged filter promptly.
- Do not vacuum burning or smoking materials, such as lit cigarette butts, matches or hot ashes.
- Do not use on or near hot surfaces.
- Do not use without dust bag and/or filters in place.
- When not in use, the appliance should be stored in a dry place. Children should not have access to stored appliances.
- Before use, check the appliance for damaged or defective parts. Check for breakage of parts, damage to switches and any other conditions that may affect its operation.
- Have any damaged or defective parts repaired or replaced by an authorized repair agent.
- Regularly check the power lead for damage. Replace the lead if it is damaged or defective.
- Never attempt to remove or replace any parts other than those specified in this manual.
- The appliance is designed for use with 12V negative ground vehicle battery systems.

WARNING:
△WARNING:: Do not operate the appliance with systems which have positive ground or a different voltage.
- The cigarette lighter socket may not be live when the ignition is off and/or the key is removed. If in doubt, consult your vehicle's owner's manual for information regarding the above.
- Use only as described in this manual. Use only manufacturer's recommended attachments.
- Do not use the appliance near water. Do not immerse the appliance in water.

WARNING:
Risk of Fire. Do not replace any vehicle fuse with a rating higher than recommended by the vehicle manufacturer. This product is rated to draw 10 amperes from a 12V vehicle outlet. Ensure that the electrical system in your vehicle can supply this product without causing the vehicle fusing to open. This can be determined by making sure the fuse in the vehicle which protects the outlet is rated higher than 10 amperes. Information on the vehicle fuse ratings are typically found in the vehicle operator's manual. If a vehicle fuse opens repeatedly, do not keep on replacing it. The cause of the overload must be found. On no account should fuses be patched up with tin foil or wire as this may cause serious damage elsewhere in the electrical circuit or cause fire.

WARNING:
Do not look into the air vents when the unit is switched on, as sometimes there is a possibility of small debris being discharged from the air vents, especially after cleaning / replacement of the filters as debris inside the unit can be disturbed.
Symbols
- The label on your tool may include the following symbols. The symbols and their definitions are as follows:
V....volts
Hz......hertz
min......minutes
or DC ..direct current
Class I Construction (grounded)
☐ ......Class II Construction (double insulated)
A.....amperes
W.....watts
\~ or AC......alternating current
n_0 ......no load speed
earthing terminal
⚠️ ......safety alert symbol
.../min or rpm...revolutions or reciprocation per minute
SAVE THESE INSTRUCTIONS
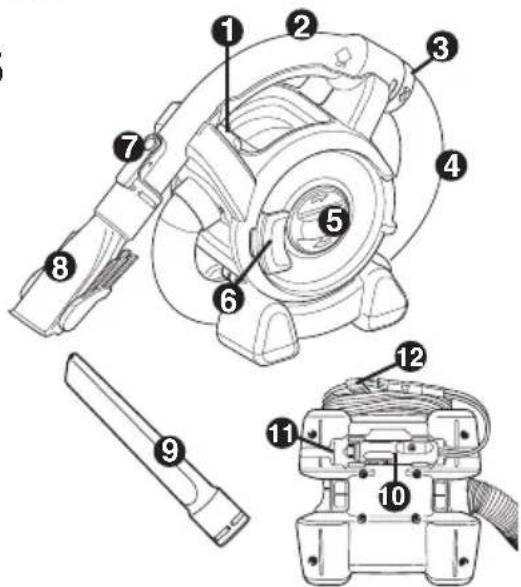
PRODUCT FEATURES
-
On/off power switch
-
Removable handle
-
Locking ring
-
Hose
-
Dust container door
-
Door latch
-
Accessory clip
-
2-in-1 nozzle accessory
-
Crevice tool
-
Vehicle adaptor
- Storage recess
- Cord clip
ASSEMBLY
MOUNTING ACCESSORIES (FIGURES A - C)
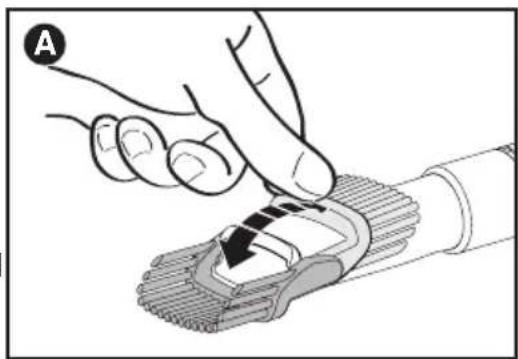
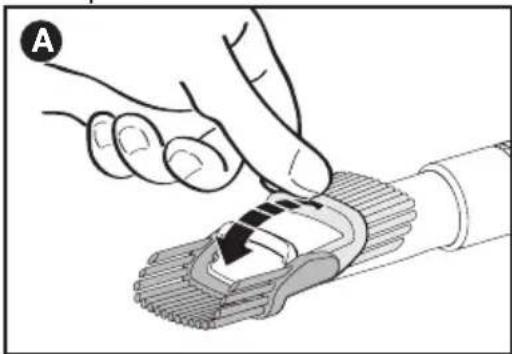
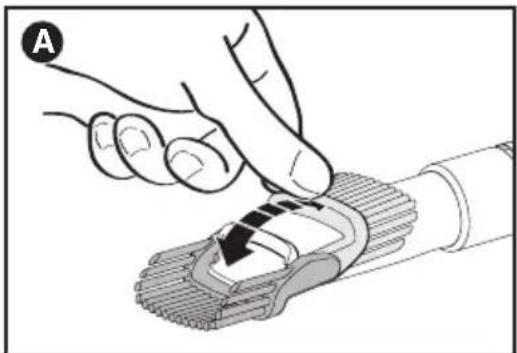
The 2-in-1 nozzle (8) has a brush that can be folded forward for dusting and upholstery cleaning (figure A). The crevice tool (9) allows for vacuuming in narrow and hard-to-reach places.
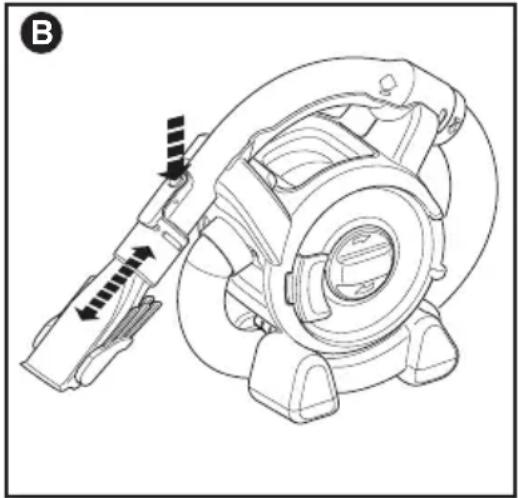
• To attach an accessory, press the accessory clip (7) and slide the accessory onto the handle (2).
• To remove an accessory, press the accessory clip and remove the accessory as shown in figure B.
natural_image
Illustration of a hand pressing down on a mechanical component (no text or symbols visible)To unwrap and extend the handle and hose:
The handle and hose can be unwrapped from the main appliance for extended reach when cleaning. Grab the handle and lift upwards. Unwrap the handle and hose from the main appliance. The hose can extend up to approximately 4 feet (1.21m). To place the handle and hose back onto the main appliance, wrap the hose back underneath and around the vac making sure that the hose fits between the two “feet” of the appliance. Align the handle with its cradle and click back into place. The handle (2) can be removed from the hose allowing the accessories to be connected directly to the hose cuff (13) when desired.
To remove the handle:
- Unclip the handle (2) from the appliance.
- Rotate the locking ring (3) counterclockwise to release the clips.
- Pull the hose away from the handle.
• Fit the accessory directly to the hose cuff (13). - Remove the accessory from the hose.
- Push the hose into the handle (2). Rotate locking ring (3) clockwise until it clicks into place.
To refit the handle:
OPERATION
CONNECTING TO THE VEHICLE'S POWER SUPPLY
- Make sure that the appliance is switched off.
- Remove the vehicle's socket plug from the socket.
- Plug the vehicle adaptor (10) into the socket.
natural_image
Technical line drawing of a mechanical assembly with directional arrows indicating motion or force (no text or symbols)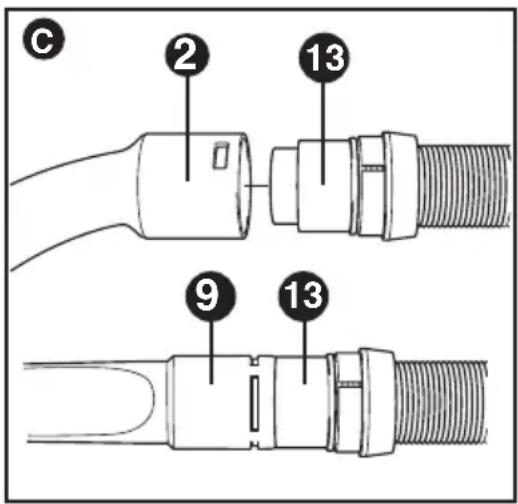
SWITCHING ON AND OFF
- To switch on, slide the on/off switch (1) to the right.
- To switch off, slide the on/off switch left.
NOTE: The appliance can be used for periods of up to 30 minutes without noticeably affecting the power of a normally charged car battery in good condition.
CAUTION:
Extended use will drain the battery power.
- Do not run the vehicle's engine while cleaning. This can shorten the life of the appliance.
- This appliance is intended for household use only and not for commercial or industrial use.
VACUUMING
- When operating the appliance, make sure that the hose is not trapped, twisted, or blocked.
- The handle (2) can be easily removed from the appliance allowing for further reach.
- With the handle (2) removed, the appliance can be carried using the built-in handle.
- The handle (2) can also be removed from the hose (4) so you can connect an accessory directly to the hose cuff (13) when required.
MAXIMIZING THE SUCTION FORCE
In order to keep the suction force maximized, the filters must be cleared regularly during use.
- Rotate the filter cleaning wheel (5) a few turns to shake out dust clogging the filters.
TROUBLESHOOTING
If the product does not work, follow the instructions below. If this does not solve the problem, please contact your local Black & Decker repair facility.
- Make sure the vehicle adaptor (10) is plugged into the socket correctly.
- Make sure your vehicle battery system is of the 12 V negative ground type.
CLEANING AND MAINTENANCE
WARNING: Do not, under any circumstances, immerse the appliance in water. A damp cloth and soapy water should be used to clean the exterior of the appliance. Always make sure the appliance is completely dry before reuse or storage.
EMPTYING THE DUST CONTAINER
The dust container must be emptied regularly, preferably after every use.
- Pull the door latch (6) and open the dust container door (5).
- Tilt appliance to empty dirt.
- Tap the back end of appliance if debris does not fall out easily or remove filters for better access.
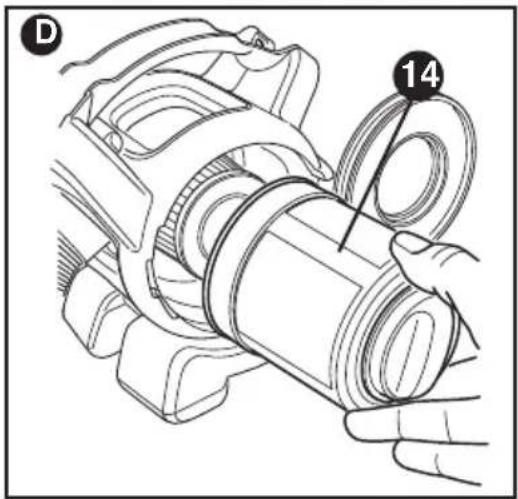
CLEANING PRE-FILTER
Both the plastic pre-filter (14) and the pleated filter (15) are re-usable and should be cleaned regularly. The dust container must be emptied regularly, preferably after every use.
- Release the door latch (6) and open the door (5) 180^ until it clicks in the open position.
• Empty the dust container. - Remove the pre-filter (14).
- Clean the pre-filter by lightly shaking over a dustbin.
- Refit the pre-filter.
- Close the door and make sure that it clicks into place.
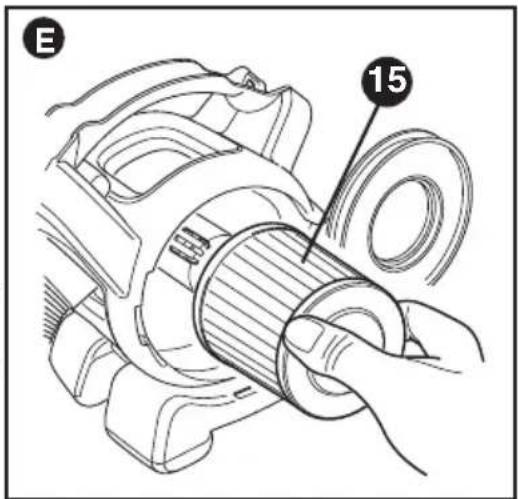
CLEANING PLEATED FILTER
The pleated filter (15) prevents particles and larger objects from entering the motor housing. The filter is re-usable and should be cleaned regularly.
- Remove the pre-filter (14) from the appliance as described above.
- Remove the fine pleated filter (15) by pulling firmly.
- Tap the filter vigorously to remove loose dust from the filter.
• If necessary, wash the filter in warm, soapy water.
• Make sure the filters are dry before replacing.
• Refit the pleated filter into the appliance. - Refit the pre-filter.
MAINTENANCE
Use only mild soap and damp cloth to clean the vac. Never let any liquid get inside the vac; never immerse the battery/motor housing in liquid.
WARNING: Make sure the vacuum is completely dry before using it.
IMPORTANT: To assure product SAFETY and RELIABILITY, repairs, maintenance and adjustment (other than those listed in this manual) should be performed by authorized service centers or other qualified service organizations, always using identical replacement parts.
SERVICE INFORMATION
All Black & Decker Service Centers are staffed with trained personnel to provide customers with efficient and reliable power tool service. Whether you need technical advice, repair, or genuine factory replacement parts, contact the Black & Decker location nearest you. To find your local service location, call: 1-800-544-6986 or visit www.blackanddecker.com
TWO-YEAR LIMITED HOME USE WARRANTY
Black & Decker (U.S.) Inc. warrants this product for two years against any defects in material or workmanship. The defective product will be replaced or repaired at no charge in either of two ways.
The first, which will result in exchanges only, is to return the product to the retailer from whom it was purchased (provided that the store is a participating retailer). Returns should be made within the time period of the retailer's policy for exchanges (usually 30 to 90 days after the sale). Proof of purchase may be required. Please check with the retailer for their specific return policy regarding returns that are beyond the time set for exchanges.
The second option is to take or send the product (prepaid) to a Black & Decker owned or authorized Service Center for repair or replacement at our option. Proof of purchase may be required.
This warranty does not apply to accessories. This warranty gives you specific legal rights and you may have other rights which vary from state to state or province to province.
Should you have any questions, contact the manager of your nearest Black & Decker Service Center. This product is not intended for commercial use.
FREE WARNING LABEL REPLACEMENT: If your warning labels become illegible or are missing, call 1-800-544-6986 for a free replacement.
LATIN AMERICA: This warranty does not apply to products sold in Latin America. For products sold in Latin America, check country specific warranty information contained in the packaging, call the local company or see the website for warranty information.
Imported by
Black & Decker (U.S.) Inc.,
701 E. Joppa Rd.
Towson, MD 21286 U.S.A.

BlackandDecker.com
1-800-544-6986
natural_image
Technical line drawing of a mechanical assembly with no visible text or symbolsNUMERO DE CATALOGUE PAD1200
CARACTÉRISTIQUES DU PRODUIT
natural_image
Illustration of a hand pressing down on a mechanical component (no text or symbols visible)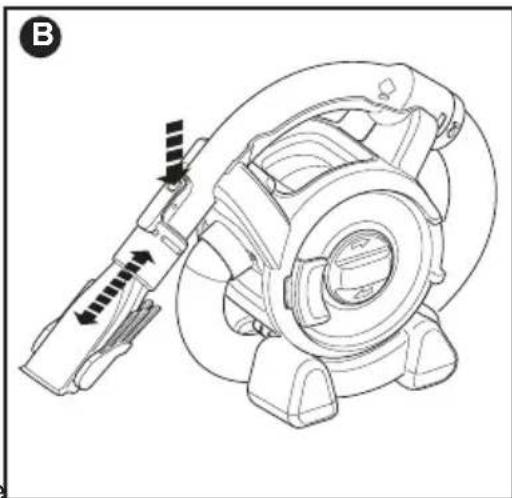
natural_image
Technical line drawing of a mechanical component with directional arrows indicating motion or force (no text or symbols)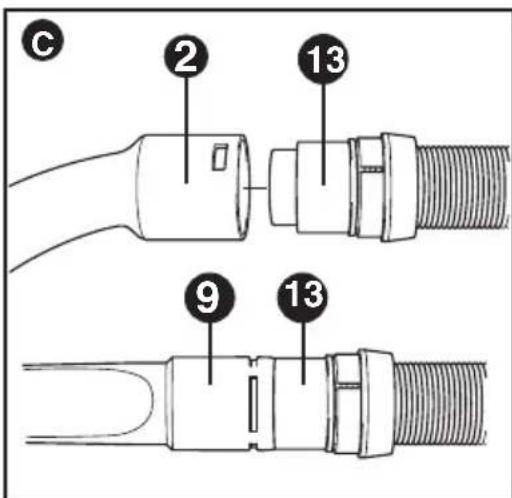
natural_image
Technical line drawing of a mechanical assembly with no visible text or symbolsCATÁLOGO N°
PAD1200
natural_image
Illustration of a hand pressing down on a mechanical component with a black arrow indicating force (no text or symbols present)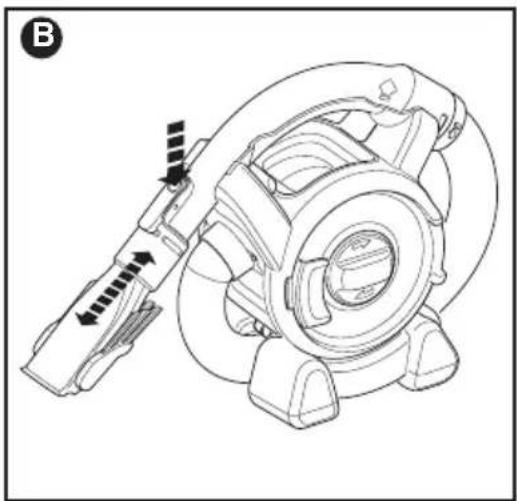
natural_image
Technical line drawing of a mechanical component with directional arrows indicating motion or force (no text or symbols)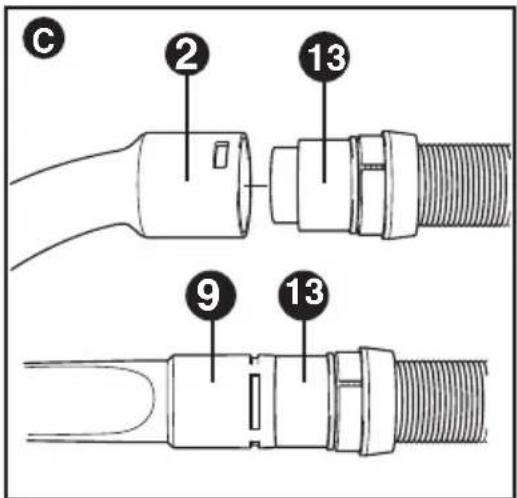
ENCENDIDO Y APAGADO
Date of purchase · Fecha de compra Invoice No. · No. de factura
Col. Fracc. Universidad
Chihuahua, Chihuahua
Tel. 01 614 413 64 04
Fernando González Armenta
Bolivia No. 605
Col. Felipe Carrillo Puerto
Cd. Madero, Tamaulipas
Tel. 01 833 221 34 50
March 2014 Form No. 90609591
Copyright© 2014 Black & Decker Printed in China