
BD200MT - Multitools BLACK & DECKER - Free user manual and instructions
Find the device manual for free BD200MT BLACK & DECKER in PDF.

| Product Type | Oscillating Multi-Tool |
| Brand | Black & Decker |
| Model | BD200MT |
| Power Supply | 120 V, 60 Hz, AC |
| Power | Not specified (about 2 A according to extension cord chart) |
| Variable Speed | 10,000 to 20,000 oscillations per minute (6 positions) |
| Accessory Change Mechanism | Tool-free (clamping lever) |
| Compatible Accessories | Black & Decker, Porter-Cable, Stanley FatMax accessories; universal adapter kit included |
| Main Functions | Detail sanding, flush cutting, removal work (carpet, adhesives), surface preparation |
| Workable Materials | Wood, PVC, plastic, metal, drywall, grout, mortar |
| Safety | Wear safety glasses, hearing protection, dust mask; keep away from children |
| Maintenance | Clean debris from the shaft and accessory holder; replace worn accessories; do not sand wet |
| Warranty | 2 years for household use (replacement or repair) |
| Repairability | Black & Decker authorized service centers; spare parts available |
| Included Sanding Accessories | BDA1209 sanding base, abrasive papers grits 60, 120, 240 |
| Included Cutting Accessories | BDA1212 precision blade, BDA1214 wood plunge blade, BDA1215 wood-metal blade |
| Scraping Accessories | BDA1216 rigid scraper blade, BDA1220 flexible blade |
| Weight | Not specified (approximately 1.2 kg estimated) |
| Dimensions | Not specified (approximately 30 x 10 x 10 cm) |
Frequently Asked Questions - BD200MT BLACK & DECKER
User questions about BD200MT BLACK & DECKER
0 question about this device. Answer the ones you know or ask your own.
Ask a new question about this device
Download the instructions for your Multitools in PDF format for free! Find your manual BD200MT - BLACK & DECKER and take your electronic device back in hand. On this page are published all the documents necessary for the use of your device. BD200MT by BLACK & DECKER.
USER MANUAL BD200MT BLACK & DECKER
If you have a question or experience a problem with your BLACK+DECKER purchase, go to http://www.blackanddecker.com/instantanswers If you can't find the answer or do not have access to the Internet, call 1-800-544-6986 from 8 a.m. to 5 p.m. EST Mon. - Fri. to speak with an agent. Please have the catalog number available when you call. SAVE THIS MANUAL FOR FUTURE REFERENCE.
VEA EL ESPANOL EN LA CONTRAPORTADA. INSTRUCTIVO DE OPERATION, CENTROS DE SERVICIO Y POLIZA DE GARANTIA. ADVERTENCIA: LÉASE ESTE INSTRUCTIVO ANTES DE USAR EL PRODUCTO.
SAFETY GUIDELINES - DEFINITIONS
It is important for you to read and understand this manual. The information it contains relates to protecting YOUR SAFETY and PREVENTING PROBLEMS. The symbols below are used to help you recognize this information.

DANGER: Indicates an imminently hazardous situation which, if not avoided, will result in death or serious injury.

WARNING: Indicates a potentially hazardous situation which, if not avoided, could result in death or serious injury.

CAUTION: Indicates a potentially haz ard ous situation which, if not avoided, may result in minor or mod er ate injury.
NOTICE: Used without the safety alert symbol indicates potentially hazardous situation which, if not avoided, may result in property damage.
General Power Tool SafetyWarnings
WARNING: Read all safety warnings and all instructions. Failure to follow the warnings and instructions may result in electric shock, fire and/or serious injury. SAVE ALL WARNINGS AND INSTRUCTIONS FOR FUTURE REFERENCE
The term "power tool" in the warnings refers to your mains-operated (corded) power tool or battery-operated (cordless) power tool.
1) WORK AREA SAFETY
a) Keep work area clean and well lit. Cluttered or dark areas invite accidents.
b) Do not operate power tools in explosive atmospheres, such as in the presence of flammable liquids, gases or dust. Power tools create sparks which may ignite the dust or fumes.
c) Keep children and bystanders away while operating a power tool. Distractions can cause you to lose control.
2) ELECTRICAL SAFETY
a) Power tool plugs must match the outlet. Never modify the plug in any way. Do not use any adapter plugs with earthed (grounded) power tools. Unmodified plugs and matching outlets will reduce risk of electric shock.
b) Avoid body contact with earthed or grounded surfaces such as pipes, radiators, ranges and refrigerators. There is an increased risk of electric shock if your body is earthed or grounded.
c) Do not expose power tools to rain or wet conditions. Water entering a power tool will increase the risk of electric shock.
d) Do not abuse the cord. Never use the cord for carrying, pulling or unplugging the power tool. Keep cord away from heat, oil, sharp edges or moving parts. Damaged or entangled cords increase the risk of electric shock.
e) When operating a power tool outdoors, use an extension cord suitable for outdoor use. Use of a cord suitable for outdoor use reduces the risk of electric shock.
f) If operating a power tool in a damp location is unavoidable, use a ground fault circuit interrupter (GFCI) protected supply. Use of a GFCI reduces the risk of electric shock.
3) PERSONAL SAFETY
a) Stay alert, watch what you are doing and use common sense when operating a power tool. Do not use a power tool while you are tired or under the influence of drugs, alcohol or medication. A moment of inattention while operating power tools may result in serious personal injury.
b) Use personal protective equipment. Always wear eye protection. Protective equipment such as dust mask, nonskid safety shoes, hard hat, or hearing protection used for appropriate conditions will reduce personal injuries.
c) Prevent unintentional starting. Ensure the switch is in the off position before connecting to power source and/ or battery pack, picking up or carrying the tool. Carrying power tools with your finger on the switch or energizing power tools that have the switch on invites accidents.
d) Remove any adjusting key or wrench before turning the power tool on. A wrench or a key left attached to a rotating part of the power tool may result in personal injury.
e) Do not overreach. Keep proper footing and balance at all times. This enables better control of the power tool in unexpected situations.
f) Dress properly. Do not wear loose clothing or jewelry. Keep your hair, clothing and gloves away from moving parts. Loose clothes, jewelry or long hair can be caught in moving parts.
g) If devices are provided for the connection of dust extraction and collection facilities, ensure these are connected and properly used. Use of dust collection can reduce dust-related hazards.
4) POWER TOOL USE AND CARE
a) Do not force the power tool. Use the correct power tool for your application. The correct power tool will do the job better and safer at the rate for which it was designed.
b) Do not use the power tool if the switch does not turn it on and off. Any power tool that cannot be controlled with the switch is dangerous and must be repaired.
c) Disconnect the plug from the power source and/or the battery pack from the power tool before making any adjustments, changing accessories, or storing power tools. Such preventive safety measures reduce the risk of starting the power tool accidentally.
d) Store idle power tools out of the reach of children and do not allow persons unfamiliar with the power tool or these instructions to operate the power tool. Power tools are dangerous in the hands of untrained users.
e) Maintain power tools. Check for misalignment or binding of moving parts, breakage of parts and any other condition that may affect the power tool's operation. If damaged, have the power tool repaired before use. Many accidents are caused by poorly maintained power tools.
f) Keep cutting tools sharp and clean. Properly maintained cutting tools with sharp cutting edges are less likely to bind and are easier to control.
g) Use the power tool, accessories and tool bits, etc. in accordance with these instructions, taking into account the working conditions and the work to be performed. Use of the power tool for operations different from those intended could result in a hazardous situation.
5) SERVICE
a) Have your power tool serviced by a qualified repair person using only identical replacement parts. This will ensure that the safety of the power tool is maintained.
Specific Safety Rules
- Hold power tool by insulated gripping surfaces, when performing an operation where the cutting accessory may contact hidden wiring or its own cord. Cutting accessory contacting a "live" wire may make exposed metal parts of the power tool "live" and could give the operator an electric shock.
- Use clamps or another practical way to secure and support the workpiece to a stable platform. Holding the work by hand or against your body leaves it unstable and may lead to loss of control.
- Disconnect power before using tool near live wires or where there may be hidden wiring. Cutting accessory contacting a "live" wire may make exposed metal parts of the power tool "live" and could give the operator an electric shock. Always check for hidden wiring, gas lines, or other utilities before performing any material cutting or removal operations with the tool.
- Wait for the cutter to stop before setting the tool down. An exposed cutter may engage the surface leading to possible loss of control and serious injury.
-
Do not operate this tool for long periods of time. Vibration caused by the operating action of this tool may cause permanent injury to fingers, hands, and arms. Use gloves to provide extra cushion, take frequent rest periods, and limit daily time of use.
-
Always hold the tool firmly with both hands for maximum control. Keep proper footing and balance at all times. This enables better control of the power tool in unexpected situations.
-
Do not restart the cutting operation in the workpiece. Let the tool reach full speed and carefully re-enter the cut.
-
Do not "jam" the cut-off saw blade or apply excessive pressure. Do not attempt to make an excessive depth of cut.
-
Keep your hands away from cutting area. Do not reach under the material being cut.
-
Do not use dull or damaged blades. Bent blade can break easily or cause kickback. Exercise extreme caution when handling the accessories. The accessories are very sharp. Wear protective gloves when changing cutting accessories. Accessories become hot after prolonged usage.
-
Before scraping, check workpiece for nails. If there are nails, either remove them or set them well below intended finished surface. Striking a nail with accessory edge could cause the tool to jump.
-
Do not wet sand with this tool. Liquids entering the motor housing are an electrical shock hazard.
-
Never work in area which is soaked with a liquid, such as a solvent or water, or dampened such as newly applied wallpaper. There is an electrical shock hazard when working in such conditions with a power tool and heating of the liquid caused by scraping action may cause harmful vapors to be emitted from workpiece.
-
Do not use sandpaper intended for larger sanding pads. Larger sandpaper will extend beyond the sanding pad causing snagging, tearing of the paper or kick-back. Extra paper extending beyond the sanding pad can also cause serious lacerations.
WARNING: ALWAYS use safety glasses. Everyday eyeglasses are NOT safety glasses. Also use face or dust mask. ALWAYS WEAR CERTIFIED SAFETY EQUIPMENT:
ANSI Z87.1 eye protection (CAN/CPA Z94.3),
ANSI S12.6 (S3.19) hearing protection,
NOSH/OSHA respiratory protection.
WARNING: Some dust created by power sanding, sawing, grinding, drilling, and other construction activities contains chemicals known to the state of California to cause cancer, birth defects or other reproductive harm. Some examples of these chemicals are:
- lead from lead-based paints,
crystalline silica from bricks and cement and other masonry products, and
- arsenic and chromium from chemically-treated lumber.
Your risk from these exposures varies, depending on how often you do this type of work. To reduce your exposure to these chemicals: work in a well ventilated area, and work with approved safety equipment, such as those dust masks that are specially designed to filter out microscopic particles.
- Avoid prolonged contact with dust from power sanding, sawing, grinding, drilling, and other construction activities. Wear protective clothing and wash exposed areas with soap and water. Allowing dust to get into your mouth, eyes, or lay on the skin may promote absorption of harmful chemicals.
WARNING: Use of this tool can generate and/or disperse dust, which may cause serious and permanent respiratory or other injury. Always use NOSH/OSHA approved respiratory protection appropriate for the dust exposure. Direct particles away from face and body.
WARNING: Always wear proper personal hearing protection that conforms to ANSI S12.6 (S3.19) during use. Under some conditions and duration of use, noise from this product may contribute to hearing loss.
Precautions To Take When Sanding Paint
- Sanding of lead based paint is NOT RECOMMENDED due to the difficulty of controlling the contaminated dust. The greatest danger of lead poisoning is to children and pregnant women.
- Since it is difficult to identify whether or not a paint contains lead without a chemical analysis, we recommend the following precautions when sanding any paint:
PERSONAL SAFETY
-
No children or pregnant women should enter the work area where the paint sanding is being done until all clean up is completed.
-
A dust mask or respirator should be worn by all persons entering the work area. The filter should be replaced daily or whenever the wearer has difficulty breathing. See your local hardware store for the proper N.I.O.S.H. approved dust mask.
- NO EATING, DRINKING or SMOKING should be done in the work area to prevent ingesting contaminated paint particles. Workers should wash and clean up BEFORE eating, drinking or smoking. Articles of food, drink, or smoking should not be left in the work area where dust would settle on them.
ENVIRONMENTAL SAFETY
- Paint should be removed in such a manner as to minimize the amount of dust generated.
- Areas where paint removal is occurring should be sealed with plastic sheeting of 4 mils thickness.
- Sanding should be done in a manner to reduce tracking of paint dust outside the work area.
CLEANING AND DISPOSAL
- All surfaces in the work area should be vacuumed and thoroughly cleaned daily for the duration of the sanding project. Vacuum filter bags should be changed frequently.
- Plastic drop cloths should be gathered up and disposed of along with any dust chips or other removal debris. They should be placed in sealed refuse receptacles and disposed of through regular trash pick-up procedures. During clean up, children and pregnant women should be kept away from the immediate work area.
- All toys, washable furniture and utensils used by children should be washed thoroughly before being used again.
Symbols
The label on your tool may include the following symbols. The sym definitions are as follows:
V.....volts
Hz......hertz
min.........minutes
---or DC...direct current
Class I Construction (grounded)
Class II Construction (double insulated)
bpm . . . . . . . . . . . . . . . . . . . . . . . . . . . . . . . . . . . . . . . . . . . . . . . . . . . . . . . . . protection
Read instruction manual before use .Use proper eye protection Use proper hearing protection
- When using an extension cord, be sure to use one heavy enough to carry the current your product will draw. An undersized cord will cause a drop in line voltage resulting in loss of power and overheating.
The table shows the correct size to use depending on cord length and nameplate ampere rating. If in doubt, use the next heavier gauge.
The smaller the gauge number, the heavier the cord.
| Minimum Gauge for Cord Sets Volts Total Length of Cord in Feet | |||||
| 120V | 0-25 | 26-50 | 51-100 | 101-150 | |
| (0-7,6m) | (7,6-15,2m) | (15,2-30,4m) | (30,4-45,7m) | ||
| 240V | 0-50 | 51-100 | 101-200 | 201-300 | |
| (0-15,2m) | (15,2-30,4m) | (30,4-60,9m) | (60,9-91,4m) | ||
| Ampere Rating | |||||
| More | Not more | American Wire Gauge | |||
| Than | Than | ||||
| 0 | - 6 | 18 | 16 | 16 | 14 |
| 6 | - 10 | 18 | 16 | 14 | 12 |
| 10 | - 12 | 16 | 16 | 14 | 12 |
| 12 | - 16 | 14 | 12 | Not Recommended | |
Intended Use
Detail Sanding
Sanding in extremely tight areas otherwise difficult to reach and require hand sanding. Select a high oscillating frequency. Sand with continuous motion and light pressure. Applying excessive pressure does not increase material removal; but will prematurely wear sanding sheets.
Flush Cutting
Remove excess wood from door jamb, window sill and/or toe kick. Re copper or PVC pipe.
Removal Work
Carpets & backing, old tile adhesives, caulking on masonry, wood and other surfaces.
Removal of Excess Materials
Tile grout, plaster, mortar splatters, concrete on tiles, sills.
Preparation of Surfaces
New floors and tiles.
SAVE THESE INSTRUCTIONS
Functional Description (Figure 1)
WARNING: Disconnect the plug from the power source before making any assembly, adjustments or changing accessories. Such preventive safety measures reduce the risk of starting the tool accidentally.
WARNING: Risk of lacerations or burns. Do not touch workpiece or blade immediately after operating the tool. They can become very hot. Handle carefully. Always allow workpiece and accessories to cool before handling.
Installing/Removing Accessories
The BD200MT features an exclusive tool-free accessory changing system. This allows for faster accessory changes without the need for wrenches or hex keys like other oscillating tool systems.
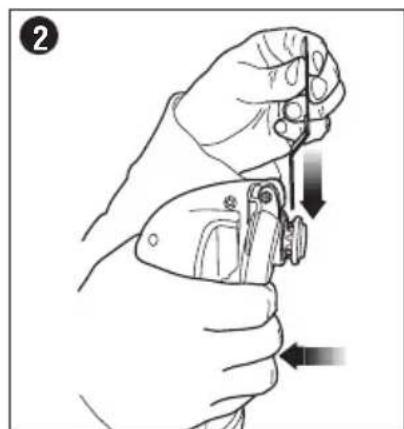
- Grasp the tool and squeeze the accessory clamping lever (Figure 2).
- Clean any residual debris from the tool shaft and the accessory holder.
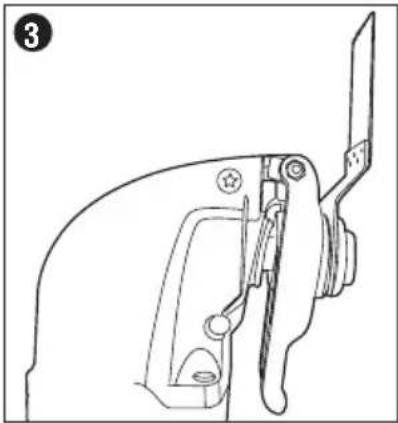
- Position the accessory so the working edge is away from the tool as shown in Figure 3.
- Slide the accessory between the shaft and the accessory holder making sure the accessory fully engages the pins on the holder and is flush with the shaft.
- Release the accessory clamp lever.
Universal Adaptor Kit
An accessory adapter kit is provided with BD200MT. The adapter is compatible with many manufacturers' accessories, but if unsure, confirm with the specific manufacturer that their accessory is compatible.
CAUTION: To avoid injury, do not use any accessory for an application where the adaptor may fail to hold the accessory.
CAUTION: Read and follow all manufacturers' safety warnings for any accessories used with this tool.
CAUTION: To avoid injury, ensure adapter and accessory are securely tightened.
CAUTION: Do not use this adaptor with BLACK+DECKER accessories. Attach BLACK+DECKER accessories with the tool-free release (G) according to the instructions in this instruction manual.
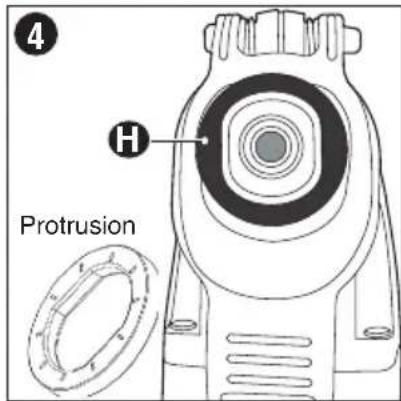
- To attach, place adaptor plate (H) onto the oscillating tool attachment with protrusions facing up as shown in Figure 4.
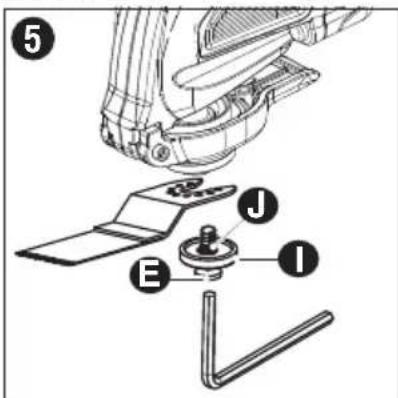
- Place accessory on top of adaptor plate and fasten with the bolt (E), press board (I) and o-ring (J). Then, tighten with the hex wrench as shown in Figure 5.
- To remove, loosen the bolt and washer with the hex wrench, then remove the accessory and adapter.
Installing/Removing Accessories
- Some accessories, such as scrapers and blades can be mounted at an angle if required as shown in Figure 6.
-
A triangle shaped base, or platen, uses a hook and loop adhesion system to attach the sanding sheets.
-
Clean any residual debris from the tool shaft and the accessory holder.
- Position the accessory so the working edge is away from the tool as shown in Figure 7.
- Place the sanding platen on the front of the oscillating tool, ensuring the accessory fully engages the pins as described under "Assembly."
- Align the edges on the sanding sheet, with the edge of the sanding platen and press the sanding sheet onto the platen as shown in Figure 7.
- Firmly press the base with the sanding sheet attached against a flat surface and briefly switch the tool on. This provides for good adhesion between the platen and the sanding sheet and also helps to prevent premature wear.
- When the tip of the sanding sheet becomes worn, detach the sheet from the platen, rotate and reapply as shown in Figure 7.


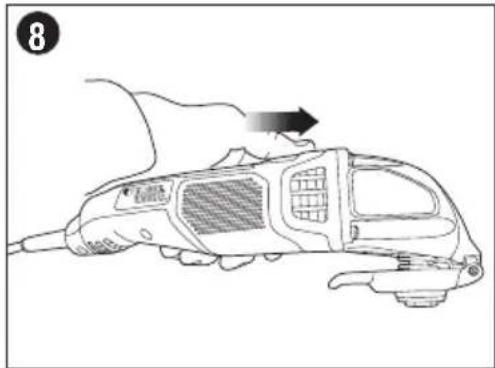
Operation Switch
CAUTION: Be sure switch is fully OFF before plugging in the power cord.
Plug in power cord.
- To turn the tool ON, hold it as shown in Figure 8 and push the slide switch forward.
- To turn the tool OFF, push the slide switch backward.
Variable Speed Dial
To operate the tool, select the speed setting you wish with the speed dial, shown in Figure 9, and slide the ON/OFF switch forward. The speed setting can be adjusted either with the tool on or off
CAUTION: Because the oscillating tool has a separate speed dial for setting the speed (1-6), the tool will start at the speed where the speed dial is set.
The numbered positions, 1 through 6 inscribed on the variable speed dial, do not indicate any precise speed but are good reference points. The higher the number, the higher the tool speed.
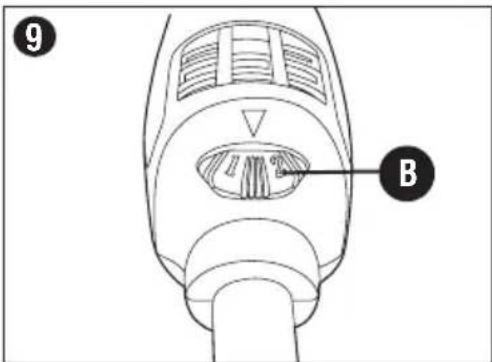
The approximate speed at each setting is:
SPEED SETTING 1 2 3 4 5 6
OSCILLATIONS PER MINUTE 10,000 12,000 14,000 16,000 18,000 20,000
(Actual oscillations per minute on your tool may vary.)
Be sure to select the proper speed for your oscillating tool operation. In general, use lower speeds (1-3) for cutting metal and PVC or plastic materials and use higher speeds (4-6) for sanding, removal & wood cutting applications. For paint, varnish, or other finish removal, use the lowest speed setting (1) to get the maximum life from the sanding sheet.
If in doubt about the proper speed for your operation, test the performance at low speed settings and gradually increase until a comfortable speed is found.
Helpful Hints
- Always ensure the workpiece is firmly held or clamped to prevent movement. Any movement of the material may affect the quality of the cutting or sanding finish.
- Do not start sanding without having the sandpaper attached to sanding platen.
- Use coarse grit paper to sand rough surfaces, medium grit for smooth surfaces and fine grit for the finishing surfaces. If necessary, first make a test run on scrap material.
- Do not allow the sandpaper to wear away, it will damage the sanding pad.
- Excessive force will reduce the working efficiency and cause motor overload. Replacing the accessory regularly will maintain optimum working efficiency.
- If the tool overheats, especially when used at low speed, set the speed to maximum and run it with no load for 2-3 minutes to cool the motor. Avoid prolonged usage at very low speeds. Always keep the blade sharp.
Troubleshooting
| Problem | Possible Cause | Possible Solution |
| · Unit will not start. working | · Cord not plugged in. | · Plug tool into an outlet. |
| · Circuit fuse is blown. | · Replace circuit fuse. (If the product causes the circuit fuse blow, discontinuuse immediately have it seBLACK+DECKER service centerauthorized service | |
| · Circuit breaker is tripped. | · Reset circuit breaker. (If the pro repeatedly circuit breaker discontinue use immediately and it servicedBLACK+DECKER service centerauthorized service | |
| · Cord o r switch is damaged. | · Have cord or switch replaced at a BLACK+DECKER service centerauthorized service |
For assistance with your product, visit our website www.blackanddecker.com for the location of the service center nearest you or call the BLACK+DECKER help line at 1-800-544-6986.
Accessories
Recommended accessories for use with your tool are listed on page 12 and 13 and are available from your local dealer or authorized service center. In addition to BLACK+DECKER accessories, your oscillating tool will also accept Porter Cable® and Stanley FatMax® oscillating tool accessories. If you need assistance regarding accessories, please call: 1-800-544-6986.
WARNING: The use of any accessory not recommended for use with this tool could be hazardous.
Service Information
All BLACK+DECKER Service Centers are staffed with trained personnel to provide customers with efficient and reliable power tool service. Whether you need technical advice, repair, or genuine factory replacement parts, contact the BLACK+DECKER location nearest you. To find your local service location, call: 1-800-544-6986 or visit www.blackanddecker.com
Full Two-Year Home Use Warranty
Black & Decker (U.S.) Inc. warrants this product for two years against any defects in material or workmanship. The defective product will be replaced or repaired at no charge in either of two ways.
The first, which will result in exchanges only, is to return the product to the retailer from whom it was purchased (provided that the store is a participating retailer). Returns should be made within the time period of the retailer's policy for exchanges (usually 30 to 90 days after the sale). Proof of purchase may be required. Please check with the retailer for their specific return policy regarding returns that are beyond the time set for exchanges.
The second option is to take or send the product (prepaid) to a BLACK+DECKER owned or authorized Service Center for repair or replacement at our option. Proof of purchase may be required. BLACK+DECKER owned and authorized Service Centers are listed on our website www.blackanddecker.com.
This warranty does not apply to accessories. This warranty gives you specific legal rights and you may have other rights which vary from state to state. Should you have any questions, contact the manager of your nearest BLACK+DECKER Service Center. This product is not intended for commercial use.
LATIN AMERICA: This warranty does not apply to products sold in Latin America. For products sold in Latin America, check country specific warranty information contained in the packaging, call the local company or see the website for warranty information.
FREE WARNING LABEL REPLACEMENT: If your warning labels become illegible or are missing, call 1-800-544-6986 for a free replacement.
Imported by:
Black & Decker (U.S.) Inc.,
701 E. Joppa Rd.
Towson, MD 21286 U.S.A.

SANDING & REMOVAL ACCESSORIES
Part # Accessory Recommended Materials Typical Applications
| BDA1209 Sanding Base / Platen To be used with appropriate sandpaper sheets (see below) | |||
| BDA1210 Wood Removal Wood Sandpaper Finishing/Detail sanding of wood (60, 120, 240 grit) | |||
| BDA1211 Paint & Finish Removal Sandpaper Wood, Metal, Plastic and other finished materials Finishing/Detail sanding paint & other finishes. Rust removal (80, 120, 240 grit). | |||
| BDA1216 Rigid Scaper Blade Tough materials, adhesive, vinyl flooring. Removing paint, carpet, adhesive tile and layers of paint and varnish | |||
| BDA1220 Flexible Scaper Blade Soft materials, caulk, baths and sinks. Any soft material removal such as old caulk around adhesive, tape, peeling paint | |||
| BDA1218 Grout Removal Blade Grout, plaster, other masonry surfaces Removing grout between tiles, removing thinset beneath tiles, cutting abrasive | |||
| BDA1221 Carbide Rasp Grout, plaster, other masonry surfaces removal. Aggressive removal of hard and softRemoving remaining grout and thinset in tile materials. |
CUTTING ACCESSORIES
Part # Accessory Recommended Materials Typical Applications
| BDA1212 1" Precision Wood Wood, PVC & plastic, Drywall Aggressive cuts for larger jobs. Flush cutting door Plunge Cut Blade jambs, molding and flooring. | |||
| BDA1214 1" Wood Plunge Cut Wood, PVC & plastic, Drywall Wood plunge cutting. Finer cuts for clean and flush cut paths. | |||
| BDA1215 1" Wood-Metal Blade Wood, PVC & plastic, Drywall, Hardwoods, Metal Wood plunge cutting. Finer cuts for clean and flush cut paths. Trimming finishing nails. Cutting copper pipe. | |||
| BDA1219 3/8" Wood Plunge Cut Wood, PVC & plastic, Drywall Small, fine and controlled cuts. Good for small areas or hobbies and crafts where detail is needed. | |||
| BDA1217 Flush Cut / Wood, PVC & plastic, Drywall Drywall and plywood cutouts for vents or outlets. Wood-Drywall Blade blade is positioned away from oscillating tool when installing on the tool. |
BLACK+ DECKER
OUTIL OSCILLANT POLYVALENT
MODE D'EMPLOI
NUMERO DE CATALOGUE BD200MT
Functional Description (Figure 1)
Visite www.BlackandDecker.com/NewOwner
Col. Americana, S. Juarez
Guadalajara, Jalisco
Tel. 01 33 38 25 69 78
Col. Fracc. Universidad
Chihuahua, Chihuahua
Tel. 01 614 413 64 04
Fernando González Armenta
Bolivia No. 605
Col. Felipe Carrillo Puerto
Cd. Madero, Tamaulipas
Tel. 01 833 221 34 50


- SAFETY GUIDELINES - DEFINITIONS
- General Power Tool SafetyWarnings
- 4) POWER TOOL USE AND CARE
- 5) SERVICE
- Specific Safety Rules
- Precautions To Take When Sanding Paint
- PERSONAL SAFETY
- ENVIRONMENTAL SAFETY
- CLEANING AND DISPOSAL
- Symbols
- Intended Use
- Detail Sanding
- Flush Cutting
- Removal Work
- Removal of Excess Materials
- Preparation of Surfaces
- SAVE THESE INSTRUCTIONS
- Functional Description (Figure 1)
- Installing/Removing Accessories
- Universal Adaptor Kit
- Operation Switch
- Variable Speed Dial
- Helpful Hints
- Troubleshooting
- Accessories
- Service Information
- Full Two-Year Home Use Warranty
- CUTTING ACCESSORIES
- BLACK+ DECKER
- OUTIL OSCILLANT POLYVALENT
Brand : BLACK & DECKER
Model : BD200MT
Category : Multitools