CS1518 - Electric saw BLACK & DECKER - Free user manual and instructions
Find the device manual for free CS1518 BLACK & DECKER in PDF.

| Product Type | Electric Chain Saw |
| Brand | Black & Decker |
| Model | CS1518 |
| Power Source | Mains (corded) |
| Rated Voltage | 120 V (estimated) |
| Guide Bar Length | 457 mm (18 in) |
| Maximum Cutting Capacity | 406 mm (16 in) diameter |
| Lubrication | Automatic with oil reservoir |
| Chain Brake | Yes, front hand guard activating the brake |
| Low Kickback Chain | Yes |
| Low Kickback Guide Bar | Yes |
| Weight | Approximately 5 kg (11 lb) |
| Dimensions (L x W x H) | Approximately 900 x 250 x 300 mm |
| Intended Use | Pruning, cutting small logs |
| Maintenance | Clean with a damp cloth and mild detergent; sharpen the chain regularly |
| Safety | Chain brake, hand guard, anti-kickback chain, switch lock |
| Spare Parts | Chain RC1800, Oregon 18 in guide bar, filter, etc. |
| Warranty | 2 years for domestic use |
| Repairability | Black & Decker authorized service center |
| Included Accessories | Guide bar, chain, guide bar sheath |
Frequently Asked Questions - CS1518 BLACK & DECKER
User questions about CS1518 BLACK & DECKER
0 question about this device. Answer the ones you know or ask your own.
Ask a new question about this device
Download the instructions for your Electric saw in PDF format for free! Find your manual CS1518 - BLACK & DECKER and take your electronic device back in hand. On this page are published all the documents necessary for the use of your device. CS1518 by BLACK & DECKER.
USER MANUAL CS1518 BLACK & DECKER
natural_image
Technical line drawing of a chain-linking machine (no text or symbols)Thank you for choosing BLACK+DECKER!
PLEASE READ BEFORE RETURNING THIS PRODUCT FOR ANY REASON.
If you have a question or experience a problem with your BLACK+DECKER purchase, go to http://www.blackanddecker.com/instantanswers If you can't find the answer or do not have access to the Internet, call 1-800-544-6986 from 8 a.m. to 5 p.m. EST Mon. - Fri. to speak with an agent. Please have the catalog number available when you call. SAVE THIS MANUAL FOR FUTURE REFERENCE.
DO NOT OVER-TENSION CHAIN. Refer to "ADJUSTING CHAIN TENSION" for proper method of tensioning chain.
Retighten chain frequently during first two hours of use.
SAFETY GUIDELINES - DEFINITIONS
It is important for you to read and understand this manual. The information it contains relates to protecting YOUR SAFETY and PREVENTING PROBLEMS. The symbols below are used to help you recognize this information.
⚠️ DANGER: Indicates an imminently hazardous situation which, if not avoided, will result in death or serious injury.
⚠ WARNING: Indicates a potentially hazardous situation which, if not avoided, could result in death or serious injury.
⚠️ CAUTION: Indicates a potentially haz ard ous situation which, if not avoided, may result in minor or mod er ate injury.
NOTICE: Used without the safety alert symbol indicates potentially hazardous situation which, if not avoided, may result in property damage.
GENERAL POWER TOOL SAFETY RULES
⚠ WARNING: Read all safety
warnings and all instructions. Failure to follow the warnings and instructions may result in electric shock, fire and/or serious injury.
SAVE ALL WARNINGS AND INSTRUCTIONS FOR FUTURE REFERENCE
The term "power tool" in the warnings refers to your mains-operated (corded) power tool or battery-operated (cordless) power tool.
1) WORK AREA SAFETY
a) Keep work area clean and well lit.
Cluttered or dark areas invite accidents.
b) Do not operate power tools in explosive atmospheres, such as in the presence of flammable liquids, gases or dust. Power tools create sparks which may ignite the dust or fumes.
c) Keep children and bystanders away while operating a power tool. Distractions can cause you to lose control.
2) ELECTRICAL SAFETY
a) Power tool plugs must match the outlet. Never modify the plug in any way. Do not use any adapter plugs with earthed (grounded) power tools. Unmodified plugs and matching outlets will reduce risk of electric shock.
b) Avoid body contact with earthed or grounded surfaces such as pipes, radiators, ranges and refrigerators. There is an increased risk of electric shock if your body is earthed or grounded.
c) Do not expose power tools to rain or wet conditions. Water entering a power tool will increase the risk of electric shock.
d) Do not abuse the cord. Never use the cord for carrying, pulling or unplugging the power tool. Keep cord away from heat, oil, sharp edges or moving parts. Damaged or entangled cords increase the risk of
electric shock.
e) When operating a power tool outdoors, use an extension cord suitable for outdoor use. Use of a cord suitable for outdoor use reduces the risk of electric shock.
f) If operating a power tool in a damp location is unavoidable, use a ground fault circuit interrupter (GFCI) protected supply. Use of a GFCI reduces the risk of electric shock.
3) PERSONAL SAFETY
a) Stay alert, watch what you are doing and use common sense when operating a power tool. Do not use a power tool while you are tired or under the influence of drugs, alcohol or medication. A moment of inattention while operating power tools may result in serious personal injury.
b) Use personal protective equipment. Always wear eye protection. Protective equipment such as dust mask, nonskid safety shoes, hard hat, or hearing protection used for appropriate conditions will reduce personal injuries.
c) Prevent unintentional starting. Ensure the switch is in the off position before connecting to power source and/or battery pack, picking up or carrying the tool. Carrying power tools with your finger on the switch or energizing power tools that have the switch on invites accidents.
d) Remove any adjusting key or wrench before turning the power tool on. A wrench or a key left attached to a rotating part of the power tool may result in personal injury.
e) Do not overreach. Keep proper footing and balance at all times. This enables better control of the power tool in unexpected situations.
f) Dress properly. Do not wear loose clothing or jewelry. Keep your hair, clothing and gloves away from moving parts. Loose clothes, jewelry or long hair can be caught in moving parts.
g) If devices are provided for the connection of dust extraction and collection facilities, ensure these
are connected and properly used.
Use of dust collection can reduce dust-related hazards.
4) POWER TOOL USE AND CARE
a) Do not force the power tool. Use the correct power tool for your application. The correct power tool will do the job better and safer at the rate for which it was designed.
b) Do not use the power tool if the switch does not turn it on and off. Any power tool that cannot be controlled with the switch is dangerous and must be repaired.
c) Disconnect the plug from the power source and/or the battery pack from the power tool before making any adjustments, changing accessories, or storing power tools. Such preventive safety measures reduce the risk of starting the power tool accidentally.
d) Store idle power tools out of the reach of children and do not allow persons unfamiliar with the power tool or these instructions to operate the power tool. Power tools are dangerous in the hands of untrained users.
e) Maintain power tools. Check for misalignment or binding of moving parts, breakage of parts and any other condition that may affect the power tool's operation. If damaged, have the power tool repaired before use. Many accidents are caused by poorly maintained power tools.
f) Keep cutting tools sharp and clean. Properly maintained cutting tools with sharp cutting edges are less likely to bind and are easier to control.
g) Use the power tool, accessories and tool bits, etc. in accordance with these instructions, taking into account the working conditions and the work to be performed. Use of the power tool for operations different from those intended could result in a hazardous situation.
5) SERVICE
a) Have your power tool serviced by a qualified repair person using only identical replacement parts. This will ensure that the safety of the power tool is maintained.
READ ALL INSTRUCTIONS
CHAIN SAW SAFETY WARNINGS:
- Keep all parts of the body away from the saw chain when the chain saw is operating. Before you start the chain saw, make sure the saw chain is not contacting anything. A moment of inattention while operating chain saws may cause entanglement of your clothing or body with the saw chain.
- Always hold the chain saw with your right hand on the rear handle and your left hand on the front handle. Holding the chain saw with a reversed hand configuration increases the risk of personal injury and should never be done.
- Hold the power tool by insulated gripping surfaces only, because the saw chain may contact hidden wiring or its own cord. Saw chains contacting a "live" wire may make exposed metal parts of the power tool "live" and could give the operator an electric shock.
- Wear safety glasses and hearing protection. Further protective equipment for head, hands, legs and feet is recommended. Adequate protective clothing will reduce personal injury by flying debris or accidental contact with the saw chain.
- Do not operate a chain saw in a tree. Operation of a chain saw while up in a tree may result in personal injury.
- Always keep proper footing and operate the chain saw only when standing on fixed, secure and level surface. Slippery or unstable surfaces such as ladders may cause a loss of balance or control of the chain saw.
- When cutting a limb that is under tension be alert for spring back. When the tension in the wood fibres is released the spring loaded limb may strike the operator and/or throw the chain saw out of control.
- Use extreme caution when cutting brush and saplings. The slender material may catch the saw chain and be whipped toward you or pull you off balance.
- Carry the chain saw by the front handle with the chain saw switched off and away from your body. When transporting or storing the chain saw always fit the guide bar cover. Proper handling of the chain saw will reduce the likelihood of accidental contact with the moving saw chain.
- Follow instructions for lubricating, chain tensioning and changing accessories. Improperly tensioned or lubricated chain may either break or increase the chance for kickback.
- Keep handles dry, clean, and free from oil and grease. Greasy, oily handles are slippery causing loss of control.
- Cut wood only. Do not use chain saw for purposes not intended. For example: do not use chain saw for cutting plastic, masonry or non-wood building materials. Use of the chain saw for operations different than intended could result in a hazardous situation.
CAUSES AND OPERATOR PREVENTION OF KICKBACK:
Kickback may occur when the nose or tip of the guide bar touches an object, or when
the wood closes in and pinches the saw chain in the cut.
Tip contact in some cases may cause a sudden reverse reaction, kicking the guide bar up and back towards the operator.
Pinching the saw chain along the top of the guide bar may push the guide bar rapidly back towards the operator.
Either of these reactions may cause you to lose control of the saw which could result in serious personal injury. Do not rely exclusively upon the safety devices built into your saw. As a chain saw user, you should take several steps to keep your cutting jobs free from accident or injury. Kickback is the result of tool misuse and/or incorrect operating procedures or conditions and can be avoided by taking proper precautions as given below:
- Maintain a firm grip, with thumbs and fingers encircling the chain saw handles, with both hands on the saw and position your body and arm to allow you to resist kickback forces. Kickback forces can be controlled by the operator, if proper precautions are taken. Do not let go of the chain saw.
- Do not overreach and do not cut above shoulder height. This helps prevent unintended tip contact and enables better control of the chain saw in unexpected situations.
- Only use replacement bars and chains specified by the manufacturer. Incorrect replacement bars and chains may cause chain breakage and/or kickback.
- Follow the manufacturer's sharpening and maintenance instructions for the saw chain. Decreasing the depth gauge height can lead to increased kickback.
THE FOLLOWING PRECAUTIONS SHOULD BE FOLLOWED TO MINIMIZE KICKBACK:
(1.) Grip Saw Firmly. Hold the chain saw firmly with both hands when the motor is running. Use a firm grip with thumbs and fingers encircling the chain saw handles. Chain saw will pull forward when cutting on the bottom edge of the bar, and push backward when cutting along the top edge of the bar.
(2.) Do not over reach.
(3.) Keep proper footing and balance at all times.
(4.) Don't let the nose of the guide bar contact a log, branch, ground or other obstruction.
(5.) Don't cut above shoulder height.
(6.) Use devices such as low kickback chain and reduced kickback guide bars that reduce the risks associated with kickback.
(7.) Only use replacement bars and chains specified by the manufacturer or the equivalent. (8.) Never let the moving chain contact any object at the tip of the guide bar.
(9.) Keep the working area free from obstructions such as other trees, branches, rocks, fences, stumps, etc. Eliminate or
avoid any obstruction that your saw chain could hit while you are cutting through a particular log or branch.
(10.) Keep your saw chain sharp and properly tensioned. A loose or dull chain can increase the chance of kickback. Check tension at regular intervals with the motor stopped and tool unplugged, never with the motor running. (11.) Begin and continue cutting only with the chain moving at full speed. If the chain is moving at a slower speed, there is a greater chance for kickback to occur.
(12.) Cut one log at a time.
(13.) Use extreme caution when re-entering a previous cut. Engage ribbed bumpers into wood and allow chain to reach full speed before proceeding with cut.
(14.) Do not attempt plunge cuts or bore cuts.
(15.) Watch for shifting logs or other forces that could close a cut and pinch or fall into chain.
KICKBACK SAFETY FEATURES
⚠ WARNING: The following features are included on your saw to help reduce the hazard of kickback; however such features will not totally eliminate this dangerous reaction. As a chain saw user do not rely only on safety devices. You must follow all safety precautions, instructions, and maintenance in this manual to help avoid kickback and other forces which can result in serious injury.
- Chain Brake, designed to immediately tun the chain saw off if kickback is too great.
- Reduced-Kickback Guide Bar, designed with a small radius tip which reduces the size of the kickback danger zone on bar tip. A reduced - kickback guide bar is one which has been demonstrated to significantly reduce the number and seriousness of kickbacks when tested in accordance with safety requirements for electric chain saws.
- Low-Kickback Chain, designed with a contoured depth gauge and guard link which deflect kickback force and allow wood to gradually ride into the cutter. A low-kickback chain is a chain which has met kickback performance requirements of ANSI B175.1-1991.
- Do not operate chain saw while in a tree, on a ladder, on a scaffold, or from any unstable surface.
- Hold tool by insulated gripping surfaces when performing an operation where the cutting tool may contact hidden wiring. Contact with a "live" wire will make exposed metal parts of the tool "live" and shock the operator.
- Do not attempt operations beyond your capacity or experience. Read thoroughly and understand completely all instructions in this manual.
- Before you start chain saw, make sure saw chain is not contacting any object.
- Do not operate a chain saw with one hand! Serious injury to the operator, helpers, or bystanders may result from one handed operation. A chain saw
is intended for two-handed use only.
- Keep the handles dry, clean, and free of oil or grease.
- Do not allow dirt, debris, or sawdust to build up on the motor or outside air vents.
- Stop the chain saw before setting it down.
- Do not cut vines and/or small under brush.
- Use extreme caution when cutting small size brush and saplings because slender material may catch the saw chain and be whipped toward you or pull you off balance.
⚠ WARNING: Some dust created by power sanding, sawing, grinding, drilling, and other construction activities contains chemicals known to the State of California to cause cancer, birth defects or other reproductive harm. Some examples of these chemicals are: - lead from lead-based paints, - crystalline silica from bricks and cement and other masonry products, and - arsenic and chromium from chemically-treated lumber.
Your risk from these exposures varies, depending on how often you do this type of work. To reduce your exposure to these chemicals: work in a well ventilated area, and work with approved safety equipment, such as those dust masks that are specially designed to filter out microscopic particles.
- Avoid prolonged contact with dust from power sanding, sawing, grinding, drilling, and other construction activities. Wear protective clothing and wash exposed areas with soap and water. Allowing dust to get into your mouth, eyes, or lay on the skin may promote absorption of harmful chemicals.
⚠ WARNING: Use of this tool can generate and/or disburse dust, which may cause serious and permanent respiratory or other injury. Always use NIOSH/OSHA approved respiratory protection appropriate for the dust exposure. Direct particles away from face and body.
CHAIN SAW NAMES AND TERMS
- Bucking - The process of cross cutting a felled tree or log into lengths.
- Motor Brake - A device used to stop the saw chain when the trigger is released.
- Chain Saw Powerhead - A chain saw without the saw chain and guide bar.
- Drive Sprocket or Sprocket - The toothed part that drives the saw chain.
- Felling - The process of cutting down a tree.
- Felling Back Cut - The final cut in a tree felling operation made on the opposite side of the tree from the notching cut.
- Front Handle - The support handle located at or toward the front of the chain saw.
- Front Hand Guard - A structural barrier between the front handle of a chain saw and the guide bar, typically located close to the hand position on the front handle and sometimes employed as an activating lever for a chain brake.
- Guide Bar - A solid railed structure that
supports and guides the saw chain.
- Guide Bar Scabbard - Enclosure fitted over guide bar to prevent tooth contact when saw is not in use.
- Kickback - The backward or upward motion, or both of the guide bar occurring when the saw chain near the nose of the top area of the guide bar contacts any object such as a log or branch, or when the wood closes in and pinches the saw chain in the cut.
- Kickback, Pinch - The rapid pushback of the saw which can occur when the wood closes in and pinches the moving saw chain in the cut along the top of the guide bar.
- Kickback, Rotational - The rapid upward and backward motion of the saw which can occur when the moving saw chain near the upper portion of the tip of the guide bar contacts an object, such as a log or branch.
- Limbing - Removing the branches from a fallen tree
- Low-Kickback Chain - A chain that complies with the kickback performance requirements of ANSI B175.1-1991 (when tested on a representative sample of chain saws.)
- Normal Cutting Position - Those positions assumed in performing the bucking and felling cuts.
- Notching Undercut - A notch cut in a tree that directs the tree's fall.
- Rear Handle - The support handle located at or toward the rear of the saw.
- Reduced Kickback Guide Bar - A guide bar which has been demonstrated to reduce kickback significantly.
- Replacement Saw Chain - A chain that complies with kickback performance requirements of ANSI B175.1-2000 when tested with specific chain saws. It may not meet the ANSI performance requirements when used with other saws.
- Saw Chain - A loop of chain having cutting teeth, that cut the wood, and that is driven by the motor and is supported by the guide bar.
- Ribbed Bumper - The ribs used when felling or bucking to pivot the saw and maintain position while sawing.
- Switch - A device that when operated will complete or interrupt an electrical power circuit to the motor of the chain saw.
- Switch Linkage - The mechanism that transmits motion from a trigger to the switch.
- Switch Lockout - A movable stop that prevents the unintentional operation of the switch until manually actuated.
INTENDED USE
Your BLACK+DECKER Chain Saw is ideal for pruning applications and cutting small logs up to 16 inches (406 mm) in diameter. This tool is intended for consumer use only.
SAVE THESE INSTRUCTIONS
SYMBOLS
The label on your tool may include the following symbols. The symbols and their definitions are as follows:
V....volts
A......amperes
Hz......hertz
W.....watts
min......minutes
\~ or AC.....alternating current
or DC...direct current
n_0 ......no load speed
Class I Construction
(grounded)
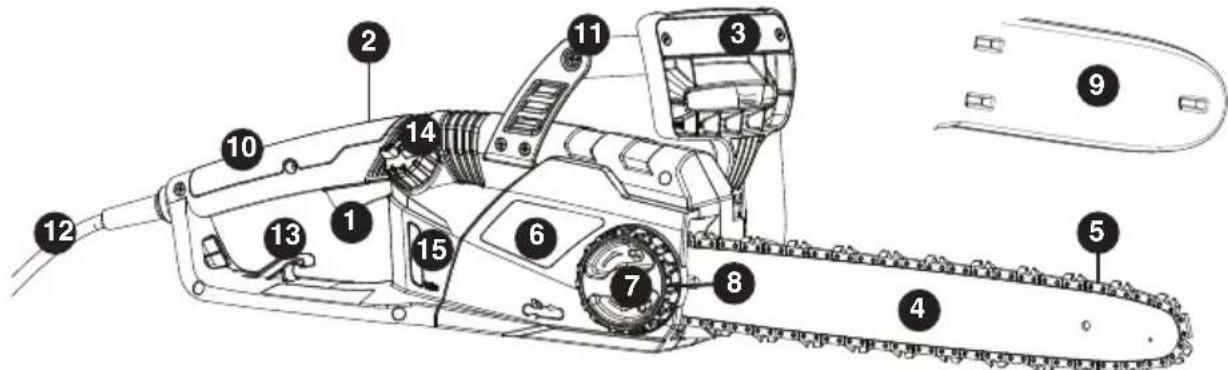
FUNCTIONAL DESCRIPTION
- Trigger switch
- Lock-off button (not shown)
- Chain brake / front hand guard
- Guide bar
- Saw chain
- Sprocket cover
- Bar adjust locking knob
±......earthing terminal
⚠️ ......safety alert symbol
☐......Class II Construction (double insulated)
.../min or rpm...revolutions or
reciprocation per minute
Read instruction manual before use
Use proper respiratory protection
Use proper eye protection
O....Use proper hearing protection
- Chain tensioning wheel
- Guide bar scabbard
- Rear handle
- Front handle
- Cord
- Extention cord retainer
- Oil cap
- Oil level indicator
PREPARING YOUR CHAIN SAW FOR USE
⚠ WARNING: Read and understand all instructions. Failure to follow all instructions listed below may result in electric shock, fire and/or serious personal injury.
ASSEMBLY
INSTALLING THE GUIDE BAR AND SAW CHAIN
⚠️CAUTION: Sharp chain. Always wear protective gloves when handling the chain. The chain is sharp and can cut you when it is not running.
⚠ WARNING: Sharp moving chain. To prevent accidental operation, insure that tool is unplugged before performing the following operations. Failure to do this could result in serious personal injury.
The saw chain (5) and guide bar (4) are packed separately in the carton. The chain has to be attached to the bar, and both must be attached to the body of the tool.
- Place the saw on a firm surface.
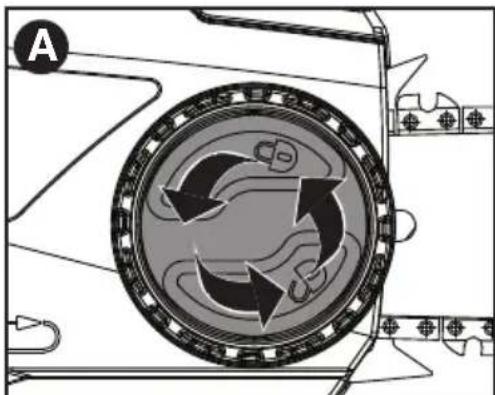
- Rotate the bar adjust locking knob (7) counterclockwise as shown in figure A to remove sprocket cover (6).
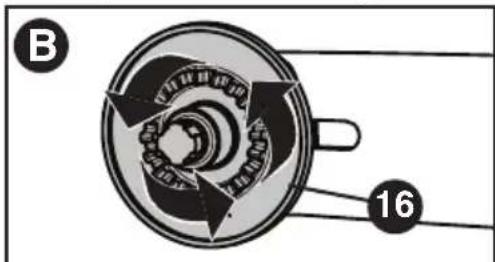
- Turn the tool-free tension assembly (16) (attached to the bar) counterclockwise until it stops as shown in figure B.
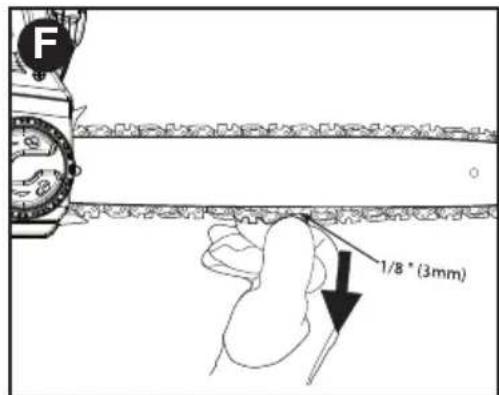
- Wearing protective gloves, grasp the saw chain (5) and wrap it around the guide bar (4), ensuring the teeth are facing the correct direction (see figure F)
- Ensure the chain is properly set in the slot around the entire guide bar.
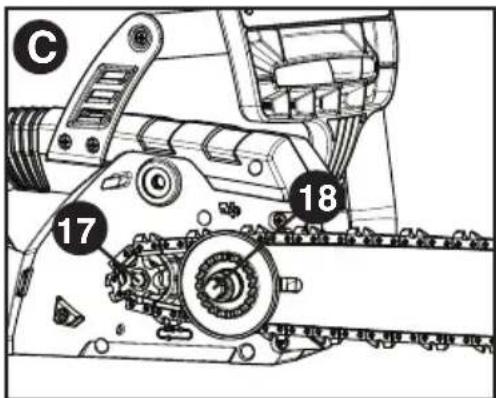
- Place the saw chain around the sprocket (17) while lining up the hole in the tool-free tension assembly with the bolt (18) in the base of the tool as shown in figure C.
- Rotate bar until it engages the two pins underneath and no longer easily rotates up and down.
- Once in place, turn the tool-free tension assembly (16) clockwise by hand to preliminarily tighten the assembly to hold it in place.
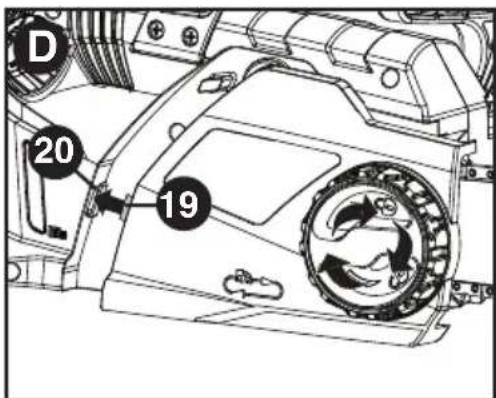
- While holding the bar in still, replace sprocket cover (6). Make sure the nub (19) on the cover lines up with the slot (20) in the main housing as shown in figure D. Rotate the bar adjust locking knob (7) clockwise until snug, then loosen knob one full turn, so the saw chain can be properly tensioned.
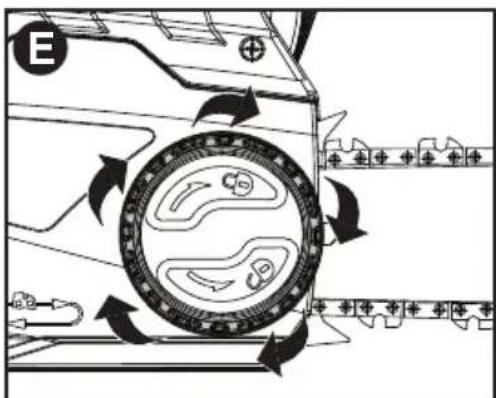
- While holding the bar adjust locking knob (7), rotate the chain tensioning wheel (8) clockwise to increase tension as shown in figure E. Make sure the saw chain (5) is snug around the guide bar (4).
⚠️CAUTION: Sharp chain. Always wear protective gloves when handling the chain. The chain is sharp and can cut you when it is not running.
⚠ WARNING: Sharp moving chain. To prevent accidental operation, insure that the tool is unplugged before performing the following operations. Failure to do this could result in serious personal injury.
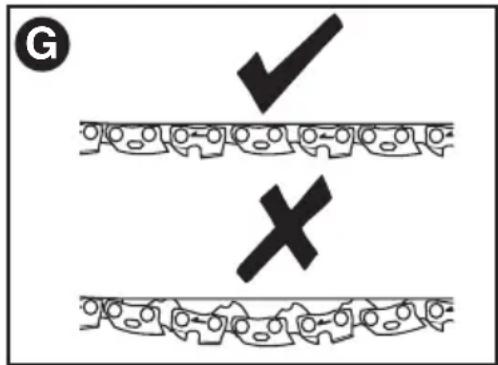
- With the saw on a firm surface, check the saw chain (5) tension. The tension is correct when the chain snaps back after being pulled 1/8 inch (3mm) away from the guide bar (4) with light force from the middle finger and thumb as shown in figure F. There should be no "sag" between the guide bar and the chain on the underside as shown in figure G.
- To adjust saw chain tension, loosen bar adjust locking knob (7) and follow instructions for "Installing the Guide Bar and Saw Chain."
- Do not over-tension the chain as this will lead to excessive wear and will reduce the life of the bar and chain.
- Once chain tension is correct, tighten bar adjust locking knob.
- When the chain is new, check the tension frequently (after unplugging tool) during the first 2 hours of use as a new chain stretches slightly.

REPLACING THE SAW CHAIN
⚠CAUTION: Sharp chain. Always wear protective gloves when handling the chain. The chain is sharp and can cut you when it is not running.
⚠ WARNING: Sharp moving chain. To prevent accidental operation, insure that the tool is unplugged before performing the following operations. Failure to do this could result in serious personal injury.
- Rotate the bar adjust locking knob (7) counterclockwise to lessen chain tension.
- Remove sprocket cover (6) as described in "Installing the Guide Bar and Saw Chain" section.
- Lift the worn saw chain (5) out of the groove in the guide bar (4).
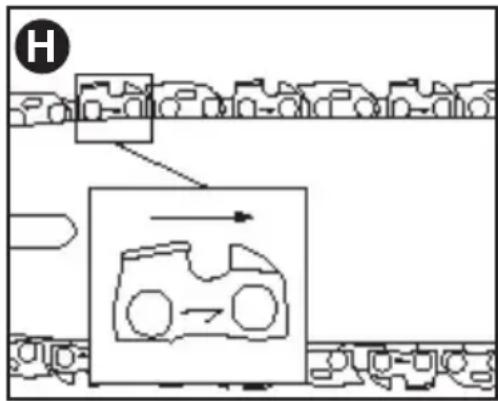
- Place the new chain in the slot of the guide bar, making sure the saw teeth are facing the correct direction by matching the arrow on the chain with the graphic on the sprocket cover (6) shown in figure H.
- Follow instructions for "Installing the Guide Bar and Saw Chain."
flowchart
graph TD
    A["Start"] --> B["Process Block 1"]
    B --> C["Process Block 2"]
    C --> D["Output"]
    style A fill:#f9f,stroke:#333
    style B fill:#ccf,stroke:#333
    style C fill:#cfc,stroke:#333
    style D fill:#fcc,stroke:#333
AUTO OILING SYSTEM
This chain saw is equipped with an auto oiling system that keeps the saw chain and guide bar constantly lubricated.
The oil level indicator (15) shows the level of the oil in the chain saw. If the oil level is less than a quarter full, unplug the chain saw and refill with the proper oil.
NOTE: Use a high quality bar and chain oil for proper chain and bar lubrication. As a temporary substitute, a non-detergent SAE30 weight motor oil can be used. The use of a vegetable based bar and chain oil is recommended when pruning trees. Mineral oil is not recommended because it may harm trees. Never use waste oil or very thick oil. These may damage your chain saw.
Filling the oil reservoir
- Remove the oil cap (14) and fill the reservoir with the recommended chain oil until the oil level has reached the top of the oil level indicator (15).
- Refit the oil cap.
- Periodically switch the chain saw off and check the oil level indicator to insure the bar and chain are being properly oiled.
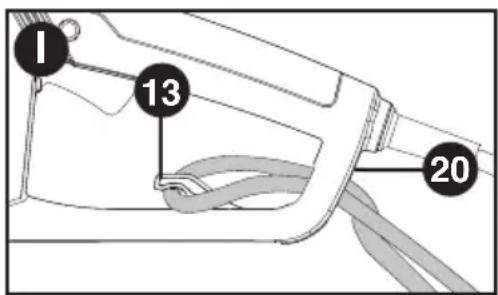
ATTACHING EXTENSION CORD
An extension cord retainer (13) is built into the switch handle. It prevents the extension cord from coming unplugged.
- Double the extension cord and insert it into the slot (20) in the end of the handle area as shown in figure I. Hook the loop formed by doubling the cord over the cord retainer (13). Gently tug on the cord to insure that it is firmly retained in the handle. Plug the receptacle end of the extension cord into the power cord (12) of the chain saw.
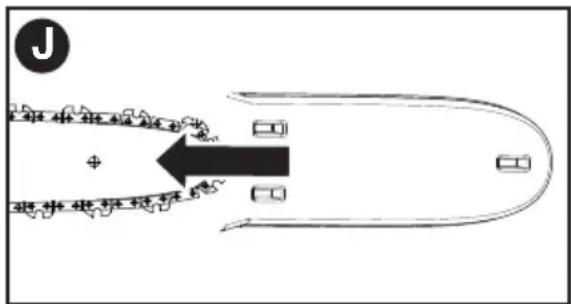
TRANSPORTING SAW
- Always cover the guide bar (4) with the scabbard (9) (figure J) when transporting the saw.
⚠ WARNING: Read and understand all instructions. Failure to follow all instructions listed below may result in electric shock, fire and/or serious personal injury.
- Guard Against Kickback which can result in severe injury or death. See Important Safety Instructions “Guard Against Kickback”, to avoid the risk of kickback.
- Do not overreach. Do not cut above chest height. Make sure your footing is firm. Keep feet apart. Divide your weight evenly on both feet.
- Use a firm grip with your left hand on the front handle (11) and your right hand on the rear handle (10) so that your body is to the left of the guide bar.
- Do not hold chain saw by front hand guard (3). Keep elbow of left arm locked so that left arm is straight to withstand a kickback.
⚠WARNING: Never use a cross-handed grip (left hand on the rear handle and right hand on the front handle).
⚠ WARNING: Never allow any part of your body to be in line with the guide bar (4) when operating the chain saw.
- Never operate while in a tree, in any awkward position or on a ladder or
other unstable surface. You may lose control of saw causing severe injury.
- Keep the chain saw running at full speed the entire time you are cutting.
- Allow the chain to cut for you. Exert only light pressure. Do not put pressure on chain saw at end of cut.
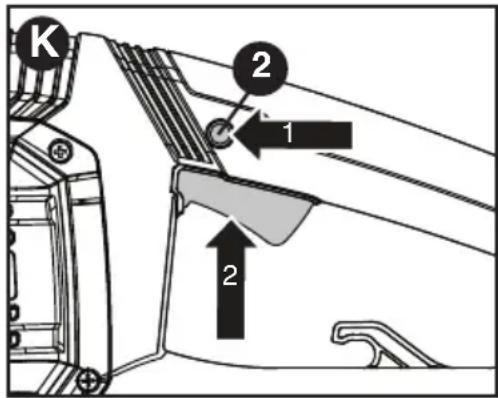
ON / OFF
• Always be sure of your footing and grip the chain saw firmly with both hands with the thumb and fingers encircling both handles.
- To turn the tool ON, depress the lock off button (2) and squeeze the trigger switch (1) as shown in figure K. (Once the tool is running you can release the lock off button.)
- To turn the tool OFF, release the trigger switch.
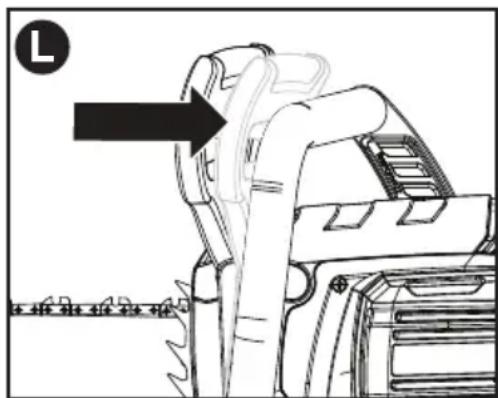
Your chain saw is equipped with a motor chain braking system which will stop the chain quickly in case of kickback.
• Make sure the tool is unplugged.
- Pull the chain brake / front hand guard (3) back into the “set” position as shown in figure L.
• The tool is now ready to use.
NOTE: In the event of kickback, your left hand will come in contact with the front guard, pushing it forward, toward the workpiece. This will stop the tool immediately.
natural_image
Technical line drawing of a mechanical component with a highlighted section and a label 'L' (no text or symbols on the diagram itself)Test the chain brake before every use to make sure it operates correctly.
- Place the tool on a firm surface. Make sure the saw chain (5) is clear of the ground.
- Grip the tool firmly with both hands and turn the chain saw on.
- Rotate your left hand forward around the front handle so the back of your hand
comes in contact with the Chain brake / front hand guard (3) and push it forward, toward the workpiece. The saw chain should stop immediately.
NOTE: If saw does not stop immediately, stop use of tool and bring it to a service center nearest you.
⚠ WARNING: Make sure to set chain brake before cutting.
COMMON CUTTING TECHNIQUES Felling
Felling is the process of cutting down a tree. Be sure battery is fully charged before felling a tree so you can finish on a single charge. Do not fell trees in high wind conditions.
⚠WARNING: Felling can result in injury. It should only be performed by a trained person.
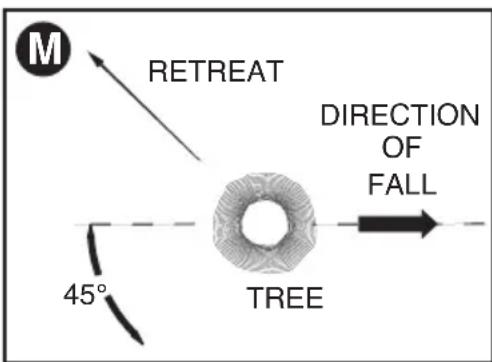
• (Figure M) A retreat path should be planned and cleared as necessary before cuts are started. The retreat path should extend back and diagonally to the rear of the expected line of fall.
- Before felling is started, consider the natural lean of the tree, the location of larger branches and the wind direction to judge which way the tree will fall. Have wedges (wood, plastic or aluminum) and a heavy mallet handy.
Remove dirt, stones, loose bark, nails, staples, and wire from the tree where the felling cuts are to be made.
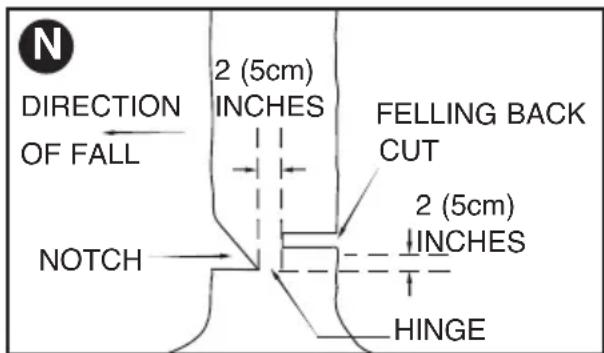
• (Figure N) Notching Undercut - Make the notch 1/3 of the diameter of the tree, perpendicular to the direction of the fall. Make the lower horizontal notching cut first. This will help to avoid pinching of either the saw chain or the guide bar when the second notch is being made.
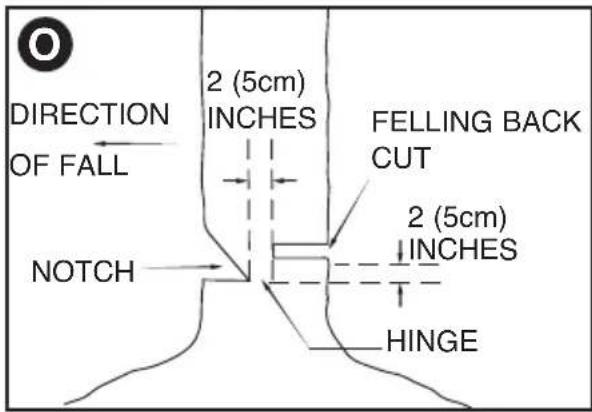
• (Figure O) Felling Back Cut - Make the felling back cut at least 2 inches (51mm) higher than the horizontal notching cut. Keep the felling back cut parallel to the horizontal notching cut. Make the felling back cut so enough wood is left to act as a hinge. The hinge wood keeps the tree from twisting and falling in the wrong direction. Do not cut through the hinge.
• (Figure O) As the felling cut gets close to the hinge the tree should begin to fall. If there is any chance that the tree may not fall in the desired direction or it may rock back and bind the saw chain, stop cutting before the felling cut is complete and use wedges to open the cut and drop the tree along the desired line of fall. When the tree begins to fall remove the chain saw from the cut, stop the motor, put the chain saw down, then use the retreat path planned. Be alert for overhead limbs falling and watch your footing.
Limbing
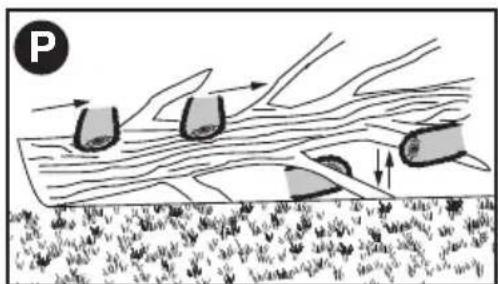
Limbing is removing the branches from a fallen tree. When limbing, leave larger lower limbs to support the log off the ground. Remove the small limbs in one cut. Branches under tension should be cut from the bottom up to avoid binding the chain saw as shown in figure P. Trim limbs from opposite side keeping tree stem between you and saw. Never make cuts with saw between your legs or straddle the limb to be cut.
natural_image
Diagram showing a geological or biological process with arrows indicating flow or movement, no readable text or symbols present.Bucking
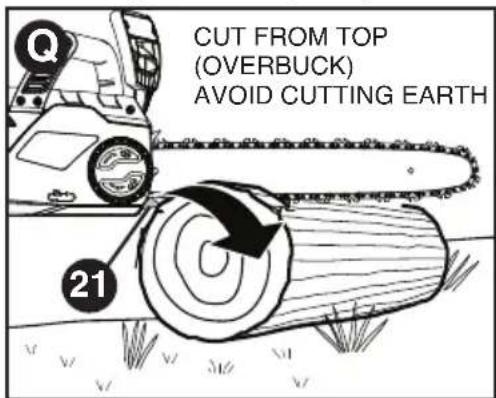
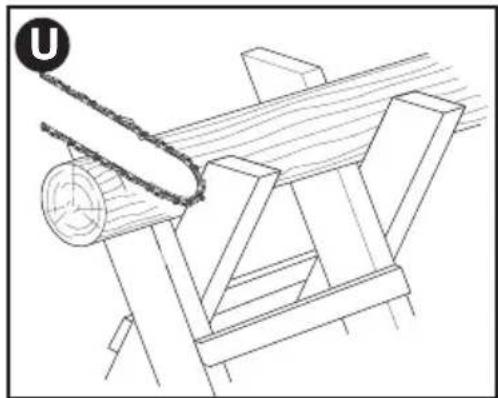
Bucking is cutting a felled tree or log into lengths. How you should cut depends on how the log is supported. Use a saw horse (figure U) whenever possible.
Always start a cut with the chain running at full speed.
- Place the bottom spike (21) of the chain saw behind the area of the initial cut as shown in figure Q.
- Turn the chain saw on then rotate the chain and bar down into the tree, using the spike as a hinge.
- Once the chain saw gets to a 45 degree angle, level the chain saw again and repeat steps until you cut fully through.
- When the tree is supported along its entire length, make a cut from the top (overbuck), but avoid cutting the earth as this will dull your saw quickly.
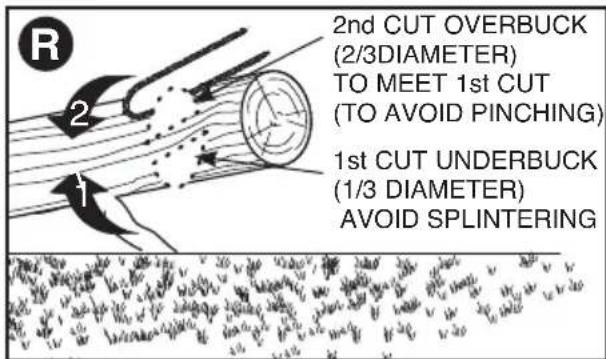
• (Figure R) When supported at one end First, cut 1/3 the diameter from the underside (underbuck). Then make the finished cut by overbucking to meet the first cut.
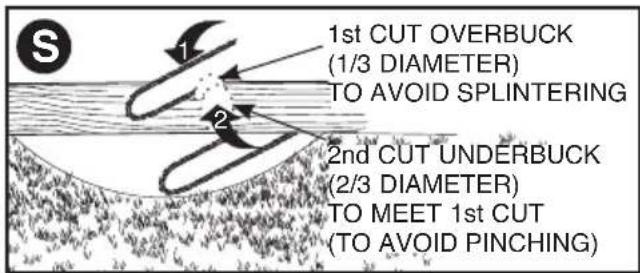
• (Figure S) When supported at both ends First, cut 1/3 down from the top overbuck. Then make the finished cut by underbucking the lower 2/3 to meet the first cut.
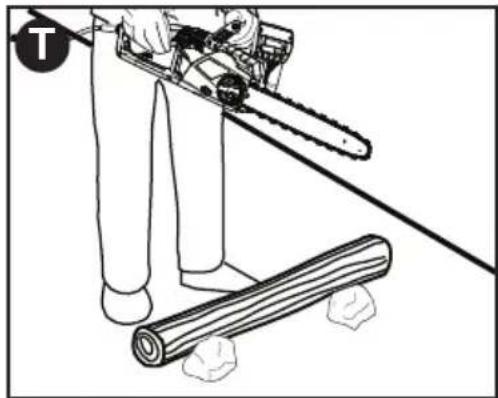
- (Figure T) When on a slope Always stand on the uphill side of the log. When “cutting through”, to maintain complete control release the cutting pressure near the end of the cut without relaxing your grip on the chain saw handles. Don’t let the chain contact the ground. After completing the cut, wait for the saw chain to stop before you move
the chain saw. Always stop the motor before moving from tree to tree.
natural_image
Illustration of a person using a chainsaw to cut wood logs (no text or symbols)• (Figure U) When using a saw horse This is strongly recommended whenever possible. Position the log in a stable position. Always cut on the outside of the saw horse arms.
natural_image
Technical line drawing of a mechanical setup with a wooden beam and rotating component (no text or symbols)CARE AND MAINTENANCE
Use only mild soap and damp cloth to clean the tool. Do not use solvents to clean the plastic housing of the saw. Never let any liquid get inside the tool; never immerse any part of the tool into a liquid.
IMPORTANT: To assure product SAFETY and RELIABILITY, repairs, maintenance and adjustment should be performed by authorized service centers or other qualified service organizations, always using identical replacement parts.
Regular maintenance ensures a long effective life for your chain saw. We recommend you make the following checks on a regular basis:
CHAIN AND BAR
After every few hours of use, remove the guide bar and chain and clean thoroughly.
SAW CHAIN SHARPENING
CAUTION: Sharp chain. Always wear protective gloves when handling the chain. The chain is sharp and can cut you when it is not running.
⚠ WARNING: Sharp moving chain. To prevent accidental operation, insure that the tool is unplugged before performing
the following operations. Failure to do this could result in serious personal injury. NOTE: The cutters will dull immediately if they touch the ground or a nail while cutting.
To get the best possible performance from your chain saw it is important to keep the teeth of the chain sharp. Follow these helpful tips for proper saw chain sharpening:
- For best results use a 4.5mm file and a file holder or filing guide to sharpen your chain. This will ensure you always get the correct sharpening angles.
- Place the file holder flat on the top plate and depth gauge of the cutter.
- (Figure V) Keep the correct top plate (22) filing angle line of 30^ on your file guide parallel with your chain (file at 60^ from chain viewed from above).
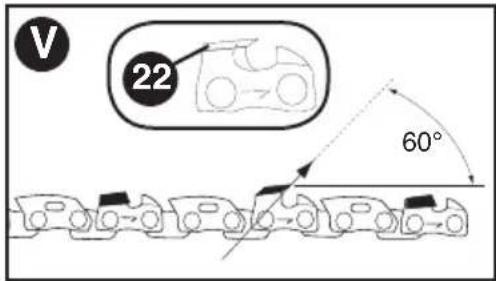
- Sharpen cutters on one side of the chain first. File from the inside of each cutter to the outside. Then turn your saw around and repeat the processes (2,3,4) for cutters on the other side of the chain.
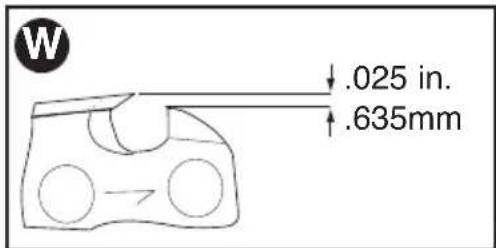
NOTE: Use a flat file to file the tops of the rakers (portion of chain link in front of the cutter) so they are about .025 inch (.635 mm) below the tips of the cutters as shown in Figure W.
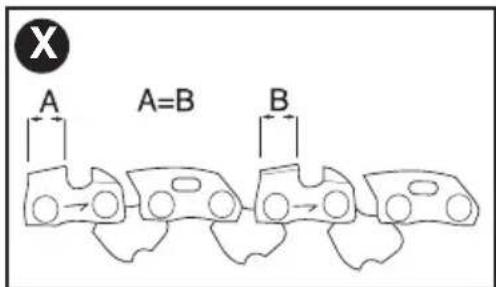
- (Figure X) Keep all cutter lengths equal.
- If damage is present on the chrome surface of the top plates or side plates, file back until such damage is removed.
⚠CAUTION: After filing, the cutter will be sharp, use extra caution during this process. NOTE: Each time the chain is sharpened,
it loses some of the low kickback qualities and extra caution should be used. It is recommended that a chain be sharpened no more than four times.
ACCESSORIES
⚠ WARNING: The use of accessories not recommended in this manual may be hazardous. Accessories are available from your local retailer or nearest BLACK+DECKER service center.
- This chain saw is compatible with the BLACK+DECKER chain RC1800
- Replace bar with a corresponding 18-inch Oregon low-kickback bar.
NOTE: Ensure the new bar is equipped with a tool-free tension assembly (16).
SERVICE INFORMATION
All BLACK+DECKER Service Centers are staffed with trained personnel to provide customers with efficient and reliable power tool service. Whether you need technical advice, repair, or genuine factory replacement parts, contact the BLACK+DECKER location nearest you. To find your local service location, call:
1-800-544-6986, or visit www.blackanddecker.com
FULL TWO-YEAR HOME USE WARRANTY
BLACK+DECKER warrants this product for two years against any defects in material or workmanship. The defective product will be replaced or repaired at no charge in either of two ways.
The first, which will result in exchanges only, is to return the product to the retailer from whom it was purchased (provided that the store is a participating retailer). Returns should be made within the time period of the retailer's policy for exchanges (usually 30 to 90 days after the sale). Proof of purchase may be required. Please check with the retailer for their specific return policy regarding returns that are beyond the time set for exchanges.
The second option is to take or send the product (prepaid) to a BLACK+DECKER owned or authorized Service Center for repair or replacement at our option. Proof of purchase may be required.
This warranty does not apply to accessories. This warranty gives you specific legal rights and you may have other rights which vary from state to state or province to province. Should you have any questions, contact the manager of your nearest BLACK+DECKER Service Center. This product is not intended for commercial use.
FREE WARNING LABEL REPLACEMENT: If your warning labels become illegible or are missing, call 1-800-544-6986 for a free replacement.
LATIN AMERICA: This warranty does not apply to products sold in Latin America. For products sold in Latin America, check country specific warranty information contained in the packaging, call the local company or see the website for warranty information.
TROUBLESHOOTING
Problem
- Chain saw will not start.
- Circuit fuse is blown. • Replace circuit fuse. (If the
Possible Cause
- Cord not plugged in.
Possible Solution
- Plug chain saw into a working outlet.
product
repeatedl
circuit fuse to blow, discontinue use
immediately and have it serviced
at a BLACK+DECKER se or authorized
- Circuit breaker is tripped.
- Reset circuit breaker. (If the product repeatedly causes
breaker to trip, discontinue use immediately and have it serviced
at
a
BLA(
center
or
- Cord or switch is
• Have cord or switch replaced at
damaged.
BLACK+DECKER Service Center or Authorized Servic
actuated.
- Bar / chain overheated.
- Lock-off button not depress the trigger switch.
- Chain too tight.
- Push lock off button and then
- Refer to “adjusting chain tension” section.
- Lubrication needed.
- Refer to "filling the oil reservoir" section.
- Chain is loose.
- Chain tension set
- Refer to “adjusting chain incorrectly. tension” section.
- Poor cut quality.
- Chain tension set
- Refer to “adjusting chain incorrectly. tension” section.
- Chain needs to be sharpened.
- Refer to "saw chain sharpening" section.
replacement.
Note: Excessive tension leads touction in
life of bar & chain. Ensure too is always adequately filled with proper oil.
Refer to "replacing the saw chain"
section.
- Unit runs but does not cut. backwards.
- Chain installed and removing chain.
• Refer to sections for installing
For assistance with your product, visit our website www.blackanddecker.com for the location of the service center nearest you or call the BLACK+DECKER help line at 1-800-544-6986.
Imported by
Black & Decker (U.S.) Inc.,
701 E. Joppa Rd.
Towson, MD 21286 U.S.A.
BlackandDecker.com
1-800-544-6986
BLACK+ DECKER™
SCIE À CHAÎNE
MODE D'EMPLOI
NUMERO DE CATALOGUE CS1518
PRÉPARATION POUR L'UTILISATION DE LA SCIE À CHAÎNE
RÉGLAGE DE LA TENSION DE LA CHAINE
REEMPLACEMENT DE LA CHAÎNE
flowchart
graph TD
    A["H"] --> B["Box with circular icons"]
    B --> C["Vehicle Icon with directional arrows"]
    C --> D["Output"]
SYSTÈME DE GRAISSAGE AUTOMATIQUE
natural_image
Technical line drawing of a mechanical component with a tool and gear assembly (no text or symbols)ESSAI DU FREIN DE CHAÎNE
natural_image
Diagram showing a geological or sedimentary process with arrows indicating flow and movement, no text or symbols present.Tronçonnage
natural_image
Illustration of a person using a chainsaw to cut wood logs (no text or symbols)natural_image
Technical line drawing of a mechanical setup with a chain and wooden beam (no text or symbols)SOINS ET ENTRETIEN
REPLACEMENT GRATUIT DES
--- o DC....corriente directa

REEMPLAZO DE LA CADENA DE LA MOTOSIERRA
natural_image
Technical line drawing of a mechanical component with an arrow indicating direction (no text or symbols)PRUEBA DEL FRENO DE CADENA
natural_image
Diagram showing a geological or biological process with arrows indicating flow or movement, no readable text or symbols present.Aserrado
natural_image
Illustration of a person using a chainsaw to cut wood logs, no text or symbols presentnatural_image
Technical line drawing of a wooden log being cut with a chain, no text or symbols presentDate of purchase · Fecha de compra Invoice No. · No. de factura
Col. Fracc. Universidad
Chihuahua, Chihuahua
Tel. 01 614 413 64 04
Fernando González Armenta
Bolivia No. 605
Col. Felipe Carrillo Puerto
Cd. Madero, Tamaulipas
Tel. 01 833 221 34 50