MAESTRO1 - Sound system Monacor - Free user manual and instructions
Find the device manual for free MAESTRO1 Monacor in PDF.
| Product Type | Sound System |
| Brand | Monacor |
| Model | MAESTRO1 |
| Dimensions (W x H x D) | 126 x 40 x 115 mm |
| Weight | 310 g |
| Power Supply | 9 V - 24 V DC, 90 mA consumption |
| Audio Output | 1 V, 600 ohms, balanced |
| Output Relays | 2 relays, 30 V / 50 mA |
| Supported Audio Formats | MP3 (max 256 kb/s) and WAV (max 44 kHz, 8 bits) |
| SD Card Capacity | 4 GB (original, replaceable) |
| Number of Input Contacts | 6 configurable contacts |
| Number of DTMF Keys | 9 keys (1 to 9) |
| Programmable Schedule | Yes, up to 30 alarms per day |
| Ambiance Mode | Yes, looped file playback |
| Configuration | Via conf.txt file on SD card |
| Time Setting | Via time.txt file on SD card |
| Test Button | Yes, on front panel |
| Indicator LEDs | Green (power), orange (playback), red (fault) |
| Connectivity | Mini USB (for configuration), RJ11 telephone line |
| Maintenance and Cleaning | Clean with a dry, lint-free cloth |
| Safety | Low voltage power supply, do not expose to moisture |
| Spare Parts and Repairability | Removable and replaceable SD card; repair by qualified technician |
| General Information | Free user manual and instructions available in PDF |
Frequently Asked Questions - MAESTRO1 Monacor
User questions about MAESTRO1 Monacor
0 question about this device. Answer the ones you know or ask your own.
Ask a new question about this device
Download the instructions for your Sound system in PDF format for free! Find your manual MAESTRO1 - Monacor and take your electronic device back in hand. On this page are published all the documents necessary for the use of your device. MAESTRO1 by Monacor.
USER MANUAL MAESTRO1 Monacor
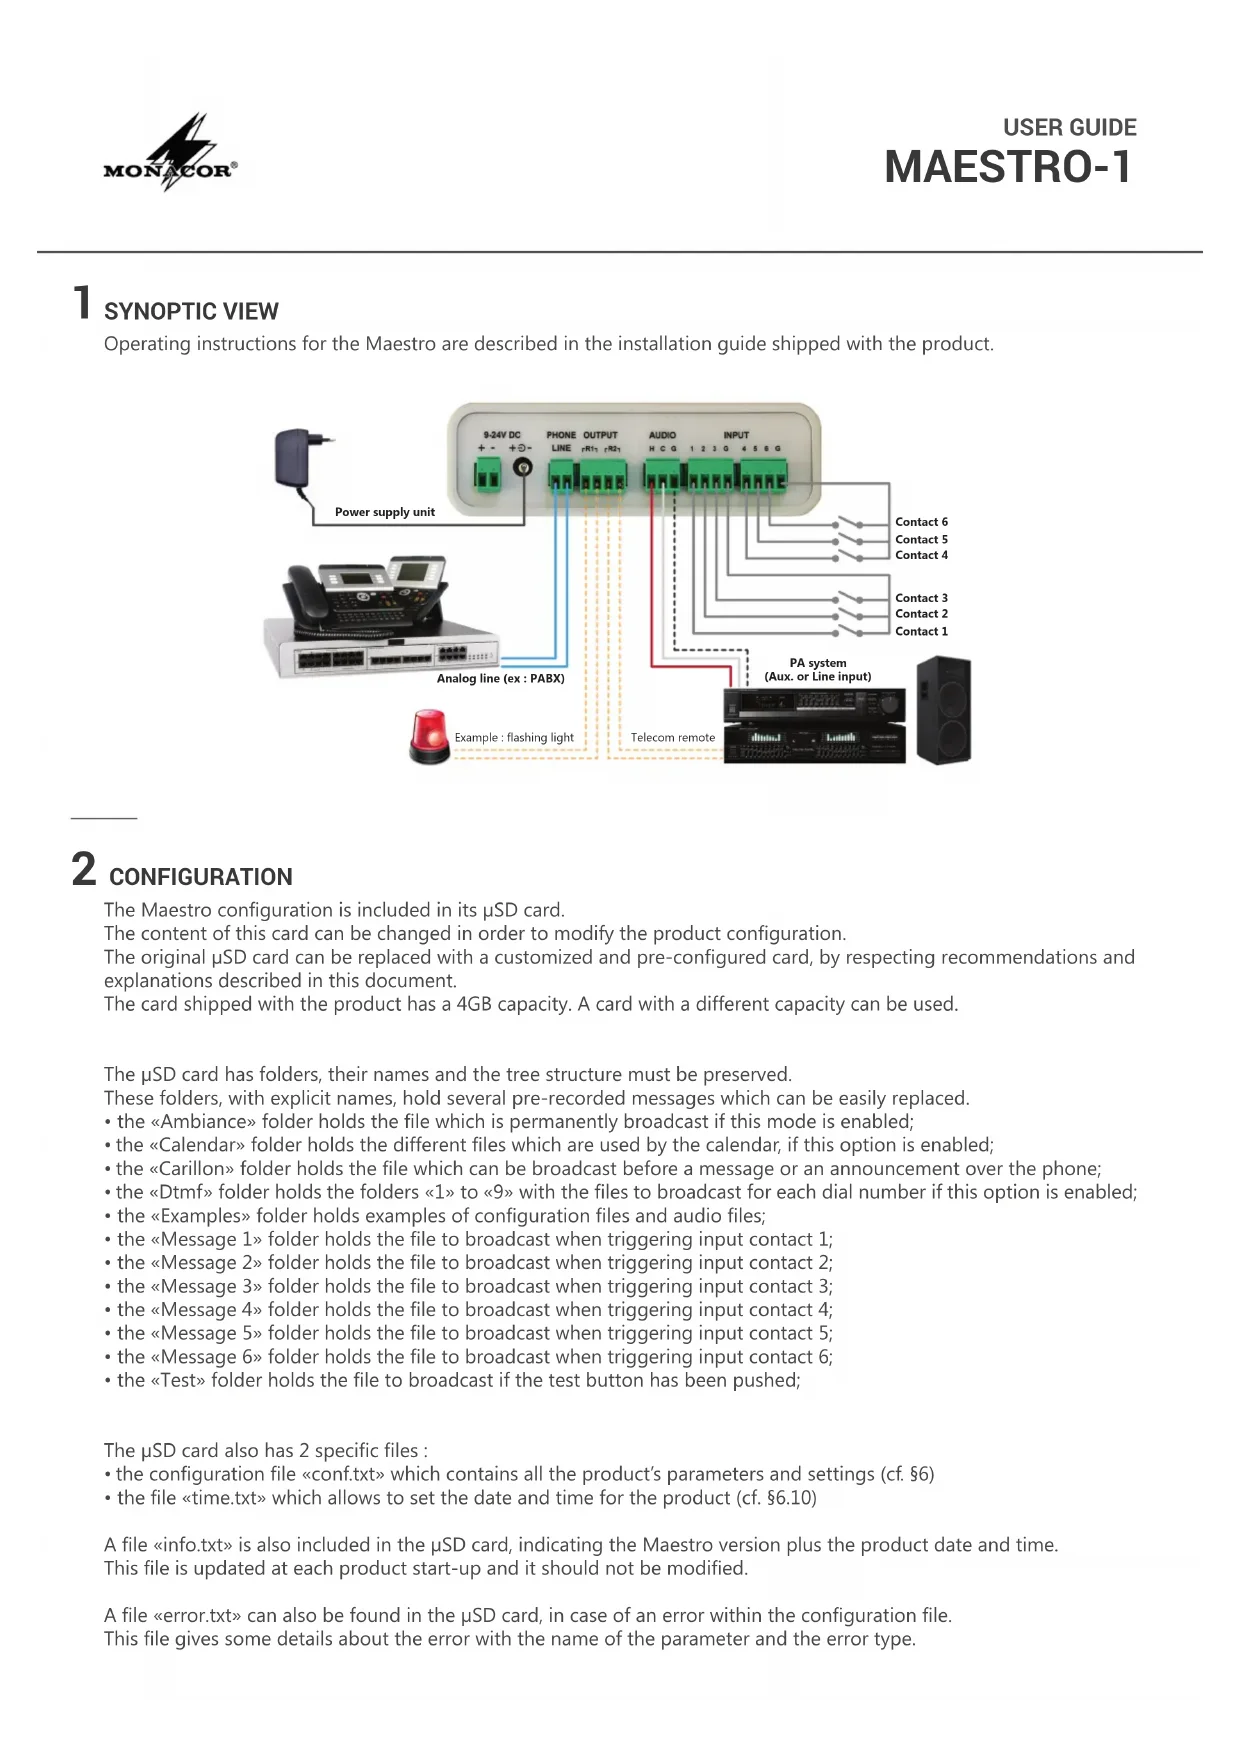
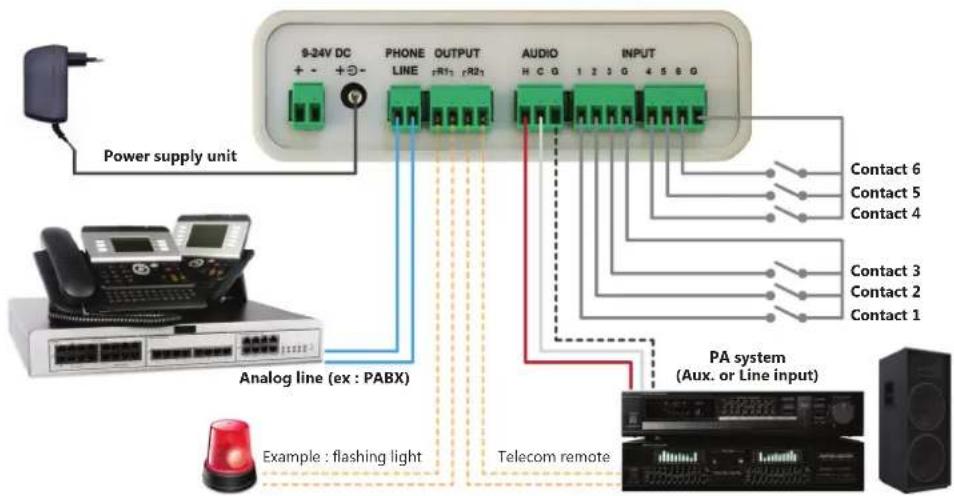
Operating instructions for the Maestro are described in the installation guide shipped with the product.
2 CONFIGURATION
The Maestro configuration is included in its SD card.
The content of this card can be changed in order to modify the product configuration.
The original SD card can be replaced with a customized and pre-configured card, by respecting recommendations and explanations described in this document.
The card shipped with the product has a 4GB capacity. A card with a different capacity can be used.
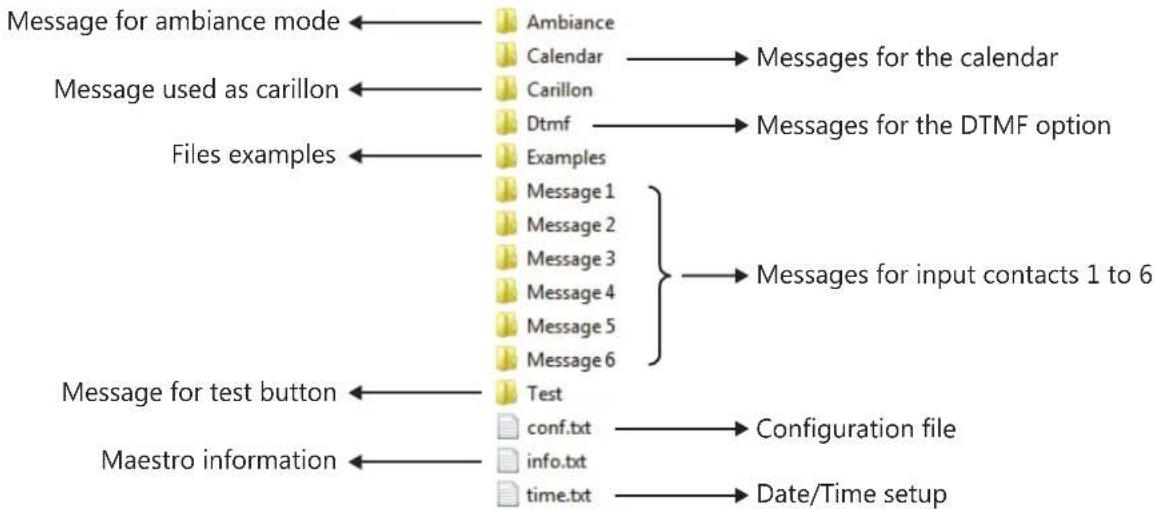
The SD card has folders, their names and the tree structure must be preserved.
These folders, with explicit names, hold several pre-recorded messages which can be easily replaced.
- the «Ambiance» folder holds the file which is permanently broadcast if this mode is enabled;
- the «Calendar» folder holds the different files which are used by the calendar, if this option is enabled;
- the «Carillon» folder holds the file which can be broadcast before a message or an announcement over the phone;
- the «Dtmf» folder holds the folders «1» to «9» with the files to broadcast for each dial number if this option is enabled;
- the «Examples» folder holds examples of configuration files and audio files;
- the «Message 1» folder holds the file to broadcast when triggering input contact 1;
- the «Message 2» folder holds the file to broadcast when triggering input contact 2;
- the «Message 3» folder holds the file to broadcast when triggering input contact 3;
- the «Message 4» folder holds the file to broadcast when triggering input contact 4;
- the «Message 5» folder holds the file to broadcast when triggering input contact 5;
- the «Message 6» folder holds the file to broadcast when triggering input contact 6;
- the «Test» folder holds the file to broadcast if the test button has been pushed;
The SD card also has 2 specific files :
- the configuration file «conf.txt» which contains all the product's parameters and settings (cf. §6)
- the file «time.txt» which allows to set the date and time for the product (cf. §6.10)
A file «info.txt» is also included in the μSD card, indicating the Maestro version plus the product date and time.
This file is updated at each product start-up and it should not be modified.
A file «error.txt» can also be found in the SD card, in case of an error within the configuration file.
This file gives some details about the error with the name of the parameter and the error type.
3 TREE STRUCTURE OF THE MICROSD CARD
4 DIGITAL AUDIO FILES
Messages are digital audio files with MP3 format (max : 256kb/s) or WAV format (max : 44kb/8 bits). Each folder must contain one and only one digital audio file corresponding to the matching message. Only the folder name matters. Filenames, in most folders, are free and not taken into account.
The «Calendar» folder is an exception because it holds all the files used by the calendar. Filenames are taken into account in this folder. They are used in the calendar's parameters (cf. §6.11).
The filename length («filename.mp3») must not exceed 50 characters.
5 MESSAGES
Messages from the Maestro can be triggered by one of the 6 input contacts (cf. §6.7), by a DTMF dial number (cf. §6.8), or by a calendar schedule (cf. §6.11).
Whatever the triggering source, all messages have a list of common parameters which can be modified in order to ensure the proper functioning.
- Broadcast repetition
The Maestro offers the possibility to repeat the broadcast of each message and to insert a delay between these repetitions. This allows to repeat a message without having to create a specific digital audio file.
- Priority
The Maestro handles messages priority to decide on the action to take if a broadcast is already in progress.
If a message with higher priority is triggered, the message in progress is stopped and the new message, or the phone announcement, will be broadcast instead.
By default, the test button message has the higher priority, followed by messages from input contacts 1 to 6 and DTMF dial numbers 1 to 6, then DTMF number 7 to 9, next messages from the calendar and finally the phone announcement.
Volume
The Maestro allows to adjust the volume for each message to broadcast.
Volume management is optional as the files included in the product have all been normalized. Furthermore, the product has 2 front panel volume buttons, for the messages (MES.) and for the voice (VOI.) during a phone announcement.
Nevertheless, if a new message is used on the product and if its audio rendering need to be tuned with the other messages, it is possible to modify the volume parameters and/or the front panel volume in order to so.
Output relays
The Maestro has 2 output relays, R1 et R2, which can be connected to the PA system in order to command or mix an audio input, or to select a broadcast zone.
For each message, it is possible to activate relay R1, relay R2, or both R1 and R2. Relays can also be deactivated.
The format of each line is important and omitting a semi-colon leads to an error on this parameter.
The code is essential to identify the parameter and this number must not be modified.
The parameter name is optional and can be modified by the user but it cannot be empty.
The parameter value must take one of the possible values. For each parameter, the list of values is described in this document, but also in the «conf.txt» file itself, in parenthesis at the end of each line.
If an error occurs in one of the parameters, the warning LED (red) lights up and an «error.txt» file, describing this error, is created in the SD card. The warning LED (red) also lights up if the SD card is pulled off.
In case of any error on a parameter, of a missing SD card or if the configuration file «conf.txt» is deleted, default values are used.
These default values are also used for any missing parameter in the configuration file, but in this case no error will be displayed. This choice has been made to propose shorter and simpler configuration files, containing only a few parameters.
6.1 OPERATING MODES
The Maestro has one of 2 main operating modes, selected by using the following parameter :
100;MODE;1;
With the standard mode (1), used by default, you just need to dial the Maestro number to make an announcement from any phone. To end the announcement and disconnect the communication, you can hang up the phone or remain silent. If you hang up the phone, a few busy tones will be broadcast throughout the PA system (cf. §6.6).
In this mode, you can trigger any of the 6 input contacts to broadcast the matching pre-recorded message.
It is also possible to program the automatic broadcast of messages using a calendar (cf. §6.11).
The Maestro handles messages priority if another message is already in process (cf. §5).
The ambiance mode (2) broadcasts permanently the message held in the «Ambiance» folder.
In this mode, all other functionalities are disabled and no other broadcast is allowed.
In the standard mode, and only in this mode, the DTMF option can alter the main operating mode :
110;DTMF_OPTION;0;
By default, the DTMF option is disabled (0).
It the DTMF option is enabled (1), then the phone announcement process is altered as dialling the Maestro number does not automatically start the communication with the PA system.
Indeed, once the product has picked up, it waits for a DTMF dial to decide which action to perform :
-
dial «0» to start the communication with the PA system and make an announcement from any phone;
-
dial «1» to «9» to broadcast a pre-recorded message, held in the matching folder.
You can trigger any of the 6 input contacts as in the standard mode and the message priority handling is extended to the DTMF messages : a message triggered by one of the input contacts or a DTMF dial, and which has a higher priority level, will stop any message in progress and will be broadcast instead (cf. §5).
It is also possible to program the automatic broadcast of messages using a calendar (cf. §6.11).
6.2 AMBIANCE MODE
In the ambiance mode (cf. §6.1), the Maestro broadcasts permanently the message held in the «Ambiance» folder. In this mode, all other functionalities are disabled and no other broadcast is allowed.
113;VOLUME_AMBIANCE;0;
The ambulance message has a volume (0) by default. Value 0 is for the maximal volume and 80 for the minimal volume.
The audio output can also be tuned using the volume button (MES.) on the front panel.
114;RELAY_AMBIANCE;1;
During the broadcast of the ambiance message, it is possible to activate output relays.
By default, output relay R1 is activated (1) during the broadcast of the ambiance message.
It is possible to activate relay R2 (2) or both relays R1 and R2 (3). Relays can also be deactivated (0).
6.3 TEST BUTTON
The Maestro has a test button on the front panel which allows to broadcast the file held in the «Test» folder.
111;PRIORITY_TEST_BUTTON;0;
By default, the message triggered by the test button has the highest priority level (0).
Value 0 is for the maximal priority and 99 for the minimal priority.
112;RELAY_TEST_BUTTON;1;
By default, output relay R1 is activated (1) during the broadcast of the message triggered by the test button.
It is possible to activate relay R2 (2) or both relays R1 and R2 (3). Relays can also be deactivated (0).
6.4 ERROR DETECTION
The Maestro can activate an output relay if an error is detected in the configuration (cf. §6).
115;RELAY_ERROR_DETECTION;0;
By default, none of the output relay is activated (0) during an error detection.
It is possible to activate relay R1 (1), to activate relay R2 (2) or both relays R1 and R2 (3).
6.5 CARILLON
The Maestro has an audio file, held in the «Carillon» folder, to broadcast before a phone announcement or a message. The volume of the carillon can be adjusted.
120;ANNOUNCEMENT_CARILLON;1;
By default, the carillon is enabled (1) before a phone announcement.
You just need to set this value to 0 in order to disable the carillon.
121;MESSAGE_CARILLON;0;
By default, the carillon is disabled (0) before a message.
You just need to set this value to 1 in order to enable the carillon.
122;VOLUME_announcement_CARILLON;0;
The carillon before a phone announcement has a volume (0) by default. Value 0 is for the maximal volume and 80 for the minimal volume. The audio output can also be tuned using the volume button (MES.) on the front panel.
123;VOLUME_MESSAGE_CARILLON;0;
The carillon before a message has a volume (0) by default. Value 0 is for the maximal volume and 80 for the minimal volume. The audio output can also be tuned using the volume button (MES.) on the front panel.
6.6 PHONE ANNouncement
The Maestro allows to make an announcement by calling its phone line from any phone.
If the DTMF option is enabled (cf. §6.1), you need to dial «0» in order to make an announcement.
150;BUSY_TONE;500;
This parameter, by default (500)ms, indicates the duration of the busy tone rhythm transmitted over the phone line.
This parameter should not be modified. The minimal value is 0ms and the maximal value is 5000ms.
151;NB_BUSY_TONE;1;
This parameter defines the number of busy tones, once the phone has been hanged up, that the Maestro needs before it can end the communication. The default value is (1). The minimal value is 1 and the maximal value is 255.
These busy tones will be broadcast throughout the PA system, so this value should be kept to a minimum.
152;SILENCE_DETECTION;2;
This parameter, by default (2)s, defines the time after which the Maestro automatically ends the communication if no sound is made (silence detection). The minimal value is 1s and the maximal value is 3600s.
By default, the phone announcement has a priority level of (11).
The value 0 corresponds to the maximal priority and 99 to the minimal priority.
154;RELAY VOICE:2;
By default, output relay R2 is activated (2) during a phone announcement.
It is possible to activate relay R1 (1) or both relays R1 and R2 (3). Relays can also be deactivated (0).
6.7 MESSAGES - INPUT CONTACTS
A message can be triggered for each input contact of the Maestro.
For input contact 1, the file held in the «Message 1» folder will be broadcast.
210;TYPE I1;0;
By default, input contact 1 is normally open, in pulse mode (0). In this case, a short closing of the contact triggers the broadcast of the message held in the «Message 1» folder.
Input contact 1 can be normally closed, in pulse mode (1). In this case, a short opening of the contact triggers the broadcast of the message held in the «Message 1» folder.
Input contact 1 can be normally open, in permanent mode (2). In this case, the message starts to broadcast as soon as the contact is closed and it will continue as long as the contact remains closed or until the end of the audio file.
Input contact 1 can be normally closed, in permanent mode (3). In this case, the message starts to broadcast as soon as the contact is open and it will continue as long as the contact remains open or until the end of the audio file.
211;NB_BROADCAST_I1;
This parameter defines the number of broadcasts for the file held in the «Message 1» folder. The default value is (1). It is possible to increase this value in order to broadcast this message several times in a row, the maximal value is 255.
212;INTERVAL_BROADCAST_I1;0;
If the number of broadcasts is higher than 1, this parameter defines the interval in seconds between each broadcast. The default value is (0)s and there is no interval between broadcasts. The maximal value is 3600s (i.e. 1h).
213;PRIORITY I1;1;
By default, «Message 1» has a priority level of (1).
The value 0 corresponds to the maximal priority and 99 to the minimal priority.
214;VOLUME I1;0;
«Message 1» has a volume (0) by default. Value 0 is for the maximal volume and 80 for the minimal volume.
The audio output can also be tuned using the volume button (MES.) from the front panel.
215:RELAY I1:1;
By default, output relay R1 is activated (1) during the broadcast of «Message 1».
It is possible to activate relay R2 (2) or both relays R1 and R2 (3). Relays can also be deactivated (0).
In a similar way, there are parameters for the messages triggered by input 2 to input 6 :
220;TYPE_12;0;
221;NBRE_DIFF_I2;1;
.
.
260;TYPE_16;0;
261;NB_BROADCAST_16;1;
262;INTERVAL_BROADCAST_I6;0;
263;PRIORITY 16;6
264;VOLUME_I6;0;
265;RELAY_I6;1;
Default values for the various parameters are identical for all messages, except for priority.
The priority levels for input contacts are set to the values 1 to 6.
213;PRIORITY_I1;1
223;PRIORITY_12;2
233;PRIORITY_13;3
243;PRIORITY I4;4
253;PRIORITY 15;5
263;PRIORITY I6;6
Each message has a priority level, by default.
The value 0 corresponds to the maximal priority and 99 to the minimal priority.
6.8 MESSAGES - DTMF DIAL
If the DTMF option is enabled (cf. §6.1), it is possible to call the Maestro in order to broadcast a message by dialling a number.
If you dial number «1», the file held in the «DTMF > 1» folder will be broadcast.
So messages «DTMF > 1» to «DTMF > 9» are triggered by dialling number «1» to «9».
To make an announcement from the phone, you just have to dial 0 (cf. §6.6).
As with input contacts, there are parameters for the messages triggered by DTMF dial numbers «1» to «9»:
- 410;NB_BROADCAST_DTMF_1;1;
- 411;INTERVAL_BROADCAST_DTMF_1;0;
.
.
490;NB BROADCAST DTMF 9:1;
491;INTERVAL_BROADCAST_DTMF_9;0;
492;PRIORITY_DTMF_9;9
493;VOLUME_DTMF_9;0
494;RELAY_DTMF_9;1;
Default values for the various parameters are identical for all messages, except for priority.
The priority levels for messages triggered by DTMF dial are set to the values 1 to 9.
So messages triggered by DTMF dial «1» to «6» have the same priority level as those triggered by input contacts 1 to 6.
412;PRIORITY DTMF 1:1;
422;PRIORITY DTMF 2:2
432:PRIORITYDTME 3:3
442:PRIORITYDTME4:4
452;PRIORITY_DTMF_5;5
462;PRIORITY_DTMF_6;6
472;PRIORITY_DTMF_7;7;
482;PRIORITY DTMF 8:8
492;PRIORITY_DTMF_9;9
Each message has a priority level, by default.
The value 0 corresponds to the maximal priority and 99 to the minimal priority.
6.9 OUTPUT RELAYS
The Maestro has 2 output relays which can be configured to be normally open (NO) or normally closed (NC).
311;TYPE_R1;2;
By default, the output relay R1 is normally open (2) and it is closed when activated.
The relay R1 can be normally closed (3) and it is opened when activated.
321;TYPE R2;2;
By default, the output relay R2 is normally open (2) and it is closed when activated.
The relay R1 can be normally closed (3) and it is opened when activated.
These parameters allow to define the default rest position for each output relay.
Output relay activation can be configured for each message as well as for the phone announcement (cf. §5).
It is also possible to activate output relays during an error detection (cf. §6.4).
A normally closed default position is an interesting choice in case of an error detection use. Indeed, it allows to detect a power failure of the Maestro, which will open the relay.
6.10 DATE AND TIME SETUP
To setup the product date and time, use the file «time.txt» included the μSD card :
- connect the Maestro to a computer using the USB cable
- open the file «time.txt» with a text editor
- set the value 1 in place of the 0 located at the beginning of the file
- set the date and time using the format : 17/06/16;09H00m00s;vendredi
- save the modifications (file > save) to setup the date and time for the Maestro
6.11CALENDAR
The Maestro has a calendar in order to program the automatic broadcast of messages at specific times :
700;CALENDAR;0;
By default, the calendar is disabled (0).
If the calendar is enabled (1), messages will be automatically broadcast on the scheduled date and time.
The maximal number of alarms per day is : 30, the maximal number of fixed public holidays is : 10, the maximal number of special periods is : 10, and the maximal number of audio files for the calendar is : 20.
All messages triggered by the calendar use the same parameters for priority and output relay activation.
701;PRIORITYCALENDAR;10;
By default, messages triggered by the calendar have a priority level of (10).
The value 0 corresponds to the maximal priority and 99 to the minimal priority.
702;RELAYCALENDAR;1;
By default, the output relay R1 is activated (1) during the broadcast of messages triggered by the calendar.
It is possible to activate relay R2 (2) or both relays R1 and R2 (3). Relays can also be deactivated (0).
The calendar messages are scheduled using the following format :
710;MONDAY;9H00,10H00,11H00,14H00,15H00,16H00,17H00;sonnerie_1.mp3;1;0;0
720;TUESDAY;9HOO,10HOO,11HOO,14HOO,15HOO,16HOO,17HOO;sonnerie_1.mp3;1;1;0;0
730;WEDNESDAY;9H55,10H55,11H55;sonnerie_1.mp3;1;0;0
For each schedule line, in addition to the code and the name, the value format defines :
- the list of hours, separated by comma, with the form 09H00 or 09H10m14s;
- the filename corresponding to the triggered message;
- the number of broadcasts for this message (optional parameter);
- the delay between each broadcast (optional parameter);
- the message volume (optional parameter).
All messages for the calendar must be placed in the «Calendar» folder.
If several messages should be broadcast on the same day, duplicate the corresponding line, change the list of hours and indicate the message filename on the newly created line.
The calendar allows weekday schedules, fixed public holiday schedules and special period schedules.
The special period schedules take priority over the fixed public holiday schedules, which take priority over the weekday schedules : if a special period is defined from Monday, December 25, 2017 to Sunday, December 31, 2017, then it is the schedule of the special period that will be executed on Monday, December 25, 2017.
The 3 schedule types are similar. Only the code and the first part of the value format will be changed.
For weekday schedules, use codes from 710 to 770 in order to define the week of the day.
710;MONDAY;9H55,10H55,11H55;sonnerie_1.mp3;1;0;0
For fixed public holiday schedules, use code 780 and define the date (day/month).
780;CHRISTMAS;25/12;9H55,10H55,11H55;sonnerie_1.mp3;1;0;0;
For special period schedules, use code 790 and define the start date and the end date of the special period (day/month/year).
790;HOLIDAYS;24/12/17;31/12/17;0
In this last example, the value (0) indicates that there is nothing to broadcast and this can be used to force the calendar message broadcasts to stop on some days.
If the calendar does not find any match for a given day, it won't broadcast any message that day.
The Maestro configuration is included in its SD card.
The main elements are described in this document.
The user guide, included in the SD card, gives a full and detailed description.
The SD card has folders, their names and the tree structure must be preserved. These folders, with explicit names, hold several pre-recorded messages (MP3 or WAV files) which can be easily replaced.
«Carillon» holds the message to broadcast as carillon and «Message 1» to «Message 6» hold the corresponding files used when triggering inputs 1 to 6.
«Ambiance» folder holds the file which is permanently broadcasting if this option is activated. «Calendar» and «Dtmf» folders also hold the files used if these options are activated.
The SD card also has a time.txt file allowing to set the product time and date, and a configuration file conf.txt allowing to view and modify all product settings. This file lists all parameters with the format CODE;PARAMETER_NAME;VALUE:
100:MODE;0; (Maestro mode selection)
221:NB_BROADCAST_I2;1(number of message broadcast for input 2)
700;CALENDAR;1; (calendar activation)
If an error occurs in one of the parameters, the warning LED (red) lights up and a file, named «error.txt», is created on the SD card with details on the error.
In case of an error, or if the SD is pulled off, default values are used.
7 SPECIFICATIONS
Power supply
Consumption
Audio output
Output relays
Dimensions
Weight
9V-24VDC
90 mA
1 V, 600 ohms, balanced
30V,50mA
126× 40× 115mm
310g

MONACOR INTERNATIONAL GmbH & Co. KG
Zum Falsch 36
28307 Bremen
Germany - http://www.monacor.com

INSTALLATION GUIDE
MAESTRO-1
1 CONTENT OF THE BOX
- 1 Maestro announcement adapter
- 1 μSD card 4GB (included in the Maestro)
- 1 power supply unit 9V DC
- 1 USB to mini USB cable
2 SYNOPTIC VIEW
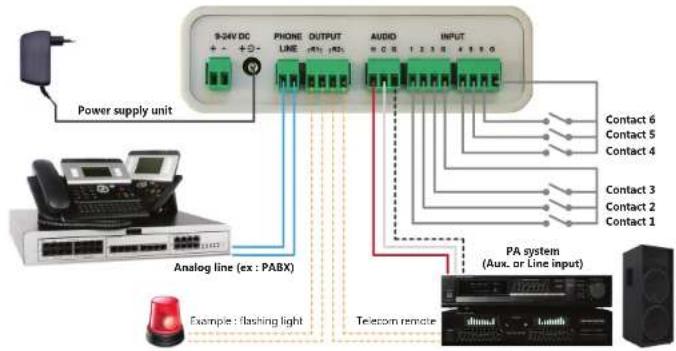
3 GETTING STARTED
To get started, the Maestro should be powered and its audio output should be connected to a PA system input.
Then, the test button can be pushed or any of the 6 inputs can be triggered in order to broadcast a pre-recorded message.
Once the phone line has been connected, its corresponding number can be dialled from any phone in order to make an announcement through the PA system. To disconnect the communication, you may hang up the phone or remain silent.
4 CONNECTIONS 5 OPERATING ELEMENTS
POWER SUPPLY
The Maestro can be powered by the power supply unit 9V DC or by an external power supply 9V to 24V DC (not included).
It can also be powered by USB cable during its connection to a computer, but only temporarily, in order to change the default configuration.
AUDIO
The balanced audio output (H / C) is connected to a PA system auxiliary or line input with optional shield (G).
The audio connection guide, available on the SD card, gives further information.
PHONE LINE
The phone line is connected to an analog line from the telephone network, either directly or through a telephone system (PBX).
You can dial its number to make an announcement from any phone. To end the announcement and disconnect the communication, you can remain silent (~2s) or hang up the phone, which will broadcast 1 or 2 busy tones through the PA system.
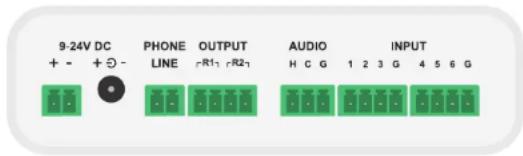
OUTPUT
The Maestro has 2 output relays which can be connected to command external actions.
The first relay (R1) is activated during message broadcasting and the second relay (R2) during phone announcement. These outputs are usually connected to the PA system in order to mix audio inputs.
INPUT
The Maestro has 6 input contacts, which can be connected by using one of the common pins (G).
The triggering of an input broadcasts the corresponding message (cf. §6).
Message 1 has priority over mess. 2, which has priority over mess. 3 ...
A higher priority message ends any broadcast in progress.
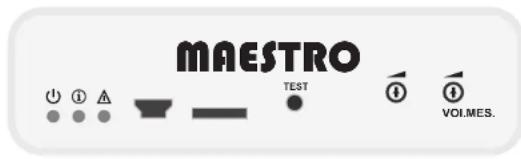
LEDS
The power LED (green) lights up when the Maestro is powered on.
The information LED (orange) lights up during message broadcasting or an announcement over the phone.
It blinks briefly at product startup and flashes in cadenced manner during USB connection.
The warning LED (red) lights up if the SD card is pulled off or if it contains an error in its configuration.
USB MINI CONNECTOR
The USB mini connector is used to connect the Maestro to a computer in order to change the pre-recorded messages or the configuration.
The Maestro can be powered by USB cable during its connection to a computer, but only temporarily, in order to change the default configuration.
MICRO SD CARD
The SD card holds the pre-recorded messages (MP3 or WAV files) and the product configuration files (cf. §6).
If the card is pulled off, the red LED indicates an error and the Maestro allows only an announcement over the phone.
A custom SD card, or one with higher capacity, can replace the one delivered with the product.
An error is indicated in case of any problem in the configuration file.
TEST BUTTON
A brief push on the test button triggers the broadcasting of a pre-recorded message in order to check that the Maestro is working properly.
VOLUMES
The Maestro has 2 volumes settings for message (MES.) and voice during a phone announcement (VOI).
These manage to regulate the audio output level.
1 SYNOPTIQUE DE CÂBLAGE
Germany - http://www.monacor.com

NOTICE D'INSTALLATION
MAESTRO-1