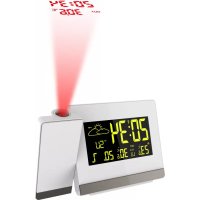
WT 486 - Alarm clock radio TECHNOLINE - Free user manual and instructions
Find the device manual for free WT 486 TECHNOLINE in PDF.
User questions about WT 486 TECHNOLINE
0 question about this device. Answer the ones you know or ask your own.
Ask a new question about this device
Download the instructions for your Alarm clock radio in PDF format for free! Find your manual WT 486 - TECHNOLINE and take your electronic device back in hand. On this page are published all the documents necessary for the use of your device. WT 486 by TECHNOLINE.
USER MANUAL WT 486 TECHNOLINE
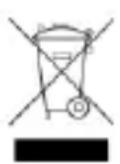
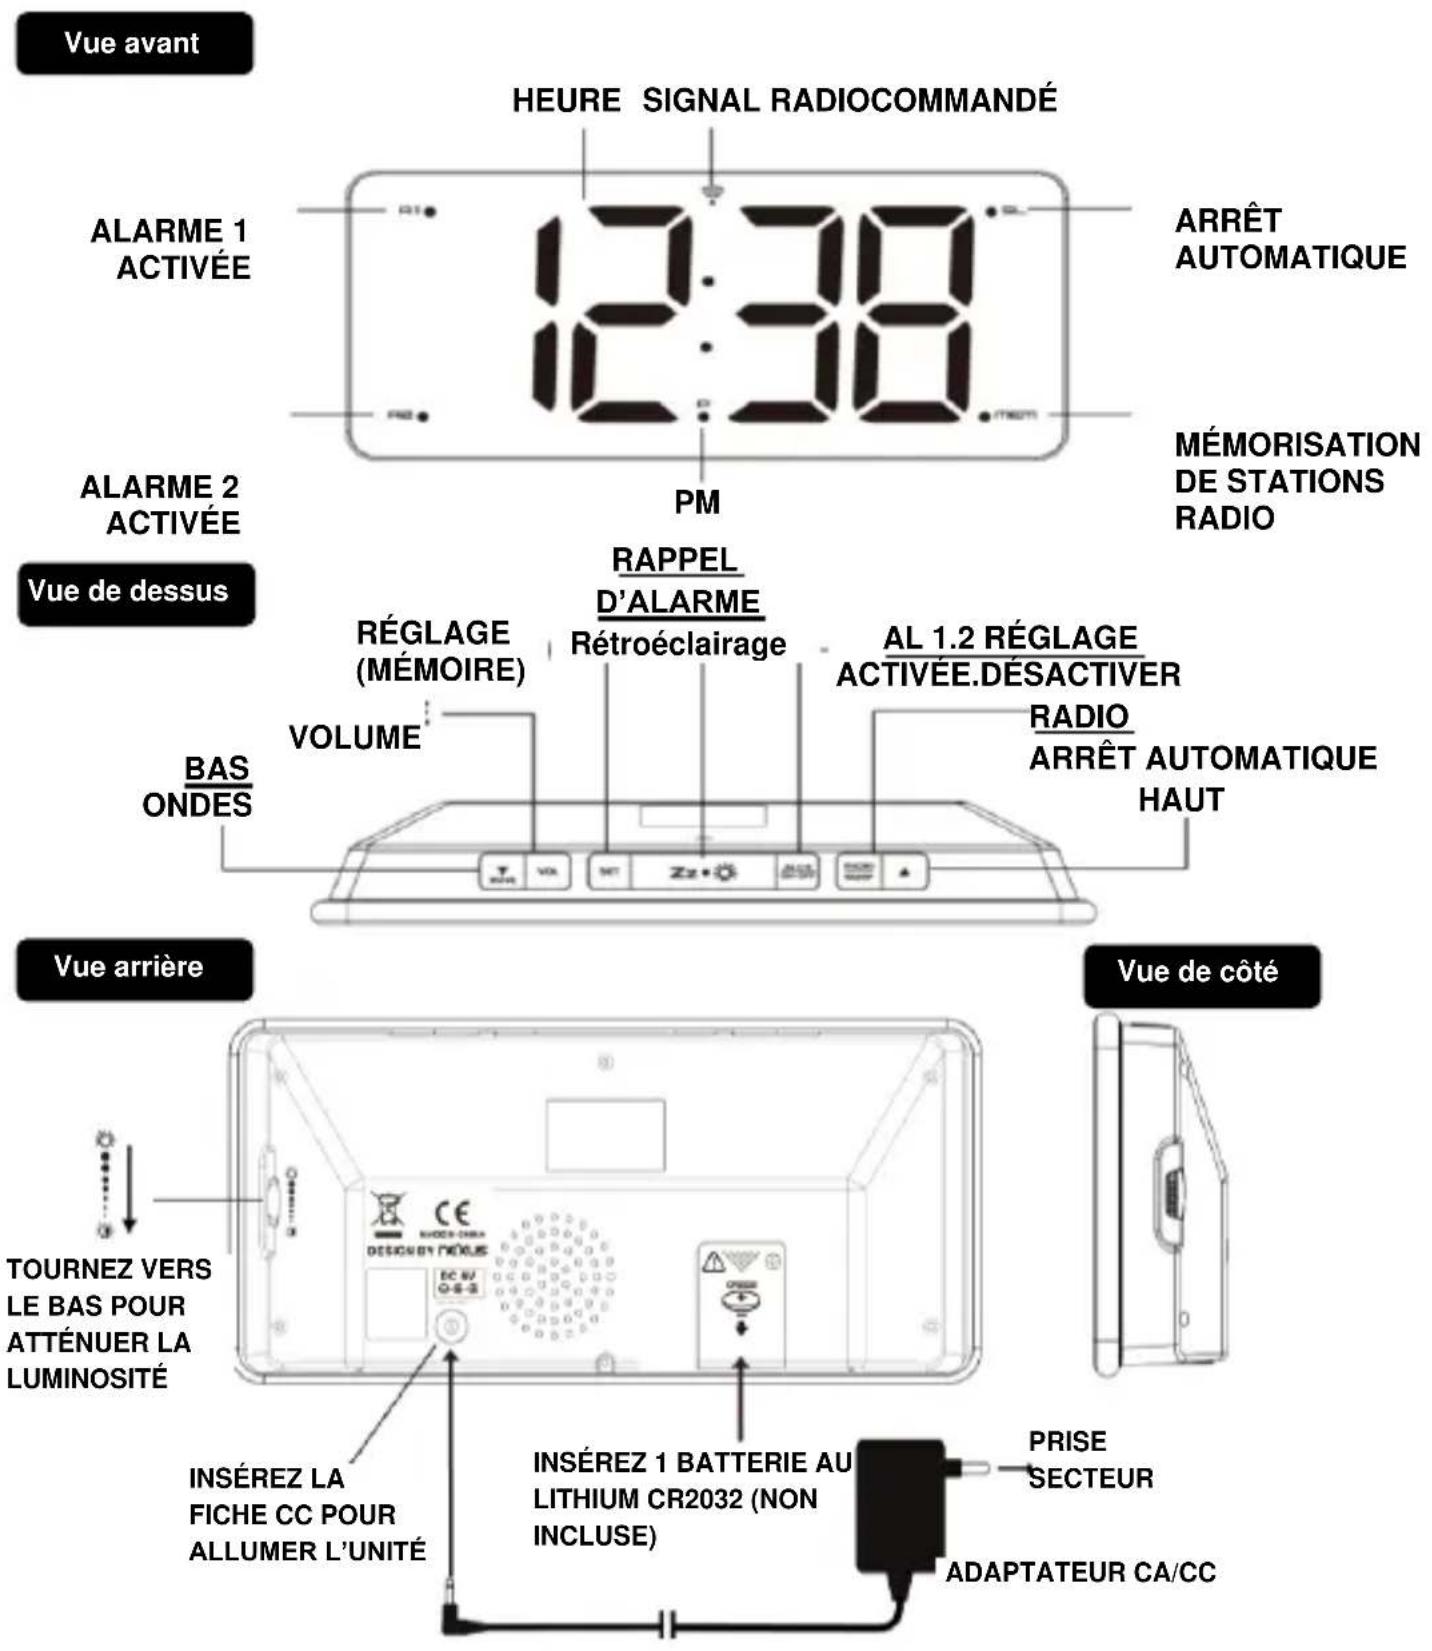
Insert the AC/DC adaptor to any 230V AC household outlet. Then insert the DC jack to the back case of your unit. Your clock radio will be powered on and it starts to receive DCF radio controlled time signal at low LED brightness.
During DCF reception, radio controlled time LED flashes. All buttons (except ZZ^* and the radio do not function.
STEP 2
When your clock radio receives DCF signal, the time will be set and LED become static.
Remark : The LED will disappear when the clock fails to receive the DCF signal.
BACKUP BATTERY INSTALLATION
Your clock radio requires one CR2032 lithium battery (not included) to provide backup power to the clock in the event of a temporary power interruption.
- Place your unit face down on a flat surface.
Use screw driver to open the backup battery compartment door located on the back of the unit. - Slide and remove the battery cover at the bottom of your unit.
- Insert one new CR2032 lithium battery into the battery compartment with the "+" side facing up as indicated.
- Replace the battery cover and tighten the battery door screw.
If AC power is interrupted, the LED display will go off and both the radio and the alarm will not function. The backup battery will keep the time and all settings of your unit. Make sure a fresh CR2032 lithium battery is used. A fresh CR2032 battery could backup your clock continuously for around 1 week.
DCF SIGNAL RECEPTION AND SIGNAL INDICATOR
The radio controlled LED indicates different status of radio controlled reception : -
Receiving DCF signal (LED flashing)
Successful Reception (LED becomes static)
Failed Reception (LED disappear)
During reception, press / WAVE once will display reception mode and signal strength indication:-
When strong DCF signal is detected, display shows with 3 bars
When weak or no DCF signal is detected, display shows r CDuring reception, the signal strength may move from 1 bar to 2 bars to 3 bars. This is normal since the clock is detecting DCF signal and other signals in the air at the same time.
Press SET will return to the time display with LED flashing.
AUTOMATIC AND MANUAL DCF TIME SIGNAL RECEPTION
Your clock starts automatic reception everyday at 1:00, 2:00, and 3:00. If it fails to receive the DCF time signal at 3:00, it will start reception at 4:00. If it fails again, it will start reception at 5:00. If it fails again, it will start automatic reception at 1:00 again in the next day.
MANUAL RECEPTION
At normal time display (radio is off), press and hold / W A V E , your clock will start manual reception. Press and hold / W A V E to stop DCF reception.
When your clock radio is receiving the radio controlled time signal, the LED digits becomes dim. After reception is completed, it will revert to the preceding brightness level which you originally selected.
SETTING TIME, 12/24HR AND SNOOZE DURATION
Press and hold SET, the time digits change to "00". Press or to set the time zone.
-01 GMT 00 hour (e.g. UK)
00 GMT + 1 hour (e.g. Germany)
01 GMT + 2 hour (e.g. Finland)
- Press SET again, the hour digits flash. Press or to set the hours. Press and hold or will accelerate your setting.
- Press SET again, the minute digits flash. Press or to set the minutes. Press and hold or will accelerate your setting.
- Press SET again, the display shows "24Hr" flash, press or to select 12Hr 24Hr. In 12Hr mode, P (PM) LED will appear on the display to indicate afternoon time. There is no AM indicator.
Press SET again, "2016" digits flash. Press or button to set the year. - Press SET again, month digits flash. Press or button to set the date.
- Press SET again, date digits flash. Press or button to set the month.
- Press SET again, the display shows "05" and flashes. Press or to select your snooze time from 5 to 60 minutes.
- Press SET again or if no key pressed for approx. 10 seconds to exit the setting mode.
SETTING THE ALARMS
TO SET ALARM 1: Press and hold AL 1.2 / ON.OFF, the A1 LED and the hour digits flash. Press or to set the Alarm 1's hours. Press and hold or will accelerate your setting.
- Press AL 1.2/ ON.OFF once again, the minute digits flash. Press or to set the Alarm 1's minutes. Press and hold or will accelerate your setting.
- Press AL 1.2/ ON.OFF again, the LED display shows "bu". To select the sound sources of your alarm, press or to select :-bu = wake-to-buzzerrd = wake-to-radio
Press AL 1.2/ ON.OFF again, "1-7" flashes, Press or to select "6-7" or "1-5" or "1-1".
1-5 = Monday to Friday only
6-7 = Saturday and Sunday only
1-7 = Monday to Sunday
1-1 = single-day alarm : after the alarm sounds and is stopped, the A1 LED goes off. Press AL 1.2/ON.OFF once to re-active another single-day alarm of Alarm 1.
TO SET ALARM 2: Press AL 1.2/ ON.OFF again, the A2 LED and the hour digits flash.
Press or to set the Alarm 2's hours. The repeat step 2 to 4 above to set alarm 2.
To store your alarm settings, press SET once (or if no button is pressed in around 10 seconds), your clock radio will return to normal time display mode.
When the related alarm is turned on, it will be indicated by the appearance of the A1 and / or the A2 LED on the left side of the display.
Note: Alarm function only works with AC/DC adaptor only.
TO TURN ON / OFF ALARM 1 AND 2
- Press AL 1.2/ON.OFF once to activate Alarm 1, A1 LED appears.
- Press AL 1.2/ON.OFF once again to activate Alarm 2, A2 LED appears.
- Press once again to activate both Alarm 1 and 2. Both A1 and A2 LED's appear.
- Press once again to deactivate both alarms, both A1 and A2 LED's disappear.
STOPPING AND RESETTING THE ALARM TO COME ON THE NEXT DAY
When alarm 1 or 2 is sounding, the related A1 or A2 LED flashes. Press the RADIO / SLEEP or
AL 1.2/ ON.OFF once to stop the alarm and reset it to come on the following day. After that A1
and / or A2 LED remains on the display.
SNOOZE OPERATION (default snooze duration is 5 minutes)
When alarm is sounding, press once, the alarm will be silenced and come on again after the set snooze duration.
Note: if your second alarm activates while the first alarm is sounding or it is in the snooze mode, the second alarm overrides the first alarm (the first alarm is reset to come on the next day).
USING THE HI-LO DIMMER
Press to select the LED brightness (high- / low-dim) of the LED display. This can only be done when the radio is off.
ADJUSTABLE LOW-DIM BRIGHTNESS
When low-dim brightness is selected, turn the knob at the right side to adjust your desired low-dim brightness. Rotate the knob downwards to reduce and upwards to increase the Lo-dim brightness. Note: High LED brightness is not adjustable.
SETTING UP THE FM ANTENNA
Extend the FM wire antenna fully and vary the direction for best FM reception. Do not strip, alter or attach to other antennas.
LISTENING TO THE FM RADIO
To turn on the radio, press RADIO/SLEEP once, the display shows "ON" and then the radio frequency readings in Mhz.
- Press / to tune the radio to a desired station. Press and hold / to scan for the next clear station.
To adjust the volume, press VOL once, the display shows "L06", press / to adjust volume from L00 (sound off) to L15 (maximum).
Press to turn off the radio.
Remark: keep your radio away from fluorescent lamps or other electronic devices, which may cause interference to the radio.
USING THE PRESET MEMORY (UP TO 10 PRESET STATIONS)
This clock radio features a total of 10 preset memories of FM stations. These allow you to preset your favorite stations and access them quickly.
- Turn on the radio and select a radio station you like to memorize.
- Press and hold the SET until "MEM" LED appears and "P01" flashes. Press SET once to store Memory 1.
- Press or to select another station you like to memorize. Then press and hold SET until "MEM" LED appears and "P01" flashes. Press once, "P02" flashes. Press SET once to store Memory 02.
- Repeat Step 2 to 3 to preset memories 3 through 10.
To access a preset station at any time, press the SET one at a time while the radio is on.
To edit a preset station, select another station and then repeat Step 2 to 4. This overrides the original settings.
USING THE SLEEP TIMER
- At Radio mode, press and hold RADIO/SLEEP to enter the sleep mode. The SL LED appear and the sleep time "05" (5 minutes) appear on the display.
Press the RADIO/SLEEP again as needed to adjust the sleep timer from 5, 15, 30, 45, 60, 75, 90 or OFF. -
When the display changes back to show the time, press and hold RADIO/SLEEP to show the sleep time remaining.
-
The radio will play for the programmed sleep time and then shut off.
To turn off the radio before the sleep time has elapsed, press once.
TROUBLE SHOOTING
If your clock radio displays irrelevant time or does not function properly, which maybe caused by electro-static discharge or other interference, unplug the DC jack to disconnect the AC power (and remove the backup battery). The clock radio will be reset to default settings and you need to set it again.
Hereby, Technotrade declares that this product WT 486 is in compliance with the essential requirements and other relevant provisions of Directive 2014/53/EU and ROHS 2011/65/EC. The original EU declaration of conformity may be found at: www.technoline.de/doc/4029665004860
SPECIFICATIONS
Alarm duration 1 hour
Snoopze duration 5 to 60 minutes
Sleep timer selections 5, 15, 30, 45, 60, 75, 90 minutes to OFF
Volume L00 (sound off) to L15 (maximum)
Preset Memories of radio 10
Power adapter HX075-0501200-AG-001
Default settings:-
Time format 24 hour
Time 0:00
Alarm 1 and 2 6:00
Volume L06 (Level 06)
Snoopze duration 05 (5 minutes)
Environmental reception effects
The clock obtains the accurate time with wireless technology. Same as all wireless devices, the reception is maybe affected by the following circumstances:
- long transmitting distance
- nearby mountains and valleys
- near freeway, railway, airports, high voltage cable etc.
- near construction site
among tall buildings - inside concrete buildings
near electrical appliances (computers, TV's, etc) and metallic structures - inside moving vehicles
Place the clock at a location with optimal signal, i.e. close to a window and away from metal surfaces or electrical appliances.
Precautions
- This main unit is intended to be used only indoors.
- Do not subject the unit to excessive force or shock.
- Do not expose the unit to extreme temperatures, direct sunlight, dust or humidity.
- Do not immerse in water.
- Avoid contact with any corrosive materials.
- Do not dispose this unit in a fire as it may explode.
- Do not open the inner back case or tamper with any components of this unit.
Batteries safety warnings
- Use only alkaline batteries, not rechargeable batteries.
Install batteries correctly by matching the polarities (+ / - ) -
Always replace a complete set of batteries.
-
Never mix used and new batteries.
- Remove exhausted batteries immediately.
- Remove batteries when not in use.
- Do not recharge and do not dispose of batteries in fire as the batteries may explode.
- Ensure batteries are stored away from metal objects as contact may cause a short circuit.
- Avoid exposing batteries to extreme temperature or humidity or direct sunlight.
- Keep all batteries out of reach from children. They are a choking hazard.
Use the product only for its intended purpose!
Consideration of duty according to the battery law
Old batteries do not belong to domestic waste because they could cause damages of health and environment. You can return used batteries free of charge to your dealer and collection points. As end-user you are committed by law to bring back needed batteries to distributors and other collecting points!
Consideration of duty according to the law of electrical devices
This symbol means that you must dispose of electrical devices separated from the General household waste when it reaches the end of its useful life. Take your unit to your local waste collection point or recycling centre. This applies to all countries of the European Union, and to other European countries with a separate waste collection system.
RADIORÉVEIL FM NUMÉRIQUE À LED RADIOCONTRÔLÉ AVEC DEUX ALARMES
INSTALLATION RAPIDE
ÉTAPE 1
5, 15, 30, 45, 60, 75, 90 Minutes a OFF