
SWD12000 - Vacuum Cleaner Sun Joe - Free user manual and instructions
Find the device manual for free SWD12000 Sun Joe in PDF.
User questions about SWD12000 Sun Joe
0 question about this device. Answer the ones you know or ask your own.
Ask a new question about this device
Download the instructions for your Vacuum Cleaner in PDF format for free! Find your manual SWD12000 - Sun Joe and take your electronic device back in hand. On this page are published all the documents necessary for the use of your device. SWD12000 by Sun Joe.
USER MANUAL SWD12000 Sun Joe
IMPORTANT! Safety Instructions
When using an electrical appliance, basic precautions should always be followed, including the following:
All Operators Must Read These Instructions Before Use
⚠️DANGER! To reduce the risk of electric shock:
Any electrical appliance can be dangerous if used incorrectly. Some of the safety precautions given in this manual apply generally to many appliances. Other warnings are specific to the use of this electric wet/dry vacuum.
Always follow these safety guidelines. Failure to do so may result in personal injury or property damage.
⚠ WARNING! This unit can be dangerous! Careless or improper use can cause serious injury.
General Safety
Before using, be sure that everyone using this tool reads and understands all safety instructions and other information contained in this manual. Save this manual and review it frequently prior to using this tool and when instructing others on the proper operating procedures.
⚠️CAUTION! Wear appropriate hearing protection during use. After long periods of extended use, the noise generated from this appliance may cause hearing loss if your ears are not properly protected.
⚠ WARNING! To reduce the risk of injury, inspect the filters frequently and replace with recommended replacement if there are signs of wear or deterioration.
Before using the wet/dry vacuum, take the time to familiarize yourself with the controls, especially how to stop the wet/dry vacuum in an emergency. The only individuals who should use the wet/dry vacuum are those who have a thorough understanding of the instructions and who know how to operate the machine. Children should never be allowed access to the wet/dry vacuum.
Retain this manual for future reference.
- Keep filters in place – Ensure that the equipment is assembled correctly and the filters are in the correct position.
- Keep bystanders and children away – All bystanders, including children and pets, should be kept a safe distance away from the work area.
- Disconnect tool – Disconnect the wet/dry vacuum from the power supply when not in use, before servicing, when transporting, or when changing accessories.
- Do not use in dangerous environments – Do not use the wet/dry vacuum in rain, damp or wet locations. Do not operate the wet/dry vacuum in gaseous or explosive atmospheres or use the wet/dry vacuum to pick up flammable or combustible liquids. Motors in these tools normally spark, and the sparks might ignite fumes.
- Check for damaged parts – Before using the wet/dry vacuum, repair or replace any part that is damaged. In addition, check for alignment of moving parts, binding of moving parts, breakage of parts, and any other conditions that may affect the tool's operation. Inspect the appliance cord periodically. If damage is found, have it repaired by an authorized service facility. Extension cords should also be inspected periodically and immediately replaced if damaged.
- Avoid unintentional starting – Make sure the switch is off before plugging in the appliance.
- Use the right tool – Do not force the tool or any attachment on the tool to do a job for which they were not designed.
- Wear face or dust masks – If operated in dusty environment, the use of a face or dust mask specially designed to filter out microscopic particles is recommended.
- Maintain tools with care – Keep tools clean for best and safest performance. Follow instructions for changing accessories. If the appliance is not working as it should, or has been dropped, damaged, left outdoors, dropped into water, please call Snow Joe ^® + Sun Joe ^® customer service center at 1-866-SNOWJOE (1-866-766-9563).
- Use recommended accessories – Consult the owner's manual for recommended accessories. The use of improper accessories may cause risk of injury.
-
Do not abuse the cord – Never carry the appliance by its cord or yank it to disconnect it from the receptacle. Keep the cord away from heat, oil, and sharp edges.
-
Do not force the appliance – It will do the job better and with less likelihood of a risk of injury if it is used at the rate for which it was designed.
- Do not overreach – Keep proper footing and balance at all times.
- Store idle tool indoors – When not in use, the wet/dry vacuum should be stored indoors in a dry and locked-up place out of the reach of children.
- Stay alert – Watch what you are doing. Use common sense. Do not operate the wet/dry vacuum when you are tired or under the influence of drugs, alcohol or other medication.
⚠️DANGER! Do not manually place objects into the vacuum inlet while operating the unit, as this can seriously damage the unit and/or harm the operator. Keep both hands away from the air inlet while the power is on.
DO NOT ATTEMPT to remove material or hold material to be vacuumed when the wet/dry vacuum is on. Make sure the wet/dry vacuum is off when clearing jammed material from the vacuum inlet.
Personal Safety
⚠️DANGER! Do not vacuum, or use this wet/dry vacuum near flammable liquids, gases, or explosive vapors like gasoline or other fuels, light fluids, cleaners, oil-based paints, natural gas, hydrogen, or explosive dusts like coal dust, magnesium dust, grain dust or gun power. Sparks generated by the motor can ignite flammable vapors or dust.
- This vacuum is only for indoor use. Do not use it outdoors.
- Children in the work area must be supervised to ensure that they do not play with the appliance. This appliance is NOT a toy and should never be used as such.
- Never leave a machine that is ready for operation unattended at the workplace.
- Do not use the tool with a damaged plug. If the tool is not working as it should or has been dropped, damaged, left outdoors or dropped into water, contact the Snow Joe® + Sun Joe® customer service department at 1-866-SNOWJOE (1-866-766-9563).
- Do not pick up anything that is burning or smoking, such as cigarettes, matches or hot ashes.
- Do not use without the power head and/or filters in place.
- Carefully inspect your appliance prior to use and follow all label and marking instructions.
• Always unplug this appliance before assemble or disassemble the filter. - Do not handle plug or the unit with wet hands.
- To reduce the risk of health hazard from vapors or dust, do not vacuum toxic material.
- Do not store near hazardous material.
-
Do not leave the wet/dry vacuum unattended when plugged in. Unplug from the power source when not in use.
-
Keep hair, loose clothing, fingers, and all parts of the body away from openings.
- Maintain proper footing and use extra care when using the appliance on stairs.
- Service on the product must be performed by qualified repair personnel only. Service or maintenance performed by unqualified personnel could result in injury to the user or damage to the product.
- This wet/dry vacuum is intended for residential use only. Commercial use of this product is prohibited and will void the manufacturer's warranty.
- Never douse or squirt the unit with water or any other liquid. Clean the unit after use every time as described in the cleaning and storage section.
- Prevent cords, plastic bags, or similar items from getting sucked in, as these might wrap around the filter, which may cause an overload or blocking of the motor. In such a case, switch the wet/dry vacuum off. Do not leave the wet/dry vacuum switched on with the motor overloaded or stalled.
- Always operate the machine in an upright position. Do not operate it tilted to one side or even upside-down.
Electrical Safety
- Ground fault circuit interrupter (GFCI) protection should be provided on the circuit(s) or outlet(s) to be used for this electric wet/dry vacuum. Receptacles are available having built-in GFCI protection and may be used for this measure of safety.
- Make sure that the mains voltage matches that listed on the unit's rating label. Using the improper voltage can damage the motor and injure the user.
- To prevent electric shock, use only with an extension cord suitable for indoor use only, such as SW-A, SOW-A, STW-A, STOW-A, SJW-A, SJOW-A, SJTW-A, or SJTOW-A.
Before use, check that the extension cord is in good condition. When using an extension cord, make sure to use one heavy enough to carry the current your product will draw. An undersized cord will cause a drop in line voltage resulting in loss of power and overheating.
⚠ WARNING! To reduce the risk of burns, fire, electric shock, or injury to persons:
- Unplug from outlet when not in use, and before putting on or taking off parts.
- Do not operate under blanket or pillow. Excessive heating can occur and cause fire, electric shock, or injury to persons.
- Close supervision is necessary when this appliance is used by, on, or near children, invalids, or disabled persons.
-
Use this appliance only for its intended use as described in this manual. Do not use attachments not recommended by the manufacturer.
-
Never operate this appliance if it has a damaged cord or plug, if it is not working properly, if it has been dropped or damaged, or dropped into water. Return the appliance to a service center for examination and repair.
- Do not operate where aerosol (spray) products are being used or where oxygen is being administered.
- To disconnect, turn all controls to the off position, then remove plug from outlet.

WARNING

Electric shock may cause SEVERE INJURY or DEATH. Heed these warnings:
- Do not allow any part of the electric wet/dry vacuum to make contact with water while it is in operation. If the appliance becomes wet while turned off, wipe dry before starting.
- Do not use an extension cord over 25 ft. The wet/dry vacuum comes equipped with a 6 ft power cable. Combined cord length must not exceed 31 ft. Any extension cord must be 18-gauge (or heavier) to safely power the wet/dry vacuum.
- Do not touch the appliance or its plug with wet hands or while standing in water. Wearing rubber boots offers some protection.
EXTENSION CORD CHART
| Cord Length: | 25 ft (7.6 m) |
| Min. Wire Gauge (A.W.G.): | 18 |
- To reduce the risk of electric shock, this appliance has a polarized plug (i.e. one blade is wider than the other). Use this appliance only with a polarized UL-, CSA- or ETL-listed extension cord recommended for indoor use only.
The appliance plug will fit into a polarized extension cord only one way. If the appliance plug does not fit fully into the extension cord, reverse the plug. If the plug still does not fit, obtain a correct polarized extension cord. A polarized extension cord will require the use of a polarized wall outlet. The extension cord plug will fit into the polarized wall outlet only one way. If the plug does not fit fully into the wall outlet, reverse the plug. If the plug still does not fit, contact a qualified electrician to install the proper wall outlet. Do not modify the appliance plug, extension cord receptacle or extension cord plug in any way.
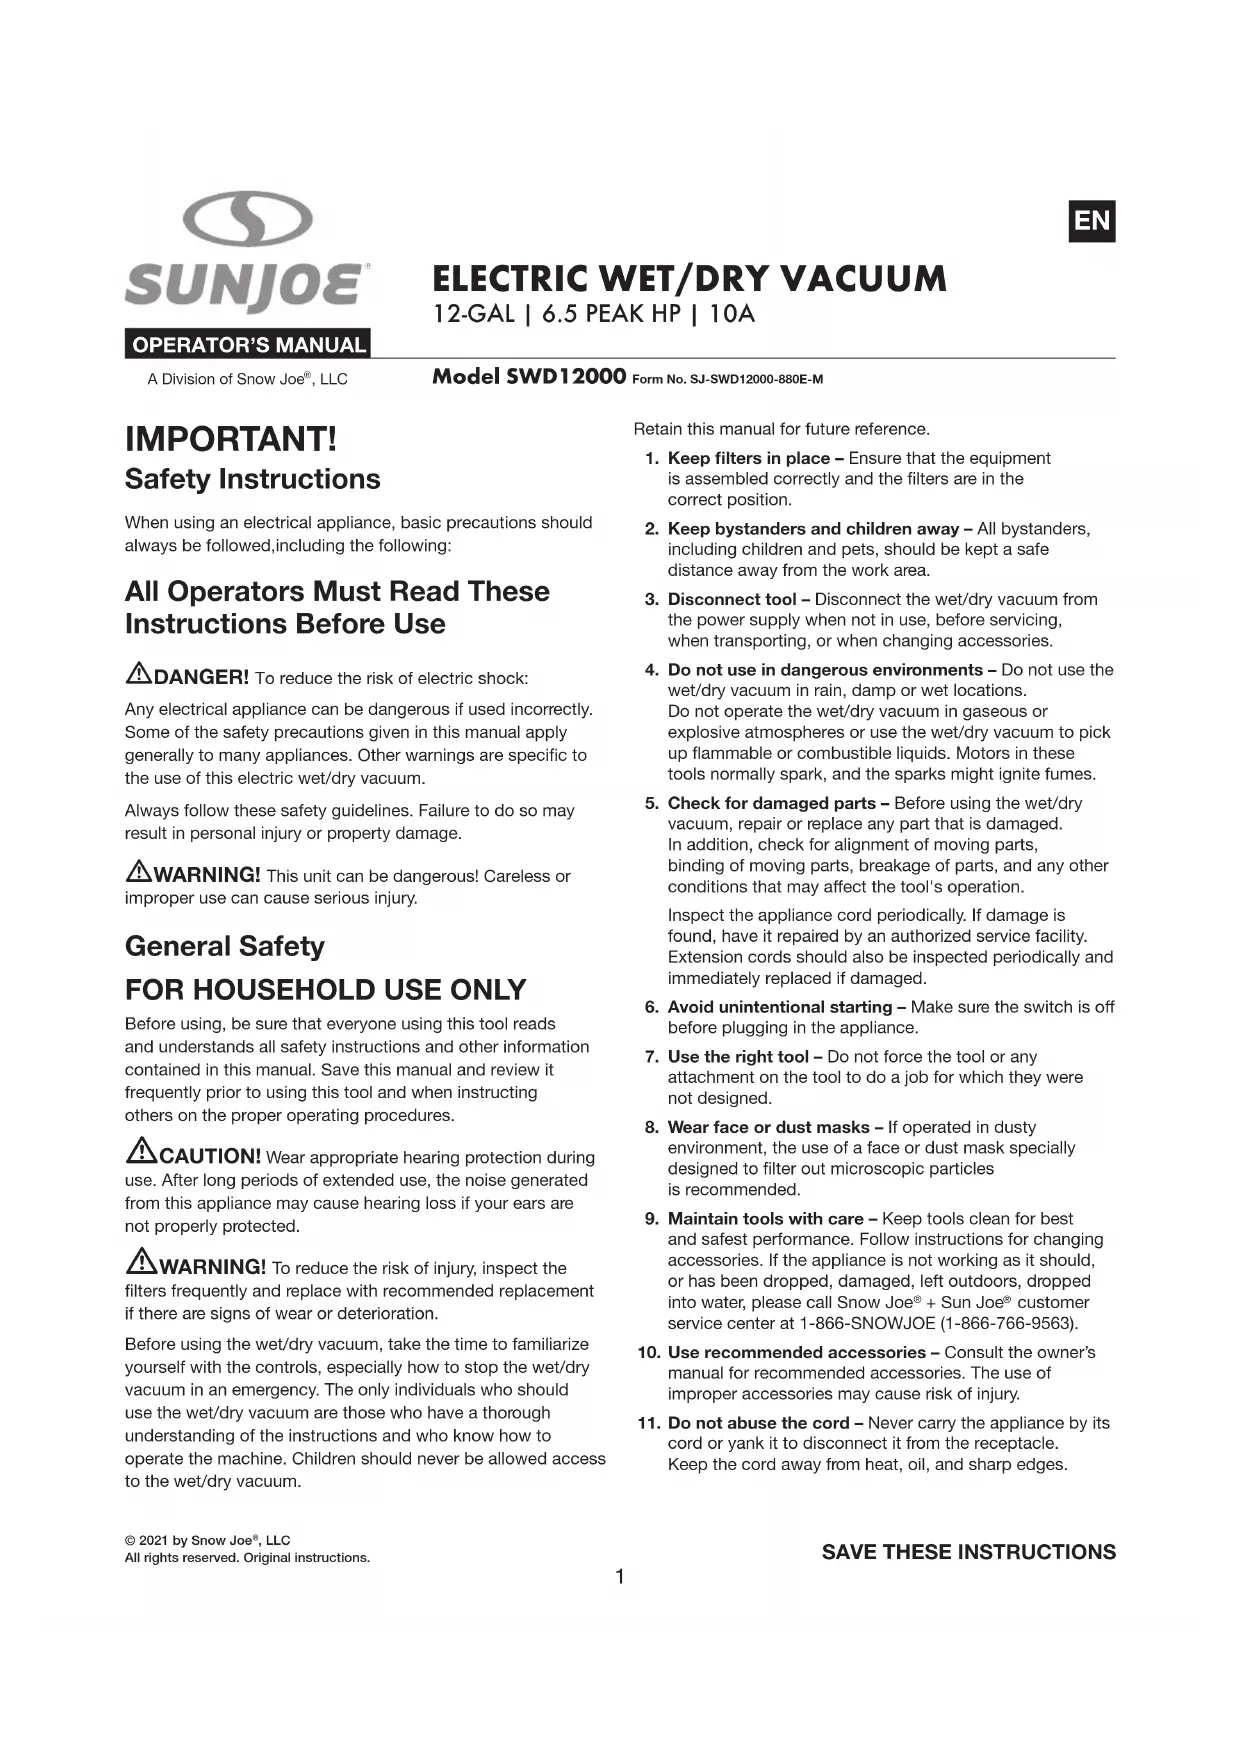
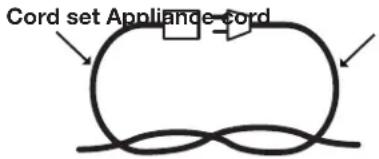
- To prevent the appliance cord from disconnecting from the extension cord during operation, make a knot with the two cords as shown in Table 1.
Table 1. Method of Securing Extension Cord
text_image
Cord set Appliance cord(A) Tie cord as shown
natural_image
Simple line drawing of a resistor connected in series with a loop (no text or symbols)(B) Connect plug and receptacle
- Do not abuse the cord. Never pull the wet/dry vacuum by the cord or yank the cord to disconnect it from the receptacle. Keep the cord away from heat, oil and sharp edges.
Double-Insulated Appliances
In a double-insulated appliance, two systems of insulation are provided instead of grounding. No grounding means is provided on a double-insulated appliance, nor should a means for grounding be added to the appliance. Servicing a double-insulated appliance requires extreme care and knowledge of the system, and should be performed only by qualified service personnel at an authorized Snow Joe ^® + Sun Joe ^® dealer. Replacement parts for a double-insulated appliance must be identical to the parts they replace. A double-insulated appliance is marked with the words “Double Insulation” or “Double Insulated.” The symbol ☐ (square within a square) may also be marked on the appliance.

BLE-INSULATED: GROUNDING NOT REQUIRED. WHEN SERVICING, USE ONLY IDENTICAL REPLACEMENT PARTS.
This electric wet/dry vacuum is double-insulated, eliminating the need for a separate grounding system. Use only identical replacement parts. Read the instructions before servicing double-insulated appliances. Use this wet/dry vacuum only as described in this manual.
Specific Safety Rules for Wet/Dry Vacuum
This motor-operated wet/dry vacuum is intended for vacuuming wet or dry material and dust. This equipment is not suitable for vacuuming ashes, coals, toxic, flammable or other hazardous materials. Vacuuming of glowing materials and dusts that are combustible, explosive or hazardous to one's health is prohibited. The manufacturer will not be held responsible for injuries resulting from incorrect use of the device or from use that does not comply with the directions.
NOTE: This wet/dry vacuum is intended for indoor household use only.
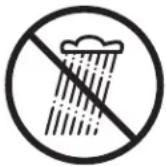
⚠ WARNING! To reduce the risk of electric shock, do not use outdoors or in damp or wet environments. Do not expose to rain. Store indoors in a dry place.
⚠ WARNING! For your own safety, read and understand the operator's manual. Do not run the unit unattended. Do not pick up hot ashes, coals, toxic substances, flammable materials or other hazardous debris. Do not use the device in an area with explosive liquids or vapors.
⚠️CAUTION! To reduce the risk of injury, unplug the unit before servicing.
- Do not use the wet/dry vacuum without filters in place.
- When vacuuming, do not place the equipment on heat sensitive floors. For safety reasons, use a fireproof base when necessary.
- Empty and clean the vacuum before and after vacuuming to avoid the accumulation of debris.
⚠️CAUTION! Do not vacuum hazardous substances (e.g. petrol, solvents, acids or lyes) and ash from unauthorized fuels (i.e. from oil-burning ovens or heating boilers). These substances pose a serious risk of injury.
- Do not use the vacuum in areas where flammable or combustible liquids, such as gasoline, may be present.
- Do not vacuum fine, combustible dust particles that can ignite and potentially lead to an explosion.
- Do not put foreign objects into openings. Do not use the vacuum with any opening blocked; keep all openings free of dust, lint, hair, and anything that may reduce air flow.
• Always check the hose and the unit when vacuuming.
Safety Symbols
The following table depicts and describes safety symbols that may appear on this product. Read, understand and follow all instructions on the machine before attempting to assemble and operate.
| Symbols | Descriptions Symbols | Descriptions | |
 | Safety alert. Exercise caution. |  | To reduce the risk of injury, user must read the instruction manual. |
 | To reduce the risk of electric shock, do not use outdoors or in damp or wet environments. Do not expose to rain. Store indoors in a dry place. |  | WARNING! Always turn the machine OFF and disconnect the electrical power before conducting inspection, cleaning and maintenance. Remove the plug from the outlet immediately if the cord is damaged or cut. |
 | Immediately remove the plug from the mains if the power cable is damaged, frayed or entangled. Always keep the power cable away from heat, oil and sharp edges. |  | DOUBLE INSULATION - When servicing, use only identical replacement parts. |
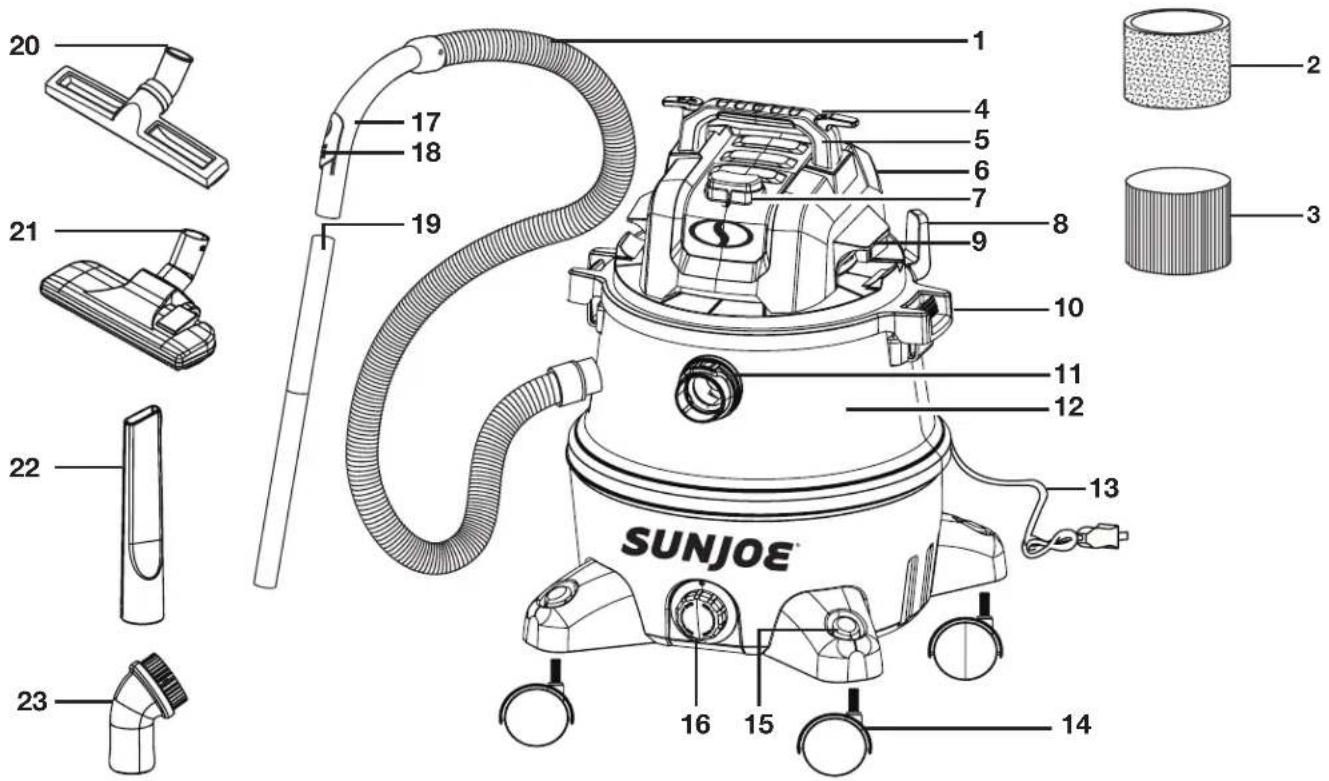
Know Your Electric Wet/Dry Vacuum
Read the owner's manual and safety instructions carefully before operating the electric wet/dry vacuum. Compare the illustration below to the electric wet/dry vacuum in order to familiarize yourself with the location of the various controls and adjustments. Save this manual for future reference.
- Vacuum hose
- Foam filter
- HEPA filter
- Onboard power cord storage
- Handle
- Power head
- On/Off switch
-
Storage hook
-
Onboard vacuum hose storage
- Lid locks (2)
- Air inlet/hose connector
- Dust tank
- Appliance cord
- Trolley wheels (4)
- Onboard accessories storage
-
Drain outlet
-
Vacuum hose end
- Air flow regulating block
- Extension tubes (2)
- Wet floor brush
- Dry floor brush
- Crevice nozzle
- Dust brush
text_image
20 17 18 19 1 4 5 6 7 8 9 10 11 12 13 20 21 22 23 SUNJOE 16 15 14Technical Data
Motor 10A
Rated Voltage 120V \~ 60 Hz
Power Cord Length 23 ft (7 m)
Air Flow 60 CFM (1.7 m³/min)
Vacuum Pressure Max 22 kPa
Peak HP 6.5 HP
Suction Power Max.... 160 W
Suction Hose Length 8.2 ft (2.5 m)
Tank Capacity 12 gallons (45 l)
Net Weight 17.8 lb (8.1 kg)
Unpacking
Carton Contents
• Electric wet/dry vacuum
• Trolley wheels (4)
- Screws (4)
- Vacuum hose
- Extension tubes (2)
- Wet floor brush
- Dry floor brush
- Crevice brush
- Dust brush
- Foam filter
- HEPA filter
- Manual + Registration card
- Carefully remove the electric wet/dry vacuum and check to see that all of the above items are supplied.
- Inspect the product carefully to make sure no breakage or damage occurred during shipping. If you find damaged or missing parts, DO NOT return the unit to the store. Please call the Snow Joe® + Sun Joe® customer service center at 1-866-SNOWJOE (1-866-766-9563).
NOTE: Do not discard the shipping carton and packaging material until you are ready to use the wet/dry vacuum. The packaging is made of recyclable materials. Properly dispose of these materials in accordance with local regulations.
IMPORTANT! The equipment and packaging material are not toys. Do not let children play with plastic bags, foils or small parts. These items can be swallowed and pose a suffocation risk!
Assembly
⚠ WARNING! To avoid serious personal injury, read and understand all safety instructions provided.
WARNING! Do not connect to power supply until assembly is complete. Failure to comply could result in accidental starting and possible serious personal injury.
⚠ WARNING! Before performing any maintenance, make sure the tool is unplugged from the power supply. Failure to heed this warning could result in serious personal injury.
WARNING! To prevent personal injury, make sure the switch is in the OFF position before attaching or removing the vacuum hose.
- Release the power head by grabbing the two lid locks and pulling outside to unlock. Then remove the power head (Fig. 1). All accessories and wheels are stored inside the dust tank.

text_image
Fig. 1 Power head Lid lock- Turn the dust tank upside down, and insert the 4 trolley wheels into the holes on the bottom of the dust tank. Press the wheels down firmly and screw in to secure (Fig. 2).

text_image
Fig. 2 Trolley wheels Dust tank- Insert the vacuum hose in the air inlet/hose connector, and push firmly to secure (Fig. 3).
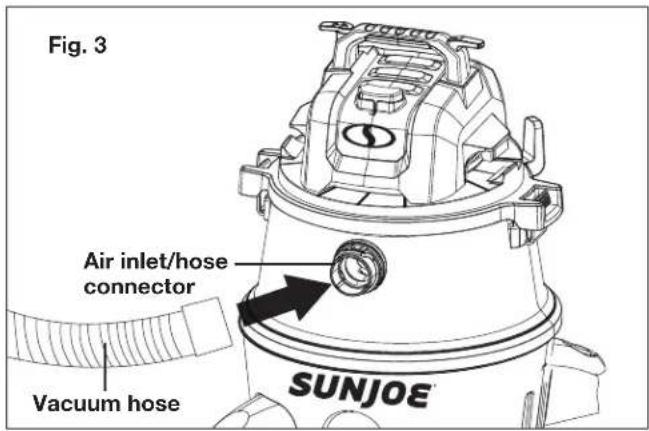
text_image
Fig. 3 Air inlet/hose connector Vacuum hose SUNJOE- Two extension tubes are equipped with the unit. If needed, insert the first extension tube into the vacuum hose end, and press firmly to lock. Follow the same instruction to assemble the second and third extension tubes (Fig. 4).
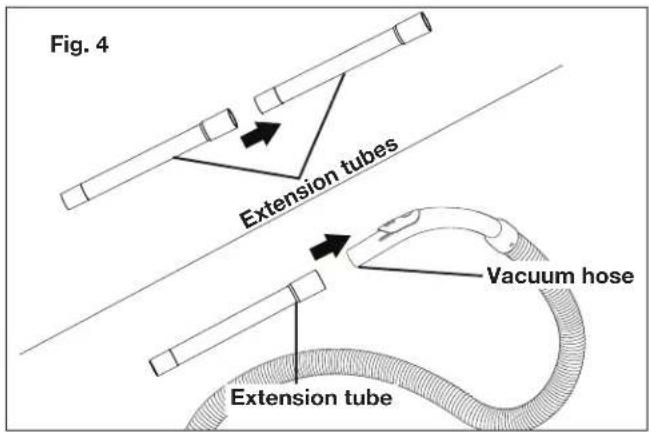
text_image
Fig. 4 Extension tubes Vacuum hose Extension tube- Select desired attachment, connect it with the end of the extension tube, press firmly to lock securely. Your wet/dry vacuum is ready for use (Fig. 5).
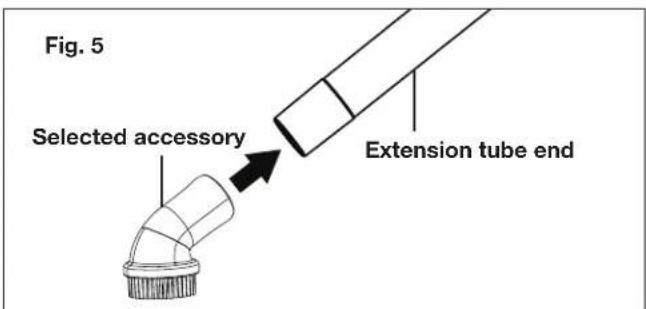
text_image
Fig. 5 Selected accessory Extension tube endOperation
WARNING! This equipment incorporates parts such as switches, motors or the like that tend to produce arcs or sparks that can cause an explosion. Do not pick up flammable, combustible, or hot materials. Do not use around explosive liquids or vapors, as electrical devices produce arcs or sparks which can cause a fire or explosion – do not use at filling stations or anywhere gasoline is stored or dispensed.
Starting + Stopping
Do not switch on the wet/dry vacuum until it has been completely assembled. Before switching on the unit, always check the power cord for signs of damage. Use only intact cords.
⚠ WARNING! Damaged cords pose a severe risk of injury. Replace damaged cords immediately.
⚠ WARNING! Before switching on the wet/dry vacuum, make sure that it is not in contact with any foreign objects.
- Make sure the proper filter is installed before starting. See page 10 to determine which filter to use.
- Make sure the power head and the vacuum hose are installed properly and locked securely.
- Install the desired brush attachment onto the end of the hose. Use the extension tubes if needed.
- Check that the electrical supply voltage and frequency (Volt/Hz) correspond to those specified on the rating plate. Plug the power cord into the outlet (Fig. 6). If an extension cord is used, make a knot with the two cords as shown in Table 1.
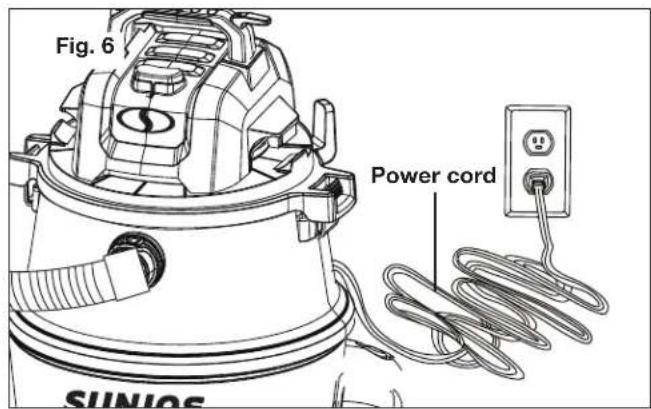
text_image
Fig. 6 Power cord SUNIOS- To start the unit, press the ON/OFF switch on the ON(I) position (Fig. 7), as indicated.
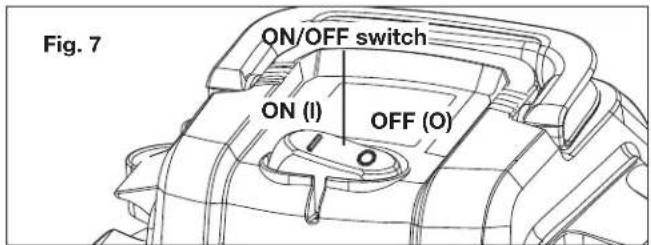
text_image
Fig. 7 ON/OFF switch ON (I) OFF (O)- To stop the unit, press down (O) on the ON/OFF switch, as indicated (Fig. 7).
Operating Tips
This electric wet/dry vacuum is designed to clean hard surfaces. It is only suitable for vacuuming wet or dry, light materials. The vacuuming of heavy materials such as metal, stones, branches, broken glass is expressly excluded.
⚠ WARNING! Use the wet/dry vacuum only in daylight or good artificial light.
• Make sure the power head is properly installed and secured when using. Make sure each lock is secured. Failure to properly secure the locks could cause the power head to release from the tank.
- Double check to make sure the filters are not broken or torn. Do not use filters that are broken or torn. Handle the filters carefully when removing and installing.
- To reduce the risk of hearing loss associated with sound level(s), hearing protection is required.
• Always direct the cord backwards, away from the unit. - This unit is intended for indoor use only. Do not use this unit outdoors.
- Be extremely careful when working on slopes and stairs.
• Always move forward by walking. Never run. - Clean up after using the wet/dry vacuum. Dispose of debris appropriately.
• Always use the handle for transporting the equipment.
⚠ WARNING! To avoid personal injury, wear ear protectors when operating this unit. Wear a face mask or dust mask in dusty locations.
Air Inlet
Never cover the air inlets. Keep them free from obstructions and debris. They must always remain clear for proper motor cooling.
⚠ WARNING! To avoid personal injury, do not wear loose fitting clothing or articles such as scarves, necklaces, chains, ties, etc., that could get drawn into the air inlet. To make sure long hair does not get drawn into the air inlet, tie back long hair.
Basic Vacuum Procedures
⚠ WARNING! Do not vacuum drywall dust, fireplace soot or ash with the unit. This is very fine dust which will not be captured by the filter and may cause damage to motor.
⚠ WARNING! The HEPA filter is only for dry vacuum. Make sure the HEPA filter is attached for dry cleaning, and DO NOT use the HEPA filter when vacuuming liquid.
⚠ WARNING! The foam filter must be used for wet vacuuming, and make sure to clean the foam filter after wet vacuuming.
- Place the equipment on a level surface that is not heat sensitive.
- Always use the vacuum hose for vacuuming. Hold the vacuum hose at a distance of approximately 0.4 in. (1 cm) above the material to be vacuumed.
⚠ WARNING! When vacuuming large quantities of liquids, do not immerse the brush attachment completely in the liquid; leave a gap at the tip of the brush attachment opening to allow air inflow. The machine is fitted with a float valve that stops the suction action when the collection tank reaches its maximum capacity. You will notice a decrease in motor speed. When this happens, turn off the machine, disconnect from power supply, and drain the liquid into a suitable receptacle or drain.
To continue vacuuming, refit the collection tank with the power head.
- To prevent overheating of the motor, stop the unit for one minute after every 15 minutes of using.
- Turn off and unplug the unit after vacuuming, before cleaning and maintenance. After wet vacuuming, empty the collection tank, clean and dry the inside and outside before storage.
• Empty the tank outside in order to avoid a mess. - Clean or change the filters (see Maintenance section) if the suction performance deteriorates.
⚠ WARNING! Never remove the power head without first turning the power switch to the OFF (O) position and unplugging the unit from the main power source.
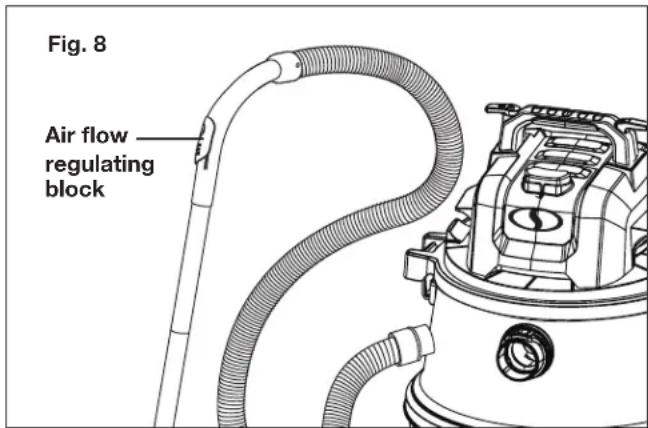
Air Flow Regulating Block
- Used for the auxiliary regulation of suction force; when the air flow regulating block opens, suction will decrease gradually (Fig. 8).
- When the air flow regulating block is closed, the suction force reaches the maximum value
text_image
Fig. 8 Air flow regulating blockReleasing and Assembling the Power Head
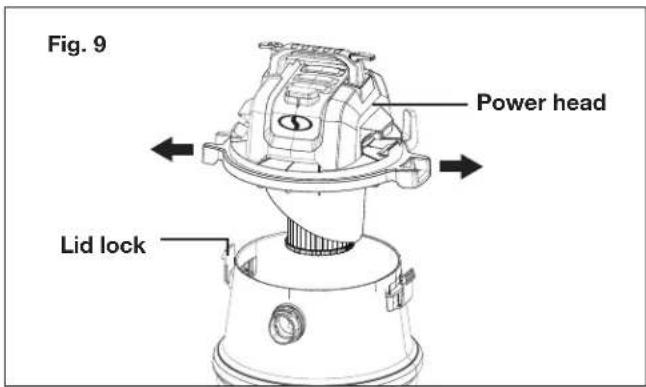
⚠ WARNING! To prevent personal injury, make sure the switch is in the OFF position and the unit is unplugged before attaching or removing the power head.
- To release the power head, grab the two lid locks and pull outside to unlock. Then remove the power head (Fig. 9).
text_image
Fig. 9 Power head Lid lock- To attach the power head, insert the tabs on each side of the collection tank into the lid lock slots, and push firmly to make sure the tabs are locked inside of the lid locks.
NOTE: The power head must be attached any time the unit is being operated.
Maintenance
To order genuine replacement parts or accessories for the Sun Joe ^® SWD12000 electric wet/dry vacuum, please visit sunjoe.com or contact the Snow Joe ^® + Sun Joe ^® customer service center at 1-866-SNOWJOE (1-866-766-9563).
WARNING! Disconnect the power cord before performing any maintenance task.
If the power is still connected, the unit could be accidentally turned on while you are performing maintenance on it, which could result in personal injury.
Cleaning The Dust Tank
Clean the equipment routinely after each use:
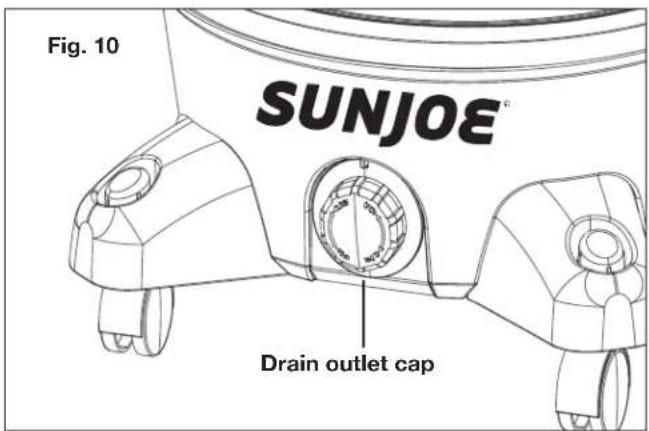
- Take the unit outside to clean it to avoid creating a mess indoors.
- Remove the power head and empty the dust tank. Clean the tank with water and allow it to dry completely.
- The tank must be drained and cleaned every time after vacuuming. Remove the drain outlet cap by turning it clockwise and use the Drain outlet to drain the liquid waste in the tank (Fig. 10).
text_image
Fig. 10 SUNJOE® Drain outlet capCleaning the HEPA filter
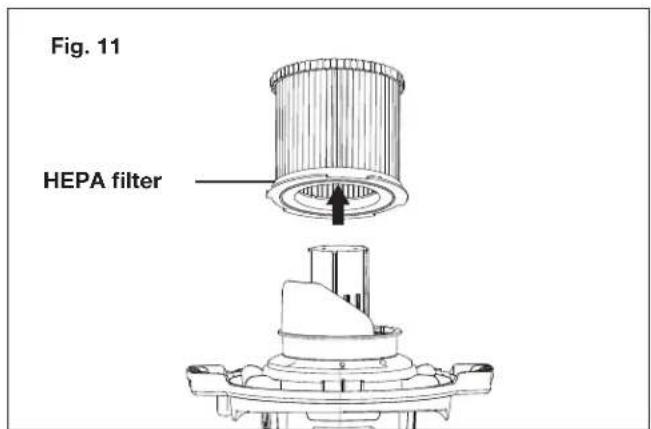
⚠ WARNING! To avoid serious personal injury, always turn the unit off and unplug it before cleaning or servicing.
The HEPA filter included is made of high quality material designed to stop small dust particles. The filter should be used for dry pick-up only. If the dust filter is wet, it will clog quickly and be very difficult to clean. Handle the filter carefully when removing it for cleaning and replacing. Check the filters for tears or small holes, a small hole can let dust pass through and out of the cleaner. Do not use a filter with holes or tears, replace it immediately.
- Switch off and unplug the unit.
- Remove the power head from the collection tank.
- With the removed power head in the upside down position, carefully remove the HEPA filter from the filter cage (Fig. 11).
text_image
Fig. 11 HEPA filter- Clean the HEPA filter by gently tapping or brushing dirt off. Cleaning should not be done indoors in living areas.
- If needed, use a mild soap and water solution to wash the HEPA filter and rinse with clean water. Allow the wet filter to air dry for 24 hours before installing onto the filter cage.
WARNING! The HEPA filter must be installed before dry vacuuming again.
Cleaning the Foam Filter
WARNING! The foam filter must be cleaned every time after wet vacuuming.
- Switch off and unplug the unit.
- Remove the power head from the collection tank.
- With the removed power head in the upside down position, carefully remove the foam filter from the filter cage (Fig. 12).
Fig. 12
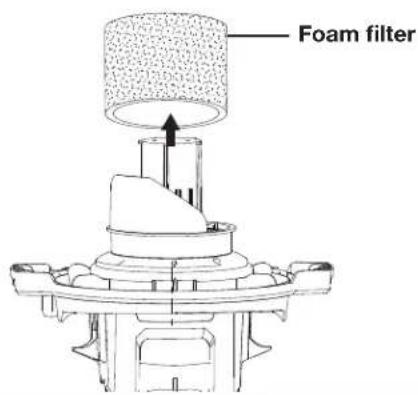
text_image
Foam filter- Use a mild soap and water solution to wash the foam filter and rinse with clean water. Allow the wet filter to air dry for 24 hours before installing onto the filter cage.
- To assemble the filter, fit the foam filter on the filter cage (Fig. 13).
Fig. 13
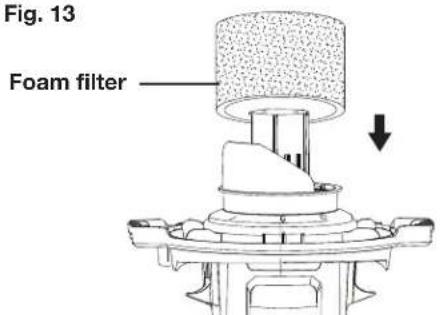
text_image
Fig. 13 Foam filterFig. 14
Onboard vacuum hose + power cord storage
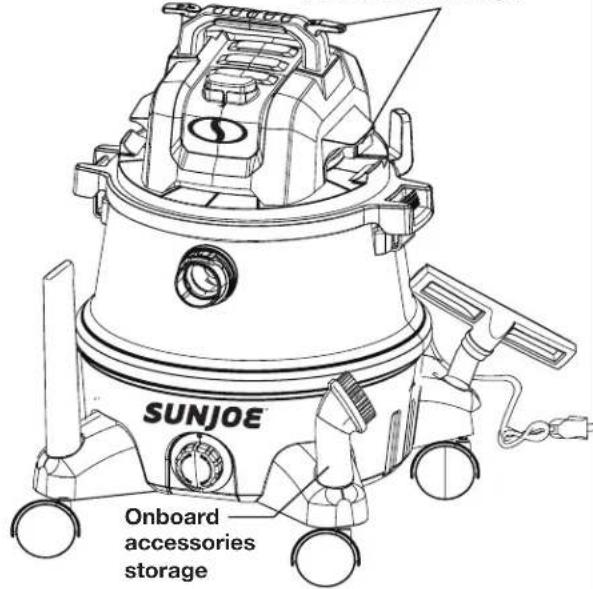
text_image
SUNJOE Onboard accessories storageService and Support
If your Sun Joe ^® SWD12000 electric wet/dry vacuum requires service or maintenance, please call the Snow Joe ^® + Sun Joe ^® customer service center at 1-866-SNOWJOE (1-866-766-9563).
Model and Serial Numbers
When contacting the company, reordering parts or arranging service from an authorized dealer, you will need to provide the model and serial numbers, which can be found on the decal located on the housing of the unit. Copy these numbers into the space provided below.
Record the following numbers from the housing or handle of your new product:
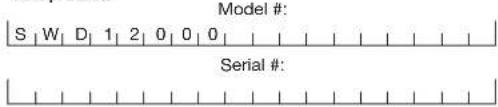
text_image
Model # S | W | D | 1 | 2 | 0 | 0 | 0 | Serial #:Storage
-
Examine the electric wet/dry vacuum thoroughly for worn, loose or damaged parts. Should you need to repair or replace a part, contact an authorized Snow Joe ^® + Sun Joe ^® dealer or call the Snow Joe ^® + Sun Joe ^® customer service center at 1-866-SNOWJOE (1-866-766-9563) for assistance.
-
Examine the appliance cord thoroughly for signs of excess wear or damage. If it is worn or damaged, replace it immediately.
-
Store the wet/dry vacuum indoors in a clean, dry and locked location out of the reach of children and animals.
-
When not in use, the equipped tubes, handles and nozzles can be temporarily stored in the onboard accessories storage and onboard accessories storage (Fig. 14).
Troubleshooting
WARNING! Always unplug the power cord before performing any adjustments, maintenance or repairs to your electric wet/dry vacuum.
| Problem Possible Cause | Use Possible Solution | |
| Device does not start Mains | voltage is not present Check power supply – cord | breakers, fuses.If damage is found, contact a qualified electrician to repair |
| The equipment is not switched ON | Switch on the equipment | |
| The collection tank is full | Empty the collection tank | |
| Defective appliance cord or ON/OFF switch | Contact Snow Joe®customer service at 1-866-SNOWJOE (1-866-766-9563) to repair | |
| Defective motor | ||
| Dust comes out from motor cover | The HEPA filter is missing or damaged | Attach or replace the HEPA filter |
| There is a blockage in the nozzle, hose, or air inlet. The HEPA filter is clogged by fine dust | Check the unit for blockage. Clean or replace the HEPA filter |
Optional Accessories
WARNING! ALWAYS use only authorized Snow Joe® + Sun Joe® replacement parts and accessories. NEVER use replacement parts or accessories that are not intended for use with this tool. Contact Snow Joe® + Sun Joe® if you are unsure whether it is safe to use a particular replacement part or accessory with your tool. The use of any other attachment or accessory can be dangerous and could cause injury or mechanical damage.
| Accessories Item Model | ||
1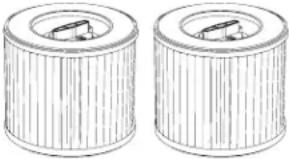 | 2-Pack Replacement HEPA Filters SWD-HEPA-2PK | |
2 | 10-Pack Disposable Wet/Dry VacCollection Filter Bags | SWD-12GB-10PK |
NOTE: Accessories are subject to change without any obligation on the part of Snow Joe ^® + Sun Joe ^® to provide notice of such changes. Accessories can be ordered online at sunjoe.com or via phone by contacting the Snow Joe ^® + Sun Joe ^® customer service center at 1-866-SNOWJOE (1-866-766-9563).
SNOW JOE® + SUN JOE® CUSTOMER PROMISE
ABOVE ALL ELSE, Snow Joe, LLC (“Snow Joe”) is dedicated to you, our customer. We strive to make your experience as pleasant as possible. Unfortunately, there are times when a Snow Joe ^® , Sun Joe ^® , or Aqua Joe ^® product (“Product”) does not work or breaks under normal operating conditions. We think it’s important that you know what you can expect from us. That’s why we have a Limited Warranty (“Warranty”) for our Products.
OUR WARRANTY:
Snow Joe warrants new, genuine, powered and non-powered Products to be free from defects in material or workmanship when used for ordinary household use for a period of two years from the date of purchase by the original, end-user purchaser when purchased from Snow Joe or from one of Snow Joe's authorized sellers with proof of purchase. Because Snow Joe is unable to control the quality of its Products sold by unauthorized sellers, unless otherwise prohibited by law, this Warranty does not cover Products purchased from unauthorized sellers. If your Product does not work or there's an issue with a specific part that is covered by the terms of this Warranty, Snow Joe will elect to either (1) send you a free replacement part, (2) replace the Product with a new or comparable product at no charge, or (3) repair the Product. How cool is that!
This Warranty gives you specific legal rights, and you may also have other rights which vary from State to State.
PRODUCT REGISTRATION:
Snow Joe strongly encourages you to register your Product. You can register online at snowjoe.com/register, or by printing and mailing in a registration card available online from our website, or calling our Customer Service Department at 1-866-SNOWJOE (1-866-766-9563), or by e-mailing us at help@snowjoe.com. Failure to register your Product will not diminish your warranty rights. However, registering your Product will allow Snow Joe to better serve you with any of your customer service needs.
WHO CAN SEEK LIMITED WARRANTY COVERAGE:
This Warranty is extended by Snow Joe to the original purchaser and original owner of the Product.
WHAT IS NOT COVERED?
This Warranty does not apply if the Product has been used commercially or for non-household or rental applications. This Warranty also does not apply if the Product was purchased from an unauthorized seller. This Warranty also does not cover cosmetic changes that do not affect performance. Wearing parts like belts, augers, chains and tines are not covered under this Warranty, and can be purchased at snowjoe.com or by calling 1-866-SNOWJOE (1-866-766-9563).
