70815 - Food Processor HAMILTON BEACH - Free user manual and instructions
Find the device manual for free 70815 HAMILTON BEACH in PDF.

User questions about 70815 HAMILTON BEACH
0 question about this device. Answer the ones you know or ask your own.
Ask a new question about this device
Download the instructions for your Food Processor in PDF format for free! Find your manual 70815 - HAMILTON BEACH and take your electronic device back in hand. On this page are published all the documents necessary for the use of your device. 70815 by HAMILTON BEACH.
USER MANUAL 70815 HAMILTON BEACH
Visit www.hamiltonbeach.com for our complete line of products and Use and Care Guides – as well as delicious recipes, tips, and to register your product online.
For questions: 1.800.851.8900 For recipes, tips, product information and registration: hamiltonbeach.com
natural_image
Exterior view of a Hamiltonian blender oven with food inside, no visible text or symbols on the main device.Hamilton Beach®
PROFESSIONAL
Food Processor with Spiralizer Robot culinaire avec spiraleur Procesador de alimentos con espiralizador
English 2
Français ....18
Español....33
IMPORTANT SAFEGUARDS
When using electrical appliances, basic safety precautions should always be followed to reduce the risk of fire, electric shock, and/or injury to persons, including the following:
- Read all instructions.
- This appliance is not intended for use by persons with reduced physical, sensory, or mental capabilities, or lack of experience and knowledge, unless they are closely supervised and instructed concerning use of the appliance by a person responsible for their safety.
- This appliance shall not be used by children. Keep the appliance and its cord out of reach of children.
- Close supervision is necessary when any appliance is used near children. Children should be supervised to ensure that they do not play with the appliance.
- To protect against risk of electrical shock, do not put cord, plug, base, or motor in water or other liquid.
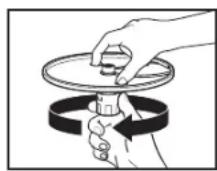
- Turn the appliance OFFQ, then unplug from outlet when not in use, before putting on or taking off parts, and before cleaning. To unplug, grasp the plug and pull from the outlet. Never pull from the power cord.
- Avoid contact with moving parts.
- Keep hands and utensils away from moving blade and disc while processing food to reduce the risk of severe personal injury and/or damage to the food processor. A rubber scraper may be used but must be used ONLY when the food processor is not running.
- Blades are sharp. Handle cutting blades carefully when inserting or removing, emptying the bowl, and during cleaning. Store out of reach of children.
- To reduce the risk of injury, be sure to insert or remove blade and disc using hubs provided for this purpose. Use caution when removing blade and disc from the bowl, when emptying the bowl, and when cleaning.
2
- Do not operate any appliance with a damaged supply cord or plug, or after the appliance malfunctions or has been dropped or damaged in any manner. Supply cord replacement and repairs must be conducted by the manufacturer, its service agent, or similarly qualified persons in order to avoid a hazard. Call the provided customer service number for information on examination, repair, or adjustment.
- The use of attachments not recommended or sold by the appliance manufacturer may cause fire, electric shock, or injury.
- Do not use your food processor if any part is broken.
- Do not use outdoors.
- Do not let cord hang over edge of table or counter or touch hot surfaces, including stove
- Do not place on or near a hot gas or electric burner, or in a heated oven.
- Check that the appliance is OFF (☐ before plugging cord into wall outlet. To disconnect, turn the control to OFF (☐ then remove plug from wall outlet. To unplug, grasp the plug and pull from the outlet. Never pull from the power cord.
- Be sure to turn switch to OFF (Oposition after each use. Always use the pushers to clear the food chute. When this method is not possible, unplug cord from outlet and disassemble unit to remove the remaining food.
- Be certain lid is securely locked in place before operating appliance.
- Never feed food into food chute by hand. Always use the food pushers.
- Do not attempt to defeat any interlock mechanism.
-
To reduce the risk of injury, never place cutting blade or disc on base without first putting bowl properly in place.
-
Make sure the blade or disc has come to a full stop before removing lid.
- Do not use appliance for other than intended purpose.
- The appliance is not intended for commercial, professional, or industrial use. It is designed and built exclusively for household use only.
- Never use appliance for a longer period or with a larger amount of ingredients other than that recommended by appliance manufacturer.
-
Be careful if hot liquid is poured into the food processor bowl as it can be ejected out of the appliance due to a sudden steaming.
-
Do not fill the bowl above the marked maximum fill line (or rated capacity) to avoid risk of injury due to damage to the cover or bowl.
- CAUTION! In order to avoid a hazard due to inadvertent resetting of the thermal cut-out, this appliance must not be supplied through an external switching device, such as a timer, or connected to a circuit that is regularly switched on and off by the utility.
- The maximum rating of this unit is based on using the chopping/mixing blade. Using the slicing/shredding disc may draw significantly less power.
SAVE THESE INSTRUCTIONS
Other Consumer Safety Information
This appliance is intended for household use only.
⚠ WARNING Electrical Shock Hazard: This appliance is provided with a grounded (3-prong) plug to reduce the risk of electric shock. The plug fits only one way into a grounded outlet. Do not defeat the safety purpose of the plug by modifying the plug in any way or by using an adapter. If the plug does not fit into the outlet, have an electrician replace the outlet.
The length of the cord used on this appliance was selected to reduce the hazards of becoming tangled in or tripping over a longer cord. If a longer cord is necessary, an approved extension cord may be used. The electrical rating of the extension cord must be equal to or greater than the rating of the appliance. The extension cord must be a grounding-type, 3-wire cord. Care must be taken to arrange the extension cord so that it will not drape over the countertop or tabletop where it can be pulled on by children or accidentally tripped over. To avoid an electrical circuit overload, do not use another high-wattage appliance on the same circuit with this appliance.
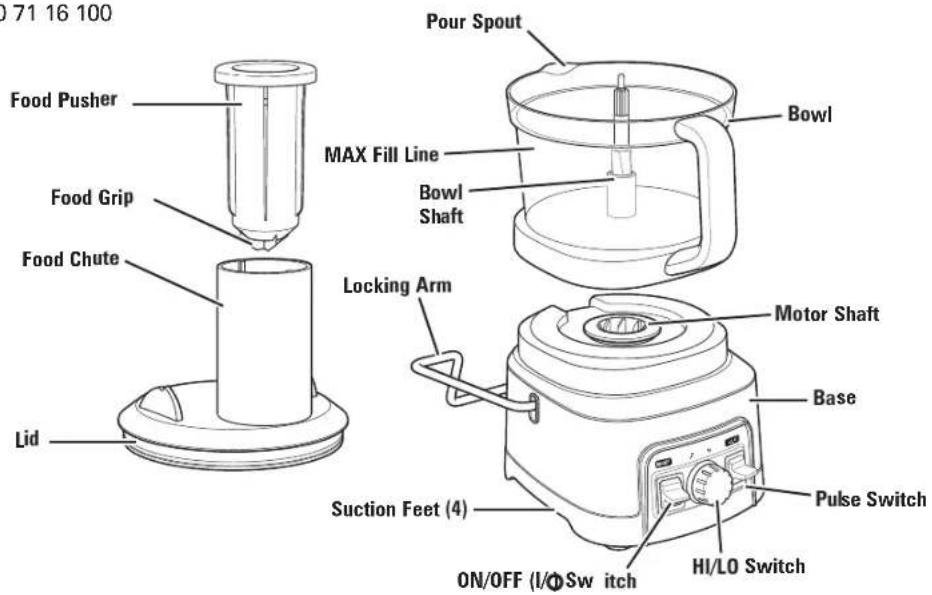
Parts and Features
To order parts:
US: 1.800.851.8900
www.hamiltonbeach.com
Canada: 1.800.267.2826
Mexico: 800 71 16 100
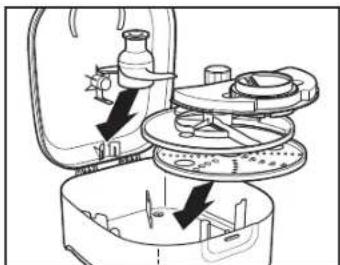
Before first use: Unpack Food Processor. Handle Blade and Disc(s) carefully; they are very sharp. Wash all parts except Base in hot, soapy water. Rinse; then dry.
text_image
71 16 100 Food Pusher Food Grip Food Chute Lid Pour Spout Bowl MAX Fill Line Bowl Shaft Locking Arm Motor Shaft Base Suction Feet (4) Pulse Switch ON/OFF (I/∅Sw itch) HI/LO Switch
Storage Case and Parts
natural_image
Diagram of a mechanical device with internal components and directional arrows indicating motion (no text or symbols)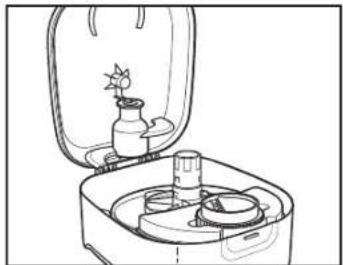
natural_image
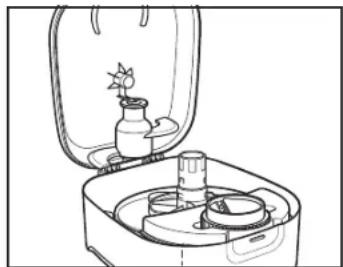
Line drawing of a portable appliance with a small plant inside, no text or symbols present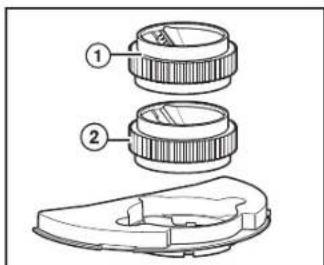
text_image
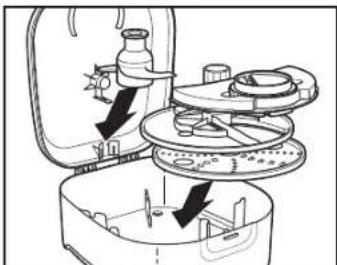
Technical diagram showing two labeled mechanical components with numbered partsThe storage case can be stored in three ways: flat, tipped on its side, or under the Food Processor. To store attachments, use finger holes to insert Shredding Disc first, aligning finger holes with the rounded ribs in bottom of the storage case. Next, adjust Slicing Disc to position 1 and place on top and to the side with hub facing the top of the storage case. Fit Spiral Slicer on top of Slicing Disc. Snap Dough Blade into notches provided in the Lid. Store Chopping/Mixing Blade inside the Food Processor Bowl.
Spiral Slicer
Use to spiralize vegetables. NOTE: Do not use with other attachments installed.
- Spiral Blade: Makes continuous noodle cuts.
- Ribbon Blade: Makes continuous wide cuts.

natural_image
Simple line drawing of a propeller or fan with two blades (no text or symbols)Chopping/Mixing Blade
Use to coarsely chop, mince, mix, or puree food.
natural_image
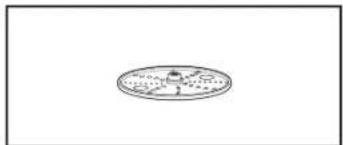
Simple line drawing of a circular object with internal patterns, resembling a stylized moon or emblem (no text or symbols)Reversible Fine or Coarse Shredding Disc
Use to shred a variety of foods (such as chilled cheese, carrots, cabbage, and potatoes).
natural_image
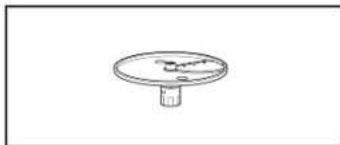
Simple line drawing of a circular object with a protruding rod (no text or symbols)Adjustable Slicing Disc
Use to slice a variety of foods from 1 mm to 6 mm (1/32" to 1/4") such as carrots, cucumbers, potatoes, pepperoni, onions, peppers, tomatoes, and chilled cheeses.

natural_image
Simple line drawing of a bottle with a side arm (no text or symbols)Plastic Dough Blade
Use to mix cookie dough, pastry crust, knead bread dough, pizza dough, and crumb toppings.
How to Use Chopping/Mixing Blade or Dough Blade
WARNING Laceration Hazard.
- Handle blade carefully; it is very sharp. Make sure unit is switched to OFF (☐ and is unplugged.
-
Always use food pusher to feed food into the chute. Never push food through chute with hands or other objects.
-
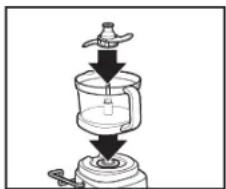
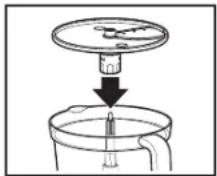
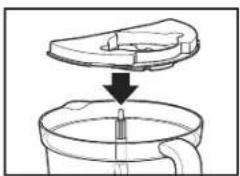
Place Bowl on Base with handle facing the front. Carefully place Chopping/Mixing Blade or Dough Blade straight down onto Motor Shaft.
- Add food to Bowl. Place Lid on Bowl, raise Locking Arm up and over, and snap in place. Plug into outlet.
- Select High (HI) speed by turning the Speed Dial to the right, or LO speed by turning the Speed Dial to the left.
NOTE: This Food Processor will start in the speed it was last used.
natural_image
Simple line drawing of a laboratory setup with a funnel and dropping funnel (no text or symbols)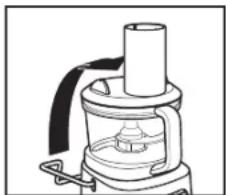
natural_image
Line drawing of a mechanical device with a cylindrical top and internal components (no text or symbols)- Press the ON/OFF (I/O) Switch up to turn ON (I) Food Processor. The Food Processor will run continuously at the selected speed. Press Switch down to turn OFF (Q).
- For more precise control, press PULSE in short bursts, checking progress frequently.
- When finished, switch to OFF (○). Unplug. Push Locking Arm back to unlock Lid and lower Arm.
- Always remove Lid before removing Bowl to avoid possible damage to the appliance.
NOTES:
- Operate using only one Blade or Disc at a time.
- High (HI) speed is recommended for most recipes using the Chopping/Mixing Blade or Dough Blade.
- When chopping foods, pulsing on and off will produce the best results.
- Make sure Food Pusher is in place while operating.

natural_image
Diagram showing a hand operating a washing machine with a rotating cylinder and a switch, illustrating the process (no text or symbols present)How to Use Adjustable Slicing Disc
WARNING Laceration Hazard.
-
Handle disc carefully; it is very sharp. Make sure unit is switched to OFF (O) and is unplugged.
• Always use food pusher to feed food into the chute. Never push food through chute with hands or other objects. -
Place Bowl on Base with handle facing the front. Adjust Disc to desired thickness by turning the adjustment post. There are 6 adjustment positions, ranging from 1 mm to 6 mm (1/32" to 1/4").
- Carefully place Adjustable Slicing Disc straight down onto Motor Shaft.
- Place Lid on Bowl. Raise Locking Arm up and over Bowl and snap into place. Plug into outlet.
- Place food into Food Chute and press Food Pusher Grip securely into food by pushing down on the Food Pusher. Do not fill Bowl above MAX Fill Line.
- Select LO speed by turning the Speed Dial to the left. NOTE: This Food Processor will start in the speed it was last used.
- Press the ON/OFF (I/O) Switch up to turn ON (I) Food
Processor. Press Switch down to turn OFF (Φ)
- When finished, switch to OFF (☐ Unplug. Push Locking Arm back to unlock Lid and lower Arm.
- Always remove Lid before removing Bowl to avoid possible damage to the appliance. Carefully remove Disc from Motor Shaft using the finger holes. Pour out food.
NOTES:
- Check to make sure no other blades are in the bottom of the Bowl.
- For smaller, thinner foods, like carrots, cut in half and load pieces side by side in the Food Chute in an upright position to prevent the food from falling over. This will result in more uniform slices.
- LO speed is recommended for slicing and shredding.
How to Use Reversible Shredding Disc
WARNING Laceration Hazard.
- Handle disc carefully; it is very sharp. Make sure unit is switched to OFF (O) and is unplugged.
-
Always use food pusher to feed food into the chute. Never push food through chute with hands or other objects.
-
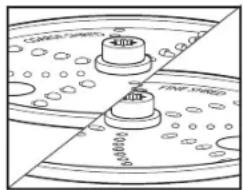
Place Bowl on Base with handle facing the front. Disc is labeled FINE SHRED on one side and COARSE SHRED on the other side. Carefully place Shredding Disc straight down onto Motor Shaft with desired side facing UP.
- Place Lid on Bowl. Raise Locking Arm up and over Bowl and snap into place. Plug into outlet.
- Place food into Food Chute and press Food Pusher Grip securely into food by pushing down on the Food Pusher. Do not fill Bowl above MAX Fill Line.
- Select LO speed by turning the Speed Dial to the left. NOTE: Food Processor will start in the speed it was last used.
- Press the ON/OFF (I/O) Switch up to turn ON (I) Food Processor. Press Switch down to turn OFF (O).
- When finished, switch to OFF (○). Unplug. Push Locking Arm back to unlock Lid and lower Locking Arm.
- Always remove Lid before removing Bowl to avoid possible damage to the appliance.
natural_image
Technical line drawing of a mechanical component with two circular holes and a central shaft (no text or symbols)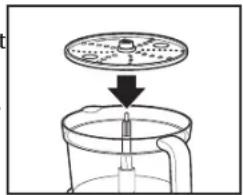
text_image
100% 100%NOTES:
- Check to make sure no other blades are in the bottom of the Bowl.
- LO speed is recommended for slicing and shredding.
- For smaller, thinner foods, like carrots, cut in half and load pieces side by side in the Food Chute in an upright position to prevent the food from falling over. This will produce more uniform results.
How to Assemble Spiral Slicer
WARNING Cut Hazard.
- Blades are sharp; handle carefully.
- Inspect parts before use. Do not use if parts are cracked, bent, or damaged.
-
Do not place fingers or utensils into the blade while in use.
-
With the tabs on the Spiral Slicing Plate aligned to the tabs on inside of Bowl, insert Spiral Slicer into the Bowl facing handle.
- With pointed end of Spiralizing Blade pointed down, place selected Blade into Spiral Slicer.
- Replace Lid and secure Locking Arm.
- Slide Food Pusher into Food Chute.
natural_image
Diagram showing a container being inserted into a lid, with an arrow indicating the process (no text or symbols present)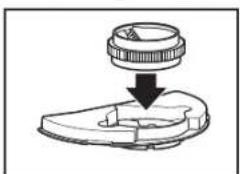
natural_image
Simple line drawing of a mechanical component with a downward arrow indicating motion (no text or symbols)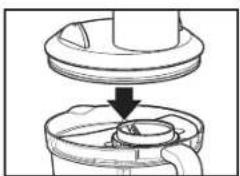
natural_image
Mechanical assembly diagram showing a cylindrical component being inserted into a housing (no text or symbols)How to Spiralize
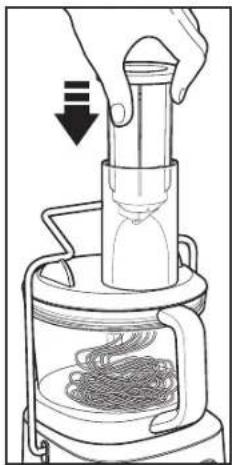
- Plug into outlet.
- Place the food in center of the Food Chute. Process only one piece of food at a time.
- Press Food Pusher Grip securely into food by pushing down on the Food Pusher.
- Turn on the Food Processor on LO speed.
- Apply light, constant pressure to Food Pusher while processing food. Allow the Food Pusher and motor to work at their own pace.
- Keep processing until food stops being cut. About 1 inch (2.5 cm) of food will always remain unprocessed.
- Remove the small cone-shaped piece of food left on the Food Pusher Grip. Use as a snack or add to stock, soup, or salads.
- Check Spiralizing Blade before spiralizing more food. If pulp is caught in Blade, clean with a brush and rinse.
- When finished, switch to OFF (☐ Unplug. Push Locking Arm back to unlock Lid and lower Locking Arm.
NOTES:
- If Grip is spinning on top of food, the Food Pusher has lost its grip on the food. Turn the appliance OFF (Q) Cut a flat edge on the food, and try again.
- Pressing harder will not speed up the process or make the Spiral Slicer cut better. The Spiralizing Blade turns, not the food.
- Do not lift up the Food Pusher during processing. This can cause the Food Pusher to lose its grip on the food.
natural_image
Line drawing of a hand using a vertical tube to press down a cylindrical object into a container filled with noodles (no text or symbols)Successful Spiralizing
- Start by choosing the best foods for spiralizing. Here is a general rule: Think about what foods will work well on a manual food grater. If you can grate a food, it should spiralize well.
- Solid fruits or vegetables work better than those that have seeds. Seeds get caught in the Blade and will not make uniform spirals. For vegetables such as butternut squash, use the solid part and save the end with seeds for another use.
- Size does matter. The best foods for spiralizing are the ones that most closely fit the size of the Food Chute.
- When making ribbons, symmetrical foods (like zucchini or cucumbers) will produce better results. Large foods can be cut to fit the Food Chute but ribbons may not be as uniform or pretty.
- Scrub or peel your fruits and vegetables before spiralizing. When practical, you should peel the food. Peels add to the pulp that can get caught in the Blade. Zucchini, yellow squash, cucumbers, and apples are examples that you could leave unpeeled.
- Center the item in the Spiral Slicer for more even cutting. Foods that are held vertically with the Food Pusher will give the best results.
- Apples, pears, and potatoes are examples of foods that turn brown quickly when cut. To avoid browning, sprinkle fruit with lemon juice and place potatoes in water until ready to use. Be sure to pat dry thoroughly with paper towels.
- Spiralized fruits and vegetables can be eaten raw or cooked. Most noodles can be stored 2 to 3 days in the refrigerator in covered containers.
- Dry the noodles with paper towels before serving or, if desired, blanch them in water to avoid watery sauces. Reduce sauces before topping noodles to prevent thinned-down sauces.
- Spiralized fruits and vegetables will be processed in very long strands. Use a knife or scissors to cut the produce into serving-sized pieces.
- Use tongs or a pasta fork to serve the noodles.
- The 1-inch (2.5 cm) leftover piece from processing can be eaten as a snack or saved to use in stock, soups, or salads.
- When spiralizing long food items, guide the item to keep it centered in the Food Chute.
Tips and Techniques
- For a more uniform consistency, start with pieces of food that are similar in size. Cut food into 1-inch (2.5 cm) pieces before processing with Chopping/Mixing Blade and leave room in Bowl for the food to be tossed around.
- This Food Processor is excellent to chop, mix, slice, or shred most foods. However, to maintain peak performance, do not use Food Processor for the following: grinding coffee beans or spices, slicing frozen meats, or crushing ice.
- When chopping foods, pulsing on and off will produce the best results.
- Operating time will depend on quantity of food being processed. Most foods can be sliced, chopped, or shredded in seconds. If unit is operated continuously for an extended period of time, let Food Processor rest about 4 minutes before continuing.
- Do not puree or mash starchy vegetables like potatoes as they are easily overprocessed and will become gummy.
- To slice or shred cheese, use only firm cheese like Cheddar or Swiss that has been chilled for at least 30 minutes. Cheese should be processed immediately after being removed from the refrigerator. Soft cheese like mozzarella must be placed in the freezer for 30 minutes prior to processing to ensure it is firm enough for shredding.
Visit hamiltonbeach.com for delicious recipes, tips, and to register your product online!
Processing Charts
Disc attachments are reversible and labeled. The label should face up for the desired function. Do not process past the MAX Fill Line on the Bowl.
ATTACHMENT FOODS
| Chopping/Mixing Blade (HI speed) | Chop: nuts, meat, garlic, onions, peppers, celery, herbs, bread (for crumbs), crackersMince/Puree: vegetables, fruitMix: salad dressingsPuree: soups, sauces, dipsGrate: cheese, such as Parmesan (chilled) |
| Spiralizing Blades (LO speed) | Apples, beets, bell peppers, broccoli, butternut squash, cabbage, carrots, celeriac, chayote, cucumbers, daikon radish, jicama, kolrabi, onion, parsnip, plantain, rutabaga, sweet potatoes, summer squash, taro root, turnip, white potato, zucchini |
| Slicing Disc (LO speed) | Cucumbers, apples, mushrooms, carrots, potatoes, cabbage, tomatoes, pepperoni, peppers, radishes, firm cheeses (chilled) |
| Shredding Disc (LO Speed, slicing side facing up) | Cabbage, potatoes, carrots, cheese (chilled) |
| Dough Blade (HI speed) | Cookie dough, pastry crust, bread, pizza dough |
For best results, do not exceed the following amounts when chopping, mincing, or pureeing with the Chopping/Mixing Blade.
FOOD MAXIMUM AMOUNT
| Dry ingredients such as crackers or nuts 12 cups (2.8 L) |
| Vegetables or fruits, quartered 3 pounds (1.4 kg) |
| Cheese such as Parmesan or Cheddar, cubed 40 ounces (1.2 L) |
| Thick sauces or dips 8 cups (1.9 L) |
| Liquids such as marinades or soups 7 cups (1.7 L) |
| Boneless beef, cut into 1-inch (2.5 cm) cubes* 1 pound (454 g)*PULSE until desired consistency. |

Care and Cleaning
WARNING Laceration Hazard. Store slicing disc with slicing side down. Handle blades carefully.
⚠ WARNING Electrical Shock Hazard: Disconnect power before cleaning. Do not immerse cord, plug, or base in any liquid.
⚠ WARNING Cut Hazard. Blades are sharp; handle blades with care.
- Wash Bowl, Lid, Food Pusher, Blades, and Discs in hot, soapy water or place in dishwasher. Rinse and dry.
- Wipe Base, Controls, and cord with a damp cloth or sponge. If necessary, use a mild nonabrasive cleanser. Never place in water or rinse under running water or other liquid.
- DO NOT use the "SANI" setting when washing in the dishwasher, top-rack only. "SANI" cycle temperatures could damage your product. All removable parts may also be cleaned in the sink with hot, soapy water. Use caution when washing Chopping/Mixing Blade and Slicing/Shredding Disc.
Storage and Storage Case
- Store Chopping/Mixing Blade inside Food Processor Bowl.
- Add Lid and raise Locking Arm up and over Bowl and snap into place.
- Place Food Pusher in Food Chute.
- To store attachments in storage case, insert Shredding Disc first, aligning finger holes with the rounded ribs in bottom. Next, adjust Slicing Disc to position 1 and place on top and to the side with hub facing the top of the storage case. Fit Spiral Slicer on top of Slicing Disc. Snap Dough Blade into notches provided in the Lid.
- Food Processor can be placed on top of storage case or beside it.
natural_image
Diagram of a mechanical device with rotating components and directional arrows indicating motion (no text or symbols)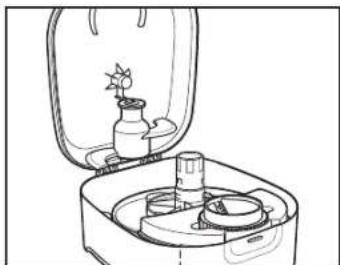
natural_image
Line drawing of a portable electronic device with a small flower inside, no text or symbols presentTroubleshooting
Unit does not operate on any speed or Pulse.
- The unit is not plugged in or outlet does not work.
- The Bowl and Lid are not locked in place. See "How to Use" sections.
- The Locking Arm is not locked in place over Bowl and Lid.
Food is not sliced, spiralized, or shredded uniformly.
- Packing too much food in the Food Chute or pushing too hard on the Food Pusher may cause processed food to be irregularly sliced or shredded. Refer to "Processing Charts" for recommended sizes and quantities.
- For smaller, thinner foods, like carrots, cut in half and load pieces side by side in the Food Chute in an upright position to prevent the food from falling over. This will result in more uniform slices.
Unit stops and will not come back on.
- The Bowl and Lid are not locked in place. They may have moved slightly during processing. See "How to Use" sections.
- The outlet is not working. Check it by plugging in a working lamp or other appliance. You may have overloaded the circuit and blown a fuse or tripped the circuit breaker.
- This machine is equipped with motor overload protection. If the motor stops during operation due to overheating, unplug and allow it to cool down for 15 minutes before resuming process.
Unit has a burning smell.
- There may be a residue left on motor from the manufacturing process, causing a slight odor during initial use. This will go away. If a strong odor or any visible smoke appears, unplug unit IMMEDIATELY and call the Customer Service number.
Motor seems weak.
- The recommended food size and quantity to be processed have not been used. Refer to "Processing Charts" for recommended food sizes and speeds.
Cheese is not shredding well.
- Cheese should be processed immediately after being removed from the refrigerator. Soft cheese like mozzarella must be placed in the freezer for 30 minutes prior to processing to ensure it is firm enough for shredding.
Vegetables are not shredding, spiralizing, or slicing.
- Store vegetables with high water content in refrigerator prior to processing. Room-temperature vegetables are less firm and do not perform as well.
Vegetables are not spiralizing consistently.
- Remove and clean any food debris from the Blade. Reinstall the Spiral Slicer and continue use.
Food won't spiralize. Food mashes or breaks apart.
- Some soft or overripe foods may not be suitable for spiralizing. Choose firm foods. A success tip is to think of foods that can be grated on a manual food grater. If a food can be grated, it is appropriate for spiralizing.
- Not pressing hard enough or pressing too hard. Apply light, constant pressure to Food Pusher while spiralizing. Allow the Spiral Slicer to work at its own pace. NOTE: Pressing harder will not speed up the process or make the Spiral Slicer cut better.
- Food is not centered in the Food Chute. Stop the motor. Cut a flat edge on the food and try again. Best results occur when the food most closely fits the size of the Food Chute and when it is held vertically with the Food Pusher securely inserted in the end, not allowing the food to fall over on its side.
Recipes
Easy Pepperoni Pizza
2 1/2 cups (591 ml) all-purpose flour
1 envelope pizza crust yeast
1 1/2 teaspoons (7.5 ml) sugar
1 teaspoon (5 ml) salt
1 cup (237 ml) very warm water (120° to 130°F [49°–54°C])
Directions:
- Assemble Food Processor with Dough Blade. Place 2 cups (473 ml) flour, undissolved yeast, sugar and salt in work Bowl. Pulse a few times to blend ingredients.
- Add water and oil. Process 1 minute. Add additional flour until mixture forms a soft dough.
- Preheat oven to 425°F (218°C).
- Place dough on floured counter and let rest for 10 minutes.
- Assemble Food Processor with Shredding Disc. Shred mozzarella; set aside.
- Assemble Food Processor with Adjustable Slicing Disc. Set to thin slice. Slice pepperoni; set aside.
- Spray pizza pan with nonstick cooking spray. Shape dough into a 15- to 16-inch (38.1- to 40.6-cm) round pizza pan. Add favorite pizza ingredients.
- Bake 20 to 25 minutes or until crust is browned and cheese is melted.
Serves: 14 to 16
1/4 cup (59 ml) vegetable oil
2/3 cup (158 ml) pizza sauce
8 ounces (227 g) mozzarella cheese
1 small (2-ounce [57-g]) stick pepperoni
Roasted Red Pepper Hummus
2 cloves garlic
2 green onions, white portion and half of green tops
2 cans (15 oz. [425 g] each) garbanzo beans (chickpeas), drained
1 jar (14 oz. [397 g]) roasted red peppers, drained
1/4 cup tahini (sesame paste) stirred
2 tablespoons (30 ml) lemon juice
2 teaspoons (10 ml) olive oil
1/4 teaspoon (1.3 ml) ground cumin
Dash cayenne pepper
Salt and pepper to taste
Dash paprika
Pita chips or cut vegetables
Directions:
- Assemble Food Processor with Chopping/Mixing Blade. With processor running, drop garlic cloves and onion into Food Chute.
- Add garbanzo beans, roasted red peppers, tahini, lemon juice, olive oil, cumin, cayenne, salt and pepper. Continue to process until smooth.
- Place in serving bowl and garnish with paprika. Serve with pita chips and/or vegetables. Refrigerate to store.
Serves: 4 to 6
Recipes (cont)
Lemon Garlic Shrimp and Veggie Pasta
2 large zucchini
2 large yellow squash
2 large thick carrots, peeled 3/4 cup (177 ml) butter
4 cloves garlic, minced
1 tablespoon (15 ml) cornstarch
1/2 cup (118 ml) chicken broth plus 2 tablespoons (30 ml), divided
1 pound (454 g) (20 to 24 count) peeled and deveined shrimp
Directions:
- Using a Spiral Slicer, make spirals of zucchini, yellow squash and carrot.
- Fill a large saucepan two-thirds full of water. Over high heat, boil water. Add zucchini, yellow squash and carrots spirals. Cook until tender, about 15 seconds. Drain and cover to keep warm.
- In a large skillet over medium-high heat, melt butter. Add garlic and cook until tender, 1 to 2 minutes.
- In a small bowl, dissolve cornstarch in 2 tablespoons (30 ml) chicken broth. Add to skillet with shrimp, remaining chicken broth, lemon juice, salt and black pepper. Cook until shrimp are opaque throughout and sauce is thickened, about 2 minutes.
- Stir in capers and lemon zest. Serve over veggie pasta.
- Sprinkle with parsley before serving.
Serves: 4–6
1/4 cup (59 ml) lemon juice
1 teaspoon (5 ml) salt
1/2 teaspoon (2.5 ml) coarse black pepper
2 tablespoons (30 ml) drained capers
1 teaspoon (5 ml) lemon zest
Chopped fresh parsley
Beets With Orange and Goat Cheese Salad
2 pounds (907 g) fresh beets (about 6 medium), peeled
3 teaspoons (15 ml) salt, divided
6 tablespoons(89 ml) fresh
orange juice
1/2 cup (118 ml) vegetable oil
2tablespoons(30 ml) rice vinegar
2 tablespoons (30 ml) honey
1 tablespoon(15 ml) fresh
thyme leaves
Directions:
- Using Spiral Slicer, make ribbons of beets.
- Fill a large saucepan two-thirds full of water and 2 teaspoons (10 ml) salt. Over high heat, boil water. Add beets and cook until tender, 1 to 2 minutes.
- Chill in an ice bath. Drain and dry ribbons with paper towels.
- To make dressing, assemble Food Processor with Mixing/Chopping Blade. Add orange juice, oil, vinegar, honey, thyme leaves, garlic, 1 teaspoon (5 ml) salt and coarse black pepper to Food Processor. Process until slightly thickened.
- On a salad plate, arrange fresh greens, beets and orange segments. Top with goat cheese and toasted walnuts.
Serves: 8
1 clove garlic
1/2teaspoon(2.5 ml) coarse black pepper
Salad greens
2 medium oranges, sectioned 1/2cup(118 ml) crumbled goat cheese
1/2cup(118 ml) chopped walnuts, toasted
Limited Warranty
This warranty applies to products purchased and used in the U.S. and Canada. This is the only express warranty for this product and is in lieu of any other warranty or condition.
This product is warranted to be free from defects in material and workmanship for a period of five (5) years from the date of original purchase in Canada and one (5) years from the date of original purchase in the U.S. During this period, your exclusive remedy is repair or replacement of this product or any component found to be defective, at our option; however, you are responsible for all costs associated with returning the product to us and our returning a product or component under this warranty to you. If the product or component is no longer available, we will replace with a similar one of equal or greater value.
This warranty does not cover glass, filters, wear from normal use, use not in conformity with the printed directions, or damage to the product resulting from accident, alteration, abuse, or misuse. This warranty extends only to the original consumer purchaser or gift recipient. Keep the original sales receipt, as proof of purchase is required to make a warranty claim. This warranty is void if the product is used for other than single-family household use or subjected to any voltage and waveform other than as specified on the rating label (e.g., 120 V \~ 60 Hz).
We exclude all claims for special, incidental, and consequential damages caused by breach of express or implied warranty. All liability is limited to the amount of the purchase price. Every implied warranty, including any statutory warranty or condition of merchantability or fitness for a particular purpose, is disclaimed except to the extent prohibited by law, in which case such warranty or condition is limited to the duration of this written warranty. This warranty gives you specific legal rights. You may have other legal rights that vary depending on where you live. Some states or provinces do not allow limitations on implied warranties or special, incidental, or consequential damages, so the foregoing limitations may not apply to you.
To make a warranty claim, do not return this appliance to the store. Please call 1.800.851.8900 in the U.S. or 1.800.267.2826 in Canada or visit hamiltonbeach.com in the U.S. or hamiltonbeach.ca in Canada. For faster service, locate the model, type, and series numbers on your appliance.
Notes
PRÉCAUTIONS IMPORTANTES
natural_image
Diagram of a laboratory apparatus with a bottle inside a container, showing internal components and directional arrows (no text or labels)
natural_image
Line drawing of a portable air conditioner unit with a small plant inside (no text or symbols)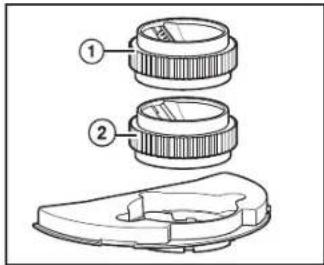
text_image
Technical diagram showing two labeled mechanical components with numbered partsnatural_image
Simple line drawing of a mechanical component resembling a pump or impeller (no text or symbols)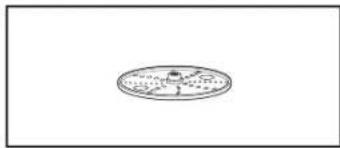
natural_image
Simple line drawing of a circular object with a central hole and horizontal lines, resembling a stylized globe or emblem (no text or symbols)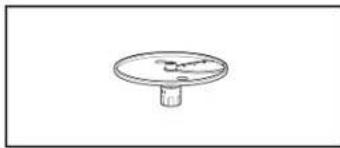
natural_image
Simple line drawing of a circular object with a small protrusion at the base (no text or symbols)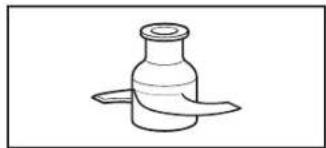
natural_image
Simple line drawing of a bottle with a flared rim and two curved ends (no text or symbols)natural_image
Simple line drawing of a laboratory setup with a dropping funnel and a beaker (no text or symbols)natural_image
Line drawing of a mechanical device with a cylindrical top and internal components (no text or symbols)natural_image
Diagram showing a hand pressing a button on a device with a rotating arrow indicating rotation (no text or symbols present)natural_image
Technical line drawing of a mechanical component with no visible text or symbolsREMARQUES :
text_image
Diagram showing a container with a lid and a downward arrow indicating a process or operation, likely illustrating a mechanical or fluid system.natural_image
Diagram showing a mechanical component being inserted into a container (no text or symbols present)natural_image
Simple line drawing of a mechanical component with a downward arrow indicating motion (no text or symbols)natural_image
Mechanical assembly diagram showing a cylindrical component being inserted into a housing (no text or symbols)natural_image
Line drawing of a hand using a vertical tube to press down a steamer (no text or symbols present)natural_image
Diagram of a mechanical device with internal components and directional arrows indicating motion (no text or symbols)
natural_image
Line drawing of a portable oven with a small jar and a small container, containing a small plant (no text or symbols)Dépannage
natural_image
Diagram of a gas stove with cooling fans and heat exchanger (no text or labels)
natural_image
Line drawing of a portable appliance with a small bottle and fan inside, no text or symbols presenttext_image
Technical diagram showing two labeled mechanical components with numbered partsnatural_image
Simple line drawing of a propeller or fan with two blades (no text or symbols)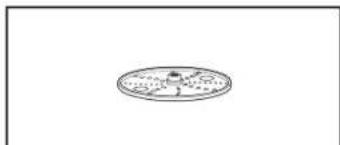
natural_image
Simple line drawing of a circular object with internal patterns, resembling a stylized moon or bowl (no text or symbols)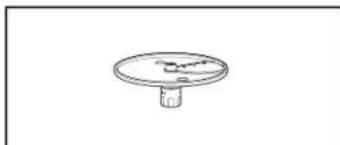
natural_image
Simple line drawing of a circular object with a small protrusion and a central hole (no text or symbols)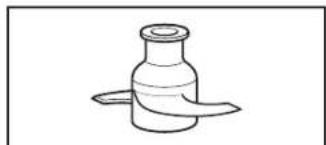
natural_image
Simple line drawing of a bottle with a flared rim and two curved blades (no text or symbols)natural_image
Diagram of a coffee maker with a funnel and base, showing liquid level (no text or labels)
natural_image
Line drawing of a mechanical device with a cylindrical top and internal components (no text or symbols)natural_image
Diagram showing a hand operating a washing machine with a rotating dial and a side view of the device (no text or symbols present)natural_image
Diagram of a mechanical component with two circular features, no text or symbols present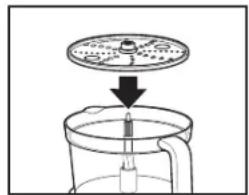
natural_image
Simple line drawing of a funnel pouring liquid into a glass container (no text or symbols)NOTAS:
natural_image
Diagram showing a mechanical component being inserted into a container (no text or symbols present)natural_image
Simple line drawing of a mechanical component with a downward arrow indicating force or direction (no text or symbols)natural_image
Mechanical assembly diagram showing a cylindrical component being inserted into a housing (no text or symbols)natural_image
Illustration of a hand using a portable food grater to press or spread contents (no text or symbols visible)The image contains a graphical symbol (a target with a crosshair and a central dot) that does not contain any textual content. Therefore, no OCR text can be extracted.
natural_image
Diagram of a mechanical device with internal components and directional arrows indicating motion (no text or symbols)