Residential Park (2025) - Holiday home Swift - Free user manual and instructions
Find the device manual for free Residential Park (2025) Swift in PDF.


User questions about Residential Park (2025) Swift
0 question about this device. Answer the ones you know or ask your own.
Ask a new question about this device
Download the instructions for your Holiday home in PDF format for free! Find your manual Residential Park (2025) - Swift and take your electronic device back in hand. On this page are published all the documents necessary for the use of your device. Residential Park (2025) by Swift.
USER MANUAL Residential Park (2025) Swift
Issued September 2024
Part No.1730714

CONTENTS
- Introduction 4
- Warranty and after sales support 9
- Siting 13
- General safety advice 21
- Safe use of LPG 25
6.Mains electricity and wiring 31 - Heating and thermal properties 35
8.Appliances 37
9.Cooking 39
10.Blinds 41
11.Beds 43 - General care 45
- Security 59
14.Winterisation 61 - Technical information 65
Index 88
Introduction
1. Introduction
Thank you for deciding to buy a new Swift Residential Park Home which has been built to the Park Home standard BS 3632:2023
We are sure you and your family will enjoy many happy hours of comfort and relaxation and hope the information in this handbook will improve your enjoyment. It has been designed to give you a general guide to the care, safe use and maintenance of your park home and help protect your investment.
The information contained will answer most of your queries, but if there are any aspects which are not covered please consult your park owner, distributor or dealer for further advice. A dedicated customer care team supports them and, together, we aim to give you many years of pleasure.
Residential Park Home definition
A residential park home also referred to as a park home may be used as a permanent place of residence (subject to local authority and site permissions).
Throughout the season, specifications and equipment details contained within this handbook may change. Please refer to our online handbooks (www.swiftgroup.co.uk) for the most up-to-date version of your handbook.
1.2 Safety
The information contained in this handbook is provided for your safety and enjoyment whilst using the product. It is recommended that you read this handbook right through before using it as you will find information, tips and important warnings regarding the use of your park home. Whilst all the content is important there are specific items, prefixed with a warning, caution or note, which are drawn to your attention for your safety and comfort.
WARNINGs are instructions that if ignored can cause the user(s) physical harm.
CAUTIONS are instructions that if ignored can result in damage to the park home.
① Notes are reminders that should beheeded.
WARNING: For your safety:-
- Ensure all the occupants are aware of the escape routes from the park home.
Always keep escape routes and exit points clear from obstruction and hazards. - Provide one dry powder fire extinguisher of an approved type or complying with EN 3-7, of at least 1kg capacity, by the main exterior door and a fire blanket next to the cooker.
Familiarise yourself with the instructions on your fire extinguisher and the local fire precaution arrangements.
Always keep young children away from hot surfaces.
① Note: Your attention is drawn to the notice affixed inside the boiler cupboard advising on fire precaution, ventilation and what to do in case of a fire.
Emergency action procedures
In the event of gas leakage:
- Never operate electrical switches
- Never look for a leak with a naked flame
- Call the gas supplier and consider calling the fire brigade. Wait outside.
If safe to do so:
- Extinguish all naked flames
- Turn off gas supply at cylinders
- Open doors and windows
① Note: Do not turn on the gas supply until it has been made safe to do so by a qualified person.
Introduction
In the event of fire:
- Call the fire brigade immediately and inform them that LPG cylinders are on the premises.
- Turn off the gas supply at cylinders, if practical and safe to do so.
- Do not go near cylinders in the vicinity of the fire.
① Note: Do not turn on the gas supply until it has been made safe to do so by a qualified person.
Fire and asphyxiation risks:
- Do not block ventilators.
- Flexible gas hoses shall be inspected regularly for deterioration. Have a competent person renew with an approved type as necessary and not later than the expiry date marked on the hose.
- Use only a fire extinguisher recommended for domestic kitchens and confined spaces, except on liquid fires, where only fire blankets shall be used.
- Use a fire blanket on a liquid fire. If a fire occurs in the oven, turn off the oven and leave the oven door closed to smother the fire.
- Do not use portable gas or liquid fuel heating equipment because it is a source of danger and could cause fumes, asphyxiation and condensation.
Smoke, Heat and Carbon Monoxide alarms
Please read the user instructions provided with your park home
WARNING: These are safety devices provided for your protection. Please ensure that they are maintained and working correctly by following the user instructions.
The devices require regular testing and cleaning. See user instructions.
The heat and smoke alarms fitted to Swift Park homes are Mains linked devices that have Sealed & Tamper-proof 10 Year Battery. See the product instructions for the operation and maintenance of these alarms.
Do not attempt to repair alarms as doing so will invalidate your warranty.
LPG Gas
(see also Gas section)
WARNING: If you smell gas or suspect a leak or in the event of a fire and if it is safe to do so, isolate the gas appliances and turn off the gas bottles at the regulator. Evacuate the park home and ventilate. Seek professional advice as to the cause of the leak.
WARNING: Never use a naked flame when checking for leaks.
All gas appliances and gas taps have a gas dispersal vent within the same compartment. It is essential that these are not blocked or made ineffective
Safe use of electricity
(see also Electricity section)
- Always use an NICEIC registered electrician for any work or modification to your electrical system or appliances.
- Ensure that you understand the working of all electrical switches in your park home.
- Regularly check that all electrical cable terminal connections are firm and secure. Check exposed cables for wear and damage.
- Keep spare appliance fuses handy.
WARNING: Remember don't touch it, if you don't understand it
Escape paths
It is important that you do not block escape paths to emergency exits with obstructions or hazards (see layouts further in this book).
Children
Do not leave children alone in the park home in any event and keep potentially dangerous items out of reach as you would at home e.g. matches, medicine etc.
Children under the age of 6 must be supervised whilst using the high level bunks (where fitted).
Introduction
Ventilation
The ventilation of your park home has been designed to comply with BS3632:2015 and is provided by trickle vents in the top of the window frames (or in some washrooms ducted through the building structure)
Additional night time ventilation is obtained by releasing the window catches and placing them in the second groove.
① Note: The windows are not sealed from rain in this position
As the ventilation levels are calculated to suit each model requirements, there should be no modifications made which may result in reduced ventilation levels.
CAUTION: Do not store items underneath your park home or fit decking or skirting which dramatically reduces air flow underneath it.
If snow on the roof is excessive it is important that high level ventilation and appliance flues are not blocked. Care should be taken if removing snow from the roof.
For approximate locations of vents in park homes refer to the drawings in the technical section of this handbook.
WARNING: Under no circumstances must any ventilator be blocked or obstructed even partially.
Bunk beds (where fitted)
WARNING:
- Use upper bunks for sleeping only, with the provided protection against fall out in position
- Protection boards must not be climbed over or used to access the bunks.
- Care shall be taken against the risk of fall out when the upper bunks are in use by children especially under 6 years of age, these bunks are not suitable for use by infants without supervision.
Introduction
1.3 Owner's certificate
Please complete all details on form below for reference at a later date.
| Manufacturer: Swift Group Ltd Owner's Name | ||
| Model: Home Address: | ||
| Indentification Marking: SG | ||
| Key Number: | ||
| CO Alarm (Date of Manufacture) | ||
| Smoke Alarm (Date of Manufacture) | Tel No. | |
| Supplied and fully inspected before delivery by: | Dealer: Dealer Stamp: | |
| Address: | ||
| Tel No. |
This certificate identifies your park home accurately. Please produce this whenever you require a service, repairs or when ordering additional accessories.
Introduction
2. WARRANTY
AND AFTER
SALES SUPPORT
2.1 Warranties 10
2.2 After sales 12
Warranty / After Sales
2.1 Warranties
All illustrations and descriptions in this handbook are intended to give a general idea of what a Swift holiday home might look like. Changing market and supply situations and our policy of continuous product development may prevent us from maintaining the exact specifications detailed in this handbook.
We therefore reserve the right to alter specifications as materials and conditions demand.
Your Home is manufactured by Swift Group Limited ("Swift"). Dealers and/or park operators are not agents of Swift and have absolutely no authority to bind the manufacturer by any express or implied undertaking or representation.
Your Home has three warranties:
3 Year SuperSure Warranty
Subject to the conditions, terms and exclusions set out in this section of the handbook, The Swift Group will repair (or, at its option, replace) any defective parts of your Home that comes to
light during the SuperSure Warranty Period. This applies to all parts and fittings of your Home (other than the structural exterior). The SuperSure Warranty Period means 36 months
from the date an approved Swift Group Dealer, or Park Operator [transfers/hands over] the Home to its first owner.
5 Year Structural Warranty
Subject to the conditions, terms and exclusions set out in this section of the handbook, Swift will repair (or, at its option, replace) any defects with the structural integrity of the Home, that come to light during the Structural Warranty Period. The Structural Warranty covers any defect with the seams of the Home. This includes water ingress through any permanently sealed seam joints. The Structural Warranty Period means 60 months from the date an approved Swift Group Dealer, or Park Operator [transfers/hands over] the Home to its first owner.
10 Year Chassis Warranty
Subject to the conditions, terms and exclusions set out in this section of the handbook, Swift will repair (or, at its option, replace) any defects with the chassis that come to light during the Chassis Warranty Period but only for as long as the Home belongs to its first owner. The Chassis Warranty Period means 10 years from the date an approved Swift Group Dealer, or Park Operator [transfers/ hands over] the Home to its first owner.
Conditions
- Swift will not be liable under this warranty for any damage or defect that arises from your failure to site your Home in accordance with Swift's recommendations or the Code of Practice for the Transportation, Siting and Commissioning of holiday homes. Your Dealer or Park Operator can provide you with more information on this code of practice.
- This warranty only applies to Homes purchased and sited in the UK.
- You must keep your Home in a good state of maintenance and repair. Swift will not be liable for any defect caused by any negligence, misuse or modification of the Home.
- All new Homes must be registered with Swift within 6 weeks of purchase as from new.
- The unit must be sited correctly on a recognised site pitch.
- The cost of transporting or moving the Home by any means to or from the place of repair is the responsibility of the owner.
- Swift shall not be liable under this warranty for any defects related to or arising from the following;
The failure of a component for reasons of fair wear and tear; - Damage resulting from freezing, fire, over heating or accidents (whether caused by the user or third party);
Warranty / After Sales
- Damage as a result of failure to carry out normal or specific maintenance including, but not specific too, not draining down and winterising the Home.
- Defect due to condensation, fungus, mildew and damp (other than as a result of a failure of a permanent seal or joint).
- Misuse of any component;
- Normal deterioration, corrosion, intrusion of foreign or harmful bodies, lack of servicing or negligence of any person other than Swift
- which causes stoppage of or impairment to the function of any component of the Home.
- Replacement of parts which have reached the end of their effective working life because of age and/or usage;
- Cleaning or adjustment of any assemblies;
- Cosmetic finishes to kitchen sinks, sealants, cooker tops, vanity units, shower trays;
- Routine maintenance items including lubricants, rubber gas hose, the cleaning of the heater and flues, the replacement of gas jets, the resealing and/or replacement of shower room sealant, the adjustment and lubrication of locks;
-
Any breakage or failure of any windows, glass, tyres, fluorescent tubes, replacement light bulbs, spotlights, tap washers or thermocouples;
-
Any failure resulting from the use of a part or component in the Home, which is not approved by Swift.
- Damage caused by Environmental conditions such as UV damage and corrosion.
Exclusions
In addition to the conditions above, the following parts have exclusions.
Appliances and white goods - Manufacturers give between 1 and 3 years for the appliances. Please refer to individual appliance instruction booklet for manufacturer's warranty. This can include ovens, fridges, wine coolers, microwaves, dishwashers and washing machines.
Gas central heating boilers - have a 2 year warranty.
Exterior door and window hardware - Handles, hinges, locks and keeps have 1 year warranty. This does not include: defects or damage caused by wear and tear.
Holiday home aluminium cladding
- Holiday homes sited within 250 metres of the coast or seas edge will be offered: 3 year functional warranty only (not paint coating)
- Holiday homes sited within 250 and 70 metres of the coast or seas edge will be offered: 1 year full warranty and 4 year functional warranty
- Holiday homes sited within 750 and 1500 metres of the coast or seas edge will be offered: 2 year full warranty and 4 year functional warranty
- Holiday homes sited 1500 metres of the coast or seas edge will be offered: 5 year full warranty.
Note: Failure of any part or component, which is not original equipment, or a defect caused as a result of an unauthorised modification to the Home will not be covered under warranty.
Swift shall not be liable under this Warranty if the Home has been neglected, misused, modified or used for hire or reward or if the identification marks (chassis/VIN numbers) have been removed or defaced. The Home will be deemed to have been neglected if it has not been maintained as stated in this handbook.
You have legal rights under UK law governing the sale of consumer goods. This warranty does not affect your legal rights.
Warranty / After Sales
The name and address of the warranty provider is:
Swift Group Limited, Dunswell Road, Cottingham, East Yorkshire, HU16 4JX
To make a claim under this warranty, contact the dealer or park operator which supplied your Home. If this is not possible, please contact the Swift Group Customer Experie ce Team at enquiries@swiftleisure.co.uk
2.2 After sales
After sales support and service
Please note that all after sales enquiries must be directed through your supplying Dealer or Park Operator. The after sales service at the factory is geared to supporting our Dealer/Park Operator network, as is the service provided by the appliance manufacturers.
Note: In the interests of safety, replacement parts for an appliance must conform to the appliance manufacturer's specifications and should be fitted by them or their authorised agents.
Note: Please remember to quote the chassis number when ordering any items from your Dealer/Park operator.
3. SITING
3.1 Craning 14
3.2 Siting 14
3.3 Supporting the chassis 15
3.4Jacking 15
3.5 Wheel chocks 16
3.6 Spreader plates 16
3.7Anchors 17
3.8 Snow loading 17
3.9 Chassis specification 18
Siting
3.1 Craning
Given the high risk involved in craning operations the legal requirements are particularly strict, therefore it is recommended that when a crane is required for lifting a park home, a specialist craning contractor should be used to undertake a 'Contract Lift'.
The contract lift must be organised through a reputable company which holds adequate insurance for all their operations, including liability cover for the park home being lifted. If a specialist craning contractor is employed to undertake a 'Contract Lift', the park / distributor is nevertheless obliged to have in place documented craning procedures and ensure that all persons involved with the instigating or the supervision of any craning work are fully conversant with such procedures.
Procedure
Selection of Nominated Contractor: - It is strongly recommended that the following information is obtained before any work can commence:
- A copy of the Craning Company's Health and Safety Policy
- Detailed, technical risk assessments relevant to lifting park homes and to the specific lift (including wind loading, load spread, appropriate slinging method, etc.
-
A copy of method statements as to how the work will be undertaken
-
Copies of training records for all competent persons
- Copies of all test certificates received
- Copy of segregation procedures received
Signed agreement from the nominated contractor to adhere to the hiring company's Contractor Code of Conduct - Copy of Public Liability insurance (Minimum cover £5 million and in date)
3.2 Siting
Your park home should be sited on a correctly prepared standing of suitable material, which must provide adequate support for the home placed upon it.
① Note: A Twin unit park home is produced in two units and should be assembled together on site by professional siting Engineers in accordance with CITO guidelines. If the product is to be moved in the future then you should consider seeking professional advice before commencing.
Methods of siting vary, dependent upon the ground conditions and specific requirements set by the local authority site licence. The method of siting a park home in a flood risk area must be considered carefully. In some instances as insurers impose risk management controls in order to continue their provision of flood cover.
Care is required to position the park home squarely on the pitch. The wheels should then be chocked in front and behind to resist movement.
Where practicable, the park home should remain securely attached to the towing vehicle until it is jacked and supported.
Where this is not possible, the towing vehicle should be disconnected ensuring the jockey wheel is left in a locked position and on a firm base or spreader plate.
The towing vehicle can then be removed from the sitting operational area.
All the corner steadies should be wound down in contact with the base;
The park home should be carefully jacked up in accordance with jacking instructions.
When one side of the home has been raised sufficiently to enable the wheel(s) to spin freely, solid concrete blocks should be placed under the main longitudinal chassis beams either side of the axle (in four positions) - see figure.3 page 18). The other side of the park home can then be raised and supported in the same way.
Suitable packing material should be placed between the top of the concrete block and the underside of the chassis to cushion the weight and reduce the transmission of vibration.
CAUTION: Concrete blocks should not be in direct contact with the steel chassis.
The corner steadies should now be extended on either side to ensure that the park home is stable. At this point, intermediate supports should be carefully placed between the supports either side of the chassis and the corner steadies (Figure 1)
A spirit level should be used to check that the park home is absolutely level across its width. The internal floor should be used for levelling purposes across both the width and the length of the unit.
Alternatively, a spirit level can be used by placing it under the floor joists by straddling several joists at a time, repeating this process at appropriate intervals throughout the length of the home.
Levelling the home is one of the most important aspects of sitting. Without the correct level, much time may be wasted trying to rectify what originally may be thought of as poorly fitted doors, windows or furniture.
Laser levels can be used as an alternative to spirit levels for levelling the home.
When the home is levelled correctly, the intermediate heavy duty support stands underneath the chassis should be placed and adjusted under all identified support points between the supports either side of the chassis and the corner steadies (Figure 1 illustrates the correct position).
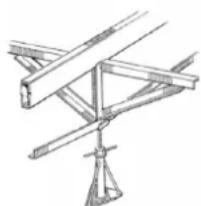
Figure 1. Intermediate supports
When the home is level in all directions, the corner steadies may be retracted into their stored position. They should not be used as additional supports and if they are to remain extended, should be at least 6mm off the ground.
3.3 Supporting the chassis
Park homes up to 12.2m long should have a minimum of twelve supports.
Each chassis longitudinal should have one support either side of the axle(s) and two forward and two rearward of the axle(s)-see figure 3 page 18).
Park homes over 12.2m long should have a minimum of sixteen supports. Each chassis longitudinal should have one support either side of the axle(s) and three forward and three rearward of the axle(s)-see figure 3 page 18
Fortwin park homes - see figure 4 (page 19)
Siting
①Note: The jacking support points either side of the axle(s) are identified by a red label and the other support points by a yellow label.
It is recommended that suitable load bearing blocks are used under the jacking/support points (red labels) and adjustable axle stands (Figure 1) are used under the chassis support points (yellow labels).
① Note: Hardwood packing should be used between the load bearing blocks and the chassis to cushion the weight and reduce the transmission of vibration.
Concrete blocks should not be in direct contact with the steel chassis.
3.4 Jacking
Selection of Jack
It is essential to ensure an appropriate jack is selected for any lifting operation. All jacks must have their maximum lifting capacity (safe working load) clearly and legibly marked with a permanent label or painted sign.
The jack(s) selected should be capable of lifting more than half the weight of the park home.
① Note: The distribution of the load and the nature of the terrain should be taken into account.
WARNING: Care must be taken to ensure the marked lifting capacity of the jack(s) is not exceeded.
Siting
Jacking Procedure
- Most jacking accidents occur when lifting on an uneven surface when the jack slips out from under the park home.
WARNING: Take care to ensure the jack is sitting on an even surface that is capable of taking the full-imposed weight at that jacking point, as indicated by the manufacturer. Spreader plates should be used on uneven and/or soft surfaces.
Before raising the park home, the wheel(s) remaining on the ground should be chocked;
- Wherever possible, consideration should be given to lifting the park home whilst still hitched to the towing vehicle to take advantage of the additional stability this can provide;
The jack(s) should be placed under the defined jacking point(s)
- Jacking should be undertaken, one side at a time, using an appropriately rated jack(s);
-
The park home should not be jacked up to its final height and then supported. Rather, it should be lifted up to a height whereby the support stand is barely extended to allow the earliest possible supporting of the park home. The jacking should be slow and gradual and the park home should be continually supported throughout the jacking operation;
-
It may be necessary to lower the park home onto the support stands and to reposition the jack at another designated jacking point to gain more height;
While jacking at other points, it is important to check and recheck all support stands to make sure they remain in the correct position.
Plan to stay safe
WARNING: No one should be under the park home whilst it is being lifted or lowered by means of a jack
WARNING: No part of the body should ever be under the main chassis beams of a park home that is supported only on a jack.
Given the risks of working beneath a park home, it is recommended that at least one other person who has been trained in how to deal with an emergency is present and able to respond to any incident. One member of the team must remain outside the underside of the park home at all times.
3.5 Wheel chocks
The danger of movement whilst the park home is being raised/levelled cannot be overstated. The wheels of the park home (those still in contact with the ground) should always be braced with wheel chocks at the front and rear. These prevent the home shifting forwards or backwards (the most likely direction of movement).
Better quality wheel chocks are fabricated from steel or thick aluminium and are wedge-shaped so that they can be pushed into close contact with the wheel and tyre.
① Note: For a park home, the wheel chock should be at least 150mm high.
3.6 Spreader plates
Spreader plates are a means of distributing a load over a wider area, and must always be used under jacks or support stands where ground conditions are uncertain. It may be necessary to double up spreader plates or lay them side by side where support is required over a large area, such as under a larger trolley jack. It is important to place jacks in the centre of any spreader plate or combination of plates.
Siting
3.7 Anchors
It is good practice to anchor the park home to the ground. Some insurance companies require they are anchored and specify minimum requirements.
The anchor points on the chassis are rated at 10kN in tension therefore the ground anchors should also be capable of withstanding the same.
The chassis' used for Swift park homes have specific holding down points located approximately 1000mm(+ / - 200mm) from the ends of the main longitudinal chassis member at each corner (see Fig. 2).
CAUTION: These anchors should not be over-tightened as they can stress the chassis.
① Note: It is important to note that both the chain and turnbuckles should be suitably rated.
Swift recommends that the person responsible for the ground installation provides anchorage points to prevent the park home from overturning if local climatic conditions result in wind velocities in excess of 48m / s (107 mph) being experienced.
① Note: Each ground anchor should be capable of resisting 10kN in tension.
The preferred turnbuckle is the type which has an 'eyelet' at both ends (as opposed to hooks) and should be used with suitable 'D' shackles.
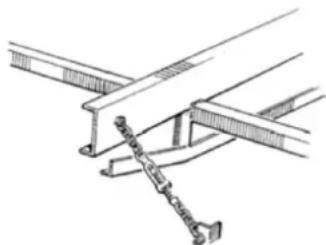
Figure 2. Anchor Points
3.8 Snow loading
All Swift park homes are designed to withstand a snow loading of 1500pa (pascals) which equates to Grade B (see below).
To withstand this snow loading the following method of supporting the park home when sited must be carried out.
The main longitudinal chassis beams should be supported by concrete blocks where cross braced on either side of the axle. An axle stand should be placed underneath the cross bracing between the concrete blocks and the corner steadies in four positions as shown in Figure 3 (page 18).
Great caution should be used when cleaning snow from the roof of the park home.
Guide to Snow Loading Grades
Grade A - Only in parts of the UK
Grade B-All of the UK ^+ France and Germany
Grade C - Higher European Ground
Grade D - Scandinavia and Northern Europe
Siting
3.9 Chassis specification
- All chassis are built to NCC CoP 501 specification.
-
Holding down points capable of resisting 10KN - located 1000mm + / - 200mm from the end of each longitudinal.
-
Corner steady - maximum extended height of 432mm Corner steadies must not be used to fully support the unit.
-
Jockey wheel assembly maximum load that can be applied in a static position is 150Kg .
-
Hitch - cast iron with 50mm ball. The maximum vertical load of the coupling head is 2.5 tonnes.
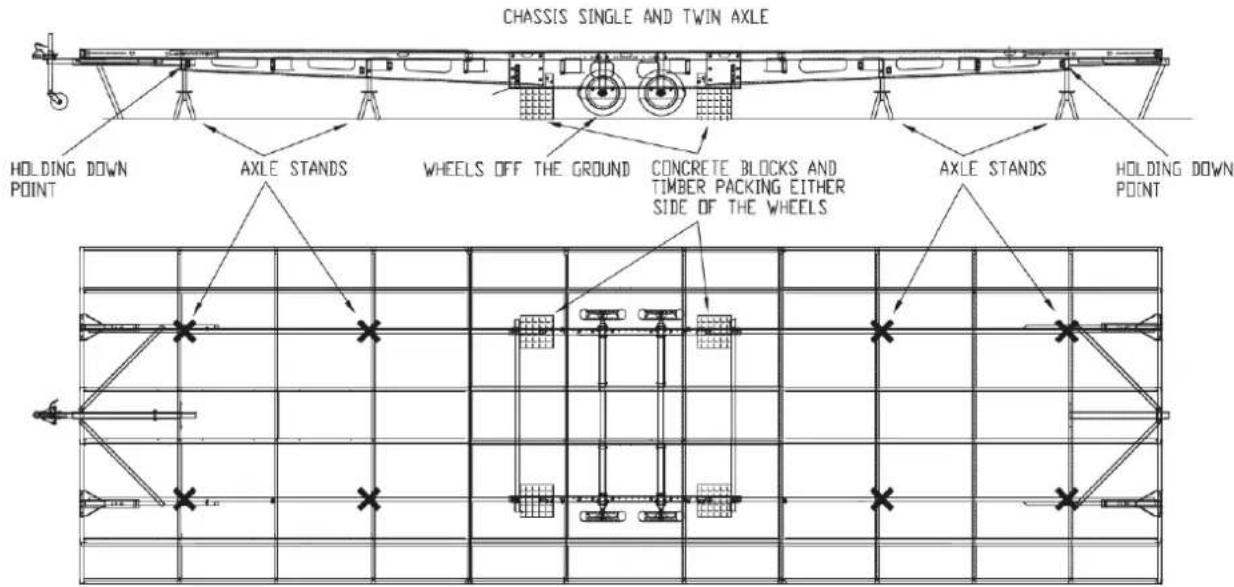
Figure 3. Typical Support and holding down points - Single unit
Siting
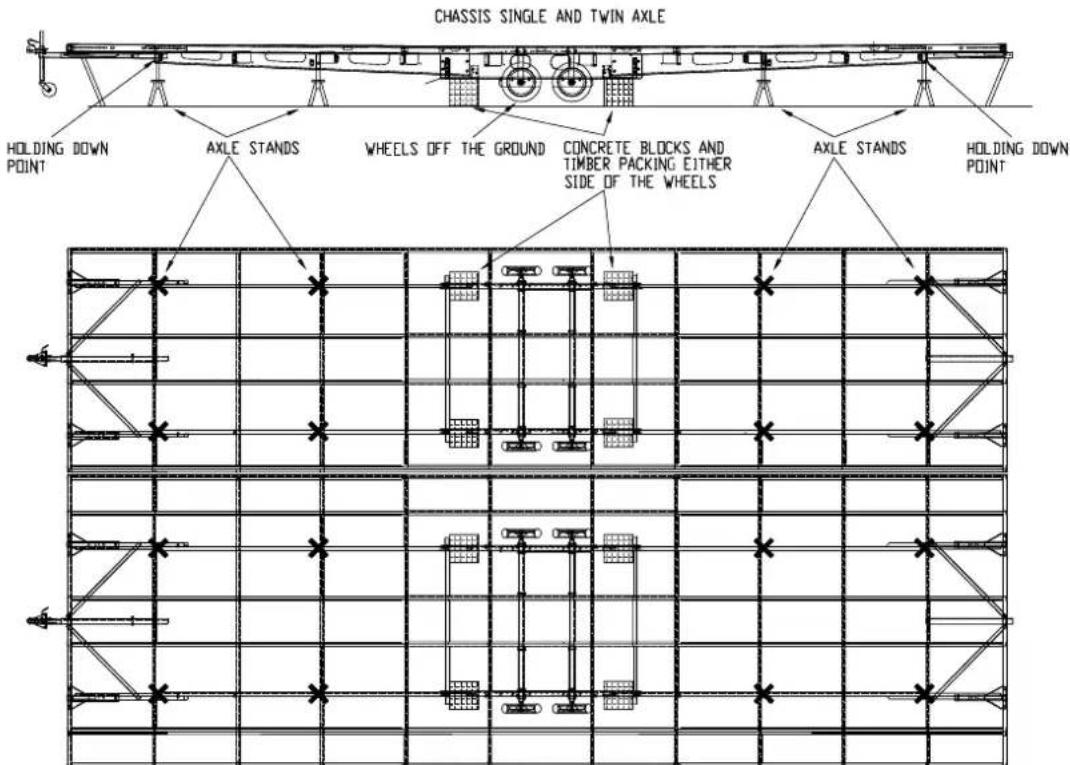
Figure 4. Typical Support and holding down points - Twin unit
4. GENERAL SAFETY ADVICE
4.1 Fire precautions 23
4.2 Emergency shut off points 24
General Safety Advice
Ensure you and your family know the locations of all escape routes and emergency exits. (Refer to the layout drawing in the technical section of this handbook for your model).
Go over the rules in the 'what to do in case of fire' section with your children and other occupants each time you have fire drills. This will help everyone remember them in case of a real emergency.
Keep a torch handy for emergencies. Never use a naked flame.
Position a fire blanket next to the cooker.
Never leave pans of oil or fat unattended.
Combustible materials should be kept clear of all heating and cooking appliances.
Never use portable gas heaters or appliances.
Do not leave young children unattended in the park home.
Keep matches out of reach of children.
Turn off all appliances and the gas bottles if leaving the park home unattended for long periods.
Always be aware that a fire can re-ignite, even if you think it is extinguished.
WARNING: Never allow modifications or repairs to appliances, electrical and LPG systems except by a qualified person.
WARNING: Never use portable cooking or heating equipment other than electric heaters that are not of the direct radiant type, as it is a fire and asphyxiation hazard.
WARNING: Appliances such as cookers must not be used for heating.
Note: Do not use the void of the chimney breast for storage. This area must be clear at all times.
General Safety Advice
4.1 Fire precautions
WARNING: Your attention is drawn to the notice affixed inside the park home advising on fire precaution, ventilation and what to do in case of fire.
ADVICE TO OCCUPIERS
VENTILATION
Do not obstruct any ventilation openings; your safety depends on them.
Check and maintain carbon monoxide alarms.
FIRE ACTION
- Raise the alarm and get everyone out;
Call the fire brigade; - Turn off the gas and/or oil valve if safe to do so;
- Turn off the mains electrical supply if safe to do so;
Only tackle the fire if safe to do so.
FIRE PRECAUTIONS
Vulnerable persons should not be left unsupervised at any time.
Make sure you know the location and operation of the means of escape door and window openings.
Keep all escape routes clear.
Keep combustible materials clear of heating and cooking appliances.
Check and maintain smoke and heat alarms.
HANDBOOK
If on first occupation the user's handbook is not present, the occupier should contact the home manufacturer for a copy.
MANUFACTURER'S IDENTIFICATION NUMBER FOR THIS RESIDENTIAL PARK HOME (Manufactured in accordance with BS 3632:2023):
General Safety Advice
Fire Alarms
All of our Residential Park Homes are fitted with a grade D1, Category LD2 fire detection system which include mains powered, tamper proof smoke and heat detectors located in the lounge/ kitchen and hallway. Optional LD1 category (alarms in all habitable rooms) may have been fitted if specified by the first owner.
Note: If the home is to be used for hire or sublet we recommend a fire safety risk assessment is carried out by the owner to consider if any additional requirements are needed.
What to do in case of fire:
If you have made a family escape plan and practiced it with your family you have increased their chances of escaping safely. Go over the following rules with your children each time you have fire drills. This will help everyone remember them in case of a real emergency.
- Don't panic, stay calm. Your safe escape may depend on thinking clearly and remembering what you have practiced.
- Notify every member in the residence of the fire.
Get out of the park home as quickly as possible. Follow a planned escape route. Do not stop to collect anything or to get dressed.
Feel the doors to see if they are hot. If they are hot, do not open them - use an alternative escape route.
- Stay close to the floor. Smoke and hot gases rise.
- Cover your nose and mouth with a cloth (wet if possible). Take short, shallow breaths.
- Keep doors and windows closed. Open them only if you have to in order to escape.
- Meet at your planned meeting place after leaving the park home. Carry out a head count.
- Call the Fire brigade on 999 from outside your park home. If possible use a mobile phone or call box.
- Give the address and your name.
- Turn off the gas supply valve and remove the cylinders if it is safe to do so.
- If connected to the mains electrical supply, disconnect or switch off at the pitch supply point.
- Do not use water on fat or electrical appliances.
- Never go back inside the park home until a member of the fire service has told you it is safe to do so.
Fire extinguisher
It is recommended that a 1kg (2lb) minimum capacity dry powder fire extinguisher be kept inside your park home at all times.
After using a dry powder extinguisher it is suggested that the park home be evacuated until the powder has settled, to avoid inhalation.
Always aim the fire extinguisher at the base of the fire not at the flames.
WARNING: Never use a powder extinguisher on a pan of fat or oil, only use a fire blanket on pan fires.
① Note: Provide one dry powder fire extinguisher of an approved type or complying with EN3 or ISO 7165, of at least 1kg capacity, by the main exterior door and a fire blanket next to the cooker. Familiarise yourself with the instructions on your fire extinguisher and the local fire precaution arrangements.
4.2 Emergency shut off points
Gas
Isolation shut off valve for each appliance:
- Hob/Oven/Grill - Behind the plinth at the bottom of the oven housing.
Central Heating Combination Boiler - Directly beneath the boiler.
Gas Space Heater (where fitted) - Inside the removable hatch positioned in the side of the chimney breast
Water
- Interior - Main stop cock is situated below the Boiler.
Electricity
- Exterior - Park supply box for your park home.
- Interior - At the electrical consumer unit, usually situated in the twin or master bedroom wardrobe.
5. SAFE USE OF LPG
5.1 The LPG system 26
5.2 Gas commissioning notice 26
5.3 Using cylinders 26
5.4 Gas regulators 27
5.5 Low pressure flexible hoses 27
5.6 Gas safety 28
Safe Use of LPG
5.1 The LPG system
Your gas system should have been connected and commissioned by a registered Gas Safe Engineer engaged by your Park or Siting Agent.
If this is not the case then in the general interests of your safety and others that may use this park home, you should have the gas installation and appliances properly commissioned and checked for safety by a competent Gas Safe registered engineer. This should be carried out after the park home has been sited but before a gas supply is connected.
The inlet connection is the start point of the park home's gas system. It will be found at the rear of the park home.
5.2 Gas commissioning notice
In the general interests of your safety and that of others who may use this residential park home, the gas installation and gas appliances must be properly commissioned and checked for safety by a competent Gas Safe registered engineer after the residential park home has been delivered and a gas supply connected to it.
- The registered engineer shall complete this notice at the time of first commissioning this residential park home when new,
- This gas commissioning notice, including the record of first commission for this residential park home, should not be removed.
RECORD OF FIRST COMMISSION
Commissioning company:
Gas Safe registration number:
Date when first commissioned:
Commissioning engineers name:
Signature of commissioning engineer#
If this residential park home is to be let out on a permanent or short term basis then by law [The Gas Safety (Installation and Use) (Amendment) Regulations 2018 and other more general health and safety legislation], the current owner or someone acting as their agent must ensure that:
- Commissioning checks and servicing of gas installations and gas appliances are carried out by a Gas Safe registered engineer.
- The gas appliances are checked for safety at least once a year by a Gas Safe registered engineer.
- A record of the Gas Safe registered engineer's safety check is prominently displayed in the residential park home for occupants to see.
If this residential park home is solely for private use, these checks are not required by law, but it is strongly recommended that the owner has them carried out and retains a record of the annual safety checks on gas appliances.
WARNING: By law, only competent persons can carry out gas installations commissioning, maintenance and repair work on this or any other residential park home. Do not attempt to work on gas installations yourself unless you are competent. To do so could be illegal, dangerous and could put you and others at risk.
5.3 Using cylinders
What happens inside the cylinder
Calor gas cylinders are specifically manufactured to store LPG gas in its liquid state which then turns to gas filling the space above the liquid. As gas is drawn off in use, more liquid turns to gas to replace it.
An external regulator (See 5.4 Gas Regulator section) connected to the supply line between the cylinder and appliance keeps the pressure of the gas constant to the appliance as the cylinder empties until there is no liquid left to turn to gas.
Safe Use of LPG
CAUTION: A gas cylinder must always be operated standing on its base. A cylinder on its side could allow liquid gas into the supply pipes with very serious consequences.
WARNING: Never apply heat to a cylinder; this could cause a build-up of pressure beyond the design limit.
CAUTION: Treat the cylinder with care as a damaged valve could result in a leak.
Changing gas cylinders
The following procedure should be adopted:
- Turn off all gas appliances;
- Extinguish any fire, flame or source of ignition (including cigarettes, pipes and pilot lights) before changing gas cylinders;
- Ensure that the gas cylinder valve(s) is/ are closed before disconnecting any empty cylinder or before removing the plastic cap or plug on the outlet connection of the replacement cylinder (note: Left hand thread).
- Ensure that the replacement gas cylinder is the correct one for the installation.
- Make firm gas tight joints. Any leaking vapour will smell. If a leak is suspected after changing gas cylinders and opening valve, test by brushing with soapy water around the joints. Bubbles will form if vapour is leaking.
5.4 Gas regulators
Gas cannot be supplied from a bottle without gas regulation. Except for appliances fitted with a flow controller, a suitably rated regulator of a minimum of at least 3.5kg per hour, must be included in the connection between the cylinder and the appliance. The regulator is precisely set to control the pressure of the supply and must not be adjusted.
The connection must be by a high pressure flexible hose which shall be as short as possible. This is due to the gas regulator supplying gas to the gas appliances at a constant pressure independent of gas flow.
① Note: Ensure the regulator is of the correct pressure rating for the gas appliances in your park home. Your dealer or gas supplier will advise you of the type of regulator required.
① Note: Regulators should be kept clean and dry and changed approximately every 5 years or earlier if not working properly.
WARNING: The regulator capacity should have a minimum rating of 3.5Kg per hour with a working pressure of 37 mbar. Never use appliances with a different working pressure.
5.5 Low pressure flexible hoses
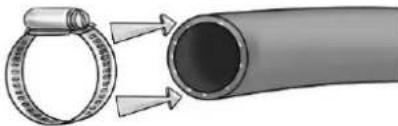
WARNING: Use only marked and certified hoses to BS: 3212 and which bear the year and name of the manufacturer as LPG attacks and erodes natural rubber.
Keep hose lengths as short as possible and less than 2 metres in length. All flexible hoses must be secured with proper hose clips. Make sure that the hoses are kept clear of 'hot spots' and inspect them from time to time. Replace any hose that shows signs of wear or damage.
Flexible hoses should be regularly inspected and replaced when signs of cracking or other deterioration appears. After replacement, ensure that the ends are well secured and gas tight.
CAUTION: Ensure that the hose assembly is not under stress when connected to the cylinder.
Safe Use of LPG
① Note: Inspect flexible gas hose(s) regularly for deterioration and renew as necessary with the approved type, in any case no later than 5 years after the date of manufacture marked on the hose.
Do's and Don'ts
- Do treat a cylinder with care to ensure that the valve is not damaged. A damaged valve could result in a leak.
- Do use a cylinder upright. If used horizontally liquid gas could get into the supply pipes with serious consequences.
- Don't attempt to disconnect a regulator from a switch-on valve (15kg and 7kg cylinders) if the flame does not go out when the regulator switch is turned off. Leave the appliance alight and call your Gas Supplier or Park Manager.
- Don't subject a cylinder to heat, because the pressure inside the cylinder could build up to a point beyond the designed safety limit.
- Don't store or use cylinders below ground level, because LPG is heavier than air. If there is a leak, the gas will collect at low level and become dangerous in the presence of a spark or flame.
- Don't store or use propane cylinders (red) indoors. It is contained under higher pressure and should only be kept outdoors.
WARNING: Never block ventilation grills or gas drop holes.
All appliances are fitted in accordance with specification laid down by each manufacturer and they have undertaken their own inspection of the installation and given their approvals.
Most of the branded appliances carry their own warranty and after sales support. In the event of either being required, please follow the directions of the warranty or consult your own supplying dealer. Surfaces of appliances become hot in use. Any guards provided may not give full protection to the young or elderly.
5.6 Gas safety
WARNING: Never use a naked flame when checking for leaks.
Gas cylinder valves are of various designs depending on the type of cylinder and the use for which it is intended and it is essential that the correct pressure regulator with the correct pressure setting and capacity for the installation is used in accordance with the manufacturer's instructions.
In the case of a connection on a pressure regulator or gas appliance which relies upon a sealing washer(s) to maintain a gas tight joint, it is essential to check that the washer is present, sound and correctly positioned prior to making the connection. Where the connection relies on a metal seating or bull nose connection to obtain a gas tight joint it is essential that the mating surfaces are clean and undamaged. In no case should a damaged valve or connection be used.
Where connections are designed to be tightened with a spanner it is essential that a spanner of the correct size is used and that the union is firmly tightened (hand tightness is not sufficient).
When self-sealing valves are incorporated in a gas cylinder, connections should be made in accordance with the manufacturer's instructions and tools should not be used.
Safe Use of LPG
- LPG is a heavy gas and therefore sinks to the lowest point.
If there is insufficient ventilation a spark could result in an explosion. - Do not store or use gas cylinders indoors, it is contained under high pressure and should only be kept outdoors and never stored below ground level.
- LPG is odourless so the manufacturers add the distinctive smell to act as a warning if a fault should occur.
- If you suspect a gas leak, extinguish all flames, turn off the gas at the bottle and ventilate the park home by opening doors, windows, and cupboards. Do not operate fans, lights or other electrical apparatus. Go outside for a few minutes and consult your park operator.
- The strong unpleasant smell of LPG will enable the general area of the leak to be detected. Check that gas is not escaping from an unlit appliance. In the case of a leak, close cylinder valve(s) and call a competent installer to rectify the fault. If a leaking gas cylinder cannot be stopped, remove the cylinder to a safe place in the open air in an upright position away from drains and any source of ignition.
- It is vitally important that you read all instructions and labels before using any appliance and keep them handy for future reference.
WARNING: If in doubt, ask advice from a competent person
-
Do not place clothes or any other combustible material on, over or near any gas appliances, such as fires, cookers or water heaters. Apart from the fire hazard, their presence could affect the appliance and negate any guarantee.
WARNING: Do not use appliances in any way other than their intended use. Cookers are for cooking not heating.
① Note: Always remember - Gas appliances that are designed, installed and used correctly, regularly serviced, properly flued and ventilated are completely safe.
WARNING: Never use portable cooking or heating equipment inside your park home other than electrical heaters that are not a direct radiant.
① Note: Always use a Gas Safe registered gas fitter for any work or modification to your gas system or appliances. -
The flue installation for all appliances should be inspected at least once a year, throughout its length, for corrosion. If any sign of corrosion is found it must be replaced immediately with the correct type and by a registered fitter. To inspect the gas flue, the engineer will remove the self-tapping screws which hold the inspection panel(s) at high and/or low level.
6. MAINS ELECTRICITY AND WIRING
6.1 Mains electricity and wiring 32
6.2 Bulbs 33
Mains Electricity & Wiring
6.1 Mains electricity and wiring
The maximum current rating of your park home is dependent on whether it is fitted with gas and mains electric powered appliances, or mains electric powered appliances only. The maximum is usually shown as the rating of the RCD (Residual Current Device) in the consumer unit, typically 40amp or 80amp.
Further to this, the electrical supply to your park home may be restricted so please check with your park manager before using additional appliances.
Within your park home the socket outlets are wired in radial circuits using 1.5mm3 core flexi cable, lighting is wired in radial circuits using 1.0mm3 core flexi cable, and appliances are wired in 2.5mm or flexi 4.0mm cable.
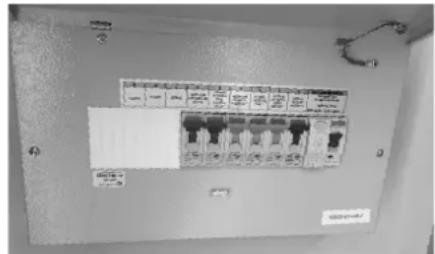
The Residual Current Circuit Breaker (RCCB) or Residual Current Device (RCD) serves as the main (& emergency shut off) switch for your park home. It is a safety device designed to protect you from the possibility of shocks that could arise from a faulty power pack supply, faulty appliance or a fault causing the current to run to earth.
The RCD has been factory tested for correct operation and should be tested each time you switch on the mains supply or at least once a month.
To do this:
- With the supply connected, switch RCD to ON.
- Press test button marked 'T'.
- The unit should now 'trip off' and should be reset simply switching it on again.
If the unit does not 'trip off' do not use the mains supply until the fault is corrected by consulting either your park owner or a qualified electrician. If the unit 'trips off', other than during test, again do not attempt to use the mains supply as there is a fault which needs expert attention.
WARNING: Never allow modifications or repairs to appliances, electrical and LPG systems except by a qualified Person.
We recommend the electrical installation is inspected once a year by a qualified electrician and a report on its condition obtained as prescribed in the Regulations for Electrical Installations, published by the Institute of Electrical Engineers.
Common electric fault finding:
Symptom:
No mains electric working in the park home:
Is the RCD and miniature electric circuit breakers (MCB) switched on?
- Is the park home connected to park supply?
Is the park supply switched on?
If a master override switch is fitted near the entrance door, is this in the on position?
③ Note: This switch would only affect lighting
Symptom:
The RCD or MCBs trip out after the park home is switched on at the park supply.
- Disconnect appliances in the park home and reset MCBs.
Symptom:
If the RCD and/or MCBs still trip out.
There is a fault on the electrical circuit or the circuit is overloaded. Consult your park owner or qualified electrician before using mains supply.
Symptom:
The RCD or MCBs do not trip when tested.
- There is a fault on the electrical circuit. Do not use the mains supply until the fault is corrected. Consult your park owner or qualified electrician.
Mains Electricity & Wiring
6.2 Bulbs
Both 230v and 12v lighting systems are present in your park home using a variety of types of ratings (wattage) across both systems.
CAUTION: It is important to fit the correct rating of light bulbs - the voltage, and maximum bulb rating that can be used, will be stated on each light fitting.
① Note: LED lamps, in the unlikely event of a failure will require the replacement of the entire light fitting.
7. HEATING AND THERMAL PROPERTIES
7.1 Central heating and hot water system 36
7.2 Thermal insulation 36
7.3 Ventilation 36
Heating & Thermal Properties
7.1 Central heating and hot water system
①Note: Please read the Combi Boiler user instructions supplied with the RPM.
WARNING: The boiler can produce water at over 80^ when in central heating mode. If you run a hot tap when the boiler has been heating the radiators, the initial flow through the hot tap could be very hot. Do not place your hands under the tap or use the shower until the initial flow has passed.
WARNING: Your boiler can heat the radiators at over 80^ . Please do not place your hands or any other part of your body on the radiator as injury could result.
7.2 Thermal insulation
The thermal efficiency of the structure of your park home has been calculated in accordance with BS 3632:2023. This requires the following maximum average thermal transmittance (U valves):
Floors 0.26 W/(m2K)
Walls 0.3 W/(m2K)
Roof 0.2 W/(m2K)
The thermal transmittance (U) of all Swift Group park homes have lower U values than these. (Lower U values = Warmer)
Swift Park homes benefit from either 125mm PIR board or a SIPs (Structural Insulated Panel) floor, 200mm roof insulation and 115mm wall insulation in addition to lagged underfloor pipes.
Radiator valves
Thermostatic radiator valves (TRV) are fitted to all lounge, dining and bedroom radiators, to control the room temperature.
7.3 Ventilation
The ventilation of your park home has been designed to comply with BS 3632:2023 and is provided by trickle vents in the top of the window frames.
Additional night time ventilation is obtained by releasing the window catches and placing them in the second groove.
① Note: The windows are not sealed from rain in this position.
As the ventilation levels are calculated to suit each model requirements, there should be no modifications made which may result in reduced ventilation levels.
WARNING: Do not store items underneath your park home or fit decking or skirting which dramatically reduces air flow underneath the park home.
If snow on the roof is excessive it is important that high level ventilation and appliance flues are not blocked. Care should be taken if removing snow from the roof. See page 46 for advice on access to roofs.
For approximate locations of trickle vents in park homes refer to the drawings in the technical section of this handbook.
WARNING: Under no circumstances must any ventilator be blocked or obstructed even partially.
8.APPLIANCES
Appliances
WARNING: Please read and understand all operating instructions provided by each manufacturer before using any appliance. You should not use any appliance before reading the manufacturer's instructions.
Most of the appliances supplied with your park home have an instruction leaflet issued by the manufacturer which you will find either with the appliance or placed inside the welcome pack. If one cannot be found, please notify your park/supplier who will write to the appliance manufacturer on your behalf or give you their name and address if you wish to make contact with them.
Oven and Grill
Please read the user instructions provided before using the oven and grill
Gas hob
Please read the user instructions provided before using the hob.
Cooker hood
Please read the user instructions provided before operating or changing the filter.
Fridge/freezer
Please read the user instructions provided before using the fridge/freezer.
Wine cooler
Please read the user instructions provided before using the wine cooler.
WARNING: Like the majority of domestic fridge/freezers sold in the UK your fridge/ freezer is designed to operate within an ambient temperature range of 16^ and 32^ . If the ambient temperature falls below 16^ the appliance compressor will not operate as often resulting in the temperature in the freezer compartment rising. If this is for an extended period of time there is a possibility of some of the freezer contents defrosting. If the temperature drops below 3^ the appliance will not operate at all and the freezer compartment will defrost. (Unless the ambient temperature is below -9^ ). Therefore, if the park home is left unoccupied and without heating, and the ambient temperature within the van is likely to fall below 3^ , we would recommend that the fridge/freeze is emptied, cleaned and switched off until such time as the ambient temperature rises to within the normal operating range.
Electric / Gas fires
Please read the user instructions provided before using the electric / gas fire.
Washing machines / Washer dryers
Please read the user instructions provided before using the washing machine / washer dryer.
Dishwasher
Please read the user instructions provided before using the dishwasher.
Microwave oven
Please read the user instructions provided before using the microwave.
WARNING: Before undertaking any maintenance or cleaning, disconnect from the power supply. Only competent persons should service/repair appliances.
CAUTION: To prevent scratching of the front screen, this appliance should be cleaned with soapy water and a damp cloth only. Due to the nature of stainless steel it picks up finger marks easily, the trim should always be cleaned with a cleaner that is suitable for stainless steel.
- COOKING
Cooking
Gas oven/Grill/Hob
Accessible parts may be hot when the oven, grill or hob is used. Remember, it is dangerous to use an appliance without reading the manufacturer's instructions.
Cooking Equipment - Be Safe Not Sorry
- When you are cooking, keep children away from the vicinity of the appliance.
- Keep all flammable materials (such as curtains, furnishings and tea towels) away from the appliances.
- Do not allow fat to build up in a grill pan, this creates a fire hazard.
- Do not use the oven with the door inner glass panel removed (glass oven doors only).
- Parts of the appliance may be hot during or immediately after use.
- Allow sufficient time for appliance to cool after switching off.
- Do not drape tea towels over flue vents as this creates a fire hazard.
- Be careful when opening the oven door as steam may escape from the oven.
- Use oven gloves when removing hot food utensils from the oven or grill.
-
Do not use foil on the hob or to line oven shelves / grill pan, or allow it to block the oven flue, as this creates a fire hazard and hinders circulation
-
When cooking heavy items, e.g. turkeys do not pull the oven shelf out with the item still on the shelf.
- If the cooker has a storage compartment below the oven, this should only be used to store oven furniture.
- Do not store any flammable materials in this compartment.
- When cooking with fat or oil, never leave unattended.
- Turn pan handles inward so they are out of reach of children and cannot be caught accidentally.
- Use pans with a flat base of minimum 100mm / 4 ins diameter, and a maximum 230mm / 9 ins diameter which are stable in use.
- Avoid using double pans, any old misshapen pans or any pan that is unstable when placed on a flat surface.
- Position pans over the centre of the burners.
- Do not allow pans on the burners to rest against side or rear splash backs.
Glass hob lids may shatter when heated, turn off all burners and allow to cool before lowering. -
Never use the appliance for heating a room. When you have finished cooking check that all controls are in the off position.
-
BLINDS
Blinds
Where appropriate blind cord cleats are provided, please ensure cords are safely secured out of reach of small children at all times.
WARNING: Always keep Venetian blind cords secured safely out of reach of small children.
WARNING:
- Young children can be strangled by loops in pull cords, chains, tapes and inner cords that operate the blinds.
To avoid strangulation and entanglement, keep cords out of the reach of young children Cords may become wrapped around a child's neck. - Move beds, cots and furniture away from window covering cords where possible and always use the cleats provided to store the cords.
- Do not tie cords together. Make sure cords do not twist and create a loop.
11.BEDS
11.1 Pull out sofa bed (where fitted) 44
11.2 Bunk beds (where fitted) 44
Beds
11.1 Pull out sofa bed (where fitted)
Take care when unfolding the bed as some components are spring loaded to assist with its function.
Remove the cushions from the seat and lift up the seat base and store safely to one side.
Unfold the bed by lifting the front edge of the bed. See diagram below.
Unfold the bed ensuring that the legs are fully pulled out.
Remove all bedding except for the mattress when folding the bed away.
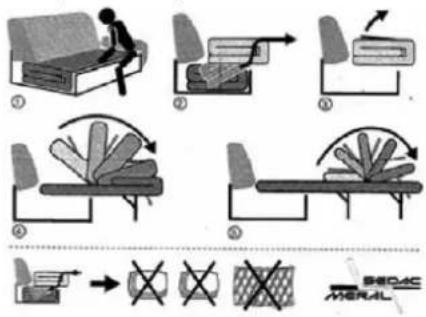
WARNING: Care must be taken when using a Pull-out bed in close proximity to the space heater.
11.2 Bunk beds (where fitted)
WARNING: If upper bunks are fitted, care shall be taken against the risk of fall out when the upper bunks are in use by children especially under 6 years of age, these bunks are not suitable for use by infants without supervision. Always ensure that the fall out protection is in place when the bunk is in use. See bunks in the safety section.
WARNING: Use upper bunks for sleeping only, with the provided protection against fall out in position. Protection boards must not be climbed over or used to access the bunks.
12. GENERAL CARE
12.1 Galvanised Chassis 46
12.2 External structure 46
12.3 Blockages 46
12.4 CanExel panels 46
12.5 Snow precautions 47
12.6 Door and windows 47
12.7 Alignment and adjustment of doors 49
12.8 Trickle vents 52
12.9 Repairs 52
12.10 Kitchen and bathroom 52
12.11 Cleaning 54
12.12 Furnishings 54
12.13 Swift Shield fabric (where fitted) 56
General Care
12.1 Galvanised Chassis
Your park home chassis is hot dipped galvanised, a method used for many years throughout the automotive industry and widely regarded as one of the best forms of corrosion protection.
When the steel is withdrawn from the galvanising bath it has a clean, bright surface which over a period of time changes to a dull grey colour as the surface zinc reacts with oxygen, water and carbon dioxide in the atmosphere to form a tough, stable, protective layer.
During this time, if galvanised items are stored in damp or wet conditions, where there is little or no air movement, then the zinc will continue to react with the moisture that is present. In doing so the zinc will produce excessive amounts of zinc hydroxide which is a bulky white deposit on the surface of the galvanising and is often referred to as wet storage stain (white rust).
You can help to prevent wet storage stain (white rust) occurring by washing the chassis with clean water as soon as it is delivered allowing an adequate flow of dry air to ensure it dries out.
Should wet storage stain (white rust) occur it can be removed using a stiff bristle brush or a "Scotchbrite" pad. Because of its post process nature "Wet Storage Stain (white rust)" is not covered under Warranty procedures.
12.2 External structure
Your park home is constructed using a timber framed structure with internal insulation and a decorative wallboard on the interior and external cladding on the exterior.
Regularly carry out visual inspections for damage to panels, gutter and other external features. Signs of damage, leakage and movement should be repaired as necessary.
WARNING: For the Cleaning, Inspection and maintenance / repair of roofs we recommend it is carried out by a suitably competent professional contractor. If access to the roof is necessary then this should be properly planned, supervised and carried out by competent people with the skills, knowledge and experience to carry out this activity. The correct equipment must always be used.
① Note: The roof should be inspected for leaks and rectified as necessary.
WARNING: Ensure that all necessary working at height safety precautions are in place before climbing onto the roof.
CAUTION To avoid damaging the roof, use a 15mm or thick sheet of plywood or similar which must be wide enough to span over two roof spars (approximately 600mm centres). A sheet 1220mm x 1220mm (4'x 4') should be suitable when positioned carefully on the roof.
12.3 Blockages
If you have a waste water or toilet blockage, the first thing to check is that the site main drainage is clear as any blockages here could back-up to your park home. If it is clear and you have a toilet blockage we would recommend that you call a plumber, unless you are aware of what could have caused the problem and are competent to address the problem. If it is a waste blockage, you should first check and clean out traps situated under the sink, basin and shower tray (if fitted). If you still have a blockage, then it must be in the feeder pipes to the main sewerage pipes or the main sewerage pipe. You should consult a plumber or your park officer at this stage unless you are competent to do the job.
Gutters and downpipes
It is important that all gutters and down pipes are kept free from obstructions and blockages. Inspect regularly.
12.4 CanExel panels
CanExel prefinished panels are produced from wood fibre, resin, and wax fused under pressure.
This engineered wood panelling is highly stable, as well as highly resistant to moisture with a finish consisting of five coats of baked-on paint and a sealer top coat.
The cleaning method recommended is to wash down with plenty of clean water and very mild detergent.
General Care
An occasional polish with a good quality wax will help obtain a high gloss finish.
CAUTION: Under no circumstances should an abrasive or harsh cleaner be used.
Stubborn marks, such as bird soiling, grease etc. can be removed by rubbing with a soft cloth dampened with White Spirit.
Small scratches and other minor damage can be repaired with the use of CanExcel retouching paint (Details can be found at www.canexel.co.uk)
WARNING: Do not wash your park home with a high pressure washer as these can permanently damage the exterior panels and seals.
12.5 Snow precautions
Great caution should be taken when cleaning snow from the roof of the park home. See page 46 for advice on access to roofs.
12.6 Door and windows
Operation of door locks
WARNING: Do not remove lock covers and bungs fitted to emergency egress window handles as these are there to facilitate quick egress in an emergency.
WARNING: Do not carry out any modifications to the structure or fixed installations without first consulting the residential park home manufacturer or a suitably qualified person.
To unlock the door from the outside, insert key and turn anticlockwise, pull on the handle. To lock, push the door to the closed position so that the first stage lock engages. Lift the handle upwards to engage the extra security roller locks, insert the key and turn clockwise to engage the deadlock.
Operation of window night vents
The window frame will have been fitted with a secondary keep within the rebate. You can close the handle to locate the spur inside this keep, which will lock the window but allow a level of ventilation.
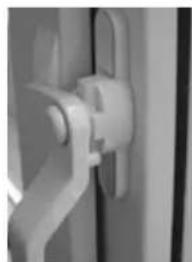
Fully closed
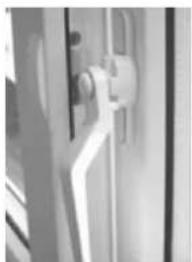
Night vent position
Door and window handles
Apply silicone spray and wipe off excess with a soft cloth.
Lock cylinder
Lubricate with PFTE (union part no. 9075) or similar. Apply the key flutes, insert the key and operate several times to ensure even distribution. Latch, dead bolt and roller locks. Apply petroleum jelly/Vaseline. This acts both as lubricant and water repellent.
Doors and window hinges
No lubrication is required, smear with Vaseline to protect against water.
General Care
Window friction stays
Protect with a mild detergent oil or a very light lubricant, use sparingly as oil does attract dirt.
①Note: The recommended maintenance is to lubricate every 6 months.
Minimum recommended cleaning intervals:
Monthly: Frames, door and window furniture. Wash with warm water and a mild detergent. It is important to ensure that all dirt and debris is regularly removed from the internal rebate of door and windows. Cleaning cloths should be in-bleached cellulose/cotton material. Do not use cloths containing synthetic fibres.
① Note: Make sure that you follow all the recommendations and cautions supplied with the product.
Repairs
On white profiles only, stains and scratches can be removed by sanding and polishing. Use a 320/400 grit sanding disc and polish using sisal rotary brush to bring back the surface finish.
① Note: It is important that you achieve a smooth even finish before beginning the polishing stage.
On wood grain surfaces, care should be taken when cleaning. Any white areas showing as a
result of damage or cleaning can be retouched using a wood grain marker pen. If you have a breakage or a crack please contact your nearest glazier. Handle any broken glass with care and dispose of with safety of others in mind.
Do's and don'ts for UPVC products
Do
- Clean the glass regularly with a good quality liquid spray glass cleaner.
- Frequently wash down the UPVC with plenty of warm soapy water (use liquid general purpose cleaner) and wipe dry.
- Only use cleaning materials which do not impair anti-corrosion properties
- Use cream cleaner for isolated stubborn stains on white UPVC only. Apply with a damp cloth using minimal pressure.
- Ensure drainage slots are kept unblocked and free from dirt, spider's webs, etc.
- Keep all tracks clear of dust and debris in order to reduce the wear on sliding parts.
- Ensure that all gutters and their outlets are kept clear of leaves and debris to maintain efficient operation
- Replace damaged or worn parts with original parts by an authorised specialist.
Don't
- Use cleaners on any UPVC.
-
Use abrasive paste or cream
-
Use excessive pressure when cleaning UPVC
- Use high pressure or steam cleaners.
- Use any type of bleach, solvent (e.g., white spirit, methylated spirits, and nail varnish remover) or adhesives.
- Use any unspecified tools.
- Use any abrasive papers, such as sandpaper.
- Use abrasives or brass cleaner on furniture: handles, door knockers, letter plates.
- Use excessive loads on the windows and doors.
- Fail to maintain the product as indicated.
- Paint or try to remove paint.
- Lean ladders against guttering.
General Care
12.7 Alignment and adjustment of doors
If the entrance door becomes misaligned the hinges can be adjusted to bring the door back into alignment. The lock keep can also be adjusted to ensure that the lock engages correctly.
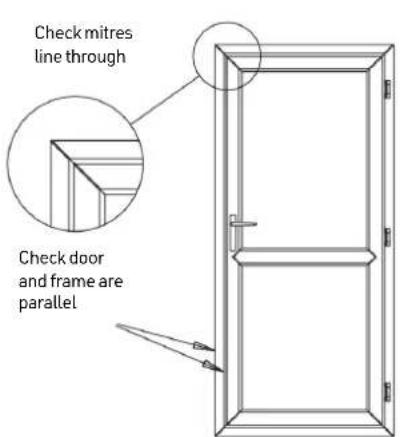
Misalignment of mitres indicate that this door is low on the handle side of the door
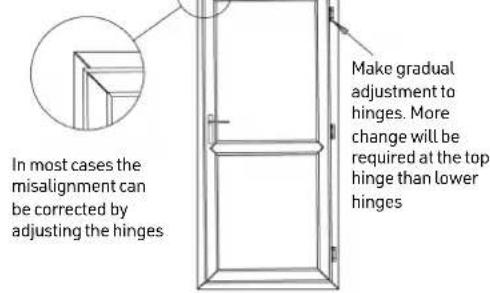
General Care
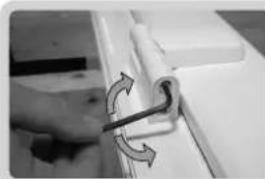
Compression Adjustment
+/-1.5mm
4mm Allen Key
- Rotate the Allen Key Clockwise or Anti-Clockwise to give the required compression setting.
- Ensure compression is evenly distributed across all hinges.
Note: In rotation positive "click" positions are felt - (2 in each direction from the central position).
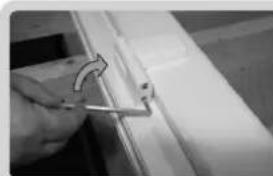
Height
Adjustment
+8mm
Smm Allen Key
- Rotate the Allen Key Clockwise give the required height setting.
- Ensure that the weight of the door is evenly distributed across all hinges.
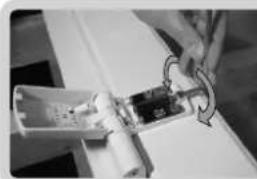
Lateral
Adjustment
+/-6mm
5mm Allen Key
General Care
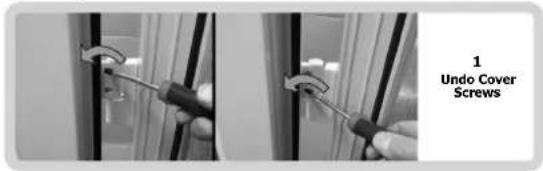
Removing the Door
- Open the door to access the Cover Retaining Screws. These are self retaining screws therefore to release the cover the screws must be completely unscrewed however the screws do not come out.
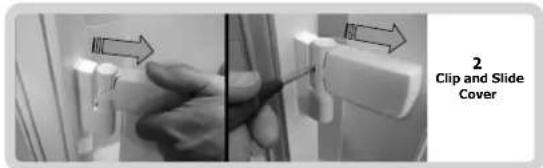
- Pull the cover out towards the centre of the door. On release a click will be heard. If the cover does not open by hand a screw driver can be used behind the knuckle to gently assist opening. Repeat stages 1 and 2.
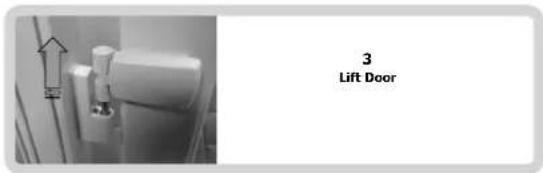
Removing the Hinge Body
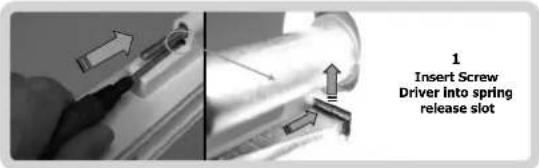
- Insert a flat end screw driver into the slot found behind the pivot pin. The screw driver must be inserted under the leaf spring in order to lift the leaf spring up (i.e. away from the door frame).
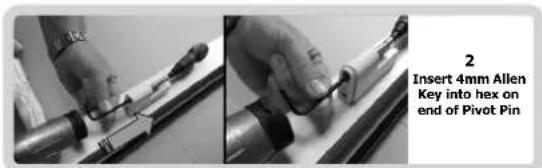
- Insert a 4mm Allen Key into the Hex Slot in the bottom of the Pivot Pin. Ensuring that the Screw Driver remains in place, tap the Allen Key into the Pin until the Hinge Body starts to slide off the Frame Mount.
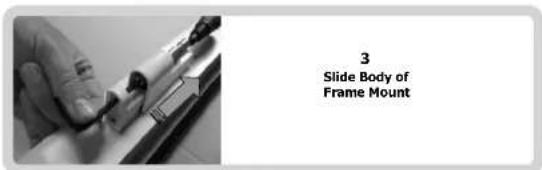
- Once the Hinge Body starts to separate from the Frame Mount it will slide off easily.
General Care
12.8 Trickle vents
Care and maintenance
The slots on the external hood/grille should be kept clean and free from obstruction, use a vacuum cleaner and/or small soft brush. The vents may be cleaned with a damp cloth only, do not use solvent or abrasive cleaners.
①Note: Make sure that you follow all the recommendations and cautions supplied with the product.
12.9 Repairs
On white profiles only, stains and scratches can be removed by sanding and polishing. Use a 320/400 grit sanding disc and polish using a sisal rotary brush to bring back the surface finish.
①Note: It is important that you achieve a smooth even finish before beginning the polishing stage.
On wood grain surfaces, care should be taken when cleaning. Any white areas showing as a result of damage or cleaning can be retouched using a wood grain marker pen.
If you have a breakage or a crack in the glass, please contact your nearest glazier. Handle any broken glass with care and dispose of with safety of others in mind.
12.10 Kitchen and bathroom
Toilet/shower room
Thermostatic mixer valve (shower)
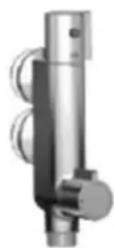
The Thermostatic Mixer Valve accurately controls the temperature of water for showering and will maintain the pre-set temperatures if the water pressure varies when other appliances are used. This significantly reduces the risk of scalding when showering.
CAUTION: All Thermostatic Mixing Valves (TMV's) must be carefully protected against frost damage and should be removed or correctly drained down during months in which frost may occur.
Function
Hot and cold water entering the valve is mixed to a temperature pre-selected by the user or installer which is achieved by a thermally sensitive mechanism within the valve that proportions the amount of hot and cold water entering it. The mechanism then automatically compensates for any variations in supply pressures or temperatures to maintain the pre-selected temperature.
① Note: In the event of cold water supply failure, the thermostatic mixing mechanism will automatically shut down the flow to prevent discharge of dangerously hot water.
Operating pressure:
Dynamic pressure:
Min: 0.5 Bar
Advisable: 1 Bar
Max:5Bar
Static pressure:
Max: 10 Bar
Valves operating outside the above conditions of use cannot be guaranteed to operate as Type 2 valves.
The valve is designed for use as a high-pressure valve and is tested against BS EN 1111.
General Care
If a water supply is fed by gravity then the supply pressure should be verified to ensure the conditions of use are appropriate for the valve.
① Note: In order to ensure the maximum efficiency of the mixer, the operating pressures (on hot and cold line) should be kept as balanced as possible and the inlet hot water must be at least 10^ above the required blend temperature.
When pressure is higher than 5 bar a pressure reducer is required to be fitted before the mixer.
Drain down procedure
- Close hot and cold mains feed taps.
- Remove the shower hose from the mixer or lay the showerhead and hose in the shower tray to drain off any trapped water.
- Turn bottom tap valve fully open
- Turn the top thermostat valve fully clockwise to drain cold water, until water stops flowing.
- Push in the red temperature set button on the top thermostat valve and turn fully anticlockwise to drain the hot water side until the water stops flowing.
Protecting your Thermostatic Mixing Tap
In addition to draining down the Thermostatic Mixer Tap in periods of cold and freezing conditions, to offer maximum protection it is highly recommended that the Thermostatic Mixer Tap is further protected by following the method outlined below:
First complete the drain down procedure ensuring the hot and cold feeds are isolated and fully drained.
Using an allen key, remove the mixer body from the tails by releasing the grub screws taking care not to misplace these.
The unit can then be completely drained, dried and wrapped in a soft cloth for storage away from frost until required.
The Thermostatic Mixer Tap can then be reattached as follows;
Re-fit body to the tails and tighten the grub screws, take care not to over tighten.
Re-connect to the water supplies and check seals.
① Note: If after the drain down procedure the Thermostatic Mixer Tap is to be left for long periods in cold or freezing conditions, leave the tap open and line up the ridge on the thermostat hand wheel with the letter "H" etched on the tap body.
General Care
Drain down procedure (fixed shower head)
- Close hot and cold mains feeds using the isolating valves.
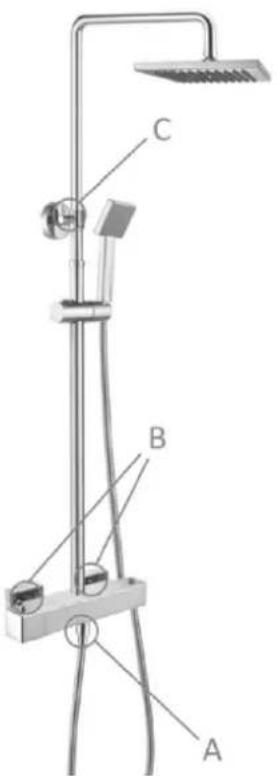
- Remove the shower hose (A) and drain the hose and head or lay the hose and head down in the shower tray to drain any excess water.
- Loosen the grub screw (C) to disconnect the fixed head from the wall.
- Loosen the two inlet nuts (B) at back of the shower and disconnect the valve from the wall.
- Remove the whole unit from the wall, face the inlet valves face down over the shower tray until the water stops running.
- Once the water is drained reverse the process to reconnect the shower back to the wall.
- Let the water drain out of the valve into the shower tray.
Protecting your bath thermostatic mixer valve (where fitted)
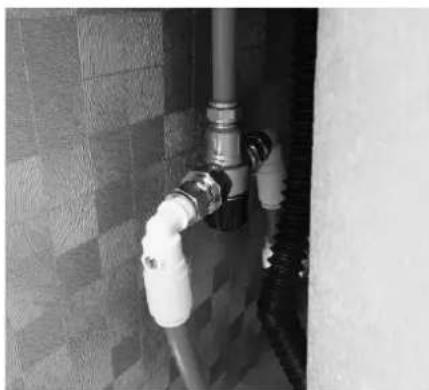
In addition to a shower Thermostatic Mixer Tap, if your park home has a bath fitted there will be a TMV fitted to regulate the water temperature to the bath. This should be removed or correctly drained down during months in which frost may occur.
12.11 12.11 Cleaning Cleaning
Shower mixer & taps
All surface finishes will wear if not cleaned correctly. The safest way to clean your mixer or tap is using warm soapy water and a cloth. To dry use a soft cloth. Stains can be removed using washing up liquid. Most bath cleaning powders and liquids will damage the surface of your fitting even the non-scratch cleaners.
Bathroom fittings
High quality plastics are used in the construction of the shower room fittings. Never pour very hot or boiling water directly onto the basin or onto the shower tray - always add cold water first.
Plastics can be cleaned using a very mild detergent in tepid water. Never use abrasive cleaner or chemical cleaner.
① Note: It is important not to pour hot water directly into or onto any plastic.
Always start with cold water and add the hot to achieve the desired temperature.
The shower cubicle and sanitary ware should be cleaned with detergent and warm water.
WARNING: Never use abrasive cleaners.
Kitchen
The kitchen worktop, sink, drainer and cooking equipment surfaces should only be cleaned with hot soapy water, unless the appliance manufacturer says otherwise in their own literature. Do not use abrasives or wire wool.
The inside of ovens should be cleaned in accordance with the instructions contained in the manufacturer's leaflet.
12.12 Furnishings
Upholstery care
Cleaning
Dust, dirt and grit should be removed frequently as this will affect the durability and colour of the fabric.
① Note: Please vacuum and brush your furniture frequently.
General Care
Spills and stains
Always deal with stains immediately. In the first instance remove excess with a soft absorbent cloth or white paper tissue.
Cleaning instructions will vary according to the type of fabric you have selected.
If the stain cannot be removed with this method then professional cleaning will be required.
Creasing
All fabrics are likely to crease, particularly on the arms and cushions. This is not a fault, but a natural feature, and will not affect the fabric's wearing qualities.
We strongly advise against washing any fabric, if in doubt, consult professional cleaning specialists.
General care for wooden furniture
This furniture is made from wood and wood veneer. These natural unique materials exhibit variations in colour, patterns and grain which define the beauty of the product.
Following these basic steps will help you protect your furniture and increase its longevity.
-
Do not use abrasive detergents or powders. Dust with a clean lint free cloth. - Frequent dusting will remove abrasive build up which can damage a finish over time.
-
Do not expose your furniture to direct sunlight—Excessive exposure to sunlight can cause fading of your furniture.
Ornaments placed on the furniture surface should be periodically moved to avoid shading.
-
Never place household heating appliances or hot objects directly on the furniture surface.
-
Always place heat resistant coasters between your furniture and hot object to protect your furniture.
-
Do not place your furniture near a heater, heat, dampness or moisture generating appliance,
-
Extreme temperature and humidity changes can cause cracking and splitting.
-
Some movement may be expected depending on environmental conditions.
-
If the air is dry, some cracking may appear due to shrinkage. This will disappear when the moisture content increases.
-
Do not expose your furniture to any liquids - All liquids should be wiped up immediately with a soft, slightly damp cloth in the direction of the wood grain. If sticky liquid residues do occur, they may be removed with a dilute solution of warm soapy water followed by a clean damp sponge. The area should then be wiped immediately in the direction of the wood grain with a clean, soft white cloth until completely dry.
CAUTION: Please do not strike, hit or stand on the furniture.
Furniture is designed and built for its intended purpose.
-
When writing, use a mat to protect the table or desk surface.
-
When removing furniture, please lift, do not drag. Protect the surface and corners from knocks & scratches. - Take care when handling. Obtain assistance if necessary.
-
Once in place make sure it stands level to smooth opening of the doors and running of the draws.
- Furniture containing glass - Do not use abrasive cleaners to clean glass surface, use a damp cloth with either washing up liquid or soft soap.
- Do not place heavy objects on the glass surface. Do not strike the glass with a sharp object.
- Any assembly required should follow the sequence of the steps in the assembly instruction sheet. - Please retain assembly instructions and hardware for future reference and use.
If furniture is dented or scratched at any time during use, this can usually be repaired by a qualified technician. Please contact your retailer. - With proper care, this furniture will give you many years of use.
General Care
Internal walls
All internal walls with an external side should be visually checked for damp and repaired as necessary.
Surface protection
Never use a knife or sharp instrument directly on worktops or unit surfaces.
12.13 Swift Shield fabric (where fitted)
The Swift Shield fabric fitted to some Swift Group products is a luxury stain resistant and durable fabric using Aquaclean® technology. This is a revolutionary fabric treatment that allows you to clean stains using water only. This provides you with simple fabric maintenance in the minimum amount of time.
Cleaning Instructions
Aquaclean® helps to remove the majority of household stains (wine, ink, sauce, fat, mud, chocolate, cream, etc.) in three simple steps:
For further details and stain cleaning demo videos visit the Cleaning Gallery on the Aquaclean® web site: http://www.aquaclean.com/ES_en/home.
Aquaclean fabrics cannot accept any responsibility for misuse of the fabric by allowing bleach or dissolvent substances coming into contact with it.
Heat and light
Never leave your furniture in direct contact with or too close to a heat source, e.g. a space heater. Avoid standing the furniture permanently in direct sunlight as the fabric colour may fade.
Carpet
Any proprietary carpet cleaner may be used, but it is recommended that you do not use excessive amounts of water.
Vinyl floor covering
Proper care of your floor prevents damage, extends its life and keeps it looking new for years.
Always vacuum or dust hard floor surfaces before mopping. Vinyl floors generally require only warm water for cleaning
Vinyl flooring risks being stained by in-ground dirt if they are not cleaned regularly.
- Avoid using waxes or polishing products
- Do not use rubber protectors on the feet of chairs and furniture. Use plastic protectors instead.
- Put rigid floor protectors beneath the feet of heavy pieces of furniture to prevent the formation of permanent indentations.
- Some materials or colourants such as tar, grease, oil, dyes, waxes, ballpoint or marker inks etc. may under certain conditions migrate into the wear layer and cause indelible stains.
Natural or intense artificial light causes a
whitening effect on all floor coverings. This phenomenon becomes visible in comparison to those areas covered by rugs or furniture, which appear yellower. This yellow effect disappears after a few weeks when these areas are once again exposed to light and the whitening effect appears.
The use of a doormat without a rubber backing is recommended for doorways leading to the exterior, in order to protect the surface of the floor covering from grit and abrasive particles brought in on the soles of people's shoes.
Regular maintenance:
Daily cleaning: using soft dry broom or vacuum cleaner.
Weekly cleaning: using neutral detergent in water with fringed mop or floor cloth.
Furniture
Use a damp cloth to remove finger marks, etc. or an all-purpose spray cleaner or a good quality furniture oil. Abrasive cleaners should not be used.
It is recommended that cupboard catches, stays, sliding bolts and hinges are kept clean and lightly oiled or smeared with petroleum jelly.
External aerial positioning
Fixing blocks for TV aerial positioning have been installed and are identified on the exterior rear wall of the Home. (commonly on the right of the rear).
General Care
If customers or fitters wish to use an alternative positions on the van they must ensure that the position is away from any vertical drops of internal wiring in the wall and confirm there is support structure within the wall.
WARNING:To reduce the risk of drilling or screwing into an electrical cable hidden with in the wall, do not drill or screw into the standard cable safe zones for electrical wiring on interior and exterior walls. These are the areas where concealed cables could be run.
General Care
13. SECURITY
13.1 Protecting your park home and possessions 60
Security
13.1 Protecting your park home and possessions
Windows and doors
Always close and lock windows and doors when leaving your park home, even if only for a few minutes. Consider fitting additional locks wherever necessary; ask your park/distributor/ dealer for details on security locks.
Note: It is very important, however, that any additional locks fitted to designated escape routes (i.e. door(s) and windows) are immobilised during occupation so that your escape remains unhindered.
Gas Cylinders
Keep them chained together and fastened to the substructure of your park home. Always use a good quality padlock.
Lights and alarms
Many devices, both battery powered and electrical, are available to the DIY enthusiast. A light inside your park home at night suggests it is occupied.
Electricity triggered to turn on as darkness falls or battery operated with a time switch, the light will help deter thieves. Ask your park/distributor/ dealer for details on electrical intruder alarms.
Marking your property with your postcode and house number would help the police identify the owners of stolen goods. Advertising the fact that your property is so identified may act as a deterrent. Property can be marked by etching, die-stamping, branding, engraving or by using a security marker pen.
Organise yourselves on the park site so that everyone keeps an eye open for strangers or anything suspicious.
Report any unusual activity to the park manager or the police.
When your park home is left unattended for long periods, take any extra precautions and remove any items that are valuable or portable.
① Note: Park homes on parks are vulnerable not only in summer but also in winter.
For free crime prevention advice about securing your park home, protecting your valuables or property marking either at home or whilst on park, contact the Crime Prevention Officer through your local police station.
14.
WINTERISATION
14.1 Winterisation 62
14.2 Condensation 63
Winterisation
14.1 Winterisation
The following items are the procedures for preparing your park home for winter storage which virtually all apply whenever the unit is to be unoccupied for any long period when frosts can be expected.
a. Turn off LPG supply at the cylinder and remove regulator and hose for storage inside. Ensure that the open gas inlet is protected against entry of dirt or insects.
b. Turn off mains water stop tap.
c. Drain off fresh water outlets on the underside of the park home always located under the central heating boiler or water heater and are identified as red and blue pipes.
CAUTION: Do NOT drain the white central heating pipes. It is a sealed system protected by an anti-freeze solution.
d. Open all hot and cold taps.
e. Drain off the water heater and domestic water part of the water boiler as per the user instructions for the water heater / boiler supplied with the park home.
f. Thermostatic Mixer Valves require full protection from frost, they should be removed or drained correctly. Refer to the Thermostatic Mixer Valve instructions in the Kitchen and Bathroom section of this Handbook
g. Flush all toilets.
h. When all water is drained, close the drain off outlets and all the hot and cold taps.
i. Fridge / Freezer:
- Turn the fridge off and allow to defrost. Clean the inside of the fridge / freezer.
- Prop the fridge / freezer door open, and the internal freezer door if applicable for ventilation.
j. If a dish washer or washing machine is fitted it should be protected from frost damage by carrying out the following instructions:-
- Remove electrical power to the dishwasher.
- Turn off the water supply and disconnect the water inlet pipes from the water valves.
- Drain water from the inlet pipes and water valves. (Use a pan to catch the water).
- Reconnect the water inlet pipes to the water valves.
① Note: When returning to your park home simply reverse the winterisation procedure. Taking these simple precautions will help to protect and maintain the efficiency of the system.
- Dish washers only - Remove the filter in the tub at the bottom and use a sponge to soak up water in the sump.
- Washing machines only - Drain the water from the pump by removing the filter. See washing machine instructions for how to do this.
k. Pour anti-freeze or common salt into the WC pan and also the sink, basin and shower waste traps. Avoid these substances coming into contact with metallic surfaces such as stainless steel sinks or waste outlet and remove any spillage. We recommend the use of a small funnel.
I. Switch off and unplug all electrical appliances (including TV Aerial plug). Turn mains control switch to off position.
m. Remove all food. Thoroughly vacuum all carpets and vinyl to remove any traces of food.
n. Empty the vacuum and or fit a clean bag.
o. The kitchen sink should be free of all particles and left clean.
p. Carry out a full lubrication schedule (i.e. locks, hinges, jockey wheel).
q. Clear gutters and fall pipes to prevent debris blocking the system. Great care should be taken when undertaking this maintenance.
r. Wash and polish exterior paintwork.
Winterisation
s. Close and secure roof light (where fitted) and all windows making sure no curtains are trapped but are hanging free.
t. Preferably, soft furnishings should be removed and stored in ideal conditions, or, if they are to remain within the unit, it is advisable to place cushions and mattresses separately on end or edge to allow a free movement of air around them.
u. Secure exterior windows. Many people leave bowls of water-absorbing crystals or common salt as a means of withdrawing moisture from the air. No moisture means no mildew and damp, so the practice is worthwhile.
v. Ensure all fixed ventilation points (high, low and trickle vents) are clear from debris and obstructions.
14.2 Condensation
Residential park homes manufactured in accordance with BS 3632:2023 have improved vapour control measures, higher thermal performance, and greater airtightness than previously. These measures improve energy efficiency and create a comfortable environment. However, because of these improvements, moisture in the form of airborne water vapour will be sealed within the residential park home and must be actively purged to the outside. To assist, whole home ventilation through background ventilators, purge ventilation through doors and windows, and extraction in all wet rooms has been provided.
What is condensation?
Condensation is the process of change of water from its gaseous form (water vapour) into liquid water when it comes into contact with a surface that is cold. Condensation generally occurs when warm air cools quickly and loses its capacity to hold water vapour, and as a result condenses to form droplets
Why condensation occurs
Condensation occurs when warm air meets a cold surface. The level of condensation will depend upon humidity levels, how moist the air is and how cold the surfaces are they come into contact with.
If the temperature falls below the dew point temperature, it is quite normal for condensation to occur on the external walls and any other cold surface.
When condensation occurs
Condensation occurs usually in winter months, because ambient temperatures are colder (leading to cold surface) and windows, vents and doors are opened less so the moist air cannot escape.
Where condensation occurs
Condensation will occur where warm moist air is put into the atmosphere in areas such as in bathrooms (during showering) and in kitchen areas (during cooking).
In bedrooms when people sleep (or the lounge when a pull out bed is used) the warmth from their body heat and breath generates moisture in the atmosphere which in turn condenses on cold surfaces leading to visible water droplets.
Condensation will also form in cold areas where air movement and ventilation is restricted, (e.g. cupboards, wardrobes, corners of rooms, etc.)
What is important
It is important to provide ventilation and air flow, so that warm moist air can escape, or be externally cooled, and to use the heating reasonably by not making rooms too warm such that people perspire, as this will only serve to generate more moist air and therefore more condensation.
However, in particularly cold periods, where the external ambient temperatures are low, condensation may still form on external walls as the wall insulation levels may well not be thermally able to cope with the difference between the internal and external temperatures.
Winterisation
How can you prevent condensation
Provide ventilation so that moist air can escape
a. Good ventilation of kitchens when cooking or when drying damp clothes, footwear or pets is essential. Observe when windows begin to show signs of misting and increase ventilation by opening a window slightly by 1cm as this will help, but keep the entrance doors closed as much as possible to retain heat.
b. If drying damp clothes or towels, open a window to ventilate the room and allow the moist air to escape.
c. Try to make sure that all areas are partially heated. Condensation most often occur in unheated areas. Try to keep cold surfaces reasonably warm, even a room or area with warm ambient air may still have cold surfaces within it. It can take a long time for a cold room/area to warm up, so it is better to have a small amount of heat then a lot of heat for a short time.
d. After showering, keep the bathroom window or skylights open, and shut the bathroom door long enough to dry off the room.
e. Fixed ventilation is provided in many areas, specifically through trickle vents in the windows it is important not to block these.
f. It is critical that low level ventilation is not blocked through the use of skirts or decking around the park home. Where such items are fitted, and equal amount (if not greater) volume of ventilation must be allowed for.
g. Electrical heating is dryer than gas heating and introduces less moisture into the atmosphere. Do not use additional portable paraffin or flue-less gas heaters at all.
h. If left unoccupied and unheated for long periods of time the temperatures can soak down thermally into the entire product and become very cold. Whenever possible, put the heating on at a low level before use by pre-heating in cold weather.
i. Even with reasonable ventilation it is likely if the temperature is less than 5^ and the humidity is high that condensation will occur. Ideally the temperature should be kept about 20^ when occupied.
Mould growth
Any sign of mould growth is an indication of the presence of moisture and if caused by condensation gives warning that heating or ventilation may require improving.
New park homes
New products take a long time before they are fully 'dried out' because of the moisture in the materials used during manufacture. While this is happening extra heat and ventilation will be required.
15. TECHNICAL INFORMATION
15.1 External dimensions 66
15.2 Model names, Berths and bed sizes 67
External Dimensions Technical info
15.1 External dimensions
| Model L1 L2 L3 L4 W1 W2 H1 | |||||||
| Vendee Lodge 42x13-2 | 13.77m (45' 2") | 13.15m (43' 2") | 12.77m (41' 11") | 12.77m (41' 11") | 4.29m (14' 1") | 4.01m (13' 2") | 3.75m (12' 4") |
| Vendee Lodge 42x14-2 | 13.77m (45' 2") | 13.15m (43' 2") | 12.77m (41' 11") | 12.77m (41' 11") | 4.59m (15' 1") | 4.32m (14' 2") | 3.83m (12' 7")* |
| Edmonton Lodge 40x20-2 | 13.34m (43' 9") | 12.77m (41' 11") | 12.34m (40' 6") | 12.34m (40' 6") | 6.42m (21' 1") | 6.15m (20' 2") | 4.13m (13' 6") |
| Edmonton Lodge 40x20-3 | 13.34m (43' 9") | 12.77m (41' 11") | 12.34m (40' 6") | 12.34m (40' 6") | 6.42m (21' 1") | 6.15m (20' 2") | 4.13m (13' 6") |
| EDmonton Lodge 43x20-4 | 13.97m (45' 10")* | 13.40m (43' 11")* | 12.97m (42' 6")* | 12.97m (42' 6")* | 6.42m (21' 1")* | 6.15m (20' 2")* | 4.13m (13' 6")* |
| Toronto Lodge 43x20-2 | 13.97m (45' 10") | 13.19m (43' 3") | 12.97m (42' 6") | 12.67m (41' 7") | 6.42m (21' 1") | 6.15m (20' 2") | 4.13m (13' 6")* |
| Toronto Lodge 43x20-3 | 13.97m (45' 10") | 13.19m (43' 3") | 12.97m (42' 6") | 12.67m (41' 7") | 6.42m (21' 1") | 6.15m (20' 2") | 4.13m (13' 6")* |
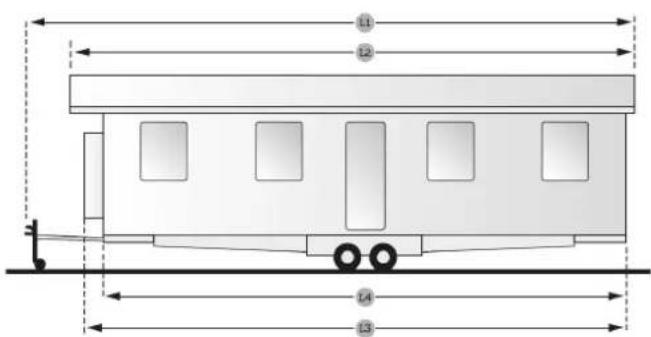
*Estimates
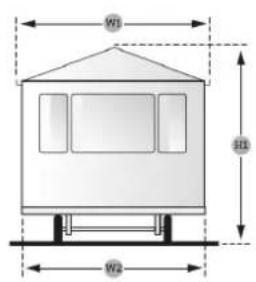
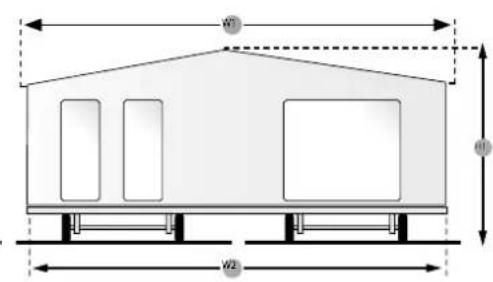
Technical info
15.2 Model names, Berths and bed sizes
| Model Berths Double Double 2 Twin Rear Twin Soa | Bed | |||||
| Vendee Lodge 42x13-2 | 4 (Plus 2) | 2.02x1.53m (6'8"x5'0") | N/A | 1.90x0.75m (6'3'x2'6') | N/A | N/A |
| Vendee Lodge 42x14-2 | 4 (Plus 2) | 2.02x1.53m (6'8"x5'0") | N/A | 1.90x0.92m (6'3'x3'0') | N/A | N/A |
| Edmonton Lodge 40x20-2 | 4 (Plus 2) | 2.02x1.53m (6'8"x5'0") | N/A | 1.83x0.92m (6'0"x3'0") | N/A | N/A |
| Edmonton Lodge 40x20-3 | 6 (Plus 2) | 2.02x1.53m (6'8"x5'0") | N/A | 1.83x0.92m (6'0"x3'0") | 1.83x0.92m (6'0"x3'0") | N/A |
| Edmonton Lodge 43x20-4 | 8 (Plus 2) | 2.02x1.53m (6'8"x5'0") | 1.91x1.37m (6'3"x4'6") | 1.83x0.92m (6'0"x3'0") | 1.83x0.92m (6'0"x3'0") | N/A |
| Toronto Lodge 43x20-2 | 4 (Plus 2) | 2.02x1.53m (6'8"x5'0") | N/A | 1.83x0.92m (6'0"x3'0") | N/A | N/A |
| Toronto Lodge 43x20-3 | 6 (Plus 2) | 2.02x1.53m (6'8"x5'0") | N/A | 1.83x0.92m (6'0"x3'0") | 1.83x0.92m (6'0"x3'0") | N/A |
Technical info
General layout showing ventilation and emergency exits
Vendee Lodge 42^× 13^2 bed layout
| ■ | Square roof ventilator (21000 SQ. mm) | ○ | Gas drop ventilator Extractor | ○○○ | ○ | Rectangular floor ventilator (6000 SQ. mm) | ○○ | CO detector |
| ■ | Square floor ventilator (2205 SQ. mm) | ● | Circular floor ventilator (760 SQ. mm) | ● | Circular roof ventilator (2000 SQ. mm) | ○○○ | ○○○ | Heat detector |
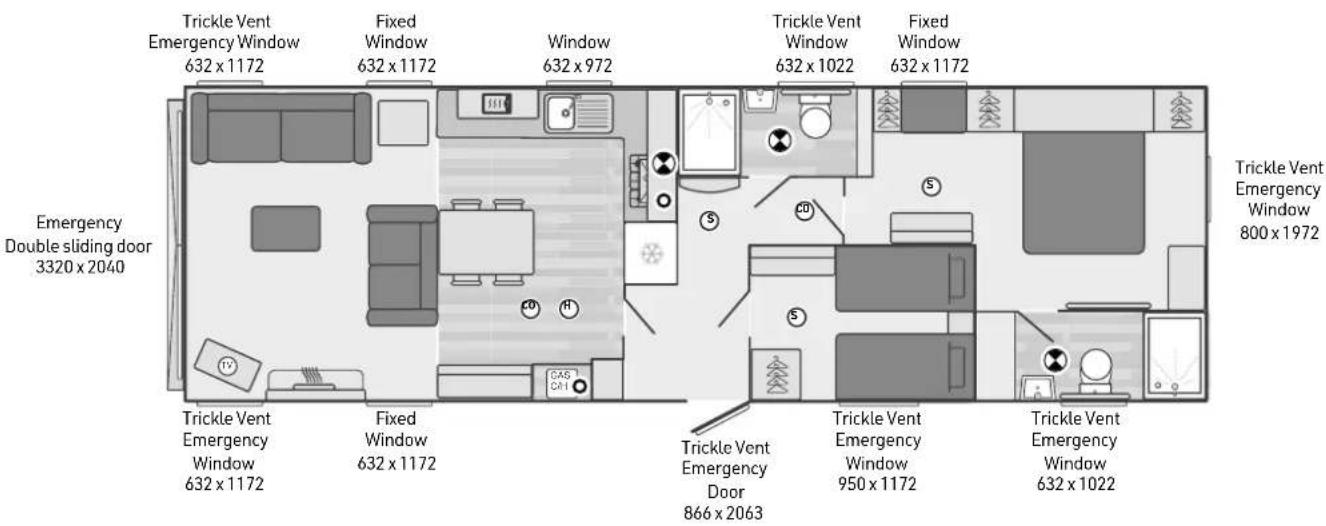
Technical info
General layout showing ventilation and emergency exits
Vendee Lodge 42^× 14^2 bed layout
| ■ | Square roof ventilator (21000 SQ. mm) | ○ | Gas drop ventilator Extractor | ○ | ○ | Rectangular floor ventilator (6000 SQ. mm) | ○ | CD detector |
| ■ | Square floor ventilator (2205 SQ. mm) | ● | Circular floor ventilator (760 SQ. mm) | ● | Circular roof ventilator (2000 SQ. mm) | ○ | Smoke alarm | ○ |
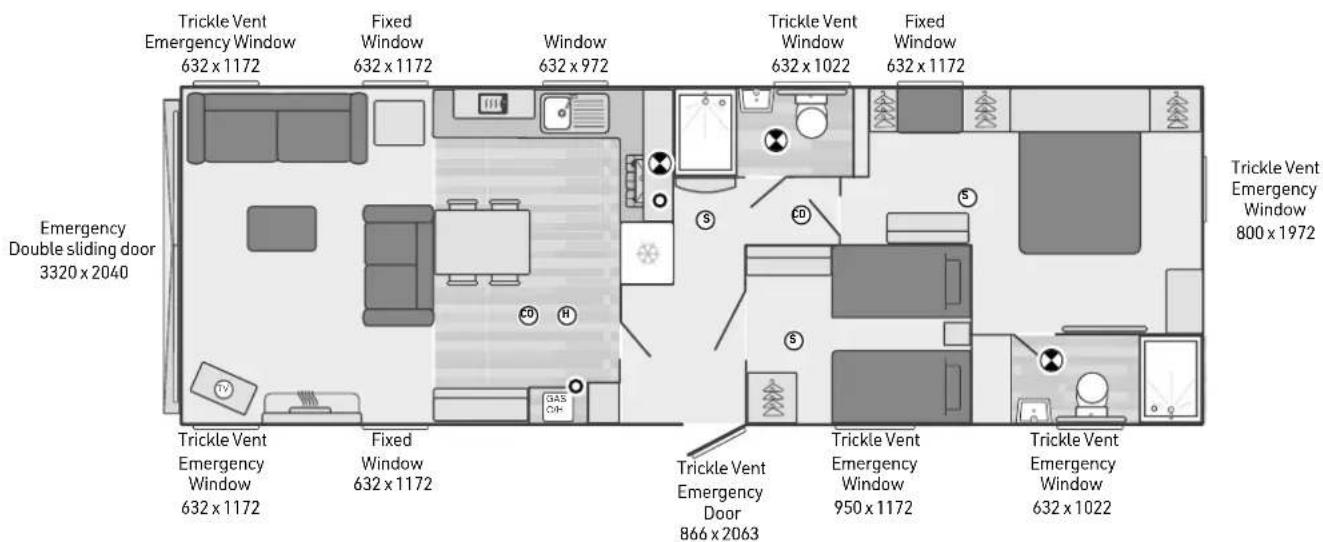
Technical info
General layout showing ventilation and emergency exits
Edmonton Lodge 40^ × 20^ 28
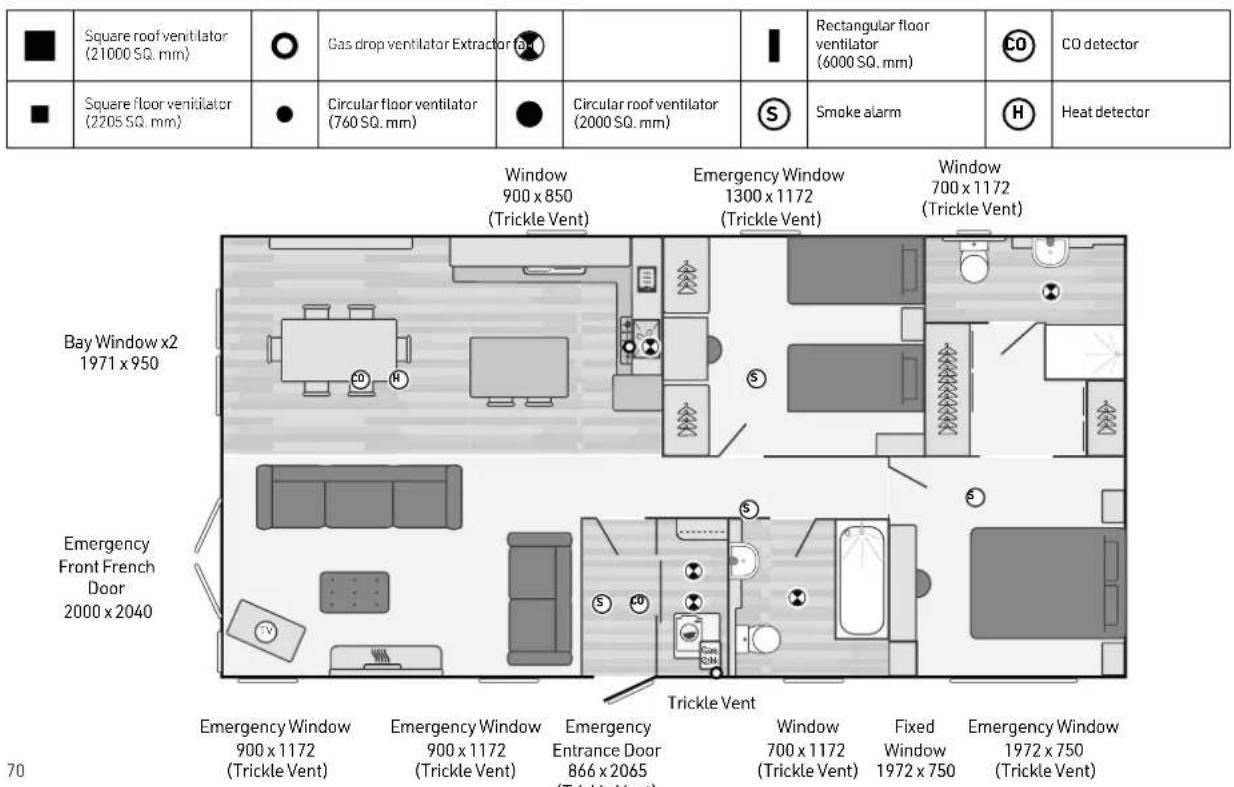
Technical info
General layout showing ventilation and emergency exits
Edmonton Lodge 40^ × 20^ 38
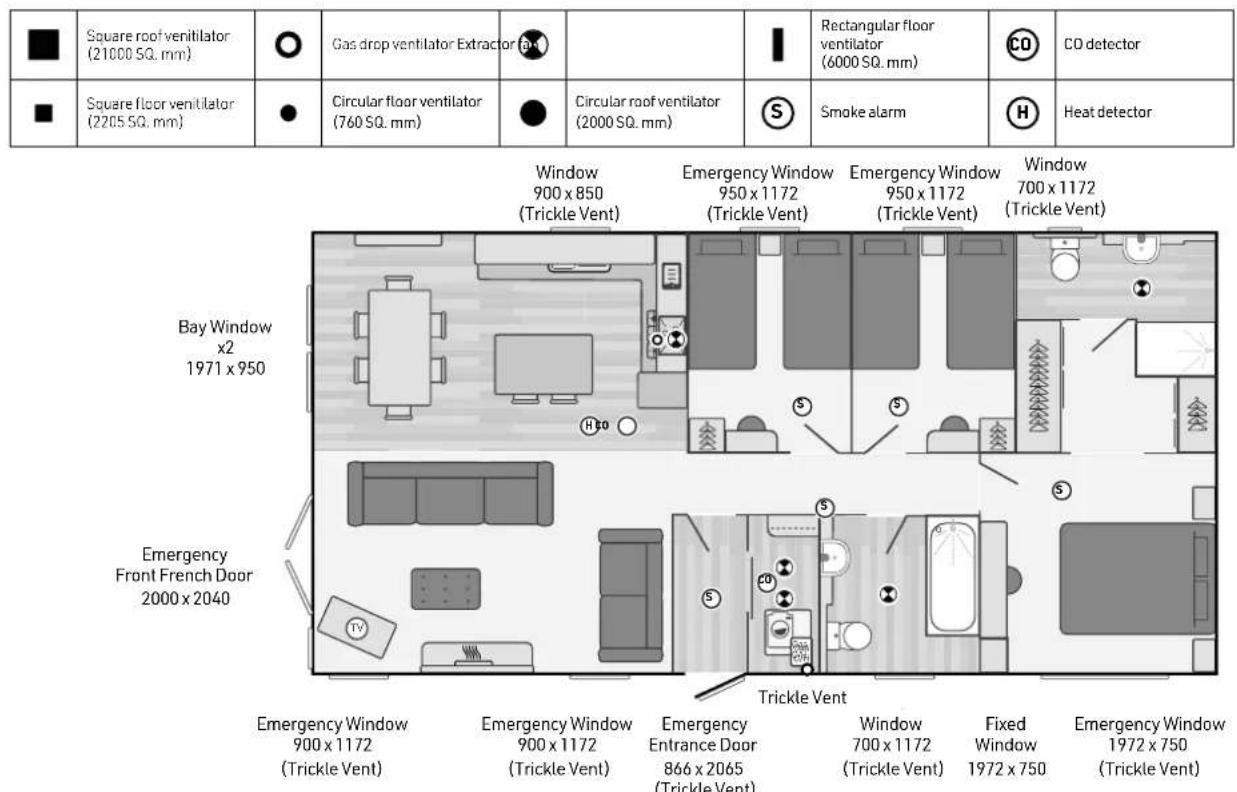
Technical info
General layout showing ventilation and emergency exits
Edmonton Lodge 43^ × 20^ 48
| ■ | Square roof ventilator (21000 SQ. mm) | ○ | Gas drop ventilator Extractor (○) | Rectangular floor ventilator (6000 SQ. mm) | CO | CO detector | |||
| ■ | Square floor ventilator (2205 SQ. mm) | ● | Circular floor ventilator (760 SQ. mm) | ● | Circular roof ventilator (2000 SQ. mm) | S | Smoke alarm | H | Heat detector |
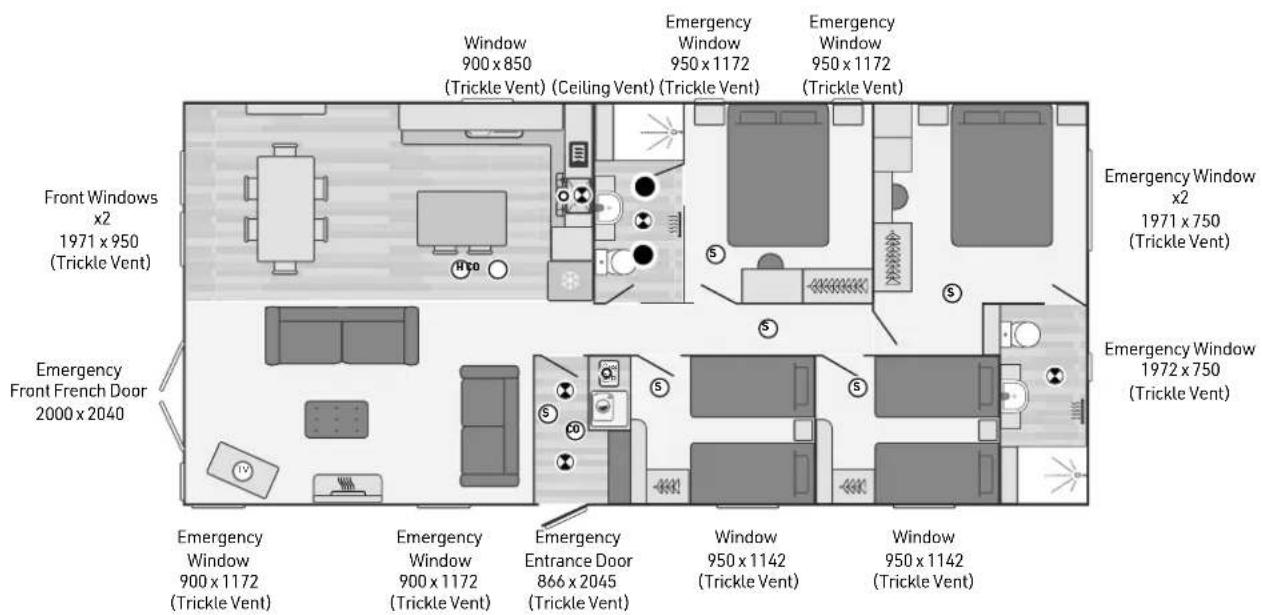
Technical info
General layout showing ventilation and emergency exits
Toronto Lodge 43^× 20^2 bed layout
| ■ | Square roof ventilator (21000 SQ. mm) | ○ | Gas drop ventilator Extractor | ○ | I | Rectangular floor ventilator (6000 SQ. mm) | CO | CD detector | |
| ■ | Square floor ventilator (2205 SQ. mm) | ● | Circular floor ventilator (760 SQ. mm) | ● | Circular roof ventilator (2000 SQ. mm) | S | Smoke alarm | H | Heat detector |

Technical info
General layout showing ventilation and emergency exits
Toronto lodge 43^× 20^3 bed layout
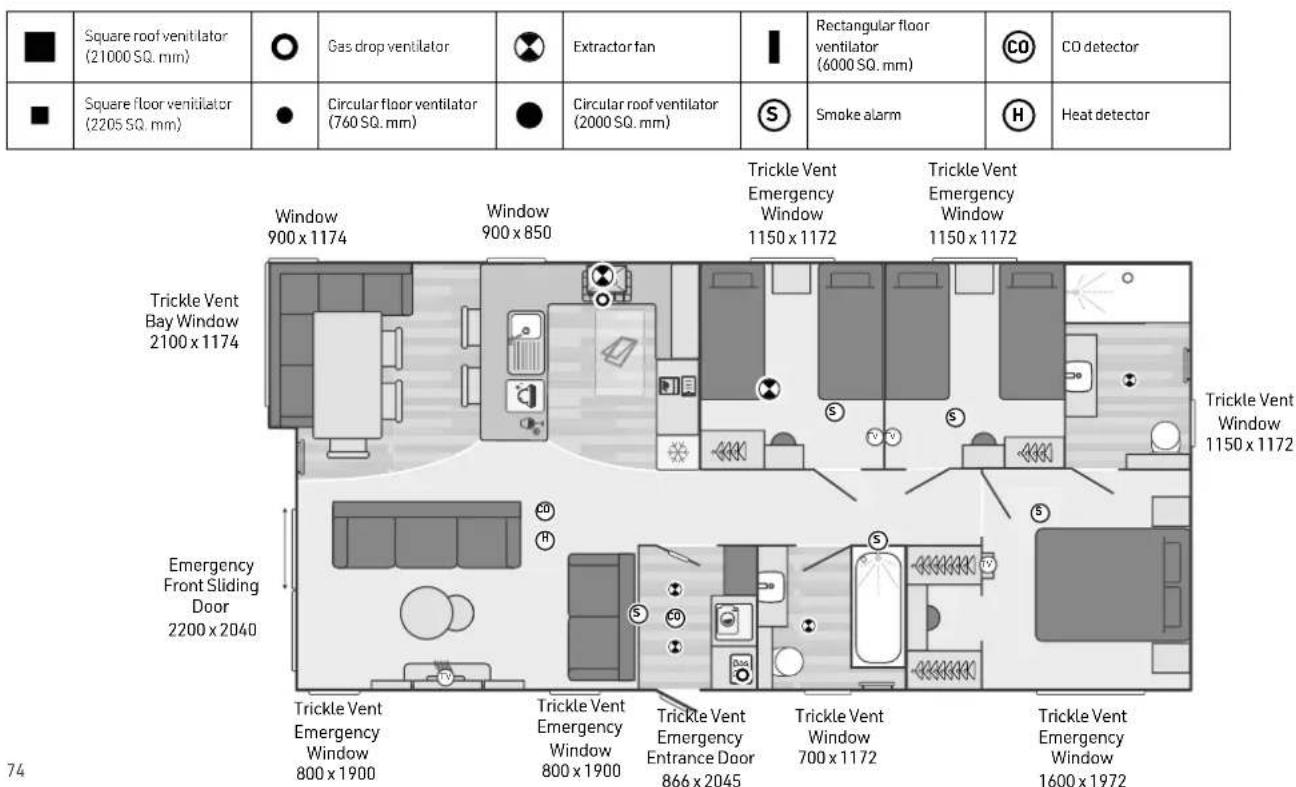
Technical info
Plumbing (typical water system)
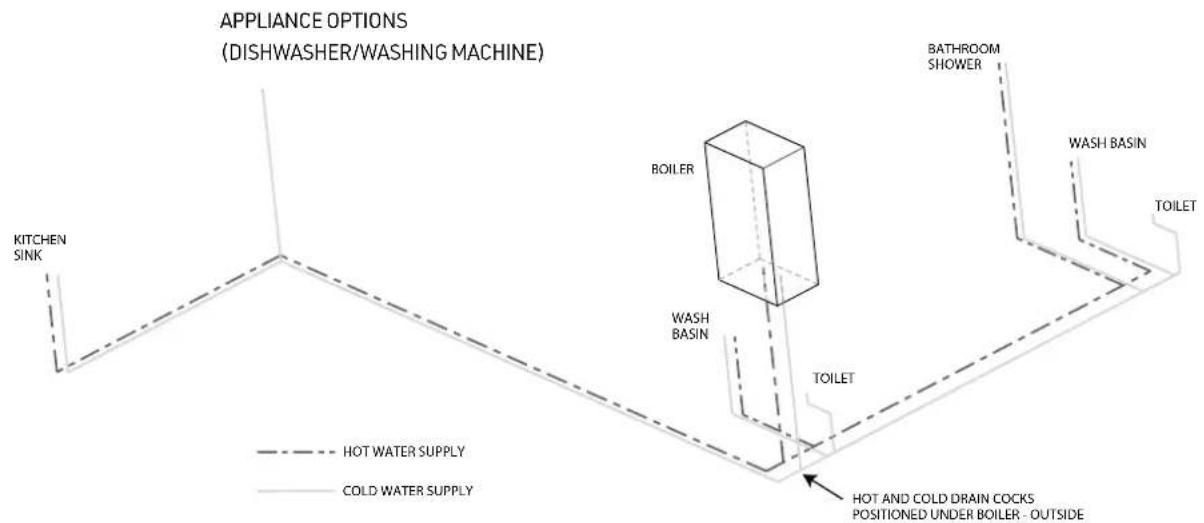
Technical info
Plumbing (typical water system twin units)
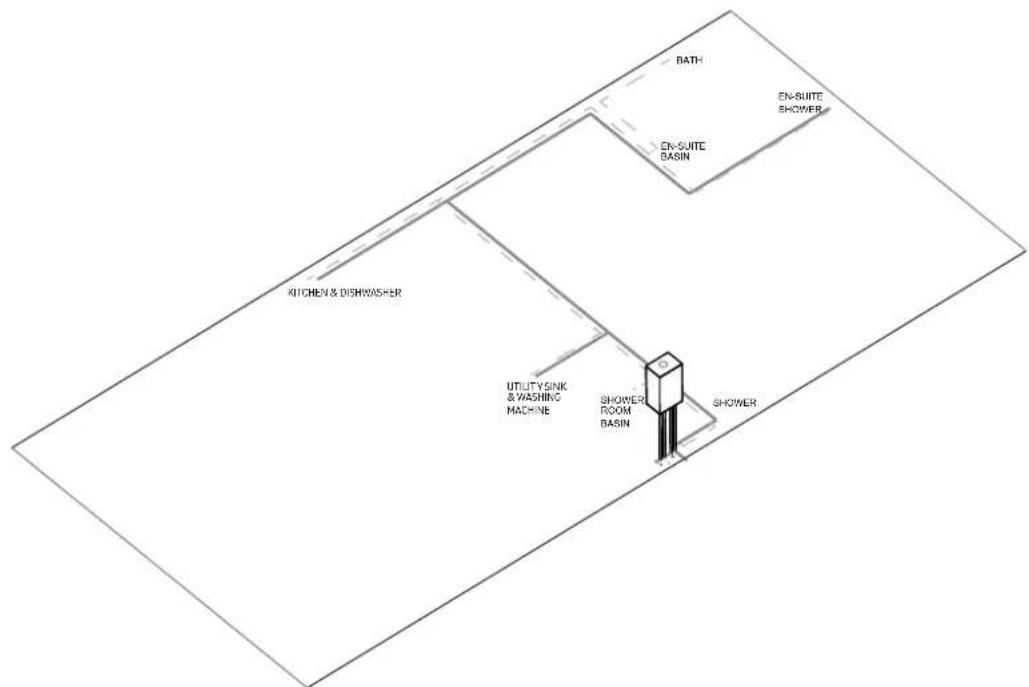
Technical info
Plumbing (typical heating system single units)
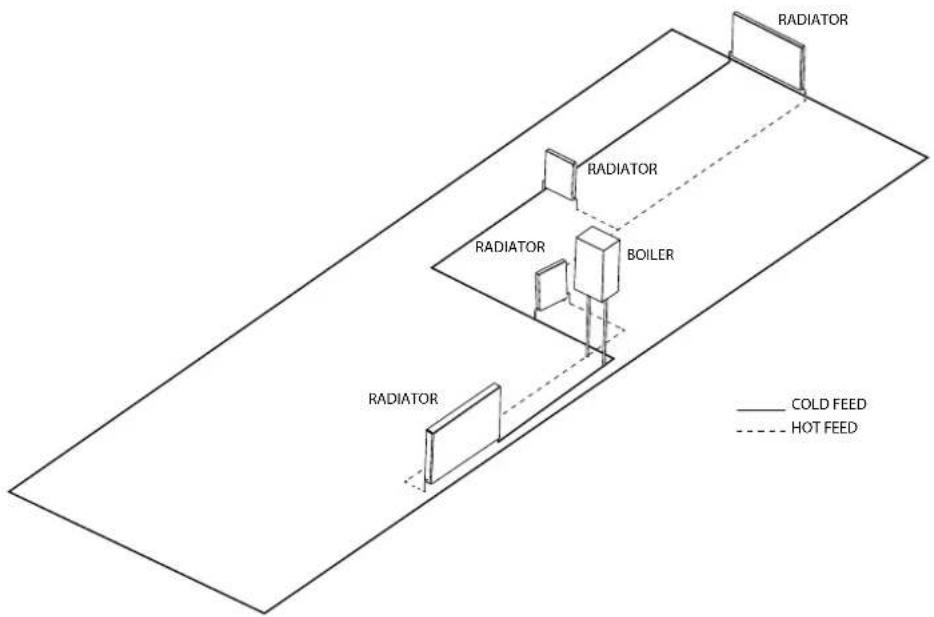
Technical info
Plumbing (typical heating system twin units)
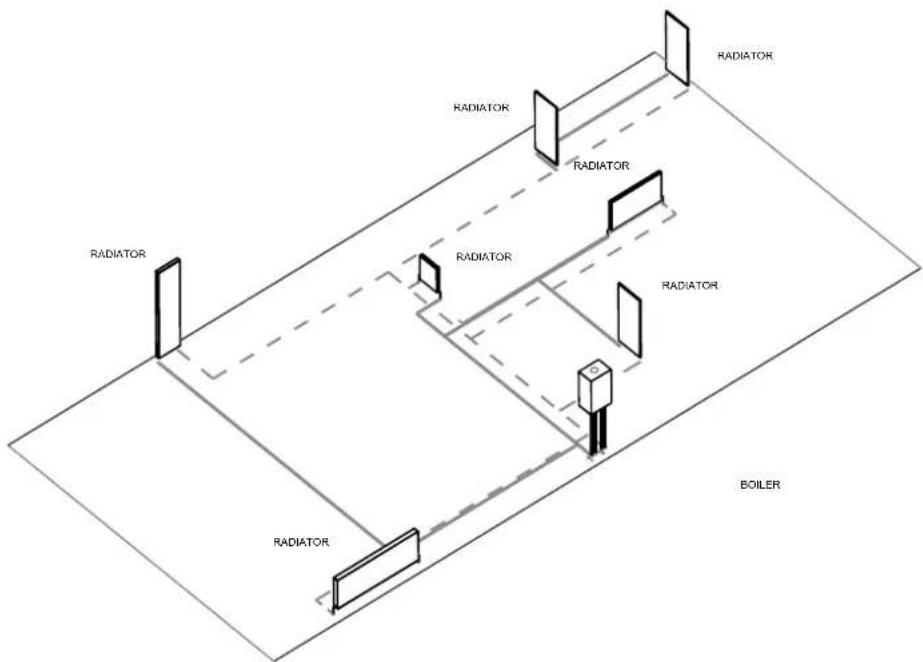
Technical info
Single Unit Generic Schematic
These electrical schematics describe the typical installation found in a park home. Various electrical options are available which may be fitted over and above the specification shown. Please consult your retailer/installer, the Swift Group Ltd or Sargent Electrical Services if further information is required.
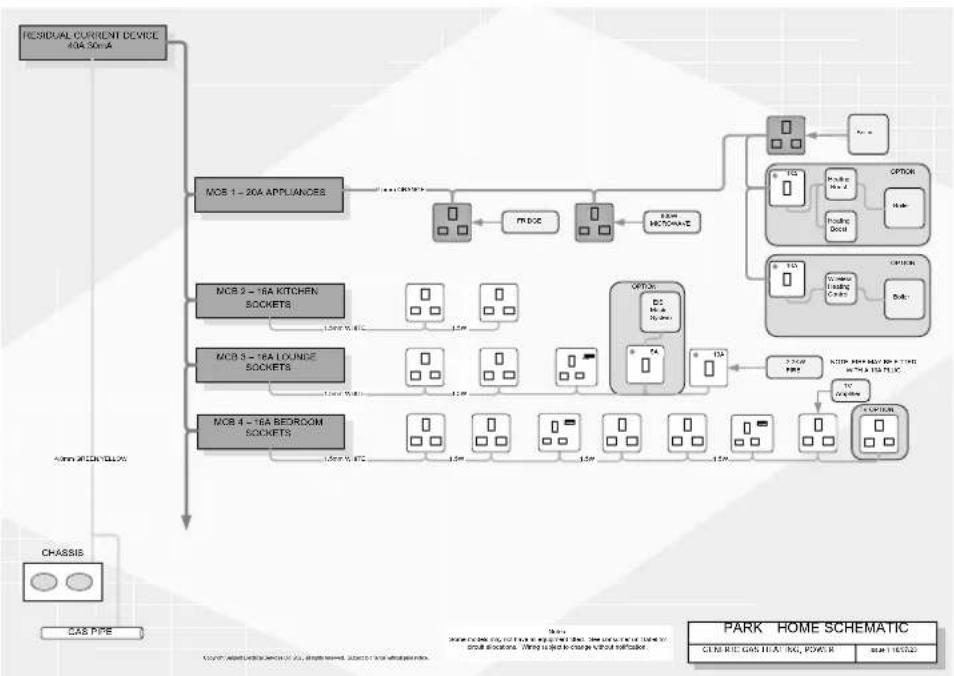
Technical info
Single Unit Generic Gas, Heating and Lighting
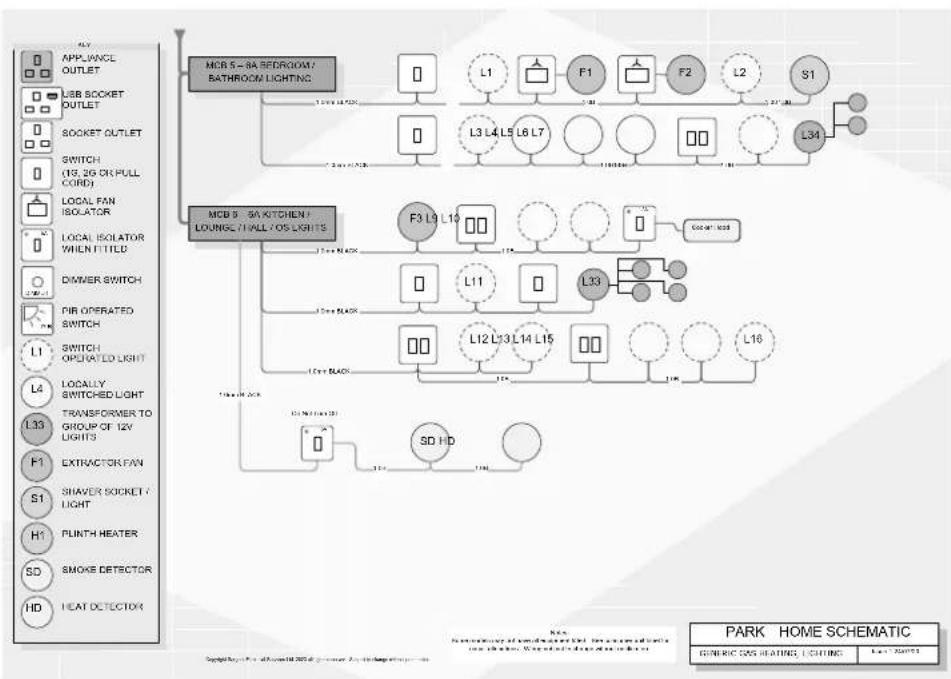
Technical info
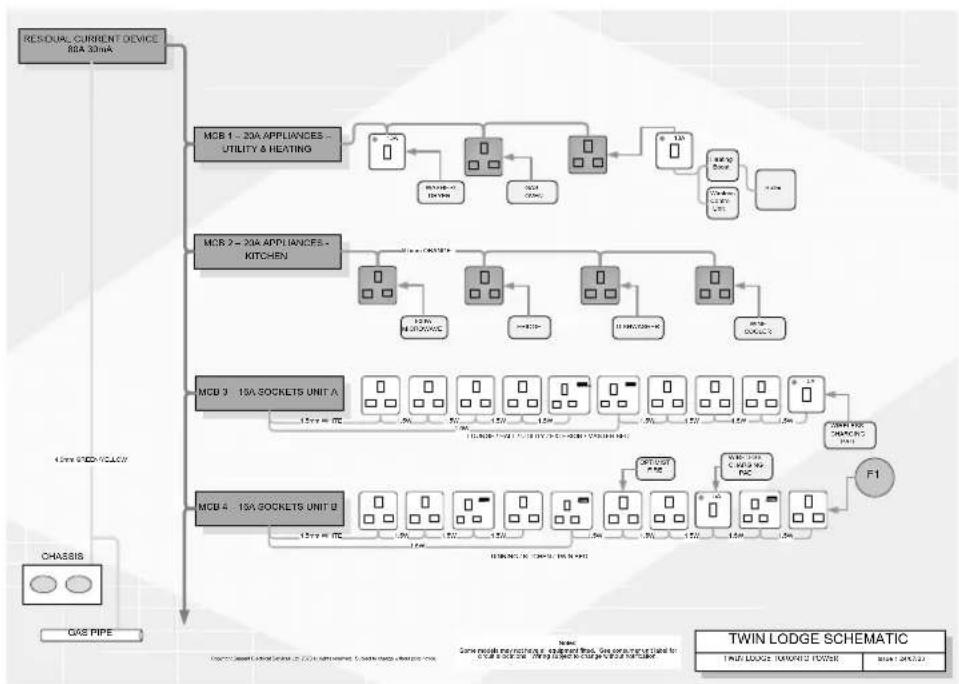
Twin Unit Toronto Power
Technical info
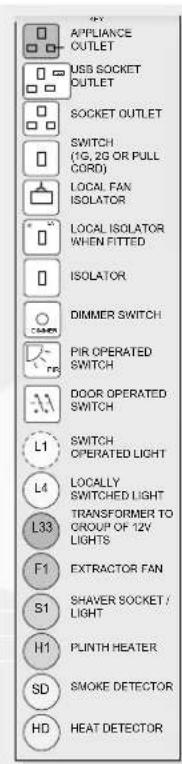
Twin Unit Toronto Lighting
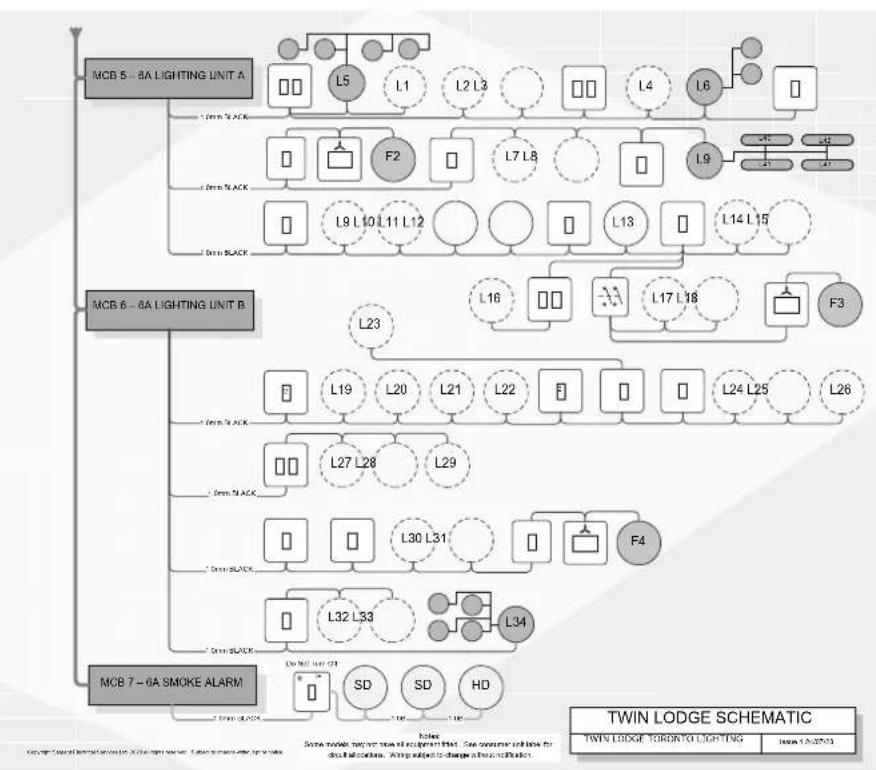
Technical info
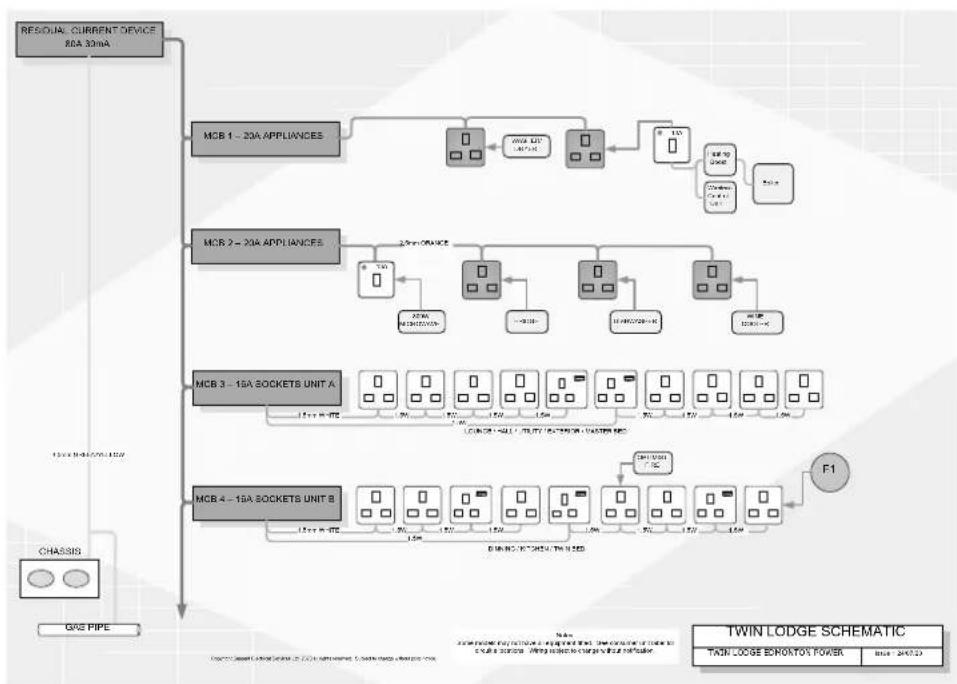
Twin Unit Edmonton Power
Technical info
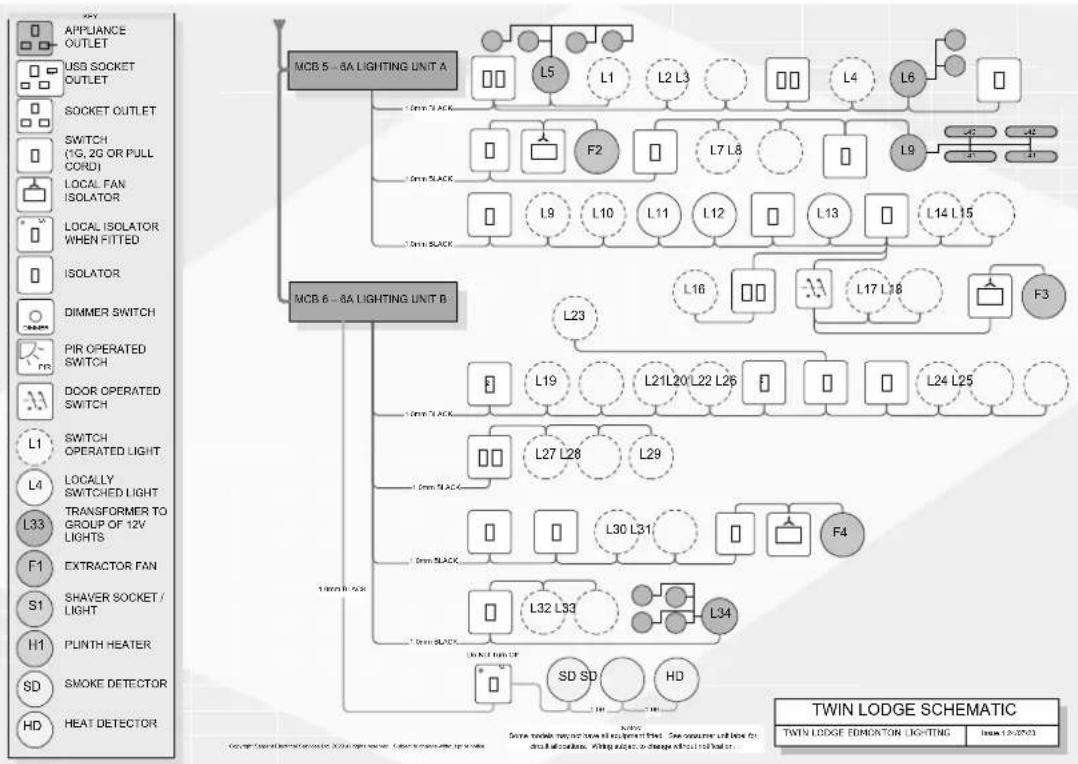
Twin Unit Edmonton Lighting
Technical info
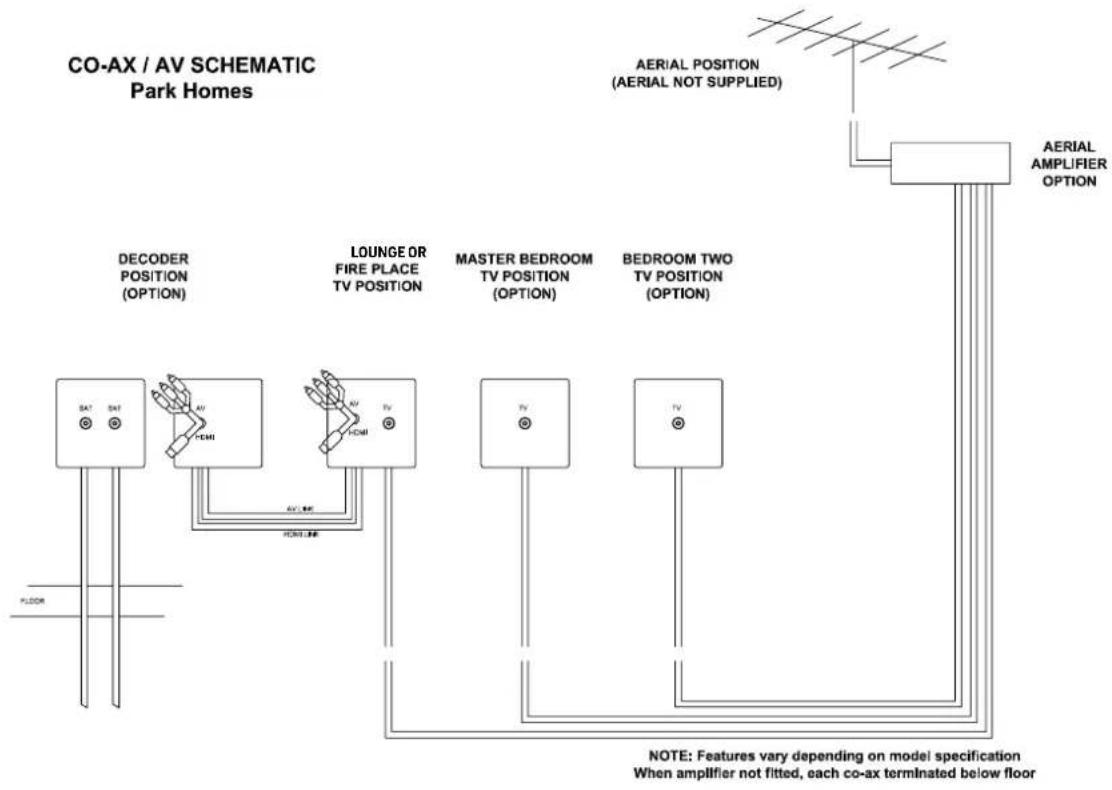
CO-AX Schematic
Technical info
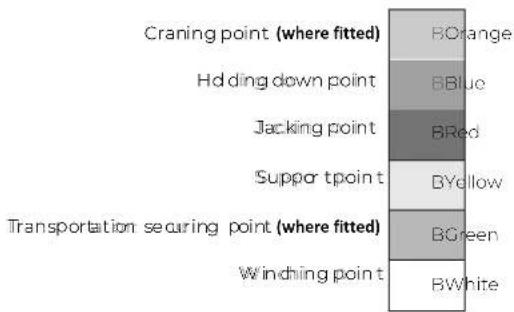
Chassis Marking
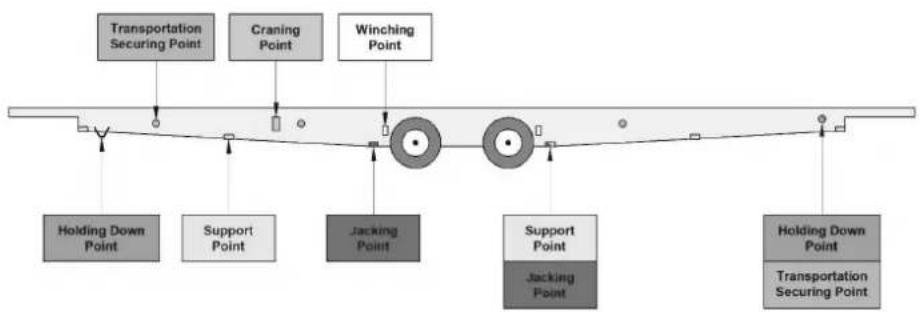
Technical info
Index
Index
Symbols
3 Year SuperSure Warranty 10
5 Year Structural Warranty 10
10 Year Chassis Warranty 10
A
After sales 12
After sales support and service 12
Alignment and adjustment of doors 49
Anchors 17
Appliances 38
B
Bathroom fittings 54
Blinds 42
Blockages 46
Bulbs 33
Bunk beds (where fitted) 6,44
C
CanExel panels 46
Care and maintenance 52
Carpet 56
Central heating and hot water system 36
Changing gas cylinders 27
Chassis Marking 86
Chassis specification 18
Children 5
Cleaning 54
CO-AX Schematic 85
Common electric fault finding 32
Condensation 63
Cooker hood 38
Cooking 40
Cooking Equipment 40
Craning 14
Creasing 55
D
Dishwasher 38
Door and window handles 47
Door and windows 47
Doors and window hinges 47
Do's and don'ts for UPVC products 48
Drain down procedure 53
Drain down procedure (fixed shower head) 54
E
Electric/Gas fires 38
Emergency action procedures 4
Emergency shut off points 24
Escape paths 5
External aerial positioning 56
External dimensions 66
External structure 46
F
Fire Alarms 24
Fire and asphyxiation risks 5
Fire extinguisher 24
Fire precautions 23
Fridge/freezer 38
Furnishings 54
G
Galvanised Chassis 46
Gas commissioning notice 26
Gas Cylinders 60
Gas hob 38
Gas oven / Grill / Hob 40
Gas regulators 27
Gas safety 28
General care for wooden furniture 55
Gutters and downpipes 46
H
Heat and light 56
Heating & Thermal Properties 36
Holiday home aluminium cladding 11
How can you prevent condensation 64
Internal walls 56
In the event of fire 5
In the event of gas leakage 4
J
Jacking 15
Jacking Procedure 16
K
Kitchen 54
Kitchen and bathroom 52
L
Lights and alarms 60
Lock cylinder 47
Low pressure flexible hoses 27
M
Mains electricity and wiring 32
Microwave oven 38
Minimum recommended cleaning intervals 48
Model names, Berths and bed sizes 67
Mould growth 64
0
Operation of door locks 47
Operation of window night vents 47
Oven and Grill 38
Owner's certificate 7
P
Plumbing (typical heating system single units) 77
Plumbing (typical heating system twin units) 78
Plumbing (typical water system) 75
Plumbing (typical water system twin units) 76
Protecting your bath thermostatic mixer valve (where fitted) 54
Protecting your park home and possessions 60
Protecting your Thermostatic Mixing Tap 53
Pull out sofa bed (where fitted) 44
R
Radiator valves 36
Repairs 48,52 Residential Park Home definition 4
Safety 4
Selection of Jack 15
Single Unit Generic Gas 80
Single Unit Generic Schematic 79
Sitting 14
Snow loading 17
Snow precautions 47
Spills and stains 55
Spreader plates 16
Supporting the chassis 15
Surface protection 56
Swift Shield fabric (where fitted) 56
T
The LPG system 26
Thermal insulation 36
Thermostatic mixer valve (shower) 52
Toilet/shower room 52
Trickle vents 52
Twin Unit Generic Lighting 82,84
Twin Unit Generic Schematic 81,83
Index
U
Upholstery care 54
Using cylinders 26
V
Ventilation 36
Vinyl floor covering 56
W
Warranties 10
Washing machines/Washer dryers 38
What happens inside the cylinder 26
What to do in case of fire 24
Wheel chocks 16
Window friction stays 48
WineCooler 38
Winterisation 62

SWIFT
SWIFT GROUP
Dunswell Road
Cuttingham
East Yorkshire
HU164JX
Tel: 01482 875740
Fax: 01482 840082
Customer Experience Team
enquiries@swiftleisure.co.uk
FIND OUT MOREAT SWIFTGROUP.CO.UK