
DO7357F - Heating DOMO - Free user manual and instructions
Find the device manual for free DO7357F DOMO in PDF.
| Brand | Domo |
| Model | DO7357F |
| Product type | Wall and floor heating with Wi-Fi |
| Power supply | 220-240 V ~ 50 Hz |
| Nominal heat output | 2000 W (2.0 kW) |
| Minimum heat output | 1000 W (1.0 kW) |
| Protection rating | IP24 |
| Heating modes | Comfort, Eco, Anti-freeze, Programs (P1, P2, P3 adjustable) |
| Features | Wi-Fi (Tuya Smart app), timer (0-9 h), open window detection, power adjustment (H0/H1/H2), remote control, LED screen |
| Installation | Wall mounting or free-standing on feet |
| Care and cleaning | Clean the exterior with a slightly damp cloth; vacuum the dust on the ventilation grille regularly |
| Safety | Safety button (appliance only works if placed correctly), automatic shut-off in case of overheating, open window function, do not cover |
| Spare parts and repairability | Repairs only by the manufacturer or approved service; genuine accessories and parts available on the DOMO webshop |
| Warranty | 2 years (excluding normal wear, improper use, etc.) |
| Weight (approx.) | 3.5 kg |
| Dimensions (approx.) | H 45 cm, W 75 cm, D 15 cm |
Frequently Asked Questions - DO7357F DOMO
User questions about DO7357F DOMO
0 question about this device. Answer the ones you know or ask your own.
Ask a new question about this device
Download the instructions for your Heating in PDF format for free! Find your manual DO7357F - DOMO and take your electronic device back in hand. On this page are published all the documents necessary for the use of your device. DO7357F by DOMO.
USER MANUAL DO7357F DOMO
natural_image
White DOMO air purifier with digital display and control panel, accompanied by a hand holding a smartphone displaying 22°C angle (no text or symbols on main device)EN Instruction booklet Bathroom wall heater with Wi-Fi
Read all instructions carefully.
Save this instruction manual for future reference.
natural_image
Simple diagram showing a tool interacting with two dots and a dashed line, no text or symbols present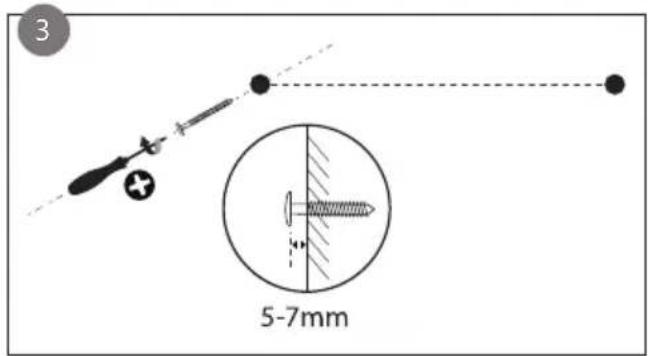
natural_image
Simple diagram of a cylindrical container with an arrow indicating direction, no text or symbols presentnatural_image
Symbol of a trash bin with crossed lines indicating no waste or discharge (no text or numbers present)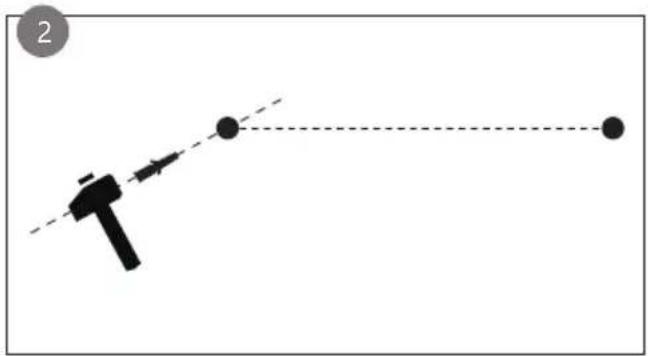
natural_image
Simple diagram showing a tool interacting with two dots and a dashed line, no text or symbols present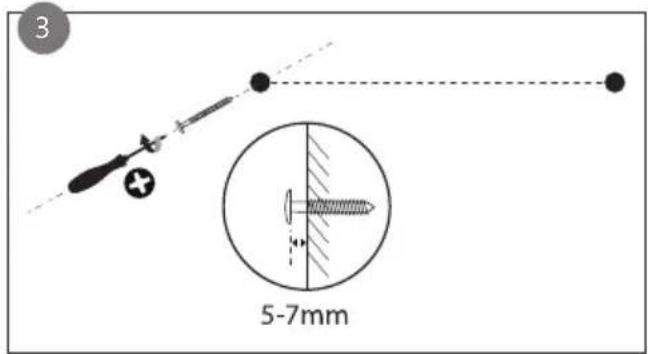
natural_image
Simple diagram of a cylindrical container with a downward arrow and small circular markers, no text or symbols present.
Mode Confort
Ajout manuel
DÉCLARATION DE CONFORMITÉ
natural_image
Symbol of a trash bin crossed with no text or numbers, indicating no waste or discharge (no text present)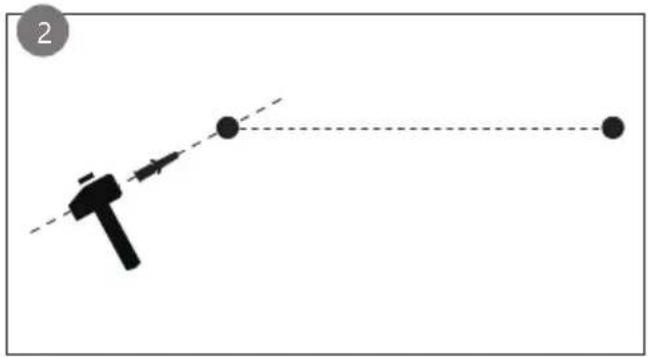
natural_image
Simple diagram showing a tool interacting with two dots and a dashed line, no text or symbols present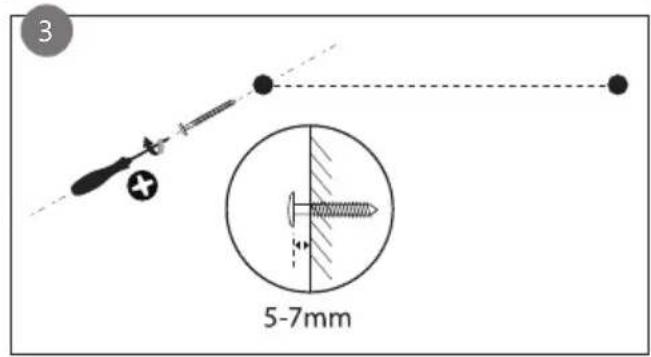
natural_image
Simple diagram of a capsule-shaped container with internal arrows and dots, no text or symbols present
Komfortmodus
natural_image
Symbol of a trash bin crossed with two crossed lines, no text or numbers presentThank you very much for placing your trust in DOMO. We hope you enjoy your new purchase.
All our products undergo strict quality control before reaching you. If you still experience any problems with your device, we sincerely regret that. We have collected the most frequently asked questions about our devices on our webshop. Scan the QR code and have a look!

If you cannot find a solution to your problem there, do not hesitate to contact our customer service via info@linea2000.be. Our staff will do everything they can to assist you!
This device has a warranty period of 2 years from the date of purchase. During this warranty period, the distributor will assume responsibility for any defects that can be shown to be the result of material, construction or manufacturing errors. Such defects will be remedied by repair or replacement of the device. The 2-year warranty period will be suspended during the repair period and will continue after the repair has taken place for the remaining duration of the warranty period. The warranty will be honoured if proof of purchase clearly showing the date of purchase is provided. If your device becomes defective within the 2-year warranty period, please return it with your proof of purchase to the store you purchased it from or follow the procedure of the relevant webshop if you bought it online.
The warranty does not cover damage to the device, accessories or parts caused by:
• normal wear and tear from use;
• non-compliance with the instructions for use, maintenance and cleaning in the manual;
- incorrect connection, e.g. electrical voltage too high;
- incorrect, heavy-handed or abnormal use;
• repairs or alterations carried out by the consumer or unauthorised third parties;
- use of parts or accessories not recommended nor supplied by the distributor.
SAFETY INSTRUCTIONS
When using electrical appliances, basic safety precautions should always be taken, including the following. Any injury or damage caused by failure to comply with these rules are at your own risk. Neither the manufacturer, importer, or the supplier may be held liable.
- Read all instructions carefully.
- Make sure all packaging materials and promotional stickers have been removed before using the appliance for the first time. Make sure children cannot play with the packaging materials.
-
This appliance is only suitable for use in domestic and similar environments, such as:
-
staff kitchen areas in shops, offices and other working environments;
- farm houses;
- by clients in hotels, motels and other residential type environments;
- bed and breakfast type environments.
- Children should be supervised to ensure that they do not play with the appliance.
- This appliance can be used by children aged from 16 years and above and persons with reduced physical, sensory or mental capabilities or lack of experience and knowledge if they have been given supervision or instruction concerning use of the appliance in a safe way and understand the hazards involved.
• Children shall not play with the appliance.
- Cleaning and user maintenance shall not be made by children unless they are older than 16 or supervised.
- Keep the appliance and its cord out of reach of children younger than 16 years.
- All repairs should be carried out by the manufacturer or its aftersales service.
▲ELECTRICAL WARNINGS
- In order to avoid a hazard this appliance must not be supplied through an external switching device, such as a timer or a
separate remote control, or connected to a circuit that is regularly switched on and off by the utility.
- The appliance must be disconnected from its power source when not in use, during service and when replacing parts. If present, first turn all the buttons to the 'off' position, then pull the plug out of the socket by grasping the plug itself. Never pull the cord or appliance to remove the plug from the socket.
- Before use, check carefully that the electric tension and frequency of the power net at your home match the indications on the rating label of the appliance.
- The appliance must be plugged into an appropriate outlet that is installed in accordance with local installation regulations.
- Do not let the power supply cord hang over the edge of a counter, or touch hot surfaces.
- Keep the power cord away from hot parts and don't cover the appliance.
- Unwrap the cord completely to prevent overheating of the cord. Do not allow the power cord supply to run underneath or around the unit.
- For safety reasons, never use the appliance if the cord, plug, or appliance itself is damaged, or after a malfunction of the appliance. Return the appliance to the DOMO Service Department or its service agent for examination, repair, or electrical or mechanical adjustment. Do not try to repair the appliance yourself.
- Under extreme circumstances, there could be leakage of the battery.
- If the liquid from the battery comes into contact with the skin, remove all contaminated clothing and immediately wash the skin profusely with soap and water or take a shower. Contact a physician immediately if you continue to feel a burning sensation.
- If the liquid comes into contact with the eyes, rinse abundantly with water for at least 15 minutes until the irritation subsides and contact a doctor immediately.
- When inhaling any fumes that were released, immediately move into the fresh air and take a deep breath in and out.
Contact a doctor immediately if you experience shortness of breath, dizziness, or headaches.
- If a battery or the liquid from a battery is swallowed, seek medical assistance immediately. Try not to induce vomiting and do not eat or drink anything.
⚠️INSTALLATION
- Do not place near flammable materials, gases or explosives.
- Do not use or store this appliance outdoors.
• Always use the appliance on a steady, dry and level surface. - Never place this appliance near a gas stove or electrical stove or in a place where it may come into contact with a warm appliance.
⚠ USE
- Do not use this appliance for other than intended use.
- Do not operate the appliance with wet hands.
- The use of accessories that are not recommended or sold by the manufacturer can cause fire, electrical shock or injuries. Only use the utensils delivered with the appliance.
⚠ CLEANING AND MAINTENANCE
- To protect against electrical shock or burns, do not immerse unit, cord, or plug in water or other liquid.
- Failure to maintain this appliance in a clean condition could adversely affect the life of the appliance and possibly result in a hazardous situation.
⚠️PRODUCTSPECIFIC WARNINGS
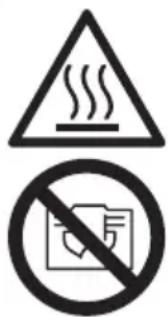
CAUTION: the appliance gets hot during use and stays warm for some time after use. Keep the power cord away from hot parts.
Do not cover the appliance.
- Do not place the unit against or directly under a socket.
- Do not use the appliance in the immediate vicinity of a bath, shower, or swimming pool. It must not be possible for a person in the bath or shower to touch the unit, the cord, or the control buttons.
- Do not use this unit in confined spaces when these are used by people who are unable to leave the room on their own, unless they are under constant supervision.
- Do not use the heater if it has fallen over.
- Never insert foreign objects into the air inlet or outlet.
- Do not spray insecticides or flammable sprays in the direction of or around the product.
- Keep all textiles, such as curtains, towels, and clothing, at a minimum distance of one metre from the appliance to avoid a fire hazard.
- If the unit emits a strange odour or noise when in use, stop using it immediately and unplug it from the socket.
- Do not bend the cord.
- Switch off and unplug the appliance when not using it for a long period of time.
SAVE THESE INSTRUCTIONS FOR FUTURE REFERENCE
All images and descriptions in this manual are purely indicative and may differ slightly from the actual device.
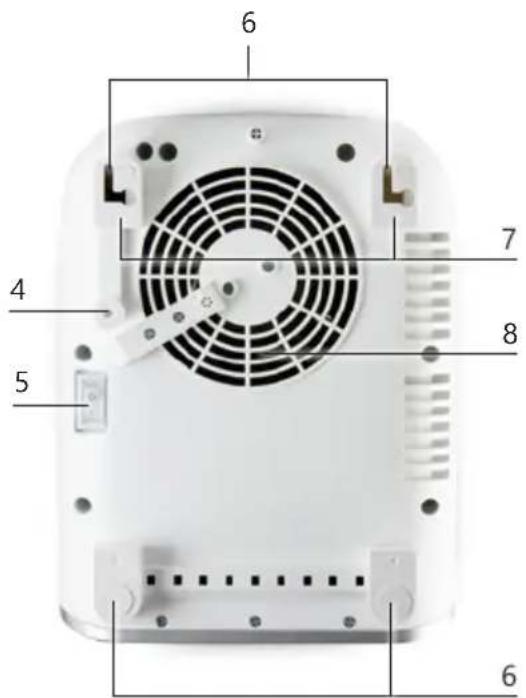
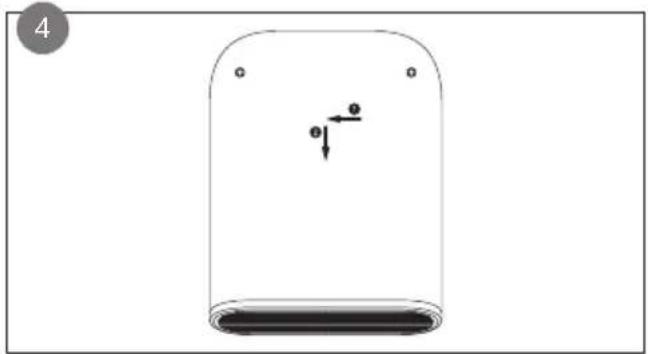
PARTS
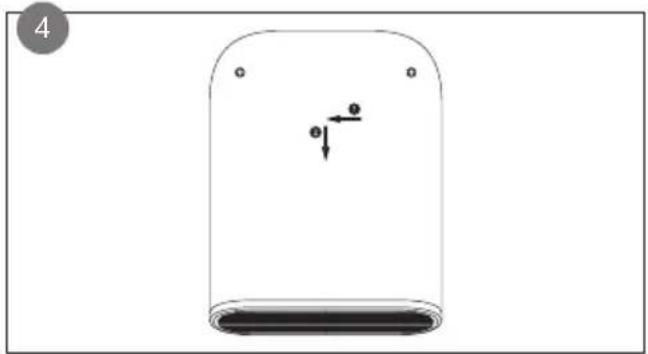
- Remote control
- Air outlet
- Control panel
- Safety button
- Power switch
- Suspension holes
- Feet
- Fan
1
2

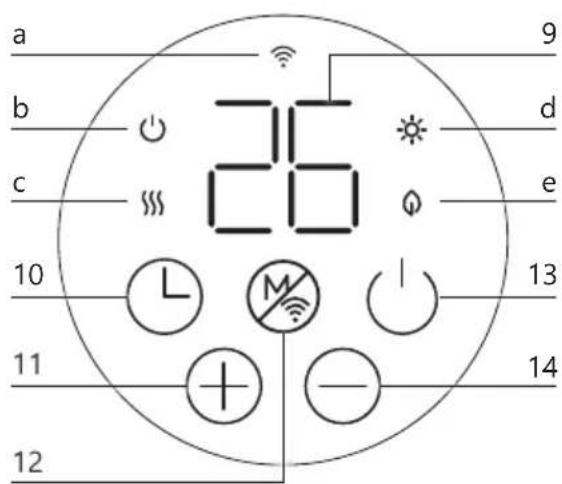
CONTROL PANEL
- Display
- Timer
- Raise
- Mode selection / Wi-Fi connection button
- On/Off button
- Lower
Indicator lights:
a. Wi-Fi
b. On/Off
c. Heating on
d. Comfort mode
e. ECO mode
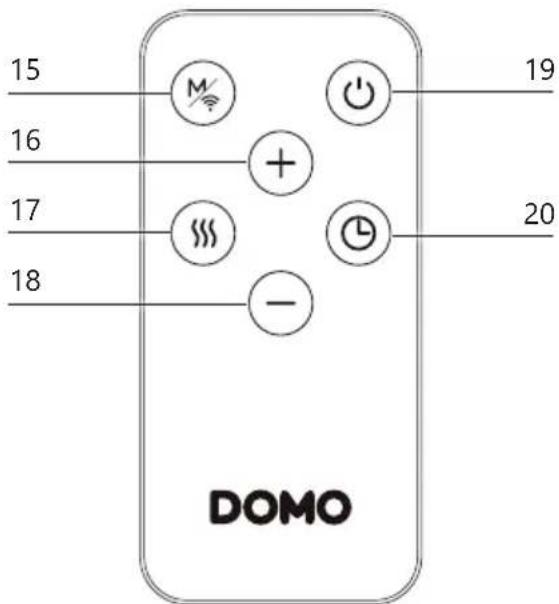
REMOTE CONTROL
- Mode selection / Wi-Fi connection button
- Raise
- Power setting button
- Lower
- On/Off button
- Timer
BEFORE THE FIRST USE
- Remove all packaging materials and any promotional stickers.
- When the appliance is switched on for the first time, a slight smell may be emitted. Please ensure sufficient ventilation. This smell will disappear very quickly.
ASSEMBLY
• Fix the unit to the wall or use the feet to position it freely.
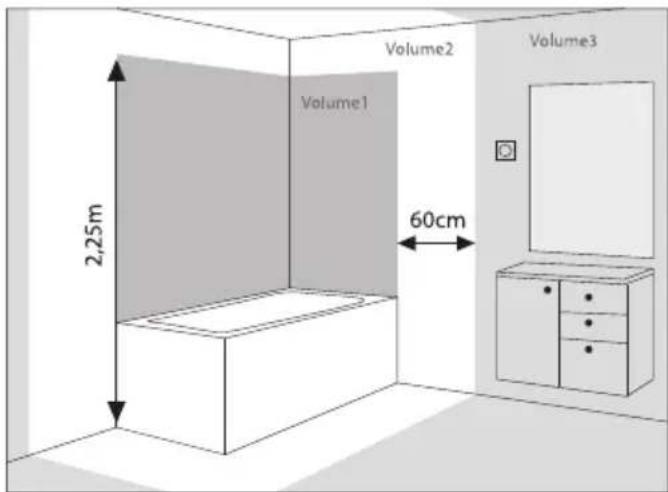
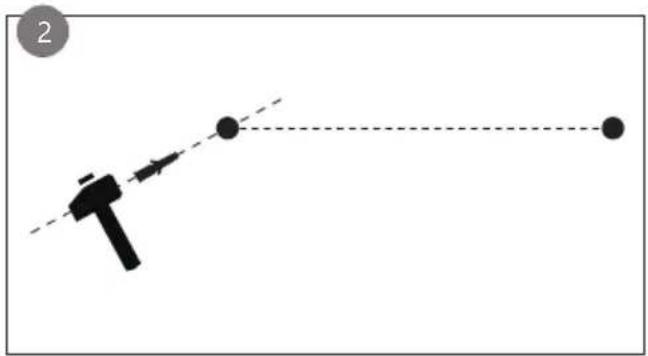
- This heater has IP rating 24 and may be wall-mounted from volume 2 or placed on the ground in volume 3 (placement with feet). See drawing 2. It must not be possible for a person in the bath or shower to touch the unit, the cord, or the control buttons.
Wall mounted
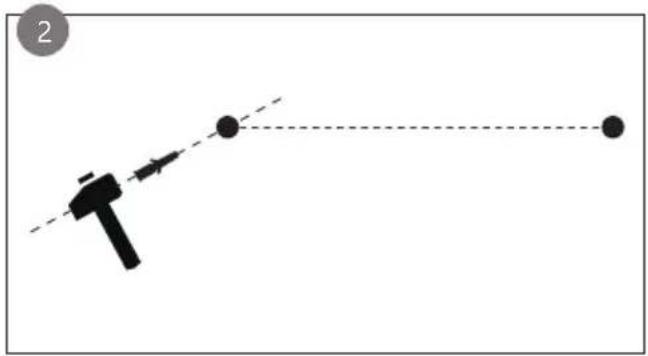
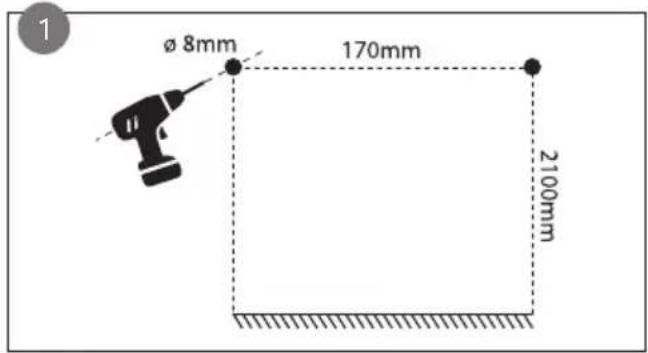
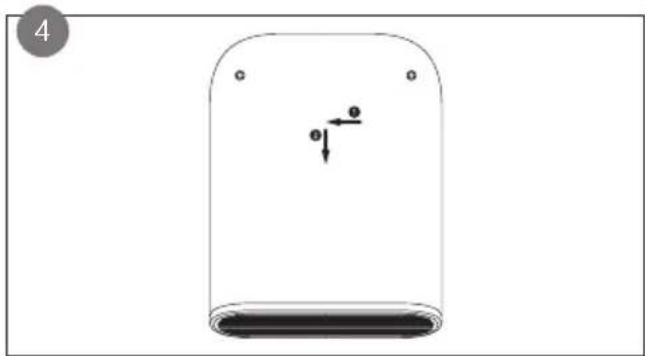
- Mark out two drill holes on the wall at a height of 210 cm from the floor and 17 cm apart (measured horizontally). Use an 8 mm drill bit to drill the marked holes.
- Insert the supplied dowels firmly into the drilled holes.
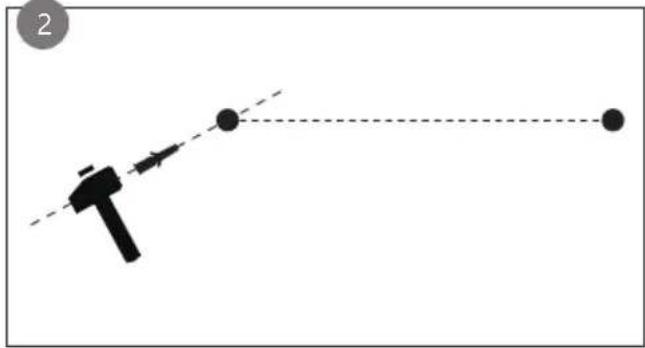
- Screw the screws provided into the plugs, but leave them protruding a few millimetres so that the appliance can be hung on them.
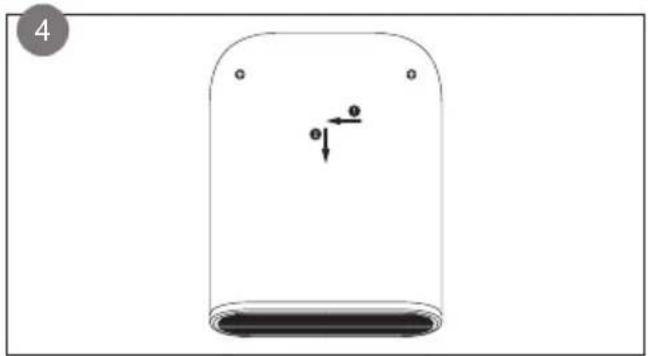
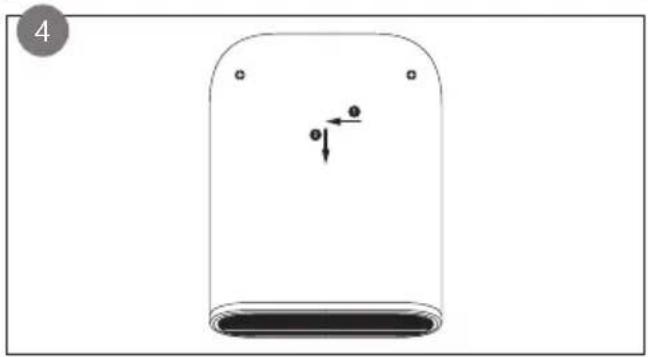
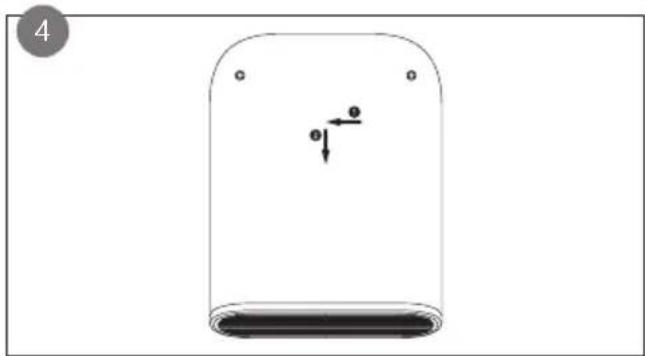
- Hang the appliance by sliding the suspension holes on the back over the screws. Then move the appliance to the left and down so that the screws fall properly into the slots. Make sure the
appliance rests with its feet fully against the wall. It is only in this position that the safety button is pressed and the appliance can operate correctly.
natural_image
Simple diagram showing a tool interacting with two dots and a dashed line, no text or symbols present

natural_image
Simple diagram of a cylindrical container with an arrow indicating direction, no text or symbols presentFree positioning with feet
The appliance can also be placed horizontally on a firm, dry, flat surface. When placed correctly, the safety button at the bottom will be pushed in and the appliance can operate correctly.
If the safety button is not pressed down sufficiently, the appliance will not operate. For this, the four feet must always rest completely against the wall (when suspended) or on a flat surface (when free-standing).
USE
- Plug in the appliance and turn on the power switch at the back of the device
- Press the power button on the control panel or the remote control to turn on the appliance.
- Press this button again when you switch off the appliance after use. The appliance will blow air for 60 seconds before turning itself off. The timer will count down on the display.
DAY AND TIME SETTINGS
First set day and time correctly when using the unit for the first time:
- Press and hold the timer button for 3 seconds. The display will show:
- Press + or - to set the correct day: 1=Monday, 2=Tuesday, ..., 7=Sunday.
- Press the timer button to confirm the day. The display will show:
- Select the correct hour by pressing + or -. You can also hold down the buttons to advance the setting faster.
- Press the timer button to confirm the hour. The display will show:
- Select the correct minutes by pressing + or -.
- Press the timer button to confirm the day and time settings.
The clock and calendar are reset to factory settings when the plug is unplugged.
When operated with a smartphone via Wi-Fi, it synchronises the day and time with the phone.
CHOOSING THE HEATING MODE
- Press the power button to turn on the device. The heating activates in comfort mode at the last selected temperature.
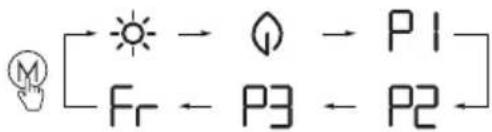
- Press the mode selection button to choose the desired heating mode. Cycle through the different heating modes by pressing the mode selection button:

Comfort mode
Continuous heating until the desired temperature is reached. Set the temperature with the + and - between 5°C and 35°C.

ECO mode
Continuous heating up to 4 degrees below the set comfort temperature. You can adjust the ECO temperature with + and - between 1^ and 31^ .

ECO temperature is always 4 degrees below comfort temperature. If you adjust the ECO temperature, the comfort temperature will be adjusted accordingly.

Anti-freeze mode
The desired temperature is set at 7^ C and is not adjustable.

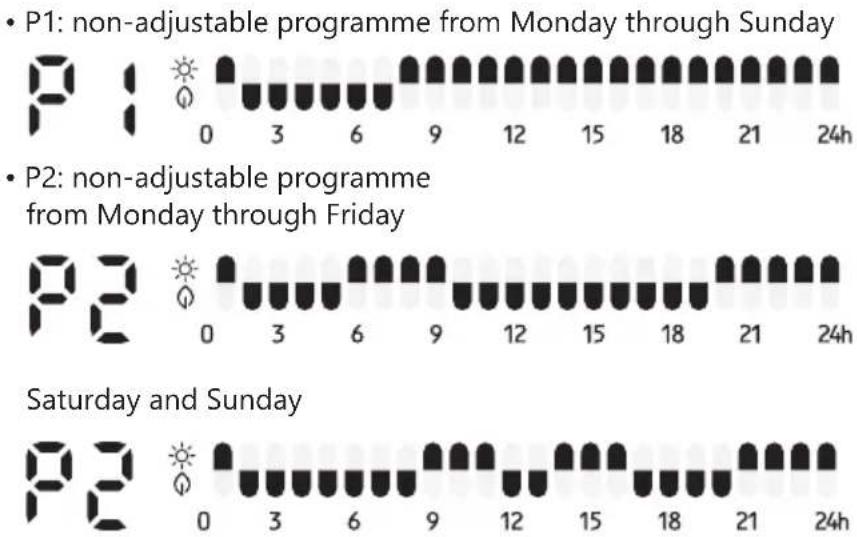
- Fixed programmes
The unit has 2 fixed settings:

Adjustable programme
In this mode, you can set the programming to your own liking:
- Press the mode selection button successively until P3 is displayed.
- Press and hold the mode selection button for 3 seconds until is displayed.
-
Press + or - to select a day (d1=Monday, d2=Tuesday, ..., d7=Sunday).
-
Press to confirm the day and proceed to the hour setting. The display will show .
- Press + and - to set the starting hour (from 00 to 23). Press successively to select anti-freeze mode (no indicator light is on), comfort mode or eco mode for this hour.
- Repeat from step 3 until you have completed the programme for each hour of the day. After setting hour 23, press + to return to day selection.
- Repeat the above steps to complete the programme for each hour of each day.

⚠ The factory settings of P3 are as follows: from Monday through Friday

Saturday and Sunday

⚠️ If the power supply was interrupted or the unit was unplugged, the clock and calendar will be reset and must be reconfigured before using the programmes.
POWER SETTING
Successively press the power setting button on the remote control or in the app to set the fan power:
• H0: the appliance only blows cold air
• H1: the appliance blows at half power
• H2: the appliance blows at full power
TIMER FUNCTION
With the timer function, you can have the unit stop heating automatically after a set time.
-
After selecting the heating mode, press the timer button . '0 h' appears on the display.
-
Press to set the timer between 0 and 8 hours, in increments of 0, 2, 4, or 8 hours. Or press + or - to set the timer between 0 and 9 hours, in 1-hour increments.
-
When the selected time has been expired, the appliance will enter the stand-by mode and will no longer emit heat.
OPEN WINDOW DETECTION
When enabled, the heater will stop working when the room temperature drops by 2 degrees within 2 minutes.
- Press and + simultaneously to enable the open window function. 'F0' appears on the display. After 3 seconds, the selected temperature is displayed.
- To deactivate the open window function, press and - simultaneously. 'FF appears on the display. After 3 seconds, the selected temperature is displayed.
CONTROL VIA WI-FI
This heater can also be controlled via Wi-Fi and the Tuya Smart App.
• Additional features are available in the app, such as a child lock and open window function.
- When operated with the app, the unit synchronises the day and time with the phone, which means they do not need to be set.
INSTALLATION
Scan the QR code to download the app and follow the on-screen instructions.
- Log in or create an account on the Tuya app.
- Press and hold the Wi-Fi connection button on the unit for 3 seconds. A beep will sound and the Wi-Fi indicator light will blink rapidly.
- Once the app is open and logged in, click the "+" at the top right of the screen and choose "Add Device". The app will now search for the device.
- Once the app has found the device, it will appear as "DOMO heater DO7357F" on your screen. Click on the device. The app will now ask for the password of the Wi-Fi network.
- Once the device is connected to Wi-Fi and added to the app, you can start using all its functionalities on the app.

Manual addition
If the app fails to automatically find the device, you can add it manually.
- Click the "+" at the top right of the screen and choose "Add Device".
- Go to "Manual entry" and select "Small household appliance" on the left and then "Heaters (Wi-Fi)" from the list.
- Select your 2.4GHz Wi-Fi network and enter the password.
- Follow the on-screen instructions.
- Once the device is connected to Wi-Fi and added to the app, you can start using all its functionalities on the app.
⚠️ Tuya is constantly developing and upgrading its apps to make them more user-friendly. Sometimes the steps described above may vary slightly due to upgrades. It is recommended to always follow the instructions in the app.
CONTROL IN APP
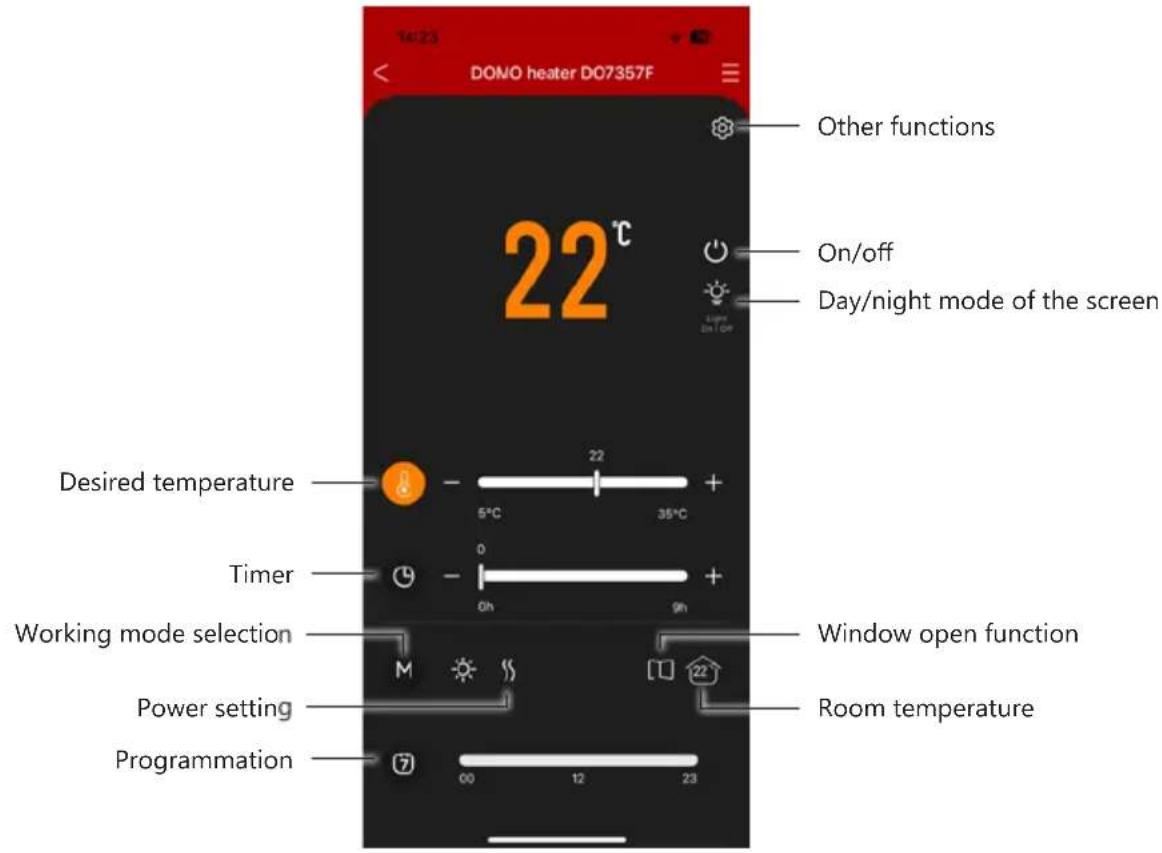
Other functions
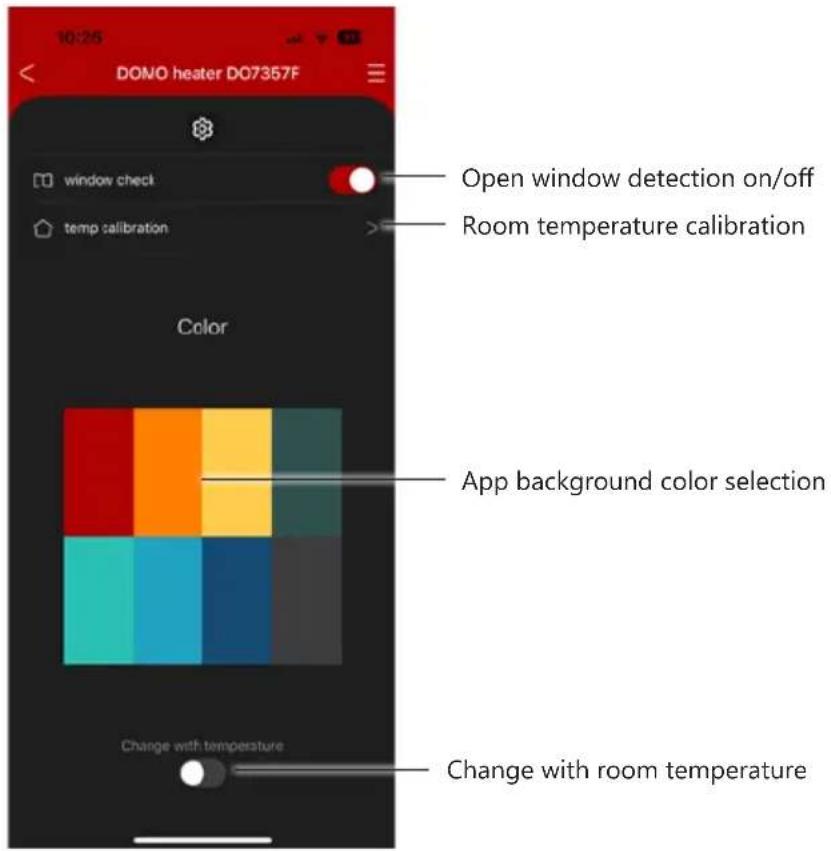
Open window detection
When enabled, the heater will stop working when the room temperature drops by 2 degrees within 2 minutes.
'F0' appears on the display when this function is enabled and 'FF' when this function is disabled. After 3 seconds, the selected temperature is displayed.
Calibrating the room temperature
Use this function to set the room temperature calibration to the correct room temperature if the reading is incorrect. Select room temperature calibration, adjust the temperature to the current room temperature and tick the box.
Background colour selection
Here you can choose the colour of the app background.
When enabling "Change with room temperature", the background colour of the app will change according to the room temperature change.

Tuya is constantly developing and upgrading its apps to make them more user-friendly. the screen shots may vary slightly due to upgrades.
CLEANING AND MAINTENANCE
- Before cleaning the appliance, ensure it is disconnected from the power supply and has cooled down completely.
- To avoid the risk of electric shock, do not clean the heater with water and do not immerse it. Clean the housing with a damp cloth.
- If necessary, dust particles accumulated in the air outlet openings may be removed with a vacuum cleaner. This maintenance should be done regularly to assure the good operation of the appliance. Dust particles in the appliance may cause overheating.
- Store the appliance in a clean and dry place.
Do not immerse unit, cord, or plug in water or other liquid.
⚠️Never use aggressive or abrasive cleaning agents.
PROBLEMS AND SOLUTIONS
| PROBLEMS SOLUTIONS | |
| The appliance does not turn on when you press the on/off button | Check that the plug is placed in a working socket and that the on/off switch at the back is on. |
| The appliance does not heat up.Is the room temperature higher than the set temperature?Was the right heating mode selected?The power setting is set to ‘H0’ so it only blows cold air.The device may have overheated. Let it cool down for at least 30 minutes by switching it off and try again. Check that the front grille is free of obstacles (such as curtains, clothes, etc.) that block the heat outlet. | |
| The appliance is not following the weekly schedule. | Check that the day and time are set correctly.Check that the correct programme is activated. |
SPECIFICATIONS
| Model designation(s): DO7357F | |
| Contact details Linea | 2000 BV - Dompel 9 - 2200 Herentals - Belgium |
| Article Symbol Value | Unit Article | Unit | |||
| Heat output Type of heat output/room | temperature control (select one) | ||||
| Nominal heat output P | nom 2,000 | kW | Single-stage | heat output and no room temperature control | [No] |
| Minimum heat output (indicative) | P min 1,000 | 0 kW | Two or more | manual stages, no room temperature control | [No] |
| Maximum continuous heat output | P max | 2,000 kW | With | mechanical thermostat room temperature control | [No] |
| Power consumption | With electronic temperature control | [No] | |||
| In off mode | P o | 0,00 | W | Electronic room temperature control plus day timer | [No] |
| In stand-by mode | P sm | N/A | W | Electronic room temperature control plus week timer | [Yes] |
| In idle mode | P idle | 0,70 | W | ||
| In network standby | P nsm | 0,71 | W | Other control options (multiple selections possible) | |
| Standby mode with display of information or status | [No] | Room temperature control with presence detection | [No] | ||
| Seasonal energy efficiency for space heating in active mode (portable) | η s,on | 95,0 | % | Room temperature control with open room detection | [Yes] |
| Seasonal energy efficiency for space heating in active mode (fixed) | η s,on | 94,0 | % | Distance control option | [Yes] |
| Adaptive start control | [No] | ||||
| Working time limitation | [Yes] | ||||
| Article Symbol Value Unit Article Unit | |||||
| Black bulb sensor [No] | |||||
| Self-learning functionality [No] | |||||
| Control accuracy [No] | |||||
DECLARATION OF CONFORMITY
This product complies with the EU requirements concerning radio interference. Linea 2000 BV hereby declares that this heater, product code DO7357F, complies with the provisions of EU Directive 2014/53/EU. The full text of the Declaration of Conformity for the EU is available on the DO7357F product page on the DOMO website: https://www.domo-elektro.be
GUIDELINES
natural_image
Symbol of a trash bin crossed out by two crossed lines, with a blank rectangular base below (no text or labels)This symbol on the product or on its packaging indicates that this product may not be treated as household waste. Instead it must be brought to the applicable collection point for recycling of electrical and electronic equipment. By ensuring this product is disposed of correctly, you will help prevent potential negative consequences for the environment and human health, which could otherwise be caused by inappropriate waste handling of this product. For more detailed information about recycling of this product, please contact your local city office, your household waste disposal service or the shop where you purchased the product.
The packaging is recyclable. Please treat the packaging ecologically.
REMOVABLE BATTERY
The appliance is battery-operated, and the battery must not be disposed of with household waste, even after use. You can take the appliance to a collection point for discarded electrical appliances (Recupel) in your neighbourhood (container park, specialist shop, etc.). Batteries contain substances that are dangerous to human health and to the environment.
Remove the battery from the appliance before disposal as described in this manual. Recycle the battery in accordance with local laws and regulations. Never pierce the battery or expose it to high temperatures; this may cause the battery to explode.
This appliance conforms to all European requirements in the areas of safety, health, and environmental protection.
The EU declaration concerning this appliance can be requested at any time from info@linea2000.be
GARANTIA
Estimado cliente,
natural_image
Simple diagram showing a tool interacting with two dots and a dashed line, no text or symbols present
natural_image
Simple diagram of a cylindrical container with a downward arrow and small circular markers, no text or symbols present.natural_image
Symbol of a trash bin with crossed lines indicating no waste, and a solid black rectangle below (no text or labels)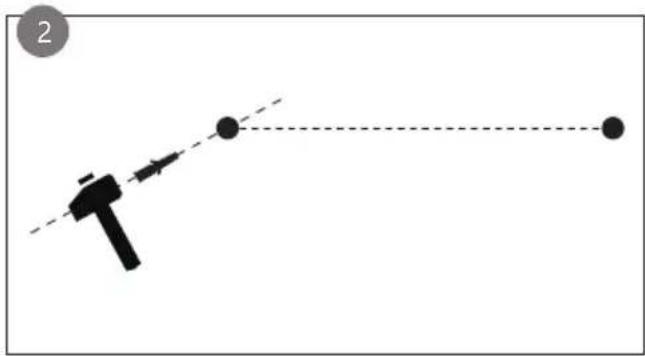
natural_image
Simple diagram showing a tool interacting with two dots and a dashed line, no text or symbols present

natural_image
Simple diagram of a cylindrical container with a downward arrow and small circular markers, no text or symbols present.
Modalità Comfort
Aggiunta manuale
natural_image
Symbol of a trash bin with crossed lines indicating no waste or discharge, and a solid black rectangle below (no text or labels)
natural_image
Simple diagram showing a tool interacting with two dots and a dashed line, no text or symbols present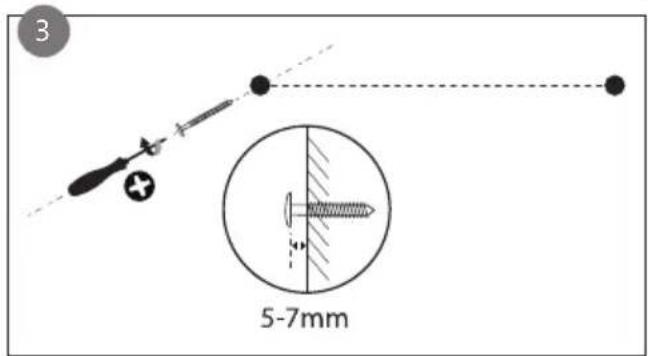
natural_image
Simple diagram of a cylindrical container with internal arrows indicating movement or force (no text or symbols)
Komfortní režim
Ruční přidání
natural_image
Symbol of a trash bin with crossed lines indicating no waste or discharge, and a solid black rectangle below (no text or labels)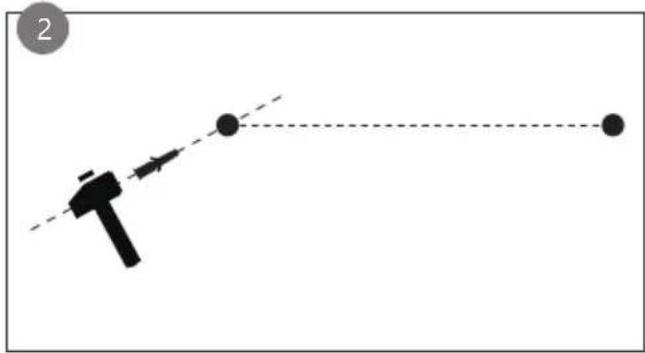
natural_image
Simple diagram showing a tool interacting with two dots and a dashed line, no text or symbols present
natural_image
Simple diagram of a cylindrical container with an arrow indicating direction, no text or symbols presentNASTAVENIE DŇA A ČASU

Komfortný režim
Ručné pridanie
natural_image
Symbol of a trash bin with crossed lines indicating no waste or discharge (no text or labels)Looking for extra accessories or you have a broken piece?
ORDER the original DOMO accessories and parts on our webshop.

Webshop


natural_image
Stack of sheets of paper with a circular inset showing a small object, no visible text or symbols
natural_image
Two white plastic electrical connectors with mounting holes (no text or symbols visible)
natural_image
White rectangular container with a black lid, resembling a small kitchen or pestle (no text or symbols visible)
natural_image
Clear glass coffee maker with black handle and lid (no text or symbols visible)


- Mode Confort
- Ajout manuel
- DÉCLARATION DE CONFORMITÉ
- Komfortmodus
- SAFETY INSTRUCTIONS
- ▲ELECTRICAL WARNINGS
- ⚠️INSTALLATION
- ⚠ USE
- ⚠ CLEANING AND MAINTENANCE
- ⚠️PRODUCTSPECIFIC WARNINGS
- SAVE THESE INSTRUCTIONS FOR FUTURE REFERENCE
- PARTS
- CONTROL PANEL
- Indicator lights:
- REMOTE CONTROL
- BEFORE THE FIRST USE
- ASSEMBLY
- Wall mounted
- Free positioning with feet
- USE
- DAY AND TIME SETTINGS
- CHOOSING THE HEATING MODE
- Comfort mode
- ECO mode
- Anti-freeze mode
- - Fixed programmes
- Adjustable programme
- POWER SETTING
- TIMER FUNCTION
- OPEN WINDOW DETECTION
- CONTROL VIA WI-FI
- INSTALLATION
- Manual addition
- Calibrating the room temperature
- Background colour selection
- CLEANING AND MAINTENANCE
- DECLARATION OF CONFORMITY
- GUIDELINES
- REMOVABLE BATTERY
- GARANTIA
- Modalità Comfort
- Aggiunta manuale
- Komfortní režim
- Ruční přidání
- NASTAVENIE DŇA A ČASU
- Komfortný režim
- Ručné pridanie
Brand : DOMO
Model : DO7357F
Category : Heating