
CHOICE Icona - Food Processor BLANCO - Free user manual and instructions
Find the device manual for free CHOICE Icona BLANCO in PDF.
| Product type | Water filtration and dispensing system (tap + unit) |
| Brand | BLANCO |
| Model | CHOICE Icona (tap) / CHOICE. All (unit) |
| Unit dimensions (W x D x H) | 495/530 x 200 x 440 mm |
| Unit weight (empty) | approx. 27.5 kg |
| Transport weight (unit) | approx. 32.5 kg |
| Transport weight (tap) | approx. 3.3 kg |
| Power supply | 220-240 V AC / 50 Hz, internal fuse 10 A, max. current 8.8 A, max. power 1780 W |
| Power consumption (heating / cooling) | 1750 W / 140 W |
| Main functions | Tap water (cold/hot), still water, medium sparkling, sparkling, hot water (65-100 °C adjustable), cold water (6-10 °C adjustable, LOW mode) |
| Cooled/carbonated water tank capacity | approx. 0.55-0.75 L |
| Hot water tank capacity | approx. 3 L |
| Flow rate (still/sparkling) | approx. 1.7 L/min |
| Flow rate (hot water) | approx. 2.0 L/min |
| Water inlet pressure | 1-10 bar |
| Operating ambient temperature | 16-43 °C |
| Water inlet temperature | 5-30 °C |
| Refrigerant | R600a (isobutane), approx. 45 g |
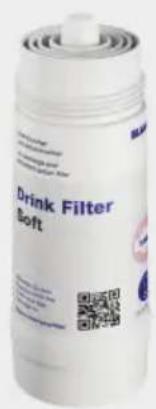
| Filter type | BLANCO filter cartridge (replace every 6 months or based on capacity) |
| CO₂ bottle | Original BLANCO, 425 g |
| Protection rating (unit) | IP21 |
| Safety | Pump safety shut-off (5 min), heating safety shut-off (20 min), safety group, shut-off valve, burn protection |
| Maintenance and cleaning | Automatic cleaning with EasyCare tablet (included), external cleaning with damp cloth |
| Supplied accessories | EasyCare adapter, EasyCare tablet, filter, CO₂ bottle (not specified if included) |
| Connectivity | BLANCO UNIT app (iOS/Android) for settings, control, error messages |
| After-sales service | BLANCO GmbH + Co KG, phone: +49 7045 44-81419, email: service@blanco.com |
Frequently Asked Questions - CHOICE Icona BLANCO
User questions about CHOICE Icona BLANCO
0 question about this device. Answer the ones you know or ask your own.
Ask a new question about this device
Download the instructions for your Food Processor in PDF format for free! Find your manual CHOICE Icona - BLANCO and take your electronic device back in hand. On this page are published all the documents necessary for the use of your device. CHOICE Icona by BLANCO.
USER MANUAL CHOICE Icona BLANCO
English User manual 35
ca. 2,0 Liter/Minute
Safety instructions 38
BLANCO CHOICE Icona - BLANCO CHOICE.All 40
Overview 40
Water conditioning unit BLANCO CHOICE.All 41
Mixer tap BLANCO CHOICE Icona 42
Adjustment wheel for water types 43
Operation 44
Cold & warm tap water 44
Processed water 45
LED ring 47
Water conditioning unit - Menu display 48
Temperature settings Temp C and Temp H 49
Changing CO_2 cylinders 50
Cleaning & fiter-changing 52
Calibration 56
Accessories 57
Technical specifications 58
Troubleshooting 59
System and surface cleaning 64
64
Disposal / Environment 65
Compliance 65
Customer Service
We hope you enjoy using our system.
Our user manual is designed in such a way that you should not have any problems handling the BLANCO CHOICE. All system and the BLANCO CHOICE Icona mixer tap.
If you should have any questions, simply get in touch with our BLANCO Customer Service.
BLANCO GmbH + Co KG
BLANCO Aftersales
+44 1923 635 200
aftersales@blanco.co.uk
www.blanco.com
For Germany: +49 7045 44-81 419
For Austria: +43 1 2782823
You can also send us a message. You are welcome to use the contact form on our website to write to us: www.blanco.com
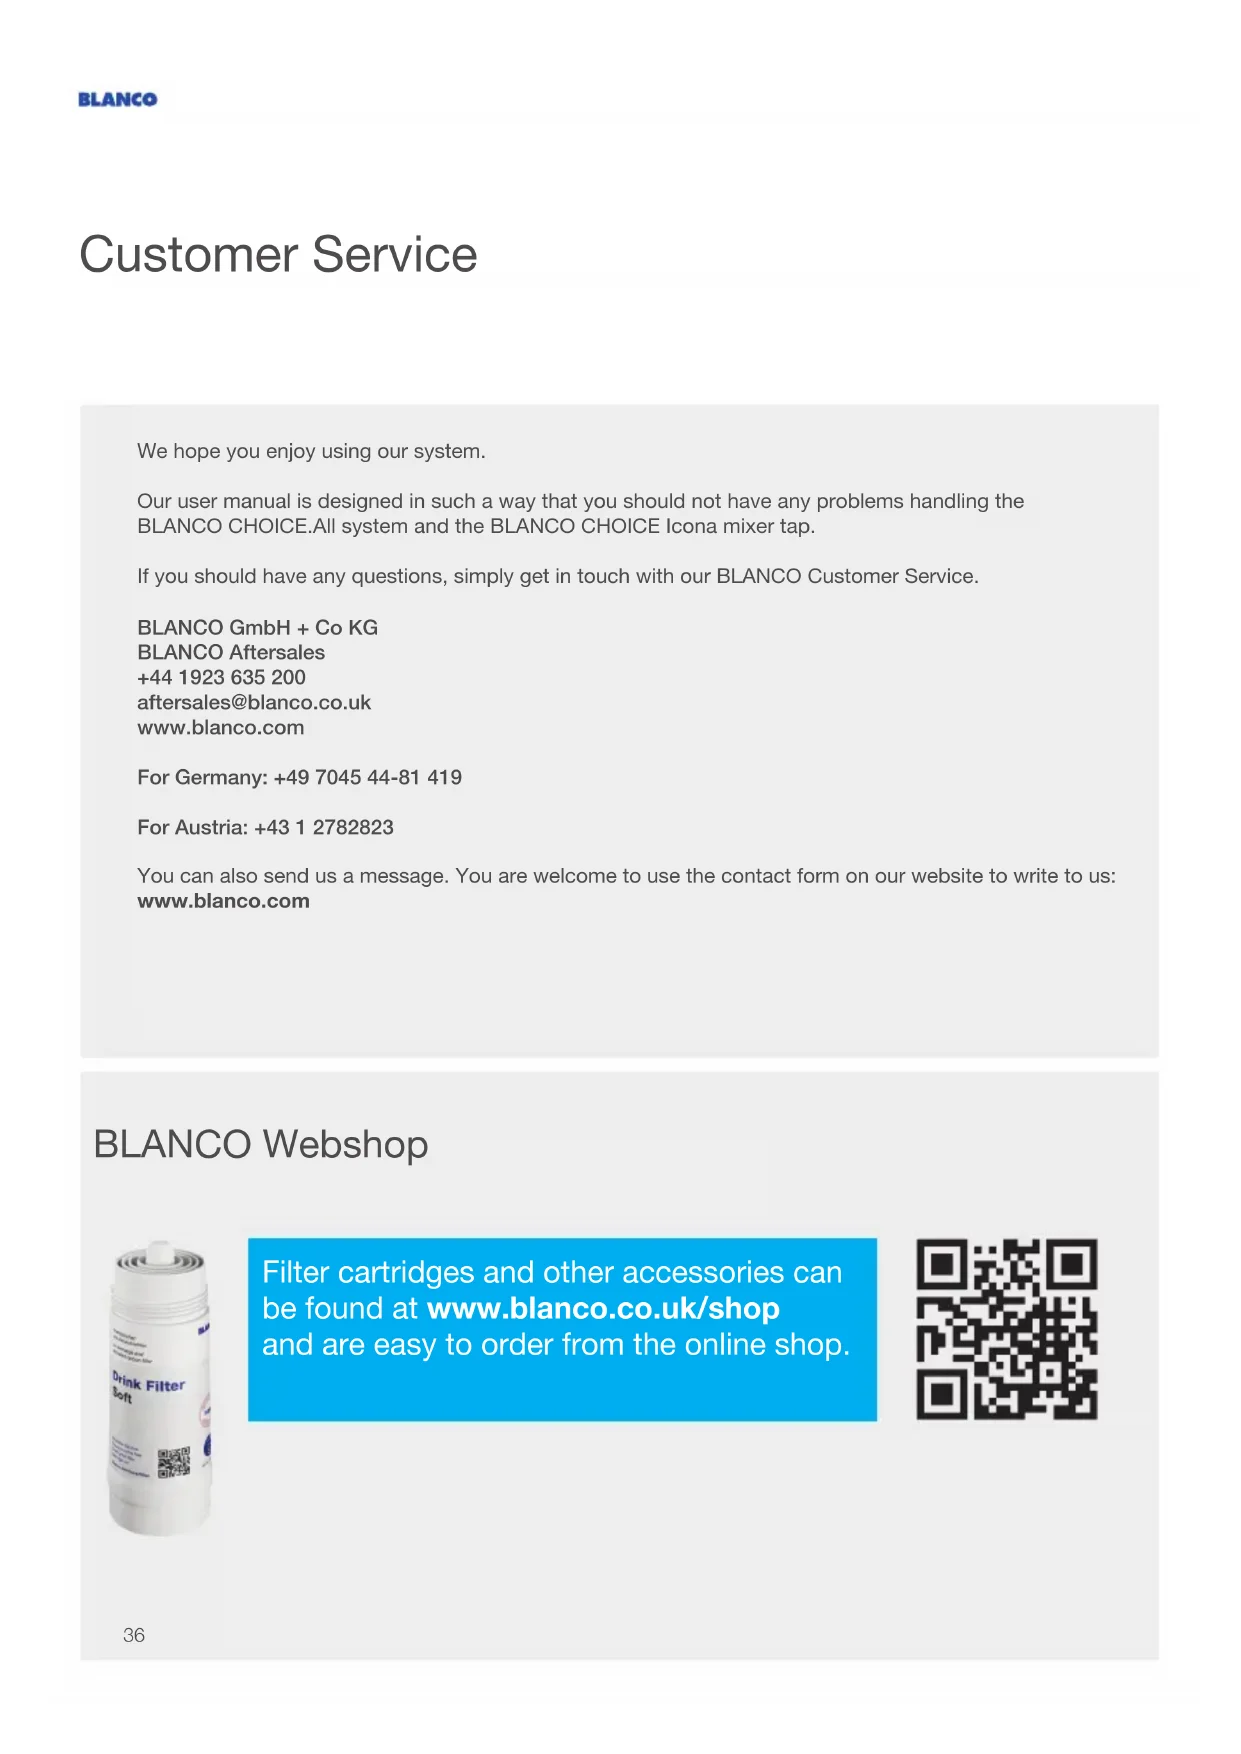
BLANCO Webshop
Filter cartridges and other accessories can be found at www.blanco.co.uk/shop and are easy to order from the online shop.

Introduction
Dear User,
Thank you for deciding to purchase the BLANCO CHOICE Icona mixer tap with the BLANCO CHOICE. All water conditioning unit. This latest generation system filters and cools tap water and can carbonate it when required, thus providing you with appetizing sparkling water. The system also produces boiling water at the required temperature, which you can also conveniently dispense from the mixer tap. Conventional tap water and processed water types (still/medium/sparkling and hot) are supplied from two different dispensing points, separate from one another in the mixer tap.
The system has been designed for use in domestic households, typically in a kitchen environment. However, it can also be used in public places, such as an office. Such cases have additional requirements regarding cleaning and maintenance, which the owner is responsible for. Any other usage, especially beyond its intended use, is considered misuse. BLANCO accepts no liability for any damages caused by misuse.
This user manual describes the system and explains all its functions to you. Read through the user manual and, in particular, the safety instructions carefully and keep these instructions together with your system. The images and descriptions will help you understand your system. Your system may differ from the images in some respects.
The system is designed for Germany, Austria and the United Kingdom. Use in other countries is at your own risk and requires a check of the legal and structural specifications at the place of use.
You will find the setup instructions and installation conditions in the separate assembly instructions booklet. Contact BLANCO Customer Service (see page 36) if you wish to install the system in a different place or no longer have the assembly instructions. Before transporting the system, ensure that the CO_2 cylinder has been removed and the system has been emptied completely. When the system is disconnected, it may still contain hot water inside the system or hoses, which may leak out and cause scalding or eye injuries. Always have a professional carry out such work!
Instructions before you use the system for the first time:
Please note that the system needs time to cool the entire system down after installation. The system will take 1 to 2 days to achieve the required cooling and sparkling performance.
After installation the air in the system gradually work its way out over the first few days. As a result, the spray pattern of sparkling water and hot water may not yet achieve the shape and behaviour desired during this time. However, it will correct itself over the first few days. Be aware that there is a higher risk of splashing from the water jet on the first day and during initial usage, especially with hot water. We recommend opening the tap and simply letting the water run the first few times until the spray pattern has settled.
The sparkling water provided by this system is very fine-beaded and offers a different taste compared to usual types of sparkling water with full sparkling content. If the sparkling content is considered too low, you should first lower the temperature in the cooling unit as cooled water can absorb more CO_2 at a reduced temperature.
Safety Instructions

Children aged 8 or over and people with reduced physical, sensory or mental capabilities or lacking in experience and knowledge may only use the system under supervision or if they undergo a suitable briefing on safe usage and they are aware of the associated risks and hazards. Children must not play with the system. Children are not permitted to clean or maintain the system unsupervised.
The system is designed to operate beneath a sink within a closed room, usually a kitchen. It may only be connected to a water connection with a constant drinking water quality as per local regulations and with a constant flow pressure between 1 and 10 bar at a water temperature between 5^ and 30^ . The ambient temperature and the temperature in the base cabinet must be between 16^ and 43^ . Avoid direct sunlight. Ensure that the system is installed in a frost-proof place. The components can become damaged if they are frozen.
Only BLANCO or BLANCO-trained professionals are authorised to make changes inside or on the water conditioning unit or to the whole system. Only trained, qualified personnel may open the water conditioning unit. Warning: live parts within the water conditioning unit!
The water conditioning unit requires constant air exchange to prevent the installation site from heating up due to warm exhaust air. A ventilation grate or cooling slits of a suitable size must be fitted if necessary.
Cables and hoses must be laid in such a way that they cannot be damaged. If the cabling, a plug or a hose are damaged, they must be replaced by a professional. The entire mixer tap must be replaced if the signal cable to the tap is damaged.
Inspect the hose supply lines to the mixer tap, the safety assembly module and the water conditioning unit once a year. A leak here will cause immediate water damage. Contact BLANCO Customer Service if necessary.
As a general rule, it is recommended to boil drinking water for babies or immunodeficient persons. If a filter with decalcification is used, sodium is added to the water in the filter and can cause problems for babies and people sensitive to sodium. Contact a doctor or BLANCO Customer Service if necessary.
The water conditioning unit's cooling circuit contains the CFC-free refrigerant isobutane (R600a). This is a natural gas without any harmful effects on the environment. However, it is flammable and may be released if the cooling circuit is damaged. Make sure that no parts of the cooling circuit are damaged. If the cooling circuit does become damaged, avoid open fire and ignition sources and ensure good ventilation.

Only original BLANCO CO2 cylinders with a standard capacity of 425g may be used in the system. When screwing the cylinder into place, always ensure that it is air-tight when inserted. Tighten a little more after inserting to ensure the cylinder is properly fitted. When you screw it in to place, there may be a slight hissing sound and small amounts of CO2 may leak out. This is not a problem.
Safety Instructions
The cylinders are pressurised. Protect the cylinders from direct sunlight, sources of heat and overheating. Store CO_2 cylinders in an environment where they won't be exposed to heat. Rooms where the system is installed must be at least 5m^2 in size. If the room is less than 2m high, it needs to have a greater area.
WARNING: inhaling CO2 poses a threat to life! Do not make any modifications to the installation or CO2 cylinders. If CO2 should leak into a room, ventilate the room and leave it to air for some time. However, the total amount within the installation is not sufficient to produce life-threatening concentrations in the air if it leaks out. Do not operate the system for an extended period with an empty CO2 cylinder or without a cylinder inserted as this can cause water damage. The CO_2 cylinder must be removed if you need to transport the system.
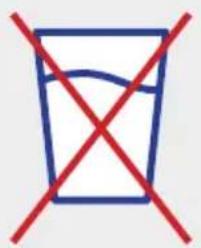
Do not use osmosis water or highly filtered water in the system. This can cause problems with the fill level control.
The spray head holder contains a strong magnet. Patients with a pacemaker should keep a distance of at least 25~cm .
Take country-specific installation and operation requirements into account.
WARNING - hot water:
CAUTION - burns/scalding
The hot water that comes out of the tap can be very hot, depending on the setting, and can cause burns.
The tube connection on the water conditioning unit rear, the mixer tap lower parts and the red connection tube to the mixer tap can be very hot. Ensure that these are securely installed and inaccessible at all times.
Do not touch the outlet for hot water on the lower surface of the rotary arm and do not touch this dispensing outlet to turn the arm either. It can be very hot or water which is still very hot can drip out. The surface of the rotary arm can also become uncomfortably hot when hot water has been dispensed continuously.
Sink surfaces may become discoloured if boiling water is allowed to splash constantly onto the same spot in composite kitchen sinks.
Check that the safety assembly module works properly on a regular basis. To do so, turn the knob on the safety assembly module in the direction indicated and let water run into the drip cup. Check whether the expansion water drips into the drip cup while the boiler is heating up. Prevent your drainage line from clogging since water will leak from the safety assembly in the event of a blockage. It is advisable to inspect and clean it regularly.
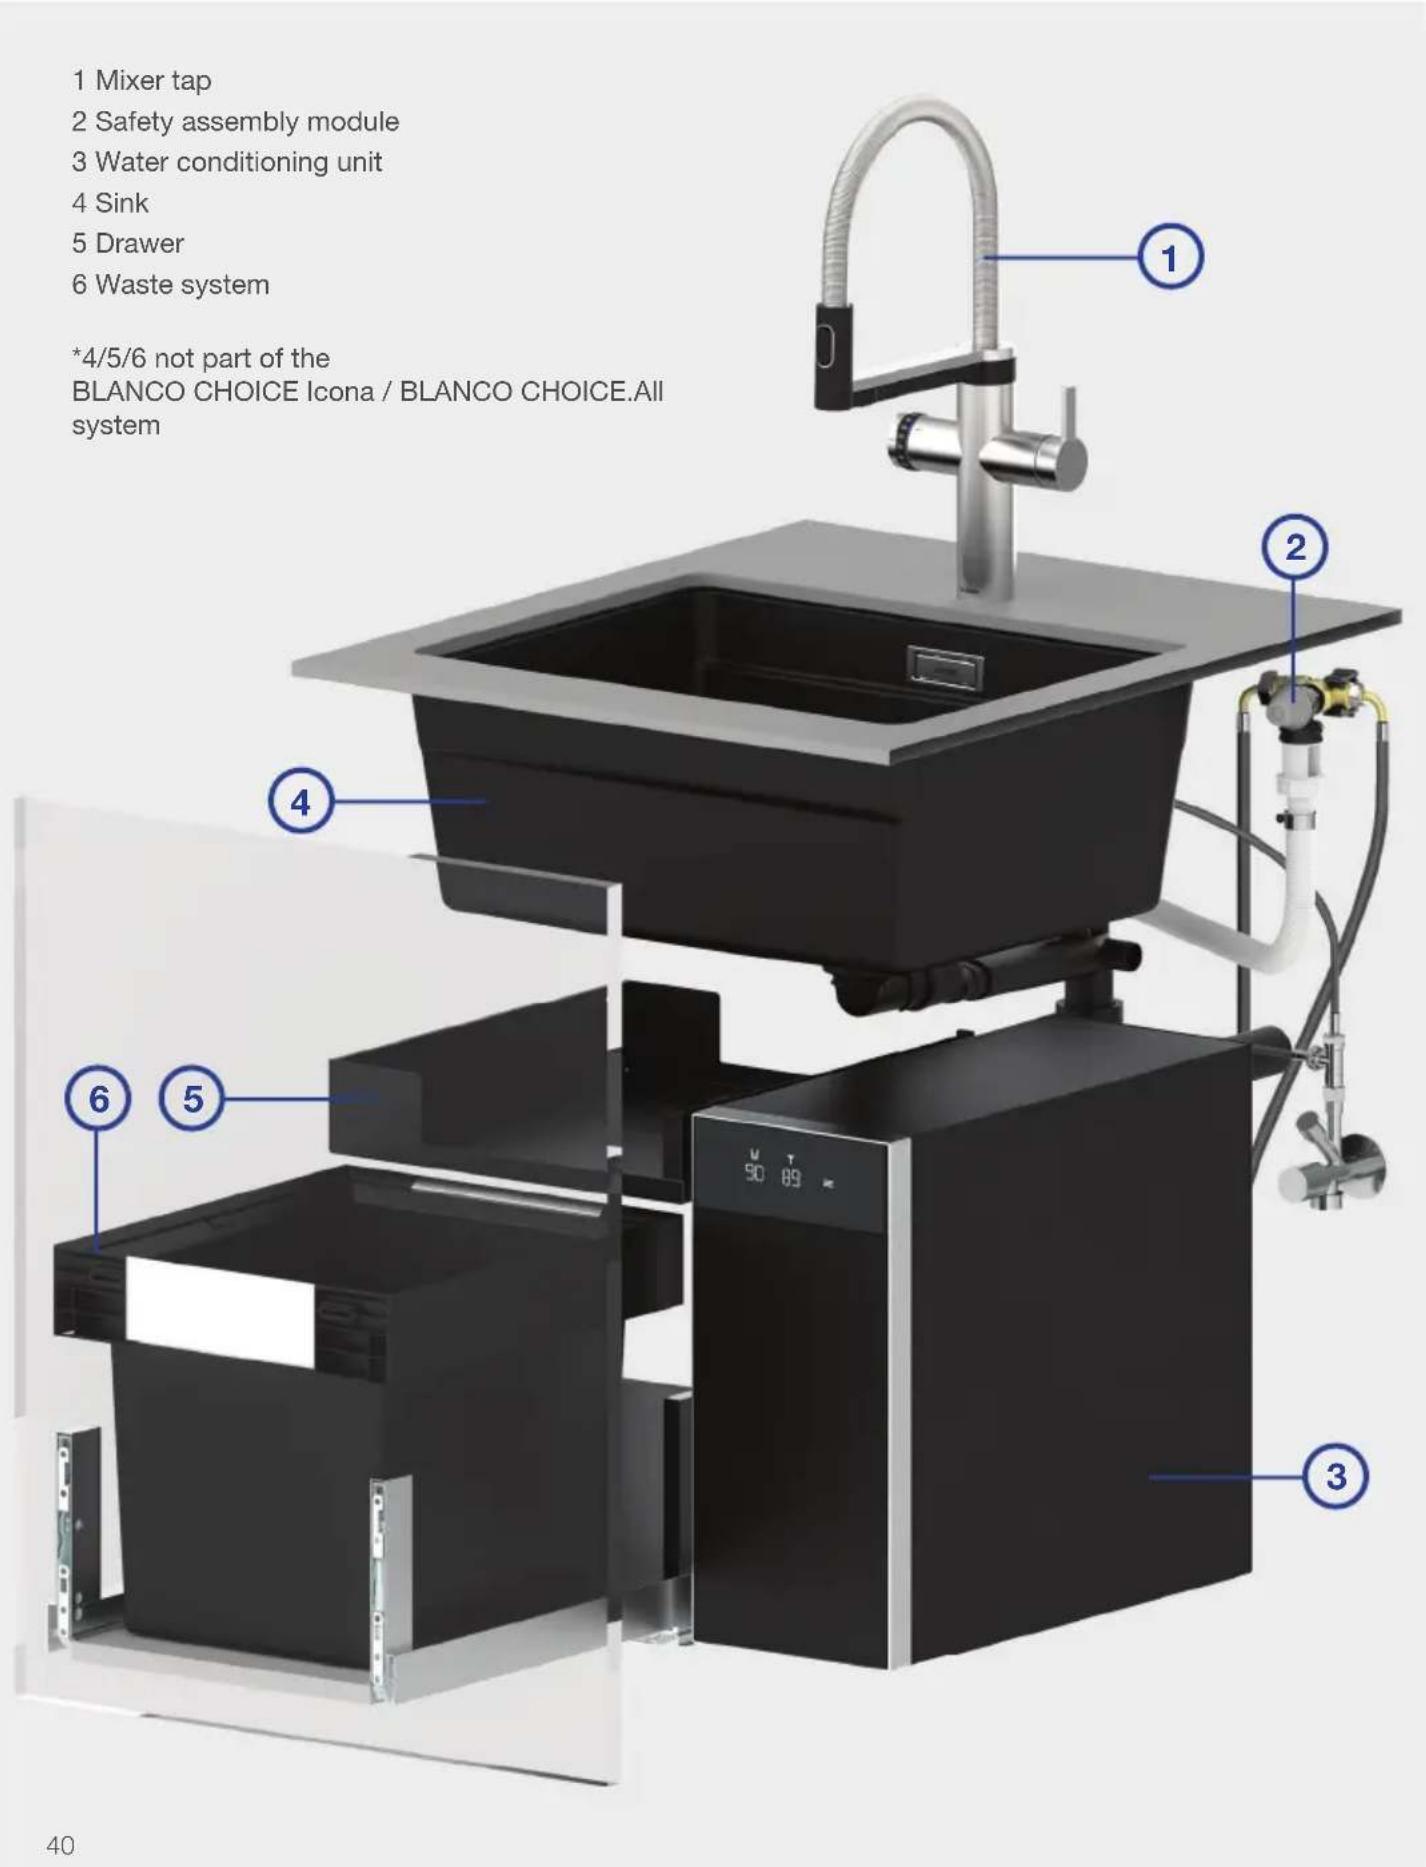
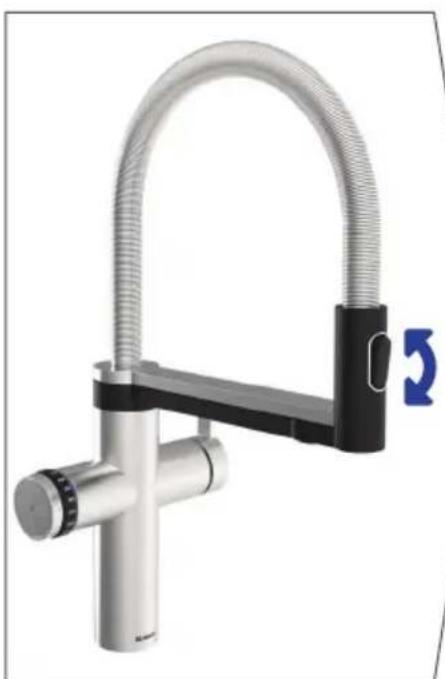
Overview
1 Mixer tap
2 Safety assembly module
3 Water conditioning unit
4 Sink
5Drawer
6 Waste system
*4/5/6 not part of the
BLANCO CHOICE Icona / BLANCO CHOICE.All system
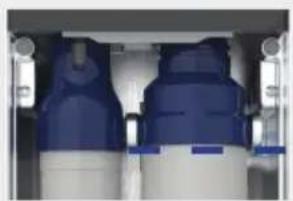
Water conditioning unit
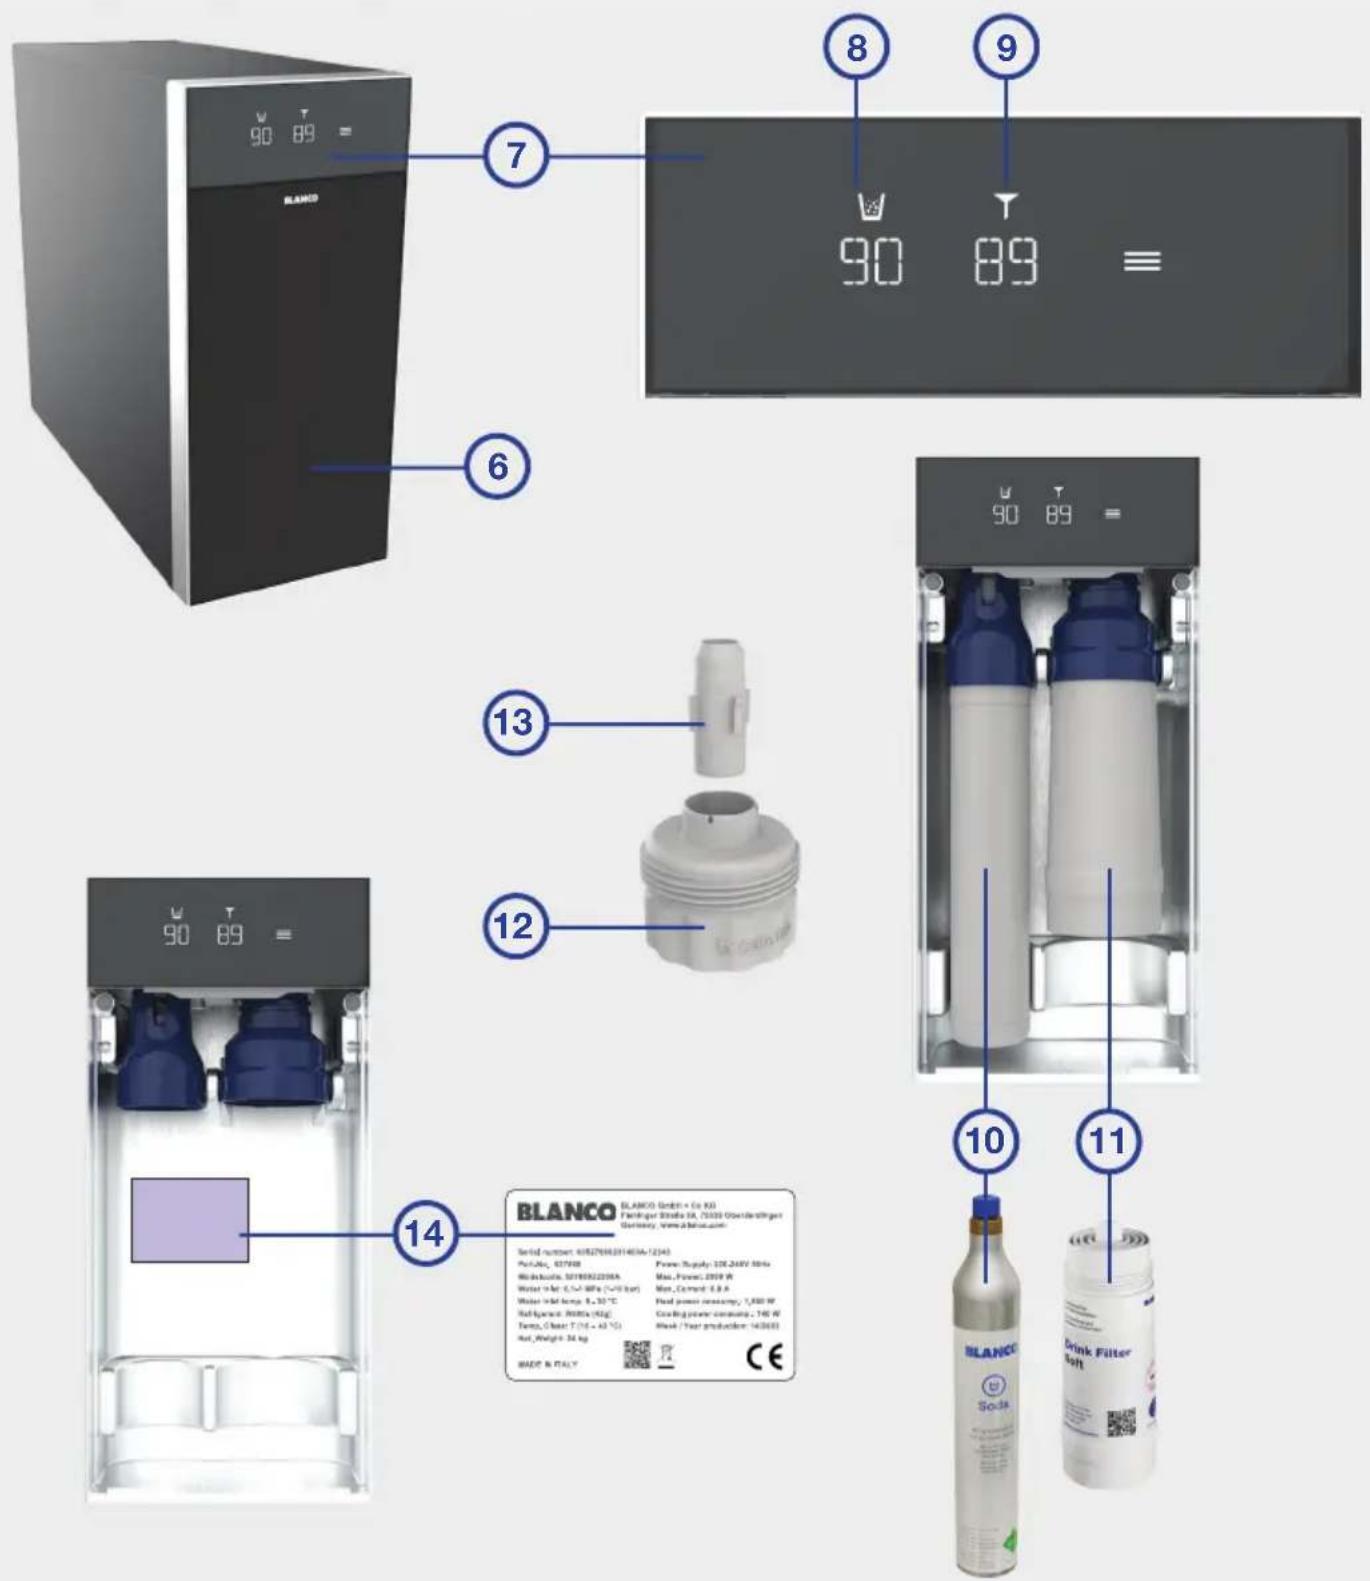
6 Front flap
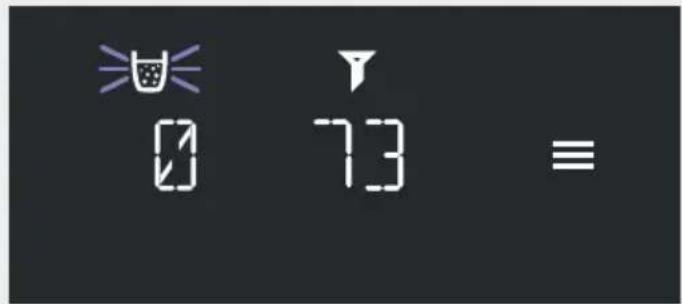
7 Display
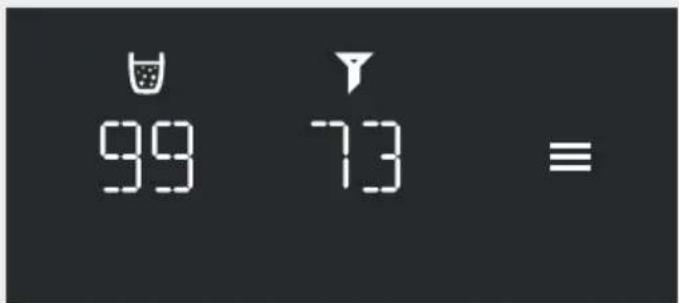
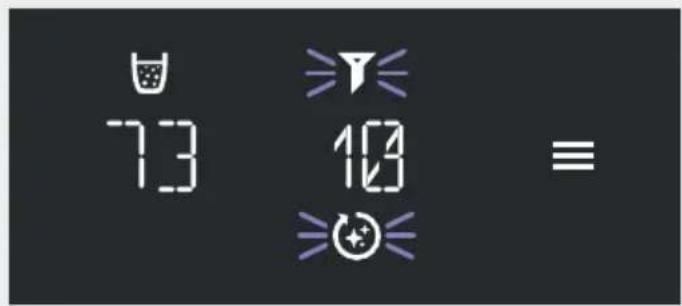
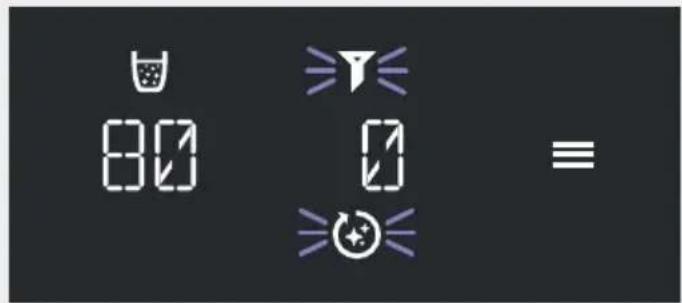
8 Remaining time for CO 2
9 Remaining time for filter & cleaning (%)
10 CO_2 -cylinder
11 Filter
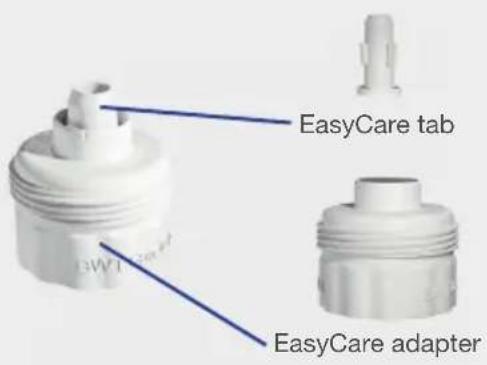
12 EasyCare adapter
13 EasyCare tab with integrated cleaning tablet
14 Rating plate
Mixer tap
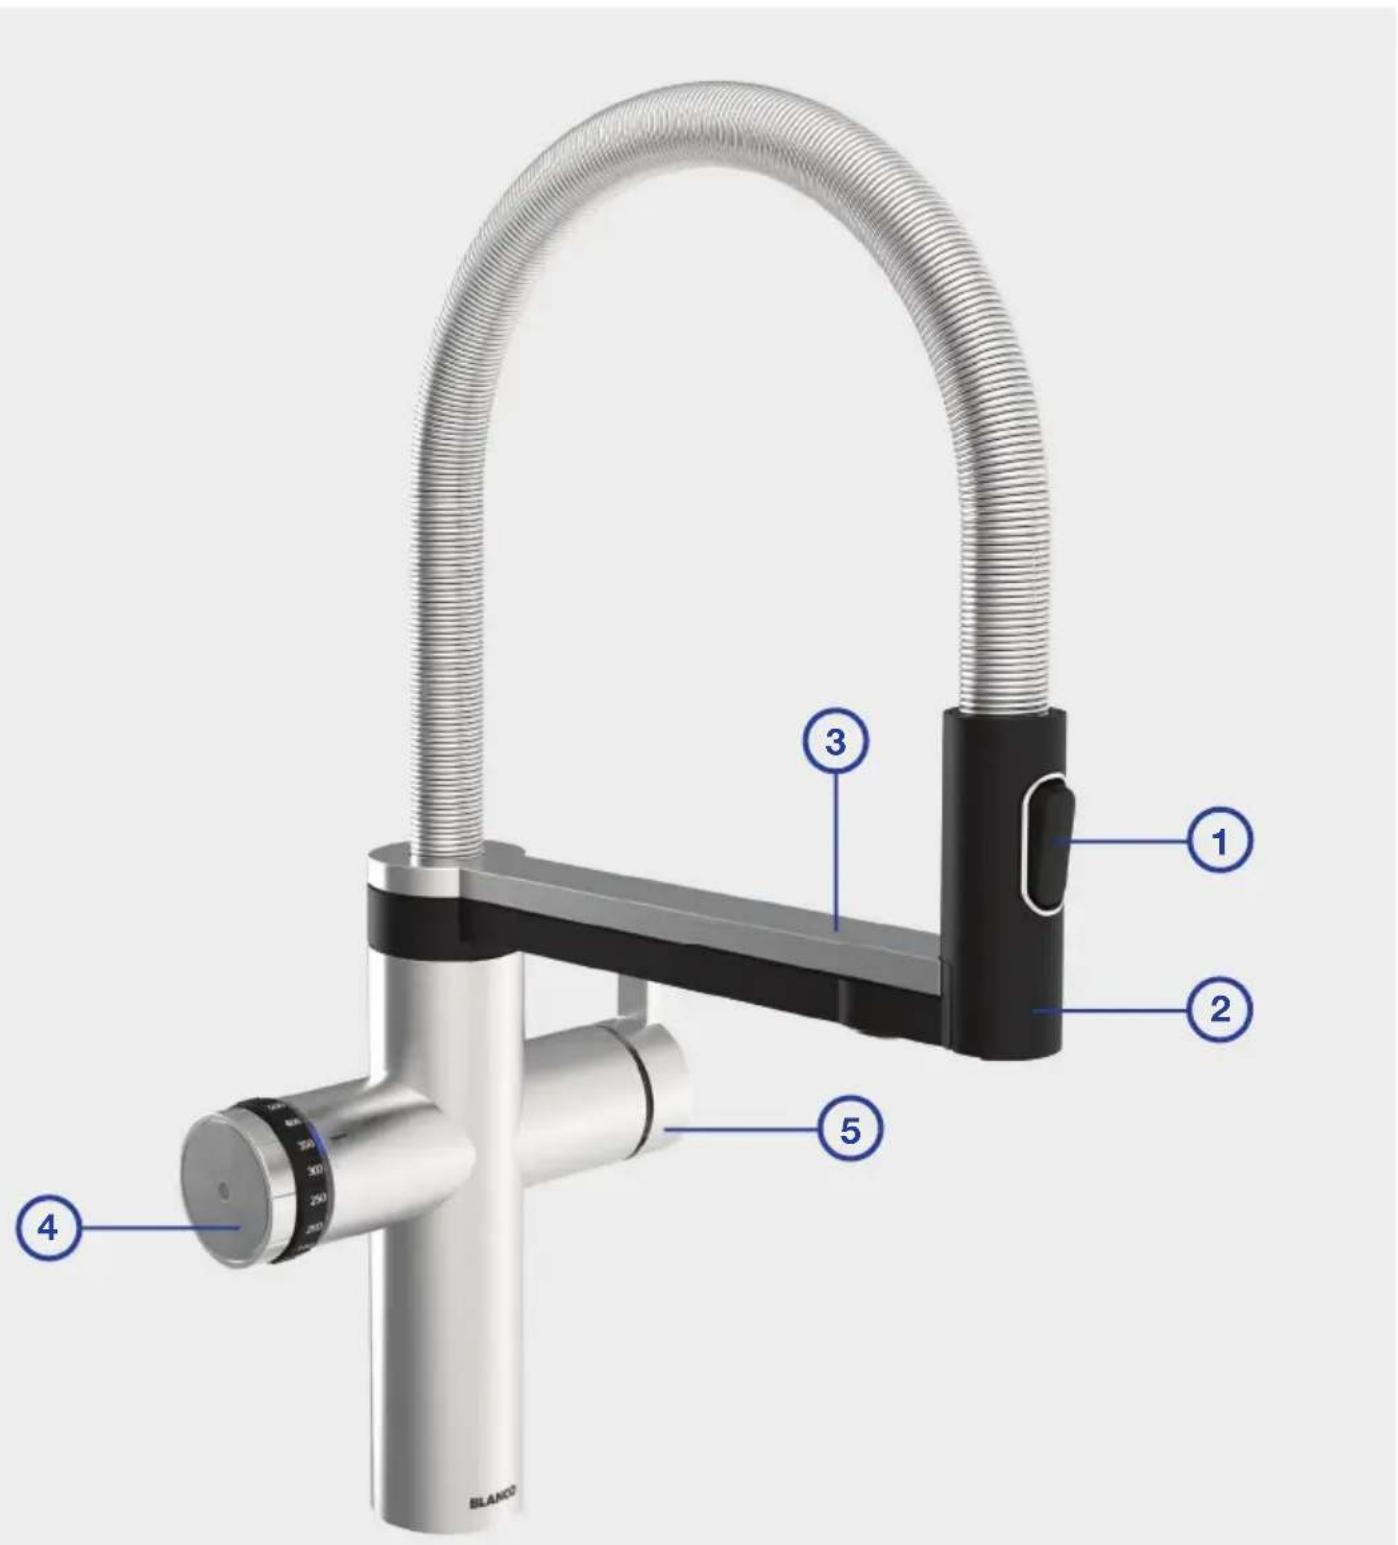
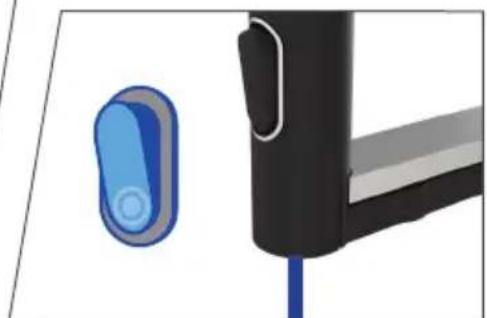
1 Switch button to change jet types (tap water)
2 Movable spray head with tap water outlet
3 Rotary arm
4 Control device for the processed water types
5 Operating lever for cold and warm tap water
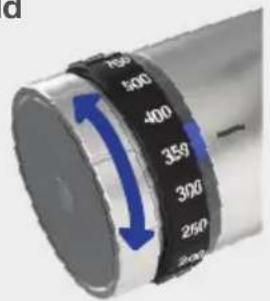
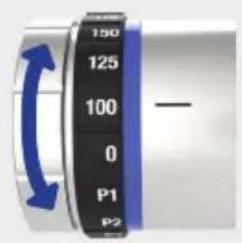
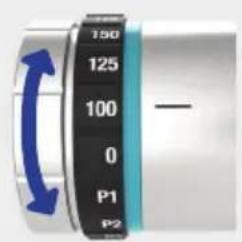
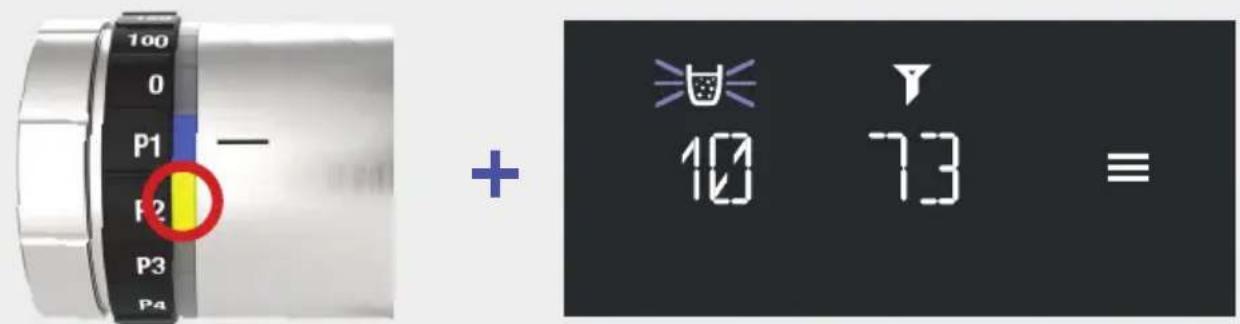
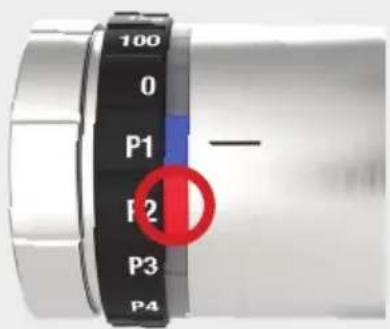
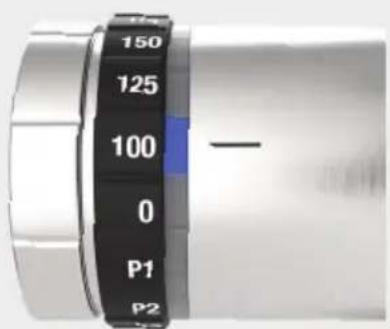
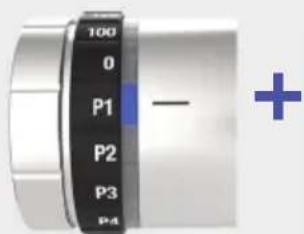
Adjustment wheel for water types
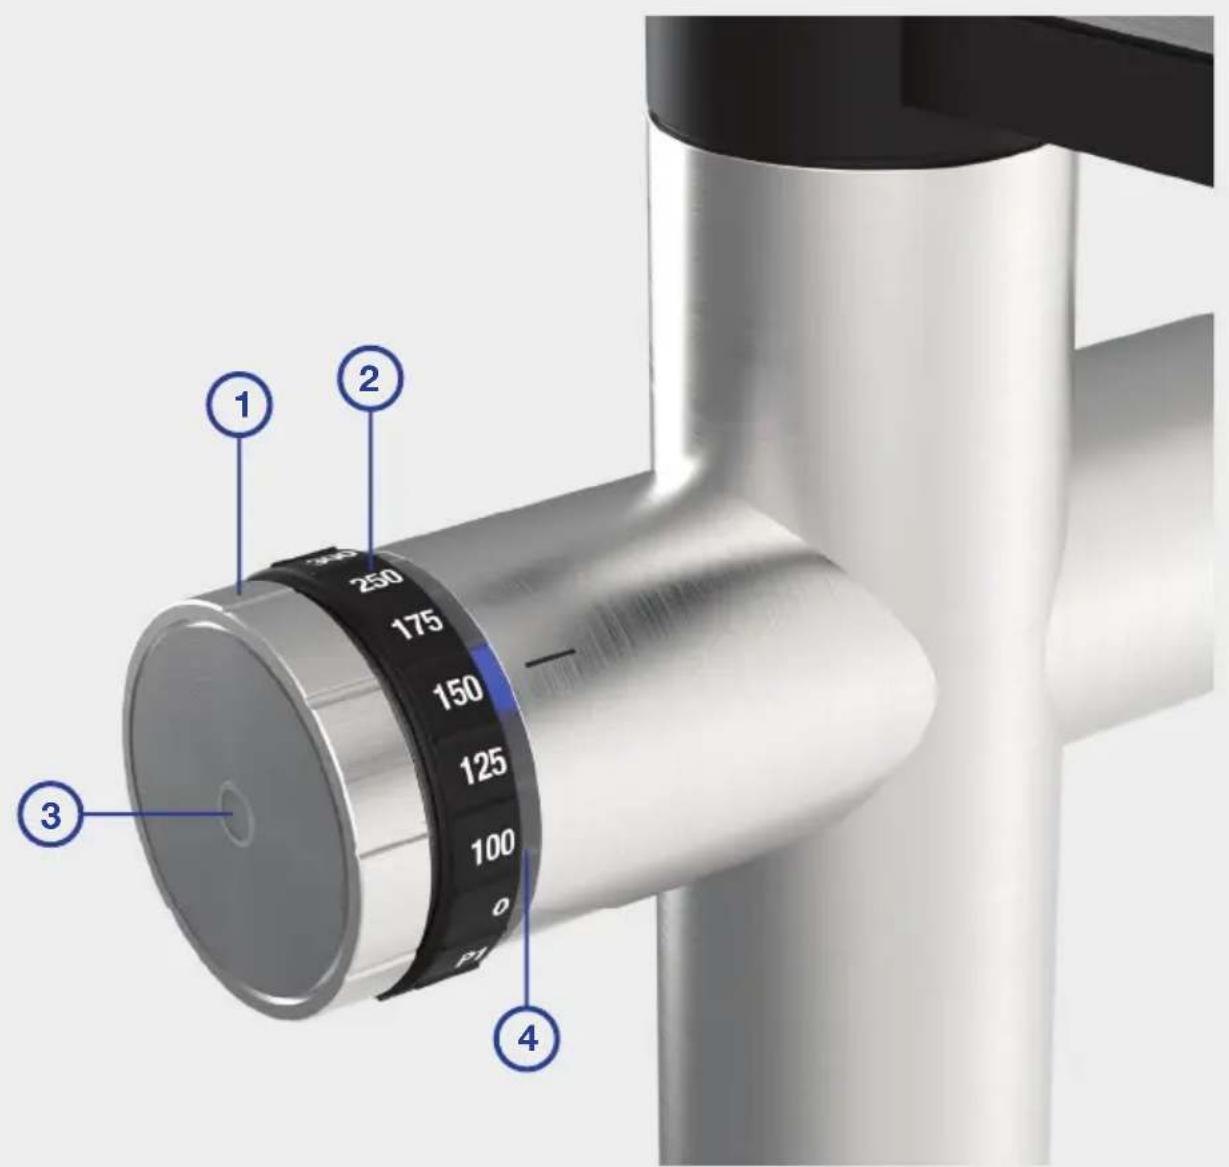
1 Adjustment wheel to choose the processed water type
2 Adjustment wheel to choose quantity
3 Touch operation trigger (sensor)
4 LED ring
Operating the system

Rotary arm; can be swivelled 180^
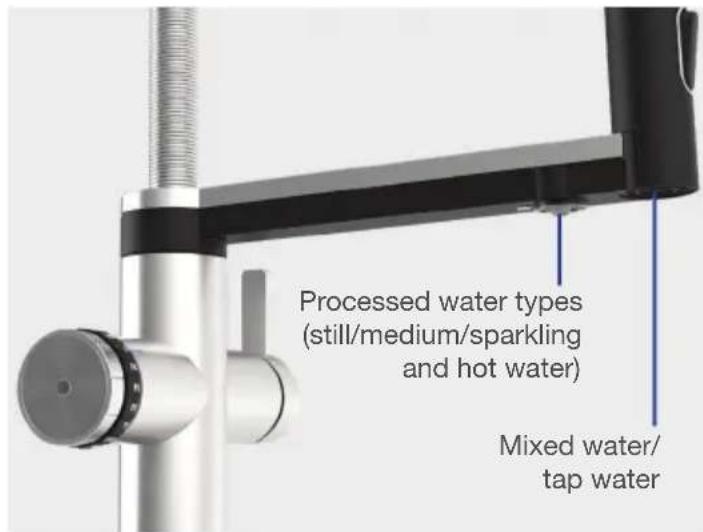
Mixed water
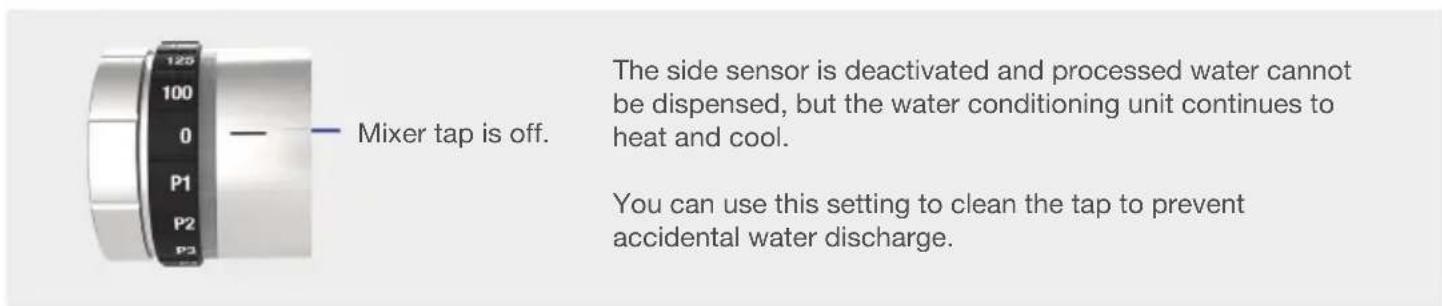
Cold water Warm water Mixed water on Mixed water off
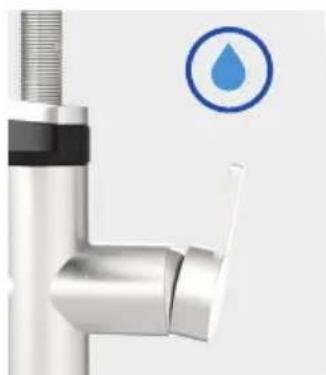
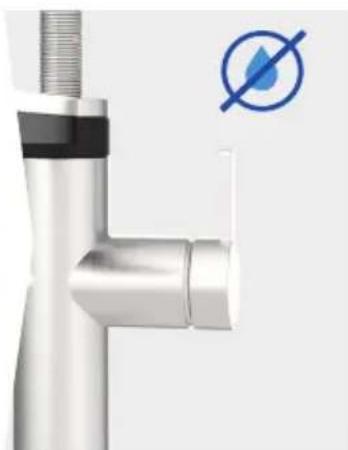
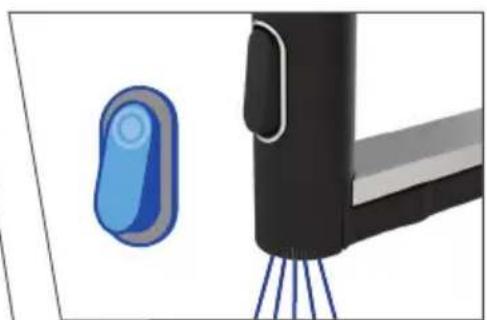

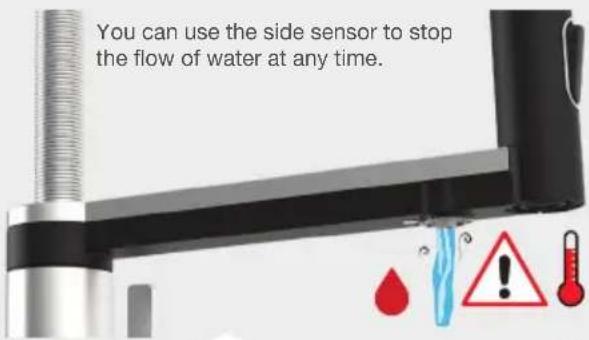
WARNING:
The water outlets should always be positioned over the sink to prevent water damage.
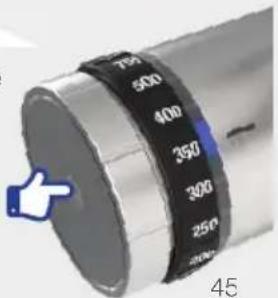
Processed water
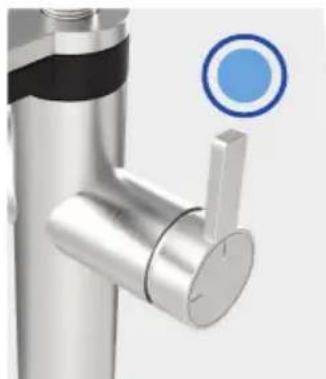
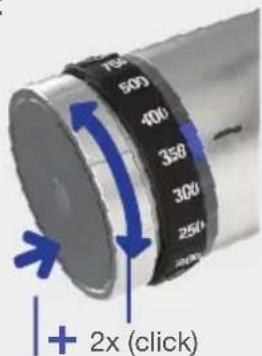
Cold
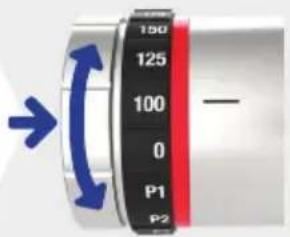
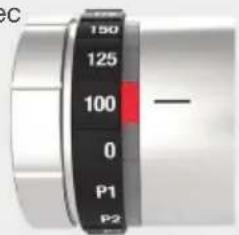
Turn the adjustment wheel: Selection of cold water type
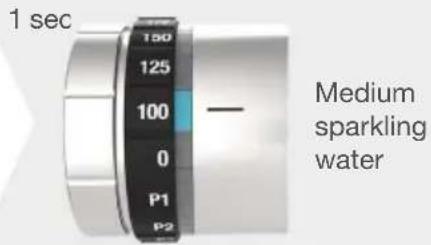
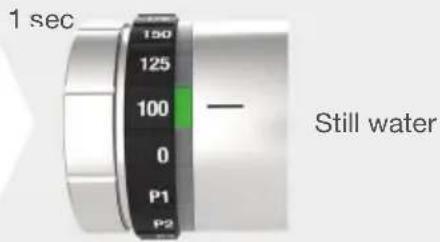
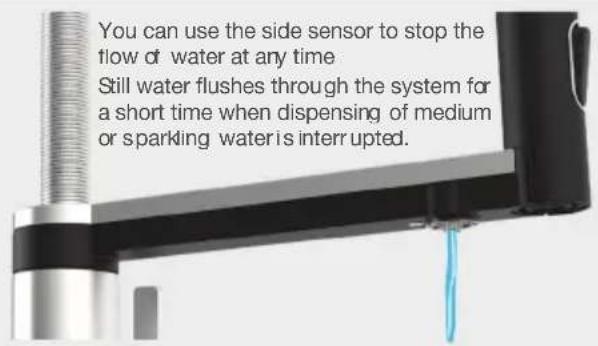
Touch the side sensor to activate the water dispensing.
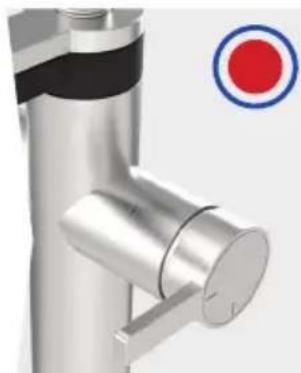
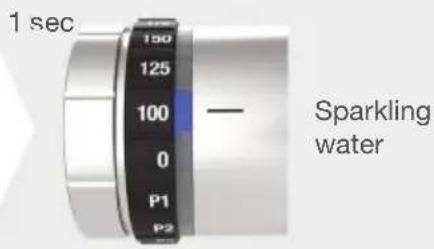
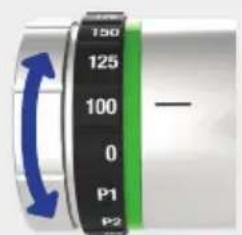
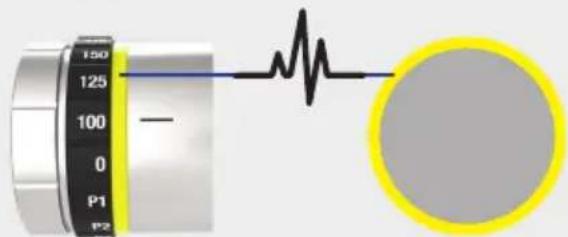
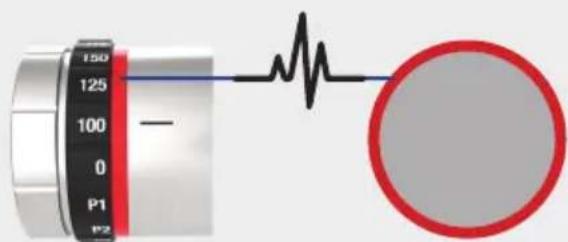
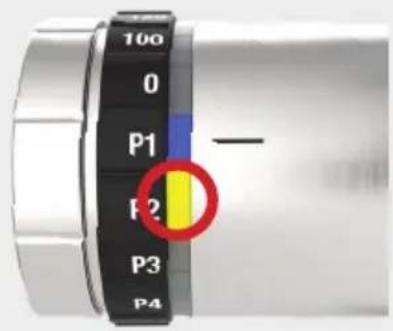
Hot
After activating the hot water mode by pressing and turning over 2 notches, hot water can be dispensed for 10 seconds. The system then switches back to the previously selected water type (cold).
Press and turn the adjustment wheel two times: Selection of hot water
1 sec
Touch the side sensor to activate the dispensing of hot water.
Processed water

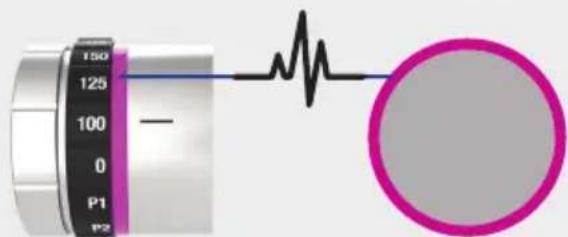
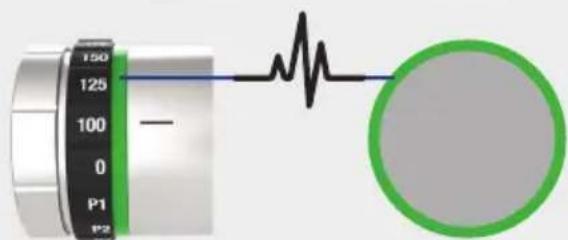
LED ring and status indication
The remaining filter life or the remaining CO2 capacity have reached a level of less than 10% . Therefore, a replacement of the CO2 cylinder or a cleaning with filter change will soon be necessary (see water conditioning unit display).
The remaining filter life or the remaining CO2 capacity have been reached. It is therefore now necessary to replace the CO2 cylinder or to do a cleaning with filter change (see water conditioning unit display).


Cleaning program running.
Cleaning program running User action required (see undersink unit display).
System malfunction/Error (see undersink unit display).
System currently in the menu mode (see undersink unit display).
System currently under initialising procedure (see undersink unit display).
Water conditioning unit - Menu display
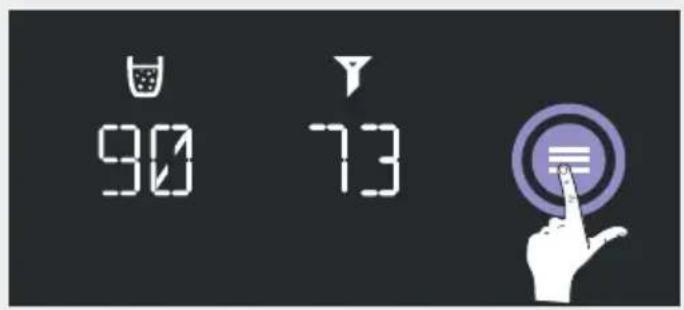
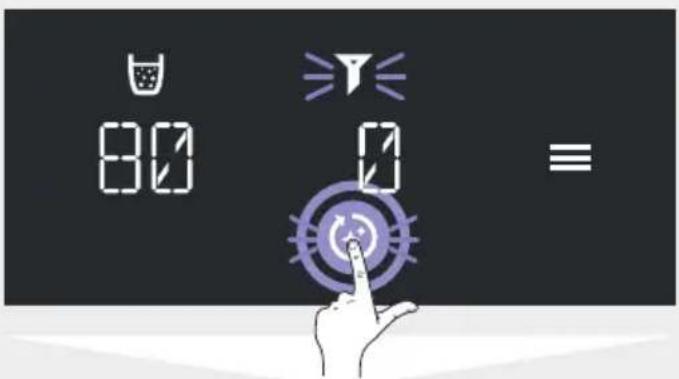
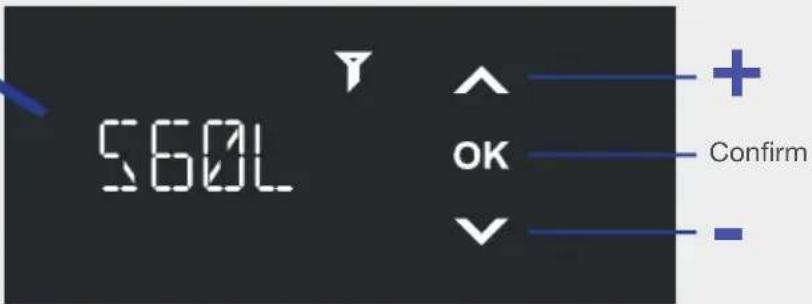
You can use the menu button to access the menu to configure all parameters.
You can use the arrow keys that will then appear to select the setting parameters.
TEMP C
TEMP H
CONNEC
RESET
CLEAR
VOLUME
After pressing 'OK' to confirm, the current temperature for the 3 cold water types (still, medium and sparkling) is displayed. You can adjust the temperature between 6^ and 10^ using the arrow keys. The 'LOW' setting is below 6^ and cools the water to the minimum possible temperature with its maximum cooling performance (also see notes on temperature settings on page 49).
After pressing 'OK' to confirm, the current temperature for hot water is displayed. This temperature can be changed between 65^ and 100^ using the arrow keys (also see notes on temperature settings on page 49).
After pressing 'OK' to confirm, the display shows the connectivity mode to link with an app: 'CON OFF' = inactive connectivity module and 'CON ON' = active connectivity module. You can use the arrow keys to change the mode and confirm by pressing 'OK'. 'CONRES' resets the connection settings (also see notes on using the app on page 49).
Press 'OK' for 3 seconds to reset to factory settings. Note that this also resets the timer for cleaning, which can cause hygiene problems. It is thus recommended to clean the system after each reset.
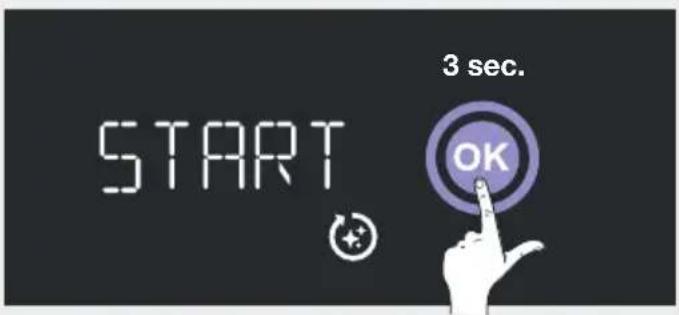
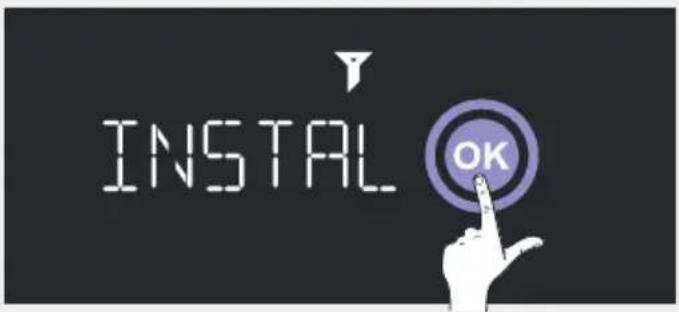
START' will be displayed after you confirm by pressing OK. Press OK for 3 seconds to start the cleaning program. The cleaning procedure will then start and run automatically (see page 52). The adjustment wheel on the mixer tap must not be set to '0' when you start the cleaning process.
START' will be displayed after you confirm by pressing 'OK'. Press OK for 3 seconds to start calibration. The calibration routine will then start automatically and you can use it to reset the quantities dispensed (see page 56). The adjustment wheel on the mixer tap must not be set to '0' when you start the calibration process.
Temperature settings Temp C and Temp H
You will only achieve an optimal result for sparkling water at the 'LOW' setting for 'TEMP C'. The higher the temperature, the less sparkling the water will be.
The system needs a little time to reach the set temperature within the system each time the temperature is adjusted for hot water ('TEMP H') or cold water ('TEMP C').
The outlet temperature for processed water types in the mixer tap may differ from the value set on the display in 'TEMP C' and 'TEMP H' due to different ambient conditions. The set value is the control temperature in the tank.
The actual outlet temperature is also conditioned by the ambient temperature, the temperature in the mixer tap, e.g. due to direct sunlight, and the temperature in the connection line from the undersink unit.
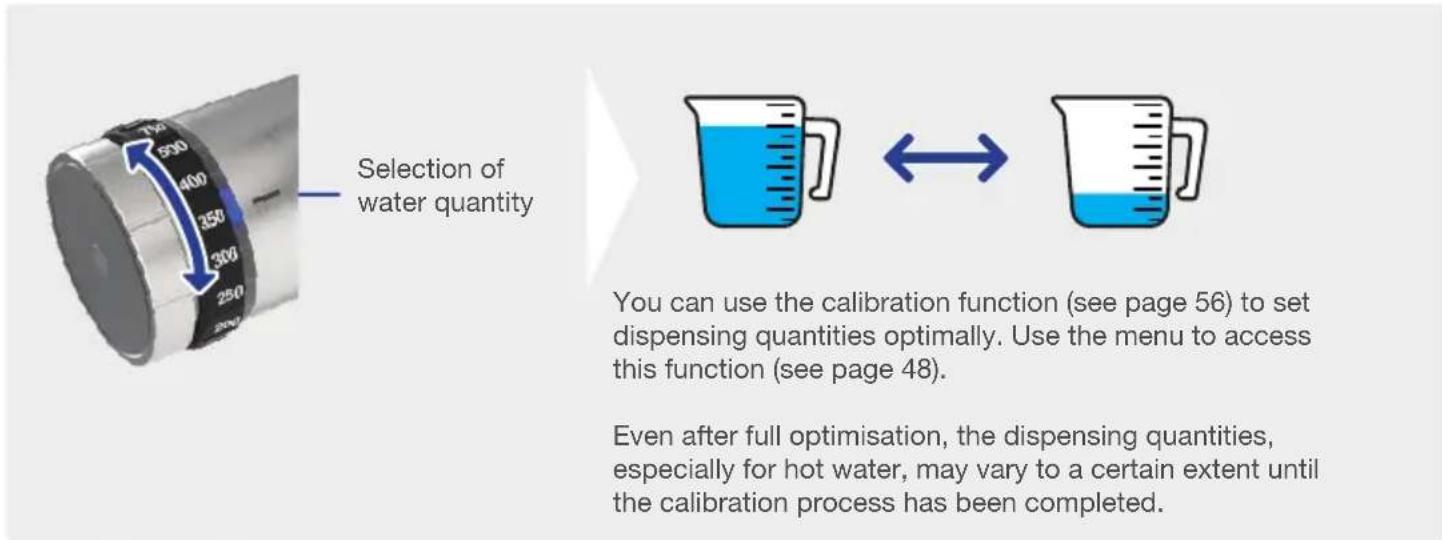
The dispensing quantities can differ from the value selected on the mixer tap after one of the temperatures has been adjusted. You can use the calibration function (see page 56) to readjust the temperature. Use the menu to access this function (see page 48).
Notes on using the BLANCO UNIT app
The BLANCO UNIT app allows you to control the system even more effectively and provides you with other adjustment options, such as:

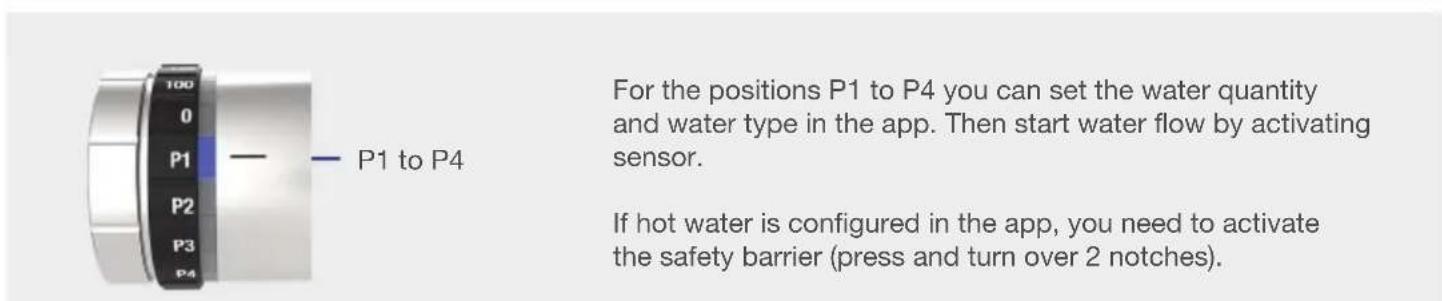
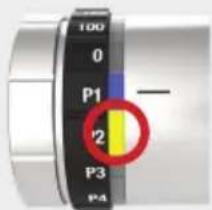
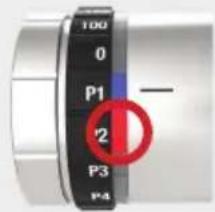
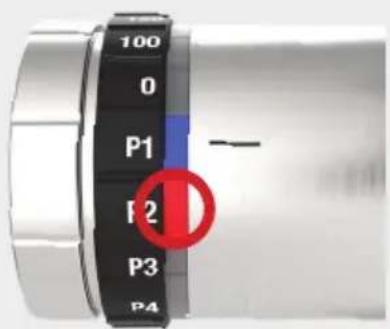
- Individual settings with water type and quantity for detent positions P1 to P4 (see page 46)
Purchase of consumables directly on your mobile device - Hot water locking to switch off the hot water function
- Error messages and notifications in real time directly on your mobile device
- Carrying out cleaning and filter change assisted with graphics directly on your mobile device
- and much more.


The software is available from the iOS App Store and the Android Store.

Download on the
App Store

GET IT ON
Google Play

You will find further notes on using the app in the BLANCO UNIT app documentation.
Google Play and the Google Play logo are trademarks of Google LLC; Apple and the Apple logo are trademarks of Apple Inc., both registered in the U.S. and other countries.
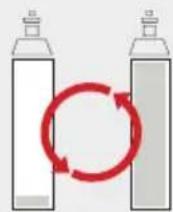
Changing CO_2 cylinders
Notification that CO_2 service life is coming to an end
CO_2 cylinder is empty and must now be replaced.
It is no longer possible to dispense medium sparkling or sparkling water from the tap until the CO_2 cylinder has been replaced.
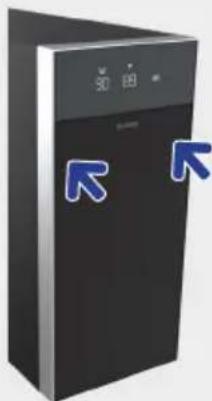
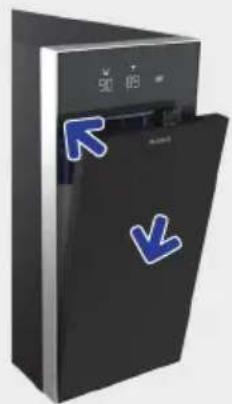
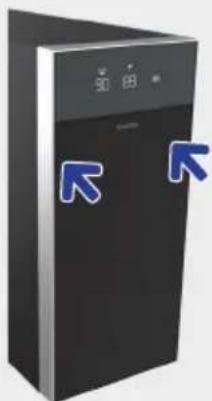
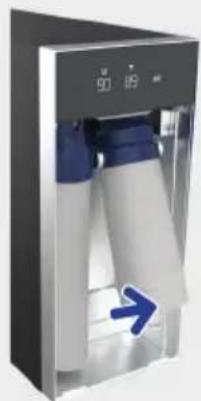
Tap on the top of the front flap on both sides to open the front flap (tap to open).
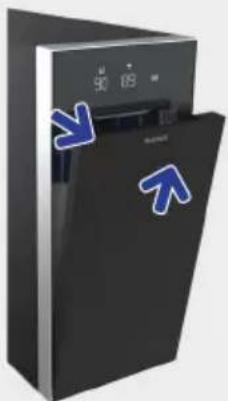
Move the top of the front flap outwards and remove by pulling upwards.

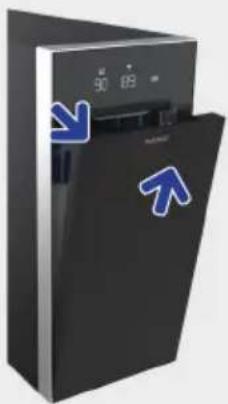
Tilt CO_2 cylinder forwards.
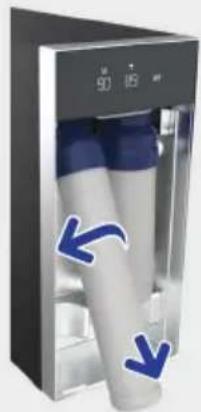
Unscrew CO_2 cylinder (anticlockwise) and remove.
Screw in the new, completely filled CO_2 cylinder (clockwise).
Changing CO_2 cylinders
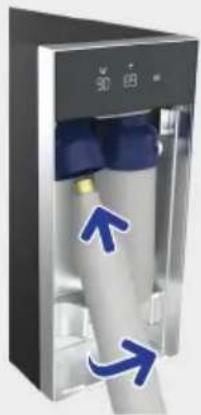
The correct position is important: screw the cylinder into the thread up to the mechanical stop when inserting. Then tighten by about another 1/4 turn to ensure that the cylinder is firmly in position.
When you screw the cylinder in and out, there may be a slight hissing sound and small amounts of CO_2 may leak out. This is to be expected.
Only original BLANCO CO_2 cylinders with a standard capacity of 425g may be used in the system.
Tilt CO_2 cylinder backwards.
Insert front flap at the bottom and close at top.

WARNING:
Do not operate the system for an extended period with an empty CO_2 cylinder or without a cylinder inserted as this can cause water damage.
On the display CO_2 service life is reset automatically and red LED on mixer tap goes out automatically.
+
When you dispense sparkling water after the cylinder has been changed, you may need to dispense one or two times before the sparkling performance returns to normal.
Cleaning & filter change
As a basic rule, cleaning and a filter change is required after the filter capacity has been reached (in litres) or after 6 months. The system also needs to be cleaned if no processed water has been dispensed for 3 weeks. This is monitored electronically and displayed if necessary.
+
Notification that service life is coming to an end and cleaning and filter change will soon be required.
Cleaning and filter change is now required.
+
A filter change and cleaning are firmly interlinked: It is only possible to change the filter within the cleaning program.
Tap on the top of the front flap on both sides to open the front flap (tap to open).
Move the top of the front flap outwards and remove by pulling upwards.
The CO2 cylinder needs to be filled to at least 20% of its capacity for cleaning. If the remaining amount for CO2 is less than 20% , the CO2 cylinder must be replaced first (see Changing CO2 cylinders, page 50).
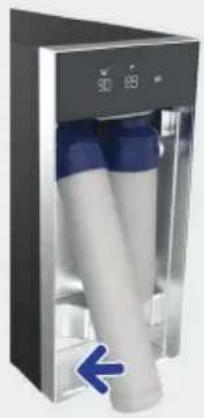
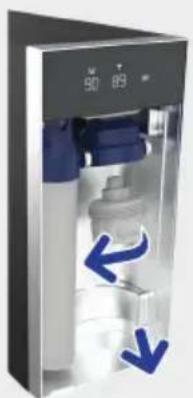
Tilt the filter forwards.
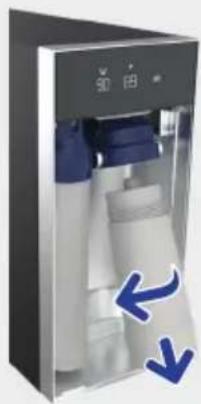
Unscrew filter (anticlockwise) and remove.
Cleaning & filter change
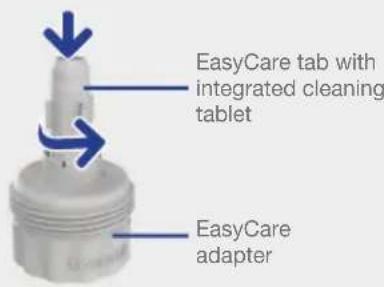
The EasyCare adapter and EasyCare tab are required for cleaning. You have received them with the system. You can purchase the EasyCare tab for further cleaning processes separately in the BLANCO Shop online.
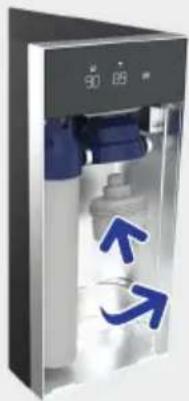
Screw the EasyCare adapter (with the EasyCare tab inserted) into the mount for the filter, turning clockwise.
WARNING! IMPORTANT! Do NOT drink the water flushed out at any time during the entire cleaning process.
Do NOT disconnect the system from the power supply or close the water inlet (corner valve) during cleaning! The water outlets should always be positioned over the sink to prevent water damage.
Press 'Clean' to start the cleaning process. Alternatively, you can also start the cleaning program in the menu (see 'Menu', page 48).
Press 'OK' for 3 seconds to start the cleaning process. The adjustment wheel on the mixer tap must not be set to '0' when you start the cleaning process.
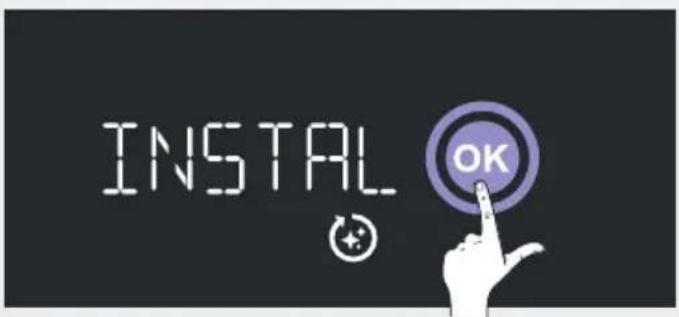
Press 'OK' to confirm that the EasyCare adapter is inserted. The system will then empty all tanks, which will cause slight splashing from the outlet. This is normal.
Cleaning & filter change
36min

The cleaning program has started and will now run automatically. The remaining running time is shown on the display.
INSTRAL OK
Unscrew the EasyCare adapter with module from the mount, turning anticlockwise.
The EasyCare tab can only be used once:
→

Remove EasyCare tab from the adapter and recycle. Keep adapter for re-use.
The EasyCare adapter must be unscrewed after about 3 minutes and a new filter inserted. A flashing yellow LED ring on the mixer tap indicates when you need to do this.
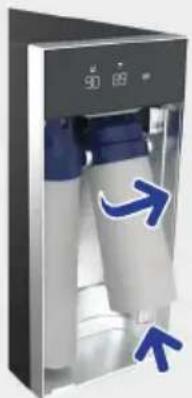
Screw a new filter into position, turning it clockwise about twice. When inserting the filter, ensure that it is straight when fitted, NOT at an angle.

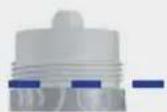
Screw filter until it will go no further so that the threaded socket is no longer visible.
Cleaning & filter change
Press 'OK' to confirm that the filter is inserted.

Find the filter capacity for your local water hardness in the filter documentation. Enter number manually. Then press 'OK' to confirm.
The local water hardness is required to determine the correct filter capacity.
Note that if you use a central water softening system, this changes the hardness level in your household. It is no longer the same level as the one that your water supply company indicates.

The cleaning program continues to run automatically.
The remaining running time is shown on the display.

Note: CO_2 is used during the cleaning program. This amount is automatically deducted from the remaining capacity. A deviation from the capacity before cleaning is therefore normal.
The remaining filter time is reset and indicates 99% again. The system has been cleaned and is ready to operate again.
Calibration (quantity dispensed)
The system is optimally pre-configured at the factory. If the dispensed quantities for the 4 processed water types do not correspond to the quantity selected on the mixer tap, you can use the quantity calibration routine to optimally re-adjust your system. Use the menu to do so (see page 48).
The adjustment wheel on the mixer tap must not be set to '0' when you start the calibration process. To perform calibration, you need a measuring beaker with a filling level of at least 500ml (0.5 litres).
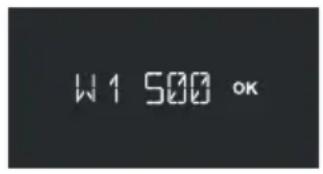
W1 500' appears on the display for the first dispensing of 500ml Place the measuring beaker beneath the outlet for processed water types and press on 'OK' to confirm.
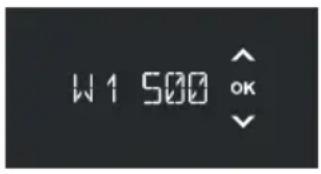
The system dispenses 500 ml and stops automatically. Next use the arrow keys to set the value which you read on the measuring beaker and press 'OK' to confirm.
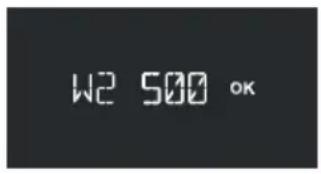
W2 500' appears on the display for the second dispensing of 500ml Empty the measuring beaker and place it beneath the outlet for processed water types again and press on 'OK' to confirm.
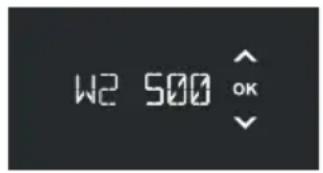
The system dispenses 500ml again and stops automatically. Next use the arrow keys to set the value which you read on the measuring beaker and press 'OK' to confirm.
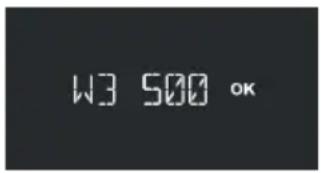
W3 500' appears on the display for the third dispensing of 500ml of hot water. Place the measuring beaker beneath the outlet for processed water types and press on 'OK' to confirm.
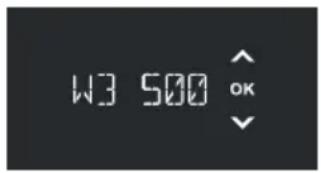
The system dispenses 500 ml and stops automatically. Next use the arrow keys to set the value which you read on the measuring beaker and press 'OK' to confirm.
Your system is optimally set and the dispensed quantities are now the same as those set on the mixer tap.
Accessories
Filter portfolio
Filter cartridges and other accessories can be found at www.blanco.co.uk/filter and are easy to order from the online shop.

If the water hardness is over 12^ , the system requires a BLANCO 'Soft' filter with descending.
The standard tap water outlet is completely separate from the processed water types, meaning that the standard tap water is not filtered. As a general rule, all four processed water types (still/medium/sparkling and hot water) are always filtered.
Cleaning accessories
| BLANCO items | Cleaning accessories |
| 526263 EasyCare tab with integrated cleaning tablet (single usage; a new EasyCare Tab is required for each cleaning) | |
| 526262 EasyCare adapter (can be reused again for each cleaning) |
Technical specifications
Ambient conditions
Relative humidity: 0 - 75 %
Room temperature and temperature in the base 16 - 43 °C cabinet:
Water inlet temperature: 5 - 30 °C
Water inlet pressure: 1 - 10 bar
Electric data
Connection/power supply: Protective contact socket (220 - 240 V AC/50 Hz). Internal 10 A fuse on the housing rear of the undersink unit (also an additional 10 A fuse in the plug in UK version).
Max. current consumption: 8.8 A
Max. power consumption: 1780 W
Power input heating: 1750 W
Power input cooling: 140 W
Undersink unit protection type: IP21
Plumbing data:
Volume of cooled, sparkling water in the cooler-carbonator: approx. 0.55 - 0.75 liter (depending on the filling level)
Volume of heated water in boiler: approx. 3 litres
System operating pressure in cooler- max. 9 - 10 bar (safety valve 11 + 3 bar) carbonator:
System operating pressure boiler: 8 bar - fixed by safety assembly module compliant with EN 1488
Dispensing quantity for still water: approx. 1.7 liters/minute
Dispensing quantity for medium sparkling water: approx. 1.7 liters/minute
Dispensing quantity for hot water: approx. 2.0 liters/minute
Pump safety shut-off: after 5 min. continuous operation ( Error 1)
Heating element safety shut-off: after 20 min. continuous operation ( Error 13)
Temperature in the cooler-carbonator: approx. 6 - 10 °C (adjustable by the user), additionally 'LOW' for maximum cooling performance
Temperature in boiler: approx. 65 - 100 °C (adjustable by user)
Cooling and heating technology:
Cooling capacity: approx. 6 liters/hour for a T of 10K
Boiler heating element heating capacity: 1800 W
4.8 ccm
Coolant: R600a, approx. 45 g
Cooling control type: Electronic thermostat
Boiler control type: Electronic thermostat
Dimensions and weights:
External dimensions of undersink unit (L× W× H) .. 495 / 530× 200× 440mm
Weight of empty undersink unit: approx. 27.5kg
Shipping weight of undersink unit plus approx. 32.5kg packaging:
Mixer tap: approx. 2.7kg
Shipping weight of mixer tap plus packaging: approx. 3.3kg
Troubleshooting
Error messages on the display (Errors)
Error in normal mode:
ERR

OK
Error during the cleaning program (the 'Clean' symbol is displayed):
ERR

OK

| Error indicator Step | (sequence) | Remedial actions |
| Error 1 - pump running time exceeded | 1 • Open | cold water corner valveCheck the supply hose from the corner valve to the water conditioning unit for kinks in the installation position and fix if necessaryCheck mixed water flow in the mixer tap; if not OK, there may be a malfunction in the building water installationPress 'OK' on the display to confirm malfunction |
| 2 • Check | state of filter installation (there must be no gap between filter attachment and filter head; see page 54)Press 'OK' on the display to confirm malfunction | |
| 3 • Contact BLANCO Customer Service | ||
| Error 1 directly after cleaning - pump running time exceeded | 1 • Filter | was not inserted correctlyInsert filter correctly and carry out cleaning again with filter inserted |
| Error 2 - leak 1 • Check if there is water in | base cabinet; if there is, trigger kitchen or apartment fuse in the building's electrical installation | |||
| 2 • Disconnect power supplyCheck for water in the system? (View through rear ventilation slits; tilt to allow any water to run out of slits)If there is none, o reconnect power supply after 15 minutes and press 'OK' on the display to confirm malfunction o Operate system and dispense 2 litres of each water type (hot, sparkling and still) and wait 15 minutes. Then inspect for any leaks in the base cabinet or error again on the displayIf there are leaks, contact BLANCO Customer Service | ||||
| Error 3 - mixer tap communication | 1 • Check whether the mixer tap cable is plugged in properly on the water conditioning unit rear, press the plug in again more firmly or remove it and re-insert | |||
| 2 • Disconnect power supplyReconnect power supply after 5 minutes | ||||
| 3 • Is there LED or halogen lighting in or around the installation site? If there is, disconnect it from the mains in the event of a malfunctionPress 'OK' on the display to confirm malfunction | ||||
| 4 • Check mixer tap cable for damage; if damaged, contact BLANCO Customer Service | ||||
| 5 • Contact BLANCO Customer Service | ||||
| Error 4 - hardware error 1 • Press 'OK' on the display to confirm malfunction | ||||
| 2 • Contact BLANCO Customer Service | ||||
| Error 5 - fill level control implausible | 1 • Press 'OK' on the display to confirm malfunction | |||
| 2 • Disconnect power supplyReconnect power supply after 5 minutes | ||||
| 3 • Contact BLANCO Customer Service | ||||
| Error 6 - hardware error 1 • Press 'OK' on the display to confirm malfunction | ||||
| 2 • Contact BLANCO Customer Service | ||||
| Error 7 - fan sensor 1 • Press 'OK' on the display to confirm malfunction | ||||
| 2 • Disconnect power supplyReconnect power supply after 5 minutes | ||||
| 3 • Contact BLANCO Customer Service | ||||
| Error 8 - cooling sensor 1 • Press 'OK' on the display to confirm malfunction | ||||
| 2 • Disconnect power supplyReconnect power supply after 5 minutes | ||||
| 3 • Contact BLANCO Customer Service | ||||
| Error 9 - overheating(fan makes noise whenoperating) | 1 • Wait | 30 minutes to see if malfunction disappears (error resetsautomatically) | ||
| 2 • Disconnect power supply • Reconnect power supply after 5 minutes | ||||
| 3 • Check for other heat sources or heat accumulation in thebase cabinet • Ventilate and reposition the water conditioning unit if necessary • Check the ventilation openings and make additional ventilationopenings to improve air exchange in the base cabinet. | ||||
| 4 • Open blocked or clean dusty air inlets and outlets • Adjust installation; clear blockages from air inlets in the basecabinet | ||||
| 5 • Contact BLANCO Customer Service | ||||
| Error 10 - displaycommunication (mes-sage in the app only;mixer tap flashes red) | 1 • Disconnect power supply • Reconnect power supply after 5 minutes | |||
| 2 • Contact BLANCO Customer Service | ||||
| Error 11 - system error(boiler control) | 1 • Disconnect power supply • Reconnect power supply after 5 minutes | |||
| 2 • Contact BLANCO Customer Service | ||||
| Error 12 - no water in theboiler | 1 • Press 'OK' on the display to confirm malfunction | |||
| 2 • Disconnect power supply • Reconnect power supply after 5 minutes | ||||
| Error 13 - boiler heatingtime | 1 • Press 'OK' on the display to confirm malfunction | |||
| 2 • Disconnect power supply • Reconnect power supply after 5 minutes | ||||
| 3 • Contact BLANCO Customer Service | ||||
| Error 14 - boiler sensor 1 1 | • Press 'OK' on the display to confirm malfunction | |||
| 2 • Disconnect power supply • Reconnect power supply after 5 minutes | ||||
| 3 • Contact BLANCO Customer Service | ||||
| Error 15 - boiler sensor 2 1 | • Press 'OK' on the display to confirm malfunction | |||
| 2 • Disconnect power supply • Reconnect power supply after 5 minutes | ||||
| 3 • Contact BLANCO Customer Service | ||||
| Error 16 - hot water valvedefective | 1 • Disconnect power supply • Reconnect power supply after 5 minutes | |||
| 2 • Contact BLANCO Customer Service | ||||
| Error 17 - cooling inade-que | 1 • Press 'OK' on the display to confirm malfunction | |||
| 2 • Disconnect power supply • Reconnect power supply after 5 minutes | ||||
| 3 • Contact BLANCO Customer Service | ||||
| Error 18 - boiler fuse 1 • Prss 'OK' on thedisplay to confirm malfunction | ||||
| 2 • Disconnect power supply • Reconnect power supply after 5 minutes | ||||
| 3 • Contact BLANCO Customer Service | ||||
Troubleshooting
| Error 19 - boiler temperature | 1 • Press 'OK' on the display to confirm malfunction |
| 2 • Disconnect power supply • Reconnect power supply after 5 minutes | |
| 3 • Contact BLANCO Customer Service | |
| Error 20 - fan defective/won't start | 1 • Press 'OK' on the display to confirm malfunction |
| 2 • Disconnect power supply • Reconnect power supply after 5 minutes | |
| 3 • Contact BLANCO Customer Service | |
| Error 21 - no water in the boiler in the installation, even after filling | 1 • Check the supply hose between safety assembly module and the water conditioning unit for kinks in the installation position and fix if necessary • Open manual valve on safety assembly module |
| 2 • Leave system in the error state to allow boiler to cool down. As soon as the temperature in the boiler falls below 35 °C, the system automatically fills the boiler with water. However, this may take hours. | |
| 3 • Contact BLANCO Customer Service |
Other troubleshooting
| LED ring on the mixer tap with all-round yellow light | ·System in cleaning mode → follow the cleaning program sequence (page 52) | |
| LED on the mixer tap flashes yellow | ·System in cleaning mode; user action required → follow the cleaning program sequence (page 52) | |
| LED on the mixer tap flashes red, but no error is visible on the display (see Error 10) | 1 · Disconnect power supply ·Reconnect power supply after 5 minutes | |
| 2 · Contact BLANCO Customer Service | ||
| LED on the mixer tap flashes red; menu option shown on the display | 1 · Menu is activated on the display and the system cannot be operated. Wait a few seconds until system returns to normal operating mode | |
| 2 · Disconnect power supply ·Reconnect power supply after 5 minutes | ||
| Incorrect representations on the display | 1 · Disconnect power supply ·Reconnect power supply after 5 minutes | |
| 2 · Contact BLANCO Customer Service | ||
| Menu cannot be operated | 1 · Disconnect power supply ·Reconnect power supply after 5 minutes | |
| 2 · Contact BLANCO Customer Service | ||
| Calibration program cannot be started | ·Set mixer tap to any other quantity and restart the calibration program in the menu (page 48) | |
| Cleaning program cannot be started; 'LOWCO2' is displayed | ·Replace CO2 cylinder (page 50) and restart cleaning program (page 52) | |
Troubleshooting
| After cleaning program: water coloured green, tastes of chlorine and/or is still foamy | • Run cleaning program again with inserted filter. To do this, start the cleaning program via the menu (page 48) | |
| Too little sparkling content | 1 • Adjust temperature setting: the colder the water, the more effectively CO2 can be added to the water | |
| 2 • Leave system to cool down (about 12 hours) • Dispense 2 x 0.3 liters of sparkling water • Wait another hour and re-evaluate | ||
| 3 • Run cleaning program | ||
| Water temperature is not the set temperature | • Leave system to cool down and heat through (about 12 hours) and re-evaluate | |
| Sparkling water spray pattern not OK or too weak | 1 • Replace CO2 cylinder | |
| 2 • Open jet aerator on the mixer tap with enclosed spanner and clean | ||
| 3 • Check correct installation (corner valves fully open, filter and CO2 cylinder fully screwed in, supply hose kinked?) | ||
| Mixer tap dripping 1 • Re-calibrate system | (see page 56) | |
| Not possible to dispense sparkling water (weak still water flow although 'sparkling' is set on mixer tap) | 1 • Check CO2 cylinder is fitted properly (cylinder has been inserted correctly if you hear a hissing sound when cylinder is unscrewed) • Screw in CO2 cylinder firmly and tighten another 1/4 turn | |
| 2 • Replace with original BLANCO CO2 cylinder → only BLANCO CO2 cylinders may be used. | ||
| Dispensing quantities of the refined water types are not correct | • Re-calibrate system (see page 56) • Check the routing of the blue and red plastic tubes (cool and hot water tubes) and the flexible hoses and look out for kinks. | |
| Dispensing quantities of hot water are not correct | • Check the routing of the red plastic tube (hot water tube) and the flexible hoses and look out for kinks. | |
| CO2 bottle freezes over during the cleaning program | • Filter was not inserted correctly • Allow the cleaning program to continue running • Insert filter correctly and carry out cleaning again with filter inserted | |
System and surface cleaning
The system requires hygienic cleaning of the internal water lines and water tanks on a regular basis. A message on the display indicates when cleaning is required (see section on 'Cleaning & Filter Change' on page 52).
You can wipe the outside of the water conditioning unit and the area below the front flap with a damp cloth. Make sure that no water enters the system and that the power supply connection terminals do not get wet.
Do not use any abrasive or chlorine-based cleaning agents to clean the surfaces.
It is recommended to use the cleaning agents indicated by BLANCO to clean the mixer tap. You can order these conveniently from the BLANCO Shop online:

Spare Parts
You will find spare parts in the BLANCO Shop at www.blanco.com on entering your model code. You will find this code on the rating plate.
If you should have any questions, simply get in touch with our BLANCO Customer Service.

www.blanco.co.uk/shop
Disposal/Environment
Correct disposal of old appliances (electronic waste) in EU countries and other European countries with a separate collection system:
The label on the system, accessories or on the associated documentation indicates that you must not dispose of the system and its accessories in normal household waste after service life comes to an end. Please dispose of this system and accessories separately from other waste to avoid harming the environment or human health due to uncontrolled waste disposal. Help by disposing of the old system and accessories properly to promote sustainable recycling of material resources. Domestic users should contact the retailer from whom they purchased the system or contact the relevant authorities to find out where they can take the old system or accessories
for environmentally friendly disposal. Commercial users should contact their supplier and proceed according to the terms in the sales contract. You must not dispose of this system or electronic accessories with other commercial waste.
Conformity

The system complies with the requirements specified in the applicable directives and guidelines.
You can request a declaration of conformity from BLANCO.
Sommaire
I'adaptateur Easy Care