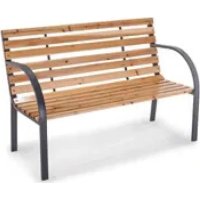
PXGB1 - Garden bench Practixx - Free user manual and instructions
Find the device manual for free PXGB1 Practixx in PDF.


| Product type | Garden bench |
| Brand | Practixx |
| Model | PXGB1 |
| Dimensions (L x H x D) | 122 x 80 x 60 cm |
| Maximum load capacity | 160 kg |
| Material | Wood (slats) with water-based protective stain |
| Number of seats | 2 seats |
| Intended use | Outdoor: garden, patio, balcony |
| Assembly required | Yes, tools provided |
| Tools included | Phillips screwdriver, wrench |
| Treated surface | Water-based protective stain (pre-treatment) |
| Care | Clean with damp cloth and mild soap solution |
| Maintenance | Tighten screws at least once per season; annual staining recommended |
| Safety | Do not use as a toy or climbing game; place on flat surface |
| Delivery contents | 12 wooden slats, 2 armrests, 2 crossbars, screws, tools, instruction manual |
| Warranty | Legal warranty (material and manufacturing defects) |
| Manufacturer | Scheppach GmbH, Günzburgerstraße 69, D-89335 Ichenhausen |
Frequently Asked Questions - PXGB1 Practixx
User questions about PXGB1 Practixx
0 question about this device. Answer the ones you know or ask your own.
Ask a new question about this device
Download the instructions for your Garden bench in PDF format for free! Find your manual PXGB1 - Practixx and take your electronic device back in hand. On this page are published all the documents necessary for the use of your device. PXGB1 by Practixx.
USER MANUAL PXGB1 Practixx
http://www.pRACTixx.com/de/service

PX-GB-1
| DE | Gartenbank Originalbetriebsanleitung WICHTIG: AUFMERKSAM LESEN, FÜR SPÄTER AUFHEBEN. | 4 |
| GB | Garden bench Translation of original instruction manual IMPORTANT: RETAIN FOR FUTURE REFERENCE, READ CAREFULLY | 8 |
| FR | Banc de jardin Traduction des instructions d'origine IMPORTANT. A CONSERVER POUR UNE CONSULTATION ULTÉRIEURE: LIRE ATTENTIVEMENT | 12 |
1
2
3
Inhaltsverzeichnis:
Seite:
Günzburger Straße 69
D-89335 Ichenhausen
Verehrter Kunde,
Table of contents: Page:
- Introduction 9
- Product description (Fig. 1) 9
- Scope of delivery (Fig. 2) 9
- Proper use 9
- General safety instructions 9
- Technical data 10
- Unpacking 10
- Layout 10
- Cleaning 10
- Storage 10
- Maintenance 10
- Disposal and recycling 11
1. Introduction
Manufacturer:
Scheppach GmbH
GünzburgerstraBe 69
D-89335 Ichenhausen
Dear Customer,
We hope your new product brings you much enjoyment and success.
Note:
In accordance with the applicable product liability laws, the manufacturer of this product assumes no liability for damage to the product or caused by the product arising from:
- Improper handling
Non-compliance with the operating manual - Repairs carried out by third parties, unauthorised speciaIstists
- Installing and replacing non-original spare parts
- Improper use
Note:
The operating manual is part of this product. It includes important instructions for the safe, proper and economic operation of the product, for avoiding danger, for minimising repair costs and downtimes and for increasing the reliability and extending the service life of the product. In addition to the safety instructions in this operating manual, you must also observe the regulations applicable to the operation of the product in your country.
Familiarise yourself with all operating and safety instructions before using the product. Only operate the product as described and for the specified areas of application.
Keep the operating manual in a good place and hand over all documents when passing the product on to third parties.
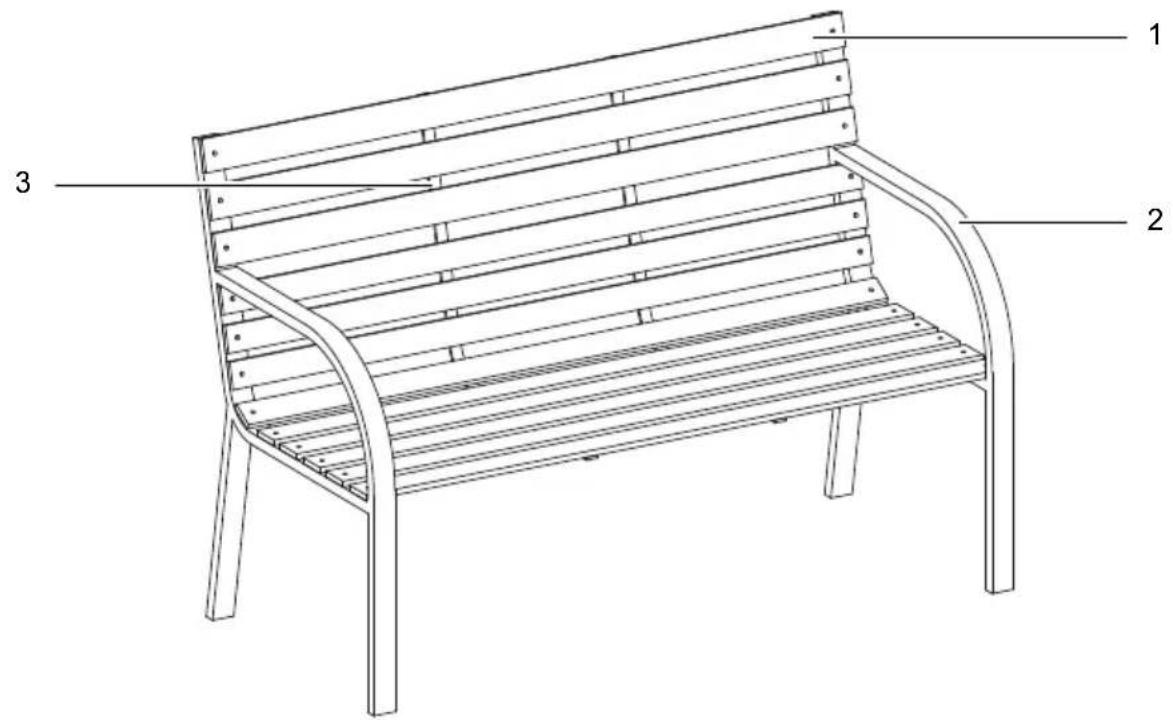
2. Product description (Fig. 1)
- Wooden slats
1a. Screw
2b. Nut
3c. Washer - Armrest (right)
2a. Armrest (left) - Cross member
3a. Screw - Phillips screwdriver
- Spanner
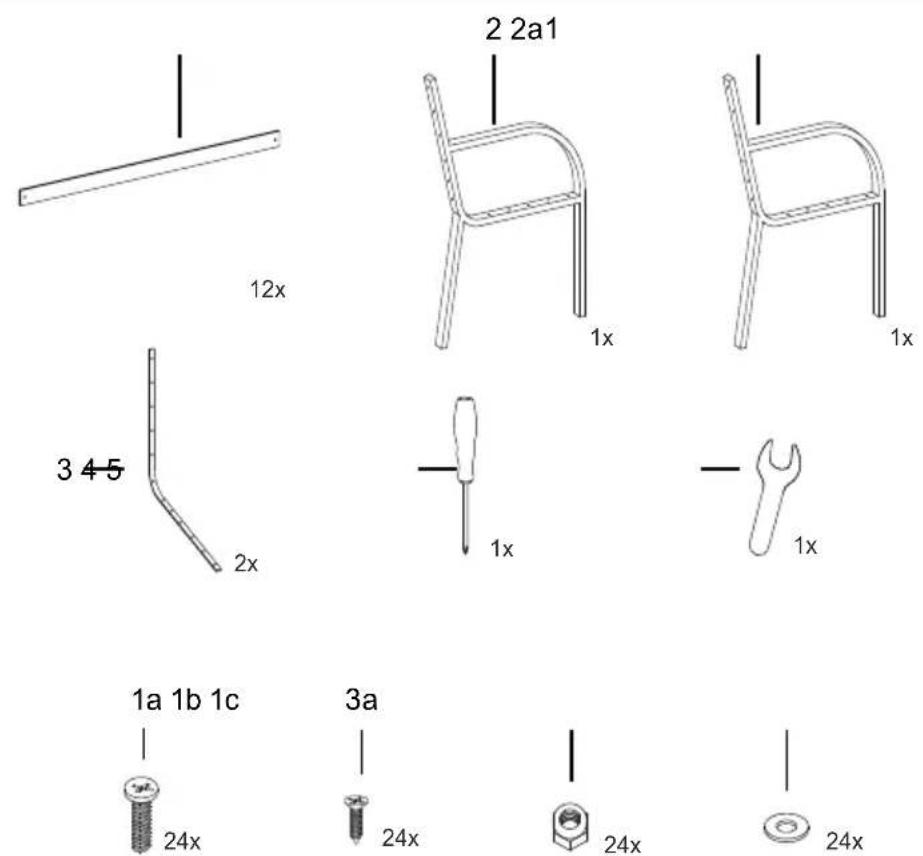
3. Scope of delivery (Fig. 2)
Item Quantity Designation
| 1 12x Wooden slats |
| 1 a 24x Washer |
| 1b 24x Nut |
| 1c 24x Screw |
| 2 1x Armrest (right) |
| 2 a 1x Armrest (left) |
| 3 2x Cross member |
| 3 a 24x Screw |
| 4 1x Phillips screwdriver |
| 5 1x Spanner |
| 1x Operating manual |
4. Proper use
The product is designed for use in the living area, e.g. balcony, terrace or garden.
The product is not intended for commercial use.
The manufacturer is not liable for damage caused by improper use or incorrect operation.
5. General safety instructions
WARNING - Read all safety information, instructions, illustrations and technical data for this product.
- Ensure that the item is stable before using it!
- Place the item on a level surface.
The article may only be used under adult supervision and not as a toy. - The article is not a climbing or play equipment! Make sure that people, especially children, do not stand or pull themselves up on the item. The article may fall over.
- Regularly check that all screw connections are tight! The item may only be used if it is in perfect condition.
- Never stand on the article.
- Backrests or armrests must not be used as seats.
- Avoidance of material damage! Secure the item in extreme weather conditions, such as strong winds. Store the article in protected rooms.
6. Technical data
- Dimensions: approx. 122 × 80 × 60 cm( L × H × D)
Maximum load: 160kg
7. Unpacking
- Open the packaging and carefully remove the product.
- Remove the packaging material, as well as the packaging and transport safety devices (if present).
- Check whether the scope of delivery is complete.
- Check the product and accessory parts for transport damage. In the event of complaints the carrier must be informed immediately. Later claims will not be recognised.
- If possible, keep the packaging until the expiry of the warranty period.
- Familiarise yourself with the product by means of the operating manual before using for the first time.
WARNING!
The product and the packaging material are not children's toys! Do not let children play with plastic bags, films or small parts! There is a danger of choking or suffocating!
8. Layout
Attention!
Always assemble the product completely before use!
It is helpful to involve a second person for the installation.
Ensure that all parts are present according to the parts list before starting assembly.
- Lay out all parts on a flat surface.
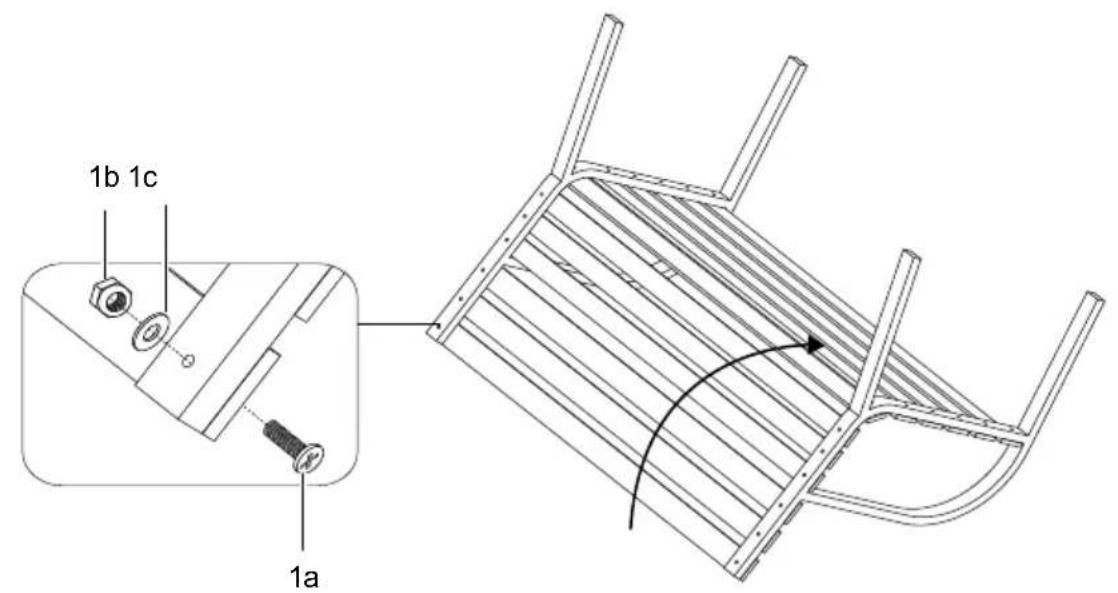
- Place both armrests (2 & 2a) upside down so that the holes are facing upwards as shown.
- Align the wooden slats (1) along the holes in the armrests (2 & 2a).
-
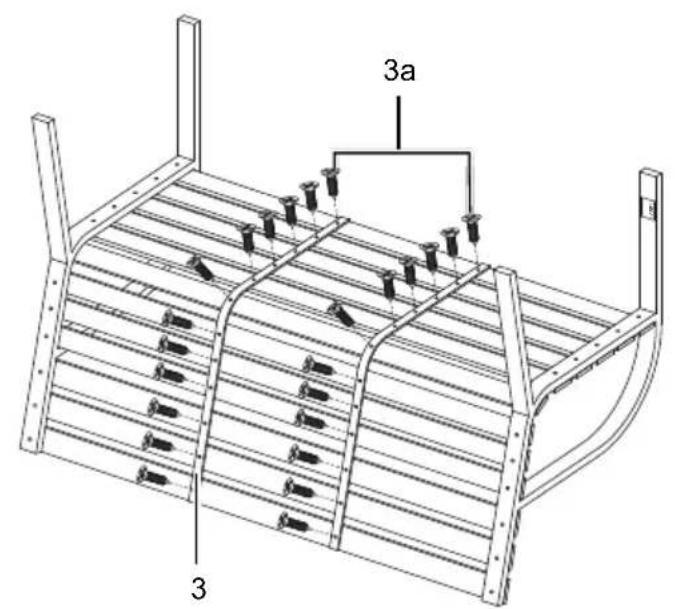
Screw the wooden slats (1) together on both sides with a screw (1a), a washer (1c) and a nut (1b) as shown in Figure 3.
-
Use the Phillips screwdriver (4) supplied for this purpose.
-
Use the spanner (5) to tighten the nuts (1b).
-
Screw the two cross struts (3) to the armrests as shown in Figure 3.
- Use the Phillips screwdriver (4) supplied for this purpose.
- Make sure that all screws are tightened and the bench is stable.
- If necessary, retighten all screws and nuts.
9. Cleaning
- This product is pre-treated with water-based wood stain to make the surface durable enough for outdoor use. To ensure a long service life, the furniture should be cleaned regularly, left unprotected outdoors for no longer than necessary and re-varnished at regular intervals.
- Clean with a damp cloth and mild soap solution. Wipe dry with a soft, clean cloth.
10. Storage
This product is pre-treated with water-based wood stain to make the surface durable enough for outdoor use. To ensure a long service life, the product should be cleaned regularly, should not be left unprotected outdoors for longer than necessary and should be replazed at regular intervals.
Clean and dry the product carefully before storing it after the summer season. Store summer furniture indoors in a cool and dry place if possible.
If stored outdoors, stow under a roof and with a protective cover if possible. Furniture that is stored unprotected from rain or snow should be carefully protected with a water-repellent cover and, if possible, positioned at an angle to allow water to run off better.
Dry the furniture after rain or snowfall - especially the flat surfaces. Ensure air circulation to prevent moisture and mould growth.
11. Maintenance
PLEASE NOTE!
To maintain the stability of the furniture, all screws should be tightened at least once a season.
Regular treatment with wood stain - e.g. once a year - freshens up wooden summer furniture and increases its durability.
How often you need to relaze depends on the climatic conditions and how much the furniture is exposed to sun and rain. After-treatment with wood stain protects the surface from drying out, prevents moisture from penetrating the wood and reduces the formation of drying cracks. For furniture that is left unprotected outside, it is a sure sign that it needs re-staining if rain is absorbed instead of forming drops on the surface.
11.1 Aftercare
Choose a shady spot for cleaning, painting and drying. Avoid direct sunlight.
- If necessary, clean the furniture with a damp cloth and a mild soap solution. Wipe dry with a soft, clean cloth. Remove stubborn stains with a soft brush. If necessary, sand the surface in the direction of the grain with fine sandpaper. Do not use steel wool or metal brushes - metal particles could stick to the wood and rust, and if the wood fibres have straightened up after cleaning, they should be sanded with fine sandpaper.
- Shake the container well and apply the glaze quickly and evenly as a thin film over the entire surface in the direction of the fibres using a brush or sponge.
- Water-based glaze dries quickly. It is therefore essential to wipe off all excess glaze with a dry cloth immediately after application.
- Clean brushes and hands with soap and water.
12. Disposal and recycling
Notes for packaging


The packaging materials are recyclable. Please dispose of packaging in an environmentally friendly manner.
Table des matieres: Page:
Homepage: https://www.pRACTixx.com/de/service
Apparent defects must be notified within 8 days from the receipt of the goods. Otherwise, the buyer's rights of claim due to such defects are invalidated. We guarantee for our machines in case of proper treatment for the time of the statutory warranty period from delivery in such a way that we replace any machine part free of charge which provably becomes unusable due to faulty material or defects of fabrication within such period of time. With respect to parts not manufactured by us we only warrant insofar as we are entitled to warranty claims against the upstream suppliers. The costs for the installation of the new parts shall be borne by the buyer. The cancellation of sale or the reduction of purchase price as well as any other claims for damages shall be excluded.
Garantie FR


- PX-GB-1
- Inhaltsverzeichnis:
- Verehrter Kunde,
- Table of contents: Page:
- Introduction
- Manufacturer:
- Dear Customer,
- Note:
- Product description (Fig. 1)
- Scope of delivery (Fig. 2)
- Proper use
- General safety instructions
- Technical data
- Unpacking
- WARNING!
- Layout
- Attention!
- Cleaning
- Storage
- Maintenance
- PLEASE NOTE!
- Aftercare
- Disposal and recycling
- Notes for packaging
- Table des matieres: Page:
- Garantie FR
Brand : Practixx
Model : PXGB1
Category : Garden bench