WF55 - Vacuum Cleaner Practixx - Free user manual and instructions
Find the device manual for free WF55 Practixx in PDF.


| Product type | Vacuum for smooth surfaces (windows) |
| Brand | Practixx |
| Model | WF55 |
| Power supply | Rechargeable Li-ion battery 3.6 V |
| Charger | Input 100-240 V, output 5 V, protection class II |
| Charging time | Approximately 2 hours |
| Runtime | Approximately 35 minutes |
| Protection rating | IPX4 (splash-proof) |
| Dirty water tank capacity | Approximately 150 ml |
| Main functions | Spraying, wiping and water vacuuming in one pass |
| Included accessories | Vacuum segment, microfiber cloth, water tank, spray bottle, charging cable |
| Cloth care | Machine washable at 60°C, without fabric softener |
| Tank cleaning | Empty and wipe with a damp cloth and mild detergent |
| Recommended use | Smooth surfaces like windows, mirrors, tiles |
| Cleaning products | Water or non-foaming, non-abrasive detergent |
| Safety instructions | Do not use outdoors, do not immerse, do not use with damaged cord |
| Repairability | Entrust any repairs to an authorized specialist, do not open yourself |
| Country of use | European countries only |
Frequently Asked Questions - WF55 Practixx
User questions about WF55 Practixx
0 question about this device. Answer the ones you know or ask your own.
Ask a new question about this device
Download the instructions for your Vacuum Cleaner in PDF format for free! Find your manual WF55 - Practixx and take your electronic device back in hand. On this page are published all the documents necessary for the use of your device. WF55 by Practixx.
USER MANUAL WF55 Practixx
natural_image
White PRACTIX air conditioner device with black handle and white body (no visible text or symbols on body)WF55
| DE | AKKU-FENSTERSAUGEROriginalbetriebsanleitung | 6-9 |
| GB | CORDLESS WINDOW VACUUMTranslation of Original Operating Manual | 10-13 |
| FR | NETTOYEAR DE VITRES SANS FILTraduction de la notice originale | 14-17 |
DE
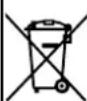
Nur für EU-Länder.
Only for EU countries.
Do not dispose of electric tools together with household waste material! In observance of European directive 2012/19/EU on wasted electrical and electronic equipment and its implementation in accordance with national law, electric tools that have reached the end of their life must be collected separately and returned to an environmentally compatible recycling facility
FR

1

natural_image
Electric plug with attached cable, labeled with numbers 8 and 9 (no text or symbols on the device itself)2
3
4
natural_image
Close-up of a white plastic cleaning tool with a black handle and label '6' (no text or symbols on the tool itself)5
3
4
natural_image
Close-up of a white plastic cleaning tool with a black handle and label '6' (no text or symbols on the tool itself)6
7
natural_image
3D rendered image of a white mechanical tool with a black circular component and a numbered label '14' (no text or symbols on the object itself)Günzburger Straße 69
D-89335 Ichenhausen
VEREHRTER KUNDE,
Explanation of symbols used on the device
 | GB | Caution - Read the operating instructions to reduce the risk of inquiry |
 | GB | Use the charger in dry rooms only. |
 | GB | Protection class II |
 | GB | Protection class III |
Introduction
MANUFACTURER:
scheppach
Günzburger Straße 69
D-89335 Ichenhausen
DEAR CUSTOMER,
We hope your new tool brings you much enjoyment and success.
NOTE:
According to the applicable product liability laws, the manufacturer of the device does not assume liability for damages to the product or damages caused by the product that occurs due to:
- Improper handling,
• Non-compliance of the operating instructions, - Repairs by third parties, not by authorized service technicians,
- Installation and replacement of non-original spare parts,
• Application other than specified,
- A breakdown of the electrical system that occurs due to the non-compliance of the electric regulations and VDE regulations 0100, DIN 57113 / VDE0113.
WE RECOMMEND:
Read through the complete text in the operating instructions before installing and commissioning the device. The operating instructions are intended to help the user to become familiar with the machine and take advantage of its application possibilities in accordance with the recommendations. The operating instructions contain important information on how to operate the machine safely, professionally and economically, how to avoid danger, costly repairs, reduce downtimes and how to increase reliability and service life of the machine.
In addition to the safety regulations in the operating instructions, you have to meet the applicable regulations that apply for the operation of the machine in your country. Keep the operating instructions package with the machine at all times and store it in a plastic cover to protect it from dirt and moisture. Read the instruction manual each time before operating the machine and carefully follow its information. The machine can only be operated by persons who were instructed concerning the operation of the machine and who are informed about the associated dangers. The minimum age requirement must be complied with. In addition to the safety requirements in these operating instructions and your country's applicable regulations, you should observe the generally recognized technical rules concerning the operation of devices.
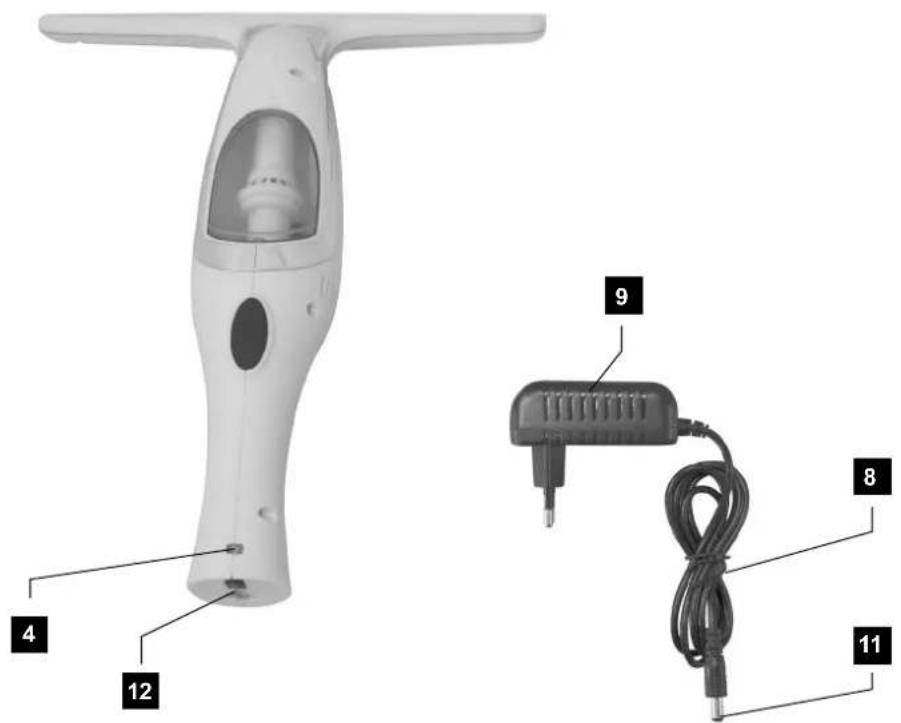
Device Description (Fig.1)
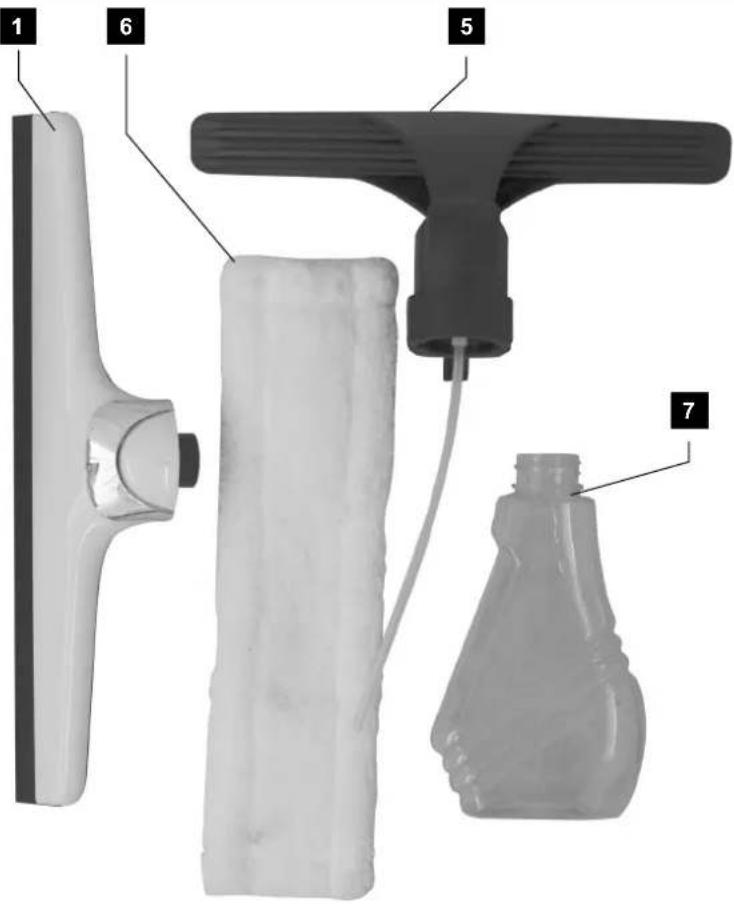
- Suction attachment
- Dirt water container
- ON/OFF switch
- Control lamp
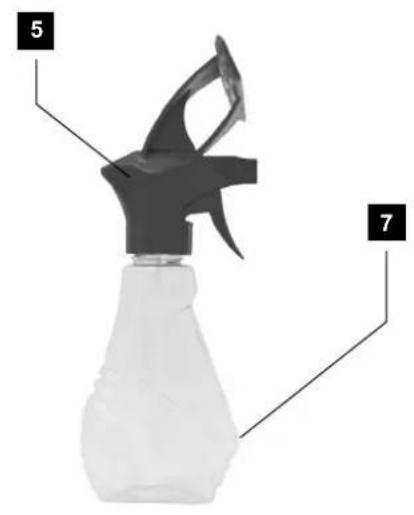
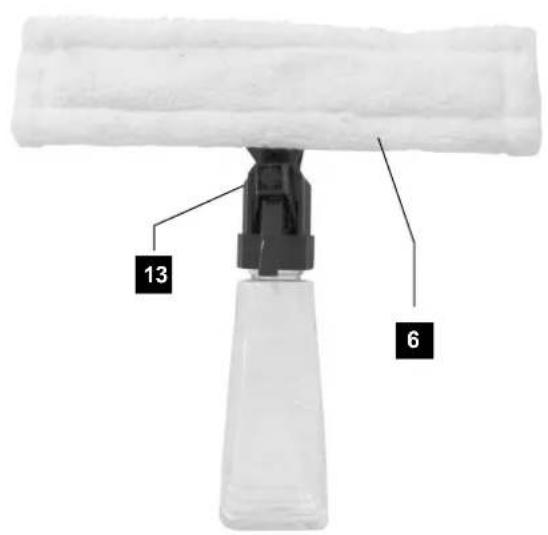
- Attachment with spray nozzle
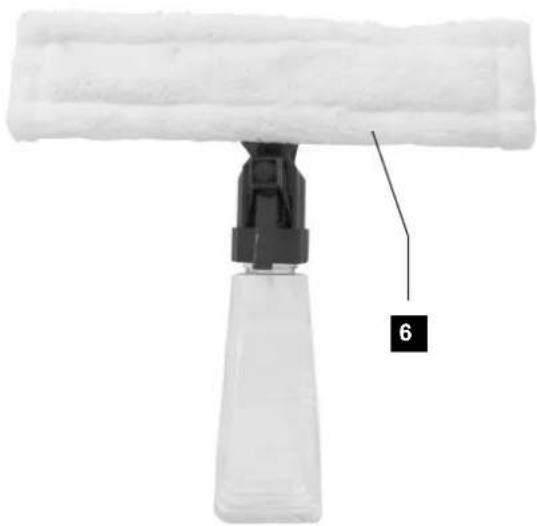
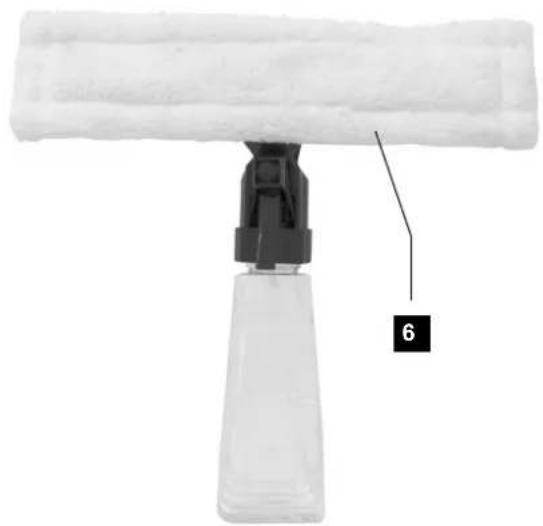
- Microfiber cover
- Water container
- Charging cable
- Charging plug
Unpacking
- Open the packaging and remove the device carefully.
- Remove the packaging material as well as the packaging and transport bracing (if available).
- Check that the delivery is complete.
- Check the device and accessory parts for transport damage.
- If possible, store the packaging until the warranty period has expired.
ATTENTION
The device and packaging materials are not toys! Children must not be allowed to play with plastic bags, film and small parts! There is a risk of swallowing and suffocation!
Proper use
The product is to be used exclusively for simultaneously squeegeeing and vacuuming water from smooth surfaces such as windows. This appliance is intended exclusively for use in domestic households. Not to be used for commercial purposes.
Safety instructions
Danger - Risk of electrical shock
- Do not charge or use the appliance outdoors.
- Never use the appliance if the cable, plug or casing are damaged.
- To avoid risks, arrange to have damaged power cables and/or plugs replaced as soon as possible by a qualified specialist.
- Have all repairs carried out by a specialist workshop. Under no circumstances should you open the appliance yourself. Repairs that are not carried out by a specialist workshop could lead to physical injuries.
- Before switching on the appliance, make sure that the mains voltage corresponds to the voltage indicated in the technical data for the appliance.
- Never touch the power supply or the appliance with wet or damp hands.
- Do not use the power supply with an extension cable; connect the power adapter directly to a power socket.
- NEVER immerse the appliance in water or other liquids! You could receive a fatal electric shock if residual liquids come into contact with live components during operation.
Warning - Risk of injury
- Do not change any accessories while the appliance is switched on.
- Do not use the appliance for vacuuming up sharp objects or broken glass.
- Never vacuum up burning matches, glowing ashes or cigarette butts.
- Do not use the appliance for vacuuming up chemical products, stone dust, gypsum, cement or similar particles.
- This appliance is not suitable for use with infl am- mable and explosive substances or chemical and aggressive liquids.
- Always store the appliance indoors. To prevent accidents, keep the appliance in a dry location when not in use.
- Under extreme conditions, leaks in the battery cells may occur. In the event that battery fluid comes into contact with skin or eyes, the affected area must be
rinsed off with water immediately. Contact a physician.
- This appliance may be used by children aged 8 over and by persons with reduced physical, sensory or mental capabilities or lack of experience and knowledge, provided that they are under supervision or have been told how to use the appliance safely and are aware of the potential risks.
• Children must not play with the appliance. - Cleaning and user maintenance tasks may not be carried out by children unless they are supervised.
Attention - Property damage
- Use only accessories recommended by the manufacturer.
- The mains adapter may not be used for other purposes.
• Always grip the power plug to disconnect the appliance from the power supply. - Do not place the appliance next to radiators, ovens or other heated devices or surfaces.
• Always make certain that the ventilation slits are not obstructed. A blocked ventilation circuit can result in overheating and damage to the appliance. - This product contains rechargeable batteries. Do not throw the batteries into a fire and do not subject them to high temperatures. There is a risk of explosion!
- Do not use the mains adapter for a different product and do not attempt to charge this appliance with a different mains adapter. Use only the mains adapter supplied with this appliance.
- Never try to recharge non-rechargeable batteries.
Technical details
| Charger |
| Input 100 ~ 240 V |
| Output 5 V |
| Protection Class II |
| Appliance |
| Battery working voltage 3.6 V |
| Batteries Li-Ion |
| Operating time with full battery charge 35 min |
| Charging time for empty battery 2 h |
| Protection class IPX4 |
Before getting started
Assembly:
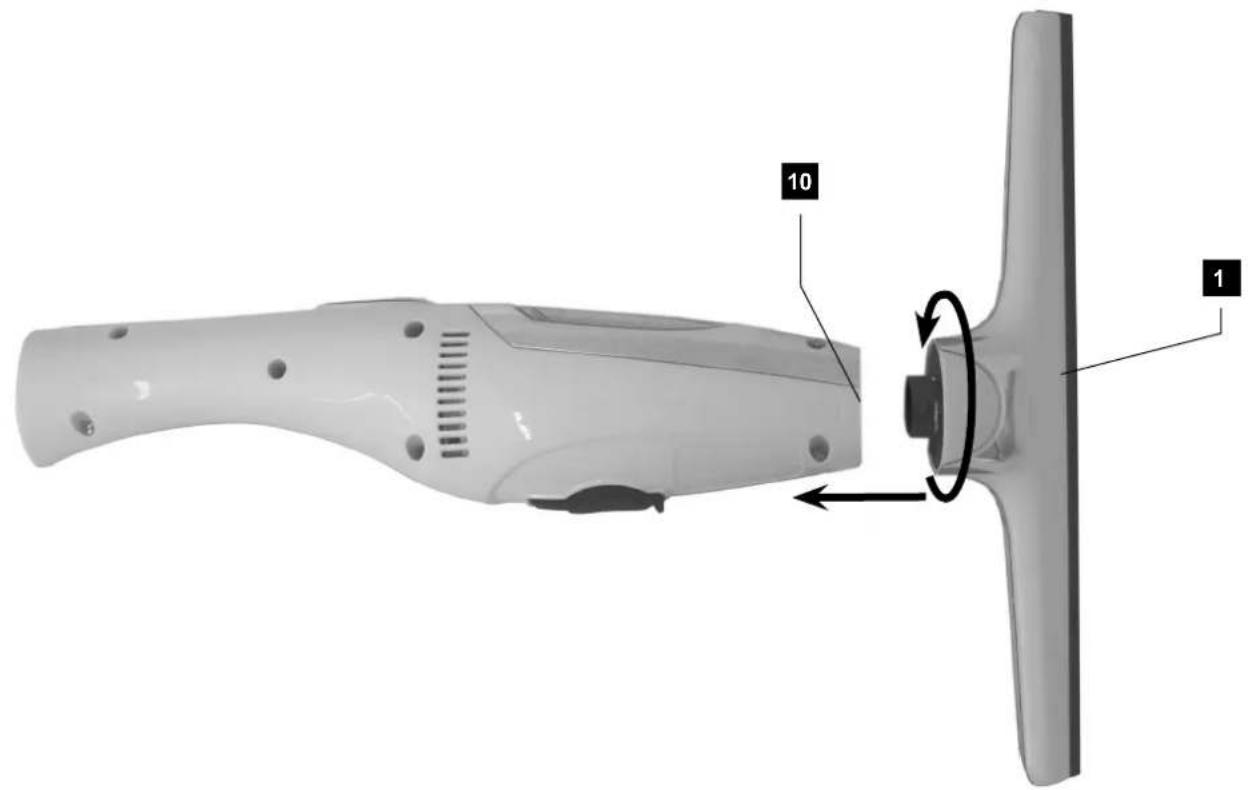
- Attach the suction attachment (1) to the connection (10) on the unit. Drive the suction attachment (1) into the connection (10), so that unit and suction attachment are firmly attached to each other. Ensure that the pins on the suction attachment (1) are guided into the slots of the connection (1). Fig.2
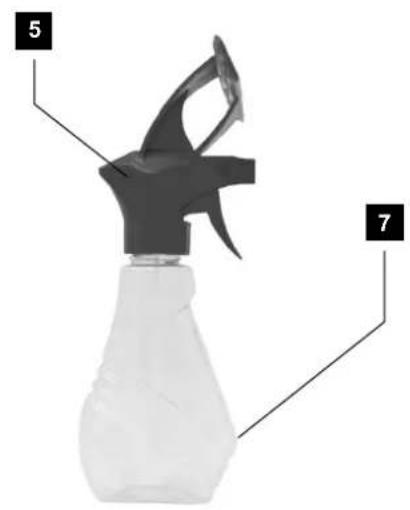
- Screw the wiper attachment with the spray nozzle (5) onto the water container (7). Fig.3
- Attach the microfiber cover (6). Fig.4
Charging the battery (Fig.5)
You need to fully charge the battery before you use it for the first time. The tool comes with a battery that is not fully charged.
Note: Make sure that the unit is switched off before you start charging it.
- Insert the plug (11) into the charging socket (12).
- Plug the charging plug (9) into a socket.
- The control light (4) flashes to show that charging is in progress.
- The control light (4) indicates by continuous illumination that the battery is charged.
Rechargeable battery information
Recharge the battery only, when the suction power of the tool is clearly reduced.
Start-up
Attention! Do not use any foaming, corrosive, aggressive, abrasive or chemical cleaning agents. Those can damage the device.
- Set the tip of the spray nozzle (13) to STREAM (jet) or Spray (coarse water mist). (Fig.6)
- Fill water into the spray bottle and add a detergent, if needed, which is suitable for cleaning windows.
- Spray onto the area you want to clean.
- With the microfiber cover (6) wipe across the sprayed surface to loosen any stubborn dirt.
- Turn on the unit by the I/O switch (3).
- Move the squeegee of the suction attachment (1) slowly from top to bottom over the wet surface. The liquid is removed and sucked into the container for dirt water (2).
Note: Do not move the squeegee sideways across wet surfaces. The water will not be absorbed and will thus run out of the squeegee by the side.
- After you have dried one track, start again from the top pulling downwards.
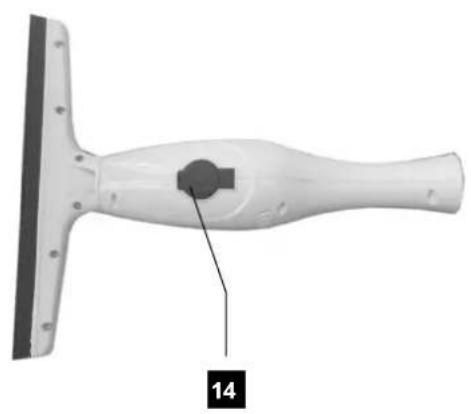
Note: Keep working with the tool until the MAX level on the dirt water container (2) has been reached. Turn off the tool and empty the container (2A). Open the plug (14) at the bottom of the dirt water container. (Fig.7). Empty the dirty water and close the dirt water container again. Now you can continue with your job.
- If the whole surface is dry, press the I/O switch (3) to turn the unit off. The control lamp (4) will turn off.
- If necessary, use a dry wipe to clean any streaks or wet spots that may have been left on the processed surface.
Cleaning and care
Before you clean the tool, disconnect it from the charger! Danger of electric shock! Do not use abrasive or aggressive cleaning agents. These can damage the surface!
Rechargeable battery information
- We recommend the following to keep your rechargeable battery in good condition: After the units have been charged, unplug the charging unit from the mains socket. Reconnect the charging unit to the electrical outlet again when the suction power has significantly decreased.
- Never vacuum until the rechargeable battery is fully discharged and suction stops. This can shorten the battery's service life.
Cleaning the spray bottle
- Open and empty the water container (7). Use a moistened cloth and if necessary apply a mild detergent to the cloth to wipe the water container (7) clean.
Cleaning the microfiber cover
- You can wash the microfiber cover (6) in the washing machine at 60°. However, do not use any softener as this will reduce the microfiber's cleaning power immensely.
Storage
Store the tool in a clean and dry location free of dust. Make sure that the dirt water container is empty.
Troubleshooting
| Defect Cause Solution | ||
| The appliance is not working. | The appliance is not charged. Charge the appliance. | |
| The appliance is defective. Contact Customer Services. | ||
| Streaks keep appearing during cleaning. | The blade is dirty. Clean the blade. | |
| The blade is worn. Replace the blade | ||
| The spray bottle does not work. | There is no water/cleaning agent in the spray bottle. | Refill the spray bottle with water/ leaning agent. |
| The spray bottle is defective. Contact Customer Services. | ||
| The tip of the spray bottle is set to OFF. Turn the tip to SPRAY or STREAM. | ||
Günzburger Straße 69
D-89335 Ichenhausen
CHER CLIENT,

natural_image
A plain gray horizontal line with no text, symbols, or markings.EC-Declaration of Conformity
CE
| DE | erklärt folgende Konformität gemäßEU-Richtlinie und Normen für den Artikel |
| GB | hereby declares the following conformity under the EU Directive and standards for the following article |
| FR | déclare la conformité suivante selon la directive UE et les normes pour l'article |
| IT | dichiara la seguente conformità secondo le direttive e le normative UE per l'articolo |
| CZ | prohlašuje následující shodu podle smernice EU a norem pro výrobek |
| HU | az EU-irányelv és a vonatkozó szabványok szerinti következo megfeleloségi nyilatkozatot teszi a termékre |
| HR | ovime izjavljuje da postoji sukladnost prema EU-smjernica i normama za sljedece article |
| RO | declară următoarea conformitate corespunzător directivelor și normelor UE pentru articolul |
| TR | Normları geregince asagídaki uygunluk açıkla masını sunar. |
| FIN | vakuuttaa täten, että seuraava tuote täyttää ala esitetyt EU-direktiivit ja standardit |
| PL | deklaruje, ze produkt jest zgodny z nastepujacymi dyrektywami UE i normami |
| SLO | izjavlja sledeco skladnost z EU-direktivo in nor-mami za artikel |
| SK | prehlasuje nasledujúcu zhodu podla smernice EU a noriem pre výrobok |
| EST | kinnitab järgmist vastavus vastavalt ELi direktiivi ja standardite järgmist artiklinumbrit |
| LT | pareiškia, taip atitiktis pagal ES direktyvos ir standartai šj straipsnį |
| LV | apliecina šādu saskaņā ar ES direktīvu atbilstības un standarti šādu rakstu |
| NL | verklaart hierbij dat het volgende artikel voldoet aan de daarop betrekking hebbende EG-richtlijnen en normen |
| RUS | заявляет о соответствии товара следующим директивам и нормам EC |
| PT | declara o seguinte conformidade com a Directiva da UE e as normas para o seguinte artigo |
| ES | declara la conformidad siguiente según la directiva la UE y las normas para el articulo |
| DK | erklærer hermed, at følgende produkt er ioverensstemmelse med nedenstående EUdirektiver og standarder: |
| SE | försäkrar härmed följande överensstämmelse enligt EU-direktiv och standarder för följande artikeln |
| NO | erklærer herved følgende samsvar under EU-direktiv og standarder for følgende artikkel |
| BG | декларира съответното съответствие съгласно Дирек-тива на ЕС и норми за артикул |
Window Vacuum Cleaner - WF55
| 2009/105/EC | |
| X | 2006/95/EC |
| 2006/28/EC | |
| 2005/32/EC | |
| X | 2004/108/EC |
| 2004/22/EC | |
| 1999/5/EC | |
| 97/23/EC | |
| 90/396/EC | |
| X | 2011/65/EU |
| 89/686/EC_96/58/EC | |
| 2006/42/EC | |
| Annex IVNotified Body:D-80339 München GermanyNotified Body No.: | |
| 2000/14/EC_2005/88/EC | |
| Annex V | |
| Annex VINoise: measured L_WA = xx dB(A); guaranteed L_WA = xx dB(A)Notified Body: Notified Body No.: | |
| 2004/26/EC | |
| Emission. No: | |
Standard references: EN 60335-1:2012/A11:2014; EN 60335-2-2:2010/A1:2013; EN 62233:2008; EN 55014-1/A2:2011; EN 55014-2/A2:2008
Apparent defects must be notified within 8 days from the receipt of the goods. Otherwise, the buyer's rights of claim due to such defects are invalidated. We guarantee for our machines in case of proper treatment for the time of the statutory warranty period from delivery in such a way that we replace any machine part free of charge which provably becomes unusable due to faulty material or defects of fabrication within such period of time. With respect to parts not
manufactured by us we only warrant insofar as we are entitled to warranty claims against the upstream suppliers. The costs for the installation of the new parts shall be borne by the buyer. The cancellation of sale or the reduction of purchase price as well as any other claims for damages shall be excluded.
Garantie FR
- WF55
- DE
- FR
- VEREHRTER KUNDE,
- Introduction
- MANUFACTURER:
- scheppach
- DEAR CUSTOMER,
- NOTE:
- WE RECOMMEND:
- Device Description (Fig.1)
- Unpacking
- ATTENTION
- Proper use
- Safety instructions
- Danger - Risk of electrical shock
- Warning - Risk of injury
- Attention - Property damage
- Technical details
- Before getting started
- Assembly:
- Charging the battery (Fig.5)
- Rechargeable battery information
- Start-up
- Cleaning and care
- Cleaning the spray bottle
- Cleaning the microfiber cover
- Storage
- CHER CLIENT,
- EC-Declaration of Conformity
- CE
- Window Vacuum Cleaner - WF55
- Garantie FR
Brand : Practixx
Model : WF55
Category : Vacuum Cleaner