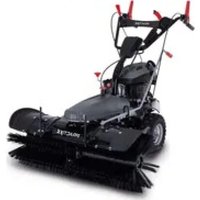
PX-KM-100 - Sweeper Practixx - Free user manual and instructions
Find the device manual for free PX-KM-100 Practixx in PDF.


| Product type | Gasoline sweeper |
| Brand | Practixx |
| Model | PX-KM-100 |
| Total width | 106 cm |
| Sweeping width | 100 cm |
| Brush diameter | 350 mm |
| Weight | 82 kg |
| Engine | 4-stroke, 173 cc, 3.6 kW / 4.9 HP |
| Fuel | Unleaded gasoline (max E10), tank 1 L |
| Engine oil | SAE 10W-30 or 10W-40, tank 0.6 L |
| Transmission | 3 forward speeds (2.5-4.3 km/h) + 1 reverse (2.5 km/h) |
| Brush speed | 5 levels, 180-350 rpm |
| Brush angle | -25° to +25° |
| Maximum slope | 20° |
| Tire pressure (drive wheels) | 1.38 bar |
| Tire pressure (carrying wheel) | 3.1 bar |
| Sound power level | 98 dB |
| Starting | Cable (manual) or electric (option) |
| Main functions | Sweeping paved surfaces, snow removal (with optional blade), collection (with optional hopper) |
| Optional accessories | Snow plow blade (ref. 5908703811), collection hopper (ref. 5908703810) |
| Wear parts | Brushes, V-belt, spark plug, air filter, rubber lip, friction rod |
| Periodic maintenance | Oil change every 50 h or 1 year, air filter cleaning every 10 h, spark plug every 50 h |
Frequently Asked Questions - PX-KM-100 Practixx
User questions about PX-KM-100 Practixx
0 question about this device. Answer the ones you know or ask your own.
Ask a new question about this device
Download the instructions for your Sweeper in PDF format for free! Find your manual PX-KM-100 - Practixx and take your electronic device back in hand. On this page are published all the documents necessary for the use of your device. PX-KM-100 by Practixx.
USER MANUAL PX-KM-100 Practixx
natural_image
Technical line drawing of a manual lawn sawer with visible blades and handle (no text or symbols)
PX-KM-100
| DE | KehrmaschineOriginalbedienungsanleitung | 7 |
| GB | SweeperTranslation of original instruction manual | 24 |
| FR | Balayeuse motoriséeTraduction des instructions d'origine | 39 |

natural_image
Technical line drawing of a mechanical assembly with labeled parts (no readable text or symbols)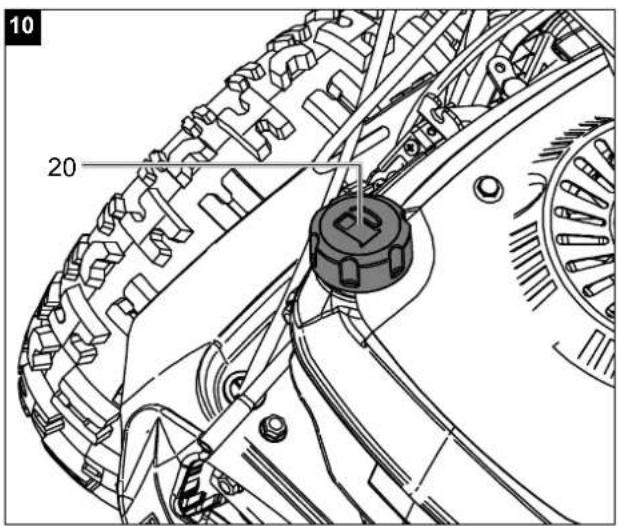
Günzburger Straße 69
D-89335 Ichenhausen
Verehrter Kunde,
Explanation of the symbols on the product
Symbols are used in this manual to draw your attention to potential hazards. The safety symbols and the accompanying explanations must be fully understood. The warnings themselves will not rectify a hazard and cannot replace proper accident prevention measures.
 | Attention! Failure to observe the safety signs and warning information affixed to the machine and failure to observe the safety and operating instructions can result in serious injury or even death. |
 | Before commissioning, read and observe the operating manual and safety instructions! |
 | Wear safety goggles! |
 | Wear hearing protection! |
 | Wear sturdy footwear! |
 | The maximum slope is 20°. |
 | Removing or modifying protective or safety equipment is prohibited. |
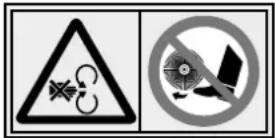 | Rotating brushes! Keep body away! Do not reach for rotating brushes. Danger of injury! |
  | ATTENTION! Operating materials are flammable and explosive - danger of burning.Do not refuel while the engine is hot or running.Danger of poisoning! Only use the device outdoors and never in closed or poorly ventilated rooms. |
 | Remove the spark plug connector prior to all maintenance work. |
 | Danger due to flying objects! Make sure that other persons maintain a sufficient safety distance. Keep uninvolved persons away from the device. |
 | Attention: hot surface - danger of burning. |
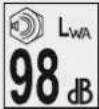 | Guaranteed sound power level. |
 | Engine oil |
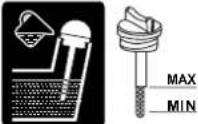 | Check the oil level. |
 | Press the fuel pump “primer”. |
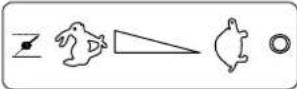 | Throttle |
 | Speed control lever for the brushes (brush speed lever) |
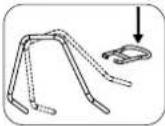 | Height adjustment of the steering bar |
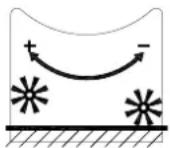 | Height adjustment for the brushes |
 | Brush drive |
 | Drive |
 | The product complies with the applicable European directives. |
Table of contents: Page:
- Introduction......28
- Product description (Fig. 1 + 11)....28
- Scope of delivery....28
- Proper use....29
- General safety instructions....29
- Technical data 31
- Unpacking 32
- Assembly 32
- Before commissioning....33
- Operating the sweeper....34
- Maintenance & Cleaning 35
- Repair & ordering spare parts 36
- Transport 37
- Storage....37
- Disposal and recycling 37
- Troubleshooting....38
- Declaration of conformity 58
1. Introduction
Manufacturer:
Scheppach GmbH
Günzburger Straße 69
D-89335 Ichenhausen
Dear Customer,
We hope your new product brings you much enjoyment and success.
Note:
In accordance with the applicable product liability laws, the manufacturer of this product assumes no liability for damage to the product or caused by the product arising from:
- Improper handling
• Non-compliance with the operating manual,
• Repairs carried out by third parties, unauthorised specialists.
• Installing and replacing non-original spare parts
• Application other than specified
Note:
Read through the complete text in the operating manual before installing and commissioning the device.
This operating manual should help you to familiarise yourself with your product and to use it for its intended purpose.
The operating manual includes important instructions for the safe, proper and economic operation of the product, for avoiding danger, for minimising repair costs and downtimes and for increasing the reliability and extending the service life of the product.
In addition to the safety instructions in this operating manual, you must also observe the regulations applicable to the operation of the product in your country.
Keep the operating manual package with the power tool at all times and store it in a plastic cover to protect it from dirt and moisture. They must be read and carefully observed by all operating personnel before starting the work.
The product may only be used by personnel who have been trained to use it and who have been instructed with respect to the associated hazards.
The required minimum age must be observed.
In addition to the safety instructions in this operating manual and the separate regulations of your country, the generally recognised technical rules relating to the operation of identical products must also be observed.
We accept no liability for accidents or damage that occur due to a failure to observe this manual and the safety instructions.
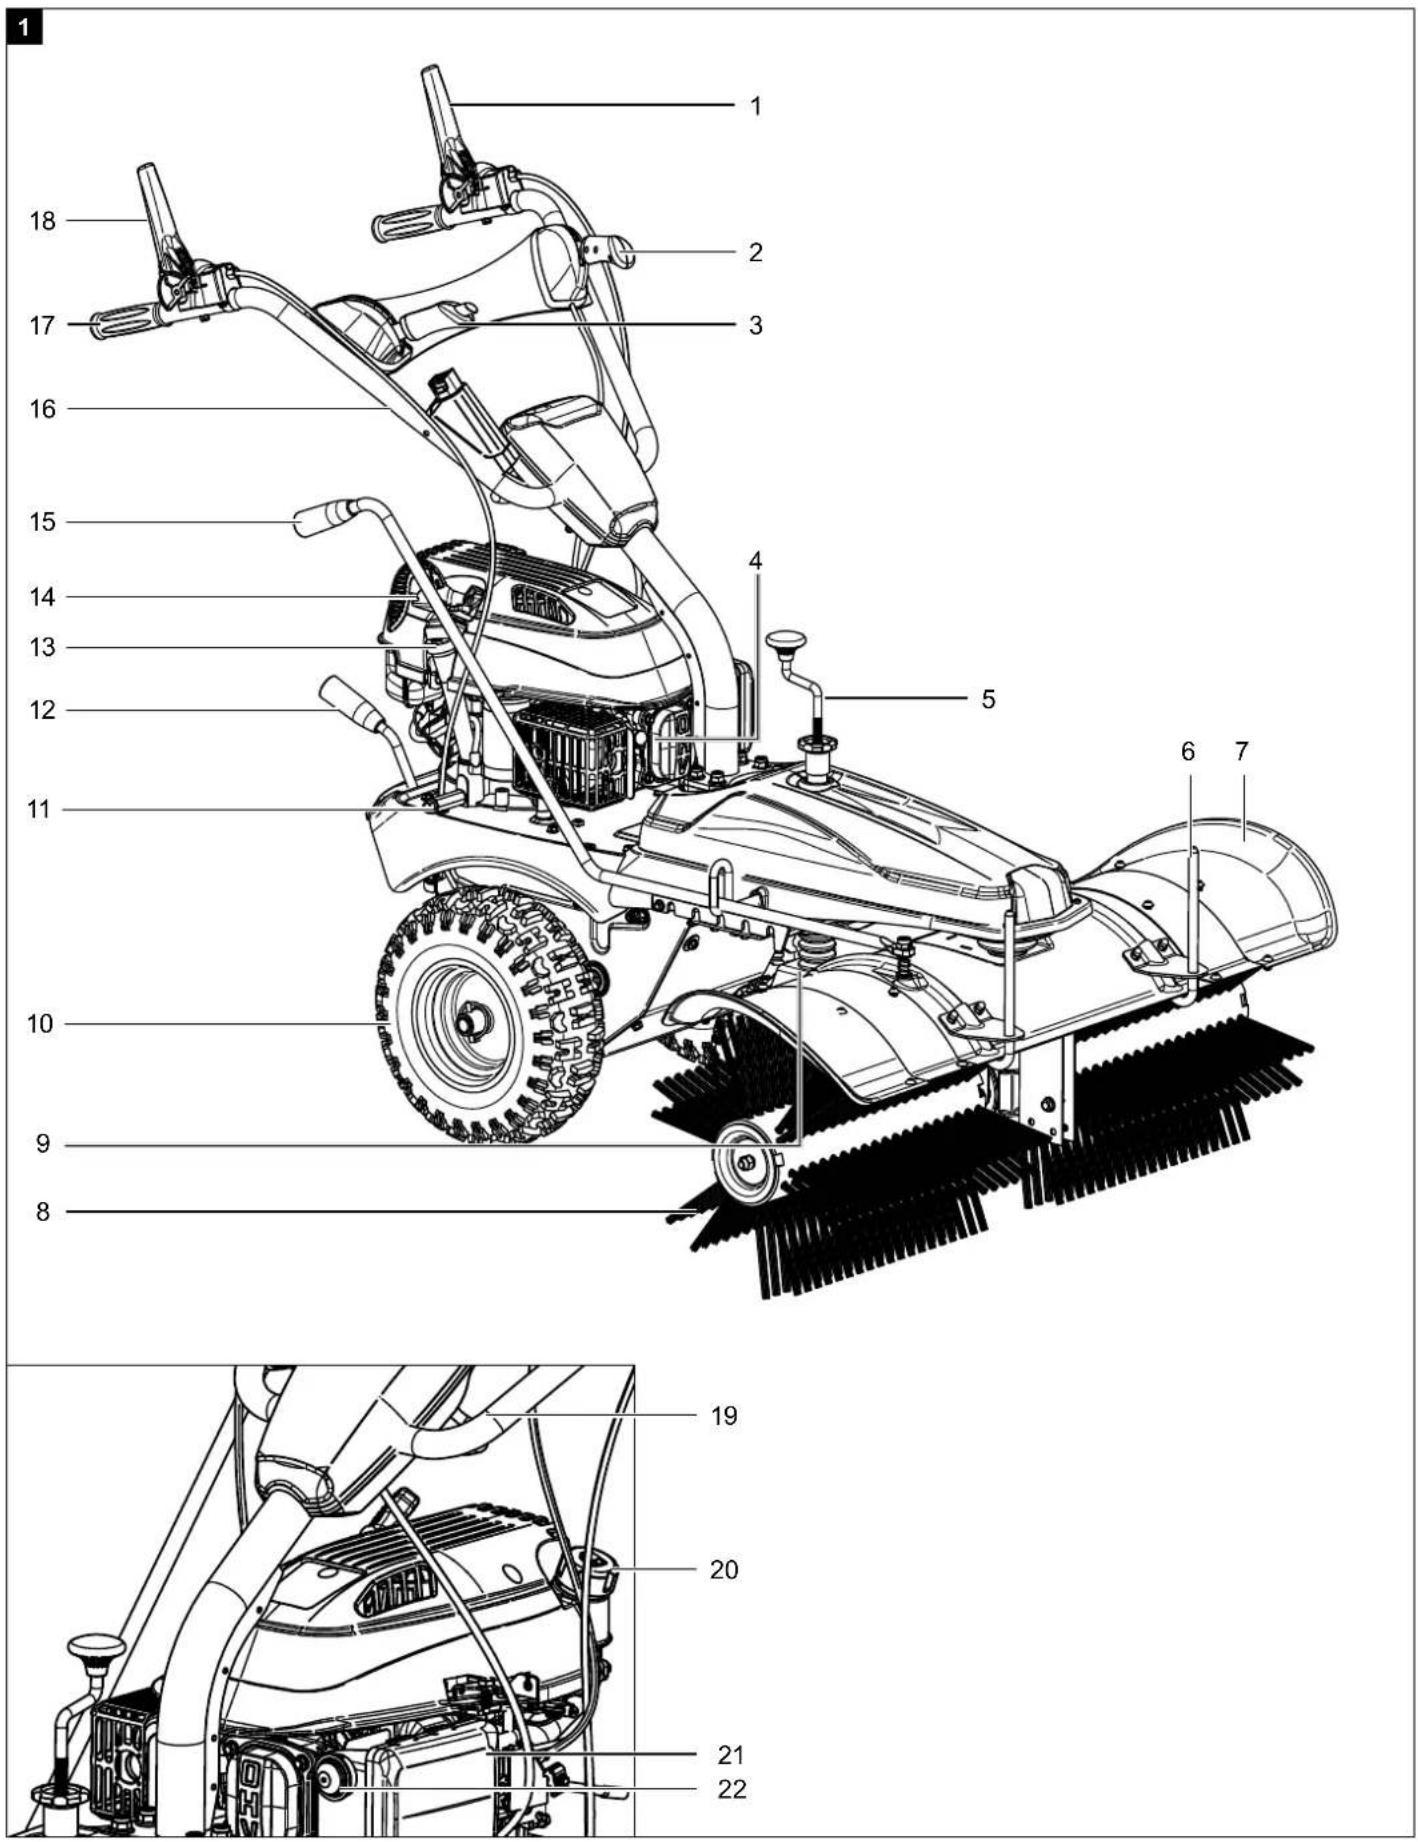
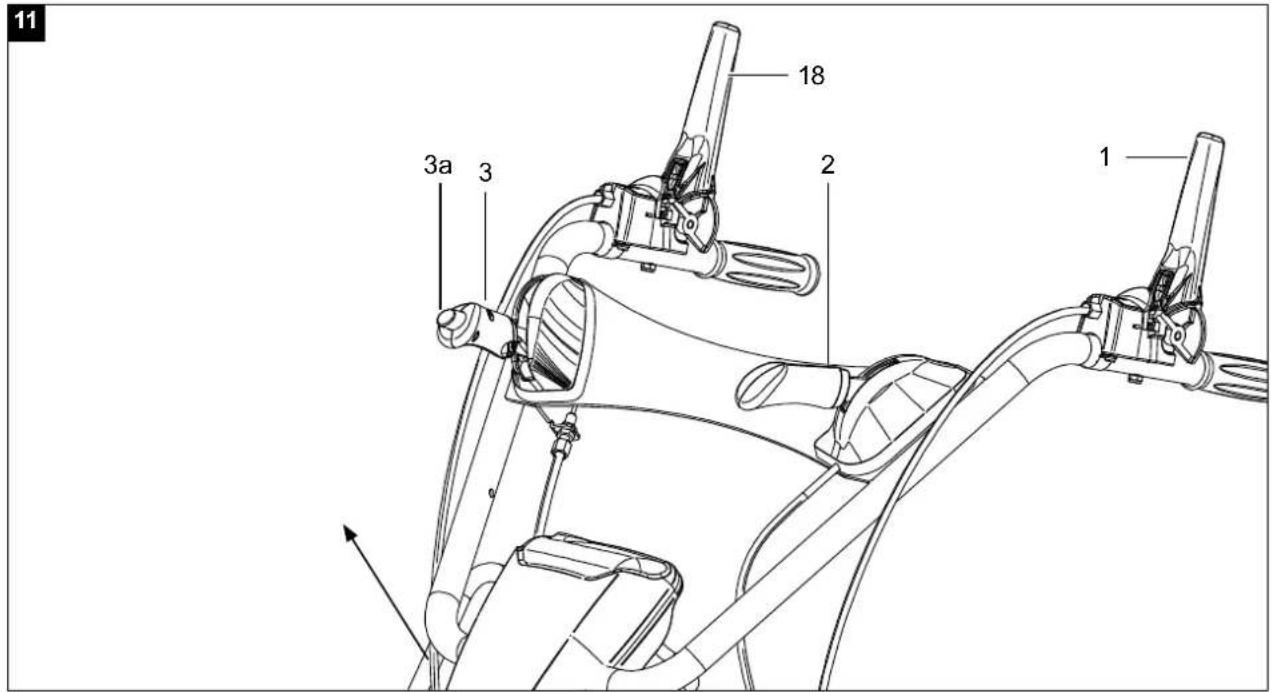
2. Product description (Fig. 1 + 11)
- Brush drive clutch lever
- Throttle
- Brush speed lever
3a. Locking knob - Spark plug connector
4a. Spark plug - Crank
5a. Star grip nut / locknut - Mounting bars for snow blade/collecting container
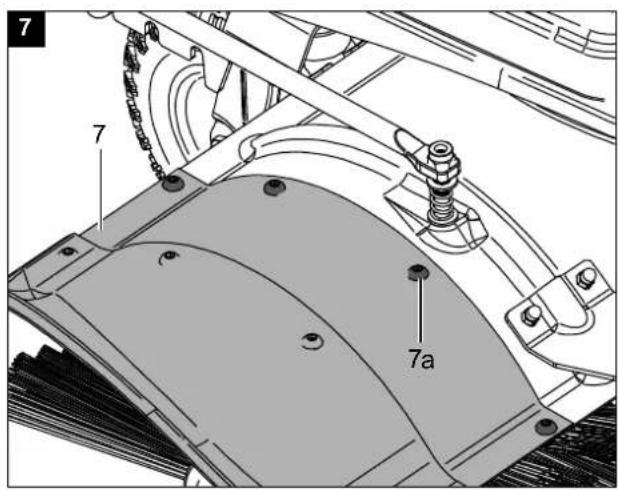
- Guard left/right
7a. Screw
7b. Nut - Brushing rollers
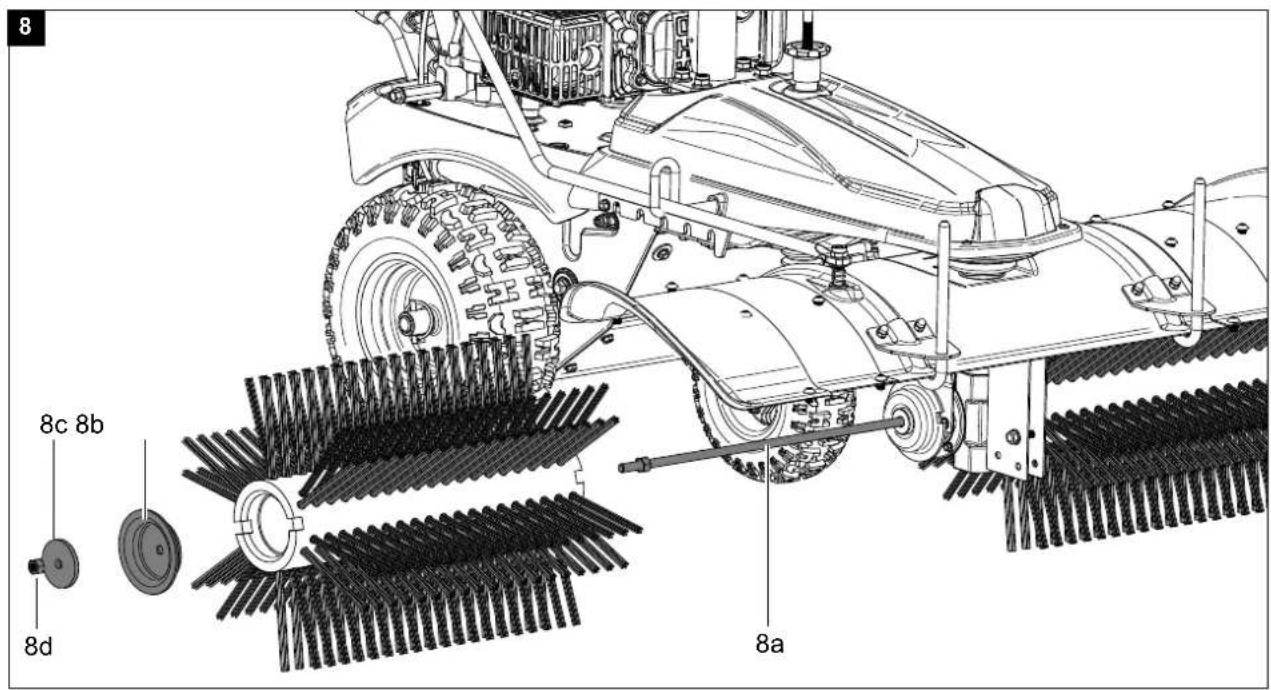
8a. Brush shaft
8b. Forming disc
8c. Washer
8d. Nut - Support wheel
- Wheel
- Oil drain screw
- Gear selector lever
12a. Screw
12b. Nut - Oil dipstick
- Pull starter
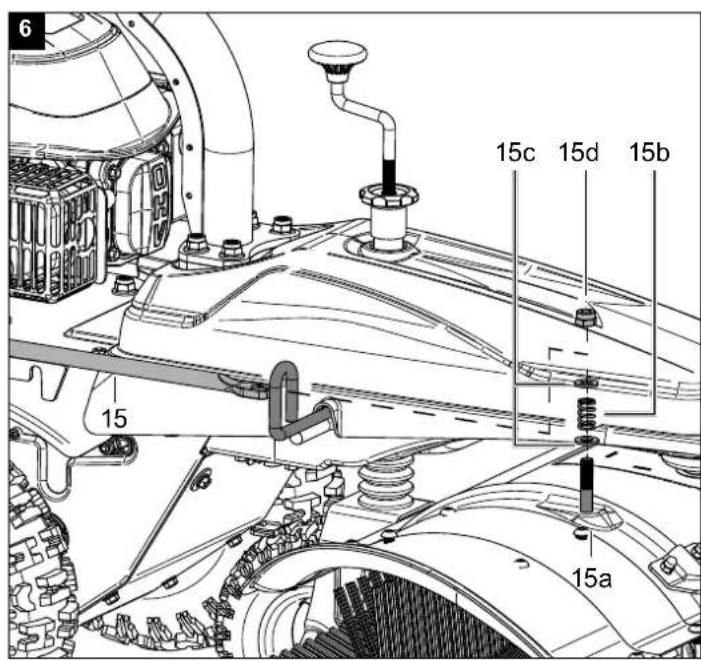
- Swivel bar
15a. Threaded pins
15b. Spring
15c. Washer
15d. Nut - Steering bar
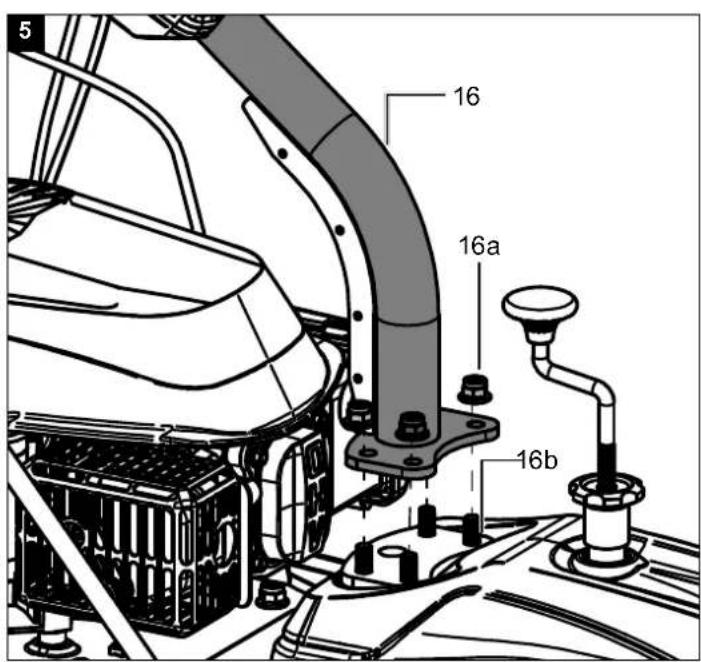
16a. Nut
16b. Fastening pins - Handle
- Travel drive clutch lever
- Handle for steering bar adjustment
- Fuel filler cap
- Air filter cover
21a. Air filter - Primer pump
3. Scope of delivery
Item Quantity Designation
| 12 | 1x | Gear selector lever |
| 8 | 2x | Brushing roller |
| 8a | 1x | Brush shaft |
| 8b | 2x | Forming disc |
| 8c | 2x | Large washer |
| 8d | 2x | Nut |
| 7 | 2x | Guard left/right |
| 1x | Operating manual |
4. Proper use
The petrol sweeper, including attachments, is specially designed for the maintenance and cleaning of paved areas, walkways, yard entrances and good ventilated storage areas. Do not operate the machine in enclosed spaces.
The petrol sweeper is suitable for sweeping or picking up loose dirt. When attaching the snow blade, the petrol sweeper can be used to clear snow.
Do not use the petrol sweeper in the rain.
The machine may only be used in the intended manner. Any use beyond this is improper.
The user/operator, not the manufacturer, is responsible for damages or injuries of any type resulting from this.
An element of the intended use is also the observance of the safety instructions, as well as the assembly instructions and operating information in the operating manual.
Persons who operate and maintain the machine must be familiar with it and must be informed about potential dangers.
In addition, the applicable accident prevention regulations must be strictly observed.
Other general occupational health and safety-related rules and regulations must be observed.
The liability of the manufacturer and resulting damages are excluded in the event of modifications of the machine.
The machine may only be operated with original parts and original accessories from the manufacturer.
Please note that our equipment was not designed with the intention of use for commercial or industrial purposes. We assume no guarantee if the device is used in commercial or industrial applications, or for equivalent work.
5. General safety instructions
We have marked points in this operating manual that impact your safety with this symbol. △
Furthermore, the operating manual contains other important text sections that are marked with the word "ATTENTION!".
⚠ Attention!
When using equipment, several safety warnings must be observed to prevent injuries and damage. For this reason, please carefully read this operating manual / safety instructions. If you hand the device over to another person, please hand over this operating manual / safety instructions as well. We accept no liability for accidents or damage that occur due to a failure to observe this manual and the safety instructions.
DANGER
A failure to observe these instructions poses an extreme danger of death or the risk of life-threatening injuries.
⚠ WARNING
A failure to observe these instructions poses a danger of death or the risk of serious injuries.
CAUTION
A failure to observe these instructions poses a minor to moderate danger of injury.
NOTE!
A failure to observe these instructions poses a risk of damage to the engine or other property.
- Familiarise yourself with your machine.
- Read the operating manual carefully and make sure you understand its contents, as well as all labels attached to the machine.
- Familiarise yourself with the area of application, as well as limitations of the machine, and particular sources of danger.
- Make sure that you know all the controls and their function exactly.
- Make sure you know how to stop the machine and quickly disable the controls.
- Do not attempt to use the machine without knowing the exact method of operation and the maintenance requirements of the engine and how to avoid accidents resulting in personal injury and/or property damage.
- Keep other people, particularly children, away from your work area.
Working range
- Never start or operate the machine in an enclosed space. The exhaust gases are dangerous because they contain the odourless and deadly gas carbon monoxide. Operate the machine only in a well-ventilated outdoor area.
- Never operate the machine without good visibility or lighting conditions.
Personal safety
- Do not use the machine if you have taken drugs, alcohol or medication that affects your ability to operate the machine correctly.
- Wear suitable clothing. Wear long trousers, boots and gloves.
-
Do not wear loose clothing, shorts or jewellery of any kind. Tie back long hair so that it is at shoulder height at most. Keep hair, clothing and gloves away from moving parts. Loose-fitting clothing, jewellery or long hair may become caught in the moving parts. Check your machine before starting.
-
Leave protective screens in place and in working order.
- Make sure that all nuts, bolts, etc. are securely tightened.
- Never use the machine if it is in need of repair or in poor mechanical condition. Replace damaged, missing or defective parts before use.
- Check the machine for fuel leaks.
- Keep it in good functional order. Do not use the machine if the engine cannot be switched on and off at the corresponding switch.
- A petrol-driven machine that cannot be controlled via the engine switch is dangerous and must be replaced.
- Before starting the machine, get into the habit of checking that screwdrivers and spanners are away from the area around the machine. A screwdriver or spanner that is still in a rotating device part may result in personal injury.
- Be attentive, watch your actions and use common sense when working with the machine. Do not overextend yourself.
- Do not operate the machine barefoot or with sandals or similar light footwear. Wear safety shoes that protect your feet and improve your grip on slippery surfaces.
- Ensure safe footing and balance at all times. This will allow you to better control the machine in unexpected situations.
- Prevent unintentional start-up. Make sure that the engine switch is switched off before transporting the machine or carrying out maintenance work on the machine. Transport or maintenance work on the machine can lead to accidents if the switch is on.
Safe handling of fuel
- Petrol is very flammable and its gases can explode if they ignite.
• Take safety measures when handling petrol to reduce the risk of serious injury. - Use a suitable petrol can when filling or draining the tank.
- Carry out this work in clean, well-ventilated outdoor areas.
- Do not smoke. Do not allow sparks, naked flames or other sources of fire to get near when filling up with petrol or working with the machine.
- Never fill the tank indoors. Keep earthed, electrically conductive objects, such as tools, away from exposed electrical parts and wires to avoid sparking or arcing. This could ignite petrol gases.
-
Always switch off the engine and let it cool down before refilling the fuel tank. Never remove the fuel filler cap or fill fuel into the tank while the engine is running or while the engine is hot.
-
Do not use the machine if you know there is a leak in the fuel system. Slowly loosen the fuel filler cap to release any pressure in the tank. Never overfill the tank (petrol should never be above the marked maximum fill level). Close the fuel tank securely again with the fuel filler cap and wipe up any spilled petrol.
- Do not use the machine if the fuel filler cap is not screwed tightly shut. Avoid ignition sources near spilled petrol. If petrol has been spilled, do not attempt to start the machine.
Move the machine away from the area of the spillage and prevent the formation of ignition sources until the petrol gases have dissipated.
- Store fuel only in containers specially manufactured for this purpose.
- Store petrol in a cool, well-ventilated area away from sparks and naked flames or other sources of ignition. Never store petrol or the machine with a filled tank in a building where petrol gases could reach sparks, naked flames or other ignition sources such as water heaters, ovens, clothes dryers or similar.
- Allow the engine to cool before storing the machine in an enclosed area.
Use and care of the machine
- Never pick up or carry the machine while the engine is running.
- Do not handle the machine violently.
- Use the right machine for your area of application. The right machine will do the job it was designed for better and more safely.
- Do not change the speed governor setting of the engine or over-rev it. The speed control system controls the maximum speed of the engine with maximum safety.
- Do not hold your hands or feet near rotating parts.
- Avoid contact with hot fuel, oil, exhaust gases and hot surfaces. Do not touch the engine or exhaust silencer. These parts become particularly hot during use. They are still hot a short time after the machine is switched off.
- Allow the engine to cool down before carrying out maintenance or adjustment work.
- If the machine starts to make unusual noises or vibrations, switch the engine off immediately, disconnect the spark plug cable and determine the cause. Unusual noises or vibrations are usually a safety sign of faults.
- Only use assembly and accessory parts approved by the manufacturer. Failure to do so may result in injury.
- Service the machine. Check for misalignment or jamming of moving parts, damaged parts and other conditions that could impair function of the machine.
Have the machine repaired before any further use if you find any damage. Many accidents are the result of poorly maintained equipment.
- Keep the engine and silencer free of grass, leaves, excess grease or soot encrustation to reduce the risk of fire.
- Never pour or splash water or any other liquid onto the machine.
- Keep the handles dry, clean and free of small parts.
- Clean the machine after every use.
- Follow the applicable waste disposal guidelines for petrol, oil etc. to protect the environment.
- Keep the switched-off machine out of the reach of children and do not allow persons who are not familiar with the machine or these instructions to use the machine. The machine is dangerous in the hands of untrained operators.
Service
- Before cleaning, repairing, inspecting or adjusting, switch off the engine and ensure that all moving parts have come to a standstill.
- Always ensure that the throttle lever is in the "off" position. Disconnect the spark plug cable and keep it away from the spark plug to prevent accidental start-up.
- Have your machine serviced by qualified personnel. Use only original spare parts. This ensures that the machine remains safe.
Residual risks
The machine has been built according to the state-of-the-art and the recognised technical safety requirements. However, individual residual risks can arise during operation. Residual risks can be minimised if the “Safety Instructions” and the “Intended Use” together with the operating manual as a whole are observed.
- Keep your hands away from the working area when the machine is in operation.
- Carefully check the area where work is to be done and keep the work area clean and free of dirt to prevent trip hazards. Work on a level smooth floor.
- During assembly, installation, operation, maintenance, repair or transport, never place any part of your body in a position where it would be in danger if movement occurred.
- Never leave the operating position while the engine is running.
- Always hold the device with both hands during operation. Always hold the handlebar securely.
• Take particular care when using reverse gear or pulling the machine towards you. - Be especially careful when working on or crossing gravel paths, pavements or roads. Always watch out for hidden dangers and traffic.
6. Technical data
| Transmission 3 forward / 1 reverse | |
| Forward speed 2.5 - 4.3 km/h | |
| Reverse speed 2.5 km/h | |
| Total machine width 106 cm | |
| Sweeping width 100 cm | |
| Brush diameter 350 mm | |
| Brush speed | 5 stages / 180 - 350 rpm |
| Brush angle -25° / +25° | |
| Weight 82 kg | |
| Drive: | |
| Type of engine 4-stroke motor | |
| Displacement 173 ccm ^3 | |
| Drive wheel tyre size 13"x5.00-6 | |
| Support wheel tyre size 4"x2.6-2.8 | |
| Load speed | 2800 rpm. |
| Maximum speed | 2900 rpm. |
| Slope | max. 20° |
| Engine starter | Pull starter / E-start |
| Power | 3.6 kW / 4.9 HP |
| Fuel | Regular grade petrol/ lead-free max. 10% bioethanol |
| Fuel tank maximum capacity | 1 l |
| Required engine oil | SAE 10W-30 / 10W-40 |
| Oil tank maximum capacity | 0.6 l |
Subject to technical changes!
Noise and vibration
The specified device emissions values were determined according to EN ISO 3744 for sound power or EN ISO 11201 for sound pressure.
Noise can have serious effects on your health. If the machine noise exceeds 85 dB, please wear suitable hearing protection.
Noise data:
| Sound pressure level L_pA | 74.4 dB |
| Uncertainty K_pA | 2.5 dB |
| Sound power level L_WA | 98 dB |
| Total machine width | 106 cm |
Vibration parameters:
| Steering lever right vibration A_hv | 7.127 m/s ^2 |
| Steering lever left vibration A_hv | 5.577 m/s ^2 |
| Measurement uncertainty K_PA | 1.5 m/s ^2 |
The specified sound levels have been measured in accordance with a standardised test procedure and can be used to compare different tools with one another.
In addition, these values are suitable for estimating the stresses for the user resulting from the noise in advance.
⚠ WARNING
The vibration emission value can vary from the specified value during actual use, depending on the type and the manner in which the device is used.
Try to minimise stress from vibrations as low as possible. Some examples of means for reducing the vibration stress are wearing gloves while using the tool and limiting work time. In doing so, all parts of the operating cycle must be taken into account (such as times in which the device is switched off or times in which it is switched on, but is not running under a load).
Warning!
In case of extended working periods, the operating personnel may suffer circulatory disturbances in their hands (vibration white finger) due to vibrations.
Raynaud's syndrome is a vascular disease that causes the small blood vessels on the fingers and toes to cramp in spasms. The affected areas are no longer supplied with sufficient blood and therefore appear extremely pale. The frequent use of vibrating devices can cause nerve damage in people whose circulation is impaired (e.g. smokers, diabetics).
If you notice unusual adverse effects, stop working immediately and seek medical advice.
Observe the following information to reduce hazards:
- Keep your body and especially your hands warm in cold weather.
• Take regular breaks and move your hands to promote circulation. - Ensure as little vibration as possible at the device via regular maintenance and stable parts on the machine.
Keep the noise level and vibration to a minimum!
7. Unpacking
- Open the packaging and carefully remove the device.
- Remove the packaging material, as well as the packaging and transport safety devices (if present).
-
Check whether the scope of delivery is complete.
-
Check the device and accessory parts for transport damage. In the event of complaints the carrier must be informed immediately. Later claims will not be recognised.
- If possible, keep the packaging until the expiry of the warranty period.
- Familiarise yourself with the product by means of the operating manual before using for the first time.
- With accessories as well as wearing parts and replacement parts use only original parts. Spare parts can be obtained from your specialist dealer.
- When ordering please provide our article number as well as type and year of manufacture for the product.
⚠ WARNING!
Danger of choking and suffocating!
The packaging material, packaging and transport safety devices are not children's toys. Plastic bags, foils and small parts can be swallowed and lead to choking.
- Keep packaging material, packaging and transport safety devices away from children.
8. Assembly
The sweeper is not completely fitted at the factory. At least 2 people are required for assembly!
The screws and nuts are already loosely pre-fitted and can be found on the respective parts.
8.1 Assembly of snow blade and collecting container
The assembly of the snow blade and the collecting container is described in separate installation instructions.
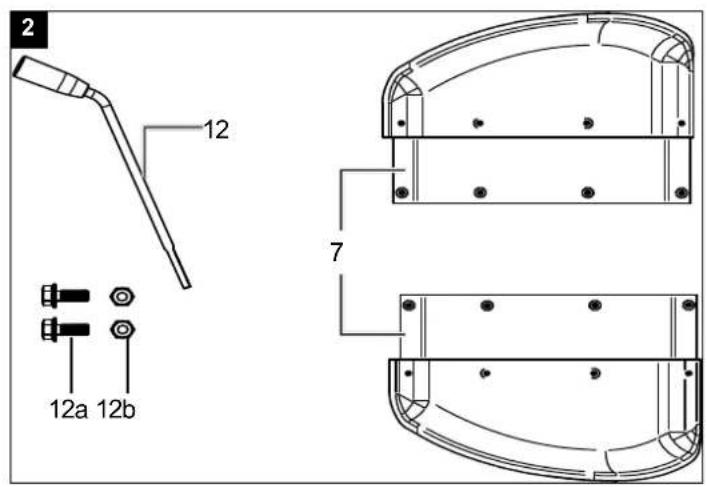
8.2 Assembly of the gear selector lever (12) (Fig. 4)
- Secure the gear selector lever (12) using the enclosed hexagonal bolts (12a) (M6 x 22 mm) and the self-locking nuts (12b) (AF10).
8.3 Installing the steering bar (16) (Fig. 5)
- Fit the steering bar (16) to the fastening bolts (16b) on the machine.
- Now tighten the four self-locking nuts M10 (16a) (AF15).
8.4 Installing the swivel bar (15) (Fig. 6)
- Put the washer (15c), the spring (15b) and the second washer (15c) on the threaded rod (15a).
- Push the slide valve (15) through the opening.
- Press the swivel rod (15) onto the threaded rod (15a) and tighten the self-locking nut M10 (15d) (AF15).
8.5 Installing the protective guards (7) (Fig. 7)
-
Fit the protective guards (7) on the left and right sides of the sweeper.
-
Secure the protective guards (7) with a Phillips screwdriver, the screws (7a) (M8 x 12 mm) supplied and the self-locking nuts (7b) (M8) (AF13).
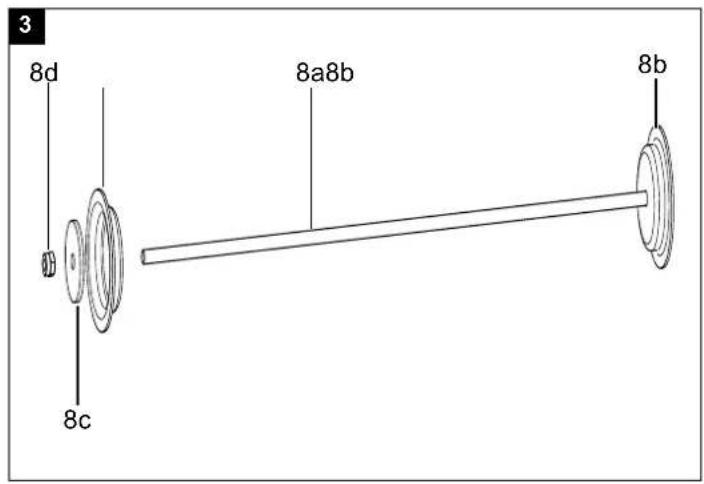
8.6 Fitting the brush rollers (8) (Fig. 3, 8)
-
On one side of the brush shaft (8a), remove the pre-fitted nut (M10), spring washer, washer (8c) and forming disc (8b).
-
Then put the brush roller (8) on the brush shaft (8a). When doing so, make sure that the groove of the brush roller (8) aligns with the cams of the drive unit.
-
Slide the brush shaft (8a) through the drive unit.
-
Put the second brush roller (8) on the brush shaft (8a). When doing so, make sure that the groove of the brush roller (8) aligns with the cams of the drive unit.
-
Place the forming disc (8b), the washer (8c) and the spring washer on the brush shaft (8a).
-
Screw on the nut (M10) (AF16) and tighten it by countering the nut (M10) (AF17) on the opposite side.
9. Before commissioning
ATTENTION!
Always make sure the machine is fully assembled before commissioning!
⚠ WARNING!
Health hazard!
Inhalation of petrol/lubricating oil vapours and exhaust gases can cause serious damage to health, unconsciousness and in extreme cases death.
- Do not breathe petrol/lubricating oil vapours and exhaust gases.
- Operate the product outdoors only.
NOTE!
Product damage
Using the product without or with too little engine and gear oil can result in engine damage.
- Fill with petrol and oil before commissioning. The product is supplied without engine and gearbox oil.
NOTE!
Environmental damage!
Spilled oil can pollute the environment permanently. The liquid is highly toxic and can quickly lead to water pollution.
- Fill/empty oil only on level, paved surfaces.
- Use a filling nozzle or funnel.
- Collect drained oil in a suitable container.
- Wipe up spilled oil carefully immediately and dispose of the cloth according to local regulations.
- Dispose of oil as per local regulations.
NOTE!
Risk of damage!
If incorrectly stored or undrained fuel is used, the carburettor may become clogged or engine operation may be affected.
- Put unused fuel in an airtight vessel and store it in a dark, cool room.
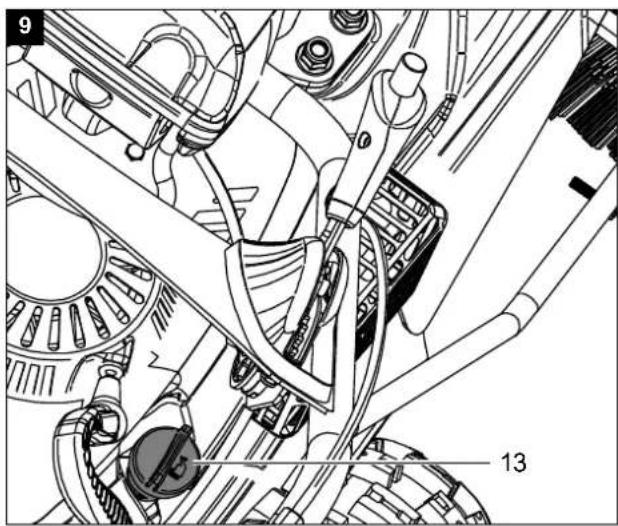
9.1 Filling up with engine oil (Fig. 9)
Attention!
The machine is delivered without engine oil. Therefore, ensure that you add oil before commissioning. Use multigrade oil (SAE 10W-30 or 10W-40 (depending on the operating temperature)) for this.
Check the oil level regularly before commissioning. An oil level that is too low can damage the engine.
- Place the machine on a level, even surface.
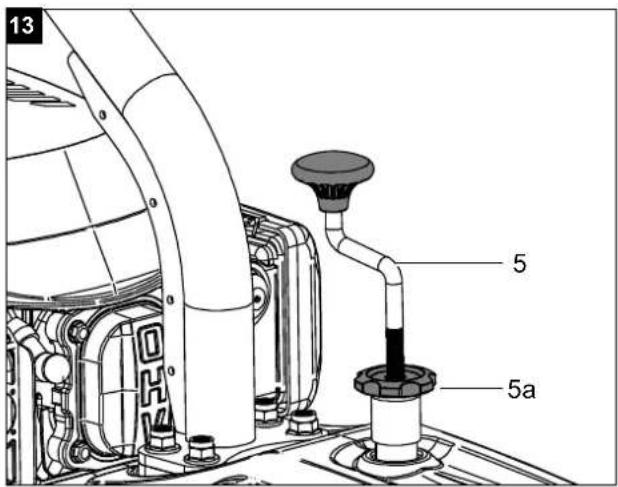
- Unscrew the oil dipstick (13).
- Fill the tank with engine oil using a funnel (not included in scope of delivery). Note the max. filling capacity of 600 ml. Carefully fill the oil up to the lower edge of the filling port.
- Wipe the oil dipstick (13) with a clean, lint-free cloth.
- Re-insert the oil dipstick (13) and check the oil level without screwing the dipstick tight again.
- The oil level must be within the middle mark on the oil dipstick.
- If the oil level is too low, add the recommended amount of oil (max. 600 ml).
- Then screw the oil dipstick (13) in again.
9.2 Filling up with petrol (Fig. 10)
Attention!
The machine is delivered without petrol. It is therefore essential to fill with petrol before commissioning.
- Clean the area surrounding the filling area. Impurities in the tank lead to operational faults.
- Carefully open the tank cover (20) so that any possible overpressure can be relieved.
- Fill the tank with petrol (Super E10) using a funnel (not included in scope of delivery).
Note the max. filling capacity of 1 litres. Carefully fill the petrol up to the lower edge of the filling nozzle.
- Close the tank cover (20) again. Ensure that the fuel cap is tightly sealed.
- Clean the fuel filler cap (20) and the surroundings.
- Check the tank and fuel lines for leaks.
- Move at least three meters away from the refueling area before starting the engine.
Do not use petrol that has already been used or that is contaminated. Do not allow dirt or water to enter the fuel tank.
9.3 Check tire pressure
Check the tyre pressure regularly. Long standing times and sunlight contribute to rapid ageing of the tyres.
- Recommended tyre pressure in the drive wheels: 1.38 bar
- Recommended tyre pressure in the support wheel: 3.1 bar
Note: If you notice that the tyres or wheels are damaged, please contact the customer service or a specialist workshop.
Check before operation
- Check all sides of the engine for oil or fuel leaks.
- Check the engine oil level.
- Check the fuel level – the tank should be at least half-full.
- Check the condition of the air filter.
- Check the condition of the fuel lines.
- Look for signs of damage.
- Check that all protective covers are in place and all screws, nuts and pins are tightened.
10. Operating the sweeper
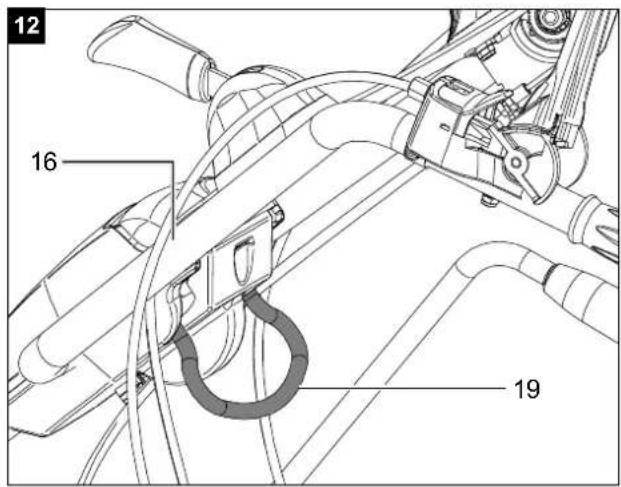
10.1 Adjusting the steering bar height (Fig. 12)
- Set the steering bar (16) to a working height that you find comfortable (3 levels).
- To do so, use the handle (19) on the underside of the steering bar (16).
- Let the handle (19) audibly engage again.

CHOKE Starting position
Engine off
10.2 Starting the engine (Fig. 1, 11)
Check the petrol and engine oil levels before each start (see sections 9.1 and 9.2). Make sure that the spark plug connector (4) is connected to the spark plug (4a).
- With the engine cold, set the throttle lever (18) to the CHOKE position. The choke is not necessary when the engine is warm.
- Press the primer pump (22) 1 to 4x depending on the temperature (see sticker on the air filter).
- Start the engine with the pull starter (14).
To do this, pull the handle out approx. 10-15 cm (until resistance is felt). And then pull hard with a jerk. If the engine does not start, pull on the pull starter (14) again.
- Due to protective coating on the engine, a small amount of smoke may be present during the initial use of the machine and should be considered normal. This is a normal process.
- Once the engine starts running, slowly move the throttle (18) to the start position.
- After the engine has warmed up, set the throttle (18) to the desired speed - maximum speed hare and lowest speed turtle).
10.3 Switch off the engine (Fig. 1, 11)
- To stop the engine, set the throttle lever (18) to "engine off" and release the two clutch handles (18, 1). Wait until the brushes stand still.
- Disconnect the spark plug connector (4) from the spark plug (4a) to prevent the engine from restarting.
10.4 Height adjustment for the brushes (Fig. 12)
The brushes are optimally adjusted when they are moved down approx. 1.5-2 cm from ground contact. Adjust the brushes to the desired height using the crank (5).
- Loosen the star grip nuts (5a).
- Turn the crank (5) anti-clockwise to move the brush downwards. Turn the crank (5) clockwise to move the brush upwards.
- Tighten the star grip nut (5a) to lock the crank (5).
Attention! If the brushes are set too low this can overload the drive system and cause increased wear.
10.5 Changing the brush angle (Fig. 1)
The brushes can be swivelled 25 degrees to the right and left.
- Lift the swivel rod (15) out of the locking mechanism.
- Push the slide valve (15) forward to swivel the brushes to the left.
- Pull the swivel bar (15) backwards to swivel the brushes to the right.
- Release the swivel rod (15) again so that it locks into place.
Attention: With the collecting container fitted, it is not possible to swivel the brushes.
10.6 Travel drive (Fig. 11)
- Put it in gear and the direction of travel.
- Press the travel drive clutch lever (18), the machine starts moving.
- Release the travel drive clutch lever (18) to stop the machine.
Attention! Do not change the gear while the travel drive clutch lever (18) is activated. This could cause significant transmission damage!
10.7 Clutch lever for brush drive (1) (Fig. 1, 11)
- Press the brush drive clutch lever (1) down to switch on the brushes.
- Release the brush drive clutch lever (1) so that the brushes stop.
10.8 Brush speed (Fig. 1, 11)
- Actuate the locking knob (3a) on the brush speed lever (3) and push it forward to increase the speed of the brushes.
- Actuate the locking knob (3a) on the brush speed lever (3) and pull it back to reduce the brush speed.
Attention! Only make this setting when the brush is running!
11. Maintenance & Cleaning
⚠ WARNING!
Danger of injury and burning!
The product can start unexpectedly and cause injuries. In addition, temperatures of 80^ C and more can be reached.
- Switch off the engine before carrying out any cleaning or maintenance work.
- Allow the engine to cool down.
- Pull the spark plug cable from the spark plug.
NOTE!
Risk of damage!
Water entering the housing can cause engine damages. In addition, the jet of a high-pressure cleaner can damage parts of the product.
- Clean the product with a cloth, a hand brush, etc.
- Do not immerse the product in water or any other liquid and do not wash it with a high-pressure cleaner.
NOTE!
Environmental damage!
Spilled oil can pollute the environment permanently. The liquid is highly toxic and can quickly lead to water pollution.
- Fill/empty oil only on level, paved surfaces.
- Use a filling nozzle or funnel.
- Collect drained oil in a suitable container.
- Wipe up spilled oil carefully immediately and dispose of the cloth according to local regulations.
- Dispose of oil as per local regulations.
| Maintenance plan | |
| Check for servicing Interval | |
| Loose screws Before commissioning | |
| Check for damage Before commissioning | |
| Check fuel tank for leaks Before commissioning | |
| Check tire pressure Before commissioning | |
| Clean machine After commissioning | |
| Clean the spark plug | Every 50 operating hours |
| Clean the air filter | Every 10 operating hours |
| Check the oil level | Every 25 operating hours |
| Change the oil 1x per year | |
11.1 Checking the oil level (Fig. 9)
- Proceed as described in 9.1.
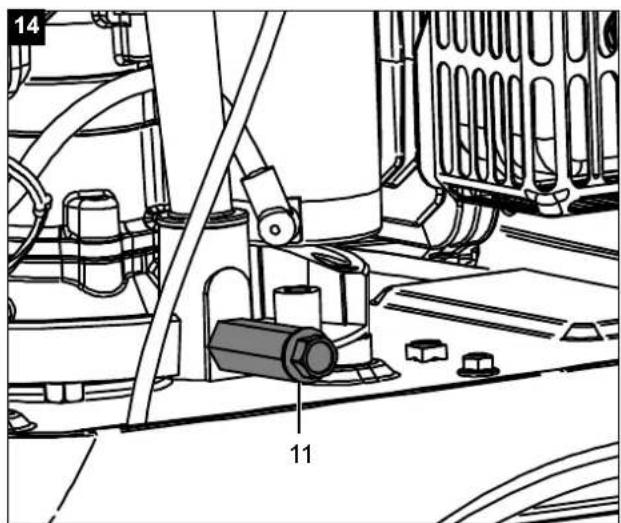
11.1.1 Changing oil (Fig. 9, 14)
Change the engine oil after 20 operating hours, then every 50 hours or once per year.
The engine oil change should be carried out while the motor is at operating temperature and switched off. Use only engine oil (SAE 30 or 10W-30).
- Place the machine on a level, even surface.
- Place a suitable collection container under the oil drain screw (11).
- Use an open-end spanner size 13 mm (not included in the scope of delivery) to open the oil drain screw (11) and drain the engine oil.
- After you have drained the engine oil completely, tighten the oil drain screw (11) again.
- Now unscrew the oil dipstick (13) anti-clockwise.
- Fill up with fresh engine oil and check the oil level (see 9.1).
- Then screw the oil dipstick (13) back in clockwise.
11.2 Air filter maintenance (Fig. 1, 15) ⚠️ DANGER!
Risk of fire and explosion!
If not cleaned correctly, fuel may ignite and even explode. This can lead to severe burns or death.
- Clean the air filter only by knocking out or blowing out with compressed air.
- Never clean the air filter with petrol or flammable solvents.
NOTE!
Risk of damage!
Operating the engine without the filter element in place can cause engine damage.
- Never run the engine without the air filter element in place.
A fouled air filter insert diminishes the engine output due to reduced air supply to the carburettor. Regular inspection is therefore essential.
The air filter should be checked every 10 operating hours and cleaned as required.
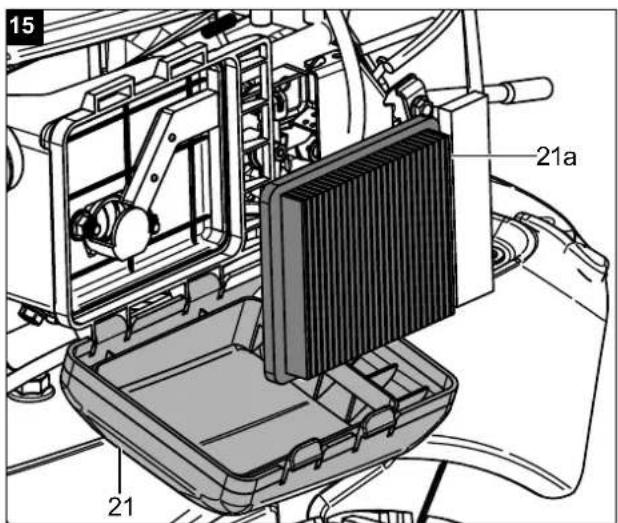
- Take off the air filter cover (21).
- Check the air filter cover (21) for holes or cracks. Replace any damaged insert.
- Wipe off dirt on the inside of the filter housing with a clean moist cloth. Make sure that no direct enters the opening. Set the air filter cover (21) on the filter housing for the duration of the filter cleaning process.
- Take off the filter (21a). Check it for damage and replace it if necessary.
- Blow out the filter (21a) from the inside to the outside with compressed air. Do not rub dirt off the filter (21a). This can result in damage.
- Reinsert the clean filter (21a).
- Put on the air filter cover (21).
⚠️ ATTENTION: Never run the engine without an air filter insert or with a damaged air filter insert. This would allow dirt to enter the engine, which would damage the engine. The manufacturer warranty is then invalidated.
11.3 Spark plug maintenance (Fig. 1, 16)
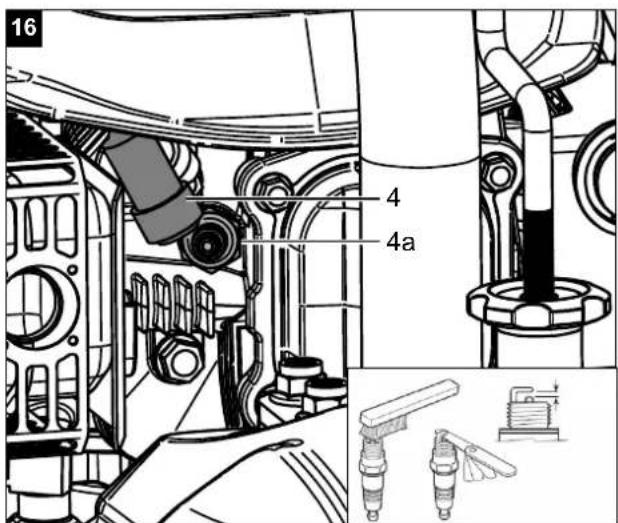
Check the spark plug for contamination for the first time after 10 operating hours and clean it with a copper wire brush if necessary. Thereafter, replace the spark plug every 50 operating hours if necessary.
- Pull off the spark plug connector (4) with a twisting motion.
- Remove the spark plug (4a) with a spark plug wrench (not included in the scope of delivery).
- Clean the spark plug (4a) with a copper wire brush if necessary.
- Use a feeler gauge to set the gap to 0.75 mm(0.030").
- Replace the spark plug (4a) and take care not to pull it too firmly.
11.4 Drain fuel with a petrol extraction pump
In case of storage over a longer period of time, the fuel must be drained.
⚠ WARNING!
Health hazard!
Inhalation of fuel / lubricating oil vapours and exhaust gases can cause serious damage to health, unconsciousness and in extreme cases death.
- Do not breathe fuel / lubricating oil vapours and exhaust gases.
-
Empty out fuel only outdoors.
-
Hold a collection container under the hose of the petrol extraction pump (not included in the scope of delivery).
- Unscrew and remove the fuel filler cap (20).
- Push the hose of the petrol extraction pump into the fuel tank and drain out the fuel completely using the petrol extraction pump.
- Retighten the fuel filler cap (20).
11.5 Replacement of the V-belt
The V-belt may only be removed and replaced by our customer service.
12. Repair & ordering spare parts
After any repair or maintenance work, make sure that all safety-related parts are in place and in perfect condition. All parts which may cause injury must be kept where they are inaccessible to children or others.
Attention: According to the German Product Liability Act, no liability is accepted for damage caused by improper repairs or by not using original spare parts. Such work should be performed by a customer service centre or an authorised specialist. The same applies to accessory parts.
Spare parts and accessories can be obtained from our Service Centre. To do this, scan the QR code on the front page.
Important note in the case of repairs:
When returning the device for repair, please ensure for safety reasons that it is free of oil and petrol when it is sent to the service centre.
12.1 Ordering spare parts
Please provide the following information when ordering spare parts:
- Model designation
- Article number
- Type plate data
Spare parts / accessories
Brush - Article no.: 5908703036
Snow blade - Article no.: 5908703811
Collecting container - Article no.: 5908703810
12.2 Service information
With this product, it is necessary to note that the following parts are subject to natural or usage-related wear, or that the following parts are required as consumables.
Wearing parts*: Brushes, V-belt, engine oil, spark plug, air filter, wheels, support wheel, rubber lip collection box, scraper bar snow blade
* may not be included in the scope of delivery!
13. Transport
⚠ WARNING!
Danger of injury!
Unintended and unexpected start-up of the product may lead to injuries.
- After loading, switch off the engine and, after the engine has cooled down, remove the spark plug connector from the spark plug.
- The product can cause severe crushing injuries due to its own weight.
Allow the engine to cool down before transporting or loading to avoid burns and to prevent fire hazards.
⚠ The machine can fall and cause damage or injury if it is not loaded properly.
When transporting over longer distances, drain the fuel tank completely.
Secure the machine on the transport vehicle against rolling, slipping or tipping over and also lash down the machine.
14. Storage
⚠️ DANGER!
Risk of fire and explosion!
Storing the product near potential sources of ignition can result in a fire or an explosion. This can lead to severe burns or death.
- Eliminate possible sources of ignition, such as furnaces, hot water boilers with gas, gas dryers, etc.
NOTE!
Risk of damage!
If the product is not stored properly, the engine can be damaged.
- Store the product protected against dirt, dust and moisture.
14.1 Storage during extended breaks in operation:
If the machine will not be used for a period of more than 30 days, follow the steps below to prepare it for storage.
-
Empty the fuel tank completely (see section 10.4). Stored petrol containing ethanol or MTBE becomes stale within 30 days. Stale petrol has a high rubber content and can thus clog the carburettor and restrict the petrol supply.
-
Start the engine and let it run until it stops. This ensures that no petrol remains in the carburettor. This prevents deposits from forming in the carburettor and potentially damaging the engine.
- Drain the engine oil from the engine while it is still warm. Top up with new oil. (See section 9.1.)
- Disconnect the spark plug cable.
- Use clean cloths to clean the machine.
- Store the machine in an upright position in a clean, dry building with good ventilation.
Store the product and its accessories in a dark, dry and frost-free place that is inaccessible to children. The optimum storage temperature is between 5 and 30°C.
Store the product in its original packaging.
Cover the machine to protect it from dust or moisture. Store the operating manual with the machine.
15. Disposal and recycling
Notes for packaging


The packaging materials are recyclable. Please dispose of packaging in an environmentally friendly manner.
Contact your local refuse disposal authority for more details of how to dispose of your worn-out electrical devices.
Fuels and oils
- Before disposing of the unit, the fuel tank and the engine oil tank must be emptied!
- Fuel and engine oil do not belong in household waste or drains, but must be collected or disposed of separately!
- Empty oil and fuel tanks must be disposed of in an environmentally friendly manner.
16. Troubleshooting
| Fault Possible cause Remedy | ||
| Engine does not start Spark | plug connector unplugged. Re-connect the spark plug cable to the spark plug. | |
| Contaminated spark plug. Clean, set gap or replace. | ||
| No fuel or old fuel. Fill with clean, fresh petrol. | ||
| Choke not in open position. The choke lever must be positioned in the choke position during cold starting. | ||
| Fuel line clogged. Check the fuel line for kinks or damage. | ||
| Engine dies. Wait a few minutes before restarting. | ||
| Motor runs erratically Spark | plug connector loose. Connect and fasten the spark plug cable. | |
| Fuel line clogged or old fuel. Fill the tank with clean, fresh petrol. | ||
| Ventilation blocked | Clean the air filter. | |
| Water or contamination in the fuel system | Empty the tank. Fill the tank with fresh fuel. | |
| Incorrect carburettor setting | Contact the service department. | |
| Motor is overheated | Engine oil level low. | Top up the oil. |
| Contaminated air filter. | Clean or replace the air filter. | |
| Airflow restricted. Remove and clean the housing. | ||
| Carburettor not adjusted correctly. | Contact the service department. | |
| The machine does not move when the engine is running | The gear was not chosen correctly. | Shift the shift lever to the correct shift position. |
| The machine does not run straight | Varying tyre pressure | Check the tyre pressure. |
Günzburger Straße 69
D-89335 Ichenhausen
Cher client,
EC Declaration of Conformity
Article name: SWEEPER - PX-KM-100
Nom d'article: BALAYEUSE MOTORISÉE - PX-KM-100
Standard references:
EN 12100:2010; EN 14982:2009; EN ISO 3744:1995; ISO 11094:1991
This declaration of conformity is issued under the sole responsibility of the manufacturer.
Apparent defects must be notified within 8 days from the receipt of the goods. Otherwise, the buyeris rights of claim due to such defects are invalidated. We guarantee for our machines in case of proper treatment for the time of the statutory warranty period from delivery in such a way that we replace any machine part free of charge which provably becomes unusable due to faulty material
or defects of fabrication within such period of time. With respect to parts not manufactured by us we only warrant insofar as we are entitled to warranty claims against the upstream suppliers. The costs for the installation of the new parts shall be borne by the buyer. The cancellation of sale or the reduction of purchase price as well as any other claims for damages shall be excluded.
Garantie FR

- PX-KM-100
- Verehrter Kunde,
- Explanation of the symbols on the product
- Table of contents: Page:
- Introduction
- Manufacturer:
- Dear Customer,
- Note:
- Product description (Fig. 1 + 11)
- Scope of delivery
- Proper use
- General safety instructions
- ⚠ Attention!
- DANGER
- ⚠ WARNING
- CAUTION
- NOTE!
- Working range
- Personal safety
- Safe handling of fuel
- Use and care of the machine
- Service
- Residual risks
- Technical data
- Noise and vibration
- Warning!
- Keep the noise level and vibration to a minimum!
- Unpacking
- ⚠ WARNING!
- Danger of choking and suffocating!
- Assembly
- Assembly of snow blade and collecting container
- Assembly of the gear selector lever (12) (Fig. 4)
- Installing the steering bar (16) (Fig. 5)
- Installing the swivel bar (15) (Fig. 6)
- Installing the protective guards (7) (Fig. 7)
- Fitting the brush rollers (8) (Fig. 3, 8)
- Before commissioning
- ATTENTION!
- Health hazard!
- Product damage
- Environmental damage!
- Risk of damage!
- Filling up with engine oil (Fig. 9)
- Filling up with petrol (Fig. 10)
- Check tire pressure
- Check before operation
- Operating the sweeper
- Adjusting the steering bar height (Fig. 12)
- Starting the engine (Fig. 1, 11)
- Switch off the engine (Fig. 1, 11)
- Height adjustment for the brushes (Fig. 12)
- Changing the brush angle (Fig. 1)
- Travel drive (Fig. 11)
- Clutch lever for brush drive (1) (Fig. 1, 11)
- Brush speed (Fig. 1, 11)
- Maintenance & Cleaning
- Danger of injury and burning!
- Checking the oil level (Fig. 9)
- Changing oil (Fig. 9, 14)
- Air filter maintenance (Fig. 1, 15) ⚠️ DANGER!
- Risk of fire and explosion!
- Spark plug maintenance (Fig. 1, 16)
- Drain fuel with a petrol extraction pump
- Replacement of the V-belt
- Repair & ordering spare parts
- Important note in the case of repairs:
- Ordering spare parts
- Spare parts / accessories
- Service information
- Transport
- Danger of injury!
- Storage
- ⚠️ DANGER!
- Storage during extended breaks in operation:
- Disposal and recycling
- Notes for packaging
- Contact your local refuse disposal authority for more details of how to dispose of your worn-out electrical devices.
- Fuels and oils
- Troubleshooting
- Cher client,
- EC Declaration of Conformity
- Standard references:
- Garantie FR
Brand : Practixx
Model : PX-KM-100
Category : Sweeper