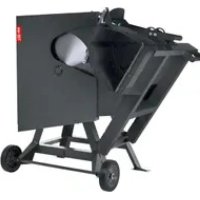
PXWS700 - Saw Practixx - Free user manual and instructions
Find the device manual for free PXWS700 Practixx in PDF.


| Product type | Tilt circular saw (log saw) |
| Dimensions (L x W x H) | 1270 x 730 x 1130 mm |
| Weight | 89,5 kg |
| Power supply | 400 V 3~ / 50 Hz, three-phase |
| Rated power (S1) | 4,0 kW |
| Power (S6 20%) | 4,5 kW |
| Rated current | 10 A |
| Motor protection | Circuit breaker 16 A (delayed) |
| Saw blade (diameter / bore) | 700 mm / 30 mm |
| Number of blade teeth | 42 |
| No-load rotation speed | 1400 min⁻¹ |
| Max. cutting height | 240 mm |
| Min. cutting height | 60 mm |
| Max. wood length | 1 m |
| Max. reversible cut | 250 mm |
| Max. firewood dimensions | 370 x 240 mm |
| Max. workpiece weight | 50 kg (recommended 35 kg) |
| Sound pressure level (machining) | 95 dB(A) |
| Sound power level (machining) | 109 dB(A) |
| Protection class | IP54 |
| Safety devices | Protective cover, electronic brake, tilt lock, on/off switch, overload protection |
| Main functions | Cross-cutting of firewood, tilt with centering prism, automatic stop braking |
| Maintenance | Monthly lubrication of rotating parts, regular cleaning, check and replacement of saw blade if necessary |
| Wear parts | Saw blade, tilt inserts |
| Manufacturer | Scheppach GmbH, Günzburger Str. 69, D-89335 Ichenhausen |
| Intended use | Outdoor use for cross-cutting firewood, reserved for one person |
Frequently Asked Questions - PXWS700 Practixx
User questions about PXWS700 Practixx
0 question about this device. Answer the ones you know or ask your own.
Ask a new question about this device
Download the instructions for your Saw in PDF format for free! Find your manual PXWS700 - Practixx and take your electronic device back in hand. On this page are published all the documents necessary for the use of your device. PXWS700 by Practixx.
USER MANUAL PXWS700 Practixx
natural_image
Technical line drawing of a mechanical device with wheels and structural components (no text or symbols)
PX-WS-700
39051109969_2001
| DE | WippkreissägeOriginalbetriebsanleitung | 5 |
| GB | Rocking log sawTranslation of original instruction manual | 17 |
| FR | Scie à bûchesTraduction des instructions d'origine | 28 |
natural_image
Technical line drawing of a soldering iron with a handle and screwdriver inserted into a socket (no text or symbols)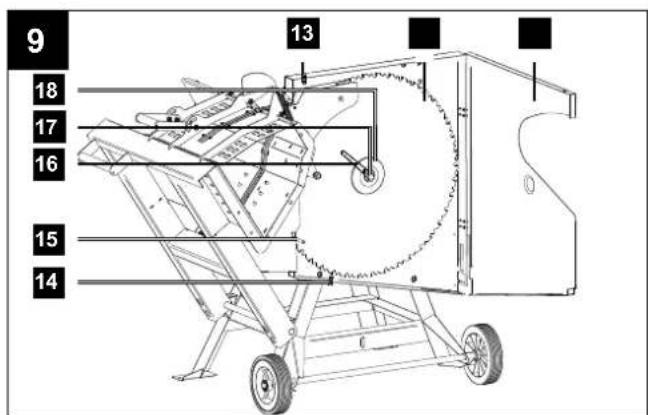
Günzburger Straße 69
D-89335 Ichenhausen
VEREHRTER KUNDE,
Explanation of the symbols on the product

Before commissioning, read and observe the operating manual and safety instructions.
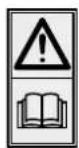
Read the operating manual before commissioning.
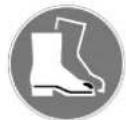
Wear safety shoes.

Wear hearing protection. Wear safety goggles.
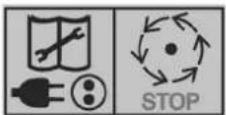
Attention!
Tool continues to run after power disconnected!
Disconnect the machine from the power supply before carrying out any maintenance, cleaning or repair work! Danger of injury for fingers and hands due to the rotating cutting tool.

The product complies with the applicable European directives.
Table of contents: Page:
- Introduction.... 19
- Description of the product 19
- Scope of delivery.... 19
- Proper use....19
- Safety instructions....20
- Operator training 22
- Technical data 22
- Before commissioning....22
- Operation....23
- Transport 24
- Electrical connection 24
- Maintenance 25
- Storage....26
- Disposal and recycling 26
- Troubleshooting....27
- Declaration of conformity 43
1. Introduction
MANUFACTURER:
Scheppach GmbH
Günzburger Straße 69
D-89335 Ichenhausen
DEAR CUSTOMER,
We hope your new tool brings you much enjoyment and success.
NOTE:
In accordance with the applicable product liability laws, the manufacturer of this device assumes no liability for damage to the device or caused by the device arising from:
- Improper handling,
- Failure to comply with the operating instructions,
• Repairs carried out by third parties, unauthorised specialists, - Installing and replacing non-original spare parts,
• Application other than specified, - Failures of the electrical system in the event of the electrical regulations and VDE provisions 0100, DIN 57113 / VDE0113 not being observed.
Note:
Read the whole text of the operating manual before assembly and commissioning.
This operating manual should help you to familiarise yourself with your device and to use it for its intended purpose.
The operating manual includes important instructions for safe, proper and economic operation of the device, for avoiding danger, for minimising repair costs and downtimes, and for increasing the reliability and extending the service life of the device.
In addition to the safety instructions in this operating manual, you must also observe the regulations applicable to the operation of the device in your country.
Keep the operating manual at the device, in a plastic sleeve, protected from dirt and moisture. They must be read and carefully observed by all operating personnel before starting the work.
The device may only be used by personnel who have been trained to use it and who have been instructed with respect to the associated hazards. The required minimum age must be observed.
In addition to the safety instructions in this operating manual and the separate regulations of your country, the generally recognised technical rules relating to the operation of such machines must also be observed.
We accept no liability for accidents or damage that occur due to a failure to observe this manual and the safety instructions.
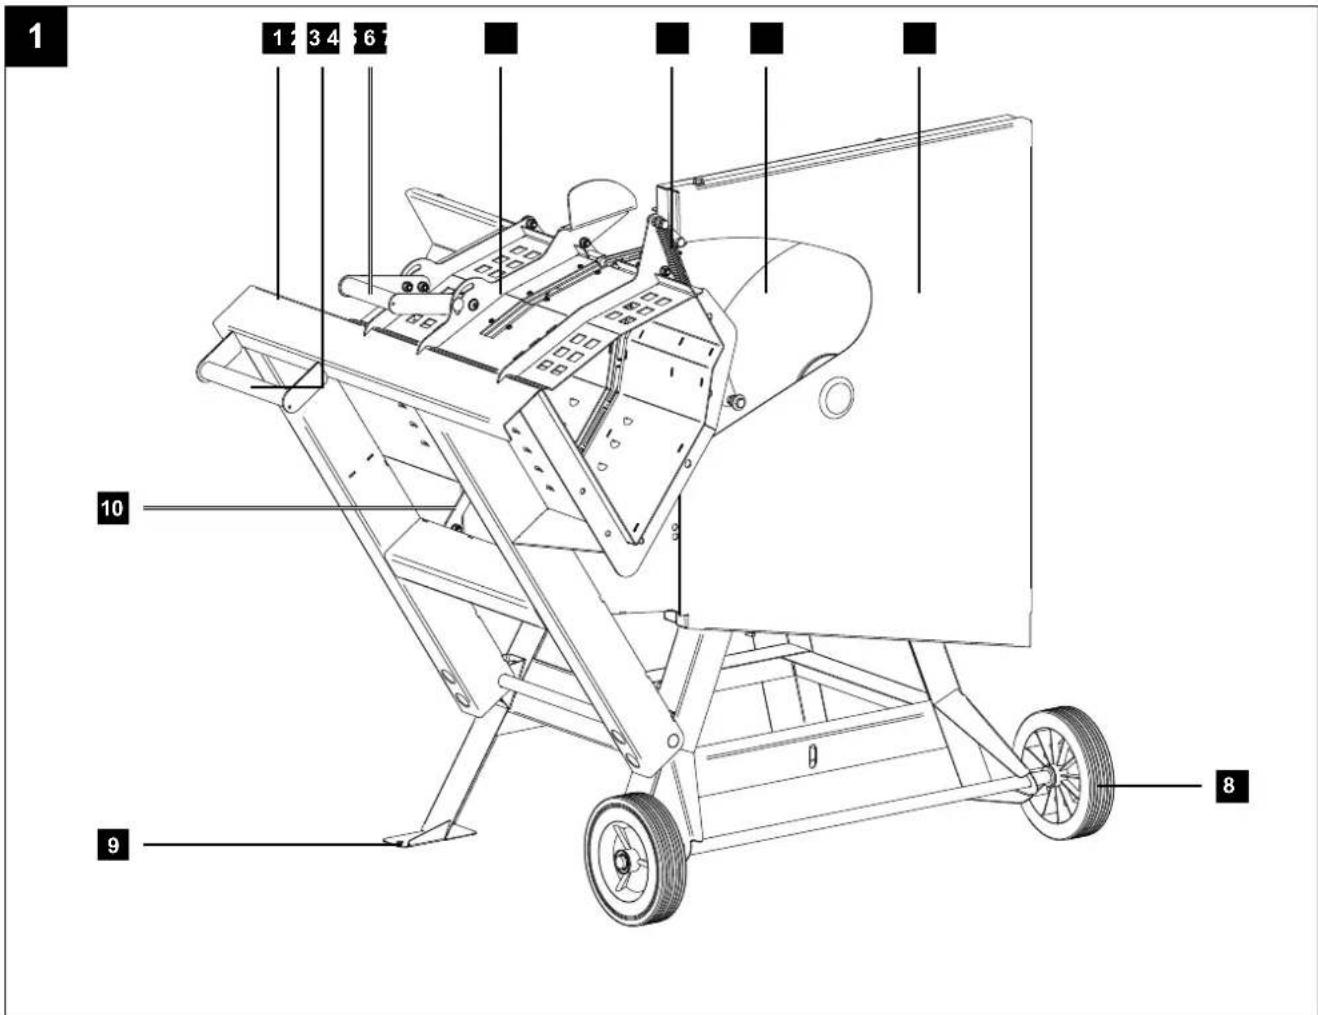
2. Description of the product
- Swivel frame
- Handle (swivel frame)
- Handle (protective cover)
- Protective cover
- Tension spring
- Saw blade
- Protective cover
- Transport wheel
- Foot
- Swivel frame lock
- On/off switch
- Transport handle
- Top screw (protective cover)
- Bottom screw (protective cover)
- Locking pin
- Open-ended spanner WAF19
- Clamping screw
- External saw blade flange
3. Scope of delivery
- Rocking log saw
• 1x open-end spanner, size 19 (16) - 1x locking pin (15)
- Operating instructions
4. Proper use
The firewood circular saw is designed exclusively with the offered tool for machining wood.
The machine complies with the applicable EC machinery directive.
- The swivel log saw is designed as a one-man operating station and without an extraction device and is only to be used outdoors.
- Only the operator may work or load the product, only two people may transport the product. Pull out the mains plug or close the fuel valve before transport.
- The rocking log saw is a transportable circular saw. It can only be used for cross-cutting firewood with feed rocker in accordance with the technical data.
- The rocking log saw is designed exclusively for cross-cutting firewood with a maximum length of 1 m.
- Do not use the saw to cut other materials.
- Regardless of the wood diameter, only one workpiece may be placed on the swivel frame.
- Observe all safety and danger notices on the machine and keep them complete and in legible condition.
- The working area and surroundings of the machine must be kept free of disruptive foreign bodies in order to prevent accidents.
-
Basically, the timbers to be cut must be free of foreign bodies such as nails and screws.
-
Only use the machine when in a technically faultless condition, appropriately and in compliance with the operating instructions and with full knowledge of safety and hazards. In particular, rectify malfunctions that could impair safety immediately (or commission rectification works accordingly).
- The safety, operating and maintenance specifications of the manufacturer, as well as the dimensions specified in the technical data, must be observed.
- The applicable accident prevention regulations and the other generally accepted safety rules must be complied with.
- The machine may only be used, maintained or repaired by persons who are familiar with it and have been informed of the dangers. The manufacturer shall not be liable for damage resulting from unauthorised changes to the machine.
- The machine may only be operated with original accessories and original tools from the manufacturer.
- Any use beyond this is improper use. The manufacturer is not responsible for the resulting damages; the user solely bears the risk.
- Only use saw blades that comply with the European standard DIN EN 847-1.
- Make sure that the machine is stable on solid ground during assembly.
- The area around the machine must be free of trip hazards.
- The machine is equipped with an electronic brake, do not brake the machine by the saw blade.
- The maximum workpiece weight should be no more than 35 kg due to one-man operation and the ergonomic risks and must not exceed 50 kg in order to prevent overloading the swivel frame.
Please note that our equipment was not designed with the intention of use for commercial or industrial purposes. We assume no guarantee if the device is used in commercial or industrial applications, or for equivalent work.
5. Safety instructions
We have marked points in these operating instructions that impact your safety with this symbol: ⚠
- Observe all of these notes before and while working with the saw.
- Store these safety instructions safely.
- Unused machines should be stored in a dry, locked place and out of reach of children.
- Keep tools sharp and clean in order to be able to work better and more safely.
- Pay attention to what you are doing. Remain sensible when working. Do not use the product when you are fatigued.
-
Do not use any machines on which the switch cannot be switched on and off.
-
Warning! The use of other insertion tools and other accessories can entail a danger of injury.
- Warning: Pull out the mains plug before undertaking any maintenance work described in this manual.
• Pass the safety instructions on to all persons who work on the machine. - Caution! There is a danger of injury to hands and fingers from the rotating saw blade.
- Do not expose the saw to rain and do not use the machine in a damp or wet environment.
- Ensure good lighting.
- Do not use in the vicinity of combustible fluids or gases.
- Wear suitable work clothing! Loose clothing or jewellery can be caught by the rotating saw blade.
- When working outdoors, anti-slip footwear is recommended.
- Tie long hair back in a hair net.
- Avoid abnormal posture.
- The operating personnel must be at least 18 years of age.
- Keep children away from the machine with the engine running.
- Keep the workplace free of wood debris and parts lying around.
• Disorder in the work area can lead to accidents. - Do not allow other persons, especially children, to touch the machine. Keep such persons away from the workplace.
- Personnel working on the machine must not be distracted.
- Observe the direction of rotation of the engine and saw blade. Only use saw blades whose maximum permissible speed is not less than the maximum spindle speed of the circular saw and the material to be cut.
- Under no circumstances should the saw blades be braked by pushing against the side after switching off the drive.
- Only install saw blades that are well sharpened, free of cracks and not deformed.
- Only use saw blades recommended by the manufacturer and which comply with EN 847-1.
- Faulty saw blades must be replaced immediately.
- Do not use saw blades that do not correspond to the characteristics specified in these usage instructions.
- Safety equipment on the machine must not be disassembled or made unusable.
- Replace worn table or swivel frame insert.
- Working position always to the side of the saw blade.
- Do not load the machine so much that it comes to a standstill.
- Make sure that cut-off pieces of wood are not caught by the sprocket of the saw blade and flung away.
- Never remove loose fragments, chips or jammed wood pieces from the running saw blade.
- To rectify faults or remove jammed pieces of wood, switch the machine off. Pull out the mains plug.
- If the sawing gap has increased due to wear, replace the swivel frame or table inlay. Switch off the machine and pull out the mains plug.
- Only carry out modifications, adjustments, measurements and cleaning work when the engine is switched off. Pull out the mains plug.
- Before switching on, make sure that keys and adjusting tools are removed.
- Switch off the engine and pull out the mains plug when leaving the work station.
- All protective and safety equipment must be reassembled immediately after repair or when maintenance is completed.
- The safety, operating and maintenance information of the manufacturer, as well as the dimensions specified in the technical data, must be observed.
- The relevant accident prevention regulations and the other generally accepted safety rules must be observed.
- Make sure that you have secure footing and always maintain your balance.
- Check the machine for potential damage!
- Protective devices or other parts with minor damage must be carefully inspected to ensure that they function correctly and as intended prior to continued use of the machine.
- Check whether the moving parts function faultlessly and do not jam or whether parts are damaged. All parts must be correctly mounted and all conditions must be fulfilled to ensure fault-free operation of the machine.
- Damaged protective devices and parts must be repaired properly or replaced by a recognised specialist workshop unless otherwise specified in the usage instructions.
- This machine conforms to the applicable safety regulations. Repairs may only be performed by a specialist using original spare parts. Otherwise accidents could occur.
- If necessary, wear suitable personal protective equipment. This could include:
- Hearing protection to prevent the risk of developing hearing loss;
- Respiratory protection to avoid the risk of inhaling damaging dust.
- Wear gloves when handling saw blades and rough materials. Saw blades must be carried in a container whenever practical.
- Wear personal protective equipment and always safety goggles.
- The operator must be informed about the conditions that affect the noise levels (e.g. saw blades designed to reduce noise, care of saw blade and machine).
- Faults in the machine, including the guards and the saw blade, must be reported to the person responsible for safety as soon as they are discovered.
- When transporting the machine, use only the transport devices and never use the guards for handling and transport.
- All operators must be adequately trained in the use, setting and operation of the machine.
- Do not saw any material to be cut that contain foreign bodies such as wires, cables or cords.
- Only use sharp saw blades.
- The machine must be on a horizontal, level floor during operation and the floor around the machine must be level, well maintained and free of waste such as chips and cut-off workpieces.
- Arrange the workpiece stack to be processed and the finished workpieces close to the normal workplace of the operator.
- Only use original, undamaged flanges as specified by the manufacturer and those that are suitable for the purpose.
Warning!
This product generates an electromagnetic field during operation. This field can impair active or passive medical implants under certain circumstances. In order to prevent the risk of serious or deadly injuries, we recommend that persons with medical implants consult with their physician and the manufacturer of the medical implant prior to operating the product.
Attention: Danger of accidents!
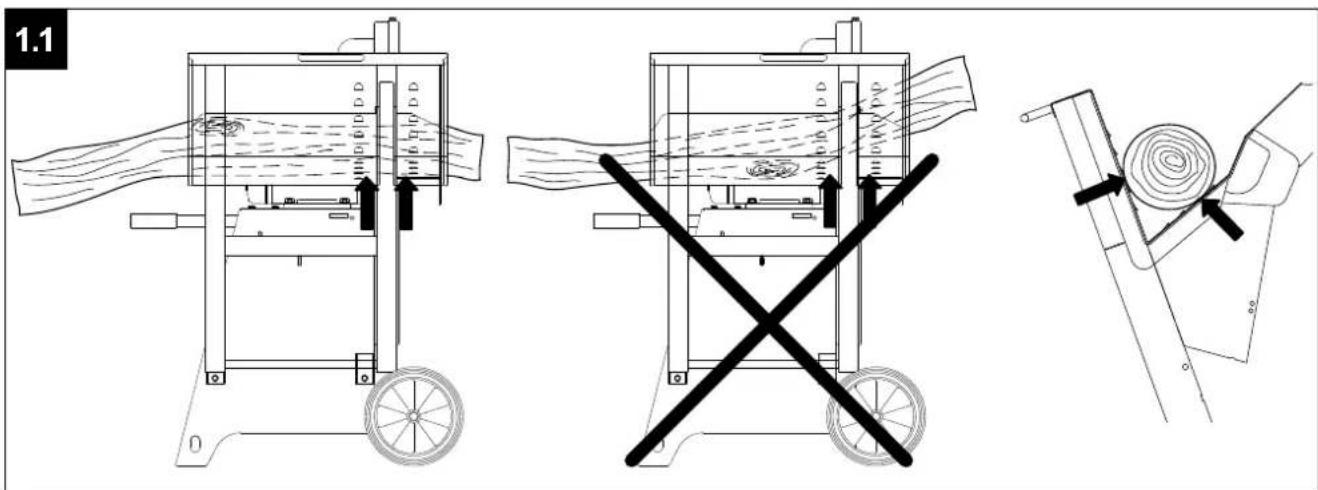
The wood must always rest on both sides of the saw blade in the prism of the swivel frame. (see arrows in fig. 1.1)
Residual risks
The machine has been built according to the state-of-the-art and the recognised technical safety requirements. However, individual residual risks can arise during operation.
- Danger of injury for fingers and hands due to the rotating saw blade with improper guiding of the workpiece.
- Risk to health from wood dust or wood chippings. The type of wood and degree of drying has an influence on the exposure to dust. Use a chip extraction system if necessary.
- Wearing personal protective equipment such as protective goggles and dust masks is mandatory.
- Risk to health due to noise. The permissible noise level is exceeded during operations. It is essential that personal protective equipment, such as hearing protection, is worn.
- Hazard due to electrical power, with the use of improper electrical connection cables.
• Furthermore, despite all precautions having been met, some non-obvious residual risks may still remain.
- Residual risks can be minimised if the "safety instructions" and the "Proper use" are observed along with the whole of the operating instructions.
- Injuries due to defective saw blade. Check the integrity of the saw blade regularly and before each use.
- When using special accessories, the operating instructions enclosed with the special accessories must be observed and read carefully.
- The noise emission can be reduced by using a specific saw blade.
6. Operator training
• Pass the safety instructions on to all persons who work on the machine.
- The operating personnel must be at least 18 years of age. Trainees must be at least 16 years of age and may only work on the machine under supervision.
- Personnel working on the machine must not be distracted.
- Keep children away from the mains-connected machine.
- Wear close-fitting clothing. Remove jewellery, rings and watches.
- Ensure that all of the safety information and danger notices on the machine are in legible condition.
- Caution when working: Danger of injury for fingers and hands due to the rotating cutting tool.
- Regular breaks must be taken during operation.
- Safety shoes and protective clothing must be worn during operation.
7. Technical data
Dimensions
| Length / width / height | 1270 / 730 / 1130 mm |
| Rocker support | 670 mm |
| Weight | 89.5 kg |
Saw blade
| Saw blade diameter | 700 mm |
| Bore diameter | 30 mm |
| Number of teeth | 42 |
Drive
| Engine | 400 V 3~ / 50 Hz |
| Nominal power S1 | 4.0 kW |
| Operating mode | S6 20%* 4.5 kW |
| Rated current | 10 A |
| Idle speed n_0 | 1400 rpm |
| Protection class | IP54 |
| Fuse | 16 A slow-blow |
Operating data
| Log cutting height max. 240 mm | |
| min. 60 mm | |
| Reversible cut max. 250 mm | |
| Firewood max. 370 x 240 mm | |
* Operating mode S6, uninterrupted, periodic operation. The mode comprises of a start-up period, a time with constant load and an idle time. The operating time is 10 mins, the relative duty cycle is 20 % of the operating time.
Subject to technical changes!
Noise data
Measurement of the noise levels was carried out in accordance with EN ISO 3744:2010.
| Sound pressure level L_pA idle 92 dB | |
| Sound pressure level L_pA operating 95 dB | |
| Uncertainty K_pA | 2 dB |
| Sound power level L_WA idle 106 dB | |
| Sound power level L_WA operating 109 dB | |
| Uncertainty K_WA | 2 dB |
The stipulated values are emission values and so do not necessarily represent safe work station values. Although there is a correlation between emission levels and exposure levels, it is not possible to reliably determine whether additional precautionary measures will be required or not based on this. Factors that influence the exposure level present at any given time in the work area include the nature of the working area, other noise sources, e.g. the number of machines and neighbouring work processes.
The permissible working values may vary from country to country. However, the information should enable the operator to evaluate the hazards and risks.
Wear hearing protection.
Excessive noise can result in a loss of hearing.
8. Before commissioning
8.1 General information
- Remove the packaging material, as well as the packaging and transport safety devices (if present).
- Check whether the scope of delivery is complete.
- Check the machine and accessory parts for transport damage.
- Later claims will not be recognised.
- If possible, keep the packaging until the expiry of the warranty period.
⚠️ DANGER
The product and the packaging are not children's toys! Do not let children play with plastic bags, films or small parts! There is a danger of choking or suffocating!
- Familiarise yourself with the machine by means of the operating instructions before using for the first time.
- With accessories as well as wearing parts and replacement parts use only original spare parts. Spare parts can be obtained from your specialist dealer.
- When ordering please provide the article number as well as type and year of manufacture for your machine.
8.2 Product-specific information
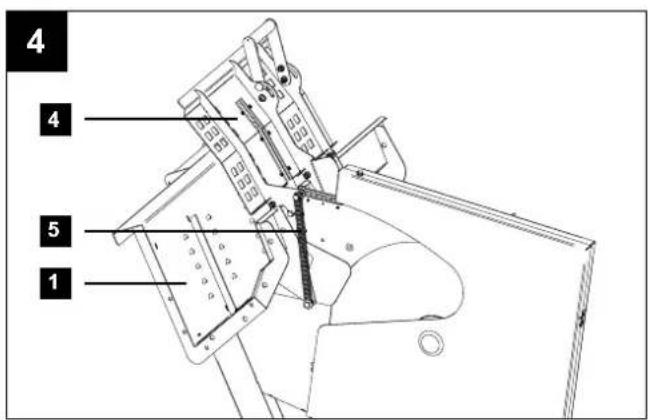
- Before using the machine for the first time, remove the cable ties from the tension spring (5). Fold open the protective cover (4) and hook in the tension spring (5). (fig. 4)
- Make sure that the machine is stable on solid ground during assembly. The transport wheels (8) and the feet (9) must not be left hanging.
- For your safety in the workplace, fasten the saw to the floor with screws (8x80mm) or ground spikes/anchors (8x230mm) to prevent it tipping or sliding.
• The workplace must be well lit. - The area around the machine must be free of trip hazards.
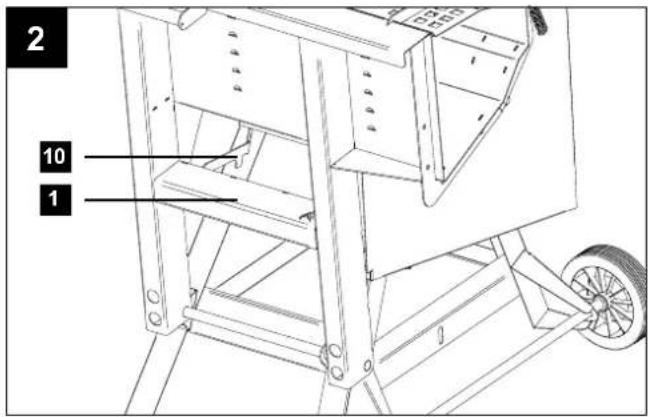
- Check the swivel frame (1). After releasing the swivel frame lock (10), it must return to its starting position by itself. (fig. 2)
- Follow the safety instructions.
- All safety devices and aids must be installed.
- Check that the saw blade (6) is properly seated and that the running direction is correct.
- Carry out a functional check before starting work.
- Perform a brake test prior to commencing work.
- The rocking log saw is designed exclusively for cross-cutting firewood with a maximum length of 1 m.
- The smallest permissible wood diameter is 60 mm.
- The wood to be sawn must not be fixed by hand.
- Only carry out modifications, adjustments, measurements and cleaning work with the engine switched off. Wait for the rotating tool to stop and disconnect the mains plug.
• After the saw has come to a complete standstill, pull out the mains plug or close the fuel valve.
9. Operation
The swivel log saw provides maximum safety thanks to its enclosed sawing area.
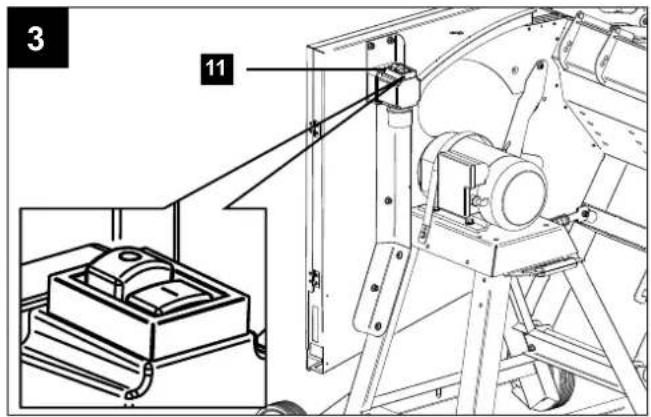
9.1 On/Off switch (fig. 3)
- To switch on the saw, press the "I" button on the on/off switch (11). Wait until the saw blade (6) has reached its maximum speed before starting sawing.
- To switch off the saw, push the "0" button at the on/off switch (11).
9.2 Overload protection
In the event of overloading, the motor will switch itself off. After a cool-down period (time varies) the motor can be switched back on again.
- Allow the machine to cool down.
- Switch the machine back on as described in 9.1.
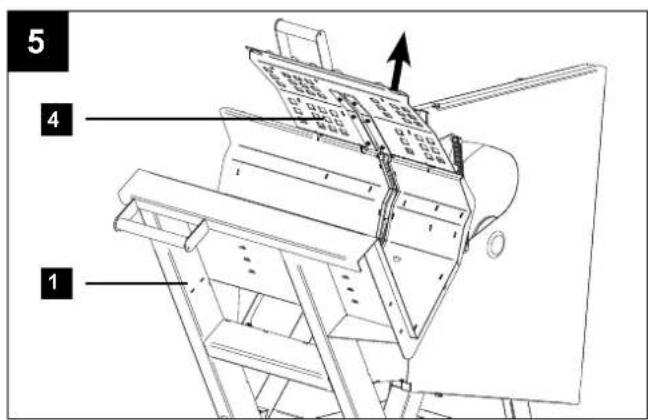
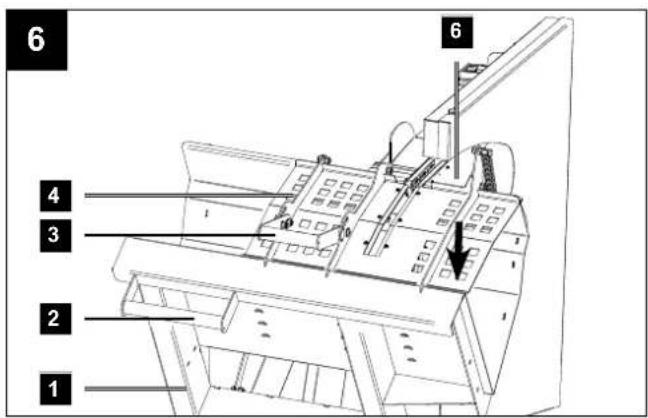
9.3 Sawing process (fig. 5 and 6)
⚠ Attention! With curved wood, the curved side must be aligned with the saw blade slot to avoid the wood tipping over and jamming during the cutting process, which can cause damage to the saw.
- Switch the machine on as described in 9.1.
- Unfold the protective cover (4).
- Place the material to be cut in the swivel frame (1).
- Close the protective cover (4).
Note: The sawing process can only be started with the protective cover (4) closed. - Swivel the swivel frame (1) with the handle (swivel frame) (2) and the handle (protective cover) (3) towards the saw blade (6) and saw through the material to be cut.
Note: During the sawing process, only exert enough pressure on the saw blade to keep the speed stable. - Swivel the swivel frame (1) back and open the protective cover (4).
Attention!
- Do not leave the machine unattended during operation.
- If you interrupt the work, switch off the machine and unplug the mains plug.
9.4 End of work (fig. 2 and 3)
- Switch the machine off as described in 9.1.
- Wait until the saw blade (6) has come to a complete stop.
- Pull out the mains plug.
- Observe the general maintenance information.
- Bring the swivel frame (1) to the transport position and secure it with the swivel frame lock (10).
10. Transport
Note:
To transport the swivel log saw, move the swivel frame lock (10) to the first position (fig. 2).
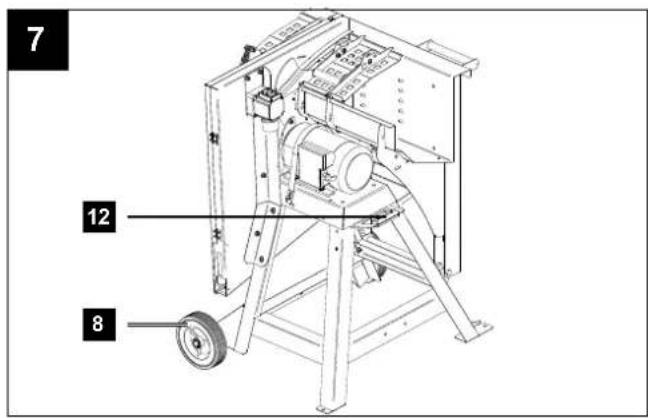
10.1 Transport over short distances (fig. 7)
- Lift the swivel log saw by the transport handle (12).
- The swivel log saw can now be moved with the transport wheels (8).
10.2 Vehicle transport
WARNING
Danger of injury due to excessive product weight. - Take a second person to help you lift the product.
- When lifting the product, note its weight (see chapter 7 technical data).
- Always switch off the product before transport and disconnect it from the power supply.
- Always carry the product with at least one other person.
- Protect the machine from impacts, shocks and severe vibrations, e.g. during vehicular transport.
- Secure the machine against tilting and slipping.
- Never use protective devices for handling or for transport.
11. Electrical connection
The electrical motor installed is connected and ready for operation. The connection complies with the applicable VDE and DIN provisions.
The customer's mains connection as well as the extension cable used must also comply with these regulations.
Use a portable safety switch (PRCD) if the residual current protective circuit (RCD) in the mains power supply is not provided with a rated residual current of no more than 30 mA.
The mains power connection is protected with a 16 A slow-blow fuse.
Damaged electrical connection cables
The insulation on electrical connection cables is often damaged.
This may have the following causes:
- Pressure points, where connection cables are passed through windows or doors.
- Kinks where the connection cable has been improperly fastened or routed.
- Places where the connection cables have been cut due to being driven over.
- Insulation damage due to being ripped out of the wall outlet.
- Cracks due to the insulation ageing.
Such damaged electrical connection cables must not be used and are life-threatening due to the insulation damage.
Check the electrical connection cables for damage regularly. Ensure that the connection cables are disconnected from electrical power when checking for damage.
Electrical connection cables must comply with the applicable VDE and DIN provisions. Only use connection cables with the designation H07RN-F.
The printing of the type designation on the connection cable is mandatory.
Three-phase motor 400 V 3\~ / 50 Hz
Mains voltage 400 V 3N\~ / 50 Hz
Mains power connection and extension leads must be 5-core = 3\~ + N + PE.
- Extension cables must have a minimum cross section of 1.5 ~mm^2 ( ≤ 25 ~m ).
- Extension cables must have a minimum cross section of 2.5 ~mm^2 (> 25 ~m) .
Attention!
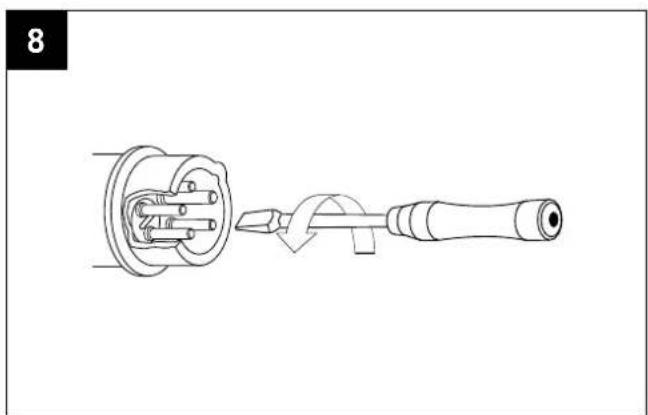
Check the direction of rotation (fig. 8)
- Three-phase motors must be checked for their direction of rotation when newly connected or relocated. If necessary, the direction of rotation must be changed.
- To do this, change the direction of rotation of the phase inverter with a screwdriver (not included in the scope of delivery) in the device plug.
Motor braking device
The swivel log saw is equipped with an electronic brake control so that the saw blade comes to a standstill after max. 10 seconds after switching off.
The electric brake control is interrupted after max. 14 s.
If the braking process takes longer than 10 seconds, the machine must no longer be operated because the brake could be defective. It is essential to disconnect the machine from the power supply.
Note:
If the electronic brake control is defective, the saw must not be operated. Repair work on the electrical connections may only be carried out by a specialist workshop.
Electrical connection test
- Switch the machine on as described in 9.1.
- The sawing shaft starts running.
12. Maintenance
⚠ WARNING
Risk of injury due to unexpected start-up of the machine
- Unplug the mains plug from the socket before carrying out any cleaning or maintenance work.
⚠ WARNING
Warning of unforeseeable hazards and product damage
- Never carry out unauthorised modifications or repairs to the product that are not described in the operating instructions.
- Do not carry out work described for a specialist workshop.
Attention! Danger of fire due to chips in the event the cleaning carried out is insufficient.
12.1 General information
- Check the product for loose, worn or damaged components.
- Check the nuts, pins and screws for firm seating.
- Check the covers and protective equipment for damage and correct seating.
- Check the electrical connections. Repair work on the electrical connections may only be carried out by a specialist workshop.
12.2 Product-specific information
- Check the saw blade regularly. Use only saw blades that are well sharpened, free of cracks and not deformed. Only use saw blades that comply with EN 847-1.
- Replace worn swivel frame bearings immediately.
- Check that no tools or miscellaneous parts are on or in the machine before putting it back into operation.
- Remove any sawdust accumulations at the discharge.
12.3 Oiling the product
- Oil the rotating parts once monthly to extend the life of the tool.
- Use a high-quality, low-viscosity machine oil to lubricate all moving parts.
- Do not oil the motor.
△ Never use a high-pressure cleaner to clean your machine. Water can penetrate sealed areas of the machine and the transmission housing and cause damage to spindles, gear wheels, bearings or the engine. The use of high-pressure cleaners shortens the service life and reduces the ease of maintenance.
Service information
With this product, it is necessary to note that the following parts are subject to natural or usage-related wear, or that the following parts are required as consumables.
Wearing parts*: Saw blade; swivel frame inserts
* may not be included in the scope of delivery!
Spare parts and accessories can be obtained from our Service Centre. To do this, scan the QR code on the front page.
12.4 Fitting/replacing the saw blade (fig. 9)
⚠ WARNING
Danger of injury! Improper handling of the swivel log saw may result in serious injury.
⚠ WARNING
Risk of injury to fingers and hands due to sharp edges
- Wear protective gloves.
Observe the max. speed specified on the saw blade and select a saw blade suitable for your machine.
- Put the swivel frame (1) into the cutting position.
- Loosen the upper screw (13) and the lower screw (14) on the protective cover (7) and turn them out approx. 5 mm.
- Open the protective cover (7).
- To lock the saw blade (6), insert the locking pin (15) through the corresponding hole on the saw blade guard. To do this, insert the locking pin (15) completely and straight into the opening on the saw blade guard. Use the corresponding hole (depending on the saw blade type) so that the pin is at the lowest point (tooth base) of the saw blade (6).
- Turn the tensioning screw (17) anti-clockwise with the open-end spanner (16) to open the tensioning screw (17).
- Remove the tensioning screw (17) and the outer saw blade flange (18) from the drive shaft.
- Now remove the saw blade (6) from the drive shaft.
- Clean the external and internal saw blade flange carefully, before fitting a new saw blade (6). Clean the clamping surfaces. The clamping surfaces must be free of dirt, grease, oil and water.
- Place a new saw blade (6) on the drive shaft. Observe the direction of rotation: The cutting angle of the teeth must point in the running direction (forwards).
- Fit the external saw blade flange (18) back on the drive shaft. Ensure the correct alignment of the outer saw blade flange.
-
Tighten the tensioning screw (17) on the drive shaft by hand.
-
Turn the saw blade (6) carefully in the running direction: It must be precisely centred and not run out of round. Check that the saw blade (6) and external saw blade flange (18) are seated correctly. Align the parts once more, if the saw-blade is not precisely centred.
⚠ WARNING
Warning against unexpected hazards and damages to the product
- Check the setting of the saw blade after every saw blade replacement.
- Turn the tensioning screw (17) with 90 Nm clockwise with the open-ended spanner (16). Use the open-ended spanner supplied. Do not extend the spanner with a tube or similar and do not tighten the screw by hitting the open-ended spanner with a hammer.
- △ ATTENTION! Remove the locking pin (15).
13. Storage
⚠ WARNING
Risk of injury due to unexpected start-up of the machine
- Remove the mains plug from the socket.
ATTENTION
Product damage due to incorrect storage
- Store the product protected against dirt, dust and moisture.
-
Store the product in the original packaging.
-
Store the product in a dark, dry and frost-free place that is inaccessible to unauthorised persons.
- The optimum storage temperature lies between 5^ C and 30^ C.
- Store the operating manual with the product.
14. Disposal and recycling
Notes for packaging


The packaging materials are recyclable. Please dispose of packaging in an environmentally friendly manner.
Notes on the electrical and electronic equipment act [ElektroG]
![Practixx PXWS700 - Notes on the electrical and electronic equipment act [ElektroG] - 1](/content/2026/03/564074/images/fde691466f47dc130bf04c783e7f925b283351644bcd9ff99810409121143cd7.jpg)
Waste electrical and electronic equipment does not belong in household waste, but must be collected and disposed of separately!
- Used batteries or rechargeable batteries that are not installed permanently in the old appliance must be removed non-destructively before disposal.
Their disposal is regulated by the battery law.
- Owners or users of electrical and electronic devices are legally obliged to return them after use.
- The end user is responsible for deleting their personal data from the old device being disposed of!
- The symbol of the crossed-out dustbin means that waste electrical and electronic equipment must not be disposed of with household waste.
-
Waste electrical and electronic equipment can be handed in free of charge at the following places:
-
Public disposal or collection points (e.g. municipal works yards)
- Points of sale of electrical appliances (stationary and online), provided that dealers are obliged to take them back or offer to do so voluntarily.
- Up to three waste electrical devices per type of device, with an edge length of no more than 25 centimetres, can be returned free of charge to the manufacturer without prior purchase of a new device from the manufacturer or taken to another authorised collection point in your vicinity.
-
Further supplementary take-back conditions of the manufacturers and distributors can be obtained from the respective customer service.
-
If the manufacturer delivers a new electrical appliance to a private household, the manufacturer can arrange for the free collection of the old electrical appliance upon request from the end user. Please contact the manufacturer's customer service for this.
- These statements only apply to devices installed and sold in the countries of the European Union and which are subject to the European Directive 2012/19/EU. In countries outside the European Union, different regulations may apply to the disposal of waste electrical and electronic equipment.
15. Troubleshooting
| Fault Possible cause | Remedy | |
| The saw does not brake when switching the machine off | Brake system defective Have the brake system checked and, if necessary, replaced by a specialist workshop | |
| Saw blade is loose after the motor is switched off | Fixing nut not tight enough Tighten the fixing nut (Attention: right-hand thread) | |
| Engine makes excessive noise or hums | Coils damaged, motor defective Arrange for inspection of the engine by a specialist workshop. | |
| Burnt areas on the cutting surface | Blunt saw blade Sharpen saw blade by a specialist or replace it if necessary | |
| Incorrect saw blade Replace saw blade | ||
| Saw blade turns in the wrong direction | Polarity reversed Change direction of rotation with phase inverter | |
| Incorrect connection Have an electrician transpose the wall socket poles | ||
| Motor not supplying power, fuse tripping | Cross section of the extension cable insufficient | See “Electrical connection” |
| Overload due to blunt saw blade Replacing the saw blade | ||
| Saw blade jammed | Switch off the machine, pull out the mains plug and release the blockage | |
Electrical maintenance work may only be carried out by a qualified electrician!
Günzburger Straße 69
D-89335 Ichenhausen
CHER CLIENT,

flowchart
graph TD
    subgraph Motor
        A["overheat protector"] --> B["Motor"]
    end
    subgraph Brake_Circuit_Board
        C["brake assisted circuit board"] --> D["SP"]
        C --> E["k"]
        C --> F["l"]
        C --> G["1"]
        C --> H["1"]
        C --> I["CB"]
        C --> J["C1"]
        C --> K["C2"]
        C --> L["V2"]
        C --> M["SP"]
        C --> N["l"]
        C --> O["L2"]
        C --> P["L2"]
        C --> Q["L3"]
        C --> R["N"]
        C --> S["L1"]
        C --> T["L2"]
        C --> U["L3"]
        C --> V["PE"]
    end
    subgraph Brake_Circuit_Board
        W["JK3 relay"] --> X["7"]
        W --> Y["8"]
        W --> Z["5"]
        W --> AA["4"]
        W --> AB["3"]
        W --> AC["1"]
        W --> AD["a"]
        W --> AE["b"]
        W --> AF["400v"]
    end
    subgraph Motor
        AG["motor"] --> AH["V"]
    end
    style Motor fill:#f9f,stroke:#333
    style Brake_Circuit_Board fill:#ccf,stroke:#333
EU Declaration of Conformity
Article name: ROCKING LOG SAW - PX-WS-700
Nom d'article: SCIE À BÜCHES - PX-WS-700
Standard references:
This declaration of conformity is issued under the sole responsibility of the manufacturer.
Subject to change without notice
Documents registrar: Simon Schunk Günzburger Str. 69, D-89335 Ichenhausen
Garantie DE
Apparent defects must be notified within 8 days from the receipt of the goods. Otherwise, the buyeris rights of claim due to such defects are invalidated. We guarantee for our machines in case of proper treatment for the time of the statutory warranty period from delivery in such a way that we replace any machine part free of charge which provably becomes unusable due to faulty material
or defects of fabrication within such period of time. With respect to parts not manufactured by us we only warrant insofar as we are entitled to warranty claims against the upstream suppliers. The costs for the installation of the new parts shall be borne by the buyer. The cancellation of sale or the reduction of purchase price as well as any other claims for damages shall be excluded.
Garantie FR


- VEREHRTER KUNDE,
- Explanation of the symbols on the product
- Attention!
- Table of contents: Page:
- Introduction
- MANUFACTURER:
- DEAR CUSTOMER,
- NOTE:
- Description of the product
- Scope of delivery
- Proper use
- Safety instructions
- Warning!
- Attention: Danger of accidents!
- Residual risks
- Operator training
- Technical data
- Noise data
- Wear hearing protection.
- Before commissioning
- General information
- ⚠️ DANGER
- Product-specific information
- Operation
- On/Off switch (fig. 3)
- Overload protection
- Sawing process (fig. 5 and 6)
- End of work (fig. 2 and 3)
- Transport
- Transport over short distances (fig. 7)
- Vehicle transport
- WARNING
- Electrical connection
- Damaged electrical connection cables
- Three-phase motor 400 V 3\~ / 50 Hz
- Mains voltage 400 V 3N\~ / 50 Hz
- Check the direction of rotation (fig. 8)
- Motor braking device
- Electrical connection test
- Maintenance
- ⚠ WARNING
- General information
- Product-specific information
- Oiling the product
- Service information
- Fitting/replacing the saw blade (fig. 9)
- Storage
- ATTENTION
- Disposal and recycling
- Notes for packaging
- Notes on the electrical and electronic equipment act [ElektroG]
- Troubleshooting
- CHER CLIENT,
- EU Declaration of Conformity
- Standard references:
- Garantie DE
- Garantie FR
Brand : Practixx
Model : PXWS700
Category : Saw