WB3CM25B - Microwave Oven Wisberg - Free user manual and instructions
Find the device manual for free WB3CM25B Wisberg in PDF.
| Product type | Combination microwave oven |
| Brand | Wisberg |
| Model | WB3CM25B |
| Capacity | 25 liters |
| Dimensions (H × W × D) | 28 × 47.2 × 37.1 cm |
| Net weight | 12.26 kg |
| Turntable diameter | 28.8 cm |
| Power supply voltage | 230 V ~ 50 Hz |
| Maximum power consumption | 450 W (microwave) |
| Microwave output power | 900 W |
| Microwave frequency | 2450 MHz |
| Functions | Microwave, grill, combined cooking, defrost, 10 auto menus |
| Microwave power levels | 5 levels: 90 W, 270 W, 500 W, 720 W, 900 W |
| Timer | Up to 95 minutes and 50 seconds |
| Child lock | Yes, long press on STOP/CLEAR to lock |
| Warranty | 3 years |
| Spare parts | Available for 10 years |
| Maintenance | Clean after each use; do not use steam cleaner |
| Operating temperature | 0 °C to 40 °C |
| Storage temperature | -20 °C to 60 °C |
Frequently Asked Questions - WB3CM25B Wisberg
User questions about WB3CM25B Wisberg
0 question about this device. Answer the ones you know or ask your own.
Ask a new question about this device
Download the instructions for your Microwave Oven in PDF format for free! Find your manual WB3CM25B - Wisberg and take your electronic device back in hand. On this page are published all the documents necessary for the use of your device. WB3CM25B by Wisberg.
USER MANUAL WB3CM25B Wisberg
Rated voltage: 230V\~
Rated frequency: 50Hz
Rated input (microwave): 1450W
Rated output (microwave): 900W
Rated input (grill): 1000W
Microwave frequency: 2450MHz
Wisepick Productions B.V.
Weena 664
3012CN, Rotterdam
The Netherlands
wisberghome.com
Made in China
Batchcode:
Serial number:
WARNING
MICROWAVE ENERGY
DO NOT REMOVE THIS
COVER

CAUTION: HOT SURFACE


INHOUDSOPGAVE
VOORWOORD
5
1. VEILIGHEID 7
Wisepick Productions B.V.
Weena 664
3012 CN Rotterdam
Nederland
Made in China
1. VEILIGHEID

WAARSCHUWING!
1.1 VEILIGHEIDSWAARSCHUWINGEN EN -VOORSCHRIFTEN

WAARSCHUWING!
text_image
A K D E F G J I H
natural_image
Diagram of a biological cell with labeled parts B and C, showing internal structures without any text or symbols.text_image
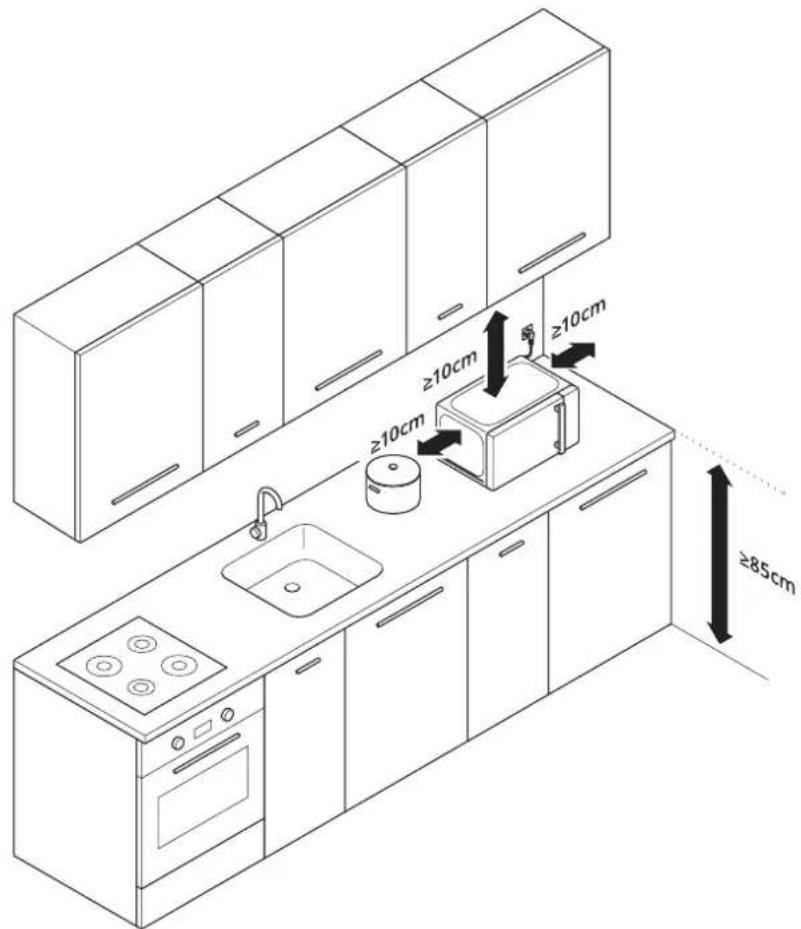
≥85cm ≥10cm ≥10cm ≥10cmtext_image
Diagram illustrating a mechanical assembly with labeled parts and directional arrows indicating motion or assembly steps.4. GEBRUIK
4.1 ALGEMENE INFORMATIE
CONFIRM START/+30SEC.

CONFIRM START/+30SEC.


CONFIRM START/+30SEC.

CONFIRM START/+30SEC.

text_image
→ 900C-02C-01Grill90270450720 → → → →
CONFIRM START/+30SEC.

CONFIRM START/+30SEC.

CONFIRM START/+30SEC.

CONFIRM START/+30SEC.
Wisepick Productions B.V.
Weena 664
3012 CN Rotterdam
Nederland
Made in China
USER MANUAL
MICROWAVE
WB3CM25B

WISBERG
TABLE OF CONTENTS
FOREWORD
33
1. SAFETY 35
1.1 Safety warnings and regulations 35
1.2 Safety instructions: installation 36
1.3 Safety instructions: use 36
1.3.1 Safety of persons 36
1.3.2 Safety in use 37
1.4 Safety instructions: electrical safety 39
1.5 Safety instructions: cleaning 40
1.6 Safety instructions: repairs 40
1.7 Explanation of graphic symbols on the product and packaging 41
2. PRODUCT FEATURES 42
2.1 System overview 42
2.2 Guarantee 42
2.3 Spare parts 42
2.4 Technical data 43
3. INSTALLATION
44
3.1 Key components
44
3.1.1 Combi microwave
44
3.1.2 Accessories
44
3.2 Unpacking the appliance
45
3.3 Cleaning before first use
45
3.4 Installing the appliance in a suitable place
45
3.5 Installing the tripod arm and the turntable
46
4. USE
47
4.1 General information
47
4.1.1 Materials and objects that can be used with the microwave function
47
4.1.2 Materials and objects that may not be used with the microwave function
48
4.2 Control panel
49
4.2.1 Microwave power
49
4.2.2 Preparation time
49
4.2.3 Pausing and stopping the preparation
50
4.2.4 Setting the current time
50
4.2.5 Using the cooking timer
50
4.2.6 Using the child safety lock
51
4.3 Preparing food 51
4.3.1 Microwave 51
4.3.1.1 Quick setting to prepare food with the microwave function 51
4.3.1.2 Preparing food with a set microwave power and preparation time 51
4.3.2 Grilling and combi food preparation 52
4.3.3 Automatic menu preparation 52
4.3.4 Defrosting of food 54
4.3.4.1 Defrosting by weight 54
4.3.4.2 Defrosting by time 54
5. MAINTENANCE AND CLEANING 55
5.1 Cleaning after each use 55
5.2 Cleaning a heavily soiled oven cavity 55
-
FAULTS AND SOLUTIONS 56
-
TAKING OUT OF SERVICE 57
-
SAFE DISPOSAL 57
8.1 Dispose of the appliance as waste 57
8.2 Dispose of the packaging material as waste 57
FOREWORD
About this document
- This manual contains all information for the correct, efficient and safe use
- of the appliance.
- This manual is intended for the end user and/or buyer of this appliance.
- Installation of the appliance, use and all cleaning and maintenance activities as described in the instructions may be carried out by the end user, unless clearly indicated to the contrary.
- Make sure you have fully read and understood the instructions in this manual before installing or using the appliance. This prevents fire, explosions, electric shocks and/or other hazards that may result in physical injury and/or material damage.
- Please retain this document for future use as long as you use and/or own the appliance and pass it on to subsequent users of the appliance.
- Wisepick Productions B.V. cannot in any way be held liable for material or immaterial damage to you or to others, the appliance, your other belongings or belongings of others caused by not following the instructions in this manual.
- The warnings and safety instructions in this manual do not cover all possible circumstances and situations.
- The combi microwave is also referred to in this manual as microwave oven or appliance.
- If you contact our customer service, make sure you have the model number at hand. The information can be found on the type plate or on the front of this manual.
Original instructions
This manual was originally written in Dutch. All other languages are translated documents. In the case of translation errors, the Dutch version takes precedence.
Symbols used
| SYMBOL DESCRIPTION | ||
 | DANGER! | Indicates a fire hazard and/or flammable materials. |
 | WARNING! | Indicates a dangerous situation which, if not avoided, can result in serious immaterial damage to you or others |
 | CAUTIONS! | Indicates a dangerous situation which, if not avoided, can result in slight immaterial damage to you or others. |
 | ATTENTION! | Indicates a situation related to material damage. |
 | NOTE | Indicates useful additional information. |

NOTE
You can also find the latest version of this manual online, at www.wisberghome.nl if you search for the article number.
Copyright
The data depicted in this manual, including texts, photographs, graphic drawings, trademarks, names (including trade names) and logos, are the property of Wisepick Productions B.V. and are protected by copyright, trademark law and/or any other intellectual property right, unless these data belong to a third party. You are never allowed to reproduce, transfer, distribute, store or make the contents of the manual available to third parties, in whole or in part, without the prior written consent of Wisepick Productions B.V. and/or the third party to whom the data belong.

Wisberg contact details
Customer service can be reached at: www.wisberghome.com
Wisepick Productions B.V.
Weena 664
3012 CN Rotterdam
The Netherlands
Made in China
1. SAFETY

WARNING!
Read this manual and safety instructions carefully and make sure you understand the contents before using the appliance with the appropriate parts. Failure to comply with all instructions can cause material damage and/or serious injury.
1.1 SAFETY WARNINGS AND REGULATIONS

WARNING!
- This appliance may be used by children from eight years of age and above and by persons with reduced physical, sensory or mental capabilities or lack of experience and knowledge, provided that they are under supervision or have been trained in the safe use of the appliance and that they understand the associated dangers.
- This appliance may not be used by children under 8 years of age.
- This appliance and its components are not toys, so children may not play with the appliance or its components.
- Children, legally incompetent persons and domestic animals must be supervised while using the appliance. The appliance contains small parts. Children must be supervised to ensure that they do not play with the appliance.
- RISK OF BURNING! The appliance and accessible parts become hot during operation.
- Do not touch the heating element. Keep children under 8 years away from the appliance during operation unless they are under constant supervision.
- Allow for a cooling-off period. After use, the appliance can remain hot for some time.
- RISK OF BURNING! Surfaces within reach may be hot.
- RISK OF BURNING! When the appliance is used in combination mode (combi food preparation), children may only use the appliance under adult supervision due to the high temperatures reached.
- RISK OF BURNING! Do not touch the heating element in the oven cavity. This can become hot during use.
- Cleaning and user maintenance may not be carried out by children without supervision.
- RISK OF SUFFOCATION! Keep packaging away from children.
- Use the appliance only in accordance with intended use.
- This appliance may only be used to defrost, heat or prepare food (cooking).
- RISK OF INJURY, IGNITION OR FIRE! Do not use the appliance for drying food and clothing, or for heating cushions, slippers, sponges, moist cloths and similar applications.
- Do not use the appliance for storing objects or food.
- This appliance is intended for domestic use and similar applications such as
• staff kitchens in shops, offices and other work environments
- farms and guests in hotels, motels, B&B and other residential environments
• catering and similar non-retail applications.
- This appliance is for indoor use only. This appliance may not be used outdoors.
- The appliance must be stored in a room free of naked flames, gas-powered appliances or electric heaters.
- The appliance must be stored in such a way so as to prevent mechanical failure.
- Store the appliance out of reach of unauthorised persons and do not allow anyone unfamiliar with the appliance and these instructions to use it.

1.2 SAFETY INSTRUCTIONS: INSTALLATION

WARNING!
- RISK OF DAMAGE! Never place the appliance on its side or front. Always place the appliance upright or on its back. Failure to comply with this warning may result in voiding the warranty claim.
- RISK OF INJURY! Sharp edges. Handle with care.
- Keep all packaging materials in case the appliance needs to be transported for warranty or repair.
- Install the appliance in accordance with the installation instructions. Incorrect installation can cause electric shocks, fire and/or property damage.
- Only use the original accessories provided for the installation.
- Make sure that the plug and socket are clearly visible and accessible at all times.
- Do not install the appliance near water, direct sunlight or heat sources such as radiators, heating grills and hobs.
- Do not expose the appliance to steam.
- This appliance is not suitable for built-in installation and may only be installed as a free-standing appliance. If the appliance is nevertheless installed in a cupboard, always observe the distances specified in the installation instructions. The cupboard doors must be open at all times while the appliance is in use to prevent overheating.
- Do not install the product behind a decorative frame to prevent overheating.
- Use two hands when moving, lifting or turning the appliance.
1.3 SAFETY INSTRUCTIONS: USE

WARNING!
1.3.1 Safety of persons
- Always be alert and act with caution. Do not use electrical appliances if you suffer from impaired concentration or lack of awareness, or if you are under the influence of drugs, alcohol or medication. Even the slightest distraction can lead to serious accidents and injuries when using electrical appliances.
- Always operate and use the appliance as described in these instructions for use. Assume that anything not specified here is also not possible.
1.3.2 Safety in use
- RISK OF SPARKS AND FIRE! Only use objects that are suitable for use in a microwave. Metal food and beverage containers may not be used in the combi microwave during cooking. Do not use utensils or containers containing metal parts in the combi microwave. Remove bags and metal handles from plastic or paper bags/containers before placing them in the appliance.
- Only use the original accessories supplied and follow the instructions for correct use with the functions of the combi microwave.
- Never start the preparation with the appliance door open. This can result in exposure to the harmful energy of the microwaves. Never block the door locking mechanism or make any changes to it.
- Never place objects between the appliance housing and door.
- Make sure the door and closing surfaces are always clean and free of dust, grease, cleaning agents and other contaminants.
- Follow the maintenance instructions for trouble-free use and long service life. A poorly maintained appliance can lead to degradation and shortened service life and/or dangerous situations.
- RISK OF SPARKS AND FIRE! Fat and food left in the appliance can cause fire and sparking when the appliance is used. Remove food residues after each use.
- RISK OF BURNING! Never heat liquids and food in closed containers as these can explode.
- RISK OF FIRE! Monitor food preparation at all times, especially when using plastic or paper packaging, due to the risk of ignition.
- If smoke develops: switch off or unplug the appliance and keep the door of the appliance closed to extinguish any flames.
- RISK OF BURNING! The contents of baby bottles and baby food containers must be stirred or shaken and checked for the correct temperature before being consumed to avoid risk of burning.
- RISK OF BURNING! Warming up or heating of liquids (and food) with a combi microwave can result in delayed, eruptive cooking. Therefore, be careful when handling the container or packaging. When heating liquids, leave them for 20 seconds before taking them out. You can stir food during heating if required. Always stir after heating.
- While opening the door, stand at arm's length from the appliance in order not to get burned by the escaping hot air or steam. Using ingredients with alcohol can cause a mix of alcohol and air.
- RISK OF EXPLOSION! Eggs in their shell and whole hard-boiled eggs may not be defrosted, heated or cooked in the combi microwave. They can explode even after the preparation has stopped.
- This combi microwave is not suited for the use of thermometers or temperature sensors.
- Do not use the appliance in the vicinity (at least one metre away) of highly flammable or explosive substances or fuels.
- Never expose the appliance to a naked flame.
-
Do not expose the appliance to direct sunlight.
-
Do not place the food directly on the turntable. Always use microwave-appropriate cooking utensils to prepare the food.
• Always place the cooking utensils in the middle of the turntable. - RISK OF FIRE! Do not cook the food for too long by increasing the microwave power and cooking time. Food can dry out, burn or cause fire.
• Always use oven gloves to remove or insert food or cookware from the appliance. - Make sure the turntable is not dislodged when packaging or food is taken out of the oven cavity.
- Do not use paint, cleaning sprays, anti-insect sprays, etc. on or near the appliance. This can cause deformation of the housing or electrical damage.
- If the appliance is installed in a cupboard, the cupboard doors must be open at all times while the appliance is in use.
- Do not use the appliance in damp or wet environments, such as the bathroom and laundry area, or near a bath, shower or swimming pool.
- Do not use near sources of fire, splashing oil or water.
- Do not spill water, oil or any liquid on or in the appliance.
- Do not pour water or other liquids over the appliance.
- Do not operate the appliance if you notice damage to the appliance, the power cable or the plug, or if does not work properly, has fallen or otherwise malfunctions. Please contact customer service for further information. See Foreword for the contact details.
- RISK OF ELECTRIC SHOCK! Do not use the appliance if the door or door seals are damaged until it is repaired by an expert.
- Remove the plug from the socket when you hear strange noises, smell a strange odour and in case of smoke development.
- Do not insert fingers or objects such as pens through the grills in the appliance and especially warn children of these dangers.
- Never remove the housing or parts of the housing due to the risk of exposure to the harmful energy of the microwaves.
- RISK OF FIRE! Do not place objects on the appliance and never cover the appliance. Never block the grills for incoming and outgoing air, not even partially. This can cause fire!
- Do not climb or stand on the appliance.
- The door of the appliance and the turntable are made of glass. This can break if the appliance falls or receives a significant blow. Do not use the product if the glass is broken or cracked, or if a piece breaks off.
- If the appliance is not in use, or when cleaning it, carrying out maintenance or moving it, first switch it off and then remove the plug from the socket.
1.4 SAFETY INSTRUCTIONS: ELECTRICAL SAFETY

DANGER!
If there are any questions regarding the instructions for electrical safety, contact a qualified electrician.
- RISK OF FIRE! The appliance has thermal protection to prevent fire. To prevent accidental resetting of this thermal protection, this appliance may not be connected to an external switching appliance, such as a timer, or be connected to a circuit that is regularly switched on and off by the energy supplier.
- RISK OF FIRE! Before use, check that the socket you want to use has no defects, that it is earthed and has a residual-current device (RCD) connected in accordance with the legal regulations. If this is not clear, contact a qualified electrician.
- Before use, check that the voltage on the socket you want to use matches that on the type plate of the appliance (230-240 V; 50 Hz). Damage caused by faulty voltage is not covered by the guarantee.
- RISK OF ELECTRIC SHOCK! Only use the appliance's factory-fitted plug and never change it. The plug must match the type of socket used to reduce the risk of electric shocks.
- RISK OF ELECTRIC SHOCK! The plug has an earth connection. Do not remove the earth contacts from the plug. Improper use of the earthing can result in an electric shock.
- RISK OF FIRE! Only connect the appliance to a fixed, earthed socket. Do not use a plug adapter, junction box or table socket, etc.
-
The appliance has a short power cable to reduce the risk of entanglement or tripping over a longer power cable. Avoid using extension cables as much as possible. If this is unavoidable:
-
Use an extension cable with at least the same or higher electrical capacity as stated on the appliance;
- Use a three-wire earthed extension cable;
- Put the extension cable over the counter or top so that it cannot be pulled on or tripped over by children.
- RISK OF ELECTRIC SHOCK! Never pull the power cable to carry or move the appliance or to disconnect the plug. Keep the power cable away from heat, oil, sharp edges and moving parts. Do not make any changes to the power cable or submerge it in water or other liquids. Do not twist or kink the power cable. Do not roll up the power cable too tightly after use and do not wind it up around the unit; this can damage the insulation layer! Damaged or tangled power cables increase the risk of electric shocks.
- RISK OF ELECTRIC SHOCK! Do not touch the appliance, plug or mains cable with wet or damp hands. Only use the appliance with clean, dry hands.
- RISK OF ELECTRIC SHOCK! Do not use the appliance barefoot.
-
Fully unroll the appliance's power cable before plugging it into the socket. This is to prevent heat generation in the cable.
-
Do not pass the power cable under a carpet or cover it with mats, runners and the like. This can lead to unforeseen heat generation.
- Regularly check the appliance for damage to the power cable and plug. If there is visible damage, a strong smell, or parts become excessively hot, stop using it immediately and remove the plug from the socket.
- The appliance, plug and/or cable must be repaired and/or replaced by an electrician or an equivalent qualified person. Repairs by amateurs invalidate the guarantee and can cause dangerous situations!
1.5 SAFETY INSTRUCTIONS: CLEANING
- RISK OF BURNS! Wait for the appliance to cool down sufficiently before cleaning.
- Never use aggressive or abrasive cleaners, gasoline, detergents, chemically impregnated wipes or other cleaning solutions. These can damage the housing and appliance.
- Never use aggressive abrasive agents or sharp/metal scrapers on the door glass. This can lead to scratches and even shattering of the glass.
- Never spray liquid onto the appliance and make sure no water gets into it.
- Do not use a steam cleaner to clean the appliance.
1.6 SAFETY INSTRUCTIONS: REPAIRS

DANGER!
- It is not permitted to open, change or repair the appliance yourself. Do not drill holes into the appliance anywhere to avoid dangerous situations. The appliance, plug and/or cable must be repaired and/or replaced by an electrician or an equivalent qualified person. Repairs by amateurs invalidate the guarantee and can cause dangerous situations!
- RISK OF INJURY OR DEATH! It is dangerous for anyone other than an expert to perform service or repair that requires the removal of a cover that protects against exposure to the energy of the microwaves.
- RISK OF INJURY OR DEATH! Never touch the internal components. This can cause serious injury and even death.
- Repairs, maintenance and all other possible work on the appliance not described in this manual may not be carried out by the end user. Please contact customer service for more information. See Foreword for the contact details.
1.7 EXPLANATION OF GRAPHIC SYMBOLS ON THE PRODUCT AND PACKAGING
| Symbol Meaning | |
 | The CE marking on this appliance indicates that Wisberg declares that this appliance meets the requirements of the relevant European legislation relating to health, safety and environmental protection.The declaration of conformity is available upon request from Wisberg. See Foreword for the contact details. |
 | The accessible surfaces can be hot during or after use. |
 | This type of electrical equipment has only basic insulation and relies on earthing for protection. |
 | This symbol indicates alternating current. |
 | This symbol indicates direct current. |
 | This symbol on a product indicates that it is suitable for food contact. |
 | This symbol on the appliance, accessories or packaging indicates that this appliance may not be disposed of with ordinary household waste, but must be returned to a collection point. |
2. PRODUCT FEATURES
2.1 SYSTEM OVERVIEW
A combi microwave can cook food with both microwaves (microwave function) and heat (oven function). A combi microwave is suitable for defrosting, heating and preparing dishes.

The microwave function works with microwaves. These are high-frequency electromagnetic waves that bounce back and forth in the oven cavity. The energy of these waves ensures that the rotating dish is evenly heated and cooked.
Microwaves penetrate the food to a depth of about 2.5 cm. The heat then spreads inside the food. This process continues even after the dish has been removed from the combi microwave. The food must always be left to rest after cooking for a while, so that the heat can spread evenly and the dish is cooked from within.
The preparation time depends on the dish used, the quantity and density of the dish, the water content and the starting temperature.
The oven function heats the air with a heating element. Hot air cooks the food from the outside in, just like a conventional oven. This heats food evenly and allows baking, frying and grilling.
The microwave function and oven function (grill function) can be combined with combi cooking to prepare the food.
2.2 GUARANTEE
This appliance comes with a warranty period of three years after purchase. For more information on warranty conditions, go to www.wisberghome.com. In any case, you must have the purchase order with purchase and/or delivery date in order to be able to claim the guarantee.
2.3 SPARE PARTS
Spare parts are available on the consumer market for at least ten years after the introduction of the appliance. Please note that some spare parts are only available to professional repairers. To order spare parts or for more information, go to: www.wisberghome.com
2.4 TECHNICAL DATA
| PARAMETER UNIT | |
| Product name Combi microwave | |
| Model / Type WB3CM25B | |
| Weight (net) 12.26 kg | |
| Size (H × W × D) 28 cm × 47.2 cm × 37.1 cm | |
| Capacity 25 litres | |
| Turntable size ∅ 28.8 cm | |
| Nominal voltage and frequency AC 230 V; 50 Hz | |
| Energy consumption | |
| Maximum | 450W |
| Microwave function | 450W |
| Grill function | 1000W |
| Stand-by mode (after max. 20 minutes) | 0,8W |
| Frequency of microwave oven 2450 MHz | |
| Microwave output power 900 W | |
| Temperature range of oven function Grill above 120°C | |
| Operating temperature range 0°C to +40°C | |
| Storage temperature range -20°C to +60°C | |
| Relative humidity | 50% |
3. INSTALLATION
3.1 KEY COMPONENTS
3.1.1 Combi microwave

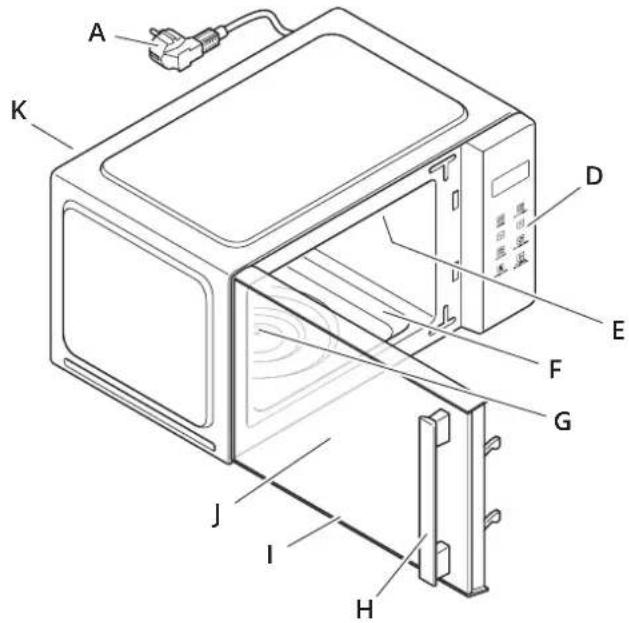
text_image
A K D E F G J I H
natural_image
Diagram of a biological cell with labeled parts B and C, showing internal structures without any text or symbols.| ID Name ID Name | |||
| A Mains plug G Turntable drive motor | |||
| B Turntable (glass) H Door handle | |||
| C Tripod arm I Door | |||
| D Control panel J Viewing window | |||
| E Heating element K Spacer | |||
| F Oven cavity | |||
3.1.2 Accessories
| ID Accessory Description | ||
| N | 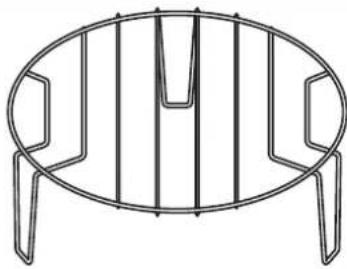 | Grill gridWARNING!Use only with the grill function.Do not use for preparations using the microwave function.Always place the grill rack on the turntable. |
3.2 UNPACKING THE APPLIANCE

WAARSCHUWING!
Keep packaging materials out of reach of children. Packaging materials are not toys.
To unpack the appliance:
-
Remove all packaging material and any transport attachments present (e.g. tape that holds parts in place during transport).
-
Remove any protective films on the outside of the housing.
WARNING! The mica film on the inside of the viewing window may not be removed.
- Check that all accessories are present and that the appliance and accessories do not present any damage. See Key components for more information.
WARNING! Do not use a damaged appliance but contact customer service. See Foreword for the contact details. In that case, keep the packaging.
3.3 CLEANING BEFORE FIRST USE

WARNING!
Never use aggressive or abrasive cleaners, gasoline, detergents, chemically impregnated wipes or other cleaning solutions. These can damage the housing and appliance. Never spray liquid onto the appliance and make sure no water gets into it.
To clean the appliance:
- Clean the oven cavity with a damp cloth and dry with a clean, dry cloth.
- Wash and dry the turntable, tripod arm and grill grid.
3.4 INSTALLING THE APPLIANCE IN A SUITABLE PLACE

WARNING!
Do not install the appliance in a cupboard space. If the appliance is nevertheless installed in a cupboard space, respect the distances specified in the installation instructions. The minimum size of the cupboard space is 67,2 cm wide × 38 cm high × 37,1 cm deep. Do not install the appliance in a cupboard space that is too small. During use, the cupboard doors must be open at all times to prevent overheating.
- Select a suitable place for use that satisfies the following points:
- A firm, flat, dry and horizontal surface, at a minimum height of 85 cm.
- Left and right of the appliance at least 20 cm free space, for the purpose of ventilation.
- At the top of the appliance at least 30 cm free space, for the purpose of ventilation.
- The ventilation openings are not blocked.
- Not near hobs or other heat sources.
- As far away as possible from television and radio equipment.
- The socket to be used gives the voltage indicated on the type plate of the appliance (230 V; 50 Hz).

text_image
≥85cm ≥10cm ≥10cm ≥10cm- Place the appliance with the spacer against the back wall.
- Insert the plug.
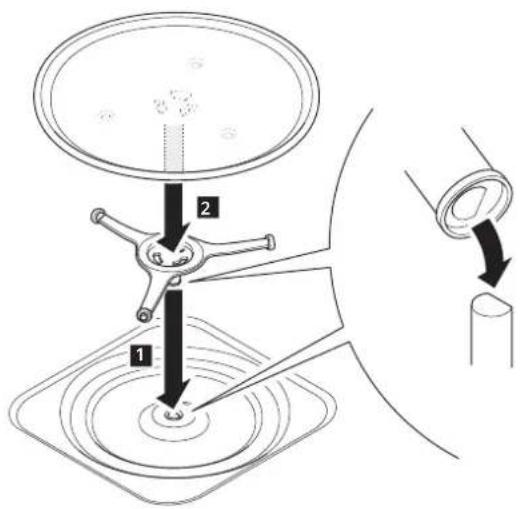
3.5 INSTALLING THE TRIPOD ARM AND THE TURNTABLE
- Open the door and gently push the tripod arm onto the drive motor. ATTENTION! The shape of the recess in the tripod arm must match the shape of the drive motor. Do not force the installation of the tripod arm; it only fits one way.
- Place the turntable, with the notches at the bottom, on the tripod arm.
- Check that the turntable can rotate freely.
text_image
Diagram illustrating a mechanical assembly with labeled parts and directional arrows indicating motion or assembly steps.4. USE
4.1 GENERAL INFORMATION
4.1.1 Materials and objects that can be used with the microwave function

WARNING!
Always follow the materials or objects manufacturer's instructions to determine if they can be used in the microwave and how.
| Utensils Comments and instructions | |
| Roasting tray • WARNING | The turntable can break if used incorrectly.There must be at least 5 mm space between the bottom of the roasting tray and the turntable. |
| Crockery • Only use crockery suitable for microwave use.Never use crockery that is cracked, chipped or missing pieces. | |
| Glass jars • WARNING | Most glass jars are not resistant to heat and can break.Only use glass jars to prepare food until just warm.Always remove the lid. |
| Glassware • Only use heat-resistant glassware suitable for microwave use.Never use glassware that has a metal edge or other metal parts.Never use glassware that is broken, chipped or missing pieces. | |
| Roasting bags • Always follow the manufacturer's instructions.Never close the roasting bag with metal clips, twist strips or other metal objects.Make a number of openings in the roasting bag so that steam can escape. | |
| Paper plates and cups • WARNING! Paper can cause fire. When using paper plates and cups, monitor food preparation at all times.Only use paper plates and cups for short preparations. | |
| Paper towels • WARNING! Paper can cause fire. When using paper towels, monitor food preparation at all times.Only use paper towels to cover the food when it is warming up and to absorb fat. | |
| Baking paper • Use baking paper to cover food to prevent splashes or as a wrapper to steam. | |
| Plastic • Only use plastic materials that are suitable for use in a microwave and follow the manufacturer's instructions. Plastics that are suitable for use in a microwave have a marking such as Microwave safe.WARNING! Some plastics become soft when the food gets hot and/or can contaminate the food. | |
| Plastic wrap • Use only microwave-appropriate plastic wrap.Use plastic wrap only to cover food so that the cooking liquid is not lost during preparation.The plastic wrap may not touch the food. | |
| Thermometers | Only use microwave compliant thermometers. |
| Wax paper for food | Only use wax paper as a cover to prevent splashes and to maintain cooking moisture. |
If in doubt, utensils can be tested with the following steps:

POWER

CONFIRM START/+30SEC.
- Fill a tray suitable for the microwave with 250 ml cold water.
- Place the utensil in the container and place it in the centre on the turntable.
- Touch the POWER button. The display shows 900 (900 W microwave power).
- Touch the CONFIRM START/+30SEC button to confirm.
- Set the preparation time with the arrow buttons to less than one minute.
- Touch the CONFIRM/START/+30SEC button to start the preparation. The combi microwave starts heating.
ATTENTION! Set a maximum of one minute. Monitor while heating. - Once the preparation time has elapsed, carefully feel the utensil. If it feels warm, it is not suitable for use in the microwave.
4.1.2 Materials and objects that may not be used with the microwave function
| Utensils Comments | |
| Aluminium packaging/aluminium trays | WARNING! Aluminium can cause sparking and/or fire.Remove the aluminium packaging or tray and prepare the food in a microwave resistant dish, plate or tray. |
| Cardboard packaging with metal parts | WARNING! Metal can cause sparking and/or fire.Remove the packaging and prepare the food in a microwave-resistant dish, plate or tray. |
| Metal utensils or utensils with metal parts | WARNING! Metal can cause sparking and/or fire.Metal prevents microwaves from coming into contact with food. |
| Metal clips, twist bands and twist strips | WARNING! Metal can cause sparking and/or fire. These objects contain metals. |
| Paper bags • WARNING! Paper can cause fire. When using paper towels, monitor food preparation at all times. | |
| Synthetic foam, plastic foam, | WARNING! Plastic foam can melt and/or contaminate food when exposed to high temperatures. |
| Wood • Wood dries out in the microwave and can therefore crack or split. | |
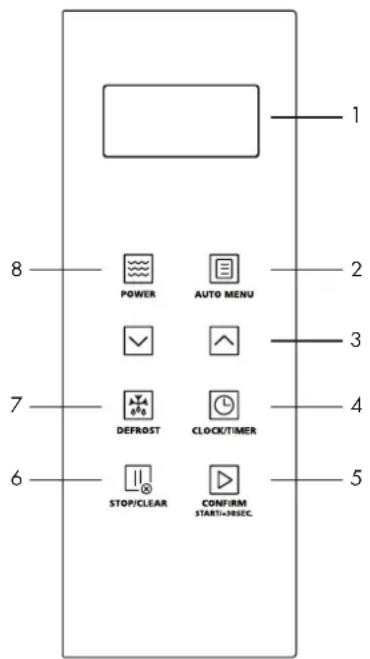
4.2 CONTROL PANEL
| ID Name | |
| 1 Display | |
| 2 POWER button | |
| 3 Arrow buttons | |
| 4 AUTO MENU button | |
| 5 CONFIRM START/+30SEC button | |
| 6 STOP/CLEAR button | |
| 7 CLOCK/TIMER button | |
| 8 DEFROST button | |
| 9 Function indications | |
| 10 Time display | |
| 11 Temperature in the oven cavity (each block represents 10°C, from 150°C to 240°C) |
text_image
1 8 POWER AUTO MENU 2 3 7 DEFROST CLOCK/TIMER 4 6 STOP/CLEAR CONFIRM START=305EC 5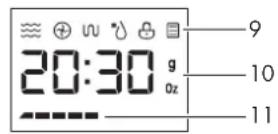

NOTE
To use a programme, first press the Stop/clear button.

STOP/CLEAR
4.2.1 Microwave power
The microwave power used for preparation can be set in five steps from 90 W to 900 W. The Preparing food section indicates how to set the microwave power.
| Display indication | 0 900 | ||||
| Percentage | 00% | ||||
| Microwave power | 500 W 720 W | 1000 W |
4.2.2 Preparation time
The preparation time and the cooking timer can be set in steps according to the table: from 5 seconds to a maximum of 95 minutes.
| Time to be set | Step size |
| From 0 seconds to 1 minute | 5 seconds |
| From 1 minute to 5 minutes | 10 seconds |
| From 5 minutes to 10 minutes | 30 seconds |
| From 10 minutes to 30 minutes | 1 minute |
| From 30 minutes to 95 minutes | 5 minutes |
4.2.3 Pausing and stopping the preparation


STOP/CLEAR

CONFIRM START/+30SEC.
To pause the preparation
A. Touch the STOP/CLEAR button once.
To continue the preparation, touch the CONFIRM START/+30SEC button.
B. Open the door.
To continue the preparation, close the door and touch the CONFIRM START/+30SEC button.
To stop the preparation
A. Touch the STOP/CLEAR button twice.
The set preparation is cleared and the display shows the current time. The appliance is in standby mode.
B. Open the door and then touch the STOP/CLEAR button.
The set preparation is cleared and the display shows the current time. The appliance is in standby mode.
4.2.4 Setting the current time

CLOCK/TIMER

- In standby mode, touch the CLOCK/TIMER button twice. The display shows 00:00.
- Set the hours with the arrow buttons (from 0 to 23).
- Touch the CLOCK/TIMER button to confirm.
- Set the minutes with the arrow buttons (from 0 to 59).
- Touch the CLOCK/TIMER button to confirm. The time is set.

NOTE
If no setting or confirmation is given for one minute or if no confirmation is given in step 5 with the CLOCK/TIMER button, the settings are not saved.
4.2.5 Using the cooking timer

NOTE
No other functions of the appliance can be used while using the cooking timer.

CLOCK/TIMER

To set the cooking timer:
- Press the Clock/Timer button twice. The display shows 00:00.
- Set the desired time with the arrow buttons.
- Touch the CONFIRM START/+30SEC button to confirm the set time. The cooking timer starts counting down.
- To stop the cooking timer, touch the STOP/CLEAR button.

STOP/CLEAR
4.2.6 Using the child safety lock
The child lock prevents children from accidentally turning on the combi microwave.

STOP/CLEAR
To use the child safety lock:
- To activate the child safety lock:
- In standby mode, touch the STOP/CLEAR button for two seconds. A tone can be heard and the display shows.

- To turn off the child safety lock:
- Touch the STOP/CLEAR button for two seconds.
A tone can be heard and the child lock is off.
4.3 PREPARING FOOD

WARNING!
Never operate the combi microwave without food or drink in the oven cavity to prevent overheating. Never allow the combi microwave to operate without its tripod arm and turntable. Always check the food packaging for preparation and preparation time and follow the manufacturer's instructions.
Keep in mind the materials and utensils used in the different preparation methods. Use only materials and utensils suitable for the chosen preparation methods.
4.3.1 Microwave
4.3.1.1 Quick setting to prepare food with the microwave function

CONFIRM START/+30SEC.

-
Place the food to be prepared in the middle of the turntable and close the door.
-
Start the preparation:
A. Start preparation immediately: a. In standby mode, touch the CONFIRM START/+30SEC button to prepare the food for 30 seconds with 100% (900 W) microwave power b. Touch the CONFIRM START/+30SEC button to extend the time by 30 seconds. Each time the CONFIRM START/+30SEC button is touched, the preparation time is extended by 30 seconds.
B. Set the time and start cooking: a. In standby mode, set the cooking time with the arrow buttons. b. Touch the CONFIRM START/+30SEC button to prepare the food for the set time with 100% (900 W) microwave power.
4.3.1.2 Preparing food with a set microwave power and preparation time

POWER

CONFIRM START/+30SEC.
- Place the food to be prepared in the middle of the turntable and close the door.
- Touch the POWER button. The display shows 900.
- Set the desired microwave power with the arrow buttons or touch the POWER button one or more times. The display shows the microwave power setting. The order of settings is as follows:

text_image
→ 900C-02C-01Grill90270450720→ → → → →- Touch the CONFIRM START/+30SEC button to confirm.
- Set the desired preparation time with the arrow buttons.
- Touch the CONFIRM START/+30SEC button to start the preparation.
4.3.2 Grilling and combi food preparation

WARNING!
Grill and combi preparation can use both the microwave and grill functions. Make sure the materials used are suitable for the chosen preparation.
Combi preparation allows you to combine different preparation functions (microwave, grill and convection).


POWER


CONFIRM START/+30SEC.
To use grill and combi cooking:
- Place the food to be prepared in the middle of the turntable and close the door. ATTENTION! The use of the grill grid is only allowed in grill mode.
- Touch the POWER button. The display shows 900.
- Use the arrow buttons (up or down) to set the desired grill or combi preparation. The order of settings is as follows:

text_image
→ 900C-02C-01Grill90270450720 → → → →There are three different modes (see table). During preparation with combi modes C-01 and C-02, the microwave function and grill function are used alternately for the specified number of seconds.
- Touch the CONFIRM START/+30SEC button to confirm.
- Set the desired time with the arrow buttons.
- Touch the CONFIRM START/+30SEC button to start the preparation.
The different grill and combi modes and functions that are used in preparation (each cycle lasts 29 seconds).
| Combi mode Microwave time Grill time | ||
| Grill 0 sec 29 sec | ||
| C-01 16 sec 13 sec | ||
| C-02 10 sec 19 sec | ||
4.3.3 Automatic menu preparation

WARNING!
All Auto Menu preparations use the microwave function. Make sure the materials used are suitable for the chosen preparations.

AUTO MENU

CONFIRM START/+30SEC.
For Auto Menu A9 and A10:
When half the preparation time has elapsed, a signal sounds to indicate that the food must be turned over.
ATTENTION! The appliance does not automatically stop preparation.
a. Open the door to pause the preparation and turn the food over.
The appliance pauses the preparation.
b. Close the door and touch the CONFIRM START/+30SEC button to continue the preparation.
Overview of the automatic menus
Auto Menu Weight/number Display indication Microwave power
| A-1Auto warm up | 200 grams 200 | 900 W | |
| 400 grams 400 | |||
| A-2Meat | 250 grams 250 | 900 W | |
| 350 grams 350 | |||
| 450 grams 450 | |||
| A-3Fresh vegetables | 200 grams 150 | 900 W | |
| 300 grams 300 | |||
| 400 grams 450 | |||
| A-4Potatoes | 1 (~230 grams) 1 | 900 W | |
| 2 (~460 grams) 2 | |||
| 3 (~690 grams) 3 | |||
| A-5Fish | 250 grams 250 | 720 W | |
| 350 grams 350 | |||
| 450 grams 450 | |||
| A-6Drinks/milk/coffee | 1 cup (120ml) 1 | 900 W | |
| 2 cups (240ml) 2 | |||
| 3 cups (360ml) 3 | |||
| A-7Popcorn | 50 grams 50 | 900 W | |
| 100 grams 100 | |||
| A-8Pizza | 200 grams 200 | Combi-preparation C-2 | |
| 400 grams 400 | |||
| A-9Roast beef/lamb | 250 grams 250 | Combi-preparation C-2 | |
| 350 grams 350 | |||
| 450 grams 450 | |||
| 550 grams 550 | |||
| A-10BBQ meat | 250 grams 250 | Combi-preparation C-2 | |
| 350 grams 350 | |||
| 450 grams 450 | |||
| 550 grams 550 |
4.3.4 Defrosting of food

WARNING!
Defrosting uses the microwave function. Make sure the materials used are suitable for the chosen preparations.

4.3.4.1 Defrosting by weight

NOTE!
The microwave power during defrosting by weight varies and is maximum 80% (720 W). The microwave power level cannot be set manually.

DEFROST


CONFIRM START/+30SEC.
To defrost by weight:
- Place the food to be defrosted in the middle of the turntable and close the door.
- Touch the DEFROST button The display shows dEF-1.
- Touch the CONFIRM START/+30SEC button to confirm.
- Adjust the weight of the food to be defrosted with the arrow buttons. The display shows the set weight. The weight can be set from 100 grams to 2000 grams, in steps of 100 grams.
- Touch the CONFIRM START/+30SEC button to start defrosting.
4.3.4.2 Defrosting by time

NOTE!
The microwave power during defrosting by time is 270 W and cannot be set manually.

DEFROST


CONFIRM START/+30SEC.
To defrost by time:
- Place the food to be defrosted in the middle of the turntable and close the door.
- Touch the DEFROST button twice. The display shows dEF-2.
- Touch the CONFIRM START/+30SEC button to confirm.
- Set the desired time with the arrow buttons.
- Touch the CONFIRM START/+30SEC button to start defrosting.
- When half of the defrosting time has elapsed, a beep sounds to indicate that the food must be turned over. ATTENTION! The appliance does not stop automatically.
- Open the door to pause defrosting and turn the food over. The appliance pauses defrosting.
- Close the door and press the CONFIRM START/+30SEC button to continue defrosting.
5. MAINTENANCE AND CLEANING

WARNING!
Never use aggressive or abrasive cleaners, gasoline, detergents, chemically impregnated wipes or other cleaning solutions. These can damage the housing and appliance. Never use aggressive abrasive agents or sharp/metal scrapers on the door glass. This can lead to scratches and even shattering of the glass. Never spray liquid onto the appliance and make sure no water gets into it. Do not use a steam cleaner to clean the appliance.
5.1 CLEANING AFTER EACH USE

WARNING!
RISK OF BURNS! Wait for the appliance to cool down sufficiently before cleaning.
Clean and dry the appliance after each use to prevent food residue or corrosion from condensation on the walls of the oven cavity and door.
To clean the appliance after use:
- Remove the mains plug from the socket.
- Remove the turntable.
- If necessary, remove the tripod arm:
a. Place the fingers around the middle of the tripod arm.
b. Gently push up the tripod arm with your fingers to release it from the drive motor.
ATTENTION! Do not use tools that could damage the appliance or the tripod arm.
c. Wash the tripod arm with soap and water and dry thoroughly.
-
Clean the oven cavity, the door and door opening with a slightly damp cloth and dry with a clean dry cloth. WARNING! Make sure that the mica film on the inside of the viewing window is not damaged.
-
Wash the turntable and grill and dry them well.
- Install the tripod arm and the turntable. Follow the instructions in Installation of the tripod arm and the turntable.
5.2 CLEANING A HEAVILY SOILED OVEN CAVITY
If the oven cavity is very dirty or difficult to clean, follow these steps to make it easier to clean:
- Place half a lemon in a bowl of 300 ml water and place on the turntable in the combi microwave.
- Heat the bowl with contents at 100% microwave power (900W) for 10 minutes.
- Open the combi microwave door and wait a few minutes for the combi microwave and the bowl to cool down. WARNING! Hot air or steam may come out of the oven cavity.
- Carefully remove the bowl with contents from the oven cavity. WARNING! The walls and the bowl with contents can be hot.
- Clean the appliance according to the instructions in Cleaning after each use.
6. FAULTS AND SOLUTIONS
The following cases are not always a fault. See the possible solutions before asking for service.
| PROBLEM CAUSE SOLUTION | ||
| The TV signal is disrupted while using the combi microwave. | ATTENTION! This is normal and not a fault or defect.The combi microwave is too close to the TV. | - Place the combi microwave further away from the TV. |
| The lighting of the oven cavity is dim. | ATTENTION! This is normal and not a fault or defect.When cooking with a low microwave power, the lighting of the oven cavity can illuminate more dimly. | |
| Steam settles on the door. / Hot air comes out of the vents. | ATTENTION! This is normal and not a fault or defect.When cooked, hot steam can come off the food. Most steam leaves the appliance through the vents, but steam can also deposit on a cool surface such as the door. | |
| The combi microwave is accidentally started without food in the oven cavity. | Immediately turn off the appliance by pressing the STOP / CLEAR button twice.WARNING! Never switch on the combi microwave without food in the oven cavity. | |
| The combi microwave won't turn on. | - The appliance is not powered. 1. Check that the plug is in the socket and that the cable or plug is not damaged.2. Check that the residual-current device (RCD) is switched on.3. Check that there is no power failure. | |
| - The fuse of the appliance has blown. - Please contact customer service. See Foreword for the contact details. | ||
| The combi microwave does not heat. | - The door is not completely closed. - Close the combi microwave door. | |
| Sparks and crackling sounds inside the oven cavity. | There are unauthorised materials in the oven cavity such as:- metals from decorative edges on plates and crockery, for example, metal parts of kitchenware or metal cutlery-aluminium foil | 1. Immediately switch off the combi microwave by pressing the STOP / CLEAR button twice.2. Wait until the contents of the oven cavity has cooled down.3. Open the door and remove unauthorised materials. |
7. TAKING OUT OF SERVICE
If the appliance is stored for a longer period, the following measures must be taken:
- Clean the appliance according to the instructions in Maintenance and cleaning.
- Remove the mains plug from the socket.
- Store the cleaned appliance in a dry, ventilated place, away from a heat source.

WARNING!
The appliance in storage may not be accessible to children playing. Do not place heavy objects on the appliance. This can cause deformations and damage to the appliance.
8. SAFE DISPOSAL
8.1 DISPOSE OF THE APPLIANCE AS WASTE
The materials used in this appliance marked with this symbol are recyclable. This marking indicates that this product may not be disposed of via household waste throughout the EU. In order to prevent damage to the environment or human health as a result of uncontrolled waste, it must be processed responsibly so that raw materials can be reused sustainably. Use the existing collection systems or contact the shop where you purchased the product if you want to dispose of the used product. There, the product is recycled in an environmentally friendly way.
8.2 DISPOSE OF THE PACKAGING MATERIAL AS WASTE
Dispose of the packaging material through your local recycling facility. By properly disposing of packaging material and packaging waste, you help prevent potential risks to the environment and public health. The symbols on the packaging indicate that the packaging is made of cardboard, EPS and HDPE.
Wisberg contact details
Customer service can be reached at: wisberghome.com
Wisepick Productions B.V.
Weena 664
3012 CN Rotterdam
The Netherlands
Made in China

MANUEL D'UTILISATION
MICRO-ONDES
WB3CM25B

WISBERG
TABLE DES MATIÈRES
AVANT-PROPOS
61
1. SÉCURITÉ 63
2. PROPRIÉTÉS DU PRODUIT 70
6. DYSFONCTIONNEMENTS ET SOLUTIONS 84
7. MISE HORS SERVICE 85
8. MISE AU REBUT SÛRE 85
Wisepick Productions B.V.
Weena 664
3012 CN Rotterdam
Pays-Bas
Made in China

1. SÉCURITÉ

AVERTISSEMENT !
2. PROPRIÉTÉS DU PRODUIT
2.1 APERÇU DU SYSTÈME
text_image
A K D E F G J I H
natural_image
Diagram of a biological structure with labeled parts B and C, showing internal components (no text or symbols beyond labels)text_image
≥85cm ≥10cm ≥10cm ≥10cmtext_image
Diagram illustrating a mechanical device with labeled parts and directional arrows indicating motion or assembly.4. UTILISATION
4.1 INFORMATIONS GÉNÉRALES
CONFIRM START/+30SEC.
CONFIRM START/+30SEC.

CONFIRM START/+30SEC.

CONFIRM START/+30SEC.

CONFIRM START/+30SEC.

CONFIRM START/+30SEC.

CONFIRM START/+30SEC.
6. DYSFONCTIONNEMENTS ET SOLUTIONS
8. MISE AU REBUT SÛRE
8.1 MISE AU REBUT DE L'APPAREIL EN TANT QUE DÉCHET

Wisepick Productions B.V.
Weena 664
3012 CN Rotterdam
Pays-Bas
Made in China

GEBRAUCHSANLEITUNG
MIKROWELLE
WB3CM25B

WISBERG
INHALTSVERZEICHNIS
VORWORT
89
1. SICHERHEIT 91
Wisepick Productions B.V.
Weena 664
3012 CN Rotterdam
Niederlande
Made in China

1. SICHERHEIT

WARNUNG!
text_image
A K D E F G J I H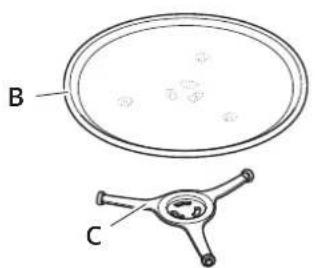
natural_image
Diagram of a biological or mechanical structure with labeled parts B and C, showing internal components without any text or symbols.text_image
≥85cm ≥10cm ≥10cm ≥10cmtext_image
Diagram illustrating a mechanical assembly with labeled parts and directional arrows indicating motion or assembly steps.4. GEBRAUCH
4.1 ALLGEMEINE INFORMATIONEN

CONFIRM START/+30SEC.
The microwave power used for preparation can be set in five steps from 90 W to 900 W. The Preparing food section indicates how to set the microwave power.
CONFIRM START/+30SEC.
CONFIRM START/+30SEC.

CONFIRM START/+30SEC.

CONFIRM START/+30SEC.

CONFIRM START/+30SEC.

CONFIRM START/+30SEC.

CONFIRM START/+30SEC.
Wisepick Productions B.V.
Weena 664
3012 CN Rotterdam
Nederland
Made in China
Wisberg contact details
Customer service can be reached at: wisberghome.com
Wisepick Productions B.V.
Weena 664
3012 CN Rotterdam
The Netherlands
Made in China