WS 9422 - Alarm clock radio TECHNOLINE - Free user manual and instructions
Find the device manual for free WS 9422 TECHNOLINE in PDF.
User questions about WS 9422 TECHNOLINE
0 question about this device. Answer the ones you know or ask your own.
Ask a new question about this device
Download the instructions for your Alarm clock radio in PDF format for free! Find your manual WS 9422 - TECHNOLINE and take your electronic device back in hand. On this page are published all the documents necessary for the use of your device. WS 9422 by TECHNOLINE.
USER MANUAL WS 9422 TECHNOLINE
Green Bank理财产品 Passworship
Wiederhfen Sehneu Passort
BESTAYGEN
Wassethetian
Tempoabur
Wind
AOMELDEN
E8
E9
E11
E10
technoline, station WD2000 og sensor TX205DTH
Artikelnummer: 8756, Promotion: 02/24/22
Kundensnavn:
Kundens adresse:
Kundens Telefonr.:
Station de base, Boutons 99
Station de base, Affichage
Station de base, Boutons
Software Requirements
Weather station WD 2000 User manual
Table of contents
Introduction 236
For your safety 237
Intended use 237
Explanation of symbols and terms 239
Safety instructions 240
Disclaimer 243
Unit overview / scope of delivery 245
Checking the scope of delivery 245
Base station, Display 247
Base station, Buttons 250
Outdoor sensor. 252
Commissioning 253
Download App 254
User registration 255
Pairing with weather station device 256
Receiving data 262
Receiving outdoor values 262
Reception strength symbol 263
Operation 265
Manual time setting 265
Setting the daily alarm 270
Switching off the alarm signal 272
Snoopzefunction. 272
Maximum / minimum temperature / relative
humidity 273
Background lighting 275
Explanation of the network weather forecast ....276
App interface specifications 282
Front page data display 282
Data chart display. 283
Temperature and humidity alert setting. 288
Temperature and humidity alert 289
Menu description 290
Low battery display 293
Cleaning 295
Troubleshooting 296
Disposal 298
Packaging 298
Unit 298
Batteries 298
Specifications 300
EU declaration of conformity 301
Service 302
Warranty conditions 303
Warranty card 305

Before you start using your new appliance, please read these operating instructions carefully. It contains important
information for your safety as well as for the use and care of the appliance.
Keep the operating instructions for future use. If this appliance is passed on to a third party, these operating instructions must also be handed over. These instructions can also be downloaded from our website as a pdf file:
www.technotrade-berlin.de
Introduction
You have purchased a weather station with the innovative DirektWetter technology. Weather specialist developed this world first, which helps your station to receive regional weather forecasts produced professional meteorologists.
In addition, the local outdoor temperature is transmitted to the base station via a radio transmitter with 868 MHz and a range of up to 50 metres. This gives you a comprehensive picture of the current and future weather situation.
Thanks to the latest technology, the weather sttion is easy to operate with just a few buttons.
For your safety
Intended use
This weather station is used to display and carry out the functions mentioned in the operating instructions.
The unit consists of a receiver (base station) and a transmitter. The receiver and the transmitter are battery-operated and can therefore be set up independently of power sources. A smartphone with internet access is required to use the station with the free app.
The base station may only be used in dry indoor areas and the outdoor transmitter only in protected outdoor areas.
This appliance can be used by children aged from 8 years and above and persons with reduced physical, sensory or mental capabilities or lack of
experience and knowledge if they have been given supervision or instruction concerning use of the appliance in a safe way and understand the hazards involved.
Children must not play with the appliance.
The appliance is intended for domestic use only and not for commercial use. This appliance must not be used for medical purposes or for providing information to the public.
Use the device only for its intended purpose. It must not be modified or technically altered.
Explanation of symbols and terms

WARNING
This signal icon/word indicates a hazard with a medium level of risk which, if not avoided, may result in death or serous injury.

CAUTION
This signal symbol/word indicates a low-risk hazard which, if not avoided, may result in minor or moderate injury.
Safety instructions

WARNING
Danger of choking!
Children can get caught in the packaging film and put small parts in their mouths.
- Do not let children play with the packaging.
- Keep children away from small parts.
- Keep batteries and small parts away from children.
Seek medical attention immediately if a battery is swallowed.
Dangers for certain groups of people
This appliance can be used by children aged from 8 years and above and persons with reduced physical, sensory or mental capabilities or lack of experience and knowledge if they have been given supervision or instruction concerning use of the appliance in a safe way and understand the hazards involved.
Children must not play with the appliance.
- Cleaning and user maintenance must not be carried out by children without supervision.
Danger of explosion!!
- Never expose batteries to extreme temperatures such as direct sunlight or fire. Do not place the unit on a radiator. Leaking battery acid can cause damage.
- Always insert batteries according to the correct polarity (+ and -).
- Only use batteries of the same type with the corresponding technical data.
- Do not use old and new batteries together or batteries of different types or manufacturers.
- Do not short-circuit batteries, throw them into fire or disassemble them.
- Non-rechargeable batteries are not to be re-charged.
Danger of chemical burns!
In the event of a fault or damage, electrolyte can leak from the battery.
- Avoid any contact with leaking electrolyte.
- In the event of contact with leaking electrolyte, rinse the area immediately with clean water.
In case of eye contact, consult a doctor immediately.
Risk of damage!
- Do not expose the unit to extreme force or impact.
- Do not expose the unit to high temperatures, direct sunlight, dust, moisture, dripping or splashing water.
- Do not immerse the unit in water or other liquids. Do not place objects filled with liquids, such as vases, on the unit.
-
Avoid contact of the unit with corrosive materials.
-
Do not open the casing or tamper with any structural parts of the unit.
- This appliance does not contain any user-serviceable parts. Any maintenance must be carried out by qualified personnel.
Disclaimer
The weather data is transmitted via your WLAN network with internet connection. The continued use of the weather station depends on the operational readiness of the transmission media, over which the seller has no influence. Failures of the transmission media are not excluded. They do not represent a defect of the device.
The seller also has no influence on the transmitted weather data and weather forecasts. The manufacturer and dealer accept no responsibility for incorrect readings and the consequences thereof.
This device is intended for home use only and does not provide 100% accuracy. The forecasts
of this device are to be understood as indicative values.
Please note that our warranty is void in the event of misuse or improper handling, non-observation of the safety instructions applicable to the unit, the use of force or interventions not carried out by the service address authorized by us.
The specifications of this unit are subject to change without notice.
This manual may not be reproduced, in whole or in part, without the written consent of the manufacturer.

WARNING Health hazard!
Batteries contain acids that are harmful to health.
- Replace weak batteries as quickly as possible to avoid leakage.
- Wear coated gloves and protective goggles when handling leaking batteries!
Unit overview / scope of delivery
Checking the scope of delivery

WARNING Choking hazard!
Children can get caught in the packaging film and put small parts in their mouths.
- Do not let children play with the packaging.
- Keep children away from small parts.
Scope of delivery:
- 1 Base station WD 2000
- 1 Outdoor sensor TX205DTH
- USB cable for base station
- 6 batteries (LR06 / AA / Mignon), for use with base station and outdoor sensor
-
1 Operating instructions with warranty card
-
Remove all parts from the packaging and check that they are complete and undamaged.
- If any parts are damaged or missing, contact the service address indicated on the warranty card.
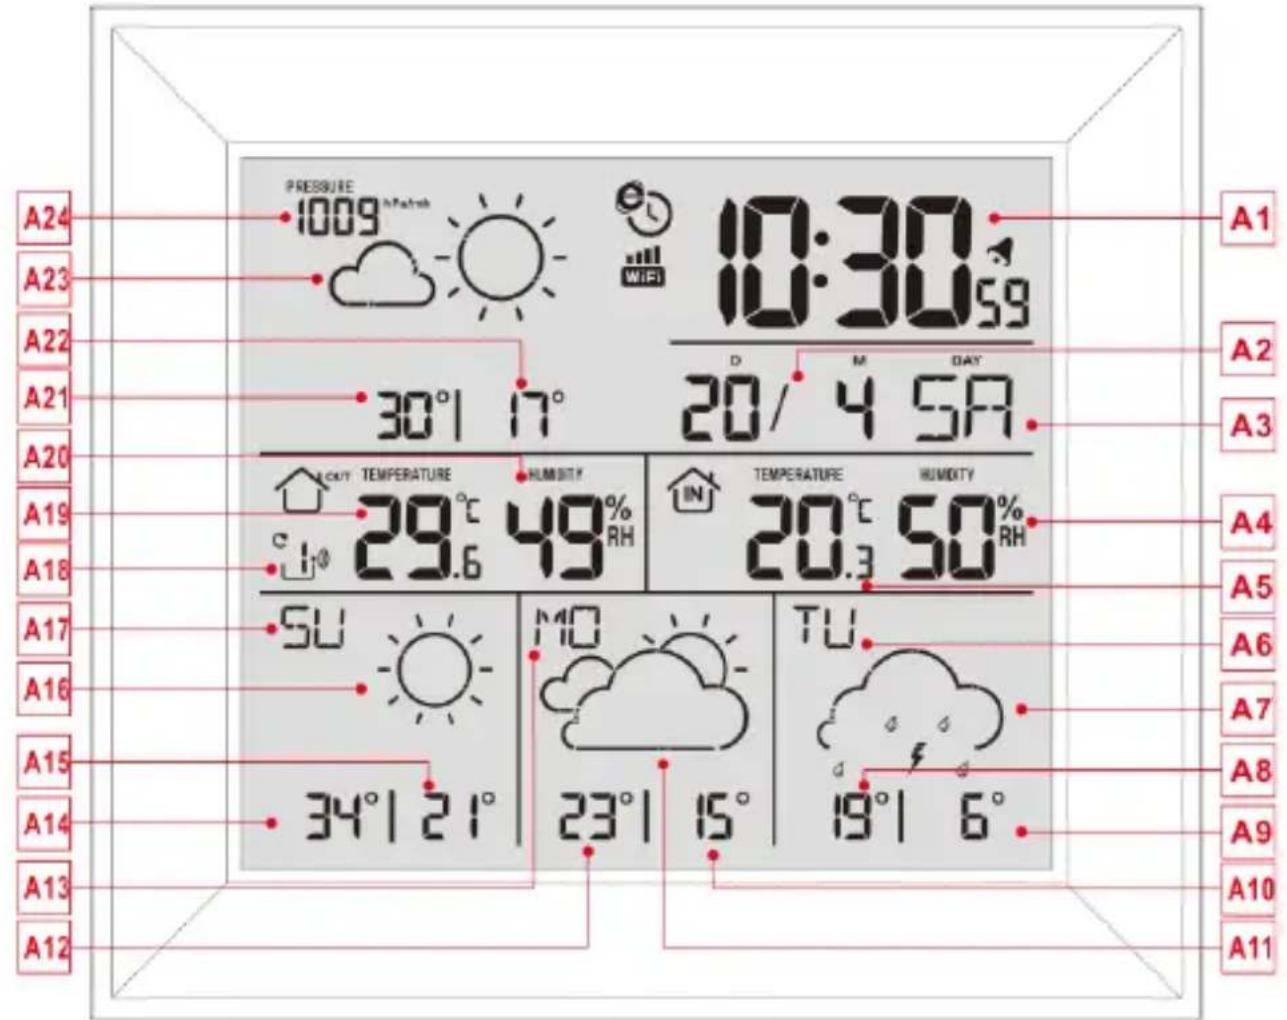
Base station, Display
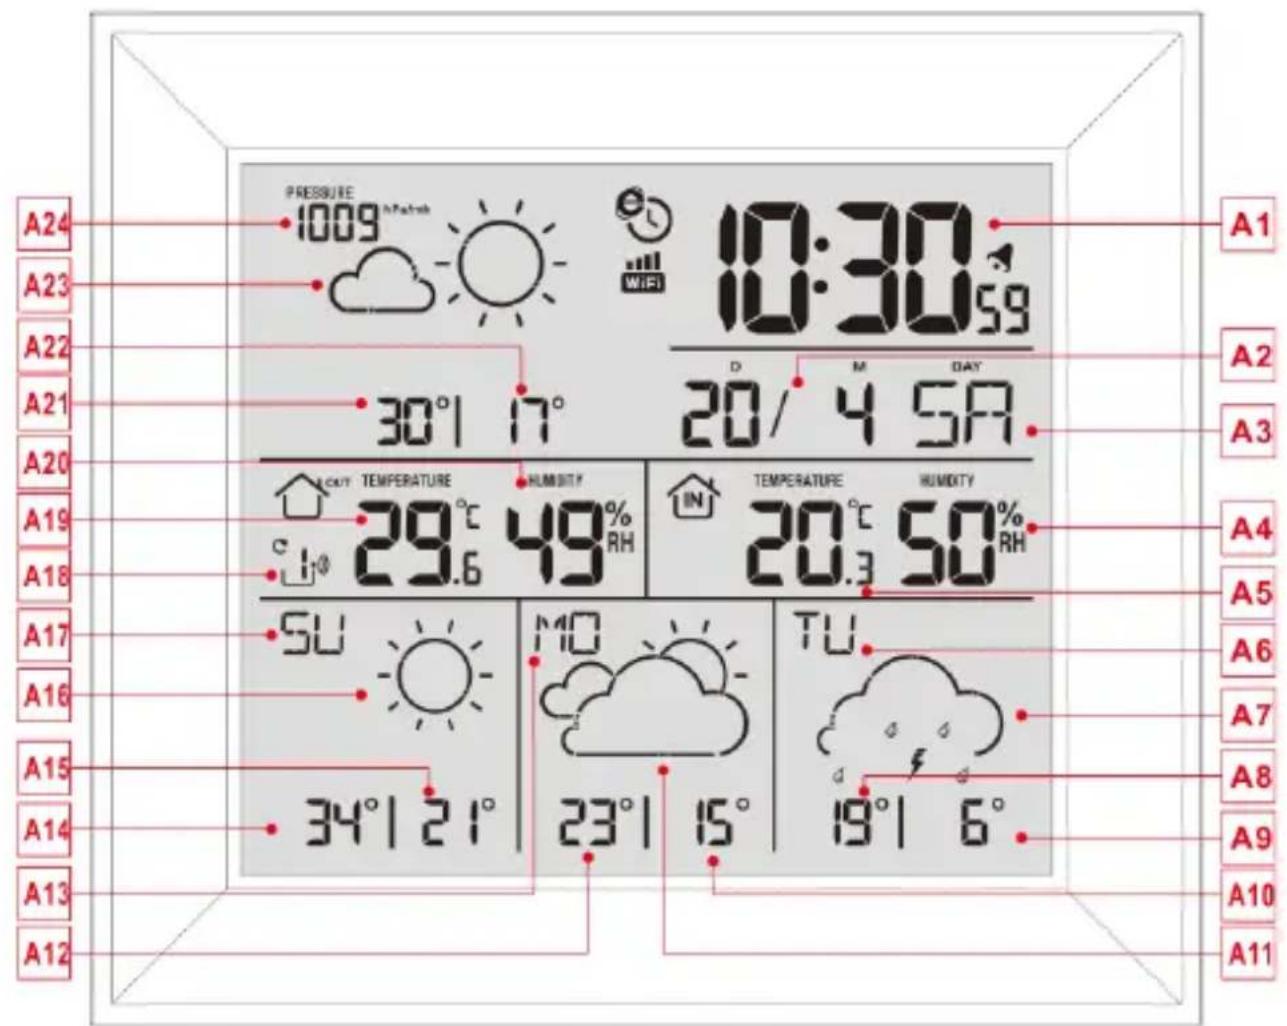
Part A-Positive LCD
A1: Time
A2: Calendar
A3: Weekday
A4: Indoor humidity
A5: Indoor temperature
A6: Weekday for the next third day
A7: Weather forecast for the next third day
A8: Maximum temperature forecasts for the next third day
A9: Minimum temperature forecast for the next third day
A10: Minimum temperature forecast for the next second day
A11: Weather forecast for the next second day
A12: Maximum temperature forecasts for the next second day
A13: Weekday for the next second day
A14: Maximum temperature forecast for tomorrow
A15: Minimum temperature forecast for tomorrow
A16: Weather forecast for tomorrow
A17: Weekday for tomorrow
A18: Remote wireless sensor channel
A19: Outdoor temperature
A20: Outdoor humidity
A21: Maximum temperature forecast for today
A22: Minimum temperature forecast for today
A23: Weather forecast for today
A24: Barometric pressure

: Network time icon

: WIFI icon

: WIFI signal strength indicator

: Battery low voltage icon

: Wireless receiving icon

: Outdoor sensor channel loop icon
MAX: Display the maximum temperature and humidity record icon
MIN: Display the minimum temperature and humidity record icon
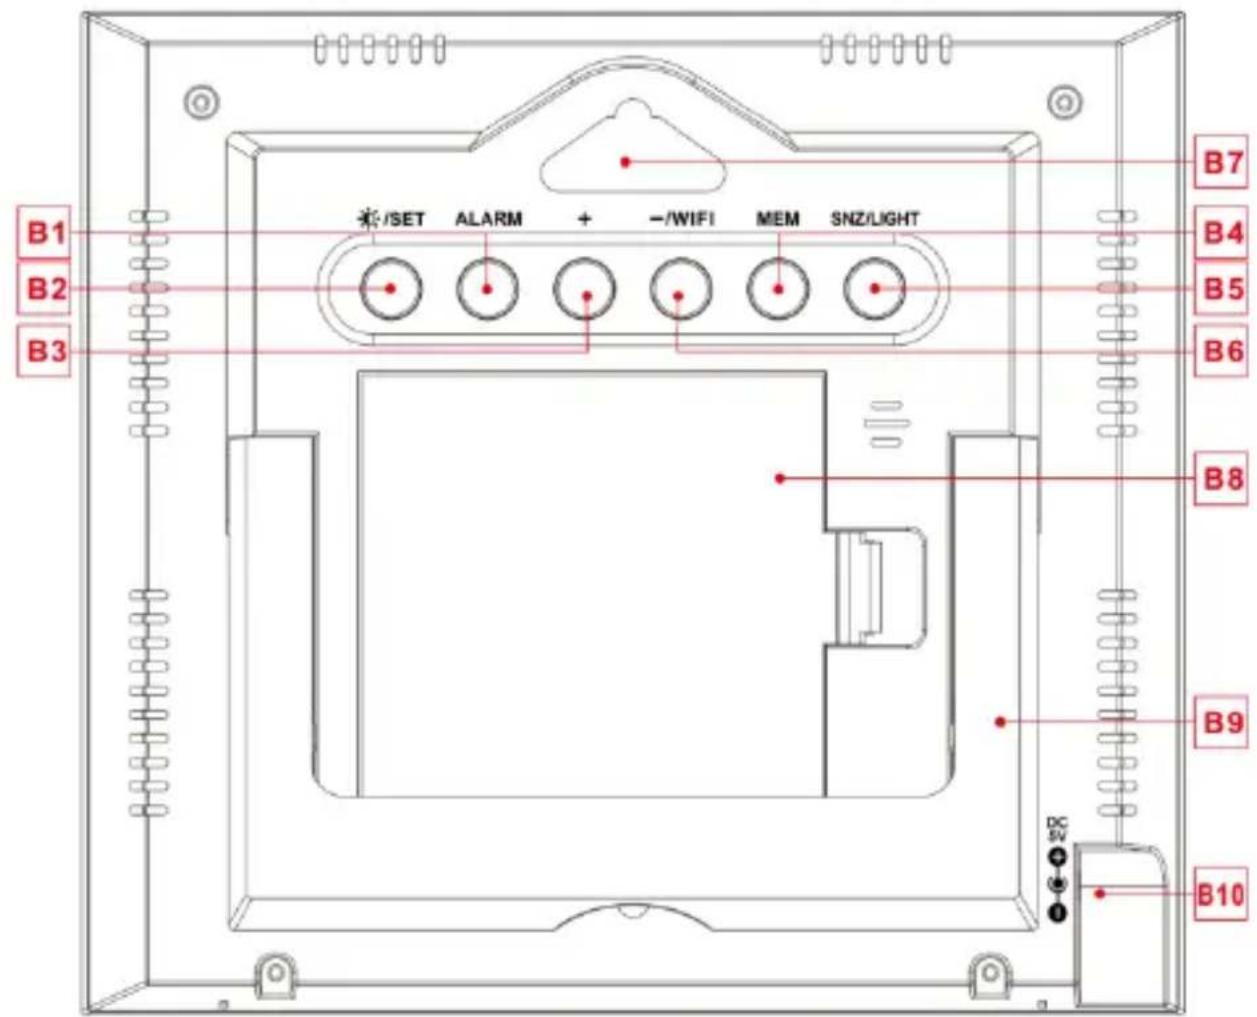
Base station, Buttons
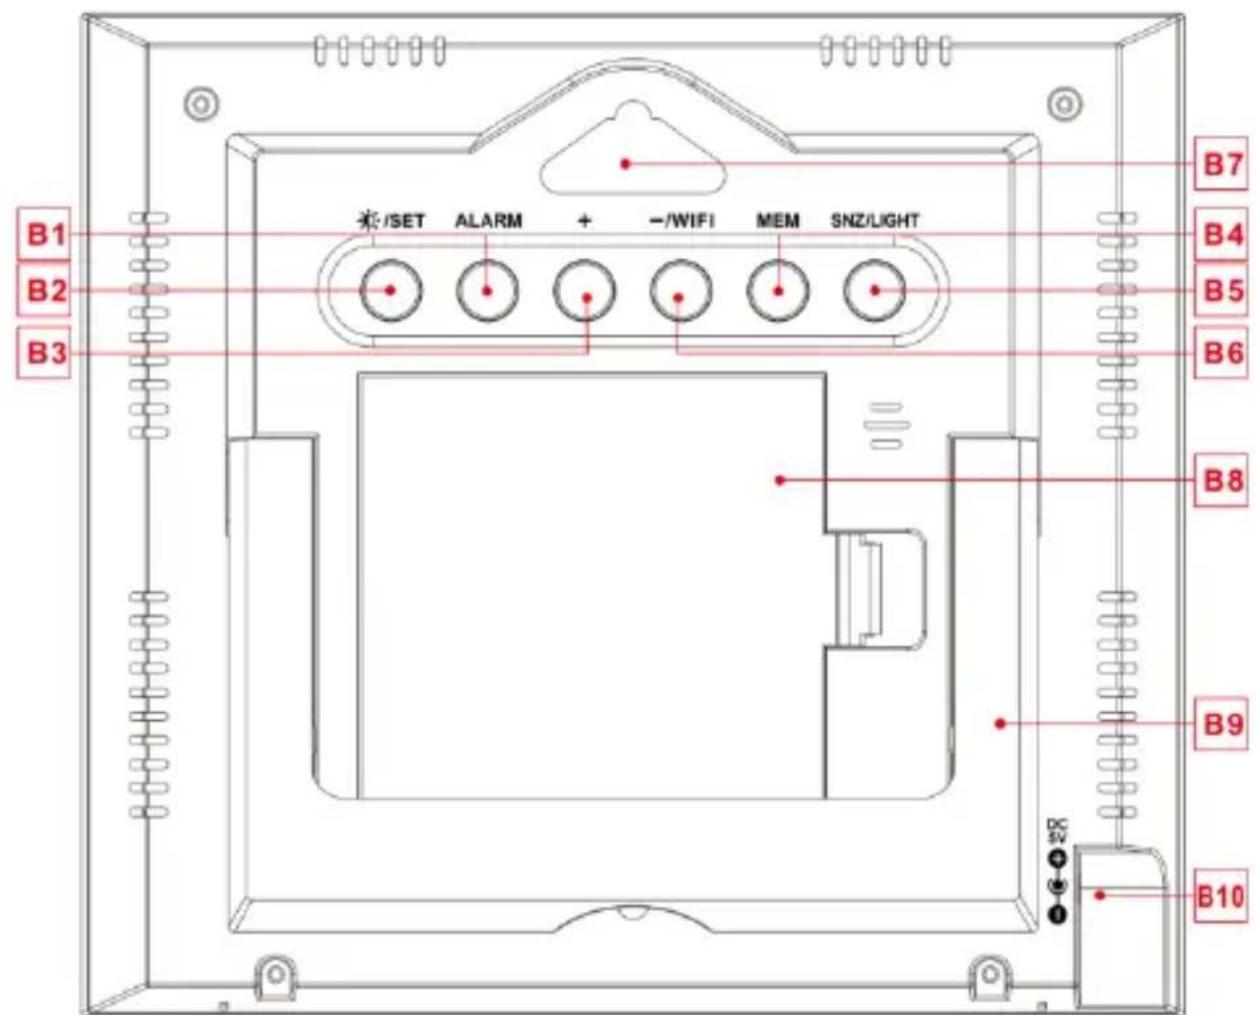
Part B - Back button and power
B1: “ALARM” button
B2:"SET" button
B3: "+" button
B4: “MEM” button
B5: “SNZ/LIGHT” button
B6: "WIFI/-" button
B7: Hanging hole
B8: Battery compartment
B9: Support frame
B10: DC-POWER input jack
Outdoor sensor
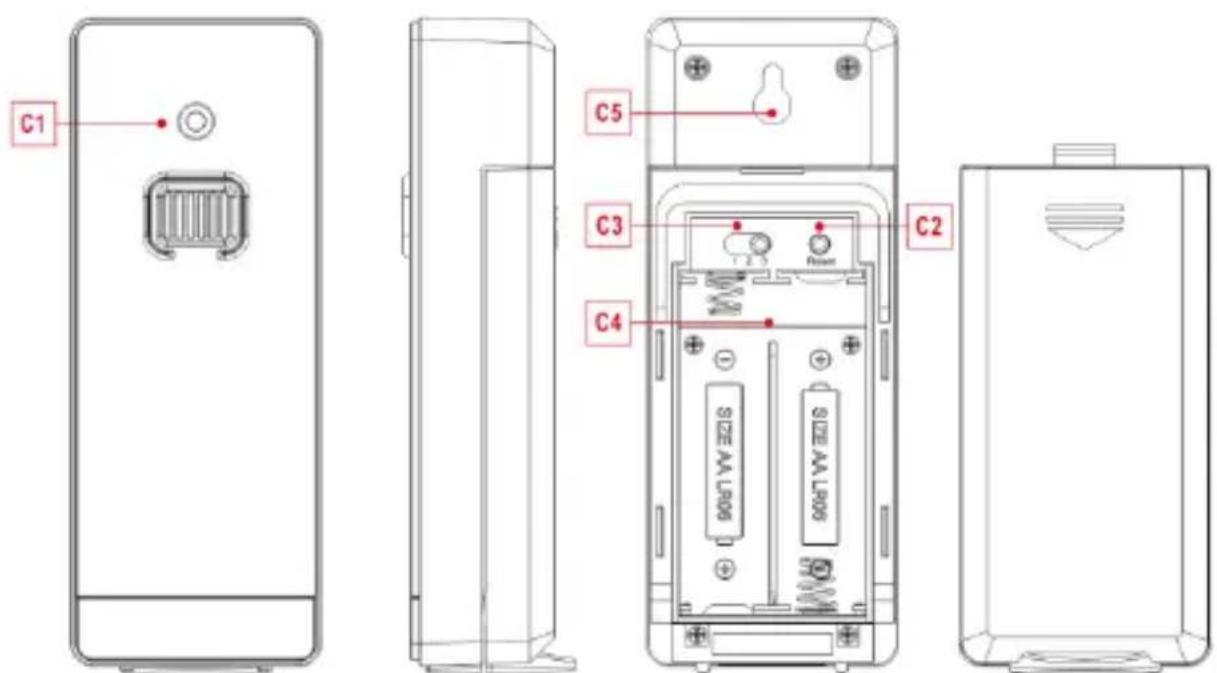
Part C –Wireless outdoor sensor:
C1: Transmit signal LED
C2: “RESET” button
C3: Channel selector switch
C4: Battery compartment
C5: Hanging hole

WARNING Choking hazard!
Children can put batteries in their mouths.
-
Keep batteries away from children. Seek medical attention immediately if a battery is swallowed.
-
Open the wireless outdoor sensor battery compartment cover and push the channel selector switch in the battery compartment of the wireless outdoor sensor. Set the correct channel and insert 2 x AA batteries observing polarity [ “+” and “-” marks]
- When you insert the batteries, all the icon on the LCD display will briefly light up for 3 seconds. The wireless outdoor sensor begins to switch to the normal working mode, to detect
the temperature and humidity in the environment. The sensor will transmit channel 1 wireless signal, and the interval of about one minutes will automatically transmit the channel 1 wireless signal. Each transmitted channel 1 wireless signal emission sensor indicator will flash one time.
- APP software for installing base station :
Download App:
Hardware Requirements:
- iPhone 4s (or above) or similar smart device Software Requirements
- iOS 7 (or above) or Android 4.3 (or above) Download APP (DirektWetter)
Download application software URL: https://direktwetter.eu/app/download-links.html
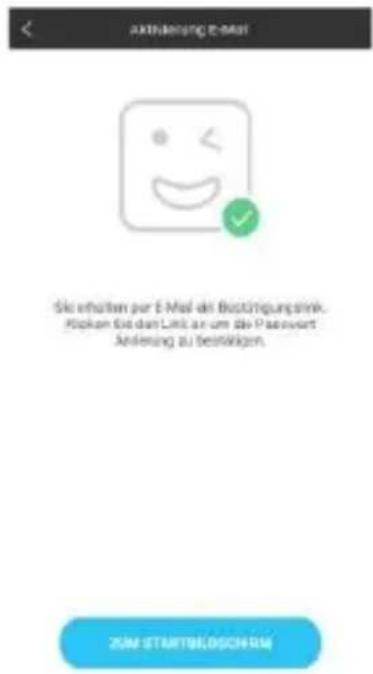
User registration :
After downloading and opening the app, the program will jump out of a registration interface, according to the registration shown below. After registration is completed, open the mailbox for account activation.


Account login interface ->
Account registration interface ->
Prompt mailbox account activation ->
Pairing with weather station device
- Login user account
- Make sure your phone is connected to a 2.4GHz Wi-Fi network. and Bluetooth function is turned on. (WiFi weather station currently only support 2.4GHz Wi-Fi network
during configuration)
- Plug in weather station with AC/DC power, Press and hold "WIFI" button for 3 seconds until "WI-FI AP" blinking on the device display. If the device is first enabled, it will automatically enter AP mode, and "WI-FI AP" blinks on the display.
- Please find and select "Weathertype".
- Select the correct Wi-Fi network SSID and Make sure Wi-Fi password you're inputting is correct.
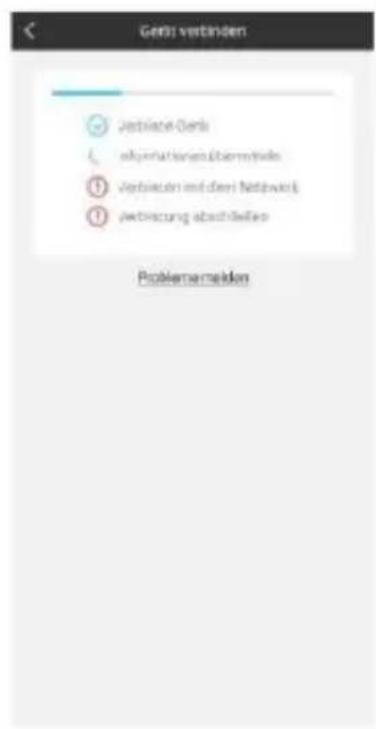
- Follow the in-App instructions to pair the weather station device:
When the notice of Device binding successful Appears in the App. The weather station device will automatically exit AP mode. If not please press and hold "WIFI" button for 3 seconds to exit it.
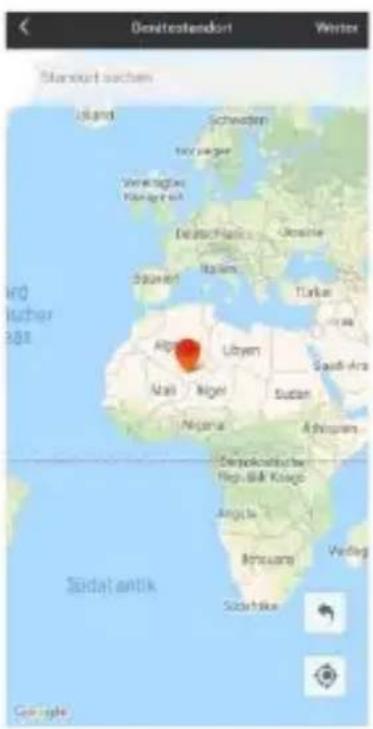
- Confirm the city of your current location:
Make sure your phone's location service are turned on and allowed for this App.
Make sure that your current location city can
be successfully located in the map. Some cities may fail to locate because there is no corresponding success in the App. You can manually move the location or be automatically positioned to a large administrative level city.
- The device will connect to your home Wi-Fi network automatically in few minutes. Wi-Fi and signal symbol and all weather data will be displayed after Wi-Fi is successfully connected.

Make sure the device enter AP mode -> Select the device name "Weathertype" -> Input correct Wi-Fi password

Bind the device ->
Device binding successful ->
Confirm your location
Note: The weather station has dual power supplies. It uses 4 AA batteries and a DC power supply. The WIFI function can work normally, but in order to ensure the stability of the coupling connection, DC power supply is recommended
The Base Station will now start to make a connection to the outdoor remote sensor. This operation takes about 3 minutes and is displayed by a flashing reception RF antenna symbol "the "OUTDOOR" display area on the receiver. the "OUTDOOR" display area will show an animation of the RF antenna symbol, indicating the base station is searching for the signal from the outdoor sensor. At the same time the base station began to establish WIFI connections (details see the WIFI connection description)
Receiving data
Receiving outdoor values
After inserting the batteries, the transmitter automatically starts transmitting the outdoor values to the base station. The transmission is completed after approximately one minute.
If the base station cannot receive the outdoor values, "- - " appears on the display.
- Check the batteries and try again. Note that you must always insert the batteries in the transmitter and receiver within one minute for the restart.
- Avoid close proximity to solid metal objects and other electrical devices (televisions, computers, radio telephones).
- Change the distance between the transmitter and receiver (free-field range max. 50 metres,
with solid walls, especially with metal parts, the transmitter range can be considerably reduced). If necessary, find a new location for the transmitter and/or receiver. "Visual contact between transmitter and receiver often improves the transmission.
If the transmission was successful, the base station display shows the outdoor temperature.
4. Place the transmitter in a shady place protected from precipitation. Direct sunlight falsifies the readings and constant wetness puts unnecessary strain on the electronic components.
5. Fix the transmitter to the wall with the holder or stand it up.
6. Set up the base station.
Reception strength symbol
Hint: The reception strength is influenced by many external factors and can fluctuate greatly over time. To select the final location of the unit,
the reception quality should therefore be observed over a longer period of time.

- Optimum reception

- Good reception

- Poor reception
The reception strength symbol shows you the strength of the reception signal at the installation location:
- If reception is weak, transmission problems may occur. In this case, we recommend a different installation location (see "Transmission problems").
Operation
Manual time setting:
- Press and hold the “ / SET” button for 2 seconds and the temperature unit ^ C is flashing. Press the “+” and the “-” buttons to set the temperature unit in ^ C or ^ F .
- Press the “/SET” to confirm your setting and the barometric pressure unit hPa/mb is flashing. Press the "+" and the "-" buttons to set the pressure unit in hPa/mb or inHg or mmHg.
- Press the “ / SET” to confirm your setting, the 12/24 hour mode display starts to flash. Press the "+" and the "-" buttons to set the correct 12/24 hour mode.
- Press the “ /SET ” to confirm your setting, the time zones start to flash. Press the "+"
and the “-” buttons set a correct time zone (-12 to +12).
- Press the “ /SET” to confirm your setting, the hour display starts to flash. Press the "+" and the "-" buttons to set the correct hour.
- Press the “ /SET” to confirm your setting, the minute displays starts to flash. Press the "+" and the "-" buttons to set the correct minute.
- Press the “/SET” button to confirm your setting, the month and date icon display starts to flash. Press the "+" and the "-" buttons to set the date display to month/date or date/month.
- Press the “/SET” button to confirm your setting, the year display 2017 starts to flash. Press the "+" and the "-" buttons to set the correct year.
- Press the “ / SET” button to confirm your setting, the month display starts to flash.
Press the "+" and the "-" buttons to set the correct month.
- Press the “ /SET” button to confirm your setting, the date display starts to flash. Press the "+" and the "-" buttons to set the correct date.
- Press the “ /SET” button to confirm your setting, the language selection for the weekday displays starts to flash. Press the "+" and the "-" buttons to select a language.
| Weekday | English | German |
| Sunday | SU | SO |
| Monday | MO | MO |
| Tuesday | TU | DI |
| Wednesday | WE | MI |
| Thursday | TH | DO |
| Friday | FR | FR |
| Saturday | SA | SA |
| Weekday | French | Dutch |
| Sunday | DI | ZO |
| Monday | LU | MA |
| Tuesday | MA | DI |
| Wednesday | ME | WO |
| Thursday | JE | DO |
| Friday | VE | VR |
| Saturday | SA | ZA |
| Weekday | Italian | Spanish |
| Sunday | DO | DO |
| Monday | LU | LU |
| Tuesday | MA | MA |
| Wednesday | ME | MI |
| Thursday | GI | JU |
| Friday | VE | VI |
| Saturday | SA | SA |
| Weekday | Danish | Russian |
| Sunday | SO | BC |
| Monday | MA | ПН |
| Tuesday | TI | ВТ |
| Wednesday | ON | СР |
| Thursday | TO | ЧТ |
| Friday | FR | ПТ |
| Saturday | LO | СБ |
- Press the “ /SET” to confirm your setting and end the setting procedures. The clock enters normal time display.
Notes:
- After 20 seconds without pressing any button, the clock switches automatically from setting mode to normal time display.
- There are 8 languages of weekday: English, German, Italian, French, Spanish, Dutch, Danish and Russian
- When the WIFI connection is successful, the time will be automatically updated to the network time, the symbol “ will display, at the time of setting, time and time zones are not to change.
Setting the daily alarms:
- Press once "ALARM" button, the display conversion to alarm activation mode. In this mode, press the "ALARM" button again to activate the alarm function, at the same time, the sound of "BI" sounded, while the alarm icon "s displayed which means alarm has been activated. And then press "ALARM" button again, you can turn off the alarm function, the alarm icon " does not shows.
- Press and hold down "ALARM" button for 2 seconds until the hour of alarm time display starts to flash. Use the "+" and "-" buttons to set the required hour.
- Press "ALARM" button to confirm your setting, the minute starts to flash. Use the "+" and "-" buttons to set the required minute.
- Press "ALARM" button to confirm your setting, the snooze time of the alarm starts to flash. Use the "+" and "-" buttons
to set the minute of snooze you need.
- Press "ALARM" button to confirm your setting and to end the setting procedure. Notes:
- After 20 seconds without pressing any button the clock switches automatically from setting mode to normal time display.
- The alarm will sound for 2 minutes if you do not deactivate it by pressing any button. In this case the alarm will be repeated automatically after 24 hours.
- Rising alarm sound (crescendo, duration: 2 minutes) changes the volume 4 times whilst the alarm signal is heard.
- The snooze time setting range: 5 60MIN , OFF, when set to OFF, means no snooze function. Snooze time unit is minutes.
Switching off the alarm signal
While the alarm is sounding, press any button except the "SNZ" button or press hold the "SNZ" button for 3 seconds to stop the alarm signal.
Snoopze function:
- While the alarm is sounding, press the "SNZ" button once to activate the snooze function. The alarm signal sounds again after already been set.
- In snooze mode, press any button except the "SNZ" button or press hold the "SNZ" button for 3 seconds to exit the snooze mode.
Note:
- When the snooze function is set to OFF, while the alarm is sounding, press "SNZ" does not have this snooze function.
Maximum / minimum temperature / relative humidity
To toggle indoor/outdoor maximum, minimum temperature and humidity data, press the “MEM” button:
- Once to show the maximum temperature and humidity values.
- Twice to sow the minimum temperature and humidity values.
- Three times to return to the current temperature and humidity levels.
To reset the maximum and minimum temperature and humidity, press and hold down the “MEM” button about 2 seconds. This will reset all minimum and maximum data recorded to the current displayed values.
Note:
If the temperature reading is below rang
es, the LL.L will be displayed. If the temperature reading is above ranges, the HH.H will be displayed.
Background lighting
- If the product is powered by batteries, Press the "SNZ/LIGHT" button and backlight will light up for 15 seconds.
- When the power supply of the product is inserted into the power supply adapter, the battery will automatically disconnect the power supply, and the backlight will always be bright.
- Press the “/SET” button to adjust the brightness of the backlight, you can adjust the 4 state: 3 different brightness backlight and close the backlight. Users can choose according to the personal preferences of different brightness backlight or turn off the backlight.
- When the backlight is in the dark bright-
ness or closed state, you can press the "SNZ/LIGHT" button to lighten the maximum brightness of backlight for 15 seconds.
Explanation of the network weather forecast
- After the base station is connected with the WIFI hotspot, the weather information of the base station will be updated automatically every hour after the weather forecast information obtained from the network.
- The base station automatically downloads real-time air pressure, weather forecasts for today and the next three days, and forecasts of the highest and lowest temperatures from the network
- The base station automatically uploads the data of indoor and outdoor temperature and humidity from the base station to
the server, and the APP can download the data automatically from the server through the network.
- If you use battery power, the weather station will automatically connect to the WIFI once an hour to implement the above network data upload and download. If you use DC power, the WIFI connection will always work
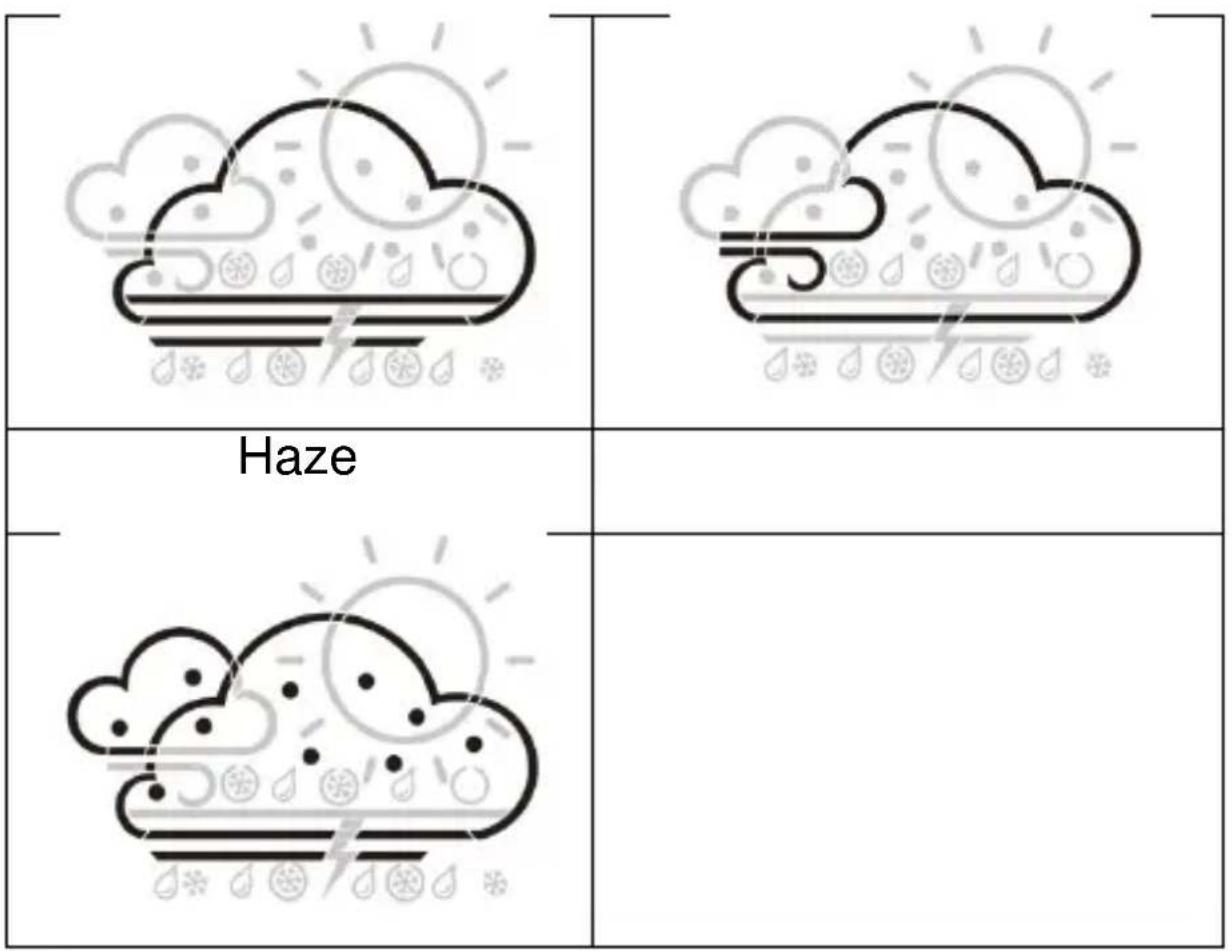
Weather forecast icon that can be displayed on the base station :
| Sunny | Mostly sunny |
| Partly Cloudy | Mostly Cloudy |
| Cloudy | Patchy Rain |
| Mostly Rain | Showers |
| Heavy Rain | Thunderstorm |
| Hailing rain | Hail |
| Soft hail / graupel | Patchy snow |
| Mostly snow | Snowy shower |
| Heavy snow | Snowy rain |
| Foggy | Windy |
App interface specification :
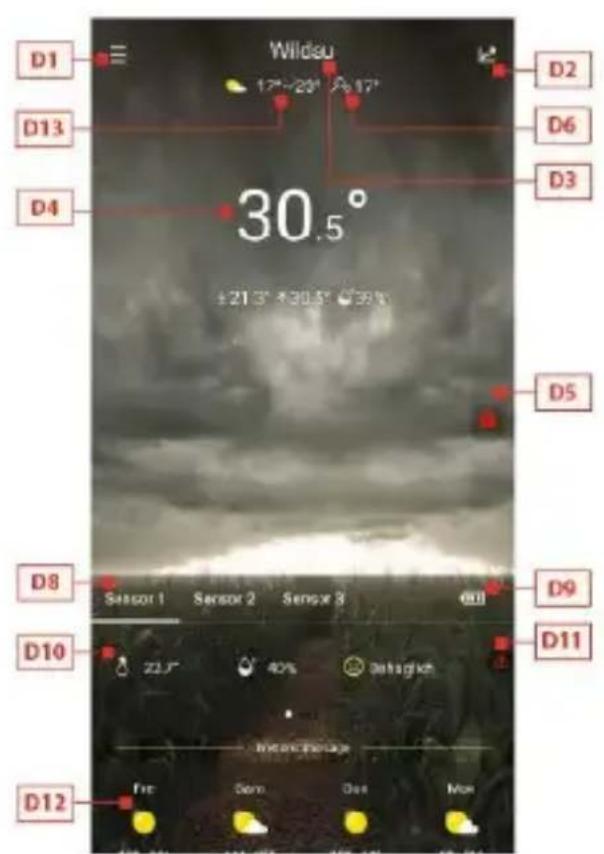
Front page data display :
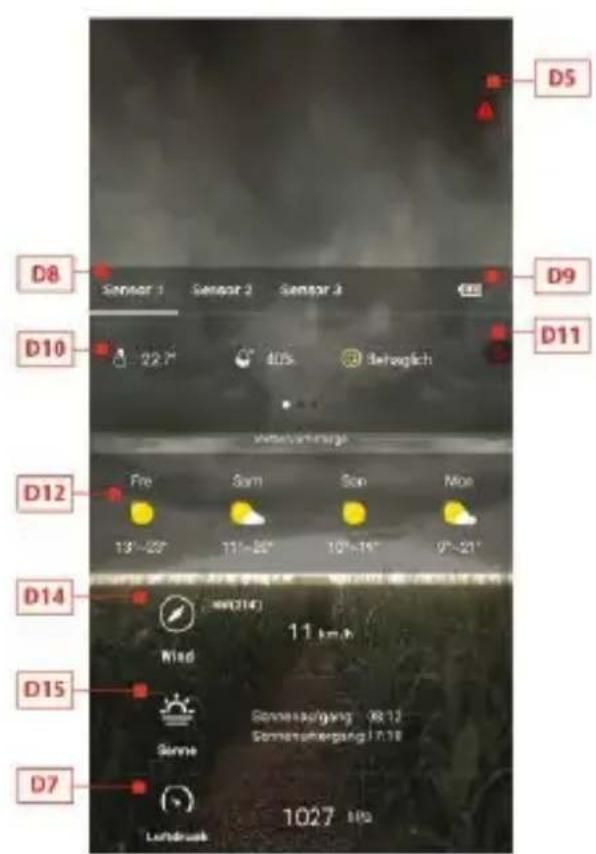
Start screen data display 1 -> Start screen data display 2
D1: Main menu bar
D2: Bar diagram view
D3: Location City
D4: Temperature and humidity data of the base station and weather today
D5: Quick setting of temperature and humidity alert for the base station
D6: Feel-like temperature value
D7: Today's barometer pressure
D8: Wireless remote sensor device name
D9: Battery power for wireless remote sensor devices
D10: Temperature and humidity data of the wireless remote sensor
D11: Quick setting of temperature and humidity alert for the wireless remote sensor
D12: Weather forecast for the next four days
D13: Weather forecast for the following day
D14: Today's wind speed and direction
D15: Today's sunrise and sunset tomorrow
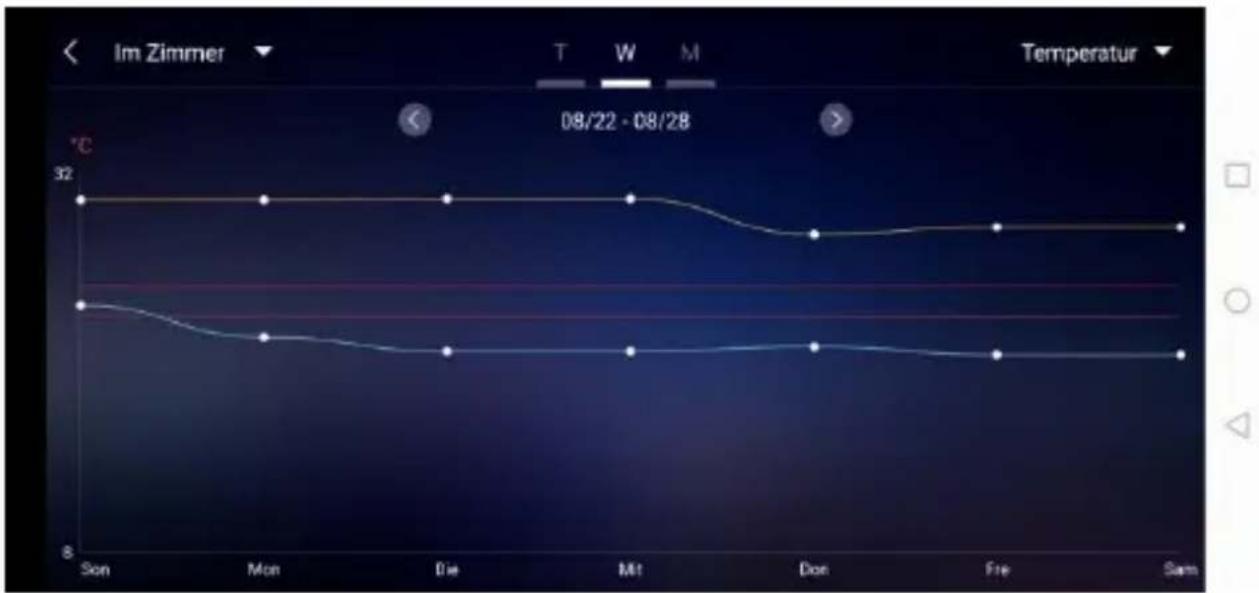
Data chart display :
- Click on the bar diagram icon “D2” of < Start screen data display 1> and the APP automatically jumps to < Data chart display >. Click the
column in the top left corner of the < Data chart display > and you
can choose to view the data chart of the base station or wireless remote sensor
- Click on the "T" (day), "W" (week) and "M" (month) boxes on the top middle of the < Data chart display >, and you can choose to view the daily, weekly and monthly data charts, Slide the screen to the left or right to view data charts at different times.
- Click the "Temperature", "Humidity" and "Air pressure" on the top right side of the screen and select the historical chart record of temperature, humidity, or air pressure
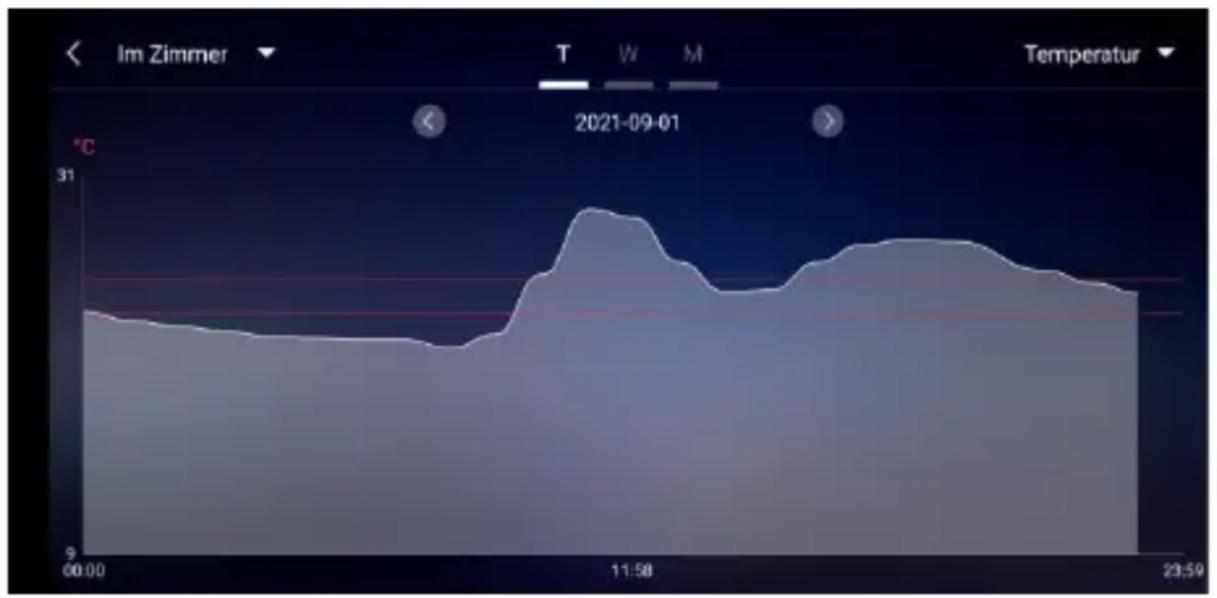
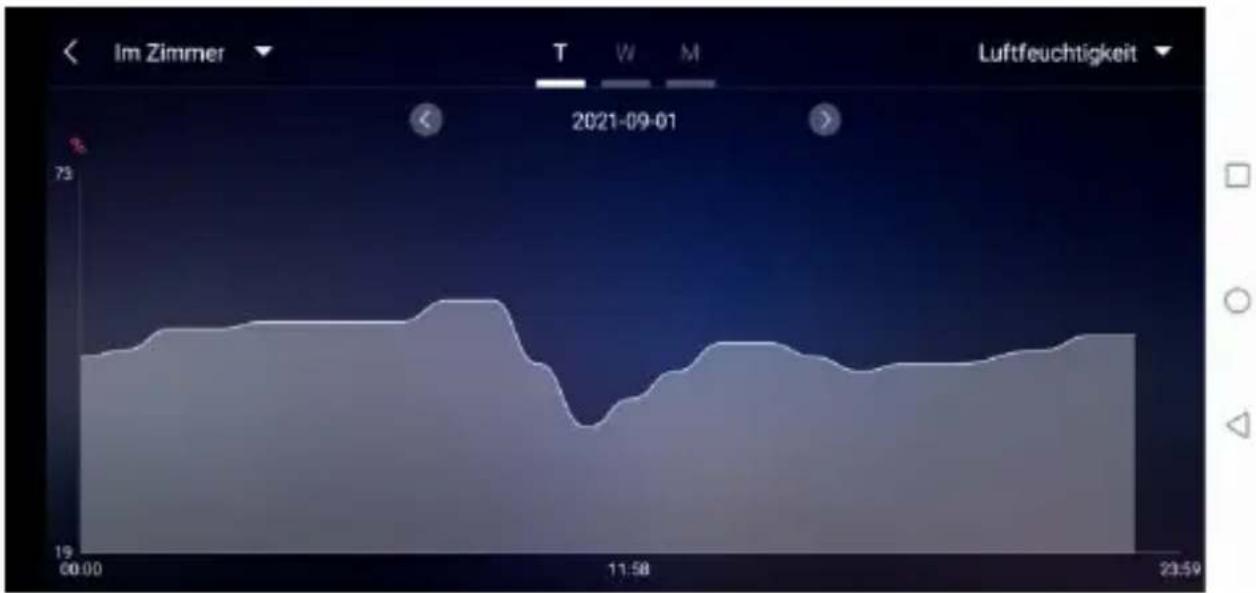
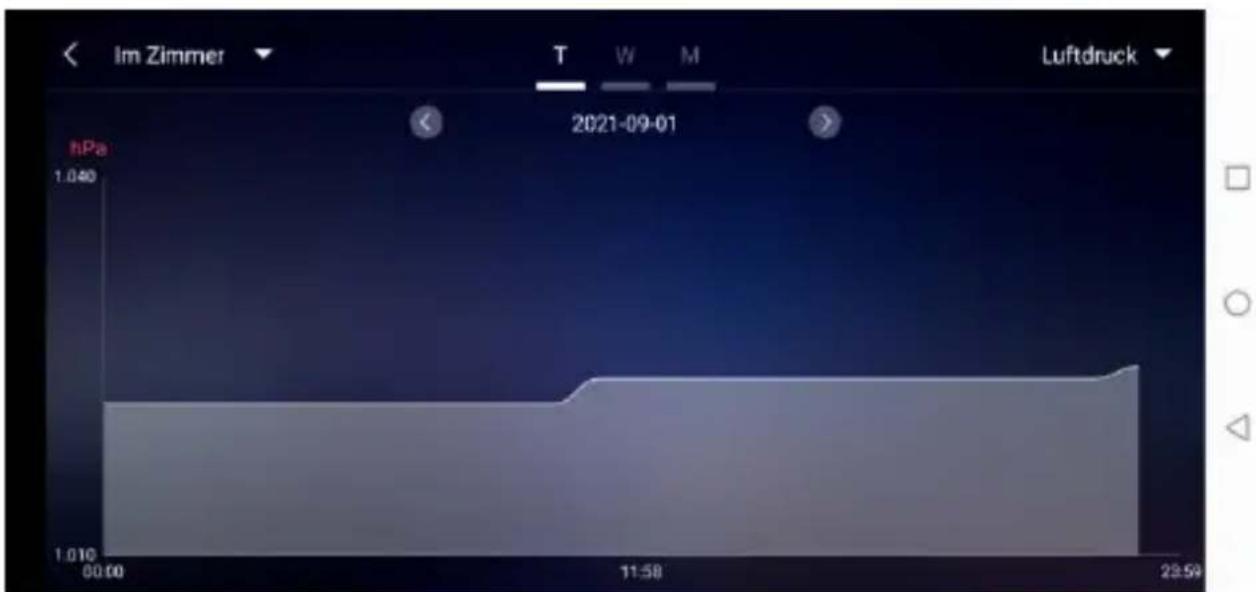
Data chart presentation - Daily
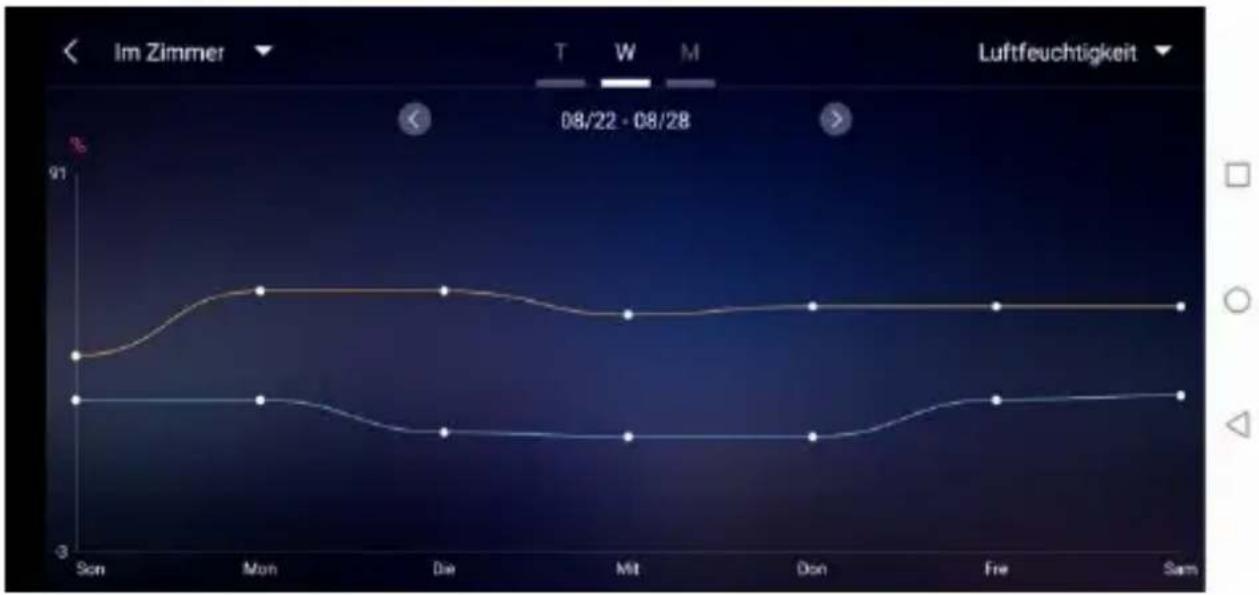
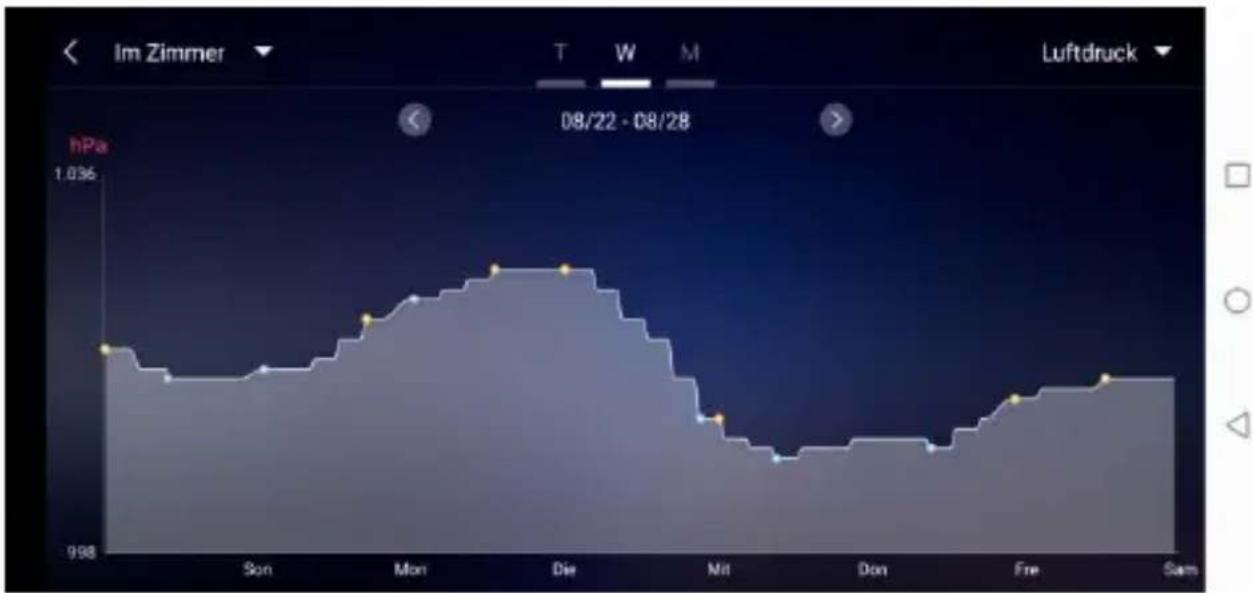
Data chart presentation – Weekly
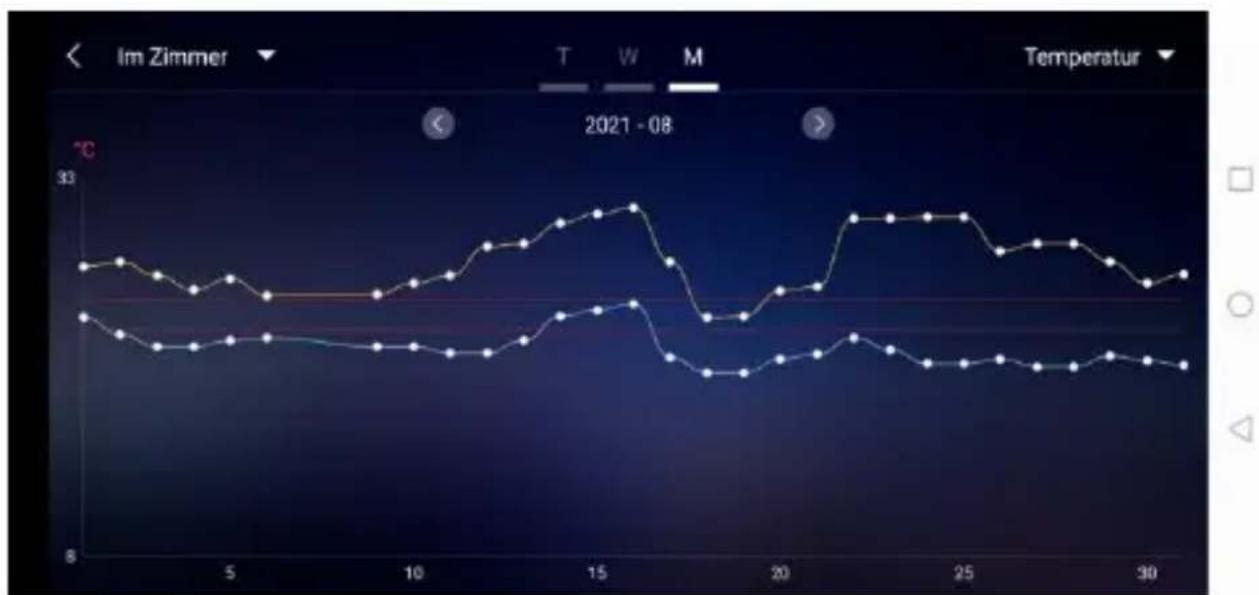
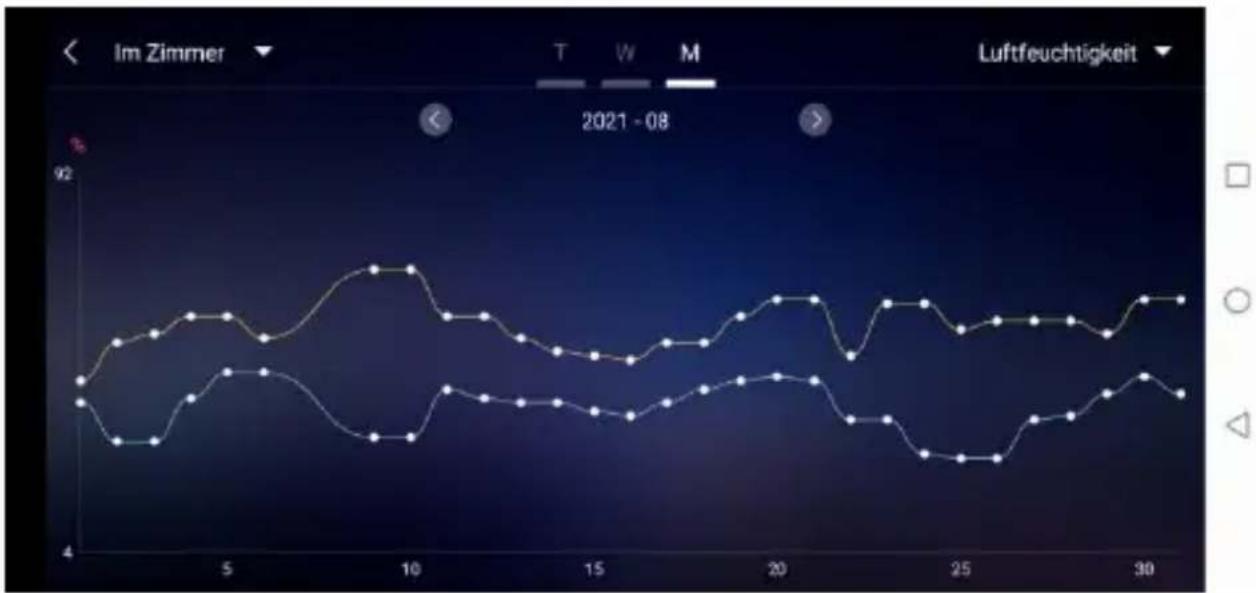

Data chart presentation – Monthly
Temperature and humidity alert setting
- Click on the "D5" in the home page, you can quickly enter the temperature and humidity alert settings interface of the base station.
- Set up wireless sensor for temperature and
humidity alert. Click on the channel selected by “D8”, and then click “D11” to quickly enter the wireless sensor temperature and humidity alarm interface to set the channel.
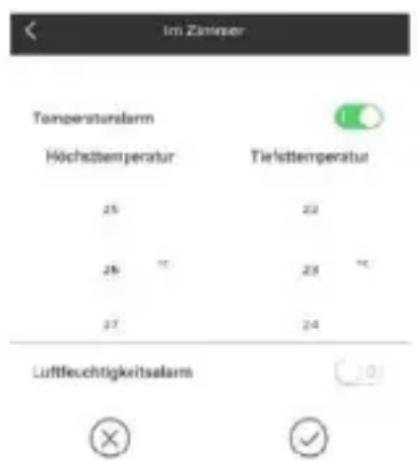
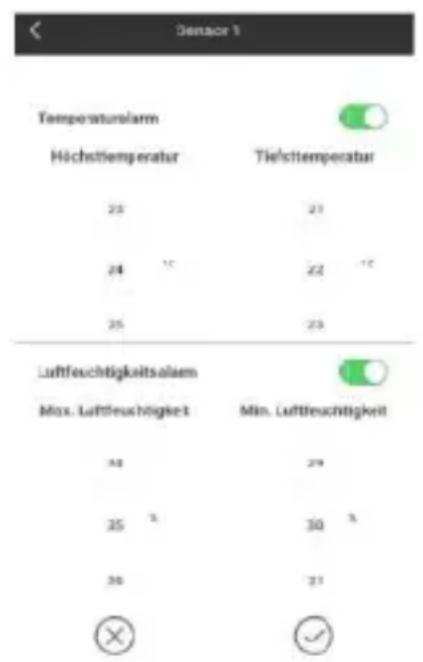
Temperature and humidity alert setting for main station (left) and outdoor sensor (right)
Temperature and humidity alert
- After the temperature and humidity alarm setup is complete, click on the "V" checking icon for confirmation. The alert setting will be
shared with the base station via the WiFi connection. Once an temperature or humidity alert gets activated, it will share the alarm information with the app via WiFi and the app will automatically prompt the alarm notice.
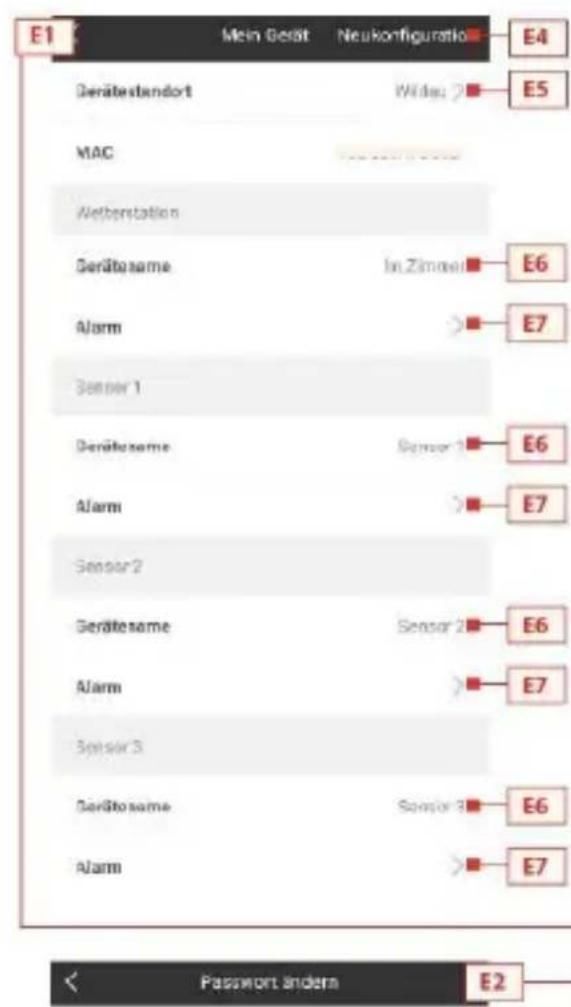
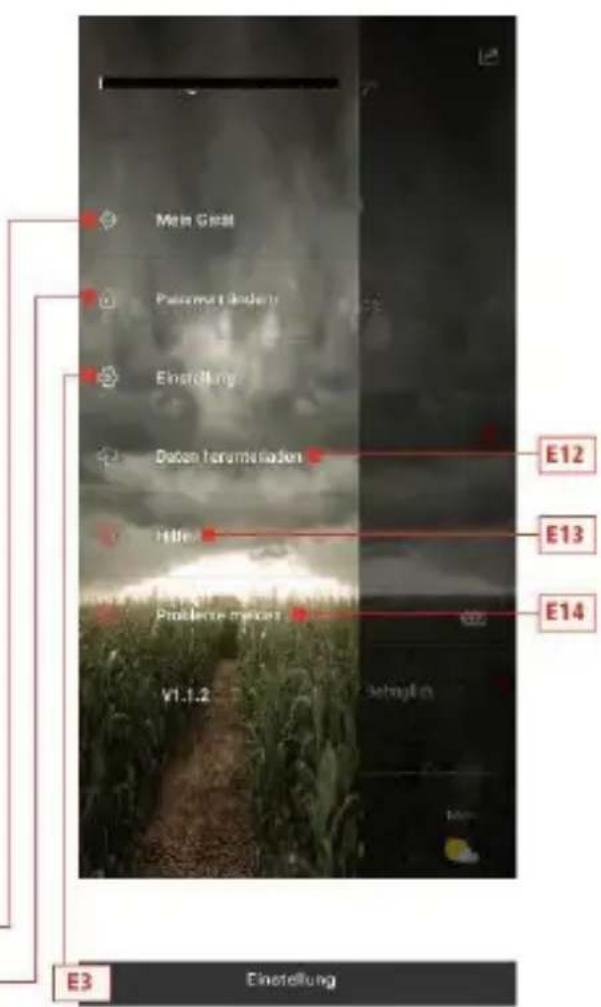
Menu description
- Click on the “D1” in the home page, and the left side will slide out of the main menu. Click on the area or function block of the icon, which corresponds to the function settings of the table below.
Bris Mallachne est aggcted
E1: Device management menu
E2: Account password changing menu
E3: Settings menu
E4: Re-bonding base station
E5: Re-positioning base station
E6: Change device name of station/sensor
E7: Open the temperature and humidity alert function of the station/sensor
E8: Setting the temperature display of the unit
E9: Setting the air pressure display of the unit
E10: Logging off from account
E11: Setting the wind speed display of the unit
E12: Data download menu
E13: Video link for help
E14: Problem form menu for cases of error
Low battery display

WARNING Health hazard!
Batteries contain acids that are harmful to health.
- Replace weak batteries as soon as possible to avoid leakage.
Wear coated gloves and protective goggles when handling leaking batteries!
When the battery symbol "
- appears in the "IN" column, please change the battery of the base station in time.
-
appears in the "OUT" column, please confirm the channel of the battery prompt and change the battery of the channel's external transmitter in time.
-
Change the corresponding batteries as soon as possible.
- Use only alkaline batteries.
- Rechargeable batteries are not suitable because their voltage is too low.
-
Proceed as described in the chapter 'Commissioning' on page 253.
-
Dispose of empty batteries in an environmentally friendly way as described in the chapter 'Disposal' on page 298.
Please note: After changing the batteries in the transmitter or receiver, your device must always "relearn" the transmitter.
Cleaning
Penetration of water into the housing and the use of corrosive and sharp cleaning agents can damage or destroy the unit.
- Clean the base station and the outdoor sensor with a dry, lint-free cloth.
Troubleshooting
-
Incorrect values from the transmitter or no signal.
-
Batteries of the transmitter are empty.
Please replace them.
- There are sources of interference or obstacles nearby or the distance to the base station is too great.
Change the position of the transmitter and/or the base station. "Visual contact" between transmitter and receiver often improves transmission.
- Internal connection problem.
Restart the base station and transmitter by removing and reinserting the batteries.
-
No reception of the time signal and weather forecast.
-
Data reception may be affected by nearby mountains and valleys, by nearby motorways, railways, airports, power lines, etc., by nearby construction sites, by nearby electrical equipment (computers, televisions, etc.) and metallic objects, by location in the middle of tall buildings or in moving vehicles, by concrete buildings.
Place the base station in a location with optimal reception, e.g. near windows and away from metallic or electrical objects.
It is recommended to keep a distance of at least 1.5 - 2 metres from possibly interfering devices such as computer screens and TV sets.
The station should display the weather correctly overnight at the latest. At night, atmospheric interference is usually less and reception is possible in most cases.
-
WiFi icon is blinking on the station display, which means the base station has no connection to the App-Server.
-
Please check if your WiFi connection is online and working.
-
Check if the app is using the correct WLAN-Key
-
Only WiFi letters are blinking on the station display, which means the base station has no connection to the WLAN.
-
Please check if your WiFi connection is online and working.
- Check if the app is using the correct WLAN-Key
If the problem persists, contact the service contact (see chapter "Service" on page 302).
Packaging
The unit packaging consists of recyclable materials. Dispose of them in an environmentally friendly manner and separate them into the appropriate collection containers.
Unit
Old units and batteries must not be disposed of in normal household waste. In accordance with Directive 2012/19/EU, the units (base station and external transmitter)
must be disposed of in an orderly manner at the end of their service life. In this way, the recyclable materials contained in the units are recycled and environmental pollution is avoided. Hand in the old devices at a collection point for electrical waste or at a recycling centre.
Batteries
Before disposing of them, remove the batteries from the units (base station and transmit
ter) and dispose of them separately. Every consumer is legally obliged to take used batteries to a collection point for used batteries at a recycling centre or to a battery retailer.
Specifications
Base station
- Temperature measuring range: -20°C to +60 °C, displays "OF.L" outside this range
- Temperature resolution: +/- 0.1 °C
- Humidity measuring range: 20% RH to 95% RH
- Outdoor transmitter data reception: every 5 seconds
- Frequency bandwidth reception 868 MHz
- Batteries: 4x 1.5 V, type AA (alternative to USB cable)
- Dimensions: 148 × 134 × 30 mm
Outdoor sensor
- Temperature measuring range: -40 to +70 °C, displays "OF.L" outside this range
- Temperature resolution: +/- 0.1 °C
- Humidity measuring range: 20% RH to 95% RH
- Radio transmission signal: 868 MHz
- Transmitting power 13 dBm
-
Radio transmission range: 50m (under optimal conditions)
-
Protection class: IPX4
- Batteries: 2 × 1.5 ~V , type AA
- Dimensions: 40 × 102 × 26 mm
EU Declaration of conformity
CE
By affixing the CE marking, the distributor declares, in accordance with EU Regulation 765/2008, that the device complies with the applicable requirements laid down in the Community harmonization legislation concerning its affixing.
We hereby declare that the WD 2000 (base station) and TX205DTH (transmitter) described below are in compliance with the essential requirements and other relevant provisions of Directive 2014/53/EU and 2011/65/EU.
The complete declaration of conformity in PDF format can be requested from our service address.
Service
Service Hotline: +49 3375 216064 (normal costs in the German fixed network, depending on provider)
E-mail: service@technotrade-berlin.de
Action identifier: 02/24/22
Warranty conditions
Our products are subject to strict quality control. Should this appliance still not function properly, we regret this very much and ask you to contact our service address listed on the guarantee card. We will also be happy to assist you by telephone via the service hotline printed on the warranty card. The following applies to the assertion of warranty claims - without limiting your statutory rights:
- Warranty claims can only be made within a period of max. 3 years, calculated from the date of purchase. Our warranty service is limited to the repair of material and manufacturing defects or the replacement of the appliance. Our warranty service is free of charge for you.
- Warranty claims must be made immediately after becoming aware of them.
- The assertion of warranty claims after the expiry of the warranty period is excluded, unless the warranty claims are made within a period of 2 weeks after the expiry of the warranty period.
- Please send a defective unit postage paid to the service address, enclosing the warranty card and
the receipt. If the defect is within the scope of our warranty service, you will receive a repaired or new unit back. Repair or replacement of the unit does not start a new warranty period. The warranty period of 3 years from the date of purchase remains decisive. This also applies when using an on-site service.
Please note that our warranty will expire in the event of misuse or improper handling, non-observation of the safety precautions applicable to the unit, use of force or interventions not carried out by the service address authorised by us. Defects to the unit that are not (or no longer) covered by the warranty or damage that voids the warranty will be repaired at our expense. To do this, please send the unit to our service address.
Warranty card
Hotline: +49 3375 216064,
Monday – Friday, 08:00 – 20:00
Costs: normal costs in the German fixed network, depending on provider
technoline, station WD2000 and sensor TX205DTH
Article number: 8756, Promotion: 02/24/22
Customer name:
Customer address:
Customer phone number:
Detailed error description: