DF60A8500CG - Iron SAMSUNG - Free user manual and instructions
Find the device manual for free DF60A8500CG SAMSUNG in PDF.

| Product type | Garment care appliance (AIRDRESSER) |
| Brand | Samsung |
| Model | DF60A8500CG |
| Dimensions (H x W x D) | 1850 x 445 x 632 mm |
| Weight | 85.0 kg |
| Voltage / Frequency | 220-240 V / 50 Hz |
| Rated power | 1700-2000 W |
| Water tank capacity | 1.4 L (fill tank) |
| Available cycles | Refresh (Daily, Uniform, Jeans, etc.), Dry (AI Dry, Quick, Down Jackets, etc.), Sanitize, Self Clean |
| Special functions | Smart Control, Keep Fresh (Air), Delay End, Child Lock, Fresh Finish™ |
| Connectivity | Built-in Wi-Fi (SmartThings compatible) |
| Noise level | Varies by cycle (compressor, fan, steam) |
| Standby power consumption | 0.50 W (off), 2.00 W (network standby) |
| Lamp energy efficiency class | Not specified (light source non-replaceable by user) |
| Maintenance | Regular cleaning of lint filter, air filter, water tanks; periodic descaling |
| Safety | Child lock, auto shut-off, overheat protection, mandatory grounding |
| Supplied accessories | Shelf, water tank, air hangers, weight kit, regular hanger kit, anti-tip strap |
| Recommended ambient temperature | 10 °C to 35 °C |
Frequently Asked Questions - DF60A8500CG SAMSUNG
User questions about DF60A8500CG SAMSUNG
0 question about this device. Answer the ones you know or ask your own.
Ask a new question about this device
Download the instructions for your Iron in PDF format for free! Find your manual DF60A8500CG - SAMSUNG and take your electronic device back in hand. On this page are published all the documents necessary for the use of your device. DF60A8500CG by SAMSUNG.
USER MANUAL DF60A8500CG SAMSUNG
Clothing Care System
(AIRDRESSER)
User manual
DF608**G
SAMSUNG
Contents
Safety information 4
What you need to know about the safety instructions 4
Important safety symbols 4
Important safety precautions 5
General warnings 6
Electrical warnings 8
Installation warnings 9
Cleaning warnings 9
Instructions about the WEEE 10
Before you start 11
Installation 11
Turning on Wi-Fi (for network models only) 13
Product overview 14
Control panel 16
Cycle overview 18
Fabric care guide 20
Fabric care chart 22
Smart control 25
Product and accessory use 28
Using a cycle 28
Using the accessories 29
Cleaning and maintenance 36
Exterior 36
37
Water tray 38
Air filter 39
Lint filter 40
Lamp (Light source) 41
41
Moving the product to another location 42
Troubleshooting 43
43
Checkpoint 44
English2
Specifications 46
Standby power consumption 46
Specification sheet 46
Safety information
Congratulations on your new Samsung product. This manual contains important information on the installation, use and care of your product. Please take some time to read this manual to take full advantage of your product's many benefits and features.
What you need to know about the safety instructions
Please read this manual thoroughly to ensure that you know how to safely and efficiently operate the extensive features and functions of your new product. Please store the manual in a safe location close to the product for future reference. Use this product only for its intended purpose as described in this instruction manual.Warnings and Important Safety Instructions in this manual do not cover all possible conditions and situations that may occur. It is your responsibility to use common sense, caution and care when installing, maintaining and operating your product. Because the following operating instructions cover various models, the characteristics of your product may differ slightly from those described in this manual and not all warning signs may be applicable. If you have any questions or concerns, contact your nearest service centre or find help and information online at www.samsung.com.
Important safety symbols
What the icons and signs in this user manual mean:
WARNING
Hazards or unsafe practises that may result in severe personal injury, death and/or property damage.
CAUTION
Hazards or unsafe practises that may result in personal injury and/or property damage.
CAUTION
Hot surface
NOTE
Indicates that a risk of personal injury or material damage exists.
These warning signs are here to prevent injury to yourself and others.
Please follow them explicitly.
After reading this manual, store it in a safe place for future reference.
Read all instructions before using the product.
As with any equipment that uses electricity and moving parts, potential hazards exist. To safely operate this product, familiarise yourself with its operation and exercise care when using it.
English4
Important safety precautions

WARNING
To reduce the risk of fire, electric shock, or injury to persons when using your appliance, follow basic precautions, including the following:
- This appliance is not intended for use by persons (including children) with reduced physical, sensory or mental capabilities, or lack of experience and knowledge, unless they have been given supervision or instruction concerning use of the appliance by a person responsible for their safety.
- This appliance can be used by children aged from 8 years and above and persons with reduced physical, sensory or mental capabilities or lack of experience and knowledge if they have been given supervision or instruction concerning use of the appliance in a safe way and understand the hazards involved. Children shall not play with the appliance. Cleaning and user maintenance shall not be made by children without supervision.
- Children should be supervised to ensure that they do not play with the appliance.
- If the supply cord is damaged, it must be replaced by the manufacturer, its service agent or similarly qualified persons in order to avoid a hazard.
Safety information
- CAUTION: In order to avoid a hazard due to inadvertent resetting of the thermal cut-out, this appliance must not be supplied through an external switching device, such as a timer, or connected to a circuit that is regularly switched on and off by the utility.
-
This appliance is intended to be used in household and similar applications such as:
-
staff kitchen areas in shops, offices and other working environments;
-farm houses;
-by clients in hotels, motels and other residential type environments;
-bed and breakfast type environments. -
WARNING: This appliance is intended only for drying textiles washed in water.
General warnings

WARNING
- To avoid electric shock, fire, and/or death, make sure the product is properly installed and grounded as described in this manual before using the product.
- Only use the product for its intended purposes. Damage incurred from using the product for purposes other than those specified in this manual are not covered by the warranty.
- To avoid physical injury and/or product damage, do not climb, stand, or hang on the product.
- Do not disassemble or modify the product in any way.
- Do not allow children to play in, on, or around the product. Close supervision of children is necessary at all times.
- To avoid fire, physical injury, and/or death, keep all packaging material away from children and properly remove and dispose all packaging material.
- Do not touch or operate the product with wet hands.
- To avoid electric shock and/or fire, keep all animals or other foreign objects out of the product.
If you hear strange noises, smell strange odours, and/or detect smoke from the product, immediately unplug the product. - Do not place heavy or dangerous objects in, on, or around the product.
English6
- To avoid electric shock, fire, and/or death, do not repair or replace any part of the product or attempt any servicing unless specifically recommended in the user manual or in published user-repair instructions that you understand and have the skills to carry out.
Take out all personal belongings (electric devices, lighters, matchboxes, and so on) from pockets. - To avoid fire and/or explosions, do not dry items that have been previously cleaned in, washed in, soaked in, or spotted with gasoline, dry-cleaning solvents, cooking oils, or other flammable or explosive substances.
- The product is not intended for use by persons (including children) with reduced physical, sensory, or mental capabilities, or lack of experience and knowledge, unless they have been given supervision or instruction concerning the use of the product by a person responsible for their safety.
- Before disposing of the product, remove the door to the drying compartment, and cut off the power plug to prevent reuse.
- Do not touch or disassemble the electrical outlet of the product. In the event of a gas leak, make sure to ventilate the location and immediately contact a Samsung service centre.
- To avoid damaging the glass panel, make sure to protect the front at all times.
- To avoid physical injury and/or product damage, do not step on the tank doors.
- Do not put hands, feet, other body parts, or metal objects under the product.
- Do not use other products to dry the interior. Do not use candles to remove interior odours.
- Do not open the door while the product is operating. Opening the door while the product is operating will affect product performance and may cause condensation to damage flooring.
- Do not drink the water from the Refill Tank or the Drain Tank.
- Clean the lint filter before or after each load.
- Do not use fabric softeners or other products to eliminate static unless recommended by the manufacturer of the fabric softeners or products.
- Keep fingers out of pinch point areas. Use caution when closing the door when children are nearby.
- Do not use the product to dry items containing foam rubber or other rubber-textured items.
- To avoid product damage, excessive noise, or fire, do not insert objects into the steam nozzle.
- Do not place your hands or body near the steam nozzle during operation. The hot steam can cause an injury.
- Do not open the door during operation. The high internal temperature can cause an injury.
- If a problem occurs during steam process, stop the product immediately and remove all items from the product. If items are not removed immediately, they will stay damp, causing damage to the fabric or smell.
- Before placing the clothing into the product, make sure to empty all pockets.
- Contains fluorinated greenhouse gases.
Hermetically sealed equipment.
Do not vent gases into the atmosphere.
- Refrigerant (Type): R-134a (GWP = 1430)
Refrigerant (Charging): 0.15 kg, 0.214 tCO _2 e
Safety information
Electrical warnings

WARNING
- Regularly remove all foreign substances such as dust or water from the power plug terminals and contact points using a dry cloth.
- Unplug the power plug and clean it with a dry cloth.
- To avoid risk of electric shock, always unplug the product before disassembly or repair.
- Do not pull the power cord when unplugging the power plug. To unplug the power plug, firmly pull the power plug straight out.
- To avoid electric shock, do not use an extension cord.
- Do not use a damaged power cord or power plug. Do not attempt to repair, disassemble, or modify the power cord or power plug. For any repairs, contact your nearest Samsung service centre.
- Plug the power cord into a wall socket that meets local electrical specifications. Use the socket for this appliance only, and do not use an extension cord.
- When moving the product, make sure to keep the power cord protected at all times.
- To avoid electric shock, fire, serious injury, product damage, and/or death, the product must be plugged into a properly grounded outlet. Make sure the wall outlet and circuit are checked by a qualified electrician.
- The product must be equipped with a cord having an equipment-grounding conductor and a grounding plug. The plug must be plugged into an appropriate outlet that is properly installed and grounded in accordance with all local codes and ordinances.
- The product must be grounded. In the event of malfunction or breakdown, grounding will reduce the risk of electric shock by providing a path of least resistance for electric current.
- Before using, make sure there is dedicated, grounded electrical-outlet rated for use with this product. It is the owner's responsibility to replace a standard 2-prong wall outlet with a standard 3-prong outlet.
- To avoid electric shock, properly ground the product that conforms to all governing codes and ordinances. Follow the instructions in the user manual.
- The product must be plugged into its own individual electrical outlet which has a voltage rating that matches the rating plate. This provides the best performance and also prevents overloading house wiring circuits which could cause a fire hazard from overheated wires.
- Connect to a properly rated, protected, and sized power circuit to avoid electrical overload. Improper power circuits can melt, creating electric shock or fire.
- Do not, under any circumstances, cut or remove the ground prong from the power cord. To prevent personal injury or product damage, the electrical power cord must be plugged into a properly grounded outlet.
- Do not use a multi socket outlet which is not properly grounded (portable). Upon using a properly-grounded multi socket outlet (portable), use a product with the current capacity of 15 A or higher alone. Failure to do so may result in electric shock or fire due to the heat of multi socket outlet. The power may be shut off when the circuit breaker is operated.
- The product must be connected to a grounded metal, permanent wiring system or an equipment-grounding conductor must be run with the circuit conductors and connected to the equipment-grounding terminal or lead on the appliance. Electric shock can result if the product is not properly grounded.
English8
- Improper connection of the equipment grounding conductor can result in electric shock. Check with a qualified electrician or service person if you are in doubt that the product is properly grounded.
Installation warnings
WARNING
- Only install the product in a stable, well-floored location. Do not install the product in locations prone to vibrations or where the product may tip over, such as ships or airplanes. Contact a Samsung service centre if you are unsure of the installation location.
- Do not install the product in locations exposed to the weather or temperatures below freezing. If the product was shipped in or at temperatures below freezing, allow the product to warm before installing.
- To avoid electric shock, fire, serious injury, product damage, and/or death, do not install the product in humid locations (such as a bathroom or sauna).
- To avoid fire, smoke, and/or product damage, do not install the product near other heat sources (such as a stove or heater).
- To avoid fire or smoke and/or product damage, do not place candles or other flammable on, in, or around the product.
- To avoid physical injury and/or product damage, contact a Samsung service centre before moving the product.
- Install the product where the power plug is easily accessible. To avoid electric shock and/or fire, unplug the product when not in use.
- If the installation location has been flooded, do not go near the product and immediately contact a Samsung service centre.
- To avoid fire, smoke, and/or product damage, remove all protective film from the product.
- To prevent product damage and/or physical injury, have at least two people move the product.
Cleaning warnings
WARNING
- To avoid electric shock, do not use sharp objects to operate or clean the product.
- Do not spray water directly onto the product when cleaning it.
- Do not use bleaching agents on the exterior of the product. Bleaching agents may discolour the exterior.
- Wipe the interior with a dry cloth after use.
- After using the product, wipe its inner side with a dry cloth.
The product could be stained by contamination such as long hair or due to dust and water drops that may form inside.
- If contamination (detergent, dirt, food residue, etc.) has accumulated in the product or any accessories, unplug the power cable and then wipe the contaminated area with a soft, wet cloth.
Do not expose the product or the accessory to cleaning or bleaching agents or apply these to the product or accessory.
- Otherwise, this may result in discoloration, deformation, damage, or rust.
Safety information
Instructions about the WEEE
us6u3
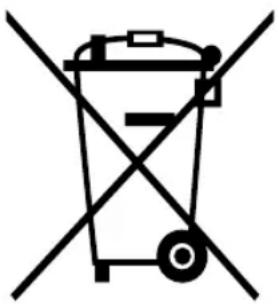
Correct Disposal of This Product (Waste Electrical & Electronic Equipment)
(Applicable in countries with separate collection systems)
This marking on the product, accessories or literature indicates that the product and its electronic accessories (e.g. charger, headset, USB cable) should not be disposed of with other household waste at the end of their working life. To prevent possible harm to the environment or human health from uncontrolled waste disposal, please separate these items from other types of waste and recycle them responsibly to promote the sustainable reuse of material resources.
Household users should contact either the retailer where they purchased this product, or their local government office, for details of where and how they can take these items for environmentally safe recycling.
Business users should contact their supplier and check the terms and conditions of the purchase contract. This product and its electronic accessories should not be mixed with other commercial wastes for disposal.

For information on Samsung's environmental commitments and product regulatory obligations, e.g. REACH, WEEE or Batteries, visit our sustainability page available via www.samsung.com
English10
Before you start
Installation
Install the product according to the instructions in this manual and local codes.
Installing the product
- Select a solid, level location with adequate space for the following clearances.
| Top 25 mm | |
| Sides 14 mm | |
| Rear 15 mm |
If the minimum clearances are not met, performance will decrease due poor ventilation and condensation may occur on the product exterior.
- Do not install the product in direct sunlight or hot and cold places. The ambient temperature must be between 10^ - 35^ . If the ambient temperature is too high or too low, the product may not operate normally, or performance may decrease.
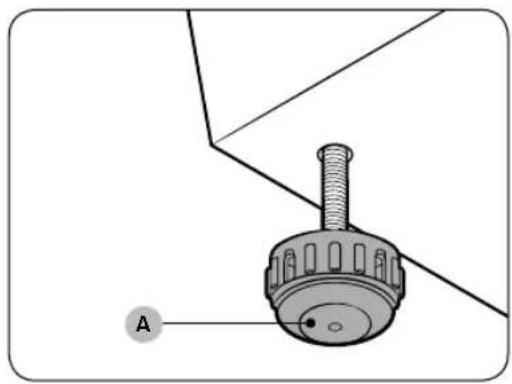
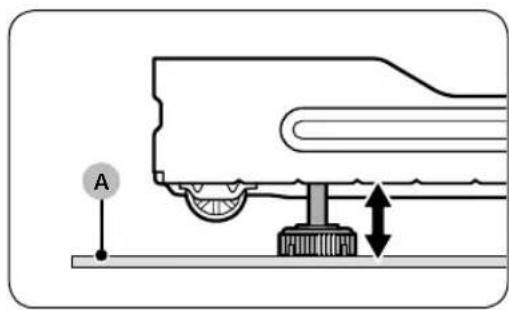
- Turn the levelling feet (A) clockwise or counterclockwise to adjust the height until the product is level.
NOTE
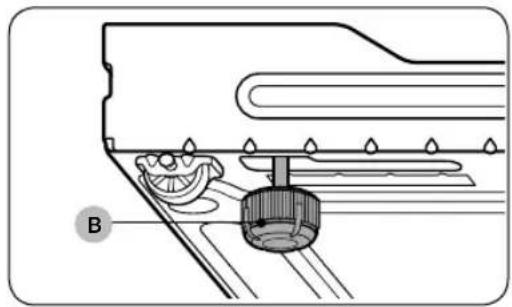
If the product wobbles or if you want to raise the height of the rear side, assemble the provided rear levelling feet (B) on the bottom-rear sides of the product.
Before you start
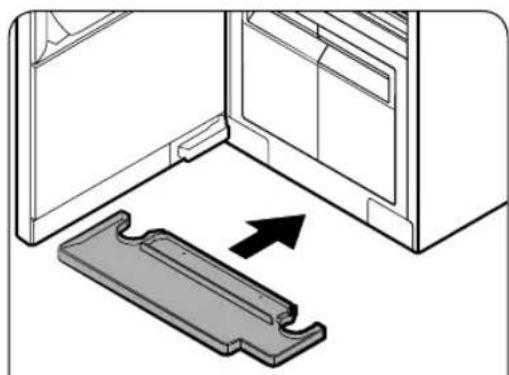
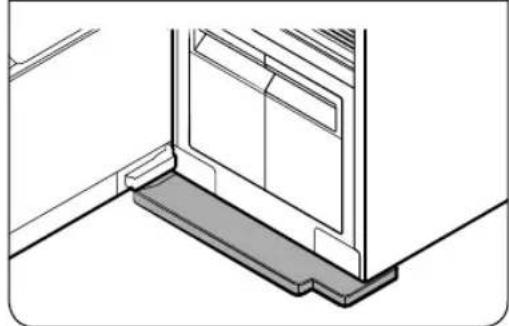
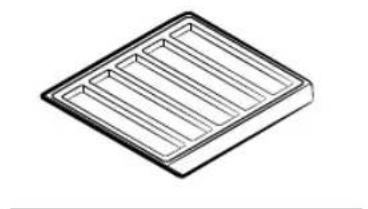
- Insert the water tray as shown in the figures.
-Make sure the side marked 'TOP' is facing upward.
NOTE
If AIRDRESSER is placed on a carpet (A), you may not be able to insert the tray. In this case, assemble the provided rear levelling feet on the bottom-rear side of AIRDRESSER to raise it from the carpet (A), and then insert the tray.
- Plug in the product to a 230 V / 50 Hz grounded outlet. If you do not have grounded outlets, contact a Samsung service centre for alternative methods to ground the product.
NOTE
- After installing the product, you must wait at least 2 hours before using it.
- The product consumes more water the first time the product is used. You may have to fill the Refill Tank more than one time.
- Connecting the power cord to a multi socket outlet causes voltage drop which may lead to abnormal operations.
English12:
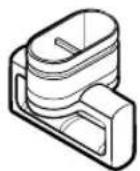
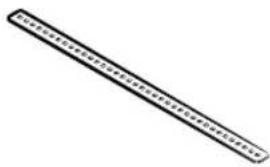
Securing AIRDRESSER with the anti-tip strap (optional)
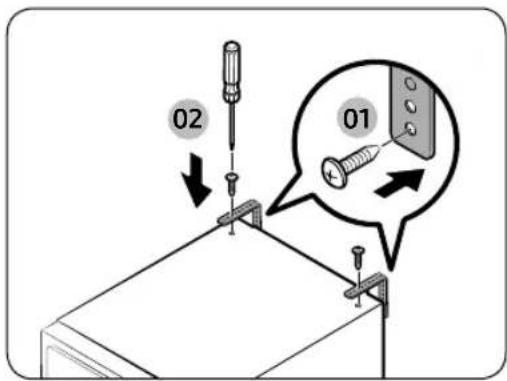
AIRDRESSER may tip-over by external force or children. If necessary, use the anti-tip strap to secure AIRDRESSER and prevent tip-over. (Refer to the figure.)
CAUTION
You must unplug the product before securing AIRDRESSER with the anti-tip strap.
NOTE
- Use the provided screw to fasten the anti-strap to a wall.
- Use the screws fastened on top of AIRDRESSER to fasten the anti-strap to AIRDRESSER.
Setting the language
When you turn on the product for the first time after the installation, the language selection screen appears on the control panel display. Follow the instructions to select the language.
- Tap < or > to select a language.
- Tap and hold save the selected language.
NOTE
- Language setting may not be applicable in some countries.
- To change the language afterward, tap and hold and for 3 seconds, and then follow the above instructions.
Turning on Wi-Fi (for network models only)
Turning on Wi-Fi consumes more energy. Under an environment where Wi-Fi is frequently turned on, actual energy consumption can be greater than the values in the specification sheet section.
- Tap turn on AIRDRESSER.
- Tap and hold Smart Control.
a. AIRDRESSER enters AP mode and connects to your smartphone.
b. Tap Smart Control to authenticate your AIRDRESSER.
c. Once the authentication process is complete, your AIRDRESSER is successfully connected to the app.
NOTE
You can tap and hold Sanitize and Smart Control simultaneously for 3 seconds to enter the Wi-Fi screen, and then tap disconnect or re-connect to the Wi-Fi.
Before you start
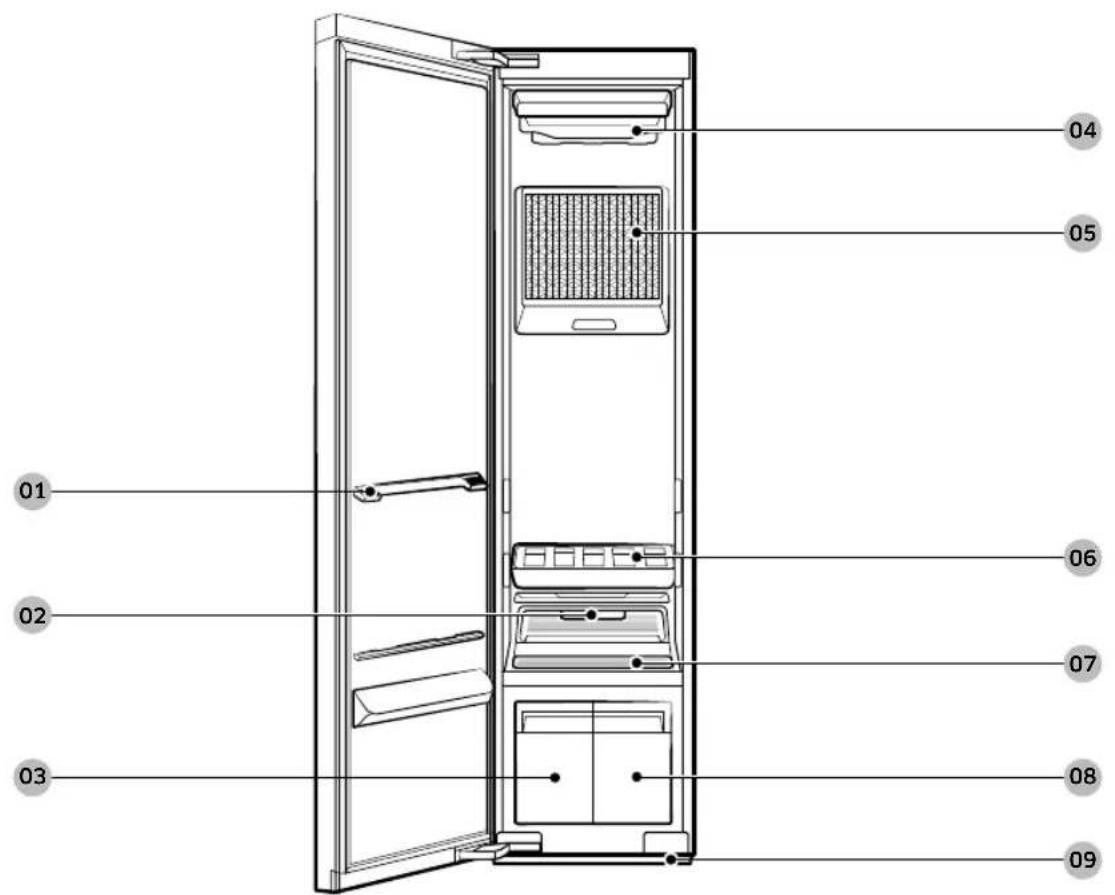
Product overview
01 Shelf holder
02 Fresh FinishTM
03 Drain tank
04 Air hole
05 Air filter
06 Shelf
07 Lint filter
08 Refill tank
09 Water tray
English14
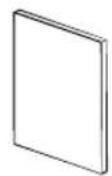
Accessories
English
Shelf Water tray Air hanger
Weight kit (applicable models only)
Regular hanger kit (applicable models only)

User manual
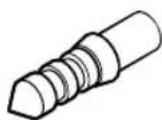
Anti-tip strap Screw (for anti-tip strap) Screw anchor (for anti-tip strap)
Rear levelling feet
Before you start
Control panel
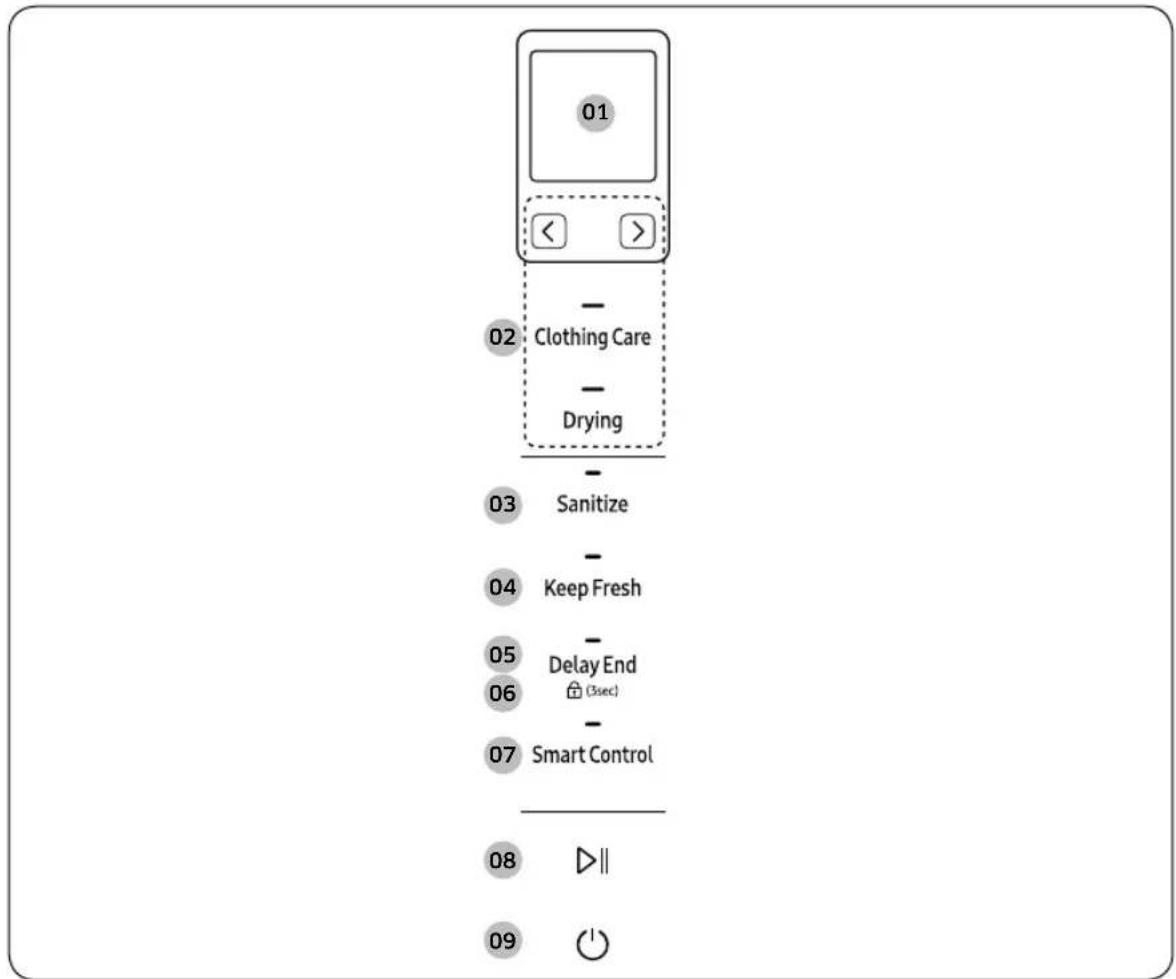
01 Display
- Displays the selected cycle and estimated time remaining.
- The Abn appears on the top-left corner of the display for the top three recommended cycles.
English16
| 02 Cycles | Clothing Care | You can select a desired Clothing Care cycle. Tap this button, and then tap < or >to select the specific cycle you want to use. |
| Drying | You can select a desired Drying cycle. Tap this button, and then tap < or >to select a desired Drying cycle. | |
| NOTE For more information about the cycles, see page 18. | ||
| 03 Sanitize | ·Use this function to sanitize items more thoroughly. ·This option is available for the School Wear, Denim, Babywear, Bedding, Toys, Daily Care cycles. | |
| 04 Keep Fresh | Tap to turn Keep Fresh on or off. You can keep items fresh if you will not be able to immediately take items out after a cycle has finished. ●NOTE ·Keep Fresh stays on up to 24 hours after a cycle has finished. ·Turning off the power or opening the door turns Keep Fresh off. | |
| 05 Delay End | Tap to turn Delay End on, and then tap < or >to increase the end time (from 1-24 hours). ●NOTE ·Some end times may not be available depending on the selected cycle. ·Depending on the items and environment, the actual end time may be different than the set time. | |
| 06 Child Lock (3sec) | Tap and hold for 3 seconds to turn Child Lock on or off. Child Lock deactivates all buttons except! ●NOTE When Child Lock is on, it will remain on until you turn it off. | |
| 07 Smart Control | Tap to turn Smart Control on or off. For more information about Smart control, see page 25. | |
| 08 Start/Pause || | Tap to start or pause the product. | |
| 09 Power ☑ | Tap to turn the power on or off. | |
Before you start
Cycle overview
Clothing Care cycles
| Cycle Description | |
| Daily Care For refreshing your everyday wear. | |
| School Wear For school uniforms that cannot be washed or dried daily. | |
| Denim For refreshing denim items without any concerns about dye bleeding. | |
| Babywear For refreshing and sanitizing baby clothes. | |
| Bedding For refreshing and sanitizing lightweight beddings. | |
| Toys For refreshing and sanitizing toys that cannot be washed in a washing machine. | |
| Winter Coat | For the coats made of wool blended fabrics. • Follow all item care labels. • For best results, use for only one item. |
| Wool/Knit | For woollen or knit items. • To avoid deforming items, neatly fold items and lay on the shelf. |
| Suit | For refreshing woollen suits. • Put the jacket in the middle air hole and trousers on the right air hole. For best results, use with the weight kit. |
| Down Jackets | To fluff heavy, down-filled jackets that have been stored for a long time. • To prevent blocking air circulation, hang only one item in the middle air hole. |
| Outdoor For outdoor or active wear. | |
| Delicates | For delicate fabric items such as chiffon, lace, and items with decorations. • For rayon, you must use this cycle. |
| Quick To quickly refresh items with light odours and wrinkles. | |
| Blouses | For refreshing blouses or summer dress (such as sleeveless dress, short sleeve dress with thin fabric). |
| Fur/Leather | Eliminates moisture and dust from fur and leather items. • Operating noise may be louder during this cycle. • Follow all item care labels. • For best results, use for only one item. • Make sure fur items are dry before using this cycle. |
| Accessories For accessories such as hats and gloves, etc. | |
| Mask Sanitize For refreshing and sanitizing disposable face masks. | |
English18
| Cycle Description | |
| Self Clean | Automatically clean the inside of the product. ·Make sure the product is empty. ·For best results and optimal cleaning, do not stop the cycle or open the door before Self Clean is complete. ·This cycle does not eliminate mold. |
Drying cycles

CAUTION
Do not use any of the following items for Drying cycles.
- Leather, fur, feather, velvet, silk.
- Any items containing rubber or sponge.
- Items made of wool blended fabrics, water-repellent fabrics, silk-blended, or hemp-blended fabric.
- Fur blankets with fur length exceeding 1 cm, wool blankets, carpets, mattresses.
- Lingerie with laces, pantyhose, stockings.

NOTE
Drying results may vary depending on thickness of the items.
| Cycle Description | |
| Al Dry | AIRDRESSER automatically sets the time to dry items. • Using Al Dry causes the Drain Tank to fill quickly. • Al Dry may not dry excessively wet items and large or bulky items well. If items are not dry, run the cycle again. |
| Quick For quickly drying lightweight items such as a shirt. | |
| Blouses | For delicate items such as chiffon, lace, and items with decorations. You must use this cycle for the items made of rayon. |
| Down Jackets | For drying and fluffing heavy, down-filled jackets. • To prevent blocking air circulation, hang only one item in the middle air hole. |
| Time Dry (1/2/3) | You can set the desired time to dry items. • Time Dry may not dry excessively wet items and large or bulky items well. If items are not dry, run the cycle again. |
| Room Care (2/4) | For dehumidifying the surrounding area. You can select 2 or 4 hours. • Make sure the product is empty when using Room Care. • The indoor temperature may increase. |
Before you start
Fabric care guide
- Fabrics have different care management depending on how they were processed and finished. This fabric care guide does not cover all materials and therefore use it for just a reference. Make sure to check the care label on your clothing before using with AIRDRESSER to prevent any damage.
- Do not put items that are not colourfast, are heat-sensitive, or are not suitable for washing with water in the Clothing Care or Sanitize cycles. Do a water blot test on a small, inconspicuous spot (an inside seam) to determine if the fabric is colourfast. For further assistance, consult the clothing manufacturer, a dry-cleaning professional, or a more detailed fabric care guide.
Cycle category
Refer to the following table to check specific cycles included in each category stated in the Fabric care guide table.
| Category Cycles | |
| Clothing Care cycle | Daily Care, Quick, Wool/Knit, Down Jackets, Winter Coat, Blouses, Fur/Leather |
| Sanitize cycles School Wear, Denim, Babywear, Bedding, Toys, Mask Sanitize | |
| Drying cycles | Al Dry, Quick, Delicates, Blouses, Down Jackets, Time Dry (1/2/3), Room Care (2/4) |
Fabric care guide table
Natural fibres - vegetable fibres
| Fabric | Cycles | Clothes / Remarks | |||
| Clothing Care | Sanitize Drying | ||||
| Reducing wrinkles | Deodorising | ||||
| Cotton | ● ● | Towels, socks, underwear, jeans, sportswear, t-shirts, blankets Wrinkles on 100% cotton fabrics may remain. Iron after cycle if desired. | |||
| Linen, hemp, ramle | ● ● | Summer clothes, tablecloths Some wrinkles may remain. Make sure fabrics are washable/hand washable before using the Clothing Care or Sanitize cycles. Lay delicate clothes on shelf. Do not use starched clothes. | |||
| Rayon | ● ● Suit lining, blouses, neckties, pyjamas | ||||
= Possible / 三 = Check care label
English20
Natural fibres - animal fibres
| Fabric | Cycles | Clothes / Remarks | |||
| Clothing Care | Sanitize Drying | ||||
| Reducing wrinkles | Deodorising | ||||
| Alpaca, camel hair, cashmere | × | × | Coats, suits Lay knitwears on the shelf. Alpaca and camel hair shrink in hot water. | ||
| × | Scarves, knitwear Lay knitwears on the shelf. Alpaca and camel hair shrink in hot water. | ||||
| Fur, leather | Coats, scarves * Only use Fur/Leather cycle. Leather must be 100% natural leather (No artificial leather) | ||||
| Silk | Silk neckties, ribbons, scarves, blouses Silk fabrics are not suitable for AIRDRESSER. | ||||
| Wool | × | ● | Sweaters, knitwear Lay knitwears on the shelf. Some wool shrinks when washed in hot water. Make sure fabrics are washable/hand washable before using the Clothing Care cycle. * Wool/Knit cycle is recommended. | ||
| ● | × | ● | Winter coat, suits Lay knitwears on the shelf. Some wool shrinks when washed in hot water. Make sure fabrics are washable/hand washable before using the Clothing Care or Sanitize cycles. * Winter Coat or Suit cycle is recommended. | ||
=Possible/ 喜 = Checkcare label
Artificial fibres
| Fabric | Cycles | Clothes / Remarks | |||
| Clothing Care | Sanitize Drying | ||||
| Reducing wrinkles | Deodorising | ||||
| Acetate ● | ● ● Suit | initing, blouses, neckties, pyjamas | |||
| Acrylic ● | ● ● | Thermal underwear, knitwear Lay clothes on shelf. | |||
| Nylon | ● ● | ● | Stockings, lingerie Lay clothes on shelf. | ||
| ● ● | ● Sportswear | ||||
| Polyurethane ● | ● ● ● | Stretchable clothing (containing less than 5 %) If the item contains more then 5 % polyurethane (ex. Swimwear), check the care label. | |||
| Polyester | ● | ● | ● | ● | Outdoor wear, sports wear, T-shirts, shirts, blouses |
=Possible/×=Checkcare label
Before you start
Fabric care chart
The following table contains some of the symbols that may help you choose appropriate items for AIRDRESSER. The use of symbols ensures consistency among garment manufacturers of domestic and imported items.
Follow care label directions to maximize garment life and reduce laundering problems.
NOTE
- : Some clothing that does not recommend washing (such as fur or leather fabrics) can be used with AIRDRESSER. Please refer to the fabric care guide.
**: Use the rack for items with this symbol on the fabric care label.
Washing
| Symbol Meaning Use with AIRDRESSER | ||
| 95 | 95 °C boil wash. O* | |
| 60 | 60 °C coloured wash. O* | |
| 60 | 60 °C coloured wash. ("Easy care" coloured wash) O* | |
| 40 | 40 °C coloured wash. O | |
| 40 | 40 °C mild wash. O | |
| 40 | 40 °C very mild wash. O | |
| 30 | 30 °C fine wash. O | |
| 30 | 30 °C mild fine wash. O | |
| 30 | 30 °C very mild fine wash. O | |
| Hand wash. O | ||
| Do not wash. O* | ||
NOTE
The numbers in the wash tub specify the maximum washing temperatures in degrees Celsius which must not be exceeded.
English22
Drying
| Symbol Meaning Use with AIRDRESSER | ||
| Tumble drying / Drying at a temperature of 80 °C with a normal drying process. | 0 | |
| Tumble drying / Drying at a temperature of 60 °C with a mild drying process. | 0 | |
| Do not tumble dry O* | ||
| Line drying. O | ||
| Drip line drying. O | ||
| Flat drying. O** | ||
| Drip flat drying. O** | ||
| Line drying in the shade. O | ||
| Drip line drying in the shade. O | ||
| Flat drying in the shade. O** | ||
| Drip flat drying in the shade. O** | ||
u#6e

NOTE
- The dots indicate the drying level of the dryer.
- The lines indicate the type and place of the drying.
Before you start
Ironing
| Symbol Meaning Use with AIRDRESSER | |
| Iron at maximum sole plate temperature of 200 °C. O | |
| Iron at maximum sole plate temperature of 150 °C. O | |
| Iron at maximum sole plate temperature of 110 °C. Caution when using steam irons (work without steam). | |
| Do not iron. O* |
NOTE
The dots indicate the temperature ranges for ironing (regulator, steam, travel irons and ironing machines).
Professional care
| Symbol Meaning Use with AIRDRESSER | ||
| P | Professional dry-cleaning in perchloroethylene and/or hydrocarbons (heavy benzines) with normal process. | 0 |
| P | Professional dry-cleaning in perchloroethylene and/or hydrocarbons (heavy benzines) with gentle process. | 0 |
| F | Professional dry-cleaning in hydrocarbons (heavy benzines) with normal process. | 0 |
| F | Professional dry-cleaning in hydrocarbons (heavy benzines) with gentle process. | 0 |
| × | Do not dry-clean. 0 | |
| W | Professional wet-cleaning. 0 | |
| W | Mild professional wet-cleaning. 0* | |
| W | Very mild professional wet-cleaning. 0* | |
| × | Do not wet-clean. 0* | |
NOTE
The letters in a circle indicate the solvents (P, F) used in dry cleaning or wet cleaning (W).
Generally, the line under the symbol indicates a milder treatment (e.g. gentle cycle for easy-care items). The double line indicates care levels with particularly gentle treatment.
English24
Smart control
Wi-Fi connection
- Recommended encryption methods are WPA/TKIP and WPA2/AES. Newly developed Wi-Fi protocols or unapproved Wi-Fi protocols are not supported.
- The reception sensitivity of a wireless network may be affected by surrounding wireless environments.
- If your Internet provider has registered the MAC address of your PC or the modem module for permanent use, your Samsung AIRDRESSER may fail to connect to the Internet. If this is the case, contact your Internet provider
- The Internet firewall may interrupt your Internet connection. If this happens, contact your Internet provider.
If Internet failure continues after following the measurement of your Internet provider, contact a local Samsung retailer or service centre.
Downloading the app
On an app market (Google Play Store, Apple App Store, Samsung Galaxy Apps), search for the SmartThings app, and then download and install the app on your device.
NOTE
-
SmartThings may not be compatible on some tablets or smartphones.
-
The recommended Android OS is 6.0 or higher (with minimum 2 GB or RAM).
The supported display resolutions for Android are 1280 x 720 (HD), 1920 x 1080 (FHD), 2560 x 1440 (WQHD).
The recommended iOS is 10.0 or higher (iPhones must be iPhone 6 or higher).
The supported display resolutions for apple devices are 1334 X 750, 1920 x 1080.
- The app is subject to change without notice for improved performance.
Log in
You must first log into SmartThings with your Samsung account. To create a new Samsung account, follow the instructions on the app. You don't need a separate app to create your account.
NOTE
If you have a Samsung account, use the account to log in. A registered Samsung smartphone user automatically logs in.
Registering your appliance to SmartThings
- Make sure your smartphone is connected to a wireless network. If not, go to Settings, turn on the wireless connection, and then select an AP (Access Point).
- Open SmartThings on your smartphone.
- If a message of "A new device is found," select Add.
- If no message appears, select + and select your appliance in a list of devices available. If your appliance is not listed, select Device Type > Specific Device Model, and then add your appliance manually.
- Follow the onscreen instructions to complete registration.
Before you start
SmartThings overview
| Category Function Description | ||
| Monitoring | Cycle Status | You can check the current cycle and options, and the remaining cycle time. |
| Smart Control | The Smart Control status is shown for AIRDRESSER. | |
| Energy Monitoring | You can monitor the energy consumption status. | |
| Control Start / Pause / Cancel | Select a cycle and necessary options, and then select Start / Pause / Cancel to start an operation, to stop temporarily, or to cancel the current operation. | |
| Notification Cycle Completed | Notifies you the current cycle is complete. | |
| AIRDRESSER functions | Care Recipe | Select the fabric type and options and get recommendations for the most suitable cycle. |
| My Closet | By inputting clothing information (such as fabric material), you can add your clothes to the app and get recommended cycles and a care history. | |
| Special Cycle Management | You can save up to 9 cycles and you can delete or change the order of the cycles. | |
| HomeCare Manager | Get advice to help you keep your AIRDRESSER in perfect condition. Check your cycle usage patterns, energy consumption, and get alerts for product maintenance. | |
English26
Open Source Announcement
The software included in this product contains open source software. You may obtain the complete corresponding source code for a period of three years after the last shipment of this product by sending an email to mailto:oss.request@samsung.com.
It is also possible to obtain the complete corresponding source code in a physical medium such as a CD-ROM; a minimal charge will be required.
The following URL http://opensource.samsung.com/opensource/SMART_AT_051/seq/0 leads to the download page of the source code made available and open source license information as related to this product. This offer is valid to anyone in receipt of this information.

NOTE
Hereby, Samsung declares that this radio equipment is in compliance with Directive 2014/53/EU and with the relevant statutory requirements in the UK. The full text of the EU declaration of conformity and the UK declaration of conformity is available at the following internet address: The official Declaration of conformity may be found at http://www.samsung.com, go to Support > Support Home and enter the model name.
Wi-Fi max transmitter power: 20 dBm at 2.412 GHz - 2.472 GHz
Product and accessory use
Using a cycle
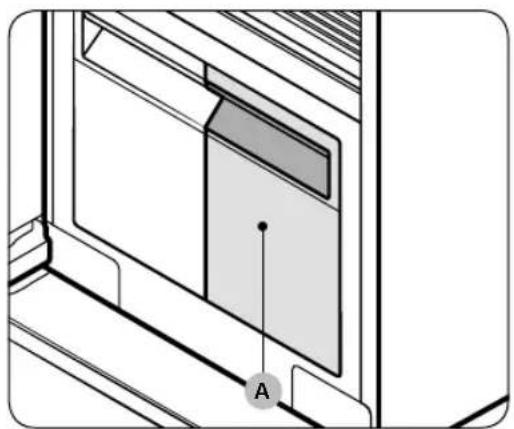
- Make sure the Refill Tank (A) is filled with water.
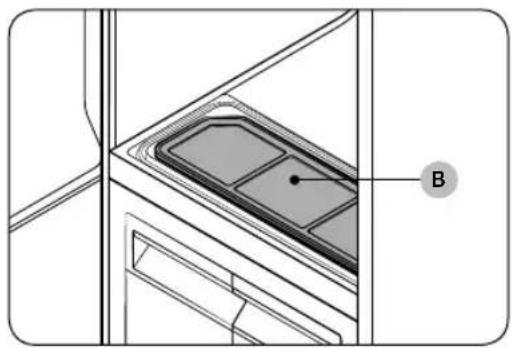
- Make sure the lint filter (B) is clean.
- Input clothes as instructed in the Using the accessories section.
- Tap ()
-
Select a cycle.
-
Tap Clothing Care or Drying, and then tap < or to select the desired cycle.
-
Select options if necessary.
-Sanitize, Keep Fresh, Delay end.
- Tap and hold 3 seconds.
Usage guidelines
Before use
- This product cannot be used to clean items. For best results, wash and dry all items before using the product.
- Before using the product, we recommend washing items with strong odours or items that have been stored for a long time.
- Separate items by odour strength.
- Check all clothing or item labels before using the product.
- Before placing the clothing into the product, make sure to empty all pockets.
- Do not use the product as a storage closet.
- The product may not remove pet hair.
During use
- Make sure items are not touching the bottom of the product. If necessary, use the shelf to stop items that are hung from touching the bottom of the product.
English28
- Hissing noises may occur during a steam process.
- If you need to stop a cycle before it will finish, make sure to run the Drying cycle.
- Operating time depends on the environment and type of items.
- If used consecutively, the product may display a different operating time than what will occur.
- Do not open the door while the product is operating.
After use
- The amount of wrinkles removed may vary depending on the fabric type.
- Remove items immediately after a cycle has finished. If you cannot remove items immediately, use Delay end or Keep Fresh.
- When removing items, hold both the items and the hanger.
Using the accessories
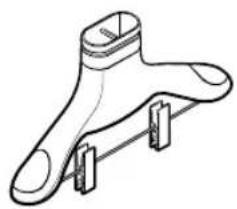
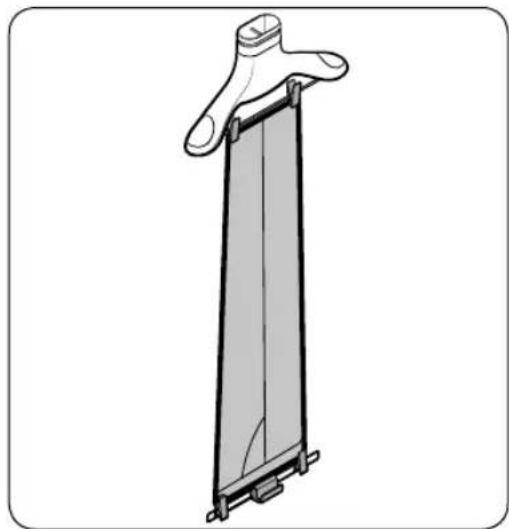
Air hangers
Use the provided Air hangers for items such as jackets, sportscoats, and blazers.

NOTE
- Make sure the interior and exterior of the hangers are clean and free of foreign matter.
- Do not use hangers for knits, wools, lingerie.
- The maximum lengths of items must be 110cm for tops and 100cm for bottoms.
Depending on the type or size of the fabric, unwanted wrinkles may form on the neck of your clothing.
To use the Air hangers
- Hang items on hangers in the same direction.
To prevent items from falling off the hangers, make sure to button all buttons and zip all zippers.
-Make sure all items are hung flatly. Make sure the hanger clips do not protrude outward.
- Slide the hangers into the air holes until you hear a clicking sound.
-Make sure hangers are facing the same direction.
-If the Air hangers are not properly inserted into the air hole, vibrations and noises may occur.
NOTE
For best results, avoid hanging longer items from the middle hole.
Product and accessory use
Regular hanger kit (applicable models only)
You can use the regular hanger kit to use regular hangers to hang your items. However, for best results, we recommend using the Air hangers.
NOTE
- Use hangers that will not be deformed by heat.
- Make sure the interior and exterior of the hangers are clean and free of foreign matter.
- Do not use plastic/silicone/wooden hanger and hangers with adhesive.
- Do not use hangers from laundry that may become rusty.
To use the regular hanger kit
- Hang items on hangers in the same direction.
-To prevent items from falling off the hangers, make sure to button all buttons and zip all zippers.
-Make sure all items are hung flatly. Make sure the hanger clips do not protrude outward.
- Slide the regular-hanger kit into the air holes until you hear a clicking sound, and then hang the hangers on the regular-hanger kit.
Make sure hangers are facing the same direction.
-If the regular-hanger kit is not properly inserted into the air hole, vibrations and noises may occur.
NOTE
For best results, avoid hanging longer items from the middle hole.
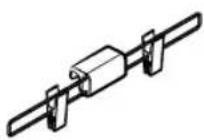
Weight kit (applicable models only)

NOTE
- Make sure the trousers or weight kit does not touch the bottom of the product.
- The maximum length of trousers must be 100cm .
To use the weight kit
- Clip the bottom of the trousers to the Air hanger.
- Clip the other end of the trousers to the weight kit.
- Slide the Air hanger into the air holes until you hear a clicking sound.
NOTE
For sharper creases, spread out the trousers by moving the clips outward.
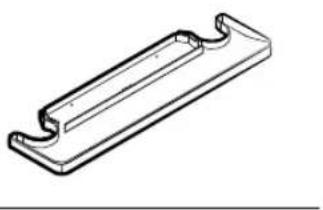
Shelf
Use the provided shelf for items that cannot be used with hangers.

NOTE
- Only place clothes or clothing accessories. Do not put heavy items or use the shelf to store any other objects
- Make sure children do not sit or climb on the shelf.
- Make sure items do not hang off the front, back, or sides of the shelf, or hang through the shelf grates.
- Do not stack items on top of other items.
To use the shelf
- On the side walls, press the bottom part of the shelf holders to turn them out.
Product and accessory use
us6u3
- Place the shelf on the shelf holders. Make sure the grooves on the shelf are firmly sitting on the holder.
NOTE
A gap between the sides of shelf and the side walls is normal.
Store the shelf on the door when not in use. Place the shelf on the bottom holder, and then hang it on the top holders.
Refill Tank

NOTE
- Before using the product, make sure there is water in the Refill Tank.
- The product consumes more water the first time the product is used.
It is recommended to use filtered water. - If you are not going to use the product for a long time, empty the Refill Tank.
- A full Refill Tank lasts approximately 4 cycles.
- Fill the Refill Tank with water only. Putting any other liquids, such as detergent or fabric softener, may cause a problem.
- Do not use the water in the Drain Tank to fill the Refill Tank.

- Pull out the Refill Tank.
English32

- Open the back cover, fill to the MAX line.
- Reinsert the Refill Tank.
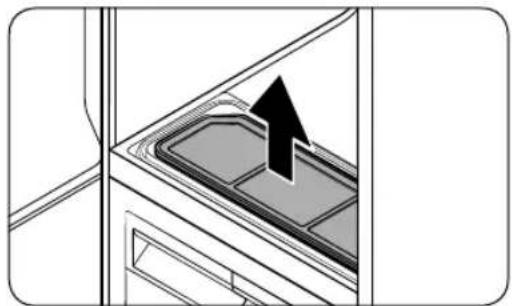
Drain Tank
Before using the product or if you are not going to use the product for a long time, make sure to empty the Drain Tank.
To empty the Drain Tank
- Pull out the Drain Tank.
- Empty the tank.
- Reinsert the Drain Tank.
Product and accessory use
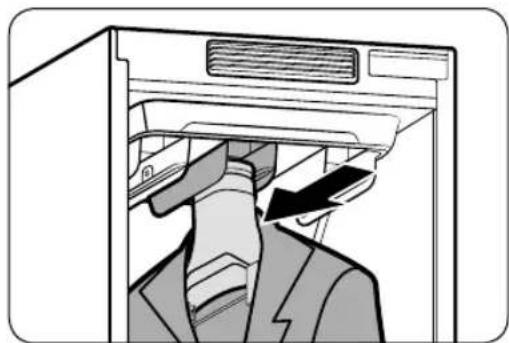
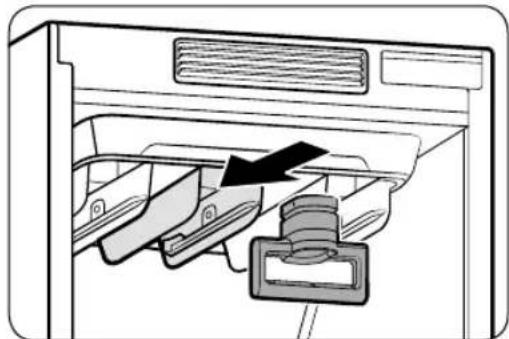
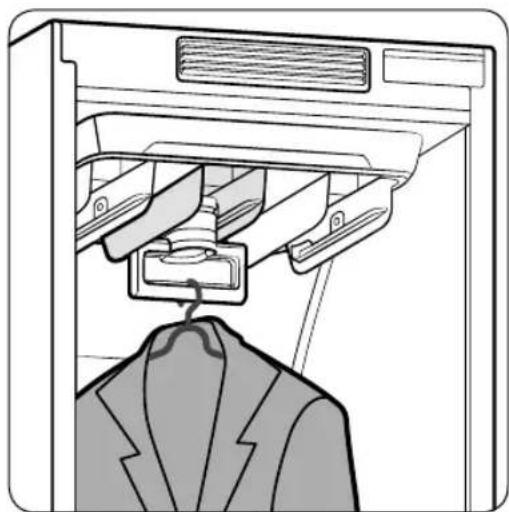
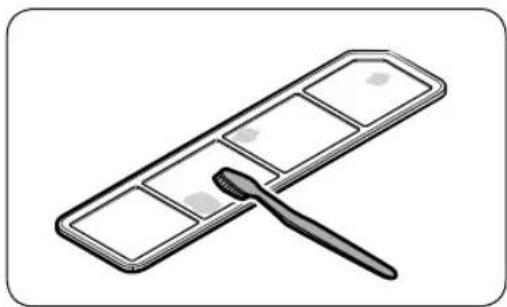
Fresh FinishTM
Use the Fresh Finish™ compartment to give your clothes a laundry fresh smell.
NOTE
- Insert a dryer sheet into the Fresh Finish™ compartment or spray your desired perfume 4-5 times on a cotton pad and insert into the Fresh Finish™ compartment. The strength of the scent diffused will differ depending on what is inserted and the scent may remain inside the AIRDRESSER after the cycle is complete.
- After the cycle is complete, remove the dryer sheet or cotton pad and dispose of it.
How to use Fresh FinishTM
- Slide out the Fresh Finish™ compartment from the inside of the AIRDRESSER.
- Insert a dryer sheet or perfumed cotton pad into the Fresh Finish™ compartment.
- Close the cover until you hear it click into place.
English34
- Insert back into the AIRDRESSER and run chosen cycle.
NOTE
- If you use a dryer sheet or perfumed cotton pad, the scent may remain inside the AIRDRESSER after the cycle is complete.
- Dryer sheets and cotton pads are not provided with the AIRDRESSER.
- The effectiveness of Fresh Finish™ cannot be guaranteed since it depends on what is inserted into the Fresh Finish™ compartment.
Cleaning and maintenance
4s16u3
CAUTION
- Unplug the product before cleaning it.
- Do not use abrasive or flammable cleaners.
- Do not spray water directly onto the product when cleaning it.
Exterior
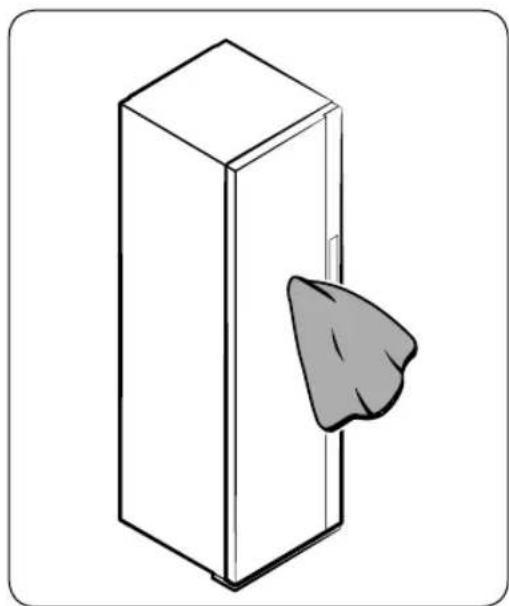
Use a smooth cloth to clean the exterior. For stubborn stains, use a damp cloth and then wipe dry.
English36
Water tanks
Clean both tanks on a regular basis. Completely dry before reinserting.
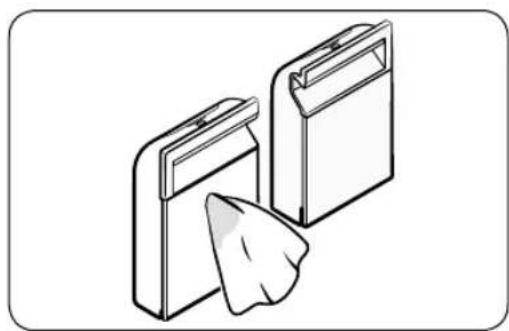
Use a damp cloth to clean the exterior.
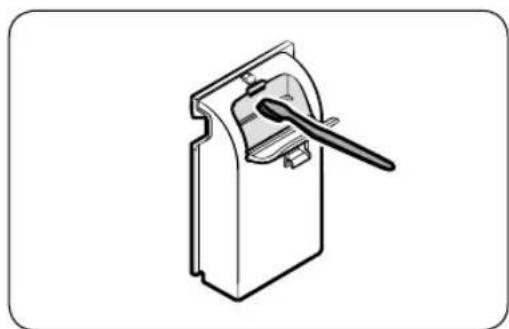
Use a soft brush to clean the interior.
Use a soft brush to clean the tanks' inlet and outlet.
Cleaning and maintenance
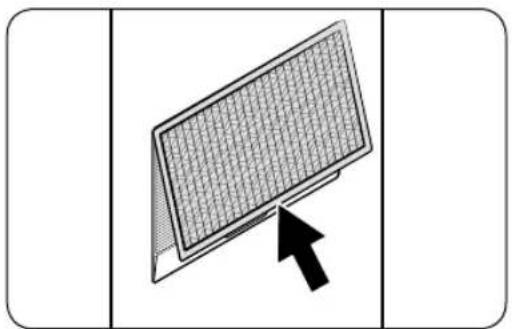
Water tray

NOTE
- Empty the water tray on a regular basis.
- Make sure to reinsert the water tray after emptying the water.

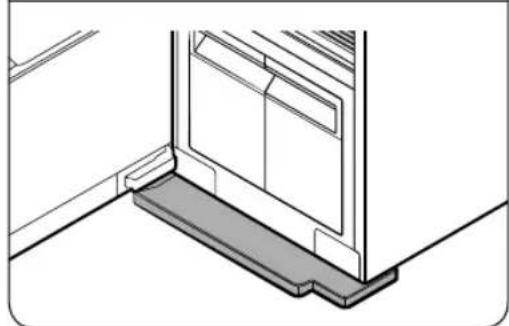
Correctly insert the water tray as shown in the figures.
- Make sure the side with 'TOP' is facing up.
English38
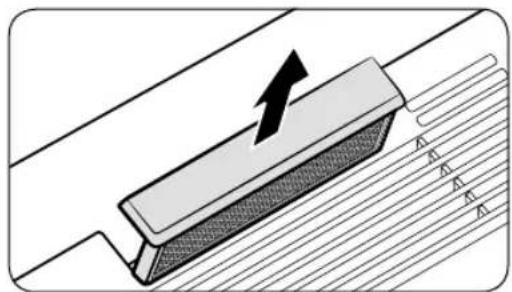
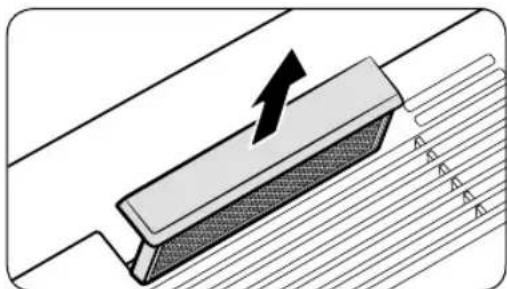
Air filter
If you frequently use the product for heavy items or items that accumulate a large amount of dust, we recommend cleaning the Air Filter frequently.
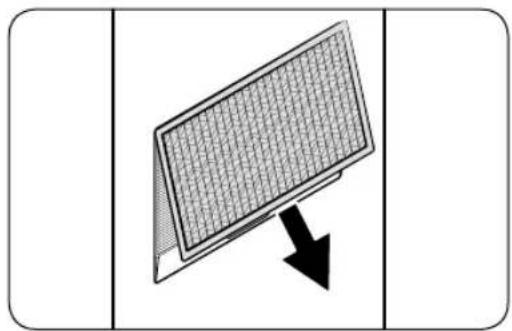
To clean the Air filter
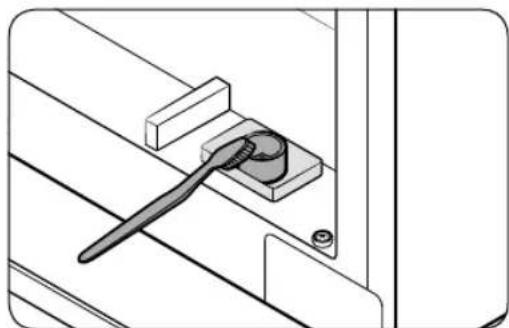
- Hold the bottom of the cover and pull out.
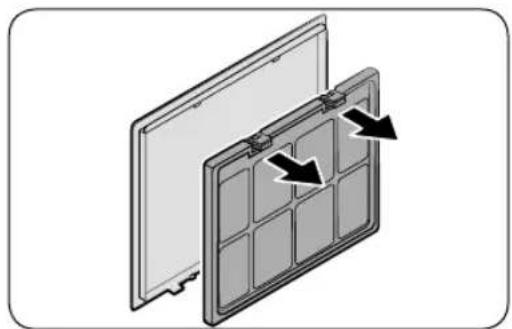
- While pressing the two hooks on the upper part of the filter, pull to remove.
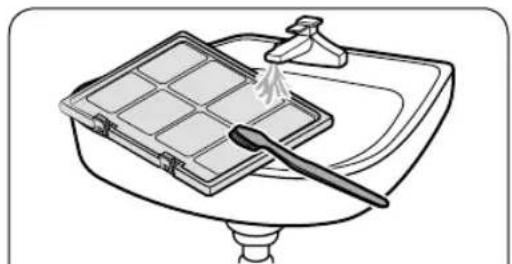
- Use a brush and running water to clean the filter.
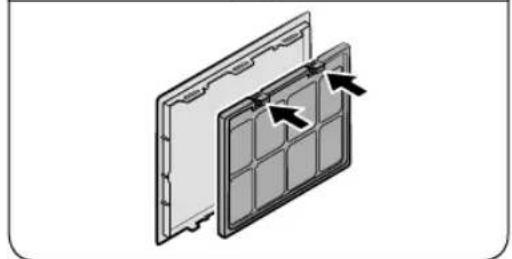
- Completely dry the filter in a shaded area and reinsert the filter.
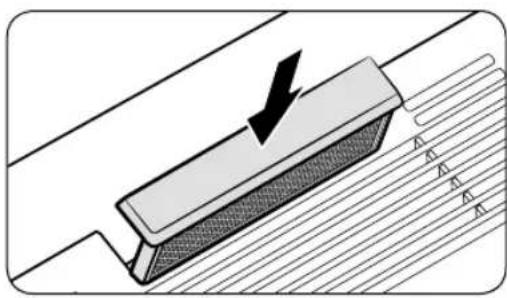
Cleaning and maintenance
4s16u3
- Insert the top of the cover into the product, and then push the cover.
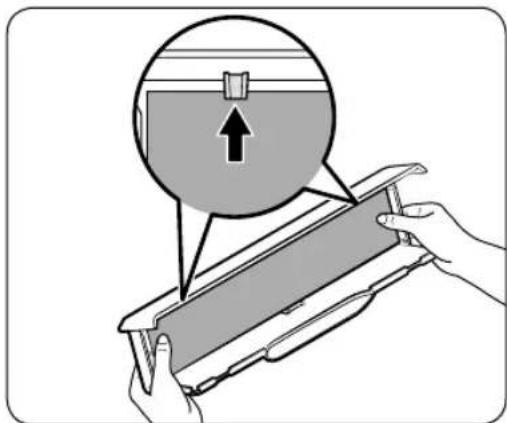
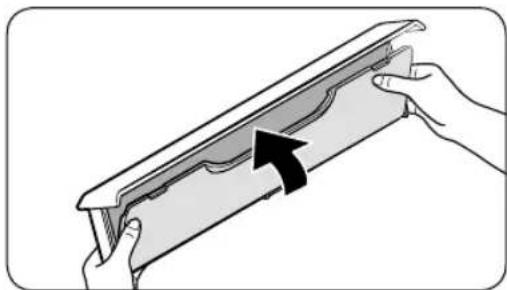
Lint filter
- For best results, clean the lint filter before or after using the product.
- Replace a damaged lint filter with a new lint filter.
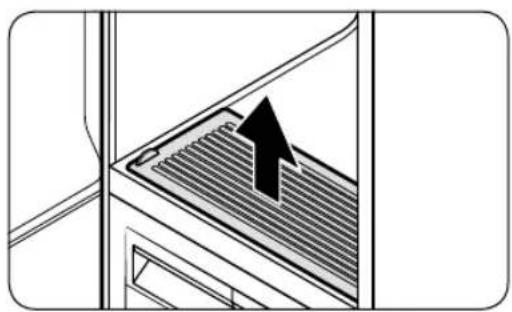
To clean the lint filter
- Open the cover.
- Remove the lint filter.
English40
- Use a brush and running water to clean the lint filter. Completely dry the lint filter in a shaded area.
- Reinsert the lint filter, and then close the cover.
Lamp (Light source)
This product contains a light source of energy efficiency class G
The lamp(s) and/or control gear(s) are not user-serviceable. To replace the lamp(s) and/or control gear(s) in the product, contact a local Samsung service centre. For detailed instructions on replacing lamp(s) or control gear(s) in your product, visit the Samsung website (http://www.samsung.com), go to Support > Support home, and then enter the model name.
For detailed instructions on dismantling lamp(s) and/or control gear(s), simply follow the replacement instruction reached as described above.
Dscaling
Using the steam function causes limestone accumulation and deposition throughout the internal water circulation system due to calcium contents of water. To prevent this, perform descending regularly to increase the performance and lengthen the lifespan of the product. If you do not perform descending immediately after getting the notification message, some functions may be restricted for use and may cause performance decrease or even shortens the lifespan of the product.
- When the Descaling Required. Check the manual message appears on the display, remove all items from the product and then tap and hold Drying and Delay End for 3 seconds.
- Empty the Refill Tank and the Drain Tank.
- Dilute a descending agent with water as recommended by the manufacturer of a descending agent.
- Fill the Refill Tank with the diluted descaling agent up to the MAX line. -The maximum capacity of the Refill Tank is 1.4 litre.
- Tap and hold start descending.
If the Empty the Drain tank message appears on the display during descaling, empty the Drain Tank.
- When the Check the Refill & Drain tanks message appears on the display, empty both the Refill Tank and the Drain Tank, and then rinse them thoroughly.
- Fill the Refill Tank with clean water up to the MAX line, and then insert the Refill Tank and the Drain Tank. Tap
- When descending is complete, empty the Drain Tank and fill the Refill Tank with water.
- You can use AIRDRESSER once you finish all these steps.
Cleaning and maintenance

NOTE
- Vibration and noise may occur during the descending process; this is normal, and there is no problem with the product.
- You may see the Add water to Refill tank message when you use the product the first time after descaling. This is normal. Fill the Refill Tank with water and tap to resume.
- Bubbles may form if the descending agent is not rinsed thoroughly. Make sure to rinse the Refill Tank and the Drain Tank thoroughly after descending.
- Use a descending agent dedicated for coffee machines.
- Do not use a descending agent for other machines such as washing machine.
- Do not use laundry detergent or fabric softener for descending.
Moving the product to another location
- There are two wheels underneath the product to assist moving it.
- To prevent the product from tipping over when moving the product, we recommend pushing the middle of the product. Do not push the top or the bottom.
- Empty the Refill Tank and the Drain Tank before moving the product to another location. If the tanks are not emptied, water can spill while moving the product.
English42
Troubleshooting
Notification messages
| Message Action | |
| Add water to Refill tank | ·Check if the Refill Tank has enough water. ·Fill the water up to the MAX line, reinsert the Refill Tank, and then tap □start. ·Check if the Refill Tank is properly inserted. ·Properly insert the Refill Tank, and then tap □start. |
| Empty the Drain tank | ·Check if the Drain Tank is full. ·Empty the Drain Tank, reinsert the Drain Tank, and then tap □to start. ·Check if the Drain Tank is properly inserted. ·Properly insert the Drain Tank, and then tap □start. |
| Close door & start again | ·Check if the door is open. ·Make sure the door is closed, and then tap □start. |
| Open the door & check inside | ·Check if the door is open and if Child Lock □on ·Make sure the door is closed, and then tap □to start. Make sure children or pets are not in the product. ·The control panel is locked when Child Lock is on. ·Tap and hold Delay End for 3 seconds to turn off the Child Lock. |
| Connect to Wi-Fi network or check your router | ·Check if the router is off. ·Turn the router on, and then connect to the Internet. |
NOTE
If a problem persists, contact a local Samsung service centre.
Troubleshooting
Checkpoint
| Problem Action | |
| The product does not turn on. | • Tap ⑥turn the product on. • Make sure the power cord is properly plugged in. • Make sure the circuit breaker is on. • Make sure the power cord is plugged into a power outlet rated for this product. |
| The product does not operate. | • Make sure the door is closed, and then tap ⑦ • If you hear water flowing or boiling sounds, the product is preparing for a steam process. This is normal. • Make sure Child Lock is off. • The product may not operate if you have used any liquid other than water. Please contact a Samsung service centre. |
| The product makes sounds. | • The product may generate sounds when the compressor operates. This is normal. • The product may generate sounds when it circulates air. This is normal. • The product may generate sounds before and during a steam process. This is normal. • The product may generate sounds to pump out and drain the water. This is normal. • When opening the door, sounds may come from the Refill Tank when the water is flowing through the pipe. This is normal. • If noises become louder, contact a Samsung service centre. |
| The control panel does not work. | • After plugging in the product, wait for a moment and try again. The control panel will respond 10 seconds after the power cord has been plugged in. • Clean the control panel and try again. If the problem continues, contact a Samsung service centre. |
| The product vibrates. | • Make sure the product is installed on a solid, level surface. • Make sure the product is level. |
| The Refill Tank is empty after one use. | • The product consumes more water the first time the product is used. This is normal. |
| Steam or air is coming out from the door. | • Make sure there are no items caught in the door. • Make sure the door is properly closed. |
| Operation time continues to increase. | • Wet items may take longer to dry. Operation time can increase depending on the quantity and moisture level of the items. |
English44
| Problem Action | |
| Items are wet after a cycle. | ·Make sure the lint filter is clean and properly inserted. ·Make sure the door gasket is not damaged or items are not caught on the door. If the door gasket is damaged, unplug the power cord and contact a Samsung service centre. |
| Items are not deodorised. | ·Wash items with strong odours or items that have been stored for a long time. ·Wash items contaminated by oils. ·Large items such as down-filled jackets may not be deodorised well. Put large items by themselves and run an additional cycle if necessary. ·Do not put items with strong odour with other items. Separate items by odour strength. ·Make sure the lint filter and both tanks are clean. |
| Wrinkles are not removed. | ·Iron items that have been stored for a long time. |
| Smoke comes out from the product when the door is opened. | ·Some cycles generate steam that may appear to be smoke. This is normal. |
Specifications
Standby power consumption
| Power consumption | Off mode 0.50 W | |
| Network standby mode 2.00 W | ||
| Time in networked standby mode (WI-Fl) | 10 min | |
Specification sheet
** Asterisk(s) means variant model and can be varied (0-9) or (A-Z).
| Type | Clothing Care System (AIRDRESSER) | |
| DF60A8****G | ||
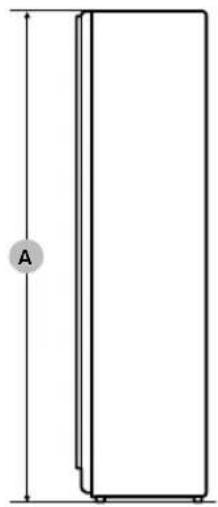
| Dimensions(mm) | A. Height 1850 | |
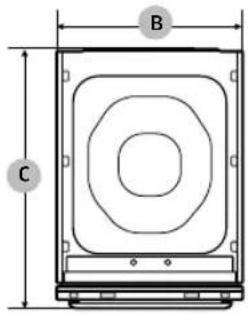
| B. Width 445 | ||
| C. Depth 632 | ||
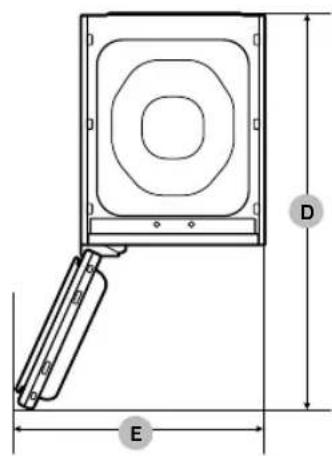
| D. Depth with door open 100 | ||
| E. Width with door open 618 | ||
| Rated power | 220-240 V / 50 Hz1700-2000 W | |
| Fuse (Fixed fuse in main PBA) | Tube type | 250 V/12 A |
| High breaking capacity type | ||
| Weight (kg) 85.0 | ||
English46
Memo
QUESTIONS OR COMMENTS?
| COUNTRY CALL | OR VISIT US ONLINE AT | |
| SWITZERLAND 0800 | 726 786 | www.samsung.com/ch/support (German) www.samsung.com/ch_fr/support (French) |
-Kaltemittel (Typ): R-134a (GWP = 1430)
Compartment Fresh FinishTM
Come usare Fresh FinishTM