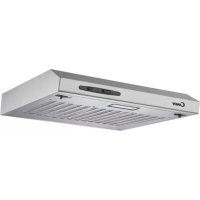
CFT6105X1 - Range hood CANDY - Free user manual and instructions
Find the device manual for free CFT6105X1 CANDY in PDF.

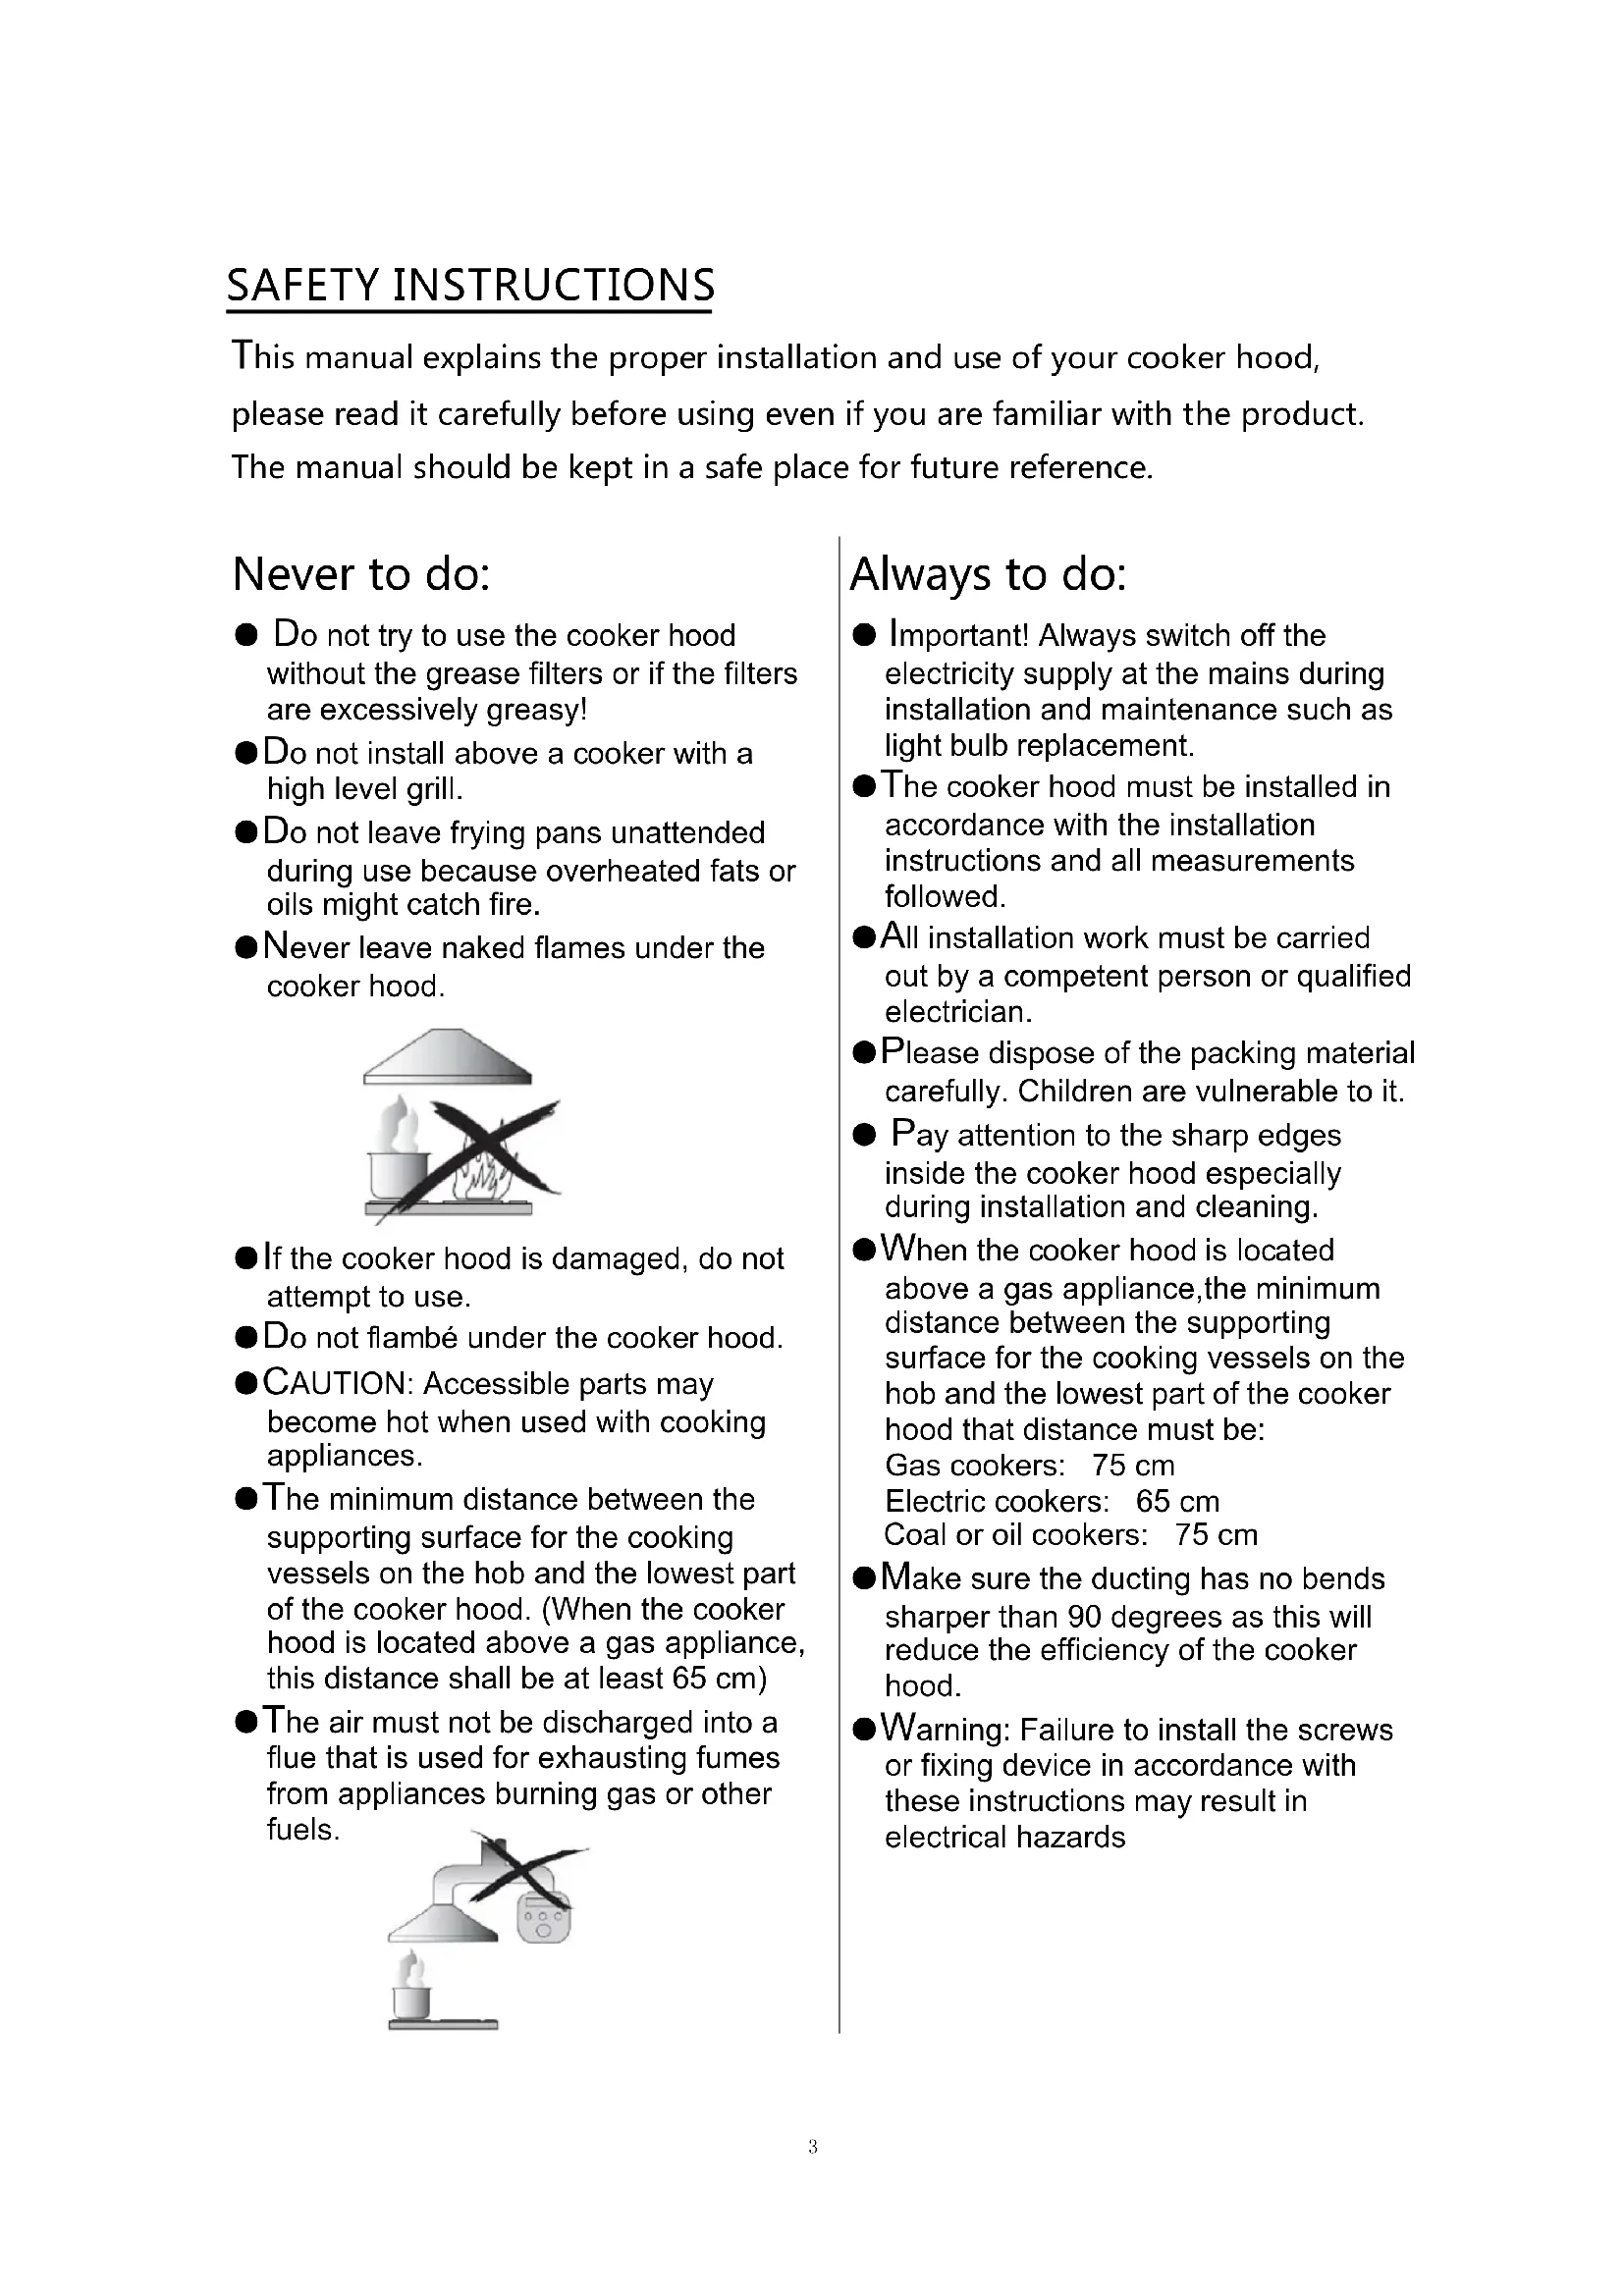


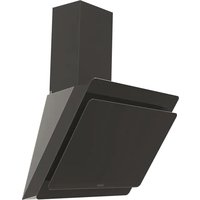
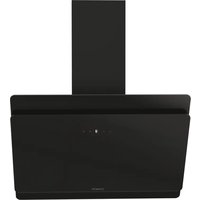
| Product type | Extractor hood |
| Brand | Candy |
| Model | CFT6105X1 |
| Width | 60 cm |
| Power supply | 220-240 V ~ 50 Hz |
| Number of motor speeds | 3 (low, medium, high) |
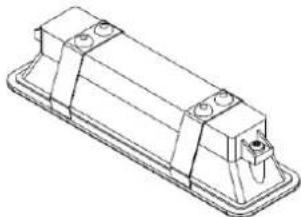
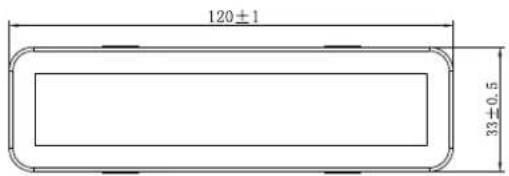
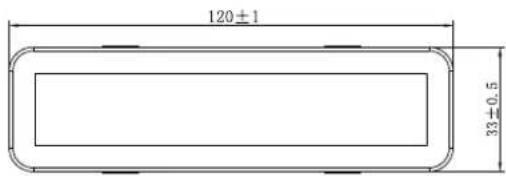
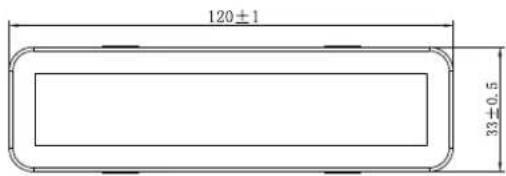
| Lighting | 1 rectangular LED module 2 W (code DBS-2/65-H-120/33) |
| Filter type | Metal grease filters (washable) + activated charcoal filter (optional) |
| Minimum safety distance (gas) | 75 cm |
| Minimum safety distance (electric) | 65 cm |
| Installation mode | Wall-mounted or under cabinet |
| Evacuation mode | Extraction to outside or recirculation (with charcoal filter) |
| Material | Stainless steel |
| Grease filter maintenance | Monthly hand wash with mild detergent |
| Charcoal filter replacement | Every 3 to 6 months depending on usage |
| Child safety | Use under supervision for children under 8 years |
| Environmental protection | Recycling at end of life according to directive 2012/19/EU |
Frequently Asked Questions - CFT6105X1 CANDY
User questions about CFT6105X1 CANDY
0 question about this device. Answer the ones you know or ask your own.
Ask a new question about this device
Download the instructions for your Range hood in PDF format for free! Find your manual CFT6105X1 - CANDY and take your electronic device back in hand. On this page are published all the documents necessary for the use of your device. CFT6105X1 by CANDY.
USER MANUAL CFT6105X1 CANDY
ENGLISH(EN)----PAGE 001
BULGARIAN (BG)----PAGE 012
CZECH (CS)----PAGE 023
GERMAN (DE)----PAGE 034
SPANISH (ES)----PAGE 045
FRENCH (FR)----PAGE 056
CROATIAN (HR)----PAGE 067
ITALIAN (IT)----PAGE 078
DUTCH (NL)----PAGE 089
ROMANIAN (RO)----PAGE 100
SLOVENIAN(SL)----PAGE 111
SLOVENSKY(SK)----PAGE 122
SRPSKI (SR)----PAGE 133
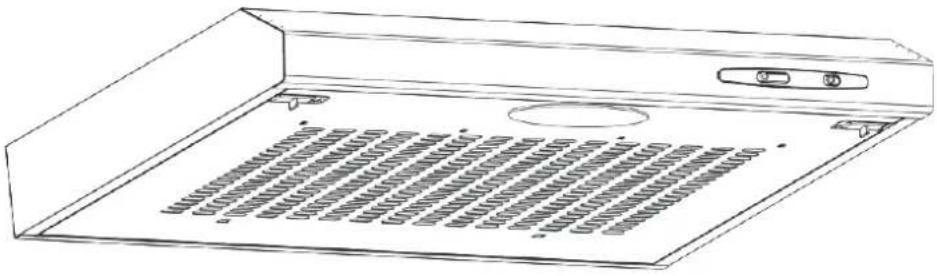
Cooker Hood Instruction Manual
Content
1....Safety instructions
2....Installation
3....Start using your cooker hood
4....Troubleshooting
5....Maintenance and cleaning
6 Environment protection
SAFETY INSTRUCTIONS
This manual explains the proper installation and use of your cooker hood, please read it carefully before using even if you are familiar with the product. The manual should be kept in a safe place for future reference.
Never to do:
- Do not try to use the cooker hood without the grease filters or if the filters are excessively greasy!
- Do not install above a cooker with a high level grill.
● Do not leave frying pans unattended during use because overheated fats or oils might catch fire.
● Never leave naked flames under the cooker hood.

● If the cooker hood is damaged, do not attempt to use.
● Do not flambé under the cooker hood.
● CAUTION: Accessible parts may become hot when used with cooking appliances.
● The minimum distance between the supporting surface for the cooking vessels on the hob and the lowest part of the cooker hood. (When the cooker hood is located above a gas appliance, this distance shall be at least 65 cm)
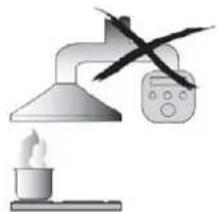
● The air must not be discharged into a flue that is used for exhausting fumes from appliances burning gas or other fuels.
Always to do:
● Important! Always switch off the electricity supply at the mains during installation and maintenance such as light bulb replacement.
● The cooker hood must be installed in accordance with the installation instructions and all measurements followed.
● All installation work must be carried out by a competent person or qualified electrician.
● Please dispose of the packing material carefully. Children are vulnerable to it.
● Pay attention to the sharp edges inside the cooker hood especially during installation and cleaning.
- When the cooker hood is located above a gas appliance, the minimum distance between the supporting surface for the cooking vessels on the hob and the lowest part of the cooker hood that distance must be:
Gas cookers: 75 cm
Electric cookers: 65 cm
Coal or oil cookers: 75 cm
● Make sure the ducting has no bends sharper than 90 degrees as this will reduce the efficiency of the cooker hood.
●Warning: Failure to install the screws or fixing device in accordance with these instructions may result in electrical hazards
Always to do:
● Always put lids on pots and pans when cooking on a gas cooker.
- When in extraction mode, air in the room is being removed by the cooker hood. Please make sure that proper ventilation measures are being observed. The cooker hood removes odours from room but not steam.
● Cooker hood is for domestic use only.

- If the supply cord is damaged, it must be replaced by the manufacturer, its service agent or similarly qualified persons in order to avoid a hazard.
● This appliance can be used by children aged from 8 years and above and persons with reduced physical, sensory or mental capabilities or lack of experience and knowledge if they have been given supervision or instruction concerning use of the appliance in a safe way and understand the hazards involved. Children shall not play with the appliance. Cleaning and user maintenance shall not be made by children without supervision.

● Warning: Before obtaining access to terminals, all supply circuits must be disconnected.
Always to do:
● Caution: The appliance and its accessible parts can become hot during operation. Be careful to avoid touching the heating elements. Children younger than 8 years old should stay away unless they are under permanent supervision.
● There shall be adequate ventilation of the room when the cooker hood is used at the same time as appliances burning gas or other fuels.
● There is a fire risk if cleaning is not carried out in accordance with the instructions
● Regulations concerning the discharge of air have to be fulfilled.
● Clean your appliance periodically by following the method given in the chapter MAINTENANCE.
● For safety reason, please use only the same size of fixing or mounting screw which are recommended in this instruction manual.
● Regarding the details about the method and frequency of cleaning, please refer to maintenance and cleaning section in the instruction manual.
● Cleaning and user maintenance shall not be made by children without supervision.
- When the cooker hood and appliances supplied with energy other than electricity are simultaneously in operation, the negative pressure in the room must not exceed 4 Pa (4 x 10⁻⁵ bar).
● WARNING: Danger of fire: do not store items on the cooking surfaces.
●A steam cleaner is not to be used.
● NEVER try to extinguish a fire with water, but switch off the appliance and then cover flame e.g. with a lid or a fire blanket.
INSTALLATION
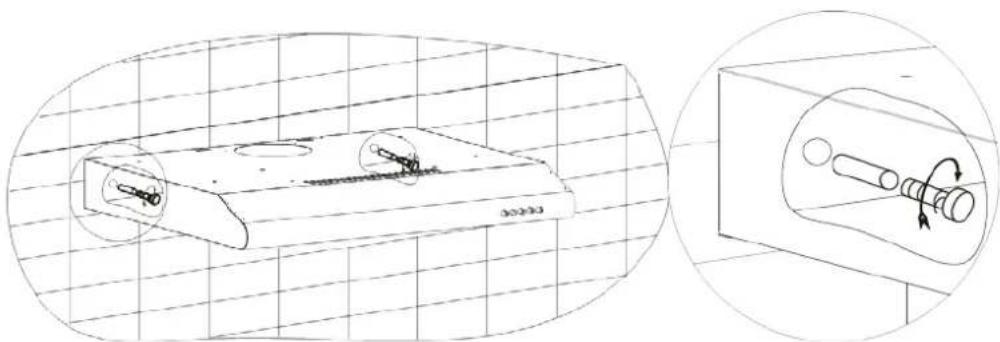
A. INSTALLATION (Wall Mounting)
(1) Decide the location of the holes for fixing the cooker hood.
(2) Mount the cooker hood on the wall by 4 screws (4x 30mm)
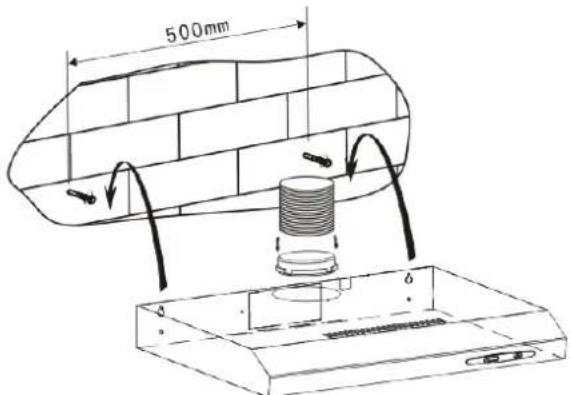
60cm cooker hood
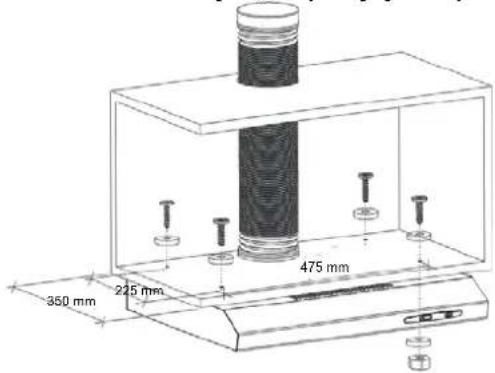
B. INSTALLATION (Cabinet Mounting)
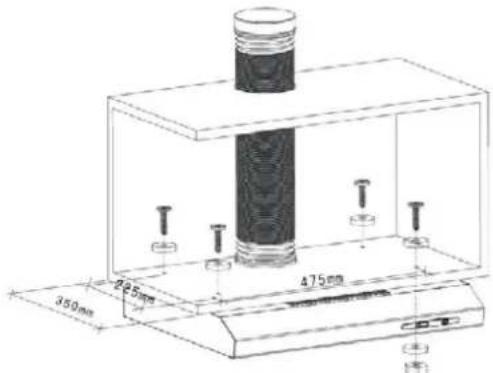
(1) Mount the cooker hood on the cabinet by 4 screws (4x35mm), 4 nuts and flat washers. Fix the hood on the cabinet by passing 4 screws and 4 flat washers from the top of cabinet to the cooker hood. Then inside the cooker hood, pass the flat washer and nut through the screw to hold the appliance on the cabinet.
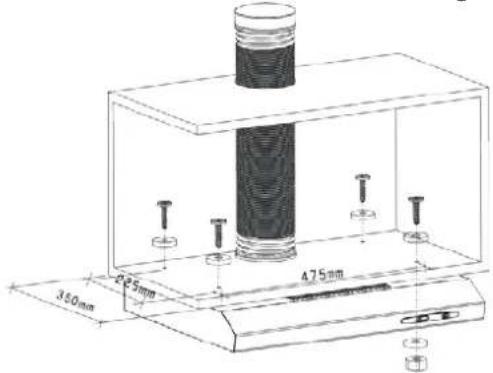
60cm cookerhood
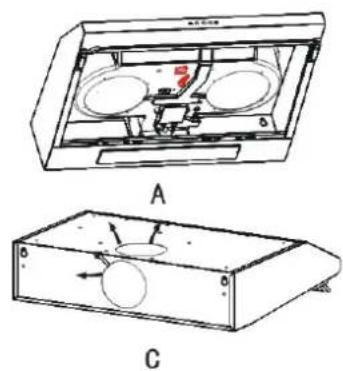
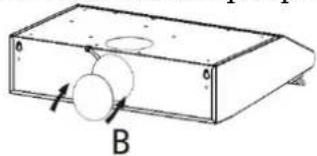
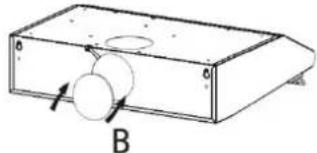
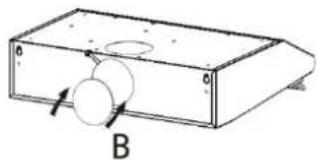
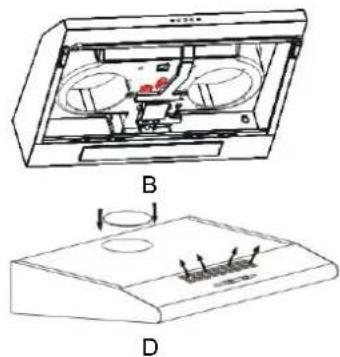
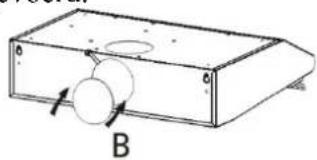
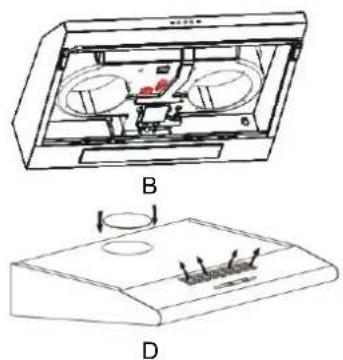
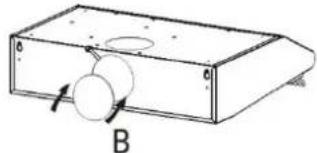
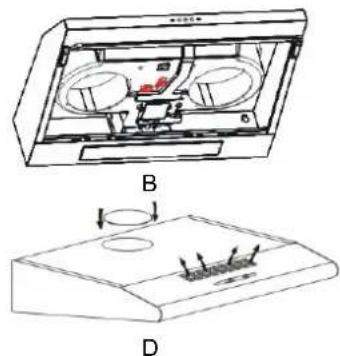
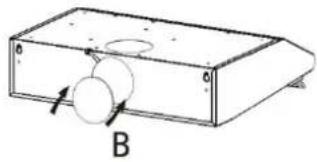
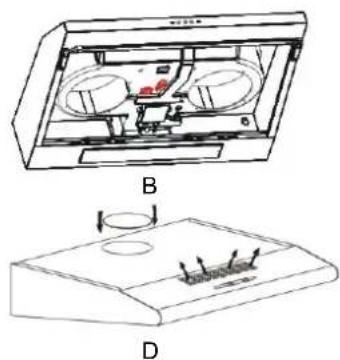
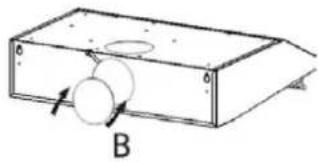
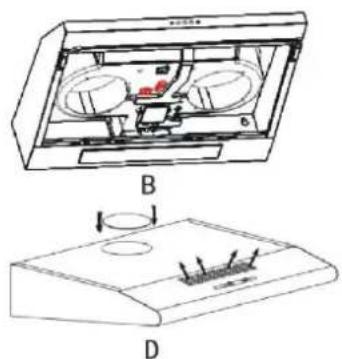
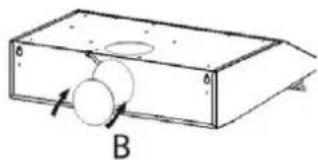
Noise: There are 2 methods for ventilation, including 'horizontal ventilation' and 'vertical ventilation'. Please pay attention to the ventilation method when installation.
Horizontal ventilation: See Pic 4A, please use the cover to seal the outlet on the top, then the air can be vented from back.
Vertical ventilation: See Pic 4B, please use the cover to seal the outlet on the back, then the air can be vented from top.
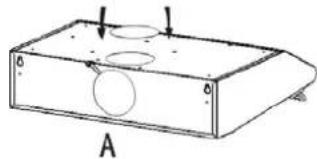
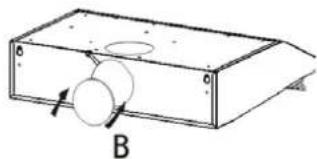
Pic 4
Air ventilation setting
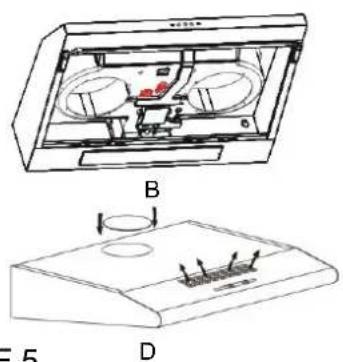
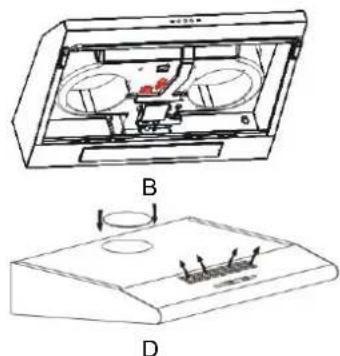
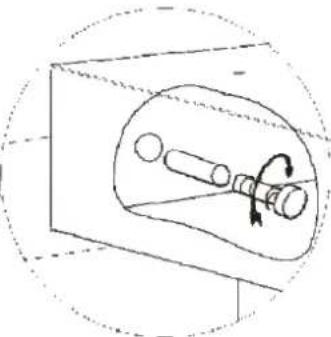
Outdoor air ventilation: Turn the adjuster to outdoor position(pic.5A), install the outlet, turn on the cooker hood, then the air will be vented from the outside outlet.
Indoor air ventilation: Turn the adjuster to indoor position (pic.5B), install the outlet cover, turn on the cooker hood, then the air can be vented from the inside outlet.
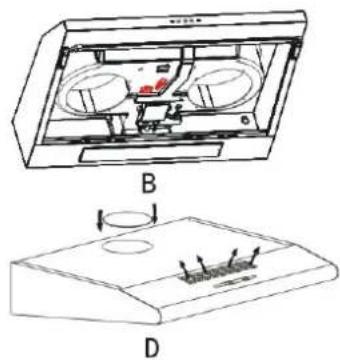
Pic 5
WARNING: | ➢ For safety reason, please use only the same size of fixing or mounting screw which recommended in this instruction manual.➢ Failure to install the screws or fixing device in accordance with these instructions may result in electrical hazards. |
Start Using Your Cooker Hood
Toggle switch
There are 3 speeds for the motor and on off switch for the lamp.
Slide the switch for operation.
Motor Operation
0- off
1- Low Power Setting
2- Mid Power Setting
3- High Power Setting
Light Operation
0- Off
1- On
3210


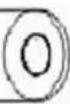
10
TROUBLESHOOTING
| Fault | Possible Cause | Solution |
| Light on, but motor does not work | Fan switch turned off | Select a fan switch position. |
| Fan switch failed | Contact service center. | |
| Motor failed Contact service center. | ||
| Light does not work, motor does not work | House fuses blown | Reset/Replace fuses. |
| Power cord loose or disconnected | Refit cord to power outlet.Switch power outlet on. | |
| Oil leakage | One way valve and the outlet are not tightly sealed | Take down the one way valve and seal with sealant. |
| Leakage from the connection of chimney and cover | Take chimney down and seal. | |
| Lights not working | Broken/Faulty globes | Replace globes as per this instruction. |
| Insufficient suction | The distance between the cooker hood and the gas top is too far | Refit the cooker hood to the correct distance. |
| The Cooker hood inclines | The fixing screw not tight enough | Tighten the hanging screw and make it horizontal. |
NOTE:

Any electrical repairs to this appliance must conform to your local, state and federal laws. Please contact the service centre if in any doubt before
undertaking any of the above. Always disconnect the unit from the power source when opening the unit.
MAINTENANCE AND CLEANING
Caution:
- Before maintenance or cleaning is carried out, the cooker hood should be disconnected from the main power supply. Ensure that the cooker hood is switched off at the wall socket and the plug removed.
- External surfaces are susceptible to scratches and abrasions, so please follow the cleaning instructions to ensure the best possible result is achieved without damage.
GENERAL
Cleaning and maintenance should be carried out with the appliance cold especially when cleaning. Avoid leaving alkaline or acid substances (lemon juice, vinegar etc.) on the surfaces.
STAINLESS STEEL
The stainless steel must be cleaned regularly (e.g. weekly) to ensure long life expectancy. Dry with a clean soft cloth. A specialized stainless steel cleaning fluid may be used.
NOTE:
Ensure that wiping is done along with the grain of the stainless steel to prevent any unsightly crisscross scratching patterns from appearing.
CONTROL PANEL SURFACE
The inlay control panel can be cleaned using warm soapy water. Ensure the cloth is clean and well wrung before cleaning. Use a dry soft cloth to remove any excess moisture left after cleaning.
Important
Using neutral detergents and avoid using harsh cleaning chemicals, strong household detergents or products containing abrasives, as this will affect the appliance appearance and potentially remove any printing of artwork on the control panel and will void manufactures warrantee.
GREASE MESH FILTERS
The filters can be cleaned by hand. Soak them for about 3 minute in water with a grease-loosening detergent then brush it gently with a soft brush. Please do not apply too much pressure, avoid to damage it . (Leave to dry naturally out of direct sun light)
Filters should be washed separately to crockery and kitchen utensils. it is advisable not to use rinse aid.
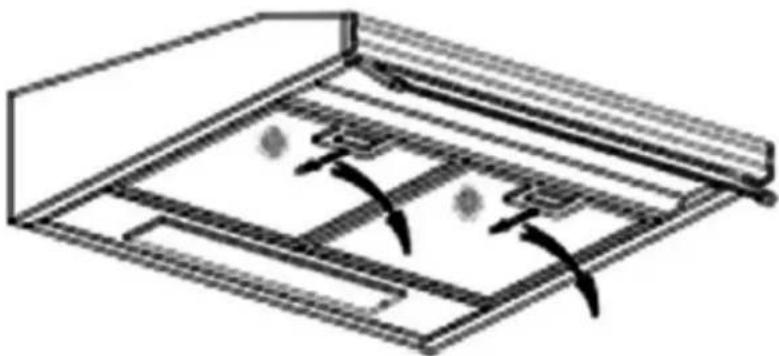
- Removing the filters as the instruction in Pic.below.
- Please do not use abrasive detergent for it will damage the hood.
INSTALLING GREASE MESH FILTERS
• To install filters for the following four steps.
- Angle the filter into slots at the back of the hood.
- Push the button on handle of the filter.
- Release the handle once the filter fits into a resting position.
- Repeat to install all filters.
CARBON FILTER
Activated carbon filter can be used to trap odors. Normally the activated carbon filter should be changed at three or six months according to your cooking habit. The installation procedure of activated carbon filter is as below.
- Remove the grease filter.
- Place the carbon filter onto the grease filter.
- Fix the properly-adjusted carbon filter with the small steel wire.
- Reinstall the grease filter.
- Use carbon filters for recirculation mode only.
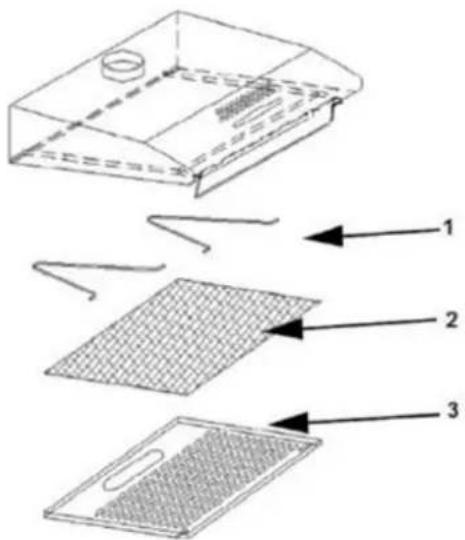
1 Steel hanger
2 Carbon filter
3 Grease filter
NOTE:
- Make sure the filter is securely locked. Otherwise, it would loosen and cause dangerous.
- When activated carbon filter attached, the suction power will be lowered.
BULB REPLACEMENT
Important :

The bulb must be replaced by the manufacturer, its service agent or similarly qualified persons.
Always switch of f t he electricity s upply before carrying out any operations on the appliance. When handling bulb, make sure it is completely cool down before any direct contact to hands.
When handling globes hold with a cloth or gloves to ensure perspiration does not come in contact with the globe as this can reduce the life of the globe.
Changing the light:
*Before changing the lights, make sure that the appliance is plugged off.
*Use the screw driver loosen the ST4*8MM self tapping screw (2pcs) from the lighting panel, take out the lighting fixture. Open the terminal box that connected with the wire, disconnect the wire connector and replace the lamp.
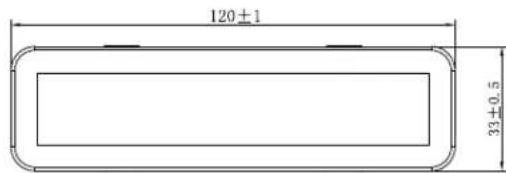
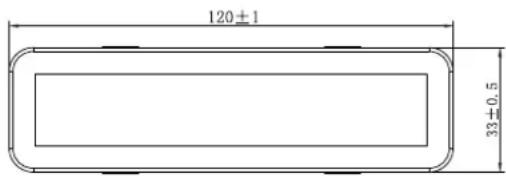
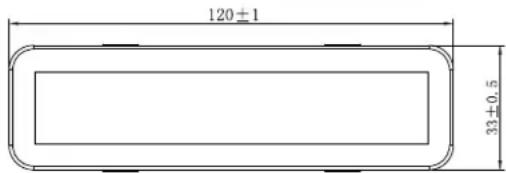
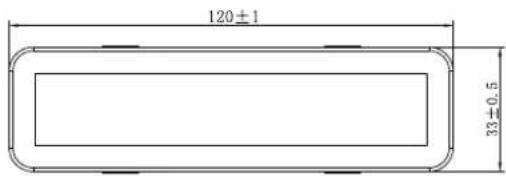
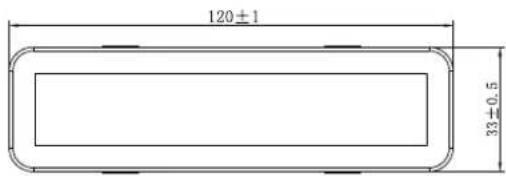
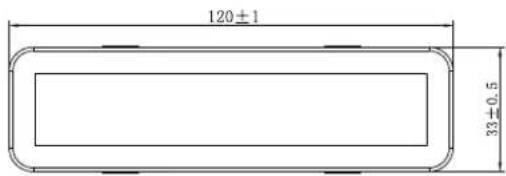
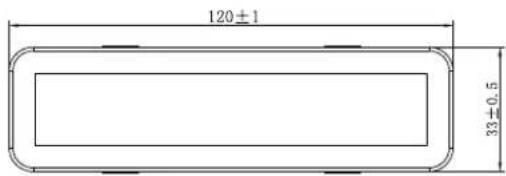
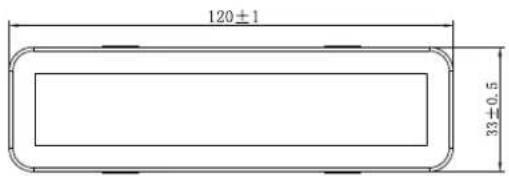
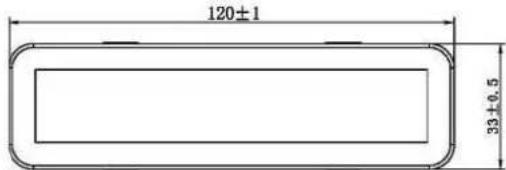
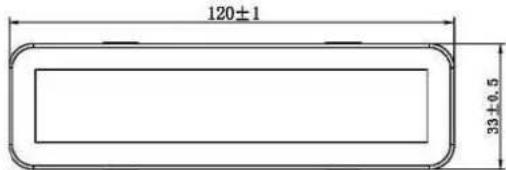
• ILCOS D code for this lamp is: DBS-2/65-H-120/33
- LED modules -rectangle lamp
- Max wattage: 2 W
- Voltage range: AC 110-240V
- Dimensions:
ENVIRONMENTAL PROTECTION:
 | This product is marked with the symbol on the selective sorting of waste electronic equipment. This means that this product must not be disposed of with household waste but must be supported by a system of selective collection in accordance with Directive 2012/19/EU. It will then be recycled or dismantled to minimize impacts on the environment, electrical and electronic products are potentially dangerous for the environment and human health due to the presence of hazardous substances.For more information, please contact your local or regional authorities. |
NOTE:
The following shows how to reduce total environmental impact (e.g. energy use) of the cooking process).
(1) Install the cooker hood in a proper place where there is efficient ventilation.
(2) Clean the cooker hood regularly so as not to block the airway.
(3) Remember to switch off the cooker hood light after cooking.
(4) Remember to switch off the cooker hood after cooking.
INFORMATION FOR DISMANTLING
Do not dismantle the appliance in a way which is not shown in the user manual. The appliance could not be dismantled by user. At the end of life, the appliance should not be disposed of with household waste. Check with you Local Authority or retainer for recycling advice.
А с п и р а т о р
Ръководство синст
рукции
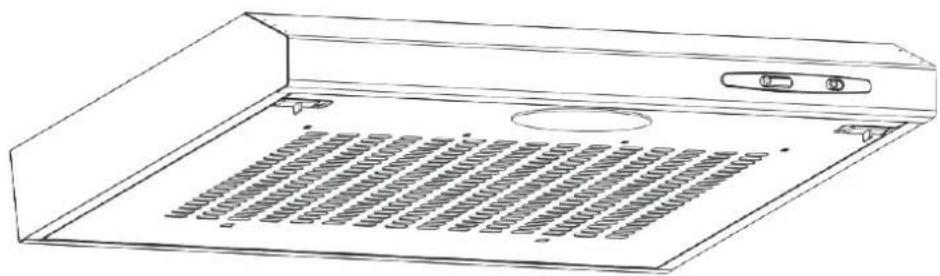
Съдържание
Какво да правите:
ИЗОБРАЖЕНИЕ 4
ИЗОБРАЖЕНИЕ 5
ПРЕДУПРЕЖДЕНИЕ

ПОСТАВЯНЕ НАМРЕЖЕСТИТЕ ФИЛТРИ ЗАМАЗНИНИ
ЗАЩИТА НА ОКОЛНАТА СРЕДА:

Obsah
Co je vždy nutné:
Obr. 4
Nastavení větrání
Obr. 5
VAROVÁNÍ:

INSTALACE MŘÍ KOVÝCH TUKOVÝCH FILTRŮ
1 Ocelová vzpěra
2 Uhlíkový filtr
3 Tukový filtr
POZNÁMKA:
OCHRANA ŽIVOTNÍHO PROSTŘEDÍ
Inhalt
A. INSTALLATION (Wandmontage)
B. INSTALLATION (Gehäusemontage)
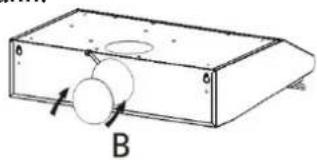
ABB 4.
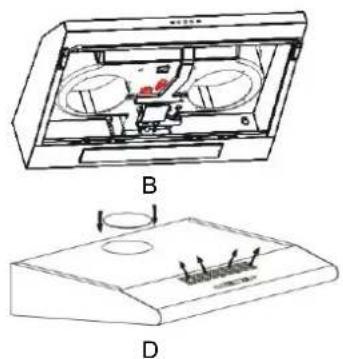
ABB 5.
WARNUNG:

EINSETZEN DER FETTFILTER
1 Befestigungsdraht
2 Kohlefilter
3 Fettfilter
HINWEIS:
UMWELTSCHUTZ:

Índice
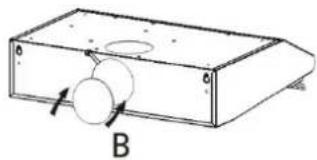
FIG 4
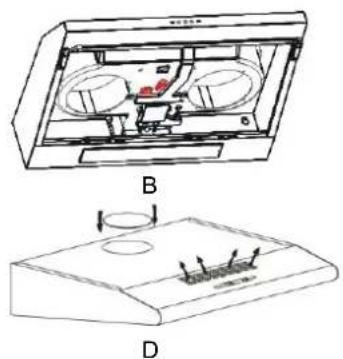
FIG 5
PRECAUCIÓN:

1 Gancho de acero
2 Filtro de carbono
Sommaire
À toujours faire :
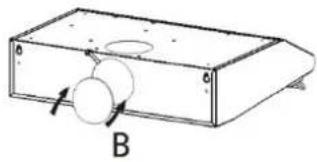
Fig. 4
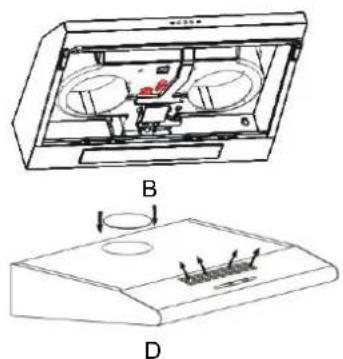
Fig. 5
AVERTISSEME NT :

1 Support en acier
2 Filtre à charbon
3 Filtre à graisse
REMARQUE :
REPLACEMENT DE L'AMPOULE
Important :

PROTECTION DE L'ENVIRONNEMENT
Sadržaj
1 ...... Sigurnosneupute
2....Ugradnja
3 Počniterabitinapuza štednjak
4....Rješavanjeproblema
5 Održavanjei čišćenje
6. Zaštitaokoliša
SIGURNOSNE UPUTE
U ovom priručniku opisane su pravilna ugradnja i uporaba vaše nape za štednjak; pažljivo ga pročitajte prije uporabe čak i ako vam je proizvod poznat. Priručnik treba čuvati na sigurnom mjestu da biste se njime mogli poslužiti i u budućnosti.
SL. 4
SL. 5
UPOZORENJE:

Iz sigurnosnih razloga upotrebljavajte samo onu veličinu pričvrsnih ili postavnih vijaka koja je preporučena u ovom priručniku s uputama.
Ako ne ugradite vijke ili pričvrsni uređaj u skladu s ovim uputama, mogu nastati rizici povezani sa strujom.
Počnite rabiti napu za Štednjak
Pregibni prekidač
- Vanjske su površine podložne ogrebotinama i abraziji; stoga se pridržavajte uputa za čišćenje da biste postigli najbolje rezultate bez oštećenja.
OPĆENITO
UGRADNJA FILTARA S MREŽICOM ZA MASNOĆE
-
Čelična kuka
-
Ugljeni filtar
-
Filtar za masnoće
NAPOMENA:
ZAŠTITA OKOLIŠA:

Indice
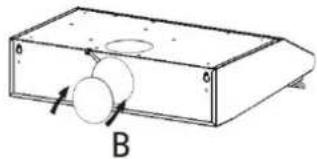
Figura 4
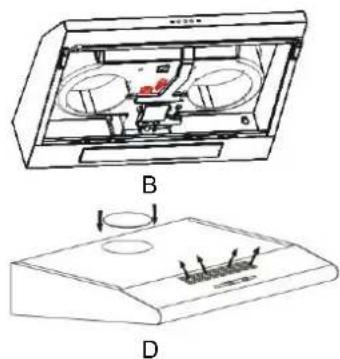
Figura 5
AVVERTENZA:

1 Staffe d'acciaio
2 Filtro a carbone
3 Filtro antigrasso
NOTA:
Inhoud
AFB 4
AFB 5
WAARSCHUWING:

VETFILTERS MET MAZEN INSTALLEREN
1 Stalen hanger
2 Koolstofffilter
3 Vetfilter
OPMERKING:
MILIEUBESCHERMING:

Cuprins
Întotdeauna:
IMG 4
Configurarea aerisirii
IMG 5
AVERTISMENT:

INSTALARE FILTRELOR PLASĂ DE GRĂSIME
1 Suport din oțel
2 Filtru cu carbon
PROTECTIA AMBIENTALĂ:

Vsebina
Vedno:
●POZOR: Preden dostopate do terminalov, morate izključiti vsa napajanja.
Vedno:
B. NAMESTITEV (montaža na omarice)
(1) Montirajte kuhinjsko napo na omarico in sicer s 4 vijaki (4 x 35 mm), 4 maticami in ploskimi tesnili. Kuhinjsko napo pritrdite na omarico s 4 vijaki in 4 ploskimi tesnili z vrha omarice na napo. Potem znotraj nape namestite plosko tesnilo in matico na vijak, ki pritrjuje napo na omarico.
60 cm-kuhinjska napa
Sl. 4
Sl. 5
POZOR:

NAMEŠČANJE MREŽASTEGA MAŠČOBNEGA FILTRA
1 Obešalo iz jekla
2 Filter z ogljem
3 Maščobni filter
POZOR:
VARSTVO OKOLJA:
Obsah
B. INŠTALÁCIA (montáž na skrinku)
(1) Digestor namontujte na skrinku 4 skrutkami (4x35 mm), 4 maticami a plochými podložkami. Nasadte digestor na skrinku tak, že zhora zo skrinky prestrčite k digestoru 4 skrutky a 4 ploché podložky. Potom, vnútri digestora nasadte na skrutku plochú podložku a maticu, aby ste prichytili spotrebič ku skrinke.
60 cm digestor
Obr. 4
Obr. 5
VAROVANIE:

INŠTALÁCIA MRIEŽKOVÉHO FILTRA PROTI MASTNOTE
OCHRANA ŽIVOTNÉHO PROSTREDIA:
Sadržaj
- Bezbednosna uputstva
2....Ugradnja
3....Početak upotrebe kuhinjskog aspiratora
4...... Rešavanje problema - Održavanje i čišćenje
6...... Zaštita životne sredine
BEZBEDNOSNA UPUTSTVA
Uovom je priručniku objašnjena pravilna ugradnja i upotreba aspiratora.
Pažljivo ga pročitajte pre upotrebe, čak i ako ste upoznati s proizvodom.
B. UGRADNJA (montaža na viseći kuhinjski element)
Aspirator od 60 cm
Napomena: Postoje 2 metode za ventilaciju, uključujući „horizontalnu ventilaciju“ i „vertikalnu ventilaciju“. Obratite pažnju na metod ventilacije prilikom ugradnje.
Horizontalna ventilacija: Pogledajte sliku 4A – upotrebite poklopac za zatvaranje izlaza na vrhu, a zatim se vazduh može ispuštati sa zadnje strane.
Vertikalna ventilacija: Pogledajte sliku 4B – upotrebite poklopac za zatvaranje izlaza
Slika 4
Podešavanje ventilacije vazduha
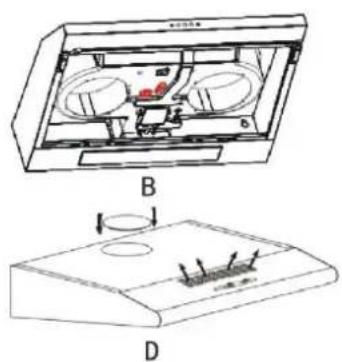
Slika 5
UPOZORENJE: | ➤ Iz bezbednosnih razloga koristite samo onu veličinu pričvrsnog ili montažnog zavrtnja koja je preporučena u ovom priručniku za upotrebu.➤ Postavka zavrtnja ili uređaja za pričvršćivanje koja nije u skladu sa ovim uputstvima može dovesti do opasnosti od strujnog udara. |
Početak upotrebe kuhinjskog aspiratora
OPŠTE
POVRŠINA KONTROLNE TABLE
Umetna kontrolna tabla se može očistiti toplom sapunicom. Pre čišćenja proverite da li je krpa čista i dobro isceđena. Koristite suvu meku krpu da biste uklonili višak vlage koji je ostao nakon čišćenja.
Važno
Koristite neutralne deterdžente i izbegavajte upotrebu grubih hemikalija za čišćenje, jakih deterdženata za domaćinstvo ili proizvoda koji sadrže abrazive, jer će to uticati na izgled uređaja i potencijalno ukloniti štampane oznake na kontrolnoj tabli i poništiti garanciju proizvođača.
MREŽASTI FILTERI ZA MASNOĆU
POSTAVLJANJE MREŽASTIH FILTERA ZA MASNOĆU
- Da biste postavili filtere pratite sledeća četiri koraka.
- Umetnite filter u proreze na zadnjoj strani aspiratora.
- Pritisnite dugme na ručki filtera.
- Otpustite ručku kada filter dođe u predviđeni položaj.
- Ponovite postupak da biste postavili sve filtere.
FILTER S AKTIVNIM UGLJEM
ZAŠTITA ŽIVOTNE SREDINE:
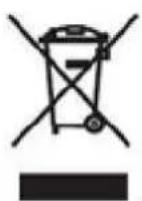
Ovaj proizvod je obeležen oznakom za selektivno odvajanje otpadne električne opreme. To znači da proizvod ne sme biti odložen zajedno sa ostalim kućnim otpadom nego se odvaja uz pomoć sistema selektivnog prikupljanja u skladu sa Direktivom 2012/19/EU. Proizvod će potom biti recikliran ili rasklopljen da bi se smanjio uticaj na životnu sredinu – električni i elektronski proizvodi predstavljaju potencijalnu opasnost po životnu sredinu i zdravlje ljudi jer sadrže štetne materije. Za više informacija kontaktirajte sa lokalnim ili regionalnim upravama.
NAPOMENA:


- COOKER HOOD INSTRUCTION MANUAL
- CONTENT
- SAFETY INSTRUCTIONS
- NEVER TO DO
- ALWAYS TO DO
- INSTALLATION
- INSTALLATION (WALL MOUNTING)
- INSTALLATION (CABINET MOUNTING)
- AIR VENTILATION SETTING
- START USING YOUR COOKER HOOD
- TOGGLE SWITCH
- NOTE
- MAINTENANCE AND CLEANING
- CAUTION
- GENERAL
- STAINLESS STEEL
- CONTROL PANEL SURFACE
- IMPORTANT
- GREASE MESH FILTERS
- INSTALLING GREASE MESH FILTERS
- CARBON FILTER
- BULB REPLACEMENT
- CHANGING THE LIGHT
- ENVIRONMENTAL PROTECTION
- INFORMATION FOR DISMANTLING
- А С П И Р А Т О Р
- РЪКОВОДСТВО СИНСТ
- РУКЦИИ
- СЪДЪРЖАНИЕ
- КАКВО ДА ПРАВИТЕ
- ПРЕДУПРЕЖДЕНИЕ
- ПОСТАВЯНЕ НАМРЕЖЕСТИТЕ ФИЛТРИ ЗАМАЗНИНИ
- ЗАЩИТА НА ОКОЛНАТА СРЕДА
- OBSAH
- CO JE VŽDY NUTNÉ
- NASTAVENÍ VĚTRÁNÍ
- INSTALACE MŘÍ KOVÝCH TUKOVÝCH FILTRŮ
- POZNÁMKA
- OCHRANA ŽIVOTNÍHO PROSTŘEDÍ
- INHALT
- INSTALLATION (WANDMONTAGE)
- INSTALLATION (GEHÄUSEMONTAGE)
- EINSETZEN DER FETTFILTER
- HINWEIS
- UMWELTSCHUTZ
- ÍNDICE
- PRECAUCIÓN
- SOMMAIRE
- À TOUJOURS FAIRE
- REMARQUE
- REPLACEMENT DE L'AMPOULE
- PROTECTION DE L'ENVIRONNEMENT
- SADRŽAJ
- SIGURNOSNE UPUTE
- UPOZORENJE
- POČNITE RABITI NAPU ZA ŠTEDNJAK
- PREGIBNI PREKIDAČ
- OPĆENITO
- UGRADNJA FILTARA S MREŽICOM ZA MASNOĆE
- NAPOMENA
- ZAŠTITA OKOLIŠA
- INDICE
- NOTA
- INHOUD
- WAARSCHUWING
- VETFILTERS MET MAZEN INSTALLEREN
- OPMERKING
- MILIEUBESCHERMING
- CUPRINS
- ÎNTOTDEAUNA
- CONFIGURAREA AERISIRII
- AVERTISMENT
- INSTALARE FILTRELOR PLASĂ DE GRĂSIME
- PROTECTIA AMBIENTALĂ
- VSEBINA
- VEDNO
- NAMESTITEV (MONTAŽA NA OMARICE)
- NAMEŠČANJE MREŽASTEGA MAŠČOBNEGA FILTRA
- POZOR
- VARSTVO OKOLJA
- INŠTALÁCIA (MONTÁŽ NA SKRINKU)
- INŠTALÁCIA MRIEŽKOVÉHO FILTRA PROTI MASTNOTE
- OCHRANA ŽIVOTNÉHO PROSTREDIA
- BEZBEDNOSNA UPUTSTVA
- UGRADNJA (MONTAŽA NA VISEĆI KUHINJSKI ELEMENT)
- PODEŠAVANJE VENTILACIJE VAZDUHA
- POČETAK UPOTREBE KUHINJSKOG ASPIRATORA
- OPŠTE
- POVRŠINA KONTROLNE TABLE
- VAŽNO
- MREŽASTI FILTERI ZA MASNOĆU
- POSTAVLJANJE MREŽASTIH FILTERA ZA MASNOĆU
- FILTER S AKTIVNIM UGLJEM
- ZAŠTITA ŽIVOTNE SREDINE
Brand : CANDY
Model : CFT6105X1
Category : Range hood