ForcePro - Surveillance Camera Spypoint - Free user manual and instructions
Find the device manual for free ForcePro Spypoint in PDF.

User questions about ForcePro Spypoint
0 question about this device. Answer the ones you know or ask your own.
Ask a new question about this device
Download the instructions for your Surveillance Camera in PDF format for free! Find your manual ForcePro - Spypoint and take your electronic device back in hand. On this page are published all the documents necessary for the use of your device. ForcePro by Spypoint.
USER MANUAL ForcePro Spypoint
QUICK START GUIDE
FORCE-PRO
AND
COMPARABLE*
IN THE BOX
1x Camera
1x 16 GB SD card
1x Installation strap
1x Quick Start Guide
NOTE
Batteries sold separately.
User Manual, software updates & FAQs available at: www.spypoint.com/support.
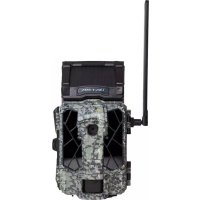
COMPONENTS
1 No glow flash
2 Red LED indicator
3 Photo lens
4 Detection lens
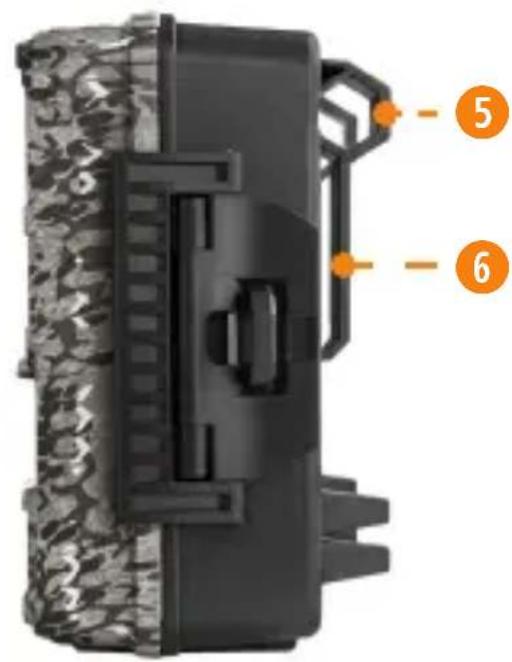
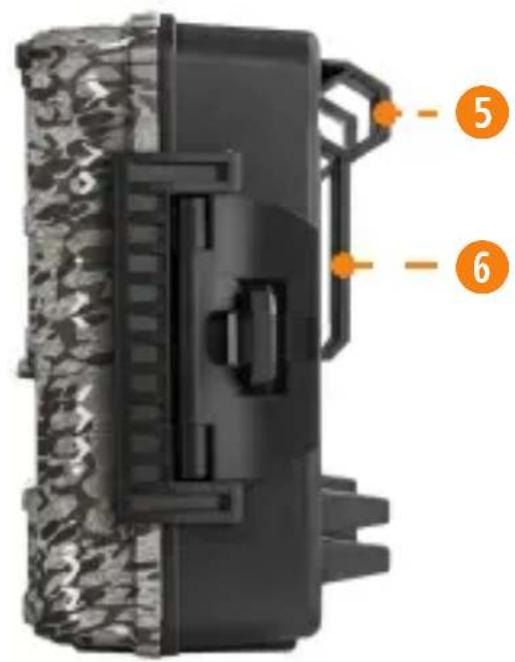
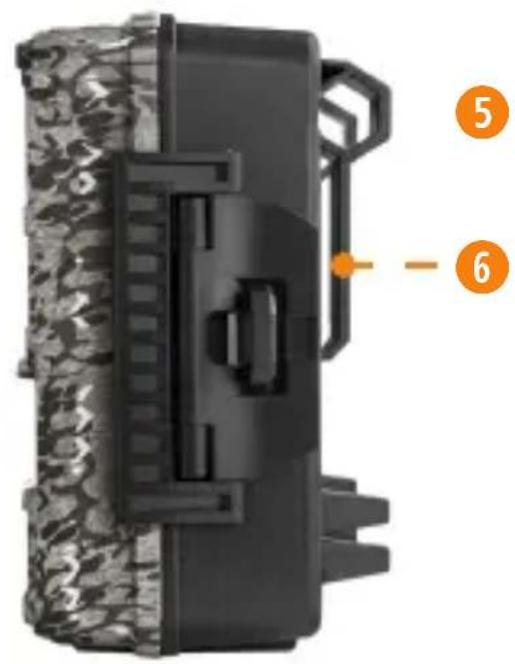
5 Locking latch
6 Slot for installation strap
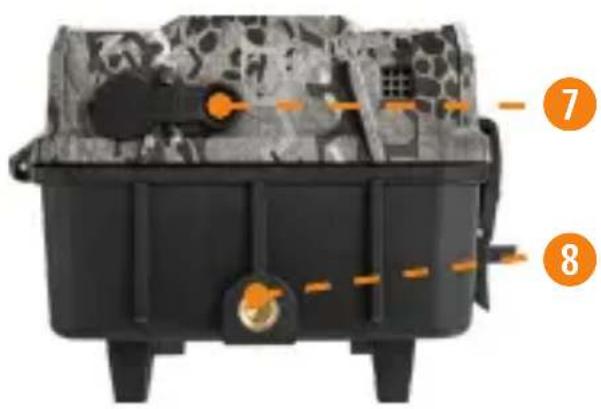
7 12 V jack
8 Screw-thread for standard 14 "-20
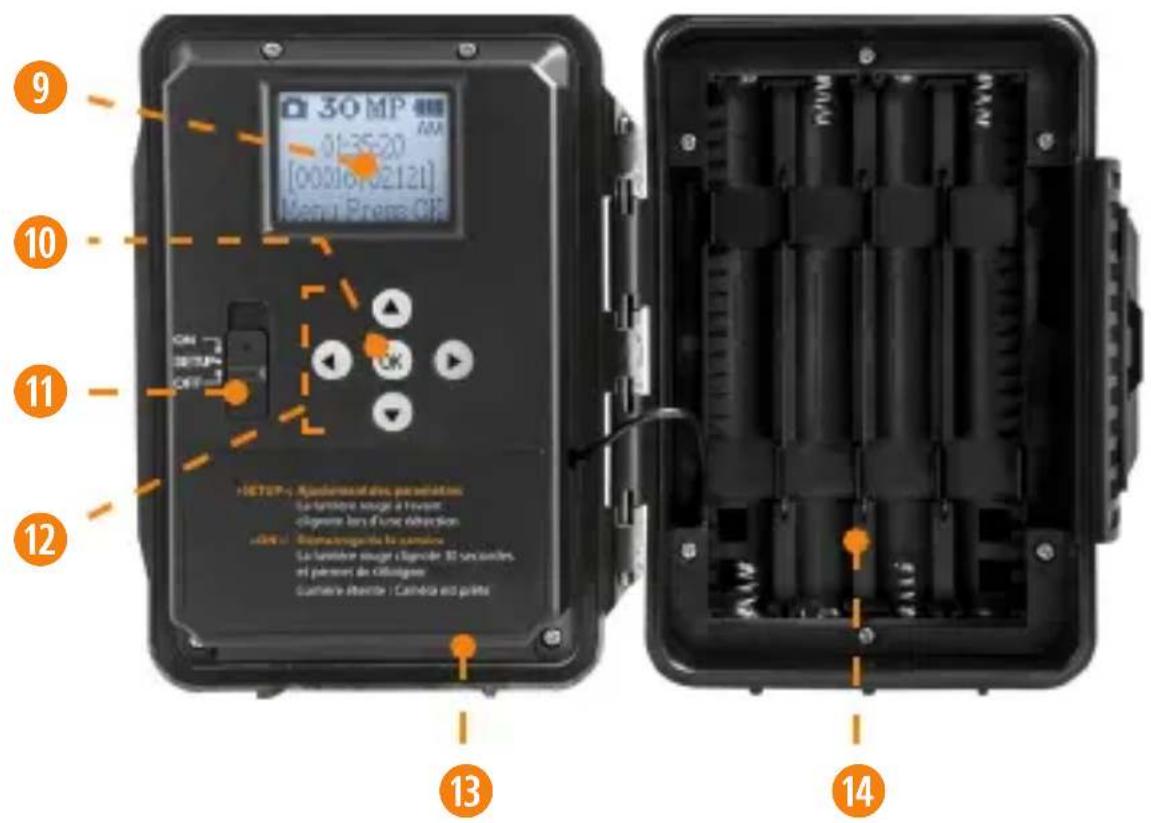
9 LCD screen
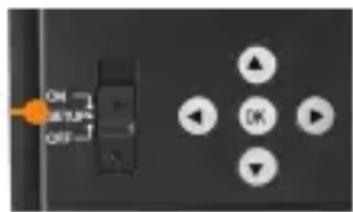
10 OK button
11 Switch ON/SETUP/OFF
12 Navigation buttons
13 SD card slot
14 Battery compartment
The specifications and characteristics of similar models may vary. Refer to the website or packaging for details.
PREPARATION
SELECT A POWER SOURCE
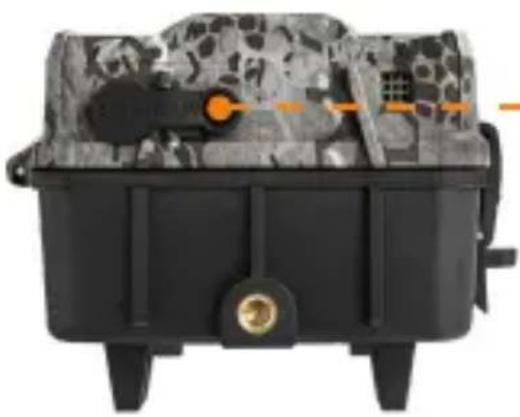
natural_image
Black and white photo of a military-style container with camouflage pattern and orange targeting elements (no visible text or symbols)12 V power source
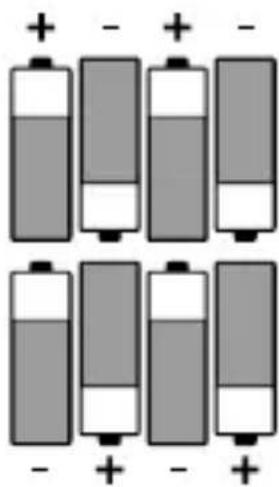
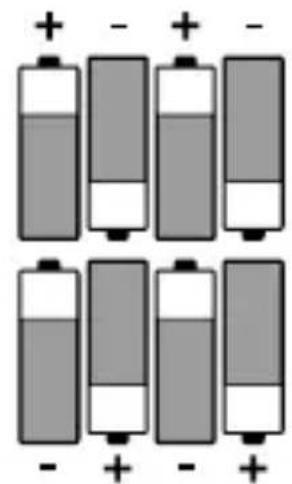
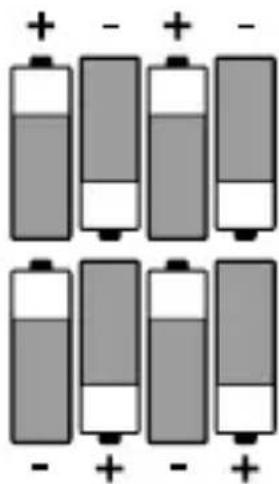
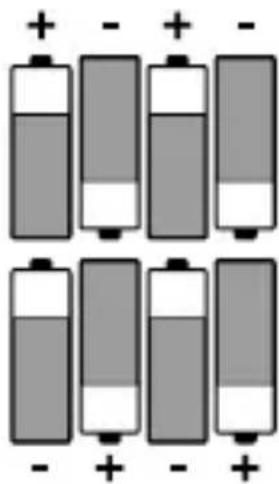
8 AA alkaline or lithium batteries

Make sure to insert the AA batteries according to their polarity (+) and (-).
FOR MAXIMUM PERFORMANCE AND WITHOUT LEAKING BATTERIES
- Use new batteries.
- Use ONLY alkaline or ONLY lithium batteries.
- Do not mix new and old batteries.
- Do not use rechargeable AA batteries, as their lower voltage may cause operating difficulties.
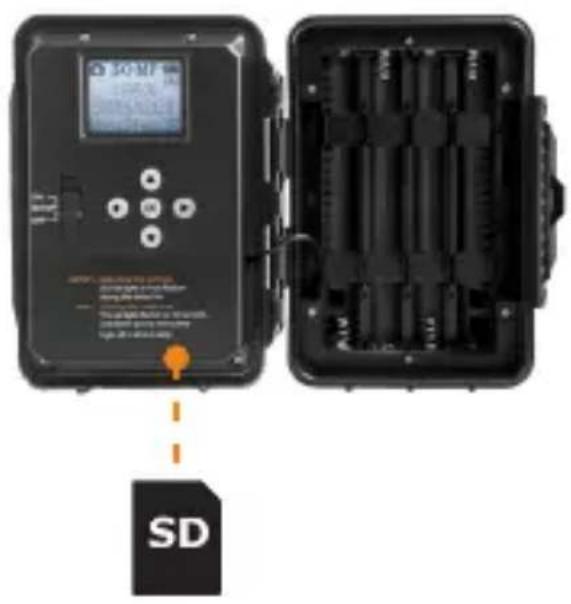
INSTALLING AN SD CARD
The camera was designed to operate with an SD card between 2 and 128 GB of memory.
INSERT AN SD CARD
• Make sure the camera is turned OFF.
- Locate the SD card slot. It is on the bottom right corner of the camera (see diagram).
- Insert an SD card (up to 128 GB) in the slot and make sure to respect the direction indicated in the diagram.
- The card is inserted correctly when a click is heard.
FORMAT YOUR SD CARD
Before inserting the SD card in your camera, it must be formatted to ensure proper operations. See section OTHER OPTIONS on page 8 for an explanation of the formatting process.
SETUP
Use the ▲▼◀▶ buttons to switch to the LCD display or to change options, and press OK to select. Several setup pages will be displayed.
GENERAL SETTINGS SETUP
- To turn the camera ON/OFF, use the ON/SETUP/OFF switch.
- The switch must be on SETUP to make your initial changes.
-
When the switch is on SETUP, press OK to open the MENU:
-
Set the language (English, Français, Deutsch)
- Set the date (MM/DD/YY or DD/MM/YY)
- Set the time (12 h or 24 h)
- Set the temperature (°F/°C)
ADJUST THE SETTINGS FOR THE 3 MODES OF OPERATION
PHOTO MODE
Delay: Allows you to select the time elapsed before the camera can detect again and take the next photo.
If you want to capture multiple photos, use a shorter delay.
Once you have selected the delay, press OK.
Quality: Allows you to select a resolution of 4 MP, 16 MP or 30 MP. Once you have made your selection, press OK.
Multi: Allows you to select the number of photos to be taken per shot (from 1 to 6 photos). Once you have made your selection, press OK.
Detect: Allows you to set motion-detector sensitivity (LOW, NORMAL, HIGH, AUTO). Once you have made your selection, press OK.
VIDEO MODE
Delay: Allows you to select the time elapsed before the camera can detect again and take the next video.
Quality: Allows you to choose between VGA, HD, FHD, QHD and 4K. Once you have made your selection, press OK.
Length: Allows the user to choose the video length (10 to 60 s). Once you have made your selection, press OK.
Detection: Allows you to set motion-detector sensitivity (LOW, NORMAL, HIGH, AUTO). Once you have made your selection, press OK.
TIME-LAPSE MODE
Allows you to take photos at regular predefined intervals without necessarily detecting a movement.
Night: Choose the BOOST option for maximum brightness at night, select OPTIMAL to reduce fuzziness at night, and MIN BLUR to minimize the blurriness of moving objects. Once you have made your selection, press OK. (Note: Regardless of the mode, the flash remains invisible.)
OTHER OPTIONS
Name: Allows to give a name to your camera.
About: Indicates the software version.
Default: Resets all default settings.
Format: Allows the camera to format the SD card the next time it is used. (Reformatting the SD card will delete all photos and videos on the card. Only format the card if you are sure you want to delete everything on it. Transfer all data to your computer beforehand).
OPERATION
Once the setup is complete, turn the button from SETUP to ON.
You may also switch from SETUP to OFF and turn the device ON later.
RED LIGHT ON THE FRONT OF THE CAMERA
When the switch is in the SETUP position, the red light will flash to confirm a motion detection once you have adjusted your settings.
When you move the switch to the ON position, the red light at the front of the camera will flash for 30 seconds to allow you to move out of the camera's field of view.
When the light turns off, the camera is ready for use.
INSTALLATION
Recommended height of installation:
The camera must be installed at the height of the centre line of the animal's body.
Ideal setup for high-quality images and videos:
The target animal should be 7.5 m from the camera to get a better line of sight.
To produce brighter photos at night, there should be items reflecting the camera's flash in the background.
Please note that the camera should never be directly pointed at the sun to avoid back lighting and faulty detections.

THIS DEVICE COMPLIES WITH PART 15 OF THE FCC RULES.
Operation is subject to the following two conditions:
- This device must not cause harmful interference.
- This device must accept any interference received, including interference that may cause undesired operation.
To ensure that you use your trail camera optimally and that it precisely meets your needs and ultimately to ensure greater success as a hunter, SPYPOINT offers you a range of useful additional digital features.
For more details on the SPYPOINT EXPERIENCE, refer to the following website www.spypoint.com/en/experience-spypoint.
DISPOSAL
ONLY USE ORIGINAL SPARE PARTS AND ACCESSORIES.
If, one day, your camera has been used so intensively that it has to be replaced, or if you no longer have any use for it, you are obliged to dispose of it at a recycling center.
Information on return points for your electrical appliance can be obtained from your local waste disposal company or from your local administrative offices.
Electrical appliances not only contain valuable recyclable raw materials, but also substances which, if disposed of improperly, can affect public health and the environment. Help ensure that valuable raw materials are recycled by returning your old appliance to a central collection point.
The WEEE (Waste Electrical and Electronic Equipment Directive) symbol represents the obligation of the labeled camera to be sent to a separate center for the proper recycling of electrical and electronic equipment.

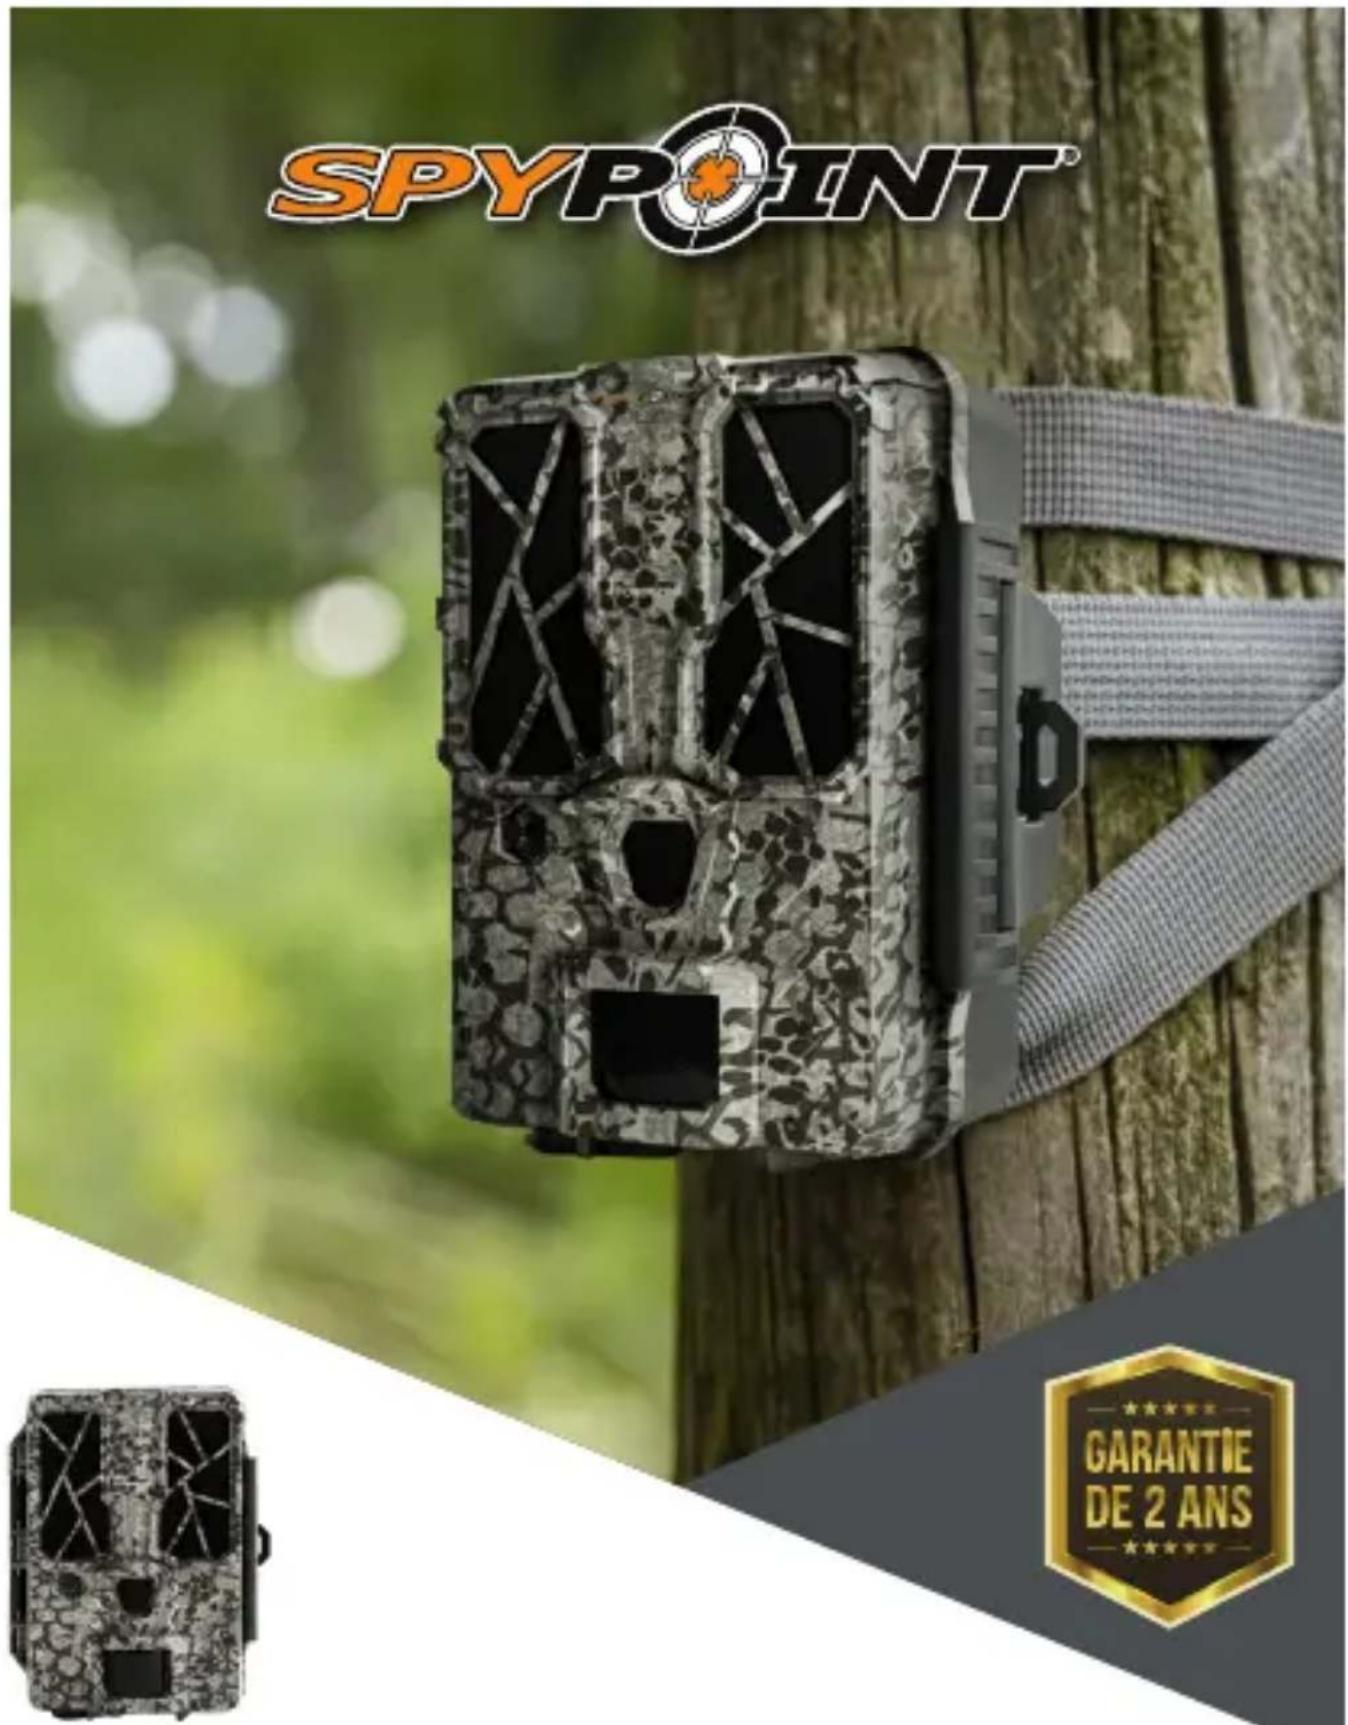
THANK YOU FOR CHOOSING

WARRANTY
Sit back and relax as this device is covered by the “Know you’re covered” 2-year warranty. We strive to provide our customers with a positive experience and an outstanding service.
For a complete list of specifications, features, and settings, visit our FORCE-PRO page at www.spypoint.com.
FAQ, User Manual & latest firmware available at www.spypoint.com/support
Live chat support at www.spypoint.com
Join the community


GUIDE DE DÉMARRAGE RAPIDE FORCE-PRO ET COMPARABLES*
DANS LA BOÎTE
1x Caméra
1x Carte SD 16 Go
natural_image
Close-up of a mechanical component with textured surface and numbered annotations (no readable text or symbols)FRANÇAIS

8 piles AA alcalines ou lithium

natural_image
Close-up of a mechanical device with textured surface and labeled parts (no readable text or symbols)
![30 MP AM 01:35:20 [00:06/02:121] Menu Press OK ON SETUP OFF OUTPUT - Adjusting the orbitings The set light in front flashes during the detectors - Receiving the sensor use The set light flashes for 30 seconds and allows you to move quickly Light off Camera ready 13 14](/content/2026/03/559473/images/dbf7e97eb6177980c93e94dd37b1b4eafd26b13faafb54f634d81c40f7b04d06.jpg)
natural_image
Cutaway view of a mechanical device with internal components and mounting feet (no visible text or symbols)12V
Stromquelle
FORMATIEREN SIE IHRE SD-KARTE

natural_image
Close-up of a black mechanical device with camouflage pattern and labeled parts (no readable text or symbols)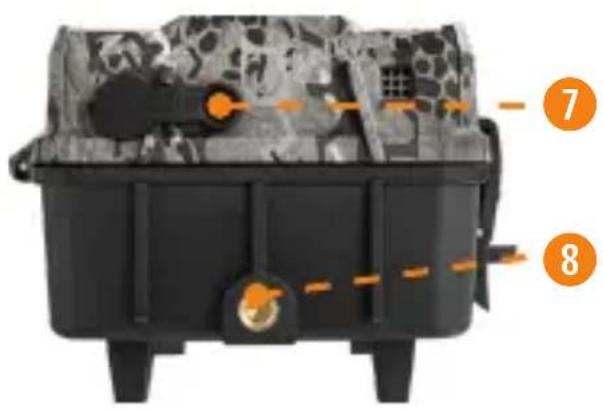
![30 MP 01:35:20 [00:06/02:121] Menu Press OK SETUP Adjusting the strings the set light in short flashes during the detection Receiving the current use the set light flashes for 30 seconds and allows you to move quickly Light off Camera ready SETUP Adjusting the strings the set light in short flashes during the detection Receiving the current use the set light flashes for 30 seconds and allows you to move quickly Light off Camera ready](/content/2026/03/559473/images/e8889e7e4825965b963ecc5869ee97ed117259e7f2b8ee11612955bd2fae7638.jpg)
natural_image
Cross-sectional view of a military vehicle chassis with visible internal components and no text or symbols
natural_image
Close-up of a mechanical device with textured surface and labeled parts (no readable text or symbols)
![30 MP 01:35:20 [00:06/02:121] Menu Press OK ON SETUP OFF OUTPUT Adjusting the strings The roll light in front flashes during the detectors Testing this sensor use The roll light flashes for 30 seconds and allows you to move leaky Light off Camera mode 13 14](/content/2026/03/559473/images/7a454d6766c353911a99a4122350dad6f462b702bf3c349db9917a1f655ce182.jpg)
natural_image
Close-up of a black military-style container with camouflage pattern and orange targeting elements (no visible text or symbols)Zdroj napájení 12 V
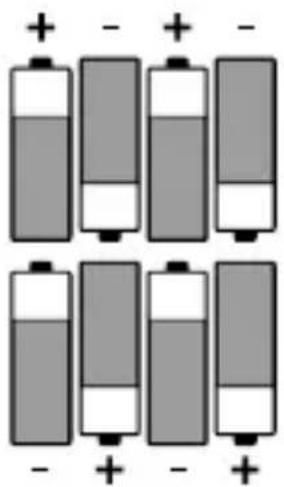
PHOTO MODE (REŽIM FOTO)

natural_image
Close-up of a mechanical device with textured surface and labeled parts (no readable text or symbols)
![30 MP 01:35:20 [00:06/02:121] Menu Press OK ON SETUP OFF OUTPUT Adjusting the strings The set light in front flashes during the detectors Testing this sensor use The set light flashes for 30 seconds and allows you to move leaky Light off Camera mode 13 14](/content/2026/03/559473/images/0bab0a38e20cf63590e704b3fc561b0cf3efbc68568bceda79da3ed561dd505d.jpg)
natural_image
Top-down view of a military-style container with camouflage pattern and targeting elements (no visible text or symbols)12 V zdroj energie
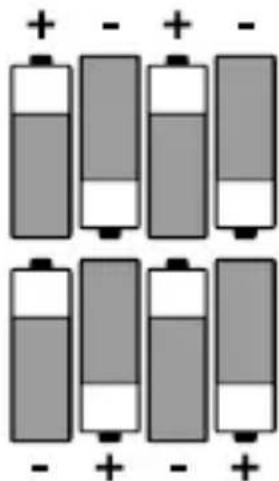
PHOTO MODE (REŽIM FOTO)

natural_image
Close-up of a mechanical device with textured surface and labeled parts (no readable text or symbols)
![30 MP 01:35:20 [00:06/02:121] Menu Press OK ON SETUP OFF OUTPUT Adjusting the strings The set light in front flashes during the detectors Testing this sensor use The set light flashes for 30 seconds and allows you to move leaky Light off Camera mode 13 14](/content/2026/03/559473/images/8d635c0e3e9267c451069cd68dad753b110a5ce2c75012d42711b3d99641d809.jpg)
natural_image
Close-up of a mechanical device with camouflage pattern and labeled parts (no readable text or symbols)ESPAÑOL

![30MP 01:25:20 [00:06:02:121] Menu Press OK SETUP Adjusting the strings the set light to short flashes during the detectors Receiving the sensor use The set light flashes for 30 seconds and allows you to move leaky Light off Camera mode SETUP Adjusting the strings the set light to short flashes during the detectors Receiving the sensor use The set light flashes for 30 seconds and allows you to move leaky Light off Camera mode SETUP Adjusting the strings the set light to short flashes during the detectors Receiving the sensor use The set light flashes for 30 seconds and allows you to move leaky Light off Camera mode](/content/2026/03/559473/images/63ab2c9357bdfc8f66cd25479a6de65ca43ab037320e78df506b90f7a18c7d15.jpg)
natural_image
Cross-sectional view of a mechanical device with internal components and mounting feet (no visible text or symbols)natural_image
Six stacked battery cells with varying internal charge levels, each marked with negative and positive signs below (no text or symbols on cells)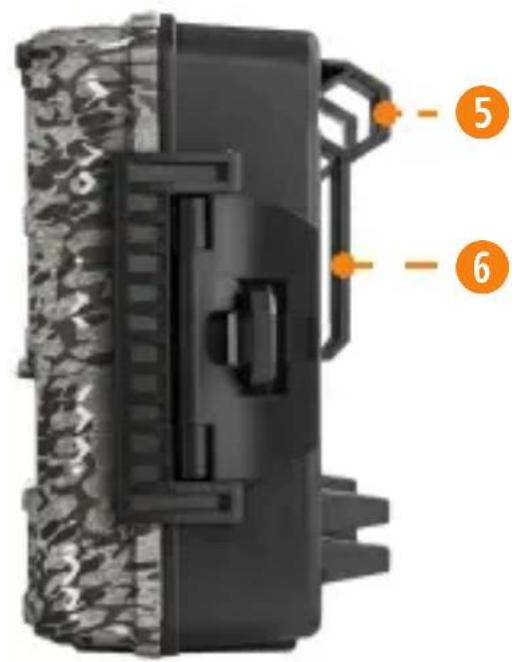
natural_image
Close-up of a mechanical device with textured surface and numbered annotations (no readable text or symbols)ITALIAN
natural_image
Interior view of a mechanical device with labeled parts (7 and 8), no readable text or symbols beyond numbered annotations![30 MP 01:35:20 [00016/02121] Menu Press OK ON SETUP OFF OUTPUT - Adjusting the options The end light in front flashes during the detectors - Opening this camera use The end light flashes for 30 seconds and allows you to move timely Light left Camera ready 13 14](/content/2026/03/559473/images/7f075f11b55b90a48980fdc5bb1346e78ef50325994a48862d9b1e35024e231c.jpg)
natural_image
Close-up of a black mechanical device with camouflage pattern and orange arrows indicating components (no visible text or symbols)Alimentazione 12 V
natural_image
Grid of six battery cells with varying internal charge states (no text or symbols)EU DECLARATION OF CONFORMITY (NO.SPO198)
Product Description: FORCE-PRO Camera
Model: FORCE-PRO
Brand: SPYPOINT
Manufacturer: SPYPOINT
Address: 330 de la Jacques-Cartier
Victoriaville, Qc Canada
G6T 1Y3
This declaration of conformity is issued under the sole responsibility of the manufacturer.
The object of the declaration described above is in conformity with the relevant Community harmonisation legislation:
2014/30/EU Electromagnetic Compatibility (EMC)
2011/65/EU The restriction of the use of
certain hazardous substances
Directive (ROHS)
(EU)2015/863
References to the relevant harmonised standards used or references to the specifications in relation to which conformity is declared:
EMC:
EN 55032:2015
EN 55024:2010+A1:2015
ROHS:
IEC 62321-1:2013
IEC 62321-2:2013
IEC 62321-3-1:2013
IEC 62321-4:2013
IEC 62321-5:2013
IEC 62321-6:2015
IEC 62321-7-1:2015
IEC 62321-7-2:2017
IEC 62321-8:2017

Additional information:
The product carries the
CE Mark.
Signed for and on behalf of:
SPYPOINT
Place of issue: Victoriaville
Date of issue: April 1 ^st , 2021
Name and position: Yan Gagnon, CEO
Signature: