USER MANUAL TX-32D300E PANASONIC
Safety Information 2
Markings on the Product 2
Maintenance 3
Display panel, Cabinet, Pedestal 3
Mains plug 3
Assembling / Removing the pedestal 4
When using the wall-hanging bracket. 4
Environmental Information. 5
Features 5
Accessories Included. 5
Standby Notifications. 5
TV Control Switch & Operation. 5
Inserting the Batteries into the Remote 6
Connect Power 6
Antenna Connection 6
Notification. 6
Specification 7
Remote Control 8
Connections. 9
Switching On/Off 10
First Time Installation. 10
MediaPlayback viaUSB Input 10
Media Browser Menu. 11
CEC and CEC RC Passthrough 11
TV Menu Contents. 12
General TV Operation 16
Using the Channel List 16
Configuring Parental Settings 16
Electronic Programme Guide (EPG) 16
Teletext Services 17
Software Upgrade. 17
Troubleshooting & Tips 17
PC Input Typical Display Modes 18
AV and HDMI Signal Compatibility 18
Supported Video File Formats for USB Mode.....19
Supported Picture File Formats for USB Mode ....19
Supported Audio File Formats for USB Mode ....20
Supported Subtitle File Formats for USB Mode ...21
Supported DVI Resolutions 22

Don't operate your TV in extreme ambient conditions as this may cause damage to your TV.

In extreme weather (storms, lightning) and long inactivity periods (going on holiday) disconnect the TV set from the mains. The mains plug is used to disconnect TV set from the mains and therefore it must remain readily operable.

This sign is present wherever there is very important information on operation and maintenance of the appliance in the literature accompanying it.
Note: Follow the on screen instructions for operating the related features.

IS IMPORTANT - Please read these instructions fully before installing or operating

WARNING: Never let people (including
children) with reduced physical, sensory or mental capabilities or lack of experience and / or knowledge use electrical devices unsupervised.
- For ventilation purposes, leave a free space of at least 10cm all around the set.
- Do not block ventilation holes.
- Do not place the TV on sloping or unstable surfaces, the TV may tip over.
- Use this device in moderate climates.
- The power cord plug should be easily accessible. Do not place the TV, furniture, etc. on the power cord. A damaged power cord/plug can cause fire or give you an electric shock. Handle the power cord by the plug, do not unplug the TV by pulling the power cord. Never touch the power cord/plug with wet hands as this could cause a short circuit or electric shock. Never make a knot in the power cord or tie it with other cords. When damaged it must be replaced, this should only be done by qualified personnel.
- Do not use this TV in a humid or damp environment. Do not expose the TV to liquids. In case the cabinet contacts any liquids unplug the TV immediately and have it checked by qualified personnel before operating it any further.
- Do not expose the TV to direct sunlight, open flames or place it near intense heat sources such as electric heaters.
-
Listening in excessive volumes from earphones and headphones may cause hearing loss.
-
Ensure that no open flame sources, such as lit candles, are placed on top of the TV.
- To prevent injuries, this TV must be securely attached to a wall by carefully following the instructions (if the option is available).
- Occasionally, a few non-active pixels may appear on the screen as a fixed blue, green or red point. Please note that this does not affect the performance of your product. Take care not to scratch the screen with fingernails or other hard objects.
- Before cleaning, unplug the TV from the wall socket. Only use a soft, dry cloth while cleaning.
| Warning | Serious injury or death risk |
| Risk of electric shock | Dangerous voltage risk |
| Caution | Injury or property damage risk |
| Important | Operating the system correctly |
| Notice | Additional notes marked |
Markings on the Product
The following symbols are used on the product as a marker for restrictions and precautions and safety instructions. Each explanation shall be considered where the product bears related marking only. Note such information for security reasons.

Class II Equipment: This appliance is designed in such a way that it does not require a safety connection to electrical earth.

Class II Equipment With Functional Earthing: This appliance is designed in such a way that it does not require a safety
connection to electrical earth, the earth connection is used for functional purposes.

Protective Earth Connection: The marked terminal is intended for connection of the protective earthing conductor associated with pply wiring.

Hazardous Live Terminal: The marked terminal(s) is/are hazardous live under normal operating conditions.

Caution, See Operating Instructions: The marked area(s) contain(s) user replaceable coin or button cell batteries.

Class 1 Laser Product: This product contains Class 1 laser source that is safe under reasonably foreseeable conditions of operation.
WARNING
Do not ingest the battery, Chemical Burn Hazard
(The accessories supplied with or) This product may contain a coin/button cell battery. If the coin/button cell battery is swallowed, it can cause severe internal burns in just 2 hours and can lead to death. Keep new and used batteries away from children.
If the battery compartment does not close securely, stop using the product and keep it away from children.
If you think batteries might have been swallowed or placed inside any part of the body, seek immediate medical attention.
WARNING
Never place a television set in an unstable location. A television set may fall, causing serious personal injury or death. Many injuries, particularly to children, can be avoided by taking simple precautions such as;
- Using cabinets or stands recommended by the manufacturer of the television set.
- Only using furniture that can safely support the television set.
- Ensuring the television set is not overhanging the edge of the supporting furniture.
- Not placing the television set on all furniture (for example, cupboards or bookcases) without acnoring both the furniture and the television set to a suitable support.
- Educating children about the dangers of climbing on furniture to reach the television set or its controls.
If your existing television set is being retained and relocated, the same considerations as above should be applied.
Maintenance
First, remove the mains plug from the mains socket.
Display panel, Cabinet, Pedestal
Regular care:
Gently wipe the surface of the display panel, cabinet, or pedestal by using a soft cloth to remove dirt or fingerprints.
For stubborn dirt:
- First clean the dust from the surface.
- Dampen a soft cloth with clean water or diluted neutral detergent (1 part detergent to 100 parts water).
- Wring out the cloth firmly. (Please note, do not let liquid enter the TV inside as it may lead to product failure.)
-
Carefully wipe moisten and wipe away the stubborn dirt.
-
Finally, wipe away all the moisture.
Caution
Do not use a hard cloth or rub the surface too hard, otherwise this may cause scratches on the surface.
- Take care not to subject the surfaces to insect repellent, solvent, thinner or other volatile substances. This may degrade surface quality or cause peeling of the paint.
- The surface of the display panel is specially treated and may be easily damaged. Take care not to tap or scratch the surface with your fingernail or other hard objects.
- Do not allow the cabinet and pedestal to make contact with a rubber or PVC substance for a long time. This may degrade surface quality.
Mains plug
Wipe the mains plug with a dry cloth at regular intervals.
Moisture and dust may cause fire or electrical shock.
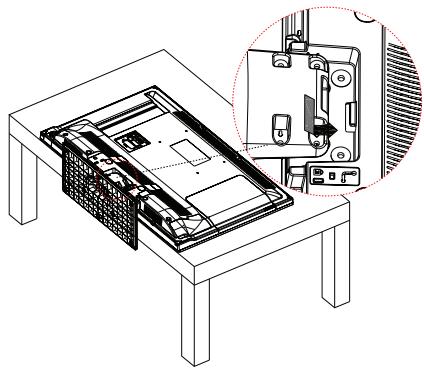
Assembling / Removing the pedestal
Preparations
Take out the pedestal(s) and the TV from the packing case and put the TV onto a work table with the screen panel down on the clean and soft cloth (blanket, etc.)
- Use a flat and firm table bigger than the TV.
- Do not hold the screen panel part.
- Make sure not to scratch or break the TV.
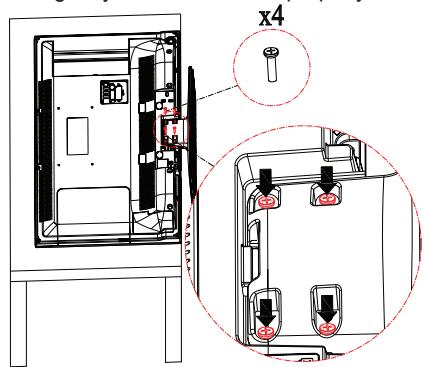
Assembling the pedestal
- Place the stand(s) on the stand mounting pattern(s) on the rear side of the TV.
- Insert the screws (M4 x 12) provided and tighten them gently until the stand is properly fitted.
Removing the pedestal from the TV
Be sure to remove the pedestal in the following way when using the wall-hanging bracket or repacking the TV.
- Put the TV onto a work table with the screen panel down on the clean and soft cloth. Leave the stand(s) protruding over the edge of the surface.
- Unscrew the screws that fixing the stand(s).
- Remove the stand(s).
When using the wall-hanging bracket
Please contact your local Panasonic dealer to purchase the recommended wall-hanging bracket.
Holes for wall-hanging bracket installation;
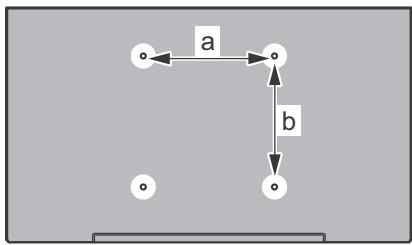
Rear of the TV
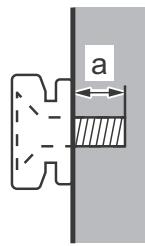
View from the side
| Depth of screw (a) | min. (mm) | 5 |
| max. (mm) | 7 |
| Diameter | M4 |
Note: The screws for fixing the TV onto the wall-hanging bracket are not supplied with the TV.
This television is designed to be environment friendly. To reduce energy consumption, you can follow these steps:
If you set the Energy Saving to Minimum, Medium, Maximum or Auto the TV will reduce the energy consumption accordingly. If you like to set the Backlight to a fixed value set as Custom and adjust the Backlight (located under the Energy Saving setting) manually using Left or Right buttons on the remote. Set as Off to turn this setting off.
Note: Available Energy Saving options may differ depending on the selected Mode in the Picture menu.
The Energy Saving settings can be found in the Picture menu. Note that some picture settings will be unavailable to be changed.
If pressed Right button while Auto option is selected or Left button while Custom option is selected, "Screen will be off in 15 seconds." message will be displayed on the screen. Select Proceed and press OK to turn the screen off immediately. If you don't press any button, the screen will be off in 15 seconds. Press any button on the remote or on the TV to turn the screen on again.
Note: Screen Off option is not available if the Mode is set to Game.
When the TV is not in use, please switch off or disconnect the TV from the mains plug. This will also reduce energy consumption.
Features
Accessories Included
Remote Control
Batteries: 2 x AA
- Instruction Book
- Detachable stand
- Stand mounting screws (M4 x 12)
Standby Notifications
If the TV does not receive any input signal (e.g. from an aerial or HDMI source) for 5 minutes, it will go into standby. When you next switch-on, the following message will be displayed: "TV switched to stand-by mode automatically because there was no signal for a long time." Press OK to continue.
If the TV is on and it isn't being operated for a while it will go into standby. When you next switch-on, the following message will be displayed. "TV switched to stand-by mode automatically because no operation was made for a long time." Press OK to continue.
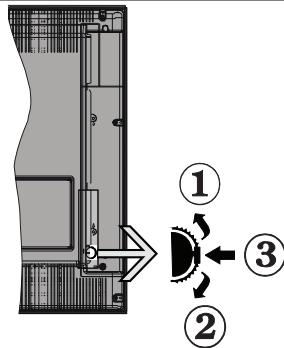
TV Control Switch & Operation
- Up direction
- Down direction
- Volume / Info / Sources List selection and Standby-On switch
The Control button allows you to control the Volume / Programme / Source and Standby-On functions of the TV.
To change volume: Increase the volume by pushing the button up. Decrease the volume by pushing the button down.
To change channel: Press the middle of the button, the information banner will appear on the screen. Scroll through the stored channels by pushing the button up or down.
To change source: Press the middle of the button twice(for the second time in total), the source list will appear on the screen. Scroll through the available sources by pushing the button up or down.
To turn the TV off: Press the middle of the button down and hold it down for a few seconds, the TV will turn into standby mode.
Notes:
- If you turn the TV off, this circle starts again beginning with the volume setting.
- Main menu OSD cannot be displayed via control button.
Operation with the Remote Control
Press the Menu button on your remote control to display main menu screen. Use the directional buttons to select a menu tab and press OK to enter. Use the directional buttons again to select or set an item. Press Return/Back or Menu button to quit a menu screen.
Once you have connected external systems to your TV, you can switch to different input sources. Press the Source button on your remote control consecutively to select the different sources.
Changing Channels and Volume
You can change the channel and adjust the volume by using the Volume +/- and Programme +/- buttons on the remote.
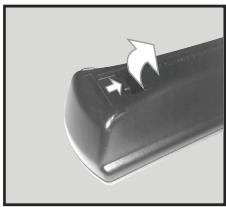
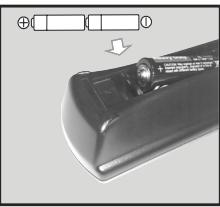
Inserting the Batteries into the Remote
Lift the cover on the back of the remote gently. Insert two AA batteries. Make sure the (+) and (-) signs match (observe correct polarity). Place the cover back on.
Connect Power
IMPORTANT: The TV set is designed to operate on 220-240V AC, 50Hz socket. After unpacking, allow the TV set to reach the ambient room temperature before you connect the set to the mains. Plug the power cable to the mains socket outlet.
Antenna Connection
Connect the aerial or cable TV plug to the AERIAL INPUT (ANT) socket located on the back of the TV.

Notification
TRADEMARK ACKNOWLEDGMENT
The terms HDMI and High-Definition Multimedia Interface, and the HDMI Logo are trademarks or registered trademarks of HDMI Licensing LLC in the United States and other countries.

Manufactured under license from Dolby Laboratories. Dolby, Dolby Audio, and the double-D symbol are trademarks of Dolby Laboratories.

Disposal of Old Equipment and Batteries

Only for European Union and countries with recycling systems
These symbols on the products, packaging, and/or accompanying documents mean that used electrical and electronic products and batteries must not be mixed with general household waste.
For proper treatment, recovery and recycling of old products and batteries, please take them to applicable collection points in accordance with your national legislation.
By disposing of them correctly, you will help to save valuable resources and prevent any potential negative effects on human health and the environment.
For more information about collection and recycling, please contact your local municipality.
Penalties may be applicable for incorrect disposal of this waste, in accordance with national legislation.
Note for the battery symbol (bottom symbol):
This symbol might be used in combination with a chemical symbol. In this case it complies with the requirement set by the Directive for the chemical involved.

C E
Authorized Representative:
Panasonic Testing Centre
Panasonic Marketing Europe GmbH
Winsberging 15, 22525 Hamburg, Germany
Web Site: http://www.panasonic.com
Specification
| TV Broadcasting | PAL BG/DK/II'
SECAM BG/DK |
| Receiving Channels | VHF (BAND I/III) - UHF
(BAND U) - HYPERBAND |
| Digital Reception | Fully integrated digital
terrestrial-cable TV
(DVB-T-C) |
| Number of Preset
Channels | 1000 |
| Channel Indicator | On Screen Display |
| RF Aerial Input | 75 Ohm (unbalanced) |
| Operating Voltage | 220-240V AC, 50Hz. |
| Audio | A2 Stereo+Nicam Stereo |
| Headphone | 3.5 mm mini stereo jack |
| Audio Output Power
(WRMS.) (10% THD) | 2 x 6 W |
| Power Consumption (W) | 65 W |
| Weight (Kg) | 6 Kg |
| TV Dimensions DxLxH
(with foot) (mm) | 185 x 735 x 478 |
| TV Dimensions DxLxH
(without foot) (mm) | 77/97 x 735 x 438 |
| Display | 16/9 32" |
| Operation temperature
and operation humidity | 0°C up to 40°C, 85%
humidity max |
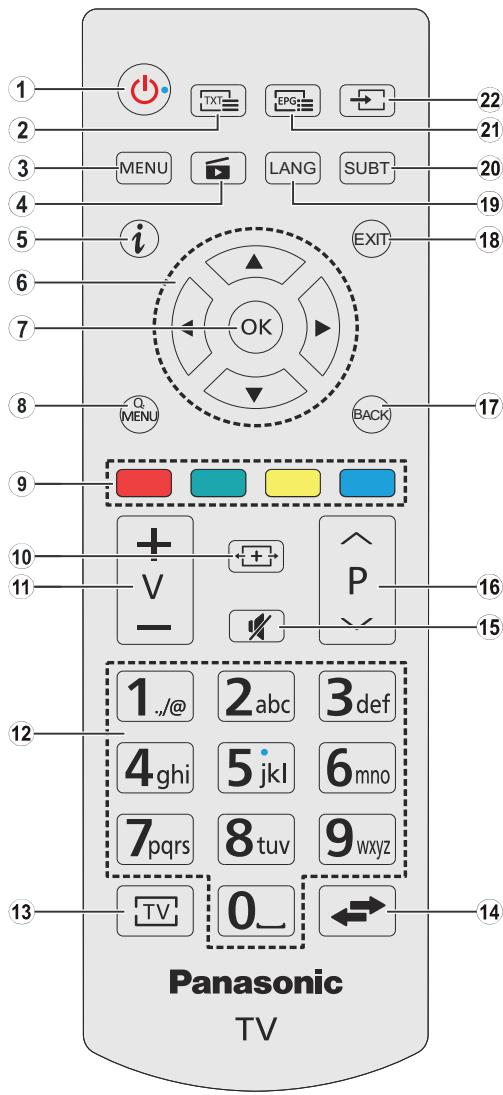
- Standby: Switches On / Off the TV
- Text: Displays teletext (where available), press again to superimpose the teletext over a normal broadcast picture (mix)
- Menu: Displays TV menu
- Media browser: Opens the media browsing screen
- Info: Displays information about on-screen content, shows hidden information (reveal - in TXT mode)
- Directional buttons: Helps navigate menus, content etc. and displays the subpages in TXT mode when pressed Right or Left In media browser mode; Left: Rapid reverse Right: Rapid advance
- OK: Confirms user selections, holds the page (in TXT mode), views channel list (DTV mode), Pause (in media browser mode)
- Quick Menu: Displays a list of menus for quick access
- Coloured Buttons: Follow the on-screen instructions for accurate functions of the coloured button In media browser mode:
Red: Stop / Play
Green:Play/Jump
Yellow: Pause / Subtitle time correction
Blue: Stop
- Screen: Changes the aspect ratio of the screen
- Volume +/-
- Numeric buttons: Switches the channel, enters a number or a letter in the text box on the screen, switches the TV on when in standby mode.
- TV: Displays channel list / Switches to TV Source
- Swap: Quickly cycles between previous and current channels or sources
- Mute: Completely turns off the volume of the TV
- Programme +/- : Programme up-down, Page up-down (in TXT mode), switches the TV on when in standby mode.
- Back/Return: Returns to previous screen, opens index page (in TXT mode)
- Exit: Closes and exits from displayed menus or returns to previous screen
- Language: Switches between sound modes (analogue TV), displays and changes audio/subtitle language (digital TV, where available)
- Subtitles: Turns subtitles on and off (where available)
- EPG (Electronic programme guide): Displays the electronic programme guide
- Source: Shows all available broadcast and content sources
Connections
| Connector | Type | Cables | Device |
| Scart Connection (back) | | |
| VGA Connection (back) | | |
| SIDE AV | PC/YPbPr Audio Connection (side) | YPbPr/PC Audio Cable (not supplied) | |
| HDMI Connection (back) | | |
| SPDIF | SPDIF (Coaxial Out) Connection (back) | | |
| SIDE AV | Side AV (Audio/Video) Connection (side) | AV Cable (not supplied) | |
| HEADPHONE | Headphone Connection (side) | |
| YPBPR | YPbPr Video Connection (back) | PC to YPbPr Connection Cable (not supplied) | |
| USB | USB Connection (side) | | |
| CI Connection (side) | | CAM module |
NOTE: When connecting a device via the YPbPr or Side AV input, you must use the connection cables to enable connection. See the illustrations on the left side. | You can use YPbPr to VGA cable (not supplied) to enable YPbPr signal via VGA input. | You cannot use VGA and YPbPr at the same time. | To enable PC/YPbPr audio, you will need to use the side audio inputs with a YPbPr/PC audio cable (not supplied) for audio connection. | If an external device is connected via the SCART socket, the TV will automatically switch to AV mode. | When receiving DTV channels (Mpeg4 H.264) or while in Media Browser mode, output will not be available via the scart socket. | When using the wall mounting kit (available from third party in the market, if not supplied), we recommend that you plug all your cables into the back of the TV before mounting on the wall. | Insert or remove the CI module only when the TV is SWITCHED OFF. You should refer to the module instruction manual for details of the settings. | The/Each USB input of your TV supports devices up to 500mA. Connecting devices that have current value above 500mA may damage your TV. | By connecting an HDMI cable to your TV, you have to use only a shielded HDMI cable to guarantee a sufficient immunity against parasitic frequency radiation.

If you want to connect a device to the TV, make sure that both the TV and the device are turned off before making any connection. After the connection is done, you can turn on the units and use them.
Switching On/Off
To Switch the TV On
Connect the power cord to a power source such as a wall socket (220-240V AC, 50 Hz).
To switch on the TV from standby mode either:
- Press the Standby button, Programme +/- or a numeric button on the remote control.
- Press the side function switch on the TV until the TV comes on from standby.
To Switch the TV Off
Press the Standby button on the remote control or press the side function switch on the TV until the TV switches into standby mode.
To power down the TV completely, unplug the power cord from the mains socket.
Note: When the TV is switched into standby mode, the standby LED can blink to indicate that features such as Standby Search, Over Air Download or Timer is active. The LED can also blink when you switch on the TV from standby mode.
First Time Installation
When turned on for the first time, the language selection screen is displayed. Select the desired language and press OK.
On the next screen, set your preferences using the directional buttons.
Note: Depending on the Country selection you may be asked to set and confirm a PIN at this point. The selected PIN cannot be 0000. You have to enter it if you are asked to enter a PIN for any menu operation later.
About Selecting Broadcast Type
Digital Aerial: If Digital Aerial broadcast search option is turned on, the TV will search for digital terrestrial broadcasts after other initial settings are completed.
Digital Cable: If Digital Cable broadcast search option is turned on, the TV will search for digital cable broadcasts after other initial settings are completed. According to your other preferences a confirmation message may be displayed before starting to search. Select YES and press OK to proceed. To cancel operation, select NO and press OK. You can select Network or set values such as Frequency, Network ID and Search Step. When finished, press OK button.
Note: Searching duration will change depending on the selected Search Step.
Analogue: If Analogue broadcast search option is turned on, the TV will search for analogue broadcasts after other initial settings are completed.
Additionally you can set a broadcast type as your favourite one. Priority will be given to the selected broadcast type during the search process and the
channels of it will be listed on the top of the Channel List. When finished, press OK to continue.
You can activate Store Mode option at this point. This option will configure your TV's settings for store environment. This option is intended only for store use. It is recommended to select Home Mode for home use. This option will be available in Setup>More menu and can be turned off/on later.
Press OK button on the remote control to continue. After the initial settings are completed TV will start to search for available broadcasts of the selected broadcast types.
After all the available stations are stored, scan results will be displayed. Press OK to continue. The Edit Channel List menu will be displayed next. You can edit the channel list according to your preferences or press the Menu button to quit and watch TV.
While the search continues a message may appear, asking whether you want to sort channels according to the LCN^(*) . Select Yes and press OK to confirm.
(*) LCN is the Logical Channel Number system that organizes available broadcasts in accordance with a recognizable channel number sequence (if available).
Note: Do not turn off the TV while initializing first time installation. Note that, some options may not be available depending on the country selection.
You can connect 2.5" and 3.5" inch (hdd with external power supply) external hard disk drives or USB memory stick to your TV by using the USB inputs of the TV.
IMPORTANT! Back up the files on your storage devices before connecting them to the TV. Manufacturer will not be responsible for any file damage or data loss. Certain types of USB devices (e.g. MP3 Players) or USB hard disk drives/memory sticks may not be compatible with this TV. The TV supports FAT32 and NTFS disk formatting.
While formatting USB hard drives which have more than 1TB (Tera Byte) storage space you may experience some problems in the formatting process.
Wait a little while before each plugging and unplugging as the player may still be reading files. Failure to do so may cause physical damage to the USB player and the USB device itself. Do not pull out your drive while playing a file.
You can use USB hubs with your TV's USB inputs. External power supplied USB hubs are recommended in such a case.
It is recommended to use the TV's USB input(s) directly, if you are going to connect a USB hard disk.
Note: When viewing image files the Media Player menu can only display 1000 image files stored on the connected USB device.
You can play photo, music and movie files stored on a USB disk by connecting it to your TV. Connect a USB disk to one of the USB inputs located on the side of the TV. Pressing the Menu button while in the Media Browser mode will access the Picture, Sound and Setup menu options. Pressing the Menu button again will exit from this screen. You can set your Media Browser preferences by using the Setup menu.
| Loop/Shuffle Mode Operation |
| Start playback with the Play button and activate | All files in the list will be continuously played in original order |
| Start playback with the OK button and activate | The same file will be played continuously (repeat) |
| Start playback with the Play button and activate | All files in the list will be played once in random order |
| Start playback with the Play button and activate | All files in the list will be continuously played in the same random order. |
CEC and CEC RC Passthrough
This function allows to control the CEC-enabled devices, that are connected through HDMI ports by using the remote control of the TV.
The CEC option in the Setup>More menu should be set as Enabled at first. Press the Source button and select the HDMI input of the connected CEC device from the Sources List menu. When new CEC source device is connected, it will be listed in source menu with its own name instead of the connected HDMI ports name(such as DVD Player, Recorder 1 etc.).
The TV remote is automatically able to perform the main functions after the connected HDMI source has been selected.
To terminate this operation and control the TV via the remote again, press Quick Menu button on the remote, highlight the CEC RC Passthrough and set as Off by pressing Left or Right button. This feature can also be enabled or disabled under the Setup>More menu.
The TV supports also ARC(Audio Return Channel) feature. This feature is an audio link meant to replace other cables between the TV and the audio system (A/V receiver or speaker system).
When ARC is active, TV does not mute its other audio outputs automatically. So you need to decrease TV volume to zero manually, if you want to hear audio from connected audio device only (same as other optical or co-axial digital audio outputs). If you want to change connected device's volume level, you should select that device from the source list. In that case volume control keys are directed to connected audio device.
Note: ARC is supported only via the HDMI1 input.
System Audio Control
Allows an Audio Amplifier/Receiver to be used with the TV. The volume can be controlled using the remote control of the TV. To activate this feature set the Speakers option in the Setup>More menu as Amplifier. The TV speakers will be muted and the sound of the watched source will be provided from the connected sound system.
Note: The audio device should support System Audio Control feature and CEC option should be set as Enabled.
TV Menu Contents
| Picture Menu Contents |
| Mode | You can change the picture mode to suit your preference or requirements. Picture mode can be set to one of these options: Cinema, Game(optional), Sports, Dynamic and Natural. |
| Contrast | Adjusts the light and dark values on the screen. |
| Brightness | Adjusts the brightness values on the screen. |
| Sharpness | Sets the sharpness value for the objects displayed on the screen. |
| Colour | Sets the colour value, adjusting the colours. |
| Energy Saving | For setting the Energy Saving to Custom, Minimum, Medium, Maximum, Auto, Picture Off or Off.
Note: Available options may differ depending on the selected Mode. |
| Backlight | This setting controls the backlight level. The backlight function will be inactive if the Energy Saving is set to an option other than Custom. |
| Advanced Settings |
| Dynamic Contrast | You can change the dynamic contrast ratio to desired value. |
| Noise Reduction | If the signal is weak and the picture is noisy, use the Noise Reduction setting to reduce the amount of noise. |
| Colour Temp | Sets the desired colour temperature value. Cool, Normal, Warm and Custom options are available. |
| White Point | If the Colour Temp option is set as Custom, this setting will be available. Increase the 'warmth' or 'coolness' of the picture by pressing Left or Right buttons. |
| Picture Zoom | Sets the desired image size format. |
| Film Mode | Films are recorded at a different number of frames per second to normal television programmes. Turn this feature on when you are watching films to see the fast motion scenes clearly. |
| Skin Tone | Skin tone can be changed between -5 and 5. |
| Colour Shift | Adjust the desired colour tone. |
| HDMI Full Range | While watching from a HDMI source, this feature will be visible. You can use this feature to enhance blackness in the picture. |
| PC Position |
| Autoposition | Automatically optimizes the display. Press OK to optimize. |
| H Position | This item shifts the image horizontally to the right hand side or left hand side of the screen. |
| V Position | This item shifts the image vertically towards the top or bottom of the screen. |
| Dot Clock | Dot Clock adjustments correct the interference that appear as vertical banding in dot intensive presentations like spreadsheets or paragraphs or text in smaller fonts. |
| Phase | Depending on the input source(computer etc.) you may see a hazy or noisy picture on the screen. You can use phase to get a clearer picture by trial and error. |
| Reset |
| While in VGA (PC) mode, some items in Picture menu will be unavailable. Instead, VGA mode settings will be added to the Picture Settings while in PC mode. |
| Sound Menu Contents |
| Volume | Adjusts the volume level. |
| Equalizer | Selects the equalizer mode. Custom settings can be made only when in User mode. |
| Balance | Adjusts whether the sound comes from the left or right speaker. |
| Headphone | Sets headphone volume.
Please ensure before using headphones that the headphone volume is set to a low level, to prevent damage to your hearing. |
| Sound Mode | You can select a sound mode (If the viewed channel supports). |
| AVL (Automatic Volume Limiting) | Sets the sound to obtain fixed output level between programmes. |
| Headphone/Lineout | When you connect an external amplifier to your TV using the headphone jack, you can select this option as Lineout. If you have connected headphones to the TV, set this option as Headphone.
Please ensure before using headphones that this menu item is set to Headphone.
If it is set to Lineout, the output from the headphone socket will be set to maximum which could damage your hearing. |
| Dynamic Bass | Enables or disables the Dynamic Bass. |
| Surround sound | Surround sound mode can be changed as On or Off. |
| Digital Out | Sets digital out audio type. |
| Setup - Settings Menu Contents |
| Conditional Access | Controls conditional access modules when available. |
| Language | You may set a different language depending on the broadcaster and the country. |
| Parental | Enter correct password to change parental settings. You can easily adjust Menu Lock, Maturity Lock, Child Lock or Guidance in this menu. You can also set a new PIN or change the Default CICAM PIN using the related options.
Note: Some menu options may not be available depending on the country selection in the First Time Installation. Default PIN can be set to 0000 or 1234. If you have defined the PIN(is requested depending on the country selection) during the First Time Installation use the PIN that you have defined. |
| Timers | Sets sleep timer to turn off the TV after a certain time. Sets timers for selected programmes. |
| Date/Time | Sets date and time. |
| Sources | Enables or disables selected source options. |
| Accessibility | Displays accessibility options of the TV. |
| Hard of Hearing | Enables any special feature sent from the broadcaster. |
| Audio Description | A narration track will be played for the blind or visually impaired audience. Press OK to see all available Audio Description menu options. This feature is available only if the broadcaster supports it. |
| More | Displays other setting options of the TV. |
| Menu Timeout | Changes timeout duration for menu screens. |
| Software Upgrade | Ensures that your TV has the latest firmware. Press OK to see the menu options. |
| Application Version | Displays current software version. |
| Subtitle Mode | This option is used to select which subtitle mode will be on the screen (DVB subtitle / Teletext subtitle) if both is available. Default value is DVB subtitle. This feature is available only for the country option of Norway. |
| Auto TV OFF | Sets the desired time for the TV to automatically go into standby mode when not being operated. |
| Store Mode | Select this mode for store display purposes. Whilst Store Mode is enabled, some items in the TV menu may not be available. |
| Power Up Mode | This setting configures the power up mode preference. Last State and Standby options are available. |
| CEC | With this setting you can enable and disable CEC functionality completely. Press Left or Right button to enable or disable the feature. |
| CEC Auto Power On | This function allows the connected HDMI-CEC compatible device to turn on the TV and switch to its input source automatically. Press Left or Right button to enable or disable the feature. |
| Speakers | To hear the TV audio from the connected compatible audio device set as Amplifier. You can use the remote control of the TV to control the volume of the audio device. |
| Install and Retune Menu Contents |
| Automatic channel scan (Retune) | Displays automatic tuning options. Digital Aerial: Searches and stores aerial DVB stations. Digital Cable: Searches and stores cable DVB stations. Analogue: Searches and stores analogue stations. |
| Manual channel scan | This feature can be used for direct broadcast entry. |
| Network channel scan | Searches for the linked channels in the broadcast system. Digital Aerial: Searches for aerial network channels. Digital Cable: Searches for cable network channels. |
| Analogue fine tune | You can use this setting for fine tuning analogue channels. This feature is not available if no analogue channels are stored. |
| Installation Settings | Displays installation settings menu. Standby Search (Optional): Your TV will search for new or missing channels while in standby. Any new found broadcasts will be shown. |
| Clear Service List | Use this setting to clear channels stored. This setting is visible only when the Country option is set to Denmark, Sweden, Norway or Finland. |
| Select Active Network | This setting allows you to select only the broadcasts within the selected network to be listed in the channel list. This feature is available only for the country option of Norway. |
| First time installation | Deletes all stored channels and settings, resets TV to factory settings. |
General TV Operation
Using the Channel List
The TV sorts all stored stations in the Channel List. You can edit this channel list, set favourites or set active stations to be listed by using the Channel List options. Press the OK/TV button to open the Channel List. You can filter the listed channels by pressing the Blue button or open the Edit Channel List menu by pressing the Green button in order to make advanced changes in the current list.
Managing the Favourite Lists
You can create four different lists of your favourite channels. Enter the Channel List in the main menu or press the Green button while the Channel List is displayed on the screen in order to open the Edit Channel List menu. Select the desired channel on the list. You can make multiple choices by pressing the Yellow button. Then press the OK button to open the Channel Edit Options menu and select Add/Remove Favourites option. Press the OK button again. Set the desired list option to On. The selected channel/s will be added to the list. In order to remove a channel or channels from a favourite list follow the same steps and set the desired list option to Off.
You can use the Filter function in the Edit Channel List menu to filter the channels in the Channel list permanently according to your preferences. Using this Filter option, you can set one of your four favourite lists to be displayed every time the Channel list is opened. The filtering function in the Channel list menu will only filter the currently displayed Channel list in order to find a channel and tune in to it. This changes will not remain the next time the Channel list is opened.
Configuring Parental Settings
The Parental Settings menu options can be used to prohibit users from viewing of certain programmes, channels and using of menus. These settings are located in the Setup>Parental menu.
To display parental lock menu options, a PIN number should be entered. After coding the correct PIN number, Parental Settings menu will be displayed.
Menu Lock: This setting enables or disables access to all menus or installation menus of the TV.
Maturity Lock: If this option is set, TV gets the maturity information from the broadcast and if this maturity level is disabled, disables access to the broadcast.
Note: If the country option in the First Time Installation is set as France, Italy or Austria, Maturity Lock's value will be set to 18 as default.
Child Lock: If this option is set to ON, the TV can only be controlled by the remote control. In this case the control buttons on the TV will not work.
Set PIN: Defines a new PIN number.
Default CICAM PIN: This option will appear as greyed out if no CI module is inserted into the CI slot of the TV. You can change the default PIN of the CI CAM using this option.
Note: Default PIN can be set to 0000 or 1234. If you have defined the PIN(is requested depending on the country selection) during the First Time Installation use the PIN that you have defined.
Some options may not be available depending on the country selection in the First Time Installation.
Electronic Programme Guide (EPG)
Some channels send information about their broadcast schedules. Press the EPG button to view the Programme Guide menu.
There are 3 different types of schedule layouts available, Timeline Schedule, List Schedule and Now/Next Schedule. To switch between them follow the instructions on the bottom of the screen.
Timeline Schedule
Zoom (Yellow button): Press the Yellow button to see events in a wider time interval.
Filter (Blue button): Views filtering options.
Select Genre (Subtitles button): Displays Select Genre menu. Using this feature, you can search the programme guide database in accordance with the genre. Info available in the programme guide will be searched and results matching your criteria will be highlighted.
Options (OK button): Displays event options.
Event Details (Info button): Displays detailed information about selected events.
Next/Prev Day (Programme +/- buttons): Displays the events of previous or next day.
Search (Text button): Displays Guide Search menu. Now (Swap button): Displays current event of the highlighted channel.
List Schedule\*
(*) In this layout option, only the events of the highlighted channel will be listed.
Prev. Time Slice (Red button): Displays the events of previous time slice.
Next/Prev Day (Programme +/- buttons): Displays the events of previous or next day.
Event Details (Info button): Displays detailed information about selected events.
Filter (Text button): Views filtering options.
Next Time Slice (Green button): Displays the events of next time slice.
Options (OK button): Displays event options.
Now/Next Schedule
Navigate (Directional buttons): Press the Directional buttons to navigate through the channels and events.
Options (OK button): Displays event options.
Event Details (Info button): Displays detailed information about selected events.
Filter (Blue button): Views filtering options.
Event Options
Use the directional buttons to highlight an event and press OK button to display Event Options menu. The following options are available.
Select Channel: Using this option, you can switch to the selected channel.
Set Timer on Event / Delete Timer on Event: After you have selected an event in the EPG menu, press the OK button. Select Set Timer on Event option and press the OK button. You can set a timer for future events. To cancel an already set timer, highlight that event and press the OK button. Then select Delete Timer on Event option. The timer will be cancelled.
Notes: You cannot switch to any other channel or source while there is an active timer on the current channel.
It is not possible to set timer for two or more individual events at the same time interval.
Teletext Services
Press the Text button to enter. Press again to activate mix mode, which allows you to see the teletext page and the TV broadcast at the same time. Press once more to exit. If available, sections in the teletext pages will become colour-coded and can be selected by pressing the coloured buttons. Follow the instructions displayed on the screen.
Digital Teletext
Press the Text button to view digital teletext information. Operate it with the coloured buttons, cursor buttons and the OK button. The operation method may differ depending on the contents of the digital teletext. Follow the instructions displayed on the digital teletext screen. When the Text button is pressed again, the TV returns to television broadcast.
Software Upgrade
Your TV is capable of finding and updating the firmware automatically via the broadcast signal.
Software upgrade search via user interface
On the main menu select Setup and press the OK button. Setup Menu will be displayed. Then select More and press the OK button. Navigate to Software upgrade and press the OK button. In Upgrade options menu select Scan for upgrade and press OK button to check for a new software upgrade.
If a new upgrade is found, it starts to download the upgrade. After the download is completed confirm the question asking about rebooting the TV by pressing the OK to continue with the reboot operation.
3 AM search and upgrade mode
Your TV will search for new upgrades at 3:00 o'clock if Automatic scanning option in the Upgrade options menu is set to Enabled and if the TV is connected
to an aerial signal. If a new software is found and downloaded successfully, it will be installed at the next power on.
Note: Do not unplug the power cord while led is blinking during the reboot process. If the TV fails to come on after the upgrade, unplug, wait for two minutes then plug it back in.
Troubleshooting & Tips
Tv will not turn on
Make sure the power cord is plugged in securely to wall outlet. Check if batteries are exhausted. Press the Power button on the TV.
Poor picture
- Check if you have selected the correct TV system.
- Low signal level can cause picture distortion. Please check antenna access.
- Check if you have entered the correct channel frequency if you have done manual tuning.
- The picture quality may degrade when two devices are connected to the TV at the same time. In such a case, disconnect one of the devices.
No picture
- This means your TV is not receiving any transmission.
Make sure the correct source has been selected.
- Is the antenna connected properly?
- Is the antenna cable damaged?
- Are suitable plugs used to connect the antenna?
If you are in doubt, consult your dealer.
No sound
- Check if the TV is muted. Press the Mute button or increase the volume to check.
- Sound may be coming from only one speaker. Check the balance settings from Sound menu.
Remote control - no operation
- The batteries may be exhausted. Replace the batteries.
- If you cannot select an input source, it is possible that no device is connected. If not;
- Check the AV cables and connections if you are trying to switch to the input source dedicated to the connected device.
The following table is an illustration of some of the typical video display modes. Your TV may not support all resolutions.
| Index | Resolution | Frequency |
| 1 | 640x350 | 85Hz |
| 2 | 640x400 | 70Hz |
| 3 | 640x480 | 60Hz |
| 4 | 640x480 | 66Hz |
| 5 | 640x480 | 72Hz |
| 6 | 640x480 | 75Hz |
| 7 | 640x480 | 85Hz |
| 8 | 800x600 | 56Hz |
| 9 | 800x600 | 60Hz |
| 10 | 800x600 | 70Hz |
| 11 | 800x600 | 72Hz |
| 12 | 800x600 | 75Hz |
| 13 | 800x600 | 85Hz |
| 14 | 832x624 | 75Hz |
| 15 | 1024x768 | 60Hz |
| 16 | 1024x768 | 66Hz |
| 17 | 1024x768 | 70Hz |
| 18 | 1024x768 | 72Hz |
| 19 | 1024x768 | 75Hz |
| 20 | 1024x768 | 85Hz |
| 21 | 1152x864 | 60Hz |
| 22 | 1152x864 | 70Hz |
| 23 | 1152x864 | 75Hz |
| 24 | 1152x864 | 85Hz |
| 25 | 1152x870 | 75Hz |
| 26 | 1280x768 | 60Hz |
| 27 | 1360x768 | 60Hz |
| 28 | 1280x768 | 75Hz |
| 29 | 1280x768 | 85Hz |
| 30 | 1280x960 | 60Hz |
| 31 | 1280x960 | 75Hz |
| 32 | 1280x960 | 85Hz |
| 33 | 1280x1024 | 60Hz |
| 34 | 1280x1024 | 75Hz |
| 35 | 1280x1024 | 85Hz |
| 36 | 1400x1050 | 60Hz |
| 37 | 1400x1050 | 75Hz |
| 38 | 1400x1050 | 85Hz |
| 39 | 1440x900 | 60Hz |
| 40 | 1440x900 | 75Hz |
| 41 | 1600x1200 | 60Hz |
| 42 | 1680x1050 | 60Hz |
| 43 | 1920x1080 | 60Hz |
| 44 | 1920x1200 | 60Hz |
AV and HDMI Signal Compatibility
| Source | Supported Signals | Available |
| EXT(SCART) | PAL | O |
| SECAM | O |
| NTSC4.43 | O |
| NTSC3.58 | O |
| RGB 50/60 | O |
| Side AV | PAL | O |
| SECAM | O |
| NTSC4.43 | O |
| NTSC3.58 | O |
| YPbPr | 480i, 480p | 60Hz | O |
| 576i, 576p | 50Hz | O |
| 720p | 50Hz,60Hz | O |
| 1080i | 50Hz,60Hz | O |
| HDMI | 480i, 480p | 60Hz | O |
| 576i, 576p | 50Hz | O |
| 720p | 50Hz,60Hz | O |
| 1080i | 50Hz,60Hz | O |
| 1080p | 24Hz,25Hz,30Hz,50Hz,60Hz | O |
(X: Not Available, O: Available)
In some cases a signal on the TV may not be displayed properly. The problem may be an inconsistency with standards from the source equipment (DVD, Set-top box, etc.). If you do experience such a problem please contact your dealer and also the manufacturer of the source equipment.
Supported Video File Formats for USB Mode
| Extension | Video Codec | SPEC (Resolution) & Bit Rate |
| .dat, vob | MPEG1/2 | 1080P@30fps - 40 Mbps |
| .mpg, .mpeg | MPEG1/2, MPEG4 |
| .ts, .trp, .tp | MPEG1/2, H.264, AVS, MVC | H.264: 1080Px2@30fps - 62.5 Mbps, 1080P@60fps - 62.5 Mbps MVC: 1080P@30fps - 62.5 Mbps Other: 1080P@30fps - 40Mbps |
| .mp4, .mov, .3gpp, .3gp | MPEG1/2, MPEG4, H.263, H.264, Motion JPEG | H.264: 1080Px2@30fps - 62.5 Mbps, 1080P@60fps - 62.5 Mbps Motion JPEG: 640x480@30fps - 10 Mbps Other: 1080P@30fps - 40 Mbps |
| .avi | MPEG1/2, MPEG4, Sorenson H.263, H.263, H.264, WMV3, Motion JPEG |
| .mkv | MPEG1/2, MPEG4, H.263, H.264, WMV3, Motion JPEG |
| .asf | Sorenson H.263, H.264, WMV3, Motion JPEG |
| .flv | WMV3 | 1080P@30fps - 40 Mbps |
| .swf | RV30/RV40 | 1080P@30fps - 40 Mbps |
| .wmv | | |
Supported Picture File Formats for USB Mode
| Image | Photo | Resolution (width x height) | Remark |
| JPEG | Base-line | 15360x8640 | The limitation of max resolution depends on DRAM size |
| Progressive | 1024x768 |
| PNG | non-interlace | 9600x6400 |
| interlace | 1200x800 |
| BMP | | 9600x6400 |
| Extension | Audio Codec | Bit Rate | Sample rate |
| .mp3, | MPEG1/2 Layer1 | 32Kbps ~ 448Kbps | 16KHz ~ 48KHz |
| MPEG1/2 Layer2 | 8Kbps ~ 384Kbps |
| MPEG1/2 Layer3 | 8Kbps ~ 320Kbps |
| .avi | MPEG1/2 Layer1 | 32Kbps ~ 448Kbps | 16KHz ~ 48KHz |
| MPEG1/2 Layer2 | 8Kbps ~ 384Kbps |
| MPEG1/2 Layer3 | 8Kbps ~ 320Kbps |
| AC3 | 32Kbps ~ 640Kbps | 32KHz, 44.1KHz, 48KHz |
| AAC, HEAAC | | 8KHz ~ 48KHz |
| WMA | 128bps ~ 320Kbps | 8KHz ~ 48KHz |
| WMA 10 Pro M0 | < 192kbps | 48KHz |
| WMA 10 Pro M1 | < 384kbps | 48KHz |
| WMA 10 Pro M2 | < 768kbps | 96KHz |
| LPCM | 64Kbps ~ 1.5Mbps | 8KHz ~ 48KHz |
| IMA-ADPCM, MS-ADPCM | 384Kbps | 8KHz ~ 48KHz |
| G711 A/mu-law | 64Kbps ~ 128Kbps | 8KHz |
| .asf | MPEG1/2 Layer1 | 32Kbps ~ 448Kbps | 16KHz ~ 48KHz |
| MPEG1/2 Layer2 | 8Kbps ~ 384Kbps |
| MPEG1/2 Layer3 | 8Kbps ~ 320Kbps |
| WMA | 128bps ~ 320Kbps | 8KHz ~ 48KHz |
| WMA 10 Pro M0 | < 192kbps | 48KHz |
| WMA 10 Pro M1 | < 384kbps | 48KHz |
| WMA 10 Pro M2 | < 768kbps | 8KHz ~ 48KHz |
| .mkv, .mka | MPEG1/2 Layer1 | 32Kbps ~ 448Kbps | 16KHz ~ 48KHz |
| MPEG1/2 Layer2 | 8Kbps ~ 384Kbps |
| MPEG1/2 Layer3 | 8Kbps ~ 320Kbps |
| AC3 | 32Kbps ~ 640Kbps | 32KHZ, 44.1KHz, 48KHz |
| AAC, HEAAC | | 8KHz ~ 48KHz |
| WMA | 128bps ~ 320Kbps | 8KHz ~ 48KHz |
| WMA 10 Pro M0 | < 192kbps | 48KHz |
| WMA 10 Pro M1 | \( < \) 384kbps | 48KHz |
| WMA 10 Pro M2 | < 768kbps | 96KHz |
| VORBIS | | Up to 48KHz |
| LPCM | 64Kbps ~ 1.5Mbps | 8KHz ~ 48KHz |
| IMA-ADPCM,MS-ADPCM | 384Kbps | 8KHz ~ 48KHz |
| G711 A/mu-law | 64Kbps ~ 128Kbps | 8KHz |
| FLAC | < 1.6Mbps | 8KHz ~ 96KHz |
| .ts, .trp, ,tp, .dat, .vob, .mpg, .mpeg | MPEG1/2 Layer1 | 32Kbps ~ 448Kbps | 16KHz ~ 48KHz |
| MPEG1/2 Layer2 | 8Kbps ~ 384Kbps |
| MPEG1/2 Layer3 | 8Kbps ~ 320Kbps |
| AC3 | 32Kbps ~ 640Kbps | 32Khz, 44.1KHz, 48KHz |
| EAC3 | 32Kbps ~ 6Mbps | 32KHz, 44.1KHz, 48KHz |
| AAC, HEAAC | | 8KHz ~ 48KHz |
| LPCM | 64Kbps ~ 1.5Mbps | 8KHz ~ 48KHz |
Supported Subtitle File Formats for USB Mode
| Extension | Audio Codec | Bit Rate | Sample rate |
| .wav | MPEG1/2 Layer1 | 32Kbps ~ 448Kbps | 16KHz ~ 48KHz |
| MPEG1/2 Layer2 | 8Kbps ~ 384Kbps |
| MPEG1/2 Layer3 | 8Kbps ~ 320Kbps |
| LPCM | 64Kbps ~ 1.5Mbps | 8KHz ~ 48KHz |
| IMA-ADPCM,MS-ADPCM | 384Kbps | 8KHz ~ 48KHz |
| G711 A/mu-law | 64Kbps ~ 128Kbps | 8KHz |
| .3gpp, .3gp, .mp4, .mov,m4a | MPEG1/2 Layer3 | 8Kbps ~ 320Kbps | 16KHz ~ 48KHz |
| AC3 | 32Kbps ~ 640Kbps | 32KHz, 44.1KHz, 48KHz |
| EAC3 | 32Kbps ~ 6Mbps | 32KHz, 44.1KHz, 48KHz |
| AAC, HEAAC | | 8KHz ~ 48KHz |
| VORBIS | | Up to 48KHz |
| LPCM | 64Kbps ~ 1.5Mbps | 8KHz ~ 48KHz |
| IMA-ADPCM,MS-ADPCM | 384Kbps | 8KHz ~ 48KHz |
| G711 A/mu-law | 64Kbps ~ 128Kbps | 8KHz |
| .flv | MPEG1/2 Layer3 | 8Kbps ~ 320Kbps | 16KHz ~ 48KHz |
| AAC, HEAAC | | 8KHz ~ 48KHz |
| .ac3 | AC3 | 32Kbps ~ 640Kbps | 32KHz, 44.1KHz, 48KHz |
| AAC, HEAAC | | 8KHz ~ 48KHz |
| .swf | MPEG1/2 Layer3 | 8Kbps ~ 320Kbps | 16KHz ~ 48KHz |
| .ec3 | EAC3 | 32Kbps ~ 6Mbps | 32KHz, 44.1KHz, 48KHz |
| .rm, .rmvb, .ra | AAC, HEAAC | | 8KHz ~ 48KHz |
| LBR (cook) | 6Kbps ~ 128Kbps | 8KHz, 11.025KHz,22.05KHz, 44.1KHz |
| .wma, .wmv | WMA | 128bps ~ 320Kbps | 8KHz ~ 48KHz |
| WMA 10 Pro M0 | < 192kbps | 48KHz |
| WMA 10 Pro M1 | < 384kbps | 48KHz |
| WMA 10 Pro M2 | < 768kbps | 96KHz |
| .webm | VORBIS | | Up to 48KHz |
Internal Subtitles
| Extension | Container | Subtitle Code |
| dat, mpg,mpeg, gob | MPG, MPEG | DVD Subtitle |
| ts, trp, tp | TS | DVB Subtitle |
| mp4 | MP4 | DVD Subtitle
UTF-8 Plain Text |
| mkv | MKV | ASS
SSA
UTF-8 Plain Text
VobSub
DVD Subtitle |
External Subtitles
| Extension | Subtitle Parser | Remark |
| .srt | Subrip | |
| .ssa/.ass | SubStation Alpha | |
| .smi | SAMI | |
| .sub | Subscriber MicroDVD
DVDSusbtitleSystem
SubIdx (VobSub) | Subscriber 1.0 & 2.0 Only |
| .txt | TMPlayer | |
Supported DVI Resolutions
When connecting devices to your TV's connectors by using DVI converter cable(DVI to HDMI cable - not supplied), you can refer to the following resolution information.
| 56Hz | 60Hz | 66Hz | 70Hz | 72Hz | 75Hz |
| 640x400 | | | | ☑ | | |
| 640x480 | | ☑ | ☑ | | ☑ | ☑ |
| 800x600 | ☑ | ☑ | | ☑ | ☑ | ☑ |
| 832x624 | | | | | | ☑ |
| 1024x768 | | ☑ | ☑ | ☑ | ☑ | ☑ |
| 1152x864 | | ☑ | | ☑ | | ☑ |
| 1152x870 | | | | | | ☑ |
| 1280x768 | | ☑ | | | | ☑ |
| 1360x768 | | ☑ | | | | |
| 1280x960 | | ☑ | | | | ☑ |
| 1280x1024 | | ☑ | | | | ☑ |
| 1400x1050 | | ☑ | | | | ☑ |
| 1440x900 | | ☑ | | | | ☑ |
| 1600x1200 | | ☑ | | | | |
| 1680x1050 | | ☑ | | | | |
| 1920x1080 | | ☑ | | | | |
Table des matieres
Panasonic Testing Centre
Panasonic Marketing Europe GmbH
Winsberging 15, 22525 Hamburg, Germany
Web Site: http://www.panasonic.com
Spécifications
Panasonic Testing Centre
Panasonic Marketing Europe GmbH
Winsberging 15, 22525 Hamburg, Germany
Web Site: http://www.panasonic.com
Panasonic Testing Centre
Panasonic Marketing Europe GmbH
Winsberging 15, 22525 Hamburg, Germany
Web Site: http://www.panasonic.com
Especificação
CEC e CEC RC Passthrough 104
Indice menu TV 105
Panasonic Testing Centre
Panasonic Marketing Europe GmbH
Winsberging 15, 22525 Hamburg, Germany
Web Site: http://www.panasonic.com
Specifiche
CEC e CEC RC Passthrough
Panasonic Testing Centre
Panasonic Marketing Europe GmbH
Winsberging 15, 22525 Hamburg, Germany
Web Site: http://www.panasonic.com
Specificities
| B Supplier | Panasonic Corporation |
| C Model ID | TX-32D300E |
| D Energy efficiency class | A+ |
| E Visible screen size (diagonal) | 80 cm / 32 inches |
| F On mode average power consumption | 31 W |
| G Annual energy consumption *1 | 45 kWh |
| H Standby power consumption *2 | 0,5 W |
| I Off mode power consumption | NA |
| J Screen resolution | 1366 x 768 |
K^1 : Energy consumption XYZ kWh per year, based on the power consumption of the television operating 4 hours per day for 365 days.
The actual energy consumption will depend on how the television is used.
^2 : when the TV is turned off with the remote control and no function is active.
For the information of rated power consumption, refer to the label on the TV back cover.
| Deutsch | A | Produktdatenblatt | C | Modellkennung | G | Jährlicher Energieverbrauch | E | Consumo de energia anual | |
| B | Lieferanten | D | Energieeffizienzklasse | H | Leistungsaufnahme im Bereitschafts-Zustand | F | Consumo de electricidad en espera | |
| E | Sichtbare Bildschmirdiagonal | I | Leistungsaufnahme im Aus-Zusatz | I | Consumo de electricidad en mode apagado | I | |
| F | Leistungsaufnahme im Ein-Zustand | J | Bildschmirkauflösung | J | Consumo de electricidad en mode encendido | J | |
| K | Energieverbrauch XYZ kWh/Jahr, auf der Grundlage eines tajgliche viertstündigen Betriebs des Fernsehgerätes an 365 Tagen. Der tatsächlichen Energieverbrauch hängt von der Art der Nutzung des Fernsehgerätes ab. | Consumo de energia: XYZ kWh al ano, suponiendo quatro horas de funciación del diajero durante 365 días. El Consumo efctivo dependerá de las conditiones reales de uso de la television. | |
| L | wenn der Fernseher mit der Fernbedienung ausgeschaltet wird und keine Funktion aktiviert ist | Cuando el TV se apaga con el mando a distancia y no existe ninguna función activa | |
| M | Weitere Informaciones zur Nennleistungsaufnahme siehe Aufkleiber auf der hinteren Abdeckung des Femebers. | Para informacion sobre el Consumo de potencia nominal consultate la etiqueta en la cubierta trasa del telesor. | |
| Niederlande | A | Productkaart | C | Typeanduling | G | Jaarliks Elenergieverbrauk | G | Informationsblad | |
| B | Leverancier | D | Energie-efficiencklasse | H | Elektriteitsverbrauk in de slapstand | G | Leverantör | |
| E | Zichtbare schermdiagonal | I | Elektriteitsverbrauk in de uiststand | I | Synig skärmldiagonal | Effektforbrukting i standbylage | |
| F | Elektriteitsverbrauk in de gebruksstand | J | Schemresolutie | J | Effektforbrukting i päläge | Effektforbrukting i fränlage | |
| K | Energieverbrauch XYZ kWh per Jahr, gebeerd op het elektriteitsverbrauk van de televisie wannere deze gesturende 365 dagen 4 uer per dag aan staat. Het feilelijkke energieverbrauk is afhankelijk van de manier waarop de televisie wordgetrukt. | Skärmpullössning | | |
| L | Als de tv is uitgeschakeld met de afstandsbiedingen en ergen functions actief zichijn | Nordik | | |
| M | Raatpleeg het etieket aan dechterkant van de tv voor informatie over het nomiale elektriciteitsverbrauk. | Nar TV:n ar asvilen via fjkkrontollen och ingen functiorknaktiv | | |
| Italien | A | Sched prodotto | C | Identificatore del modello | G | Consumo annuo di energia | G | Produktinfo | |
| B | Fornitore | D | Classe di efficienza energetica | H | Consumo di energia in mode stand-by | H | Leverandör | |
| E | Diagonole dello schermo visible | I | Consumo di energia in modo spento | I | Synig skjm-diangular | Effektforbrukting i off-modulus | |
| F | Compo di energia in modo accesso | J | Risoluzione dello schermo | J | Stromforbruk i päl-modus | Skjermopplossing | |
| K | Consumo di energia XYZ kWh/ano calcolo sulla base del consumo di un televisie in funzione per 4 ore al giorno per 365 giorni. Il consumo effettivo di energia dipende dall'utilizzo reale del televisore. | Energifbrukting 'XYZ' kWh per ar, strømforbruk er basert prak av TV-en for 4 timer per dag for 365 dager. Det faktiske energifbrukket vil vare avhengig av hvordan TV-en brukes. | | |
| L | quando il televisore viene spento con il telecomando e non sono attive funzioni | narr TV-en er skrudd av med fjernkontrollen og ingen funksjön er aktiv | | |
| M | Per le informazioni sul consumo di energia nominale, fare rifimenti all'etichetta sul copercchio posteriori del televisore. | For information om nominale effekt, se etiketten på TV-bakdekselet. | | |
| Français | A | Fiche produit | C | Référence du modele | G | Consommation d'énergie annuelle | G | Toueseloste | |
| B | Fournisseur | D | Classe d'éfficacité énergétique | H | Consommation électricte en mode veille | H | Tavarantoimitta jade | |
| E | Diagonole d'écran visible | I | Consumption électricte en mode arrêt | I | Näkyviss olevan kuvapinnán lāviastaj | Thonkutulux pos pailà-tilassa | |
| F | Consommation électricte en mode marche | J | Résolution de l'écran | J | Tehonkutulux paila kytkettynä -tilassa | Kuvarudun resolutio | |
| K | Consommation d'énergie de "XYZ" kWh par an, sur la base de la consommation électricte d'un téléviseur fonctionnant quatre heures par jour pendant trois cent soixante-cinq jours. La consommation réelle dépendez des conditions d'utilisation du téléviseur. | Energiankutulux XYZ kWh vaudessa, kun oletetaan, enta telesisiota kajytään 4 suntia päävääss 365 päävän ajan. Todellinen energiankutulux rippuu television kajttotavasta. | | |
| L | Iorsque le téléviseur est éteint à l'aide de la télécommande et qu'uneuncune fonction n'est active. | Kun TV on sommutenttu kaukosoätimasta ja miään toiminto ei ole kajytössä | | |
| M | La consommation nominale est indiquée sur l'étiquette apposee sur la partie arière du téléviseur. | Tietaja nimellisetä virankulutuksesta on kylttissä television takakannessa. | | |
| Italien/Indien | A | Gamino kortele | C | Modelio identificatorius | G | Metinigs energios sunauodjimos | G | Termekismertete adatlap | |
| B | Tiekejas | D | Energios efektyvumo klase | H | Energios sunauodjimos budéjimo režimu | H | Beszallito | |
| E | Matoma ekrano jstrizainé | I | Energios sunauodjimos ljiungus gaminj | I | Lathato képátó nagasyá | Kikapsolt uzemmodbeli energiaefogasztá | |
| F | Energios sunauodjimos jungus gaminj | J | Ekrano skiriamoji geba | J | Bekapsolt uzemmodbeli energiaefogasztá | Keperyofelbontas | |
| K | XYZ kWh energios sunauodjimos per metus nuroidomatszveliigues liki, kiewdngenerjios sunauodjima telesoriiui veikiant 4 valandas per diaq 365 dieins ièles.Faktinig energios sunauodjima lemsi tki, kiewl klaio bus nuadjomas telesorius. | A | | |
| L | Ijungus telesoviciu niutolino valdymo jrenginiu, kai neveikia jokia fungcija | Amikor a TV-a táviriányitoval capscoljäk ki, èncins aktivifikfoci | | |
| M | Informaciçă apie vardinj insurgojens suvartojmo Ž. etiketêje ant telesoriaus galinio gaubto. | Tovabbi informacióert a nevigesiafogasztással Kapscolstan olvassa el TV htáulsó burkolatan talalható címkét. | | |
| A | Ficha de produits | C | Identificador de modelos | G | Consumo de energia annual | G | Informaciànlist výrobu | Ročni spotfeba elektrické energia |
| B | Fornecedor | D | Classe di eficiência enerética | H | Consumo, em termos de potência, em estado de vigilia | H | Dodavatel | Spotfeba elektrické energia v photovostnim reizmu |
| E | Diagonal visvel do ecrà | I | Consumo, em termos de potência, em estado de desactivação | I | Veditelná uhlogpička obrazovy | Spotfeba elektrické energia v vypnutém stavu | |
| F | Consumo, em termos de potência, no estado actual | J | Resolução do ecrà | J | Resolução do ecrà | J | Rozlisienvi obrazovy | |
| G | Consumo de energia de XYZ kWh por ano, baseado no consumedo, em termos de potência, do televisor a funcional 4 horas por dia durante 365 dias. Oconsumo de energia real dependerá do modo como o televisor éutilizzato. | Spotfeba elektrické energia xyz kWh zrok vychazjiće spotfeby electeké energia telesvinho piñjáme, kterj y v provozu 4 hodiny pennö do doob 365 din. Skutečne spotfeba elektrické energia záviś na zúposobu použuti telesvinho piñjáme. | | |
| H | Quando o televisor é desligado com o telecomando e quando não está activado qualquer fonção | Kdyje je televisor vypnutnydalkovym ovladačem a neni aktivižn zádná funke. | | |
| I | Para obter informações sobre o consumo de potência nominal, consulute a etiqueta na tampa traseira do tvlor. | Informace o jmenvovitim príkonu njadete na stitku na zadnim krytu telesvioru. | | |
| Dansk | A Datablad C Model identification B Arligt energorbrug
E Effektforbruget i standbytilstand
B Synig skarmaedjagonal E Effektforbruget i slukket tilstand
E Skermoplopsning
K Energiforbrug: XYZ kWh oaret, beregnet som fjernsnynets effektforbrug, hvis det er tændt 4 timer
om dagen i 365 dag. Det faktiske energorbrug vil bero pã, hvordan fjernsnyntebruges.
L när fjernsnydet slukket med fjernbetjeningen og ingen funktioner er aktive
M For oplynsern on ominaln strømforbrug hemvises til mærkaten pafersynets bagbeklaedning. | Extravda
A Deltro pioovtc O Avaywupotikko mvteau O Etniaq kavatvalon evpeiaic
B Poinjeutiric D Taaevyepiaikcnamdooc
C Opatri diayvivanc O ohvnc
D Kavatvalon ouxoc o katoaataan ovoanvici
E Opatri diayvivanc o ohvnc H npoyuayi c katoaataan ovoanvici
F Kavatvalon ouxoc o katoaataan ovoanvici
G Kavatvalon ouxoc o katoaataan ovoanvici
H Opatri diayvivanc o ohvnc H npoyuayi c katoaataan ovoanvici
I Opatri diayvivanc o ohvnc H npoyuayi c katoaataan ovoanvici
J Avalanun obovnc
K Kavatvalon ouxoc o katoaataan ovoanvici
L Opatri diayvivanc o ohvnc H npoyuayi c katoaataan ovoanvici
M Opatri diayvivanc o ohvnc H npoyuayi c katoaataan ovoanvici
N Opatri diayvivanc o ohvnc H npoyuayi c katoaataan ovoanvici
O Aotn ngkdoan e vane aeneyoyo yuevnto ngk deo ngk deo ngk deo ngk deo ngk deo ngk deo ngk deo ngk deo ngk deo ngk deo ngk deo ngk deo ngk deo ngk deo ngk deo ngk deo ngk deo ngk deo ngk deo ngk deo ngk deo ngk deo ngk deo ngk deo ngk deo ngkdeo
M Tia nncpnoopoe c ovoaakowc k aotauwok wctocn
Turke
A Urun fiqi G Model No Yllik enerji tuketimi
B Tedariki G Enerji verimlikn sinfi H Beklemede guc tuketimi
C Gorulebilir ekran kosegeni I Kapali modda guc tuketimi
D Aqik modda guc tuketimi E Ekran cozunlrgu
E 365 g un boynca uge 4 saat calan tevlyozinun tukettiguc guc referans alinarak ylda XZ kWh
F Enerji tuketuni Guc leneri tuketuni tevlyozinun nasil kullandlgina gnabla Olaktrk.
M Televizyon uzaktan kumanda i kepatildignda ve aktif fonkiyon yokken
M Nominal guc tuketim biligi icin jne tvluyanun arka kapaçindaki etektebakn
M Podatkovni list prozvda G ID modela G Godinji utruak energijie
B Dobavljan C Razed energetics učinkovitosti H Urošak energiju u propravnosti
C Diagonala vizilila a ecranulni G Djaaloda vidljivog zaslona
D Aftova rezaea in modul activ
P Putera consumata in modul activ
C Consumul de energia de xyz kWh pe an, pe baza puteri consumate de aparatul TV atunci cändt est in finciune
4 ore pe zi timp de 365 zile; consumul real de energia depinde de condiljile de utilize a aparatul TV.
L cänd televizorul et opr ite comuna tvi ni est ave tico ficuih
M Pentru informaji prvidun comdal nominal de energia, consultati eticheta de pe capacul posterior al televizorului.
A Produzione speciala zime G Modela identificaz nznak modelu G Rodovlač J Drieda energeticej ektivosti H Spoteba elektriekcej energie v pohotovostnme rezime
B Piegadataj D Gatorava rezima elektroenergijas pateriin
C Ekran redzamas dalas izmrs pa diagonali
D Aktiva rezaea elektroenergijas pateriin
E Kenerjias pateri's xyz kWh gadā, nemot varēa tevlyozira elektroenergijas pateriin, darbojoties 365
dienas, cetrasstundas dinien. Faktiskais pateri's bus atkarigs no tä, kā televizors tiks izmantots.
L kad televiziers tlrzlagsb pulti n undarbojas nevna fukcija
M Nominalais strávas pateri's noradits etekite tevliorba corpus azmugure.
M Tarta produktu C Identifikatior modelu G Rocze zuzycie energii
B Dostawca D Klasa efektwnoosi energetycznej G Zuzycie energii wtrybie czuwania
C Przemka widzialna ekranu G Zuzycie energii wtrybie wylęczenia
D Zuzyecie energii wtrybie wylęczenia
E Rozdzielczość ekranu
F Kenerjias pateri's xyz kWh gadā, nemot varēa tevlyozira elektroenergijas pateriin, darbojoties 365
dienas, cetrasstundas dinien. Faktiskais pateri's bus atkarigs no tä, kā televizors tiks izmantots.
L Kad televiziers tlrzlagsb pulti n undarbojas nevna fukcija
M Nominalais strávas pateri's noradits etekite tevliorba corpus azmugure.
M Tarta produktu C Identifikatior modelu G Rocze zuzycie energii
B Dostawca D Klasa efektwnoosi energetycznej G Zuzycie ergii wtrybie czuwania
C Przemka widzialna ekranu G Zuzycie energii wtrybie wylęczenia
D Zuzyecie energii wtrybie wylęczenia
E Rozdzielczość ekranu
F Kenerjias pateri's xyz kWh gadā, nemot varēa tevlyozira elektroenergijas pateriin, darbojaties 365
dienas, cetrasstundas dinien. Faktiskais pateri's bus atkarigs no tä, kā televizors tiks izmantots.
L Kad televiziers tlrzlagsb pulti n undarbojas nevna fukcija
M Nominalais strávas pateri's noradits etekite tevliorba corpus azmugURE.
M Tarta produktu C Identifikatior modelu G Rocze zuzycie energii
B Dostawca D Klasa efektwnoosi energetycznej G Zuzycie energii wtrybie czuwania
C Przemka widzialna ekranu G Zuzycie energii wtrybie wylęczenia
D Zuzyecie energii wtrybie wylęczenia
F Kenerjias pateri's xyz kWh gadā, nemot varēa tevlyozira elektroenergijas pateriin, darbojaties 365
dienas, cetrasstundas dinien. Faktiskais pateri's bus atkarigs no tä, kā televizors tiks izmantots.
L Kad televiziers tlrzlagsb pulti, kā duhutamng voldačom a ne jektiva zidna fungcia
M Udaje o menovitom pronekone s uvedené na stitku na zadnom krytelekentura.
M Tootkirjeldus G Mudelitahis G Aastane energiartarbime
B Tarnija D Energiatohususe klass H Oteseisuidle enerktarbitre
C Ekraani năhtava osa diagona I Valjalulitud seudiseli elektrarbitre
D Sisselulitud seudiseli dielini e reine zemapnitz
E Rozliseion obrazovky G Spoteba elektriekcej energie v reze imapnzt
F Kospreda enerklare xyz kWh a zakrade speotbelektrckcej energie tezvi od toho, ak ceinnost
G 4 hodyne denne poadas 365 dni. Skutočna spoterte birese kustsiod od toho, ak ceinnost
M kute teron kujukhtimspuldiga våjla lulutud ning üskki funktsoon ei tóta.
M Nimitovismusbar be alase teabe leiate teleri tagakattel olevalt sildilt.
Esti
A Standardni podkatio izdeklu C Dobavitelve identifikacjska oznaka modela G Letna porabara enerjie
B Dobavitelve ime D Razed energetske učinkovitosti G Dorabovi mei v stanju priapravlenosti
C Vidna dajnalala zaslona
D Porobovi mei v stanju delovanja G Valjalulitud seudiseli elektrarbitre
E Pora mači v stanju delovanja G Locljiostz zaslona
C Kenerjias pateri's xyz kWh a zakrana kot paraba meoi obdellovanjtelevitorza 4 ure dnevno 365 dneh.
Dejanska parabe energie je odsvna od nacin uporabe televorza. | A Standardni podkatio izdeklu C Dobavitelve identifikacjska oznaka modela G Letna porabara enerjie
B Dobavitelve ime D Razed energetske učinkovitosti G Dorabovi mei v stanju priapravlenosti
C Vilaralulitud seudiseli elektrarbitre
D Porsbaya elektriekcej energie v reine zemapnitz
E Koperbalistai xyz kWh a zakrana kot paraba meoi obdellovanjtelevitorza 4 ure dnevno 365 dneh.
Dejanska parabe energie je odsvna od nacin uporabe televorza.
G Koperbalistai xyz kWh a zakrana kot paraba meoi obdellovanjtelevitorza 4 ure dnevno 365 dneh.
Dejanska parabe energie je odsvna od nacin uporabe televorza.
G Koperbalistai xyz kWh a zakrana kot paraba meoi obdellovanjtelevitorza 4 ure dnevnu 365 dneh.
Dejanska parabe energie je odsvna od nacin uporabe televorza.
G Koperbalistai xyz kWh a zakrana kot paraba meoi obdellovanjtelevitorza 4 ure dnevnu 365 dneh.
Dejanska parabe energie je odsvna od nacin uporabe televorza.
G K operbalistai xyz kWh a zakrana kot paraba meoi obdellovanjtelevitorza 4 ure dnevnu 365 dneh.
Dejanska parabe energie je odsvna od nacin uporabe televorza.
G Koperbalistai xyz kWh a zakrana kot paraba meoi obdellovanjtelevitorza 4 ure dnevnu 1600
Dejanska parabe energie je odsvna od nacin uporabe televorza.
G Koperbalistai xyz kWh a zakrana kot paraba meoi obdellovanjtelevitorza 4 ure dnevnu 1600
Dejanska parabe energie je odsvna od nacin uporabe televorza.
G Koperbalistai xyz kWh a zakrANA kot paraba meoi obdellovanjtelevitorza 4 ure dnevnu 1600
Dejanska parabe energie je odsvna od nacin uporabe televorza.
G Koperbalistai xyz kWh a zakrANA kot paraba meoi obdellovanjtelevitorza 4 ure dnevnu 1600
Dejanska parabe energia je odsvna od nacin uporabe televorza.
G Koperbalistai xyz kWh a zakrANA kot paraba meoi obdellovanjtelevitorza 4 ure dnevnu 1600
Dejanska parabe energia je odsvna od nacin uporabe televorza.
G Koperbalistai xyz kWh a zakrANA kot paraba meoi ob dvelton 4 ure dnevnu 365 dneh.
Dejanska parabe energia je odsvna od nacin uporabe televorza.
G Koperbalistai xyz kWh a zakrANA kot paraba meoi obdellovanjtelevitorza 4 ure dnevnu 365 dneh.
Dejanska parabe energia je odsvna od nacin uporabe televorza.
G Koperbalistai xyz kWh a zakrANA kot paraba meoi obdellovanjtelevitorza 4 ure dnevnu 365 dneh.
Dejanska parabe energia je odsvna od nacin uporabe telectvorya
G Koperbalistai xyz kWh a zakrANA kot paraba meoi obdellovanjtelevitorza 4 ure dnevnu 365 dneh.
Dejanska parabe energia je odsvna od nacin uporabe televorza.
G Koperbalistai xyz kWh a zakrANA kot paraba meoi obdellovanjtelevitorza 4 ure dcvnu 365 dneh.
Dejanska parabe energia je odsvna od nacin uporabe televorza.
G Koperbalistai xyz kWh a zakrANA kot paraba meoi obdellovanjtelevitorza 4 ure dcvnu 365 dneh.
Dejanska parabe energia je odsvna od nacin uporabe televorza.
G Littenss
A Skedal Prod-odt C I identifikatur tal-mudell-tal-formirur G Ilkonsum annuali tal-Enerjiga
B Ikonsum all-firmulitur D Ilkonsum all-firmulitur bil-modalitya Stennjia
C Ikonsum all-firmulitur D Ilkonsum all-firmulitur bil-modalitya Mifti
D Ikonsum all-firmulitur D Ilkonsum all-firmulitur bil-modalitya Mifti
E Ikonsum all-firmulitur D Ilkonsum all-firmulitur bil-modalitya Mifti
F Ikonsum all-firmulitur D Ilkonsum all-firmulitur bil-modalitya Mifti
G Koperbalistai xyz kWh fsi-sena, abza'ti k' konsum tal-enerjiga ta tavelvinim haddem ghal
4 sitgh kalum ghal 365 jum. Il-konsur reali tal-enerjiga jidependu fqu kif jintua televeixin.
M metal a-TV huwa mitif bil-kontroll remot u l-edba funzioni hija attivata
M Ghal aktar informazjoni dwar klassifkazjoni tal-qawxa nominali tar aikketta fuq il-qoxra ta wara tal-TV. |

