Shineater - Sports Equipment Capital Sports - Free user manual and instructions
Find the device manual for free Shineater Capital Sports in PDF.

User questions about Shineater Capital Sports
0 question about this device. Answer the ones you know or ask your own.
Ask a new question about this device
Download the instructions for your Sports Equipment in PDF format for free! Find your manual Shineater - Capital Sports and take your electronic device back in hand. On this page are published all the documents necessary for the use of your device. Shineater by Capital Sports.
USER MANUAL Shineater Capital Sports
Congratulations on purchasing this device. Please read the following instructions carefully and follow them to prevent possible damages. We assume no liability for damage caused by disregard of the instructions and improper use. Scan the QR code to get access to the latest user manual and more product information.
Estimado cliente,
Chere cliente, cher client,
- Please keep this manual in a safe place for your reference when necessary.
- Please do not assembly or use this equipment until you read this manual thoroughly & carefully. The safety and efficiency only can be achieved when the equipment is assembled, maintained and used properly. It is your responsibility to ensure that all the users are informed of all the warnings and precautions.
- For totally safe use, a stable, leveled surface is required. Protect your floor with a mat. Do not use the equipment in a damp areas such as swimming pool sauna, etc. For safety space, the equipment must have at least 0.6 meter of free space all around it.
- Before starting any exercise program you must consult your doctor to determine if you have any physical or health conditions that could create a risk to your health and safety, or prevent you from using the equipment properly. Your doctor's advice is essential if you are taking medication that affects your heart rate, blood pressure or cholesterol level.
- Be aware of your body's signals. Incorrect or excessive exercise can damage your health. Stop exercising if you experienced any of the following symptoms: pain, tightness in your chest, irregular heartbeat, extreme shortness of breath, feeling light headed, dizzy or nauseous. If you do experience any of these conditions you must consult your doctor before continuing with your exercise program.
- Do not workout immediately after meals.
- Keep children and pets away from the equipment, the equipment must be assembled and used by adults only.
- The equipment is designed for home use only.
- The equipment is not suitable for therapeutic use, may only be used for exercises indicated in the training instructions
- Wearing proper clothing and athletic shoes while using the equipment, Avoid wearing loose clothing that may get caught in the equipment or that may restrict or prevent movements.
- Keep your back straight while exercising.
SETUP
First unpack all parts and lay out the parts as shown below. They must be included:
- 2 sides with the markings ,15^ and , 26^ .
- 2 side surfaces (Side^ ) with the markings 37^ and 48^
- Top and bottom side with the markings „Bottom 1 2 3 4“ and „Top 5-6-7-8“
- 3 inner struts
- 1 package of mounting material incl. 37 screws.
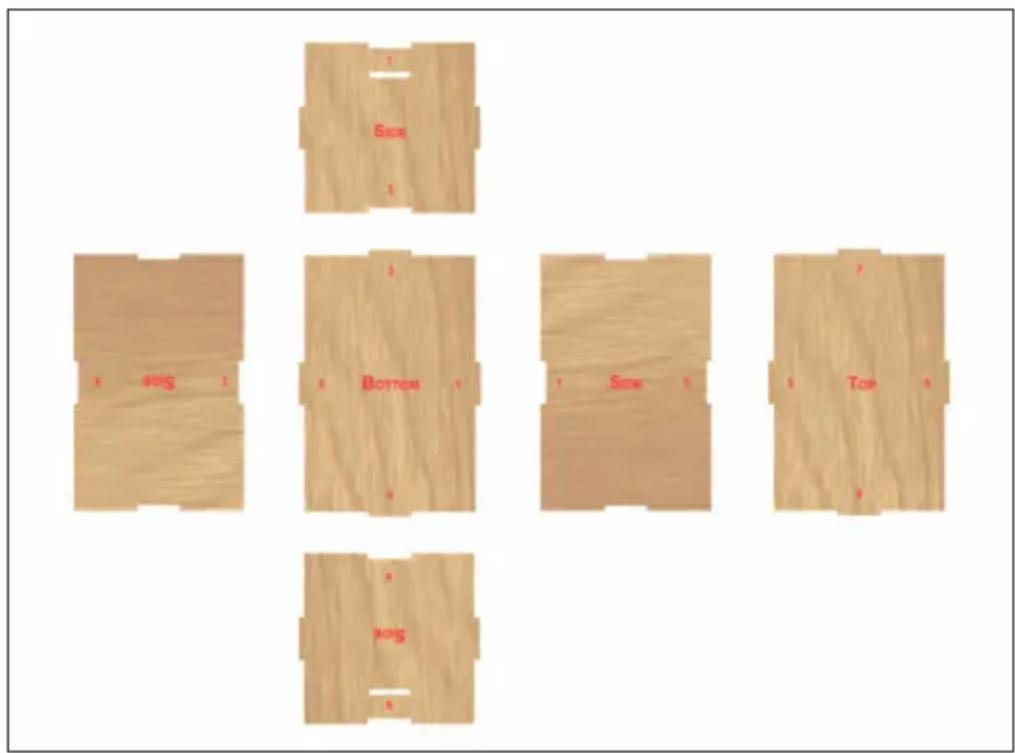
Note: When assembling, make sure that the sides marked with arrows always represent the outside of the cube. Wood glue is recommended for proper assembly of this unit.
-
Step 1: Assemble a side panel (1 5) with a short side panel (3 7). Make sure that the pieces are seamless, vertical and flush. Secure the joint with three screws, which you screw (initially only half!) into the pre-drilled holes.
-
Step 2: Repeat step 1 with the side panels (26) and (48).
-
Step 3: Place the two now, L' shaped pieces on the side of the floor and connect them to the floor panel (1 2 3 4). Use 12 screws and the corresponding pre-drilled holes (3 on each side). Tighten these screws firmly.
-
Step 4: Insert the three inner braces into each other (they only fit into each other in one way) and fix them together by screwing a screw in the middle (predrilled holes):
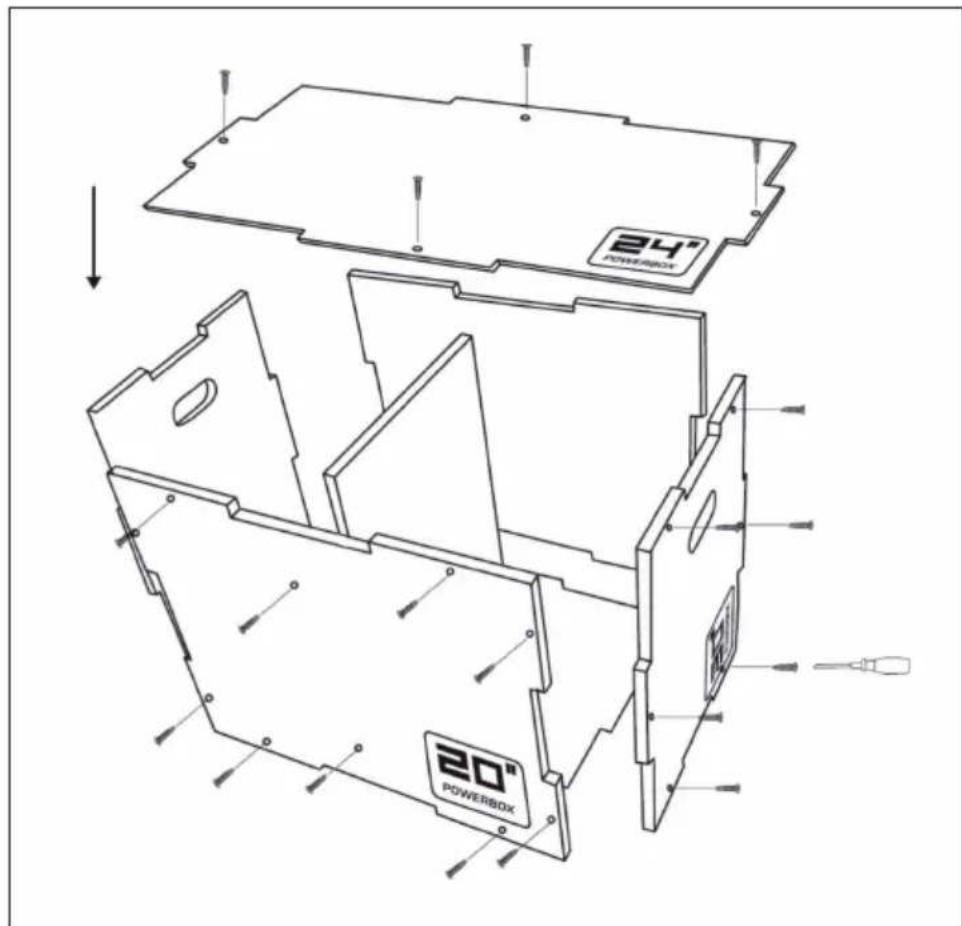
- Step 5: Finally, place the top (5 6 7 8) and screw it on with 12 screws (3 on each side).
Make sure that all side parts are flush with each other and that no edges protrude. Tighten all 36 screws. If necessary, apply wood glue to the folds and joints before screwing the parts together to give the box an extra measure of stability.
Choose colourless wood glue so as not to spoil the appearance. Apply the glue to the inner edges of each piece. Wipe off excess glue on the outside with a damp cloth.
PRODUCER
Chal-Tec GmbH, Wallstraße 16, 10179 Berlin, Germany.