
T24H315HLB - Monitor SAMSUNG - Free user manual and instructions
Find the device manual for free T24H315HLB SAMSUNG in PDF.

User questions about T24H315HLB SAMSUNG
0 question about this device. Answer the ones you know or ask your own.
Ask a new question about this device
Download the instructions for your Monitor in PDF format for free! Find your manual T24H315HLB - SAMSUNG and take your electronic device back in hand. On this page are published all the documents necessary for the use of your device. T24H315HLB by SAMSUNG.
USER MANUAL T24H315HLB SAMSUNG
Please read the Safety Instructions before using your TV.
| CAUTION |  | Class II product: This symbol indicates that a safety connection to electrical earth (ground) is not required. | |
| RISK OF ELECTRIC SHOCK. DO NOT OPEN. | |||
| CAUTION: TO REDUCE THE RISK OF ELECTRIC SHOCK, DO NOT REMOVE COVER (OR BACK). THERE ARE NO USER SERVICEABLE PARTS INSIDE. REFER ALL SERVICING TO QUALIFIED PERSONNEL. |  | AC voltage: Rated voltage marked with this symbol is AC voltage. | |
 | This symbol indicates that high voltage is present inside. It is dangerous to make any kind of contact with any internal part of this product. |  | DC voltage: Rated voltage marked with this symbol is DC voltage. |
 | This symbol indicates that this product has included important literature concerning operation and maintenance. | Caution. Consult instructions for use: This symbol instructs the user to consult the user manual for further safety related information. | |
- The slots and openings in the cabinet and in the back or bottom are provided for necessary ventilation. To ensure reliable operation of this apparatus and to protect it from overheating, these slots and openings must never be blocked or covered.
- Do not place this apparatus in a confined space, such as a bookcase or built-in cabinet, unless proper ventilation is provided.
- Do not place this apparatus near or over a radiator or heat register, or where it is exposed to direct sunlight.
- Do not place vessels (vases etc.) containing water on this apparatus, as this can result in a fire or electric shock.
- Do not expose this apparatus to rain or place it near water (near a bathtub, washbowl, kitchen sink, or laundry tub, in a wet basement, or near a swimming pool, etc.). If this apparatus accidentally gets wet, unplug it and contact an authorized dealer immediately.
- This apparatus uses batteries. In your community, there might be environmental regulations that require you to dispose of these batteries properly. Please contact your local authorities for disposal or recycling information.
- Do not overload wall outlets, extension cords, or adaptors beyond their capacity, since this can result in fire or electric shock.
- Power-supply cords should be placed so that they are not likely to be walked on or pinched by items placed upon or against them. Pay particular attention to cords at the plug end, at wall outlets, and at the point where they exit from the appliance.
- To protect this apparatus from a lightning storm, or when left unattended and unused for long periods of time, unplug it from the wall outlet and disconnect the antenna or cable system. This will prevent damage to the set due to lightning and power line surges.
- Before connecting the AC power cord to the DC adaptor outlet, make sure that the voltage designation of the DC adaptor corresponds to the local electrical supply.
- Never insert anything metallic into the open parts of this apparatus. This may cause a danger of electric shock.
- To avoid electric shock, never touch the inside of this apparatus. Only a qualified technician should open this apparatus.
- Be sure to plug in the power cord until it is firmly seated. When unplugging the power cord from a wall outlet, always pull on the power cord's plug. Never unplug it by pulling on the power cord. Do not touch the power cord with wet hands.
- If this apparatus does not operate normally - in particular, if there are any unusual sounds or smells coming from it - unplug it immediately and contact an authorized dealer or service center.
- Be sure to pull the power plug out of the outlet if the TV is to remain unused or if you are to leave the house for an extended period of time (especially when children, elderly, or disabled people will be left alone in the house).
- Accumulated dust can cause an electric shock, an electric leakage, or a fire by causing the power cord to generate sparks and heat or by causing the insulation to deteriorate.
- Be sure to contact an authorized Samsung service center for information if you intend to install your TV in a location with heavy dust, high or low temperatures, high humidity, chemical substances, or where it will operate 24 hours a day such as in an airport, a train station, etc. Failure to do so may lead to serious damage to your TV.
• Use only a properly grounded plug and wall outlet.
- An improper ground may cause electric shock or equipment damage. (Class I Equipment only.)
- To turn off this apparatus completely, disconnect it from the wall outlet. To ensure you can unplug this apparatus quickly if necessary, make sure that the wall outlet and power plug are readily accessible.
- Store the accessories (batteries, etc.) in a location safely out of the reach of children.
- Do not drop or strike the product. If the product is damaged, disconnect the power cord and contact a Samsung service center.
-
To clean this apparatus, unplug the power cord from the wall outlet and wipe the product with a soft, dry cloth. Do not use any chemicals such as wax, benzene, alcohol, thinners, insecticide, air fresheners, lubricants, or detergents. These chemicals can damage the appearance of the TV or erase the printing on the product.
-
Do not expose this apparatus to dripping or splashing.
- Do not dispose of batteries in a fire.
- Do not short-circuit, disassemble, or overheat the batteries.
- There is danger of an explosion if you replace the batteries used in the remote with the wrong type of battery. Replace only with the same or equivalent type.
- WARNING - TO PREVENT THE SPREAD OF FIRE, KEEP CANDLES AND OTHER ITEMS WITH OPEN FLAMES AWAY FROM THIS PRODUCT AT ALL TIMES.

Figures and illustrations in this User Manual are provided for reference only and may differ from the actual product appearance. Product design and specifications may change without notice.
List of Features
• Media Play (USB): Allows you to play music files and pictures saved on a USB device.
Important Warranty Information Regarding Television Format Viewing
See the warranty card for more information on warranty terms.
Wide screen format TVs (with 16:9 aspect ratios, the ratio of the screen width to height) are primarily designed to view wide screen format full-motion video. The images displayed on them should primarily be in the wide screen 16:9 ratio format, or expanded to fill the screen if your model offers this feature, with the images constantly in motion. Displaying stationary graphics and images on the screen, such as the dark sidebars on non-expanded standard format television video and programming, should be limited to no more than 5% of the total television viewing per week.
Additionally, viewing other stationary images and text such as stock market crawls, video game displays, station logos, web sites or computer graphics and patterns, should be limited as described above for all televisions. Displaying stationary images for more than 5% of total viewing time can cause uneven aging of your TV and leave subtle, but permanent burned-in ghost images in the LED picture. To avoid this, vary the programming and images, and primarily display full screen moving images, not stationary patterns or dark bars. On LED models that offer picture sizing features, use these controls to view different formats as a full screen picture. Be careful in the selection of television formats you use for viewing and the amount of time you view them. Uneven LED aging as a result of format selection and use, as well as burned in images, are not covered by your Samsung limited warranty.
Still image warning
Avoid displaying still images (such as jpeg picture files), still image elements (such as TV channel logos, stock or news bars at the screen bottom etc.), or programs in panorama or 4:3 image format on the screen. Constantly displaying still pictures can cause image burn-in on the screen, which will affect image quality. To reduce risk of this effect, please follow the recommendations below:
- Avoid displaying the same TV channel for long periods.
- Always try to display a full screen image.
- Reduce brightness and contrast to avoid the appearance of after-images.
- Use all TV features designed to reduce image retention and screen burn.
Securing the Installation Space
Keep the required distances between the product and other objects (e.g. walls) to ensure proper ventilation. Failing to do so may result in fire or a problem with the product due to an increase in the internal temperature of the product.
Installation with a stand. Installation with a wall-mount.
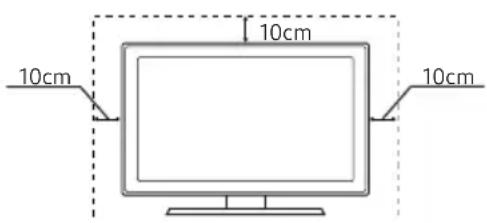
text_image
10cm 10cm 10cm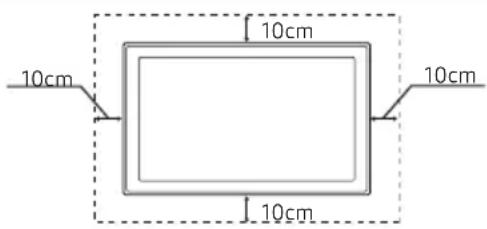
text_image
10cm 10cm 10cm 10cmOther Warnings
The actual appearance of the TV may differ from the images in this manual, depending on the model.
Be careful when you touch the TV. Some parts can be somewhat hot.
Contents
- Warning! Important Safety Instructions ......2
- List of Features....4
- Important Warranty Information Regarding Television Format Viewing ....4
• Still image warning......4
• Securing the Installation Space ....4 - Contents......5
• Accessories and Cables......6
• Installing the stand ....7
• Installing the Wall Mount......8 - Connecting to an AV Device ....10
- Connecting to a PC......11
- Connecting the Antenna or Cable Connection 13
- Connecting the Power Cord....13
- Connecting to Audio Devices....14
• Viewing the Control Panel....14
• The Remote Control Buttons ....15
• How to Navigate Menus......16 - Setup (Initial Setup)....16
- Changing the Input Source......17
- Source....17
- Edit Name....17
- Information......17
• Using the INFO button (Now & Next guide) ....18
• Memorizing channels.....18
• Using the Channel menu .....19 - Other Features....22
-
Changing the Preset Picture Mode......24
-
Adjusting Picture Settings ....24
• Calibrating the Screen Display ....26 - Changing the Picture Options ....27
- Changing the Preset Sound Modes ...... 28
- Adjusting Sound Settings......29
- Executing initial setup .... 30
- Setting the Time....31
• Using the Sleep Timer....31 - Setting the On/Off Timer....31
• Economical Solutions....32 - Other Features....33
• Using the Source List.... 34 - Connecting a USB Device.... 34
• Using the Media Contents 35 - Playing the Photos / Videos / Music...... 36
• Using the Soccer Mode...... 38
• Using the Self Diagnosis....38 - Updating the Software.... 39
- Changing the Use Mode...... 39
• Viewing the Contact Samsung 39 - Troubleshooting .... 40
• Storage and Maintenance .... 41
• Anti-theft Kensington Lock......41 - Specifications.... 42
- License 42
- Subtitle and Media Contents file formats, and Codec....43
Accessories and Cables
Please make sure the following items are included with your product. If any items are missing, contact your dealer.
The items' colors and shapes may vary depending on the model.
Make sure that there are no accessories hidden behind or under packing materials after you open the box.
• Remote Control & Batteries (AAA x 2)
- User Manual
- AC/DC Adapter
- Power Cord
• Regulatory Guide / Warranty Card (Not available in some locations)
- Antenna Adapter

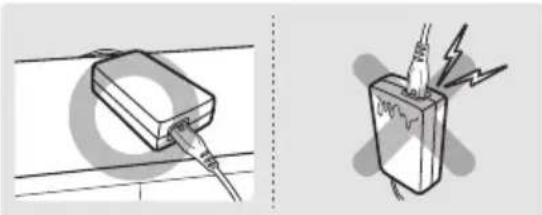
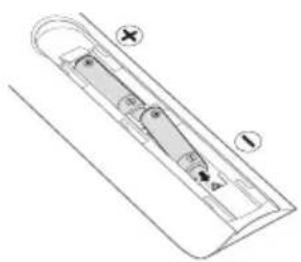
natural_image
Two technical illustrations: one showing a rectangular electronic component with wires, and another showing a plug inserted into a battery with lightning bolts (no text or symbols)Make sure to rest the AC/DC Adapter flat on a table or the floor. If you place the AC/DC Adapter so that it is hanging with the AC cord input facing upwards, water or other foreign substances could enter the Adapter and cause the Adapter to malfunction.
For the best cable connection to this product, use cables no thicker than the cable illustrated below:
| • Maximum thickness - 0.55 inches (14mm) |
Installing the stand
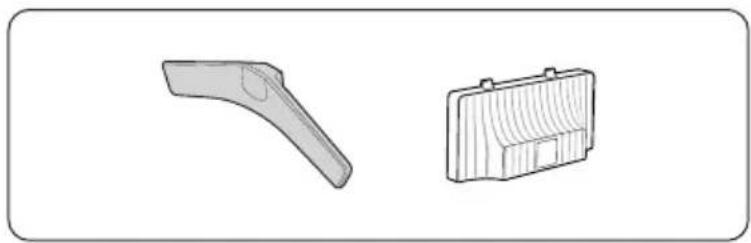
natural_image
Two technical line drawings of mechanical parts: a curved tool and a rectangular device (no text or symbols)1
text_image
超声器 外接2

text_image
Close Close3

natural_image
Diagram of a computer monitor with a clasp and an arrow pointing to the screen (no text or symbols present)4

natural_image
Technical line drawing of a mechanical component with arrows indicating direction (no text or symbols)5
natural_image
Diagram of a computer monitor with an open screen and a scroll wheel, showing no text or symbols.6

text_image
Prohibition sign with circular outline and diagonal line, indicating no prohibition or restrictionInstalling the Wall Mount

Wall or Ceiling Mounting
The product should be mounted to a wall or ceiling only as recommended by the manufacturer. Unless it is correctly mounted, the product may slide or fall, causing serious injury to a child or adult, and serious damage to the product.
Attaching a Wall Mount
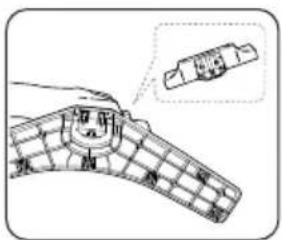
1
natural_image
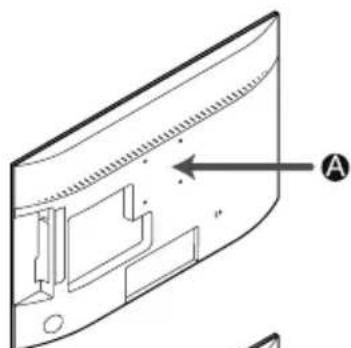
Technical line drawing of a curved electronic device with internal components and a labeled section A (no text or symbols beyond label)2
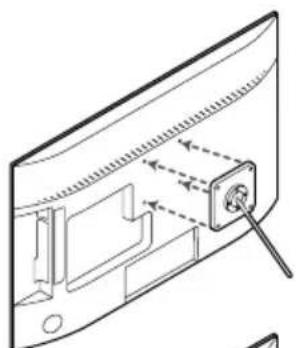
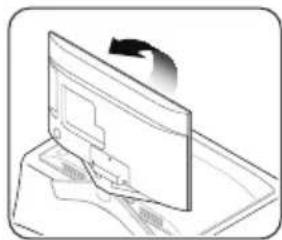
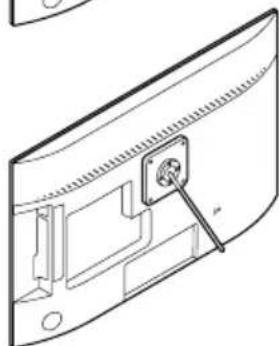
natural_image
Technical line drawing of a device panel with a screw and adjustment arrows (no text or symbols)3
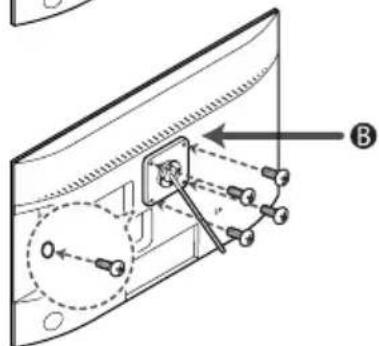
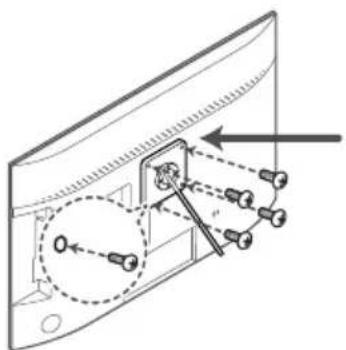
text_image
Diagram of a device panel with labeled components and directional arrows, including a magnified view and letter B.4
natural_image
Technical line drawing of a mechanical component with a central pin inserted (no text or symbols)A Wall Mount
B Wall mount kit (not supplied)
Caution
natural_image
Diagram of a device with multiple pins and a central connector, showing alignment and movement arrows (no text or symbols)Important
Align wall mount to the product and firmly fix the wall mount by fastening the screw.
Align the groove of the part of the product that is to be connected to the stand with the groove in the stand (wall mount stand or another stand) and firmly fix the stand by fastening the screw.
Installing the Wall Mount Kit
The wall mount kit allows you to mount the TV on the wall.
For detailed information on installing the wall mount, see the instructions provided with the wall mount. Contact a technician for assistance when installing the wall mount bracket. Samsung Electronics is not responsible for any damage to the product or injury to yourself or others if you elect to install the TV on your own.
Wall Mount Kit Specifications (VESA)
Install your wall mount on a solid wall perpendicular to the floor. When attaching to other building materials, please contact your nearest dealer. If installed on a ceiling or slanted wall, it may fall and result in severe personal injury.
NOTE
- Standard dimensions for wall mount kits are shown in the table below.
- Do not use screws that do not comply with the VESA standard screw specifications.
- Do not use screws that are longer than the standard dimension or do not comply with the VESA standard screw specifications. Screws that are too long may cause damage to the inside of the TV set.
- For wall mounts that do not comply with the VESA standard screw specifications, the length of the screws may differ depending on the wall mount specifications.
- Do not fasten the screws too strongly; this may damage the product or cause the product to fall, leading to personal injury. Samsung is not liable for these kinds of accidents.
- Samsung is not liable for product damage or personal injury when a non-VESA or non-specified wall mount is used or the consumer fails to follow the product installation instructions.
- Do not mount the TV at more than a 15 degree tilt.
• Always use two people to mount the TV to a wall.
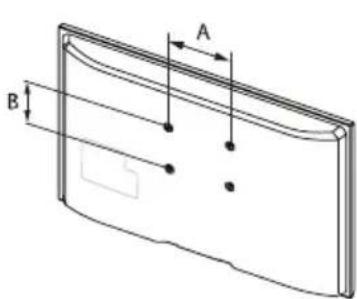
text_image
A BWall
mount
bracket
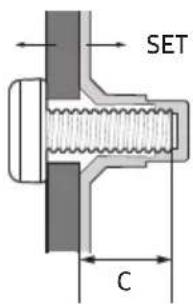
text_image
SET C| Models VESA Spec. (A * B) C Standard Screw Quantity | ||||
| T24H315HLB 75.0 x 7 | 5.0 5.3~8.3 mm M4 4 | |||
Remove the screws in the mounting holes before you install the wall mount.
| Do not install your Wall Mount Kit while your TV is turned on. It may result in personal injury due to electric shock. |

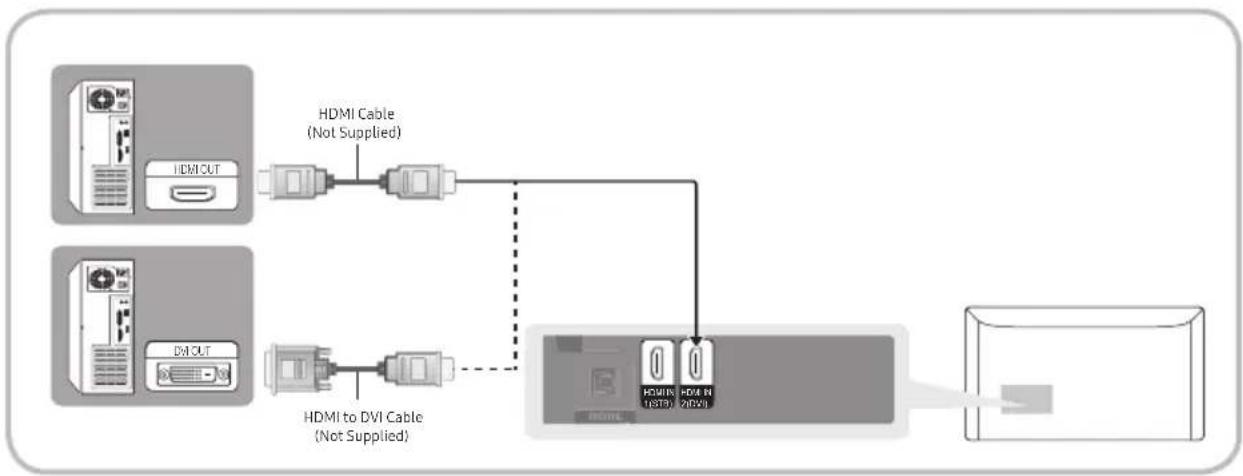
Using an HDMI or an HDMI to DVI Cable: HD connection
We recommend using the HDMI connection for the best quality HD picture.
Available devices: DVD player, Blu-ray player, HD cable box, HD STB (Set-Top-Box) satellite receiver

flowchart
graph TD
    A["Device"] -->|HDMI to DVI Cable (Not Supplied)| B["Device"]
    C["Device"] -->|HDMI Cable (Not Supplied)| B
    B --> D["HDMI IN 1 (STD) HDMI IN 2 (DVI)"]
    D --> E["Output"]
HDMI IN 1 (STB), HDMI IN 2 (DVI)
- For better picture and audio quality, connect to a digital device using an HDMI cable.
• An HDMI cable supports digital video and audio signals, and does not require an audio cable. - The picture may not display normally (if at all) or the audio may not work if you connect an external device that uses an older version of HDMI mode is connected to the TV. If such a problem occurs, ask the manufacturer of the external device about the HDMI version and, if out of date, request an upgrade.
- Be sure to purchase a certified HDMI cable. Otherwise, the picture may not display or a connection error may occur.
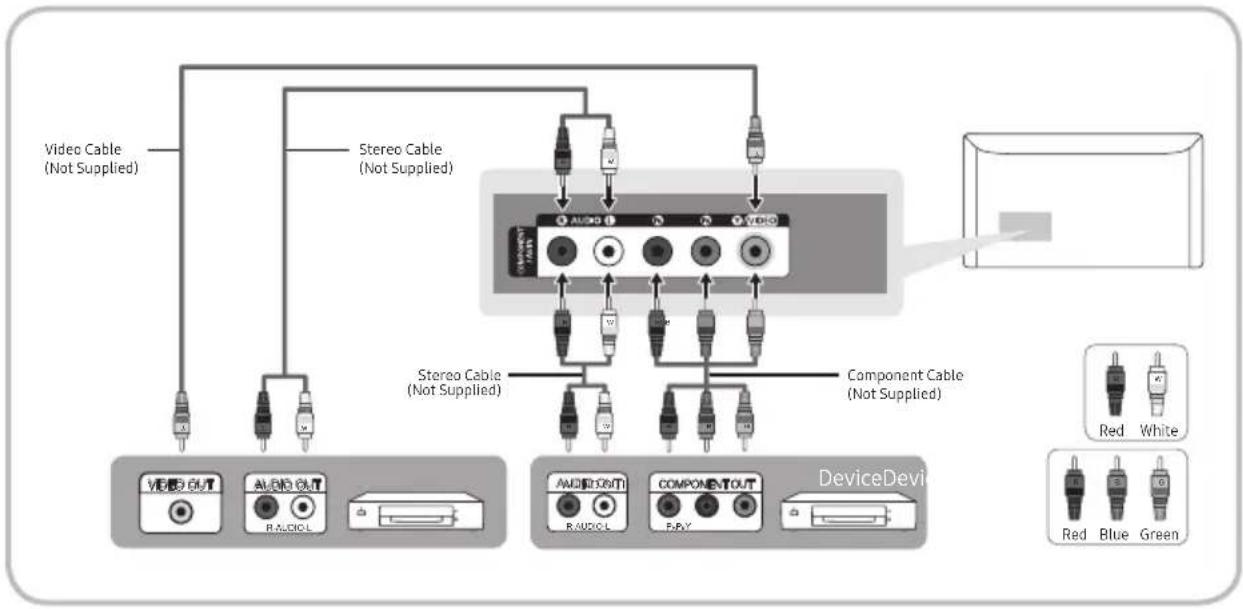
Available devices: DVD player, Blu-ray player, cable box, STB satellite receiver, VCR
flowchart
graph TD
    A["Video Cable (Not Supplied)"] --> B["Device Device"]
    C["Stereo Cable (Not Supplied)"] --> D["Device Device"]
    E["Component Cable (Not Supplied)"] --> F["Device Device"]
    G["Audio/Control"] --> H["Device Device"]
    I["Audio/Control"] --> J["Device Device"]
    K["Component/Control"] --> L["Device Device"]
    M["Audio/Control"] --> N["Device Device"]
    O["Audio/Control"] --> P["Device Device"]
    Q["Audio/Control"] --> R["Device Device"]
    S["Audio/Control"] --> T["Device Device"]
    U["Audio/Control"] --> V["Device Device"]
    W["Audio/Control"] --> X["Device Device"]
    Y["Audio/Control"] --> Z["Device Device"]
    AA["Audio/Control"] --> AB["Device Device"]
    AC["Audio/Control"] --> AD["Device Device"]
    AE["Audio/Control"] --> AF["Device Device"]
When you connect a Video cable to COMPONENT / AV IN, the color of the COMPONENT / AV IN [VIDEO] jack (green) will not match the video cable (yellow).
For better picture quality, we recommend the Component connection over the A/V connection.
Connecting to a PC
Using an HDMI Cable or an HDMI to DVI Cable Connection
Connecting through the HDMI cable may not be supported depending on the PC.
flowchart
graph LR
    A["Device 1: HDMI CUT"] --> B["Device 2: HDMI Cable (Not Supplied)"]
    C["Device 3: DVI CUT"] --> D["Device 4: HDMI to DVI Cable (Not Supplied)"]
    B --> E["Server"]
    D --> E
    E --> F["Computer"]
NOTE
• For PC connection, you must use the HDMI2(DVI) jack.
• The interlace mode is not supported.
- The set might operate abnormally if a non-standard video format is selected.
• PC(D-Sub) input is not supported.

Display Modes (HDMI to DVI Input)
Optimal resolution : 1366 x 768 pixels
| Display Mode | Horizontal Frequency (KHz) | Vertical Frequency (Hz) | Pixel Clock Frequency MHz | Sync Polarity (H / V) | ||
| Mode Resolution | ||||||
| IBM | 720 x 400 | 70Hz | 31.469 | 70.087 | 28.322 | -/+ |
| VESA DMT | 640 x 480 | 60Hz | 31.469 | 59.940 | 25.175 | -/- |
| MAC | 640 x 480 | 67Hz | 35.000 | 66.667 | 30.240 | -/- |
| VESA DMT 640 x 480 72Hz | 37.861 | 72.809 31.500 -/- | ||||
| VESA DMT 640 x 480 75Hz 37.500 | 75.000 | 31.500 -/- | ||||
| VESA DMT | 800 x 600 | 60Hz | 37.879 | 60.317 | 40.000 | +/+ |
| VESA DMT | 800 x 600 72Hz 48.077 72.188 | 50.000 +/+ | ||||
| VESA DMT | 800 x 600 | 75Hz | 46.875 | 75.000 | 49.500 | +/+ |
| MAC | 832 x 624 | 75Hz | 49.726 | 74.551 | 57.284 | -/- |
| VESA DMT | 1024 x 768 | 60Hz | 48.363 | 60.004 | 65.000 | -/- |
| VESA DMT | 1024 x 768 | 70Hz | 56.476 | 70.069 | 75.000 | -/- |
| VESA DMT | 1024 x 768 | 75Hz | 60.023 | 75.029 | 78.750 | +/+ |
| VESA DMT | 1280 x 720 | 60Hz | 45.000 | 60.000 | 74.250 | +/+ |
| VESA DMT | 1366 x 768 | 60Hz | 47.712 | 59.790 | 85.500 | +/+ |
If there is no power cut-off switch, the power consumption is "0" only when the power cord is disconnected.
DPM(Display Power Management) Function does not work if you used in connection with the HDMI port of this product.
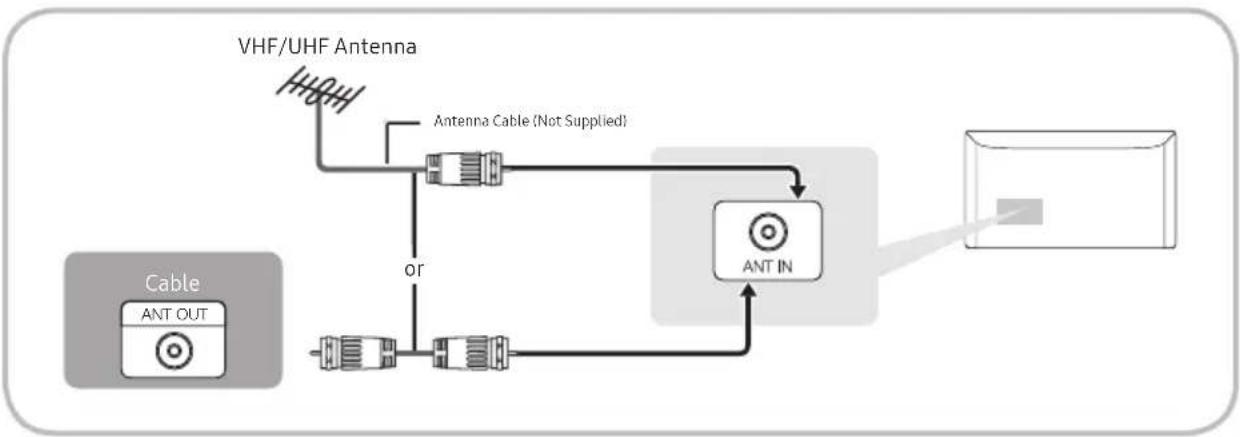
Connecting the Antenna or Cable Connection
The picture may vary depending on the model.
flowchart
graph TD
    A["VHF/UHF Antenna"] --> B["Antenna Cable (Not Supplied)"]
    B --> C["Ant IN"]
    D["Cable ANT OUT"] --> E["Antenna Cable"]
    E --> F["Antenna Inverter"]
    F --> G["Output Port"]
Connecting the Power Cord
The picture may vary depending on the model.

text_image
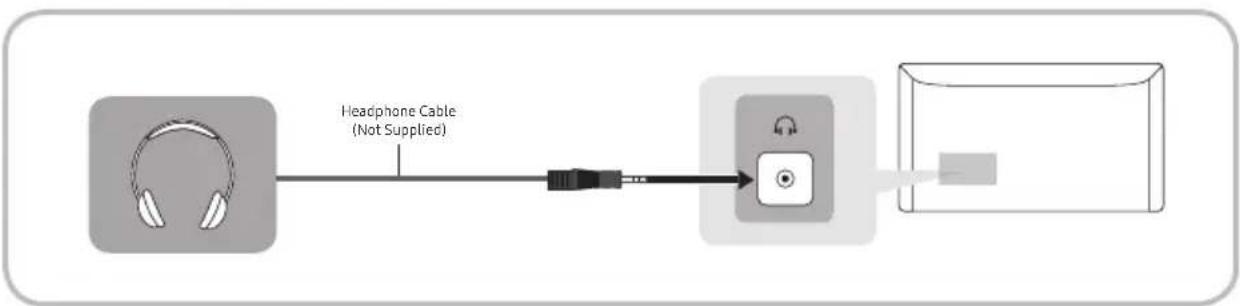
Power InputConnecting to Audio Devices
Using a Headphone Cable Connection
flowchart
graph LR
    A["Headphone Cable (Not Supplied)"] --> B["Device"]
    style A fill:#f9f,stroke:#333
    style B fill:#ccf,stroke:#333
Headphones 📞: You can connect your headphones to the headphone output jack on your product. While the headphones are connected, the sound from the built-in speakers will be disabled.
- The sound function may be restricted when you connect headphones to the product.
• Headphone volume and product volume are adjusted separately.
• The headphone jack supports only the 3 conductor tip-ring-sleeve (TRS) type.
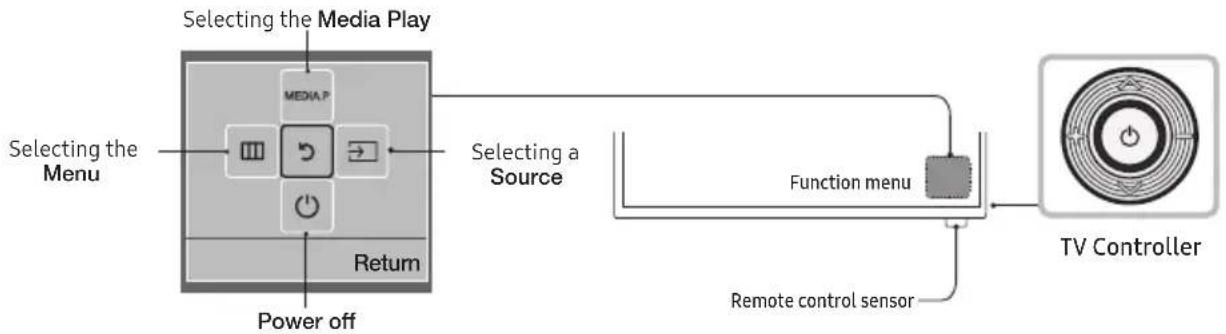
Viewing the Control Panel
The TV's Controller, a small joy stick like button on the rear right side of the TV, lets you control the TV without the remote control.
flowchart
graph LR
    A["Selecting the Media Play"] --> B["Selecting a Source"]
    B --> C["Function menu"]
    C --> D["TV Controller"]
    E["Power off"] --> A
    F["Selecting the Menu"] --> A
    G["Return"] --> A
    H["Remote control sensor"] --> C
The product color and shape may vary depending on the model.
Exits the menu when pressing the controller more than 1 second.
When selecting the function by moving the controller to the up/down/left/right directions, be sure not to press the controller. If you press it first, you cannot operate it to move the up/down/left/right directions.
Standby mode
Your TV enters Standby mode when you turn it off and continues to consume a small amount of electric power. To be safe and to decrease power consumption, do not leave your TV in standby mode for long periods of time (when you are away on a holiday, for example). It is best to unplug the power cord.
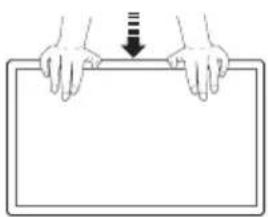
Useful Information
natural_image
Illustration of two hands holding a rectangular object with a downward arrow indicating compression or dislocation (no text or symbols)Caution
Do not press down hard on the product.
The product may become deformed and damaged.
The Remote Control Buttons
This remote control has Braille points on the Power, Channel, and Volume buttons and can be used by visually impaired persons.
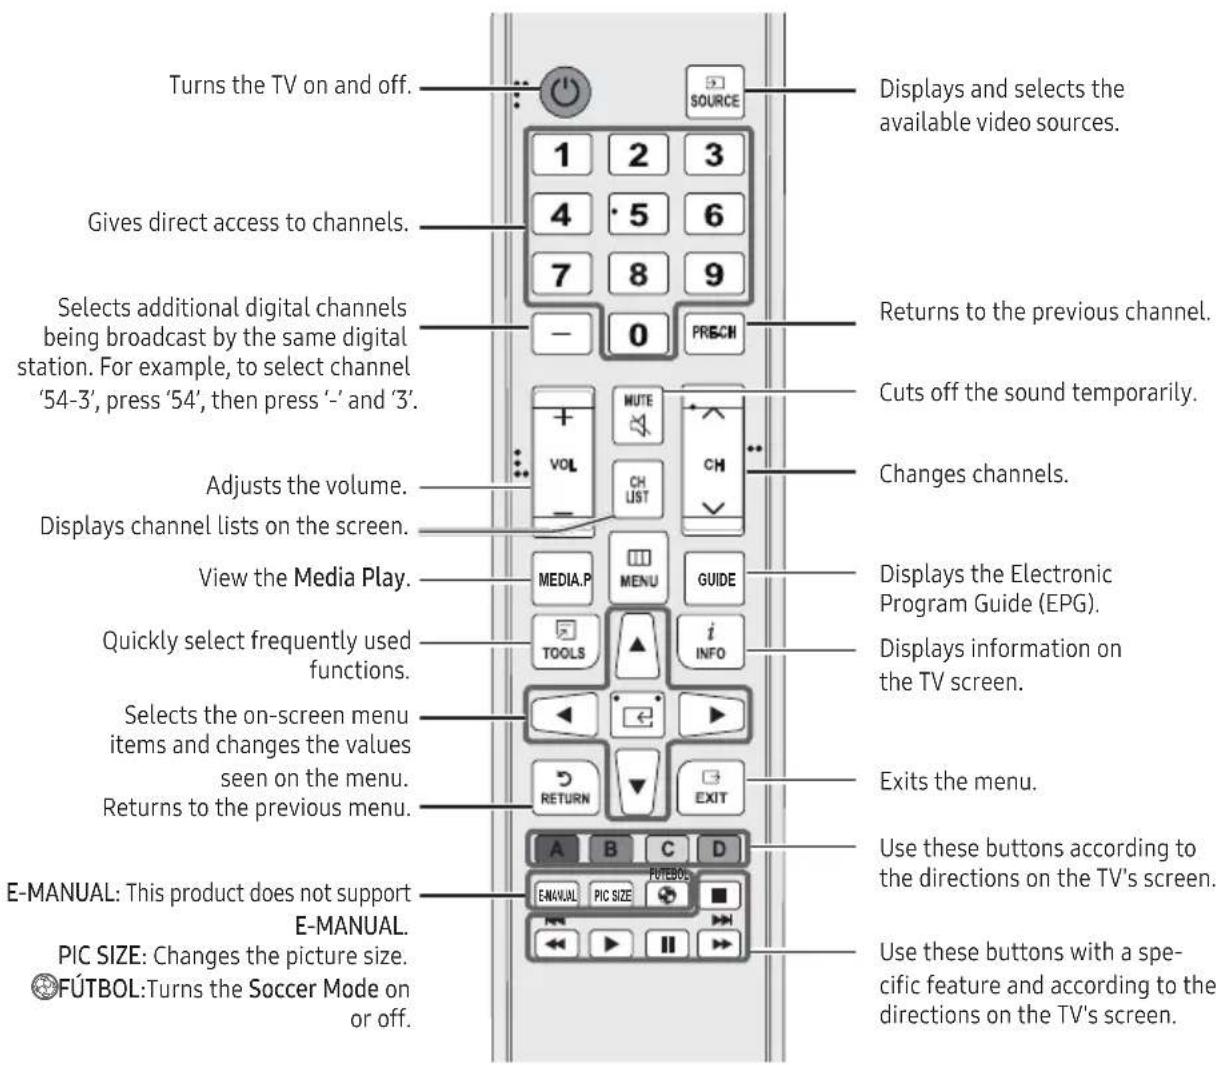
text_image
Turns the TV on and off. Gives direct access to channels. Selects additional digital channels being broadcast by the same digital station. For example, to select channel '54-3', press '54', then press '-' and '3'. Adjusts the volume. Displays channel lists on the screen. View the Media Play. Quickly select frequently used functions. Selects the on-screen menu items and changes the values seen on the menu. Returns to the previous menu. E-MANUAL: This product does not support E-MANUAL. PIC SIZE: Changes the picture size. FÚTBOL: Turns the Soccer Mode on or off. SOURCE 1 2 3 4 5 6 7 8 9 - 0 PREACH MUTE VOL CH LIST CHANGE MEDIA.P MENU GUIDE TOOLS i INFO RETURN EXIT A B C D FUTBOL E MANUAL PIC SIZE Use these buttons according to the directions on the TV's screen. Exits the menu. Cuts off the sound temporarily. Changes channels. Displays the Electronic Program Guide (EPG). Displays information on the TV screen. Use these buttons with a specific feature and according to the directions on the TV's screen.The button names above may be differ from the actual names.
the remote control may differ by its model.
Installing batteries into the remote control
Match the polarity of the batteries to the symbols on the battery compartment.
Use the remote control within 7m of the TV.
Bright light may affect the performance of the remote control. Avoid using near bright fluorescent lights or neon signs.
The color and shape of the remote may vary depending on the model.
text_image
Technical diagram of a mechanical component with labeled parts and directional indicatorsHow to Navigate Menus
Before using the TV, follow the steps below to learn how to navigate the menu and select and adjust different functions.
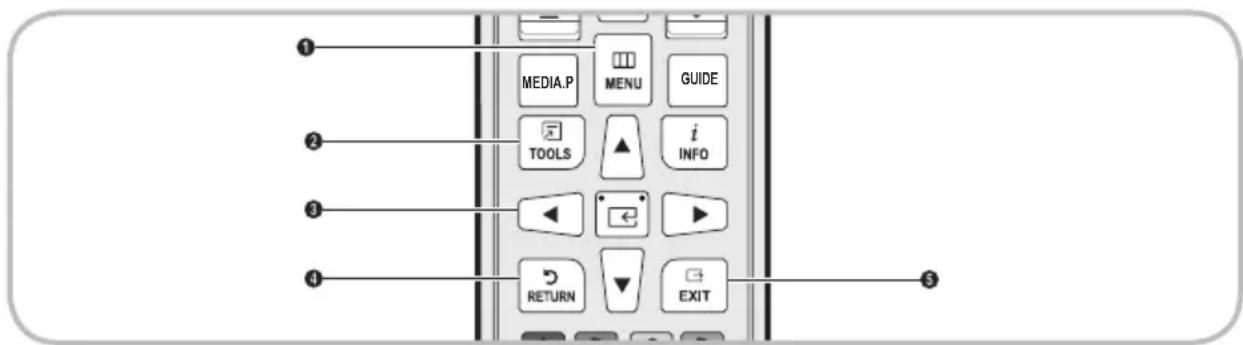
text_image
MEDIA.P MENU GUIDE TOOLS i INFO RETURN EXIT① MENU button: Displays the main on-screen menu.
② TOOLS button: Displays the Tools menus when available.
③ and Direction buttons: Use the Direction buttons to move the cursor and highlight an item. Use the button to select an item or confirm the setting.
④ RETURNS button: Returns to the previous menu.
⑤ EXIT → button: Exits the on-screen menu.
How to Operate the Main Menu (OSD - On Screen Display) Using the Remote
The access steps may differ depending on the menu option you select.
| 1 | MENU | The main menu options appear on the screen:Picture, Sound, Broadcasting, Applications, System, Support. |
| 2 | ▲/▼ | Select a main menu option on the left side of the screen with the ▲ or ▼ button. |
| 3 | ENTER | Press ← to access the sub-menus. |
| 4 | ▲/▼ | Select the desired sub-menu with the ▲ or ▼ button. |
| 5 | ▲/▼/◄/► | Adjust the value of an item with the ◀, ►, ▲, or ▼ button. The adjustment in the OSD may differ depending on the selected menu. |
| 6 | ENTER | Press ← to confirm the selection. |
| 7 | EXIT | Press EXIT →. |
Setup (Initial Setup)
When you turn the TV on for the first time, a sequence of on-screen prompts will assist in configuring basic settings. To turn on the TV, press the POWER button.
Before turning on the TV, make you have connected the TV to an antenna or cable connection.
POWER

If You Want to Rerun Setup...
MENU→System→Setup→ENTER
Changing the Input Source
Source
Use to select TV or an external input source such as a DVD player / Blu-ray player / cable box / STB satellite receiver.

■ TV / HDMI1 / HDMI2/DVI / AV / Component
- Press the SOURCE → button on your remote.
- Select a desired external input source.
You can change the view mode among the All and Connected by pressing ◀ or ▶ button.
You can only choose external devices that are connected to the TV. In Source, connected inputs will be highlighted.
Edit Name
Edit Name lets you associate a device name to an input source. To access Edit Name, press the TOOLS button on your remote when the Source list is displayed. The following selections appear under Edit Name:
VCR / DVD / Cable STB / Satellite STB / PVR STB / AV Receiver / Game / Camcorder / PC / DVI PC / DVI Devices / TV / IPTV / Blu-ray / HD DVD / DMA: Name the device connected to the input jacks to make your input source selection easier.
If you connect a PC to the HDMI(DVI) port with an HDMI cable, assign PC to HDMI2(DVI) in Edit Name.
You connect a PC to the HDMI (DVI) port with an HDMI to DVI cable, assign DVI PC to HDMI2(DVI) in Edit Name.
If you connect an AV device to the HDMI (DVI) port with an HDMI to DVI cable, assign DVI Devices to HDMI2/DVI in Edit Name.
Information
You can see detailed information about the selected external device.
Using the INFO button (Now & Next guide)
The display identifies the current channel and the status of certain audio-video settings.
The Now & Next guide shows daily TV program information for each channel according to the broadcasting time.
When you press the INFO button, a channel information banner will appear on the top of the screen. And then press the ENTER button, you can see the details of the program.
- Scroll ◀▶ to view information for a desired program while watching the current channel.
Memorizing channels
Your TV memorizes channels and adds the memorized channels to the Channel List with the Auto Tuning function. Before your TV can memorize channels, you must specify the signal source, Both, Air or Cable.
■Auto Tuning
MENU → Broadcasting → Auto Tuning → ENTER
Scans for channels automatically and stores them in the TV's memory.
To start Auto Tuning, follow these steps:
1 Select Auto Tuning, and then press ENTER←.
2. Press the ENTER← button to select Start.
3. Select Air or Cable or Both by highlighting and then pressing ENTER←.
4. SeZlect Scan, and then press ENTER←. Auto Tuning starts.
After all the available channels are stored, Auto Tuning removes scrambled channels. When done, the Auto Tuning menu then reappears. This process can take up to 30 minutes.
Automatically allocated program numbers may not correspond to actual or desired program numbers. If a channel is locked, the PIN input window appears.
How to Stop Auto Program
- Press the ENTER← button to select Stop.
- A message will ask Stop Auto Tuning?. Select Yes by pressing the ◀ or ▶ button.
- Press the ENTER← button.
When you select Change Settings, antenna setting screen appears. You can set antenna settings and start channel search again.
Press the Scan Again to restart channel search.
Antenna
MENU → Broadcasting → Antenna → ENTER
To begin the memorizing procedure, follow these steps:
- Select Antenna, and then press ENTER←.
- Select the source of your TV signal, Air or Cable.
Selecting Air or Cable also changes the actual signal input from Air to Cable or Cable to Air.
■Channel List

MENU→ Broadcasting → Channel List → ENTER
The Channel List contains the channels your TV displays (added channels) when you press the channel button. You can view channel information, Added Ch., Edit Favorites, Favorites 1 - Favorites 5. Press ▶ (Mode) button to change the channel mode.
When you press the CH LIST button, Channel List screen is displayed at once.
Mode
• Antenna: Switch between Air and Cable.
- Edit Favorites: Set channels you watch frequently as favorites. Add or delete the selected channel in Favorites1 - Favorites 5.
For detailed information about using Edit Favorites, refer to "Edit Favorites".
- Favorites 1 - Favorites 5: Show all favorite channels, arranged in up to five groups. Each group has a separate screen.
The TV displays Favorites 1 - Favorites 5 only if you have added favorites using Edit Favorites.
• All: Show all channels.
• TV: Show TV channels.
• Analog: Show analog channels.
■Guide

MENU→ Broadcasting → Guide → ENTER
The EPG (Electronic Program Guide) information is provided by broadcasters. Using program schedules provided by broadcasters, you can specify programs you want to watch in advance so that the channel automatically changes to the selected program channel at the specified time. Program entries may appear blank or out of date depending on a channel status.
- A Red (Quick Nav): Viewing the TV programs on the list quickly using ◄/▶ buttons.
- Green (Channel category): Select the type of channels you want to display.
• C Yellow (Schedule Manager): Moves to the reserved programs in Schedule Manager.
■Schedule Manager

MENU→ Broadcasting → Schedule Manager → ENTER
You can set a desired channel to be displayed automatically at the intended time. In addition, you can view, modify or delete a channel you have reserved to watch.
You must set the current time first using the Time → Clock function in the System menu to use this function.
- Press the Schedule on the Schedule Manager screen. The Schedule Viewing menu appears.
- Press the ▲/▼/◄/► buttons to set each option menu.
• Antenna: Select the desired broadcasting signal.
• Channel: Select the desired channel.
- Repeat: Select Once, Manual, Sat\~Sun, Mon\~Fri or Everyday. If you select Manual, you can set the day you want.
check (√) mark indicates a day you selected.
• Date: You can set a desired date.
Date is available only when you select Once in Repeat.
- Start Time: You can set the start time you want.
You want to edit or cancel a reserved schedule, select the reserved schedule on Schedule Manager. Then press the ENTER button and select the Edit or Delete.
■Edit Channel
MENU → Broadcasting → Edit Channel → ENTER
You can add or delete channels.
Deleting a channel from the channel list
-
Go to Edit Channel screen.
-
Press the ▲/▼ buttons to select the desired channel, and then press ENTER← button. The (√) mark indicates the channel you've selected.
You can select more than one channel.
Press ENTER← button again to deselect the channel.
- Press B (Delete) button. The selected channel has been deleted from the channel list.
Adding a channel to the channel list
- On the Edit Channel screen, press the TOOLS button, and then select the Category.
- Select All and press the OK button. A deleted channel appears in All channel list.
Your TV will display all channels, including channels you deleted from the channel list, on the All.
A gray-colored channel indicates the channel has been deleted.
- Select a deleted channel, and then press the B (Add) button.
Using the colored and function buttons with the Edit Channel.
• B Green (Delete / Add)
– Delete: Deletes a channel from the channel list.
- Add: Adds a deleted channel. It only appears when you select the deleted channel in All.
• C Yellow (Lock / Unlock): Lock a channel so that the channel cannot be selected and viewed.
- This function is available only when the Channel Lock is set to On.
- The PIN input screen appears. Enter your 4-digit PIN, the default of which is "0-0-0-0". Change the PIN using the Change PIN option.
• D Blue (Select All / Deselect All): Selects or deselects all channels at once.
- 0\~9 (Go To): Goes to channel directly by pressing numbers (0\~9).
- (Page): Moves to next or previous page.
-
Tool (Tools): Displays the option menu. The option menu items that appear may differ depending on the channel status and type.
-
Sorting: Arranges the channel order according to channel number orname on the list.
- Antenna: Select the desired broadcasting signal.
- Category: Change the channel mode to All, Added Ch., Recently Viewed, Mostly Viewed. The selected channel mode is displayed.
- Edit Favorites: Go to Edit Favorites screen directly.
– Channel Info: Display details of the selected channel.
– Rename Channel (analog channels only): Assign a name of up to five characters to a channel. For example, Food, Golf, etc. This makes it easier to find and select the channel.
– Information: Display details of the selected program.
Edit Favorites TOOLS

MENU→ Broadcasting → Edit Favorites → ENTER
You can add, edit or delete favorite channels.
Adding a channel to the Favorites 1 - Favorites 5
- Go to Edit Favorites screen.
- Press the ▲/▼ buttons to select the desired channel, and then press ENTER← button.
- Choose a specific favorite list among Favorites 1 - Favorites 5 using B (Change Fav.) button, and then press the D (Add) button. The selected channel has been added in Favorites 1 - Favorites 5.
One favorites channel can be added in several of favorites among Favorites 1 - Favorites 5.
Deleting a channel from the Favorites 1 - Favorites 5
- On the Edit Favorites screen, select the favorite list using B (Change Fav.) button.
- Move to favorite list, and then select the desired channel you want to delete.
- Press the D (Delete) button. The selected channel has been deleted from the Favorites 1 - Favorites 5.
If you want to change the favorite channel order, press the A (Change order) button and change the order using ▲/▼ buttons.
Using the colored and function buttons with the Edit Favorites.
• A Red (Category / Change order)
- Category: Changes the channel mode to Added Ch., Recently Viewed, Mostly Viewed. The selected channel mode is displayed.
- Change order: change the favorite channel order.
- Green (Change Fav.): Changes favorite list among Favorites 1-5.
• C Yellow (Select All / Deselect All): Selects or deselects all channels at once.
• D Blue (Add / Delete)
- Add: Adds selected channels to Favorites1-5.
– Delete: Delete a favorite channel from Favorites1-5.
- 0\~9 (Go To): Goes to channel directly by pressing numbers (0\~9).
• ⬇ (Page): Moves to next or previous page.
- (Tools): Displays the option menu. The option menu items that appear may differ depending on the channel status and type.

- Antenna: Select the desired broadcasting signal.
- Copy to Favorites: Edit the selected favorite channel in Favorites1-5. You can add or delete from favorite list.
– Rename Favorites: Assign your own favorite channel name. - Edit Channel: Add or delete channels.
– Information: Display details of the selected program.
■Channel Lock
MENU → Broadcasting → Channel Lock → ENTER
Lock channels to prevent unauthorized users, such as children, from watching unsuitable program.
The PIN input screen appears. Enter your 4-digit PIN, the default of which is "0-0-0-0".
Other Features
■Channel Settings
MENU → Broadcasting → Channel Settings → ENTER
- Fine Tune
(analog channels only)
If the reception is clear, you do not have to fine tune the channel, as this is done automatically during the search and store operation. If the signal is weak or distorted, fine tune the channel manually.
Fine tuned channels that have been saved are marked with an asterisk “*” on the right-hand side of the channel number in the channel banner.
To reset the fine-tuning, select Reset.
- Color System
(analog channels only)
Normally the TV can receive image and sound with good quality in Auto mode. This mode detects the color signal sources automatically. If the color implementation is unsatisfactory, select any of PAL-M, PAL-N or NTSC.
• Digital Manual Tuning
(Digital channels only)
Manually scan for channels and store them in TV's memory. Enter Digital Manual Tuning, then select New. You need to set up Channel and Frequency. Signal Quality is set automatically. Press Search to start.
■ Subtitle TOOLS (digital channels only)
MENU → Broadcasting → Subtitle → ENTER
Use this menu to set the Subtitle mode.
- Subtitle: Switches subtitles on or off.
- Subtitle Mode: Sets the subtitle mode.
The program you are watching does not support the Hearing Impaired function, Normal automatically activates even if the Hearing Impaired mode is selected.
- Subtitle Language: Sets the subtitle language.
The available language may differ depending on the broadcast.
English is the default in cases where the selected language is unavailable in the broadcast.
• Primary Subtitle: Sets the primary subtitle.
• Secondary Subtitle: Sets the secondary subtitle.
Caption TOOLS (analog channels only)
(On-Screen Text Messages)
MENU → Broadcasting → Caption → ENTER
- Caption: You can switch the caption function on or off. If captions are not available, they will not be displayed on the screen.
The Caption feature does not work with devices connected to the TV through the Component, HDMI input jacks.
- Caption Mode: You can select the desired caption mode.
The availability of captions depends on the program being broadcasted.
CC1\~CC4 / Text1\~Text4: The Analog Caption function operates in either analog TV channel mode or when a signal is supplied from an external device to the TV. (Depending on the broadcasting signal, the Analog Caption function may or may not work with digital channels.)
■Audio Options
MENU → Broadcasting → Audio Options → ENTER
• Audio Language TOOLS
(digital channels only)
Change the default value for audio languages.
The available language may differ depending on the broadcast.
• Multi-Track Sound TOOLS园
(analog channels only)
Select an option using the ▲/▼ buttons, and then press ENTER←.
Mono: Choose for channels that are broadcasting in mono or if you are having difficulty receiving a stereo signal.
Stereo: Choose for channels that are broadcasting in stereo.
SAP: Choose to listen to the Separate Audio Program, which is usually a foreign-language translation.
Depending on the program being broadcast, you can listen to Mono, Stereo or SAP.
- Audio Format
(digital channels only)
Select the audio format of current broadcasting. The available items may differ depending on the broadcasting status.
Picture Mode TOOLS
MENU → Picture → Picture Mode → ENTER
Picture modes apply preset adjustments to the picture. Select a mode using the ▲/▼ buttons, and then press ENTER.
When connecting a PC, you can only select Entertain and Standard.
• Dynamic: Suitable for a bright room.
• Standard: Suitable for a normal environment.
• Movie: Suitable for watching movies in a dark room.
- Entertain: Suitable for watching movies and games.
This is only available when connecting a PC.
Adjusting Picture Settings
■ Backlight / Contrast / Brightness / Sharpness / Color / Tint (G/R)
MENU → Picture → Backlight → ENTER
Your television has several options for adjusting picture quality. Select an option using the ▲/▼/◄/► buttons, and then press ENTER←.
NOTE
- When you make changes to Backlight, Contrast, Brightness, Sharpness, Color or Tint (G/R), the OSD will be adjusted accordingly.
- When connecting a PC, you can only make changes to Backlight, Contrast, Brightness, and Sharpness.
- You can adjust and store settings for each external device connected to the TV.
- Lowering picture brightness reduces power consumption.
Picture Size TOOLS园
MENU → Picture → Picture Size → ENTER
Picture Size provides various picture size and aspect ratio options. Select an option using the ▲/▼/◄/► buttons, and then press ENTER.
- Picture Size: If you have a cable box or satellite receiver, it may have its own set of screen sizes as well. However, we highly recommend you use your TV's 16:9 mode most of the time.
16:9: Sets the picture to 16:9 wide screen mode.
Wide Zoom: Magnifies the picture size more than 4:3. A magnified picture can be moved up and down.
Zoom: Magnifies the picture moderately. Cuts off the top and sides.
Wide Fit: Enlarges the aspect ratio of the picture so it fits the entire screen.
4:3: Sets the picture to 4:3 mode.
Do not set your TV to 4:3 format for a long time. The borders displayed on the left and right, or top and bottom of the screen may cause image retention (screen burn) which is not covered by the warranty.
Screen Fit: When your TV inputs HDMI (720p / 1080i / 1080p) or Component (1080i / 1080p) signals, displays the full image without any cut-off.
Custom: Magnifies or shrinks 16:9 pictures vertically and/or horizontally. A magnified or shrunk picture can be moved left, right, up, and down.
- Position: Adjusts the picture position. Position is only available if Picture Size is set to Zoom1, Zoom2, Wide Fit or Screen Fit.
To use the Position function after selecting Zoom1, Zoom2, Wide Fit or Screen Fit, follow these steps:
-
Select the Position, and then press the ENTER← button.
-
Select the Position button, and then press ENTER← button.
-
Press the ▲/▼ button to move the picture up or down.
-
Press the ENTER← button.
If you want to reset the pictures to its original position, select Reset in the Position screen, and then press ENTER. The picture will be reset to its default position.
To use the Position function after selecting Screen Fit when connected to an HDMI (1080i/1080p) or Component (1080i/1080p) source, follow these steps:
-
Select the Position, and then press the ENTER← button.
-
Select the Position button, and then press ENTER← button.
-
Press the ▲/▼/◄/► button to move the picture.
-
Press the ENTER← button.
If you want to reset the pictures to its original position, select Reset in the Position screen, and then press ENTER←. The picture will be reset to its default position.
ND (High Definition): 16:9 - 1080i/1080p (1920x1080), 720p (1280x720)
You can adjust and store settings for each external device you have connected to an input on the TV.
Picture Sizes available by Input Source:
| Input Source Picture Size | |
| ATV, AV, Component (480i, 480p) | 16:9, Wide Zoom, Zoom, 4:3, Custom |
| DTV(1080i), Component (1080i, 1080p), HDMI (720p, 1080i, 1080p) | 16:9, Wide Zoom, Zoom, 4:3, Screen Fit, Custom |
Using Your Product as a Computer (PC) Display
Entering the Video Settings
For your product to work properly as a computer display, you must enter the correct video settings.
Depending on your version of Windows and your video card, the procedure on your PC will probably differ slightly from the procedure presented here.
However, the same basic information will apply in most cases. (If not, contact your computer manufacturer or Samsung Dealer.)
- Click "Control Panel" on the Windows start menu.
- Click "Appearance and Themes" in the "Control Panel" window. A display dialog box appears.
- Click "Display". Another display dialog box appears.
-
Click the "Settings" tab on the display dialog box.
-
On the Settings tab, set the correct resolution (screen size). The optimal resolution for this product is 1366 x 768 and 1920 x 1080 (21.5 inches model only).
- If a vertical-frequency option exists on your display settings dialog box, select "60" or "60 Hz". Otherwise, just click "OK" and exit the dialog box.
PIP
MENU → Picture → PIP → ENTER
View two sources on the TV at the same time.
NOTE
• For PIP sound, refer to the Sound Select instructions.
- If you turn the TV off while watching in the PIP mode, the PIP function is reset to off. When you turn your TV on, you must turn PIP on again to watch in the PIP mode.
- You may notice that the picture in the PIP window becomes slightly unnatural when you use the main screen to view a game or karaoke.
• The sub-picture size can be set by three modes.
- minimum
- medium
- maximum (a quarter of screen size)
- PIP Settings
| Main picture Sub picture | |
| TV, AV, Component, HDMI1, HDMI2/DVI TV, AV, Component, HDMI1, HDMI2/DVI | |
| main screen | ||||||
| TV | AV | Component | HDMI1 | HDMI2/DVI | ||
| sub picture | TV | X | X | O | O | O |
| AV | X | X | X | O | O | |
| Component | O | X | X | O | O | |
| HDMI1 | O | O | O | X | X | |
| HDMI2/DVI | O | O | O | X | X | |
Available / X: Not Available
- PIP (Off / On): Activate or deactivate the PIP function.
- Source: Select your desired source, such as TV, HDMI1, HDMI2/DVI, AV, Component and so on.
- Antenna: Select either Air or Cable as the input source for the sub-screen.
• Channel: Select the channel for the sub-screen.
• Size: Select a size for the sub-picture.
• Position: Select a position for the sub-picture.
• Sound Select: You can choose to listen to the sound from the Main picture or the Sub picture.
Changing the Picture Options
■Advanced Settings

MENU→Picture→Advanced Settings→ENTER
Advanced Settings are available in the Standard and Movie modes.
To use, select an option using the ▲/▼/◄/► buttons, and then press ENTER←.
When connecting a PC, you can only make changes to the White Balance and Gamma.
• Dynamic Contrast (Off/Low/Medium/High): Adjusts the screen contrast.
- Black Tone (Off/Dark/Darker/Darkest): Select the black level to adjust the screen depth.
- Flesh Tone: Emphasizes pink "Flesh Tone."
- RGB Only Mode (Off/Red/Green/Blue): Displays the Red, Green and Blue color for making fine adjustments to hue and saturation.
• Color Space: Adjusts the range of colors (the color gamut) available to create images.
Adjust Auto and Native to set Color Space.
- White Balance: Adjusts the color temperature for a more natural picture.
R-Offset / G-Offset / B-Offset: Adjusts each color's (red, green, blue) darkness.
R-Gain / G-Gain / B-Gain: Adjusts each color's (red, green, blue) brightness.
Reset: Resets the White Balance to its default settings.
• Gamma: Adjusts the primary color intensity.
- Motion Lighting: Reduces power consumption by reducing screen brightness when the picture on the screen is motionless.
When you change the Backlight, Contrast, or Brightness, the TV sets Motion Lighting to Off.
Only available in Standard mode.
■Picture Options

MENU→Picture→Picture Options→ENTER
Select an option using the ▲/▼/◄/► buttons, and then press ENTER←.
When connecting a PC, you can only make changes to Color Tone.
• Color Tone (Cool/Standard/Warm1/Warm2)
Warm1 or Warm2 will be deactivated when the picture mode is Dynamic.
You can adjust and store settings for each external device connected to an input on the TV.
- Digital Clean View (Off/Low/Medium/High/Auto/Auto Visualization): If the broadcast signal received by your TV is weak, you can activate the Digital Clean View feature to reduce any static and ghosting that may appear on the screen.
When the signal is weak, try each option until the TV displays best picture. Auto Visualization: When changing analog channels, displays signal strength.
Only available for analog channels.
When the INFO button is pressed, the signal strength bar is displayed.
When the bar is green, you are receiving the best possible signal.
- MPEG Noise Filter (Off/Low/Medium/High/Auto): Reduces MPEG noise to provide improved picture quality.
- HDMI Black Level: Lets you select the black level on the screen to adjust the screen depth.
Available only in HDMI mode (RGB signals).
- Film Mode: Sets the TV so that it senses and then processes film signals from all sources automatically and adjusts the picture for optimum quality.
Available in TV mode and external input mode which supports SD (480i / 576i) and HD (1080i) signals except in PC mode.
The screen does not seem natural, change its option to Off / Auto1 / Auto2 in Film Mode.
• LED Clear Motion: Removes drag from fast scenes with a lot of movement to provide a clear picture.
The screen may become slightly darker when you play LED Clear Motion.
■Picture Off
MENU → Picture → Picture Off → ENTER
The screen is turned off but the sound remains on. Press any button (except Power and Volume buttons) on your remote to turn the screen back on.
■Reset Picture
MENU → Picture → Reset Picture → ENTER
Resets your current picture mode to its default settings.
Changing the Preset Sound Modes
Sound Mode
MENU → Sound → Sound Mode → ENTER
Use the ▲/▼ buttons to select an option, and then press ENTER←.
Speaker Select is set to External Speaker, Sound Mode is disabled.
- Standard: Selects the normal sound mode.
• Music: Emphasizes music over voices.
• Movie: Provides the best sound for movies.
• ClearVoice: Emphasizes voices over other sounds. - Amplify: Increase the intensity of high-frequency sounds to allow a better listening experience for the hearing impaired.
Sound Effect

MENU→Sound→Sound Effect→ENTER
(standard sound mode only)
Use the ▲/▼ buttons to select an option, and then press ENTER←.
①Speaker Select is set to External Speaker, Sound Effect is disabled.
- Equalizer
Use Equalizer to customize sound setting for each speaker.
Balance L/R: Adjusts the balance between the right and left speaker.
100Hz / 300Hz / 1kHz / 3kHz / 10kHz (Bandwidth Adjustment): Adjusts the volume level of specific bandwidth frequencies.
Reset: Resets the equalizer to its default settings.
■Speaker Settings

MENU→Sound→Speaker Settings→ENTER
- Speaker Select TOOLS园
A sound echo may occur due to a difference in decoding speed between the main speaker and the audio receiver. In this case, set the TV to External Speaker.
When Speaker Select is set to External Speaker, the volume and MUTE buttons will not operate and the sound settings will be limited.
When Speaker Select is set to External Speaker, you should use these settings.
• TV Speaker: Off, External Speaker: On
When Speaker Select is set to TV Speaker, you should use these settings.
• TV Speaker: On, External Speaker: ON
- Auto Volume
Normal equalizes the volume level on each channel, so that when you change channels, the volume level is the same.
Night equalizes and decrease the volume level on each channel, so each channel is quieter. Night is useful at night, when you may want to keep the volume low.
use the volume control on the source device connected to the TV, set Auto Volume to Off on the TV. Otherwise, a change to the volume control of the source device may not be applied.
• TV Installation Type
Specify the TV's installation type. Choose between Wall Mount and Stand to optimise the TV's sound automatically.
■Additional Settings
MENU → Sound → Additional Settings → ENTER
- DTV Audio Level (digital channels only): This function allows you to reduce the disparity of a voice signal (which is one of the signals received during a digital TV broadcast) to a desired level.
According to the type of broadcast signal, MPEG / HE-AAC can be adjusted between -10dB and 0dB.
To increase or decrease the volume, adjust between the range 0 and -10 respectively.
- Digital Audio Out
Digital Audio Out is used to provide digital sound, reducing interference going to speakers and various digital devices such as a DVD player.
Audio Format (PCM/Dolby Digital): You can select the Digital Audio output format. The available Digital Audio output format may differ depending on the input source.
^2 By connecting to 5.1ch speakers in a dolby digital setup, maximize your interactive 3D sound experience.
Audio Delay: Correct audio-video mismatch, when watching TV or video, and listening to digital audio output using an external device such as an AV receiver (0ms \~ 250ms).
- Dolby Digital Comp (digital channels only): This function minimizes signal disparity between a dolby digital signal and a voice signal (i.e. MPEG Audio, HE-AAC, ATV Sound).
This function is available only when the Audio Format is set to Dolby Digital, Dolby Digital Plus, AAC, or HE-AAC.
*Select Line to obtain dynamic sound, and RF to reduce the difference between loud and soft sounds at night time.
Line: Set the output level for signals greater or less than -31dB (reference) to either -20dB or -31dB.
RF: Set the output level for signals greater or less than -20dB (reference) to either -10dB or -20dB.
■Reset Sound
MENU → Sound → Reset Sound → ENTER
Reset all sound settings to the factory defaults. Select Reset Sound, press ENTER←, select Yes on the pop-up, and then press ENTER← again.
Executing initial setup
Setup
MENU → System → Setup → ENTER
Configure the channels and the time when setting up the TV for the first time or when resetting the unit.
Execute the initial setup following instructions that the TV guides.
Enter your 4-digit PIN, the default of which is 0-0-0-0.
Setting the Time
Time
MENU → System → Time → ENTER
The current time will appear every time you press the INFO button.
- Clock: Set the clock to use the various timer features of the TV.
If you disconnect the power cord, you have to set the clock again.
Clock Mode: Set the current time Manual or Auto.
• Auto: The TV sets the current time automatically using the time from a digital channel.
You must have cable or an antenna connected to the TV to set the time automatically.
• Manual: Set the current time manually.
^2 Depending on the broadcast station and signal, the auto time set up may not be correct. In this case, set the time manually.
Clock Set: Set the Date and Time.
Select Clock Set. Select Date or Time, and then press ENTER←. Use the number buttons or the ▲/▼ buttons to enter numbers. Use the ◀/▶ buttons to move from one entry field to the next. Press ENTER← when done.
Available only when Clock Mode is set to Manual.
You can set the Date and Time directly by pressing the number buttons on the remote control.
Using the Sleep Timer
MENU → System → Time → Sleep Timer → ENTER
- Sleep Timer TOOLS: Automatically shuts off the TV after a preset period of time. (30, 60, 90, 120, 150 and 180 minutes).
Use the ▲/▼ buttons to select a period of time, and then press ENTER←. To cancel the Sleep Timer, select Off.
Setting the On/Off Timer
MENU → System → Time → On Timer
Set On Timer so that your TV turns on automatically at a time and on a day of your choosing.
- On Timer: You can set up three separate On Timer configurations.
You must set the clock before you can use On Timer.
Setup: Select Off, Once, Everyday, Mon\~Fri, Mon\~Sat, Sat\~Sun or Manual. If you select Manual, you can choose the days you want On Timer to turn on your TV.
The √ mark indicates days you've selected.
Time: Set the hour, minute, am/pm. Use the number buttons or the ▲/▼ buttons to enter numbers. Use the ◀/▶ buttons to change entry fields.
Volume: Set the desired volume level. Use the ◀/▶ buttons to change the volume level.
Source: Specify which source to display when the TV turns on. The TV displays an air / cable broadcast. USB plays photos or music files from a USB device. Selecting a source on a TV connected to a set-top box displays the channel from the set-top box.
The USB option can be selected if a USB device is connected to the TV.
In select a source other than TV or USB, you must perform the following:
- Connect the cable or satellite set-top box to the AV port.
- Tune the set-top box to the channel you wish to display.
- Turn on the set-top box.
^1 a source other than TV or USB is selected. The Antenna and Channel options disappear.
Antenna (when the Source is set to TV): Select Air or Cable.
Channel (when the Source is set to TV): Select the desired channel.
Music / Photo (when the Source is set to USB): Select a folder in the USB device containing the music or photo files you want to play when the TV turns on automatically.
there is no music file on the USB device or you don't select a folder containing a music file, the Timer function does not operate correctly.
If there is only one photo file in the USB, the Slide Show will not play.
A folder with a name that is too long cannot be selected.
Each USB device you use is assigned its own folder. When using more than one of the same type of USB device, make sure the folders assigned to each USB device have different names.
This is recommended that you use a USB memory stick and a multi card reader when using On Timer.
The On Timer function may not work with USB devices with a built-in battery, MP3 players, or PMPs made by some manufacturers because these devices take a long time to be recognized.
- Off Timer: You can set up three separate Off Timer configurations. (Off Timer 1, Off Timer 2, Off Timer 3)
You must set the clock before you can use Off Timer.
Setup: Select Off, Once, Everyday, Mon\~Fri, Mon\~Sat, Sat\~Sun or Manual. If you select Manual, you can choose the days you want Off Timer to turn off your TV.
The √ mark indicates days you've selected.
Time: Set the hour, minute, and am/pm. Use the number buttons or the ▲/▼ buttons to enter numbers. Use the ◀/▶ buttons to change entry fields.
Economical Solutions
■Eco Solution
MENU → System → Eco Solution → ENTER
- Energy Saving (Off/Low/Medium/High): Lets you adjust the brightness of the TV in order to reduce power consumption.
- No Signal Power Off (Off / 15 min. / 30 min. / 60 min.): Sets how quickly the TV switches to standby mode if it is receiving no signal.
Disabled when an attached PC is in power saving mode.
• Auto Power Off: The TV will automatically turned off when no user operation is received for 4 hours.
The Auto Power Off option is set to Off, the TV will stay on even if no operations are performed on the TV.
■Menu Language
MENU → System → Menu Language → ENTER
Set the menu language.
- Select Menu Language, and then press the ENTER← button.
- Choose a language, and then press the ENTER← button.
Choose English, Español, Português or Français.
The available language may differ depending on the countries.
■Auto Protection Time
MENU → System → Auto Protection Time → ENTER
- Auto Protection Time (Off/2 hours/4 hours/8 hours/10 hours): Activates the Screen Burn Protection function if a still frame is shown for longer than the specified duration. (Displaying a still frame for longer than 4 hours can burn the screen.)
■Change PIN
MENU → System → Change PIN → ENTER
The Change PIN screen will appear. Choose any 4 digits for your PIN and enter it in Enter New PIN. Re-enter the same 4 digits in Confirm New PIN. When the Confirm screen appears, press the Close button. The TV has memorized your new PIN.
When you access the Change PIN function for the first time, the PIN input screen appears. Enter a 4 digit PIN you will remember.
The default PIN number for a new TV set is "0-0-0-0".
If you forget the PIN code, press the remote control buttons in the following sequence in Standby mode, which resets the PIN to "0-0-0-0": MUTE → 8 → 2 → 4 → POWER (on)
General
MENU → System → General → ENTER
- Game Mode (Off / On): When you have connected a game console such as PlayStation™ or Xbox™ to the TV, you can enjoy a more realistic gaming experience if you set Game Mode on.
NOTE
• Precautions and limitations for Game Mode:
- Before disconnecting a game console and connecting another external device, set Game Mode to Off.
- If you display the TV menu in Game Mode, the screen shakes slightly.
- Game Mode is not available when you've set the input source to TV.
- Set Game Mode to On only after connecting a game console. If you turn Game Mode on before you have attached the game console, you may notice reduced picture quality.
• If Game Mode is On:
– Picture Mode is set to Standard and Sound Mode is set to Movie.
• Panel Lock: Lock or unlock all the keys on the panel.
- Boot Logo: Display the Samsung logo when the TV is turned on.
- AV Color System: Normally the TV can receive image and sound with good quality when in the mode Auto. This mode detects the signal color system automatically. In case of some signal reception with color unsatisfactory, select the AV Color System Mode to PAL-M, PAL-N or NTSC.
Available only in AV mode.
Using the Source List
■Source List

MENU→Applications→Source List→ENTER
When you press the SOURCE button, Source screen will be displayed at once.
You can only choose external devices that are connected to the TV. In Source, connected inputs are highlighted.
For the detailed information, refer to "Changing the Input Source" in User Manual
Connecting a USB Device
- Turn on your TV.
- Connect a USB device containing photo, music and movie files to the USB port on the side of the TV.
- When USB is connected to the TV, popup window appears. You can select the Photos, Videos or Music directly.
It might not work properly with unlicensed multimedia files.
Need-to-Know List before using Media Contents.
• MTP (Media Transfer Protocol) is not supported.
• The file system supports NTFS (Read Only), FAT16 and FAT32.
- Certain types of USB Digital camera and audio devices may not be compatible with this TV.
• Media Contents only supports sequential jpeg format.
- Media Contents only supports USB Mass Storage Class (MSC) devices. MSC is a Mass Storage Class Bulk-Only Transport device. Examples of MSC are Thumb drives, Flash Card Readers (USB HUB are not supported). Devices should be connected directly to the TV's USB port.
- Before connecting your device to the TV, please back up your files to prevent them from damage or loss of data. SAMSUNG is not responsible for any data file damage or data loss.
- The HDD (Hard Disk Drive) connected to USB is not supported.
- Do not disconnect the USB device while it is loading.
- The higher the resolution of the image, the longer it takes to display on the screen.
- The maximum supported JPEG resolution is 15360 x 8640 pixels.
- For unsupported or corrupted files, the "Not Supported File Format" message is displayed.
-
The scene search and thumbnail functions are not supported in the Videos.
-
MP3 files with DRM that have been downloaded from a non-free site cannot be played.
Digital Rights Management (DRM) is a technology that supports the creation, distribution and management of the content in an integrated and comprehensive way, including the protection of the rights and interests of the content providers, the prevention of the illegal copying of contents, as well as managing billings and settlements. - A USB device that requires high power (more than 500mA or 5V) may not be supported.
- If the TV has been no input during time set in Auto Protection Time, the screen saver will run.
- If a USB extension cable is used, the USB device may not be recognized or the files on the device may not be read.
- If a USB device connected to the TV is not recognized, the list of files on the device is corrupted or a file in the list is not played, connect the USB device to the PC, format the device and check the connection.
- If a file deleted from the PC is still found when Media Contents is run, use the "Empty the Recycle Bin" function on the PC to permanently delete the file.
- If the number of files and folders saved on a USB storage device is approximately over 4000, the files and folders may not appear and some folders may not be opened.
Disconnecting a USB Device
- Press the SOURCE button.
- Select a desired USB device, and then press the TOOLS button. The Tools menu appears.
- Select Remove USB, and then wait until the selected USB device is disconnected. You can remove a USB device from the TV.
to remove a USB device from the TV, we recommend use Remove USB function.
Using the Media Contents
MENU → Applications → Media Play → ENTER
Enjoy photos, music and movie files saved on a USB Mass Storage Class (MSC) device.
- Press the MEDIA.P button.
- Press ◀/▶ button to select desired menu, then press the ENTER← button.
- Press ◀/▶ button to select desired device, then press the ENTER← button again.
- Press the ▲/▼/◄/► button to select the desired file in the list, then press the ENTER← button or ▶ (Play) button.
Playing the selected files
- Press the ▲ button to select Options at the top of each main screen and select Play Selected.
- Select the desired files.
The check box appears to the left of the selected files.
Press ENTER ← button again to deselect the file.
3 Press the ▲ button to select Play.
You can select or deselect all files pressing the Select All / Deselect All.
During playing a le, press the u/d/l/r button to select the desired menu.
When the option menu is not displayed, press the TOOLS button or ENTERE button.
You can also use //// buttons on the remote control during playback.
You press the INFO button during playback, you can view the playback information.
Playback menu
Button Operation Photos videos Music
| / | Previous / Next | ● | |
| Start Slide Show / Stop Slide Show | ● | ||
| / | Play / Pause Mini Player* | ● | |
| / | Previous / Next Mini Player* | ● | |
| / | Rewind / Fast forward | ● |
* When setting the Background Music to Mini Player in Photos, these buttons appear.
Setting menu
- Photos
Button Operation
| Slide Show Settings | You can set the Slide Show Speed and Slide Show Effect during the slide show. |
Zoom You can zoom into images in full screen mode.
Rotate You can rotate images in full screen mode.
| Background Music / Mini Player | You can set background music when watching a slide show. / You can control simple playback menus. |
| Settings | Picture Mode / Sound Mode: You can adjust the picture or sound setting.Information: You can see detailed information about the played le. |
During the slide show, all files in the file list will be displayed in order.
When you press the (Play) button (or u button Options Slide Show) in the file list, slide show will be started immediately.
During the slide show, you can adjust the slide show speed using (REW) or (FF) button.
• Supported Photo Formats
For the details, refer to "Specifications" in User Manual.
- Videos
| Button Operation | ||
 | Search | Search Titles: You can move the other file directly.Search Time bar: You can search the video using ◀ and ▶ button at one minute interval or entering the number directly.2) may not be supported depending on the input source. |
 | Repeat Mode You can play movie files repeatedly. | |
 | Picture Size You can adjust the picture size to your preference. | |
 | Settings | Subtitle Settings: You can play the video with subtitles. This function only works if the subtitles are the same file name as the video.Picture Mode / Sound Mode: You can adjust the picture or sound setting.Audio Language: You can change the audio language if the video has more than one language.Information: You can see detailed information about the played file. |
video time information is unknown, play time and progress bar are not displayed.
In this mode, you can enjoy movie clips contained on a Game, but you can not play the Game itself.
• Supported Subtitle / Video Formats
For the details, refer to "Specifications" in User Manual.
- Music
| Button Operation | ||
 | Repeat You can play music files repeatedly. | |
 | Shuffle You can play the music randomly. | |
 | Sound Mode You can adjust the sound setting. | |
Only displays the files with supported music file extension. Other file extensions are not displayed, even if they are saved on the same USB device.
The sound is abnormal when playing music files, adjust the Equalizer in the Sound menu. (An over-modulated music file may cause a sound problem.)
• Supported Music Formats
For the details, refer to "Specifications" in User Manual.

Setting the Encoding language
Set the encoding language if the text is not supported.
- Press the ▲ button to select Options at the top of music main screen and select Encoding.
- Select the desired encoding language.
Using the Soccer Mode
■Soccer Mode
MENU → Applications → Soccer Mode → ENTER
This mode provides optimized condition for watching sports games.
- A (Zoom): Pause playback and divide the picture into 9 parts. Select a part to zoom it in. Press this button again to resume.
When the Soccer Mode is On, the picture and sound modes are set to Stadium automatically.
If you turn the TV off while watching Soccer Mode, the Soccer Mode will be disable.
Using the Self Diagnosis
■Self Diagnosis
MENU → Support → Self Diagnosis → ENTER
- Picture Test: Use to check for picture problems. Picture test displays a high definition picture that you can examine for flaws or faults.
Yes: Select Yes if the test picture does not appear or there is noise or distortion in the test picture. There may be a problem with the TV. Contact Samsung's Call Center for assistance.
No: Select No if the test picture displays properly. There may be a problem with your external equipment. Please check your connections. If the problem persists, refer to the external device's user manual.
- Sound Test: Use to check for sound problems. Sound test plays a built-in melody that tests both speakers.
You hear no sound from the TV's speakers, before performing the sound test, make sure Speaker Select is set to TV Speaker in the Sound menu.
The melody will be heard during the test even if Speaker Select is set to External Speaker or the sound is muted by pressing the MUTE button.
Yes: Select Yes if you can hear sound from only one speaker or from neither speaker during the sound test. There may be a problem with the TV. Contact Samsung's Call Center for assistance.
No: Select No if you can hear sound from the speakers. There may be a problem with your external equipment. Please check your connections. If the problem persists, refer to the external device's user manual.
- Signal Information: (digital channels only) The reception quality of over-the-air HD channels is either perfect or the channels are unavailable. Signal Information displays HD channel signal strength so you can adjust your antenna to increase signal strength and receive HD channels.
- Reset: Reset all settings to the factory defaults.
The PIN input screen appears before the setup screen.
Enter your 4-digit PIN. Change the PIN using the Change PIN option.
Updating the Software
■Software Update

MENU→Support→Software Update→ENTER
The Software Update menu lets you upgrade your TV's software to the latest version.
- Update now: Update software by downloading update files.
Upgrading to the Latest Version
Check your TV's software version and upgrade it if necessary.
The TV will turn off and on automatically after completing the software upgrade. All video and audio settings return to the default settings after a software upgrade.
Changing the Use Mode
■Use Mode

MENU→Support→Use Mode→ENTER
Select the Use Mode suitable for your place. We strongly recommend you select Home Use.
• Home Use: Home Use is the default setting.
- Store Demo: Store Demo is for retail environments only. If you select Store Demo, some functions will not work, and the picture settings will be reset every 5 minutes.
Viewing the Contact Samsung
■Contact Samsung

MENU→Support→Contact Samsung→ENTER
View this information when your TV does not work properly or when you want to upgrade the software. You can find information regarding our call centers and how to download products and software.
Troubleshooting
If the TV seems to have a problem, first review this list of possible problems and solutions.
| Issues Solutions and Explanations | |
| The TV won't turn on. | Make sure the AC power cord is securely plugged in to the wall outlet and the TV.Make sure the wall outlet is working.Try pressing the POWER button on the TV to make sure the problem is not the remote. If the TV turns on, refer to “Remote control does not work” below. |
| The TV turns off automatically. | Ensure the Sleep Timer is set to Off in the System menu.If your PC is connected to the TV, check your PC power settings.Make sure the AC power cord is plugged in securely to the wall outlet and the TV.When watching TV from an antenna or cable connection, the TV will turn off after 15 - 60 minutes if there is no signal. If you don't want TV to turn off, please do the following steps: System > Eco Solution > No Signal Power Off > Off. |
| There is no picture/video. | Check the cable connections. Remove and reconnect all cables connected to the TV and external devices.Set the video outputs of your external devices (Cable/Sat Box, DVD, Blu-ray etc) to match the TV input connections. For example, if an external device's output is HDMI, it should be connected to an HDMI input on the TV.Make sure your connected devices are powered on.Be sure to select the correct input source by pressing the SOURCE button on the remote control.Reboot the connected device by unplugging and then reconnecting the device's power cable. |
| The remote control does not work. | Replace the remote control batteries. Make sure the batteries are installed with their poles (+/-) in the correct direction.Clean the sensor's transmission window on the remote.Try pointing the remote directly at the TV from 1.5~1.8 m away. |
| The cable/set top box remote control doesn't turn the TV on or off, or adjust the volume. | Program the Cable/Set remote control to operate the TV. Refer to the Cable/Set user manual for the SAMSUNG TV code. |
Some functions and pictures shown in this manual are available on specific models only.
To keep your TV in optimum condition, upgrade to the latest firmware on the Samsung web site by USB (www.samsung.com → Support → Downloads).
Storage and Maintenance
②a sticker was attached to the product screen, some debris can remain after you remove the sticker. Please clean the debris off before watching product.

natural_image
Illustration of a hand cleaning a surface with a prohibition symbol (no text or labels)Do not spray water directly onto the product. Any liquid that goes into the product may cause a failure, fire, or electric shock.
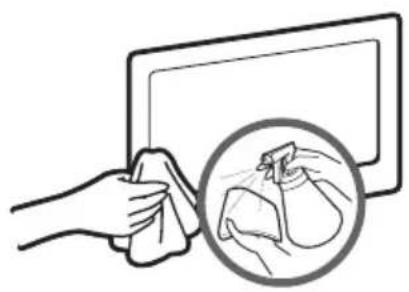
natural_image
Illustration of a hand cleaning a tablet with a magnified inset showing a close-up of the device (no text or symbols)Clean the product with a soft cloth dampened with a small amount of water. Do not use a flammable liquid (e.g. benzene, thinners) or a cleaning agent.
Anti-theft Kensington Lock
The Kensington Lock is not supplied by Samsung. It is a device used to physically fix the system when using it in a public place. The appearance and locking method may differ from the illustration depending on the manufacturer. Refer to the manual provided with the Kensington Lock for additional information on proper use.
Please find a "☒" icon on the rear of the TV. A kensington slot is beside the "☒" icon.
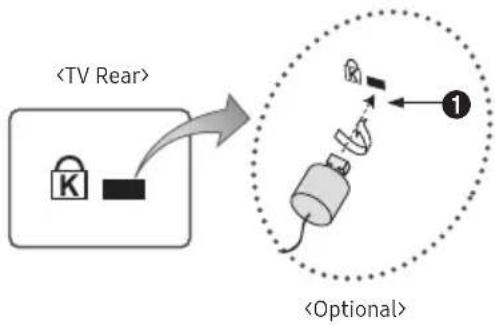
flowchart
graph TD
    A["<TV Rear>"] --> B["<Optional>"]
    B --> C["Switch 1"]
    style A fill:#f9f,stroke:#333
    style B fill:#ccf,stroke:#333
    style C fill:#cfc,stroke:#333
To lock the product, follow these steps:
- Wrap the Kensington lock cable around a large, stationary object such as desk or chair.
- Slide the end of the cable with the lock attached through the looped end of the Kensington lock cable.
- Insert the locking device into the Kensington slot on the product ①.
- Lock the lock.
These are general instructions. For exact instructions, see the User manual supplied with the locking device.
The locking device has to be purchased separately.
The location of the Kensington slot may be different depending on the TV model.
Specifications
| Environmental considerations | Operating | Temperature: 50°F ~ 104°F (10°C~40°C) Humidity: 10% ~ 80%, non-condensing |
| Storage | Temperature: -4°F ~ 113°F (-20°C ~ 45°C) Humidity: 5% ~ 95%, non-condensing | |
| Model Name T24H315 | ||
| Screen Size (Diagonal) 23.6 inches (59.8 cm) | ||
| VESA Mounting Interface 75.0 x 75.0 mm | ||
| Display Resolution 1366 x 768 @ 60 Hz | ||
| Sound (Output) 5W x 2 | ||
Plug-and-Play
This product can be installed and used with any Plug-and-Play compatible systems. Two-way data exchange between the product and PC system optimizes the product settings. Product installation takes place automatically. However, you can customize the installation settings if desired.
Panel Dots (Pixels)
Due to the nature of the manufacturing of this product, approximately 1 pixel per million (1ppm) may be brighter or darker on the LCD panel. This does not affect product performance.
The specifications are subject to change without notice to improve quality.
For detailed device specifications, visit the Samsung website.
License
DOLBY AUDIO™
Manufactured under license from Dolby Laboratories. Dolby, Dolby Audio, Pro Logic, and the double-D symbol are trademarks of Dolby Laboratories.

The terms HDMI and HDMI High-Definition Multimedia Interface, and the HDMI Logo are trademarks or registered trademarks of HDMI Licensing LLC in the United States and other countries.
Open Source License Notice
To send inquiries and requests for questions regarding open sources, contact Samsung Open Source (http://opensource.samsung.com)
Subtitle and Media Contents file formats, and Codec
Supported image resolutions
| File Extension Type Resolution | ||
| *.jpg*.jpeg | JPEG 15360x8640 | |
| *.bmp BMP 4096x4096 | ||
| *.mpo MPO 15360x8640 | ||
Supported music file formats
| File Extension Type | Codec Comments | ||
| *.mp3 MPEG MPEG1 Audio Layer 3 | |||
| *.m4a*.mpa*.aac | MPEG4 AAC | ||
| *.flac FLAC FLAC Supports up to 2 channel | |||
| *.ogg OGG Vorbis Supports up to 2 channel | |||
| *.wma | WMA WMA | WMA 10 Pro supports up to 5.1 channel.WMA lossless audio is not supported.Supports up to M2 profile.LBR mode is not supported. | |
| *.wav | wav | wav | |
| *.mid*.midi | midi | midi | The seek(jump) function is not supported type 0 and type 1 |
Subtitle
- External
| Name | Extension |
| MPEG-4 Timed text | .ttxt |
| SAMI | .smi |
| SubRip | .srt |
| SubViewer | .sub |
| Micro DVD | .sub or .txt |
| SubStation Alpha | .ssa |
| Advanced SubStation Alpha | .ass |
- Internal
| Name | Extension |
| Xsub | AVI |
| SubStation Alpha | MKV |
| Advanced SubStation Alpha | MKV |
| SubRip | MKV |
| MPEG-4 Timed text | MP4 |
Supported video file formats
| File Extention Container Video Codec Resolution Frame rate (fps) Bit rate (Mbps) Audio Codec | ||||||
| *.avi*.mkv*.asf*.wmv*.mp4*.3gp*.vro*.mpg*.mpeg*.ts*.tp*.trp*.mov*.flv*.vob*.svi | AVI MKV ASF MP4 3GP VRO VOB PS TS | MPEG4 SP/ASP | 1920x1080 | 6~30 | 30 | Dolby Digital LPCM ADPCM(IMA, MS) AAC HE-AAC WMA DD+ MPEG(MP3) G.711(A-Law, μ-Law) |
| H.264 BP/MP/HP | ||||||
| Motion JPEG | 640x480 8 | |||||
| Window Media Video v9 | 1920x1080 30 | |||||
| MPEG2 | ||||||
| MPEG1 | ||||||
Other Restriction
Video content will not play, or not play correctly, if there is an error in the content or the container.
Sound or video may not work if the contents have a standard bit rate/frame rate above the compatible Frame/sec listed in the table above.
The Index Table is damaged, the Seek (Jump) function is not supported.
the menu may take longer to appear if the video's bit rate exceeds 10Mbps.
Some USB/digital camera devices may not be compatible with the player.
This product does not support DivX and DTS codecs.
Video Decoders
• Supports up to H.264, Level 4.1 (does not support FMO/ASO/RS)
• VC1 AP L4 is not supported.
• GMC 2 is not supported.
- Frame speed:
Below 1280 x 720: 60 frame max
Above 1280 x 720: 30 frame max
Audio Decoders
• WMA 10 Pro supports up to 5.1 channels. Supports up to M2 profile.
• WMA lossless audio is not supported.
• Vorbis is supported for up to 2 channels.
• DD+ is supported for up to 5.1 channels.
text_image
10cm 10cm 10cm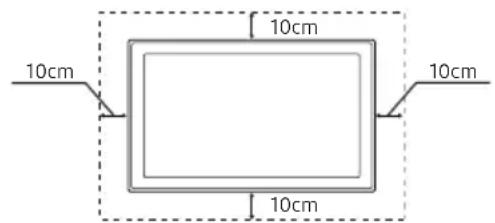
text_image
10cm 10cm 10cm 10cmOutros avisos
natural_image
Illustration of a USB cable connector and its electrical plug with lightning bolts (no text or symbols)natural_image
Diagram of a cable connector with a central shaft and side gap, shown with dimension lines (no text or symbols)natural_image
Two technical line drawings of mechanical parts: a curved tool and a rectangular device (no text or symbols)1

text_image
超声波 超声波2
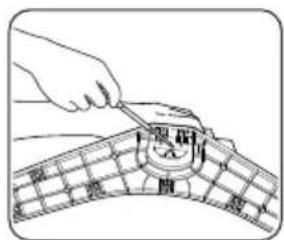
text_image
Close Close3

natural_image
Diagram of a computer monitor with a clasp and an arrow pointing to the screen (no text or symbols present)4

natural_image
Technical line drawing of a mechanical component with two inserted pins (no text or symbols)5

natural_image
Diagram of a computer monitor with an arrow indicating rotation (no text or symbols present)6

text_image
Prohibition sign with crossed-out circle and diagonal line, indicating no prohibition or restrictionComo instalar o suporte de parede

natural_image
Diagram of a curved electronic device with internal components and labeled point A (no text or symbols beyond label)2
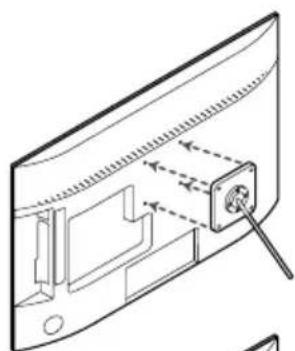
natural_image
Diagram of a device panel with a screw inserted, showing internal components and alignment arrows (no text or symbols)3

text_image
Technical diagram showing a device with labeled components and directional arrows, including a label 'B' pointing to a component.4
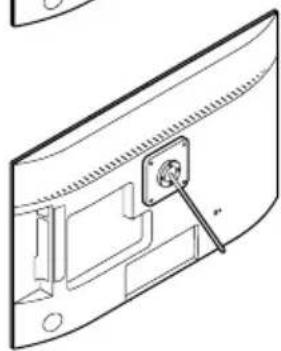
natural_image
Technical line drawing of a door panel with an electrical socket inserted (no text or symbols)text_image
Diagram showing mechanical assembly with labeled components and directional arrows indicating motion or forceImportante
natural_image
Illustration of two hands holding a rectangular object with a downward arrow and tick marks (no text or symbols)Cuidado
text_image
Diagram of a device with labeled parts and directional indicators (X, I)Como navegar pelos menus
text_image
Illustration showing a hand cleaning a document with a 'no spray bottle' symbol, indicating no chemical hazard.natural_image
Illustration of a hand cleaning a tablet with a magnified circular inset showing a close-up of a cloth (no text or symbols)Manufactured under license from Dolby Laboratories. Dolby, Dolby Audio, Pro Logic, and the double-D symbol are trademarks of Dolby Laboratories.

The terms HDMI and HDMI High-Definition Multimedia Interface, and the HDMI Logo are trademarks or registered trademarks of HDMI Licensing LLC in the United States and other countries.
Open Source License Notice
To send inquiries and requests for questions regarding open sources, contact Samsung Open Source (http://opensource.samsung.com)
natural_image
Two technical illustrations: one showing a plug inserted into a socket, the other showing a plug inserted into a socket with lightning bolts (no text or symbols)natural_image
Cross-sectional diagram of a mechanical component with internal grooves and a central shaft (no text or symbols)natural_image
Two technical illustrations of mechanical parts: a curved tool and a rectangular device with ribbed handle (no text or symbols)1

text_image
超声波 光路器2

text_image
Close Close3

natural_image
Diagram of a computer monitor with a clasp and an arrow pointing to the screen (no text or symbols present)4

natural_image
Technical line drawing of a mechanical component with no visible text or symbols5
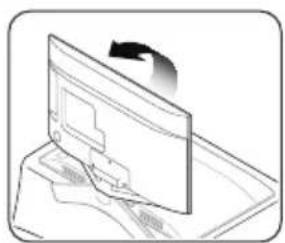
natural_image
Diagram of a computer monitor with an arrow indicating rotation (no text or symbols present)6

text_image
Prohibition sign with circular and diagonal lines, indicating no prohibition or restrictionInstallation du support mural

natural_image
Diagram of a curved electronic device with internal components and labeled point A (no text or symbols beyond label)2
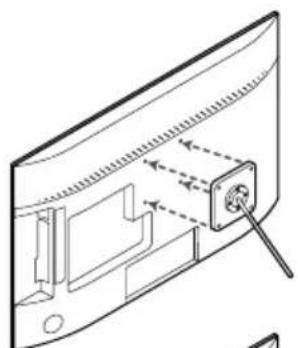
natural_image
Technical line drawing of a device panel with a screw and internal components (no text or symbols)3

text_image
Technical diagram showing a device with labeled components and directional arrows, including a label 'B' pointing to a component.4
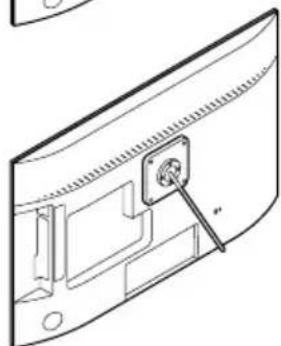
natural_image
Technical line drawing of a device with an attached socket and mounting bracket (no text or symbols)A Support mural
B Kit de fixation murale
Avertissement
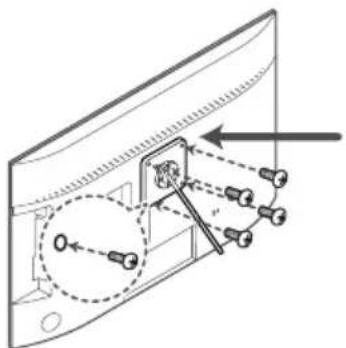
natural_image
Diagram of a device with mechanical components and wiring, no text or symbols presentImportant
natural_image
Illustration of two hands holding a rectangular object with a downward arrow indicating compression or force (no text or symbols)Avertissement
Use the remote control within 7m of the TV.
natural_image
Diagram of a mechanical component with labeled parts (no text or symbols present)MENU → Support technique → Autodiagnostic → ENTER
MENU → Support technique → Contacter Samsung → ENTER
natural_image
Illustration of a hand cleaning a tablet with a no-smoking spray bottle (no text or symbols)natural_image
Illustration of a hand cleaning a tablet with a magnified circular inset showing a close-up of a cloth (no text or symbols)Manufactured under license from Dolby Laboratories. Dolby, Dolby Audio, Pro Logic, and the double-D symbol are trademarks of Dolby Laboratories.

The terms HDMI and HDMI High-Definition Multimedia Interface, and the HDMI Logo are trademarks or registered trademarks of HDMI Licensing LLC in the United States and other countries.
Open Source License Notice
To send inquiries and requests for questions regarding open sources, contact Samsung Open Source (http://opensource.samsung.com)
text_image
10cm 10cm 10cm
text_image
10cm 10cm 10cm 10cmOtras advertencias
natural_image
Two technical illustrations: one showing a rectangular electronic component with wires, and another showing a plug with a lightning bolt (no text or symbols)natural_image
Diagram of a cable connector with a 3D model and dimension line (no text or symbols)• Grosor máximo: 0.55 pulgadas (14 mm)
natural_image
Two technical illustrations of mechanical parts: a curved tool and a rectangular device (no text or symbols)1

text_image
超声波 光谱2

text_image
裂痕 圆3

natural_image
Diagram of a computer monitor with a clip and handle, no text or symbols present4
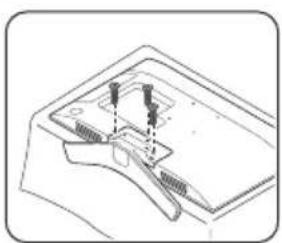
natural_image
Technical line drawing of a mechanical component with no visible text or symbols5

natural_image
Diagram of a computer monitor with an arrow indicating rotation (no text or symbols present)6
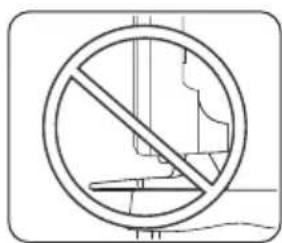
text_image
Prohibition sign with circular and diagonal lines, indicating no prohibition or restrictionnatural_image
Technical line drawing of a curved electronic component with internal components and an arrow labeled A (no text or symbols present)2
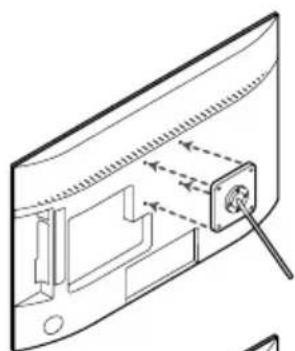
natural_image
Diagram of a device panel with a screw inserted, showing internal components and alignment arrows (no text or symbols)3
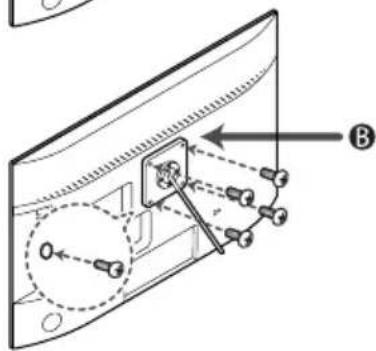
text_image
Technical diagram showing a device with labeled components and directional arrows, including a label 'B' pointing to a component.4

natural_image
Technical line drawing of a door panel with an attached socket and mounting bracket (no text or symbols)natural_image
Diagram of a device with labeled components and directional arrows, no readable text or symbols presentImportante
natural_image
Illustration of two hands holding a rectangular object with a downward arrow, no text or symbols present⚠ Precaución
natural_image
Diagram of a mechanical component with labeled parts (no text or symbols present)natural_image
Illustration of a hand cleaning a surface with a no-smoking spray bottle (no text or symbols)natural_image
Illustration of a hand cleaning a tablet with a magnified circular inset showing a close-up of a cloth (no text or symbols)Manufactured under license from Dolby Laboratories. Dolby, Dolby Audio, Pro Logic, and the double-D symbol are trademarks of Dolby Laboratories.

The terms HDMI and HDMI High-Definition Multimedia Interface, and the HDMI Logo are trademarks or registered trademarks of HDMI Licensing LLC in the United States and other countries.
Open Source License Notice
To send inquiries and requests for questions regarding open sources, contact Samsung Open Source (http://opensource.samsung.com)