
PMD300CP - Cassette tape MARANTZ - Free user manual and instructions
Find the device manual for free PMD300CP MARANTZ in PDF.

| Product Type | Dual cassette deck |
| Brand | Marantz |
| Model | PMD-300CP |
| Decks | 2 (A and B); only deck B allows recording |
| Playback functions | Normal play, fast forward, rewind, pause, stop/eject |
| Recording functions | Recording from external source, normal or high-speed dubbing, recording on Cr02 |
| Noise reduction | Dynamic Noise Reduction (DNR) |
| Supported cassette types | Normal and Cr02 cassettes (manual selection via PLAY Cr02 and REC Cr02 buttons) |
| Connectivity | Stereo RCA input (REC INPUT), stereo RCA output (PLAY OUTPUT), USB port for computer transfer |
| Controls | REC LEVEL knob (recording level), GAIN knob (USB output level) |
| Display | Screen with level indicators, tape counter, REC, HI SP DUB, PLAY Cr02, REC Cr02 indicators |
| Power | Mains via power cord (standard plug) |
| Maintenance | Regular head cleaning with a cleaning cassette recommended |
| Safety | Record-protect tabs on cassettes; unplug if not used for an extended period |
| Included accessories | User guide, rack ears with screws |
Frequently Asked Questions - PMD300CP MARANTZ
User questions about PMD300CP MARANTZ
0 question about this device. Answer the ones you know or ask your own.
Ask a new question about this device
Download the instructions for your Cassette tape in PDF format for free! Find your manual PMD300CP - MARANTZ and take your electronic device back in hand. On this page are published all the documents necessary for the use of your device. PMD300CP by MARANTZ.
USER MANUAL PMD300CP MARANTZ
User Guide (English)
Introduction
Box Contents
PMD-300CP
User Guide
Rack Ears with Screws
Safety & Warranty Manual
Support
For the latest information about this product (system requirements, compatibility information, etc.), product registration, and software download, visit marantzpro.com.
Features
Front Panel
![MoRanetz PMD-300CP 2 4 5 USB CASSETTE PLAYER RESOURCES PMD-300CP PLAY A 3 6 REC/PLAY B 11 12 31 31 4 18 7 8 9 10 16 11 12 15 RE: PLAY REN FF SMTLEDAY NAME [1] = -0.00 PLAY REN FF SMTLEDAY NAME REC PLAY REN FF SMTLEDAY NAME](/content/2026/03/557427/images/8a1c8f44b13d2eb4c7897444930b63a1c94108e43c16c5a4577b8327aa208ede.jpg)
- Power Button: Use this button to turn the unit on and off. If the unit is not being used for a prolonged period of time, please also remove the AC plug from the power socket.
- Cassette Holder: Insert your cassettes into either of these two holders. The holders may be opened by pressing the corresponding Stop/Eject button. Please note that both decks can be used for playback but only deck B can be used for recording/dubbing.
- Dynamic Noise Reduction: Dynamic Noise Reduction should be turned on whenever playing back tapes which were recorded using this feature.
-
Display: The display will help you keep track of audio levels and the features which have been engaged.
-
Peak Level Indicator: The meters indicate the audio level during recording and playback.
- Rec: Lights when deck B is recording or in record-pause mode.
• Hi Sp Dub: Lights when high-speed dubbing mode is engaged. - Play Cr02: Lights when Play Cr02 function is engaged.
-
Rec Cr02: Lights when Rec Cr02 function is engaged.
-
Tape Counter and Reset Button: The tape counter indicates the tape position when playing or recording tapes (Deck B only). To reset the counter, press the Reset button.
-
Rec Level Knob: Use this knob to adjust the recording level when recording external sources to deck B.
-
Play Cr02 Button: This feature should be set depending on the kind of tape you are playing. When using normal tapes, this feature should be turned off ("PLAY Cr02" not lit on the display). When using Cr02 tapes, this features should be turned on ("PLAY Cr02" is lit on the display).
- Dubbing Button: Press this button if you would like to dub a tape from deck A to a tape in deck B ("DUBBING" will light on the display).
- Hi Sp Dub Button: Press this button to enable high-speed dubbing ("HIGH SPEED" will light on the display). Press again to disable high-speed dubbing.
- Rec Cr02 Button: Turn this feature on when recording to a Cr02 tape on deck B ("REC Cr02" is lit on the display).
- Play Press to play the tape on the corresponding deck.
- Rewind: Press to rewind the tape on the corresponding deck.
- Fast Forward: Press to fast forward the tape on the corresponding deck.
- Stop / Eject: Press to stop the tape on the corresponding deck. When stopped, press again to open the cassette holder.
- Pause: Press to pause the tape on the corresponding deck. Press again to resume playback.
- Record: Press this button in conjunction with the Play button to begin recording.
Rear Panel

- Power Cord: Plug this cord into a power socket before powering on the unit. If not using the unit for prolonged periods of time, please remember to turn it off and remove the cord from the socket.
- USB Port: Connect this port to an available USB port on your computer when transferring tapes.
Note: Visit marantzpro.com to download the tape converter software to transfer and backup your tapes digitally.
-
Gain Knob: This knob can be used to adjust the audio signal from the unit to your computer. If you experience distortion and clipping when recording to your computer, we recommend turning down the Gain. If the audio level from the unit is extremely low when recording to your computer, we recommend turning up the Gain.
-
Rec Input: Connect a stereo RCA cable from an external source to this input. Please note that recording and dubbing only works on deck B.
-
Play Output: This is the combined audio output from deck A and deck B. Connect a stereo RCA cable from this output to the Line or Auxiliary input of a home stereo receiver system.
Operation
Playback Instructions
Important: After extensive usage, PMD-300CP's tape heads can acquire build-up, especially if the cassettes you are playing or recording are old. To ensure PMD-300CP's best performance, we recommend using a tape head cleaner periodically.
Playing Back a Recorded Tape:
- Press the Stop / Eject button to open the cassette holder.
- Insert the tape and close the holder. If playing a Cr02 tape, press the Cr02 button.
- If connected to an amplifier system, make sure the amplifier is turned on and adjust its volume to a suitable listening level.
- Press the Play button to play the tape.
Fast Forwarding and Rewinding:
- While the deck is stopped, press the Fast Forward or Rewind button.
- When the tape reaches the desired location, press Stop / Eject.
- Press the Play button to play the tape from this location.
Pausing:
- Press the Pause button to pause the tape.
- Press Pause again to release and resume playback.
Stopping and Ejecting:
- Press the Stop / Eject button while the tape is playing to stop playback.
- Press Stop / Eject again to eject the tape.
Recording Instructions
Please use deck B for recording external sources or dubbing tapes. Note that most cassettes feature a protective plastic strip which, when removed, will not allow any recording to be made to the cassette.
Note: When the plastic strip has been removed, the unit's Record button will not function when attempting to record to the cassette.
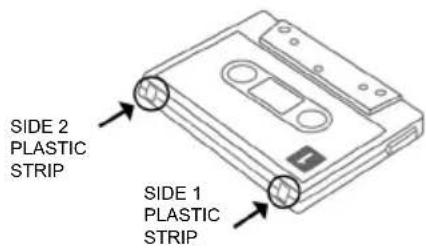
Tip: To record to a cassette which no longer has a plastic strip, use adhesive tape to cover the strip opening.
Transferring Tapes to Computer:
- Visit marantzpro.com to download and install the tape converter software.
- Open the software and follow the simple on-screen instructions to transfer your tape to your computer.
Recording External Source to Tape:
- Press Stop / Eject on deck B to open the cassette holder.
- Insert a blank tape and close the cassette holder.
- If recording to a Cr02 tape, press the Rec Cr02 button.
- Press the Pause button and then press Record.
- Play your external source and check the levels on the display. Use the Rec Level Knob to adjust the level of the incoming audio signal.
- Press the Pause button to begin recording when you are ready.
Tip: The Rec Level Knob can be used to make adjustments to the loudness of the incoming signal. If the knob is in the center position, the incoming signal will be recorded at its original volume. Ideally, the recording signal should come close but never hit red in the level indicator on the display. If the signal is in the red, then turn down the Rec Level Knob until it no longer reaches the red. If the signal is too low and not close to the red, turn up the Rec Level Knob.
Dubbing Operation:
- Insert the tape for playback in deck A.
- Insert the tape you wish to record to in deck B.
- Press the Dubbing button. "Dubbing" will be illuminated on the display.
- Select the dubbing speed with the Hi Sp Dub button. If the "HI SP DUB" indicator is illuminated on the display, you will be dubbing in high-speed mode. If the indicator is not lit, then you will be recording in normal-speed mode.
- Press the Pause button on deck A, followed by the Play button to cue the tape.
- Press the Record button on deck B.
- Press the Pause button on deck A to release pause mode. The unit will automatically start the dubbing operation.
- To stop dubbing, press the Stop / Eject button of deck B.
Please note: Do not change dubbing speed while dubbing is in progress.
Assistance technique
Technical Specifications
| Type | Stereo double cassette deck |
| Track System | 4-track 2-channel |
| Frequency Response | -20dB recordingChrome tape: 40-15000Hz (±3dB)Normal tape: 40-14000Hz (±3dB)0dB recordingChrome tape: 40-8000Hz (±3dB)Normal tape: 40-8000Hz (±3dB) |
| Signal-to-Noise Ratio | 58 dB |
| Wow and Flutter | < 0.2% (DIN45500) |
| Crosstalk | 40 dB (1 kHz) |
| Harmonic Distortion | < 1.0% (1 kHz, OVU 3^rd H.D. normal tape) |
| Channel Separation | 40 dB (1 kHz) |
| Head | Deck A: PlaybackDeck B: Recording/playback, 2-gap ferrite head for erasure |
| Motor | 2 DC servo motors |
| Fast Forward/Rewind Time | ~100 seconds with C-60 cassette |
| Inputs | 2 RCA line inputsMin. input level: 600 mV (0dB)Input impedance: 50 kΩ |
| Outputs | 2 RCA line outputsOutput level: 600mV (0dB)Output impedance: 5kΩ |
| USB Audio Interface | USB 1.1 compatible; 16-bit, 44.1 or 48 kHz |
| Power | Input Voltage: 110-120 V AC, ~50/60 HzConsumption: 11 W |
| Dimensions(width x depth x height) | 16.5" x 8.5" x 5.3"420 x 215 x 135 mm |
| Weight | 8.5 lbs.4.0 kg |
Specifications are subject to change without notice.
Trademarks & Licenses
Marantz is a trademark of D&M Holdings Inc., registered in the U.S. and other countries.
All other product or company names are trademarks or registered trademarks of their respective owners.
marantzpro.com
- User Guide (English)
- Introduction
- Box Contents
- Support
- Features
- Front Panel
- Operation
- Playback Instructions
- Playing Back a Recorded Tape:
- Fast Forwarding and Rewinding:
- Pausing:
- Stopping and Ejecting:
- Recording Instructions
- Transferring Tapes to Computer:
- Recording External Source to Tape:
- Dubbing Operation:
- Assistance technique
- Trademarks & Licenses
- marantzpro.com
Brand : MARANTZ
Model : PMD300CP
Category : Cassette tape