RTAC59U V2 - Wireless Router ASUS - Free user manual and instructions
Find the device manual for free RTAC59U V2 ASUS in PDF.
User questions about RTAC59U V2 ASUS
0 question about this device. Answer the ones you know or ask your own.
Ask a new question about this device
Download the instructions for your Wireless Router in PDF format for free! Find your manual RTAC59U V2 - ASUS and take your electronic device back in hand. On this page are published all the documents necessary for the use of your device. RTAC59U V2 by ASUS.
USER MANUAL RTAC59U V2 ASUS
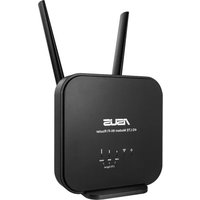
Wireless-AC1500 Dual Band Gigabit Router
Quick Start Guide
U16297/First Edition/January 2020


Table of contents
Package contents 3
A quick look at RT-AC59U V2. 3
Position your wireless router. 4
BEFORE SETTING. 5
ONE ROUTER SETUP STEPS 16
AiMesh SETUP STEPS 42
TROUBLESHOOTING 68
ASUS ROUTER APP 78
FAQ 100
This QSG contains these languages:
English
Eληνικα
Srpski
BbIrapckn
Magyar
Slovenský
Cestina
Italiano
Slovenscina
Hrvatski
Latviski
Espanol
Dansk
Lietuviu
Svenska
Nederlands
Norsk
YkpaHcbKn
Eesti
Polski
Türkce
Suomi
Portugues
Français
Româna
Deutsch
Pycckn

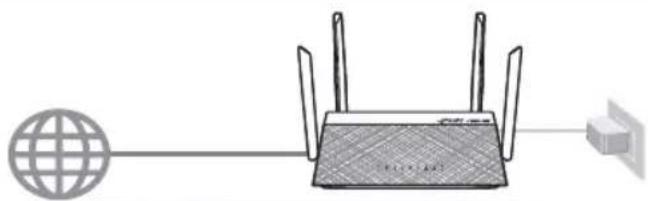
Package contents
RT-AC59U V2 Wireless Router AC adapter
Network cable (RJ-45) Quick Start Guide
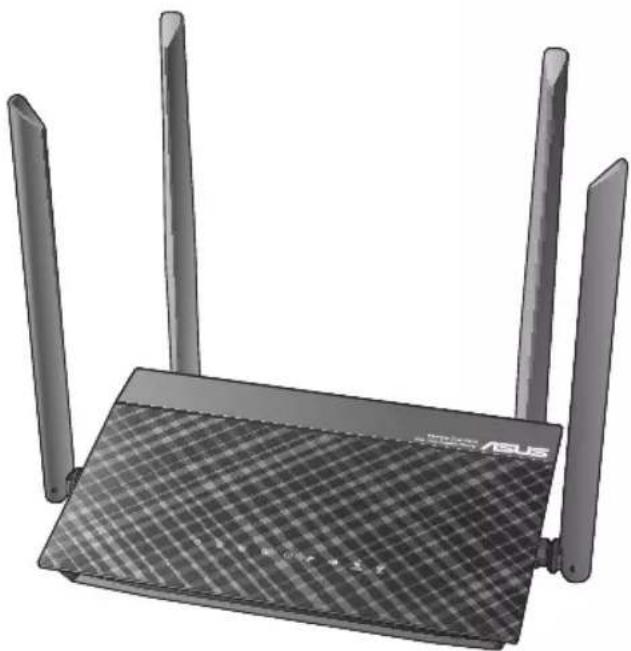
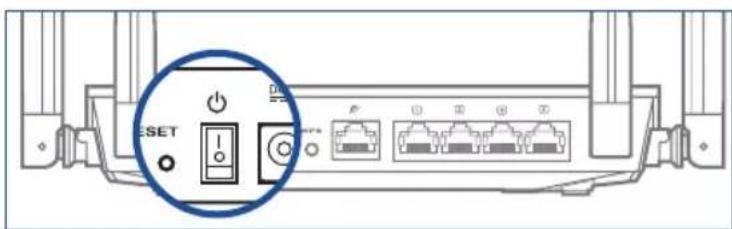
A quick look at RT-AC59UV2
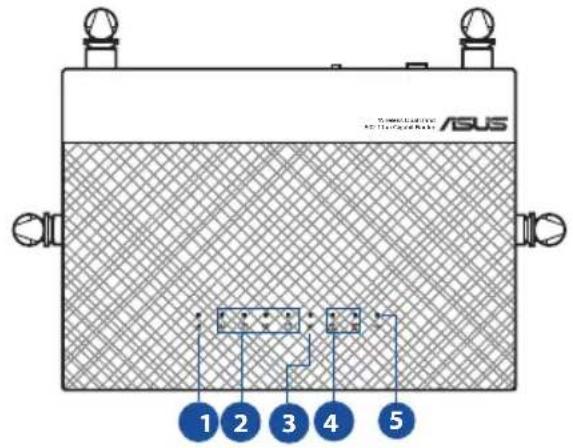

| 1 Power LED Power switch | 7 |
| 2 LAN 1~4 LEDs Power (DC-IN) port | 8 |
| 3 WAN (Internet) LED USB port | 9 |
| 4 2.4GHz LED / 5GHz LED WPS button | 10 |
| 5 USB LED WAN (Internet) port | 11 |
| 6 Reset button LAN 1 ~ 4 ports | 12 |
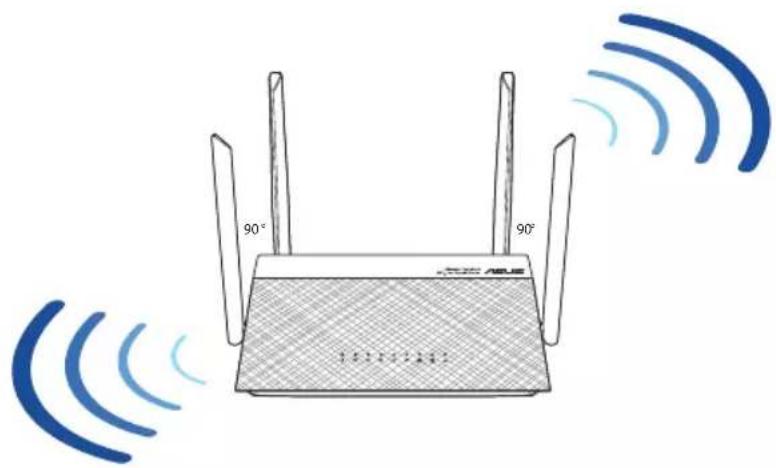
Position your wireless router
For optimal wireless transmission between the wireless router and connected wireless devices, ensure that you:
- Place the wireless router in a centralized area for a maximum wireless coverage for the network devices.
- Keep the wireless router away from metal obstructions and away from direct sunlight.
- Keep the wireless router away from 802.11g or 20MHz only Wi-Fi devices, 2.4GHz computer peripherals, Bluetooth devices, cordless phones, transformers, heavy-duty motors, fluorescent lights, microwave ovens, refrigerators, and other industrial equipment to prevent signal interference or loss.
- Always update to the latest firmware. Visit the ASUS website at http://www.asus.com to get the latest firmware updates.
- To ensure the best wireless signal, orient the four detachable antennas as shown in the drawing below.
DO NOT mount this equipment higher than 2 meters.


BEFORE SETTING
A.Preparing to setup a standalone router
- Go to ONE ROUTER SETUP STEPS
ONE ROUTER SETUP
Былгарский
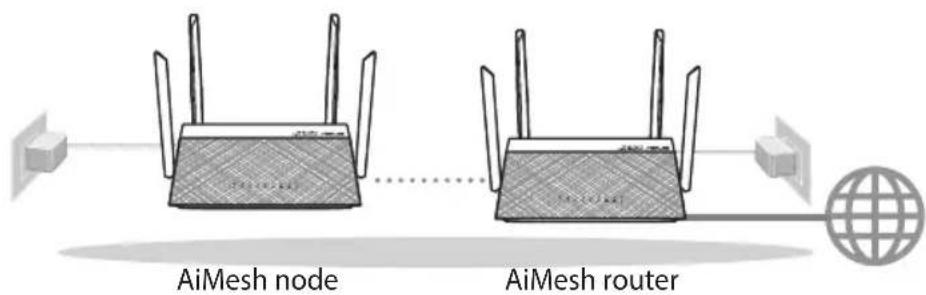
B. Preparing to setup an AiMesh Wi-Fi system
- Two (2) ASUS routers (models supporting AiMesh https://www.asus.com/AiMesh/).
- Assign one as AiMesh router, and another one as AiMesh node. **If you have multiple AiMesh routers, we recommend using the router with the highest specifications as your AiMesh router and the others as AiMesh nodes.
- Go to AiMesh SETUP STEPS.
AiMesh SETUP STEPS
Былгарский
B. Побrotовka за инсталране на AiMesh Wi-Fi систema
1.Два(2)ASUSpyTepa(moDenni,poDlbpxkauniAiMeshhttps://www.asus.com/AiMesh/).
2. 3aaiTe eunnna KaTo AiMesh pyTep, a npyrna kato AiMesh b3en.
** Ako mate HAKoIKO AiMesh pyTepa, npenopbUbame Bn da n3noJ3BaTe pyTepa c HanBvCOKxapaKtepunctkn KaTo AiMesh pyTe,p octaHAnTE kaTo AiMesh Bb3In.
- OTnTeHa CTbIKN 3A INHCTAJINPAHE HA AiMesh.
Slovenský
B. Príprava na nastavenie systému siete Wi-Fi AiMesh
- Dva (2) smerovace ASUS (modely s podporou funkcie AiMesh https://www.asus.com/AiMesh/).
- Jeden smerovač určite ako smerovač AiMesh a druhý ako uzol AiMesh.
A. Prepare your Modem
-
Unplug the power of cable / DSL modem. If it has a battery backup, remove the battery.*
-
If you are using DSL for internet, you will need your username / password from your Internet service provider (ISP) to properly configure your router.
Modem back
Былгарскn
A. Повтовka Ha модама
1.ИЗКЛЮЧЕТахpaнБашияKa6eN/DSL moJaMa.Ako Има pe3epBHO 3axpaHBaHe Ha 6aTePnI,OTcTaPAnTe 6aTePnIte.*
* Ako n3no3BaTe DSL moem 3a INhePHeT, Tp6Ba da nMaTe noTppe6nteNcKO nme/napoia, npedocTaBEn O Taunr INhePHeT DocTabuNK (ISP), 3a npabnHOn KOHnrgnpaHa npTepa.
Slovenský
A. Priprava modemu
- Check the modem LED lights to ensure the connection is active.
Deutsch
B. Connect your Device
- Power on the router.
Plug in and press the power button at the back of your router.
Былгарский
B. CbpxKeTe yctpOcTBOTo cn
- BkIIOUeTe pyTepa. BkIIOUeTe n HaTnCHete 6yToHa 3a BkIIOUbaHe n N3KIOUbaHe, HAMIPAuCe Ha Tbp6a Ha pyTepa.
Slovenský
B. Pripojenie zariadenia
- Zapnite smerovač. Zapojte a stlačte hlavný vypínač na zadnej strane smerovača.
Français
- Check the WAN and 2.4GHz/5GHz LED lights to ensure the hardware connection is ready.

Былгарский
- YbepeTe ce, ue nHnkaTopnte 3a WAN uyeToTHnte JeHTn 2.4GHz/5GHz cBeTt.
Slovenský
- Skontrolujte, Že svietia indikátry siete WAN a 2.4GHz/5GHz, co signalizuje, Že pripojenie hardveru je pripravené.
François
- Connect your PC to the router using an additional network cable.

Былгарский
- CbpxkeTe KOMnIObpa CN KbM pyTepa KaTO n3NON3BaTe dONbHInTeNeH MpeKOB Ka6eJ.
Slovenský
C. Login and Connect
- Open a web browser:
You will be redirected to the ASUS Setup Wizard. If not, navigate to: http://router.asus.com.
Find ASUS Device
http://router.asus.com
Былгарский
C. Cbbp3BaHe
- OT cBbP3aHnK bM pyTepa KOMNIObP, OTbOpTe ye6 6pay3bp. Ue 6bJe TpeHacOueHn KbM ASUS Setup Wizard (CbBeTHNK 3a INHCTaJIpaHe Ha ASUS). Ako ToBa He cTaHe, BbVeDeTe B URL noneto http://router.asus.com
Slovenský
C. Prihlásenie a pripojenie
C. Bxod n nodknIOUeHne
- OtkpoTe 6pay3ep. Bbl 6yndeTe nepeHa npaBneHb I MaCTep HacTpoiKn. Ecnn HeT, nepeiDnte Ha http://router.asus.com


Deutsch
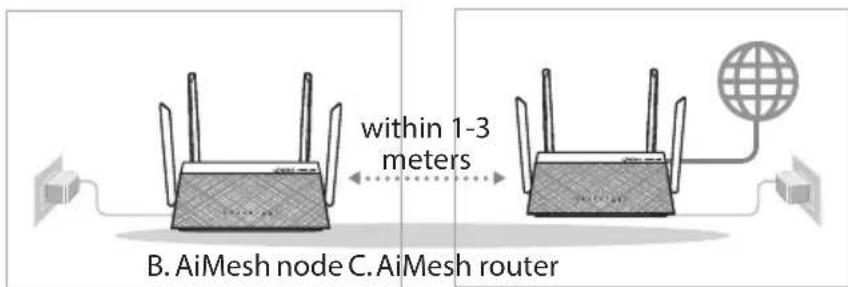
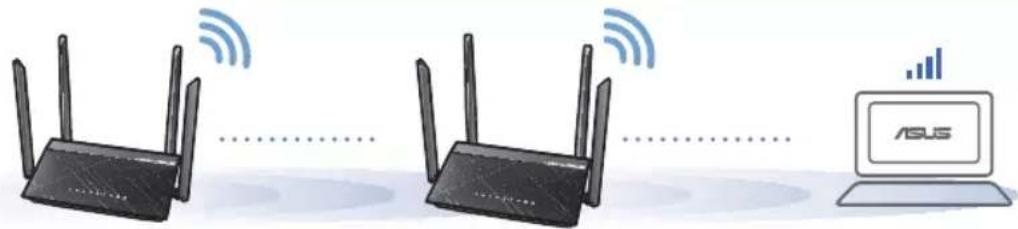
Place your AiMesh router and node within 1-3 meters of each other during the setup process.
B. AiMesh node
Factory default status. Keep power on and standby for AiMesh system settings.
Былгарский
A. Побrotовka
IocTabete Baunr AiMesh pyTep n AiMesh Ha pa3ToHne ot 1 do MaKcMym 3 MeTp aEIN OH npy r no Bpeme Ha npoueca Ha NHCTanauia.
B. AiMesh Bb3eJ
Фабчнсбстогип no noДра36ирaine.Држte 3axpaHbaHeTo BKluoyeHo nВ rOTOBHOC 3a AiMesh cnCTemHn HactpoKn.

Slovenský
A. Priprava
Pochas procesu nastavenia umiestnite smerovač a uzol AiMesh 1 až 3 metre od seba.
B. Uzol AiMesh
Vyrobne predvoleny stav. Na vykonanie nastaveni systému AiMesh ponechajte napájanie zapnuté v pohotovostnom režime.
François
A. Préparation
- Refer to ONE ROUTER SETUP STEPS to connect your AiMesh router to your PC and modem, and then log in into the web GUI.

Былгарский
C. AiMesh pyRep
- BnKTe CTbIKN 3A INHCTAIIIPAHE HA EINH PYTEP, 3a da cBpKte cB0A AiMesh pyTe KbM KOMNIOTpB n MOdEm, cIeD KOEt BOe3Te Bye6 notpe6ntckn HHTeppeic.
Slovenský
C. Smerovač AiMesh
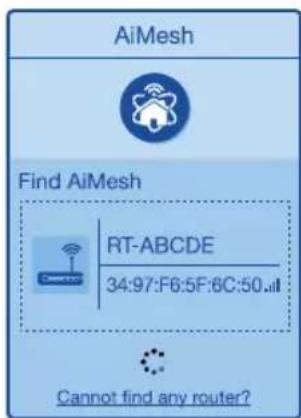
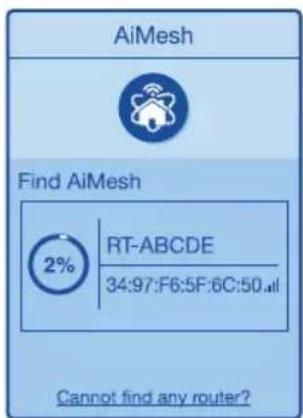
- Click Search, it will automatically search for your AiMesh node. When the AiMesh node shows on this page, click it to add it into the AiMesh system. * If you cannot find any AiMesh node, please go to TROUBLE SHOOTING.

Быларскn
-
ΜρaκHete Bbpxy Search (Tbpche) 3a aBtOMaMTnUHO TbpcHe Ha Baunr AiMesh Bb3en. Korato AiMesh Bb3enb Tc noBn Ha Ta3n CTpaHnua, ΜρaKHeTe Bbpxy Hero, 3a da ro do6abnte B AiMesh cnCTemata.
-
Ako He Moxe Te Da OTkpneTe AiMesh Bb3eJ, OTnJeTe Ha OTCTPAHRAHE HA HEN3PABHOCTN.
Slovenský
-
Kliknite na Search (Vyhladat); dojde k automatickému vyhladaniu uzla AiMesh. Ked'sa uzol AiMesh zobrażna tejto stranke, kliknutim nah ho pridáte do systému AiMesh.
-
Ak nedokážte najst Žiadny uzol AiMesh, prejdite na Čast RIESENIE PROBLEM.
François
4. A message is displayed when synchronization is completed.
Successfully added RT-ABCDE to your AiMesh system, it will take awhile to show up as connected in the AiMesh router list.
OK
Былгарский
- Ako cnHxpoHn3npaHTo Ha ycTpoiCTBaTa e ycneuHo, Ie ce noaBn CneHOTcbo6ueHHe.
Slovenský
If your AiMesh router cannot find any AiMesh node nearby or synchronization fails, please check the following and try again.
a. Move your AiMesh node closer to the AiMesh router ideally. Ensure that it is within 1-3 meters.
b. Your AiMesh node is powered on.
Былгарский
Ako Baunr AiMesh pyTep He moKe Ja otKpne AiMesh Bb3eB 6n3oCT nAn aKO cnHXPOHn3aunra Ta e HeycneuHa, npOBepTe daIi CTe N3nblHnJIn CTbKnTe NO- DOny IN ONNTaHTe OTHBO.
a. IpeMeCTe CbO AiMesh Bb3en no-6n3o do AiMesh pyTepa. YBepTe ce, pa3cToHHeTo MeKdy TEx e O1 Do 3 MeTpa.
b. BawnayiAiMeshBb3eIeBkIouyeH.
Slovenský
Locate the AiMesh router and node at the best place.
NOTES: To minimize interference, keep the routers away from devices like cordless phones, Bluetooth devices and microwave ovens.
We recommend that you place the routers in an open or spacious location.
Былгарский
H36peTe hai-do6poTo mrcTo 3a AiMesh pytepa n Bb3eJa.
BENEXK: 3a da HamaJIte nHTepepeHcIyTa, dPbXTe pyTePnTe daleu OT yCTpoIcTba KaTO 6e3KuHN TeNEphiOnn, Bluetooth ycTpoINCTBa u MKNPOBJIHOBNOfypHn.
IpenopbUbaMe Bn da nocTaBnte pyTepuTe Ha OTBopeHO nn IpocToPno Macto.
Slovenský
Smerovač a uzol AiMesh umiestnite na rajvhodnejsie miesto.
POZNÁMKY: Aby sa minimalizovalo ruşenie, smerovace uchovávajte mimo zariadení, ako su bezdrótove telefony, zariadenia s Rozhranim Bluetooth a mikrovlné rúry.
Download free ASUS Router APP to set up and manage your router(s).

ASUS Router


GETITON GooglePlay

Download on the App Store
Быларскn
I3TerIe npInoJxHHeTo ASUS Router, 3a da nHCTanipate n ynpablaBaTe pyTepuTe cn ydo6Ho, ype3 Mo6uHnna cn TelefoH.
Slovenský
Stiahnite si zadarmo aplikaciu ASUS Router na nastavenie a spravu smerovačov.
Français
Download free ASUS Router APP to set up and manage your router(s).
Deutsch
Does the AiMesh router support Access Point mode?
A:Yes. You can choose to set the AiMesh router as router mode or access point mode. Please go to web GUI (http://router.asus.com), and go to the page Administration > Operation Mode.

Былгарский
Q1 AiMesh pytepbT noDbpxka n npexkm Access Point (Toka 3a doctbn)?
Q1 Router-ul AiMesh accepta modul Access Point (Punct de acces)?
A: Da. Puteti alege sa setaşi router-ul AiMesh ca mod router pau mod punct de acces. Accesati GUI prin browser-ul web (http://router.asus.com) si accesati pagina Administration (Administrare) > Operation Mode (Mod fonctionare).
Türkce
Q1 Yu n iDtpmmye MapwpyTu3aTop AiMesh pexk m ToKn doctyny?
A: Tak. Moxha BCTaHOBuTn MapwpyTu3aTop AiMesh y pexnmi MapwpyTu3aTopa a6o B pexnmi Tockn Doctny. IpeyniToB do rpaqiuHoro Be6-iHTepceIcy (http:// router.asus.com) i BiKpnTe cToPiHKy Administration (AdminictpyBaHH) > Operation Mode (Pexn m po60Tu).
Slovenscina
Could I set up wired connection between AiMesh routers (Ethernet backhaul)?
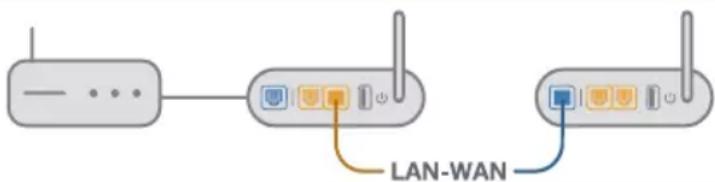
A: Yes. The AiMesh system supports both wireless and wired connection between the AiMesh router and node to maximize throughput and stability. AiMesh analyzes the wireless signal strength for each frequency band available, and then determines automatically whether a wireless or wired connection is the best to serve as the inter-router connection backbone.
a. Follow the setup steps to establish a connection between the AiMesh router and node via Wi-Fi first.
b. Place the node in the ideal locations for best coverage. Run an Ethernet cable from the LAN port of the AiMesh router to the WAN port of AiMesh node.
c. The AiMesh system will auto-select the best path for data transmission, whether wired or wireless.
Българскn
Q2 Mora Ia nHcTaIupam Ka6eHa Bpb3ka MeJy AiMesh pyTepuTe (Ethernet backhaul)?
O:Дa. AiMesh cnCTemata NOndbpxka 6e3xuHa, n Ka6enHa Bpb3Ka MeKdy AiMesh pyTepa n Bb3eJa 3a MaKcImaJIHa cKOpocT Ha npedBaHe n Cta6nInHoct. AiMesh aHaJIIN3npa CnIATA Ha 6e3xuHnCnIHaJI 3a BCsKa HAnuHa YecToTHa JeHTa, CneI KOeTO aBtOMaTNo ONpeJEn JaII e No-Do6pe 6e3xuHa IIN Ka6enHa Bpb3Ka Da Ce N3PON3Ba KaTO OCHOBHa Bpb3Ka MeKdy pyTepuTe.
a. CneBbAitte cTbNknte 3a uHCTaInpaHe, 3a da yCTaHOBUTe Wi-Fi Bpb3ka Mekny AiMesh pyTepa n BB3ena.
b. NocTabeTe B3eHa Ha IHeaJIHHTe MeCTa 3a Hau-Do6po nokpntne. IpokapaiTe Ethernet ka6en ot LAN nopTa Ha AiMesh pyTepa do WAN npTa Ha AiMesh B3eHa.
c. AiMesh cnCTemata aBTOMaTHUHO ue n36epe hai-do6pna Tb 3a npe Hoc Ha daHHN, He3aBNCIMO daJIype3 ka6eI nn6e3xuHNO.
Slovenský
Q2 Możem vykonat káblóve pripojenie medzi smerovačmi AiMesh (spātny prenos cz siet Ethernet)?
Remembering your wireless router settings
- Remember your wireless settings as you complete the router setup.
| Router Name: Password: | |
| 2.4 GHz network SSID: Password: | |
| 5GHz network SSID: Password: |
NOTES:
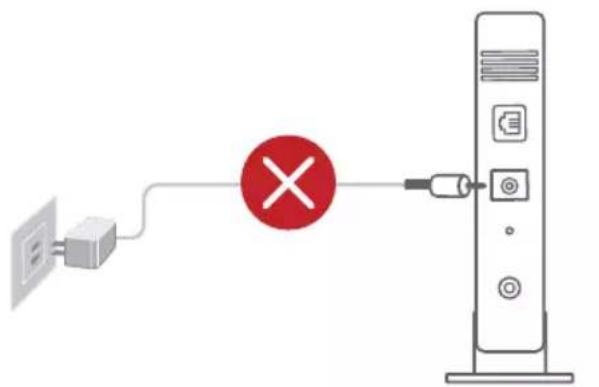
- Use only the adapter that came with your package. Using other adapters may damage the device.
- Specifications:
| DC Power adapter | DC Output: +12V with 1.5A current | ||
| Operating Temperature | 0~40 °C Storage | 0~70 | °C |
| Operating Humidity 50~90%Storage 20~90% | |||
Блгарскn
3anaMeTBAHe Ha 6e3xuHnTe HacPoKn Ha BaunpaTyep
3aONMHeTe 6e3KnHnTe cn HacTpoKn npn 3aBbPbBaHe Ha HacTpoBaHoTo a pyTepa.
Slovenský
-
Where can I find more information about the wireless router?
-
Online FAQ site: https://www.asus.com/support/faq
- Technical support site: https://www.asus.com/support
- Customer hotline: refer to the Support Hotline section in this Quick Start Guide
- You can get the user manual online at https://www.asus.com/support

ASUS Recycling/Takeback Services
ASUS recycling and takeback programs come from our commitment to the highest standards for protecting our environment. We believe in providing solutions for you to be able to responsibly recycle our products, batteries, other components, as well as the packaging materials. Please go to http://csr.asus.com/english/Takeback.htm for the detailed recycling information in different regions.
REACH
Complying with the REACH (Registration, Evaluation, Authorisation, and Restriction of Chemicals) regulatory framework, we published the chemical substances in our products at ASUS REACH website at http://csr.asus.com/english/REACH.htm
Federal Communications Commission Statement
This device complies with Part 15 of the FCC Rules. Operation is subject to the following two conditions:
- This device may not cause harmful interference.
- This device must accept any interference received, including interference that may cause undesired operation.
This equipment has been tested and found to comply with the limits for a class B digital device, pursuant to part 15 of the FCC Rules. These limits are designed to provide reasonable protection against harmful interference in a residential installation.
This equipment generates, uses and can radiate radio frequency energy and, if not installed and used in accordance with the instructions, may cause harmful interference to radio communications. However, there is no guarantee that interference will not occur in a particular installation. If this equipment does cause harmful interference to radio or television reception, which can be determined by turning the equipment off and on, the user is encouraged to try to correct the interference by one or more of the following measures:
- Reorient or relocate the receiving antenna.
- Increase the separation between the equipment and receiver.
- Connect the equipment into an outlet on a circuit different from that to which the receiver is connected.
- Consult the dealer or an experienced radio/TV technician for help.

WARNING! Any changes or modifications not expressly approved by the party responsible for compliance could void the user's authority to operate the equipment.
Prohibition of Co-location
This device and its antenna(s) must not be co-located or operating in conjunction with any other antenna or transmitter.
IMPORTANT NOTE:
Radiation Exposure Statement: This equipment complies with FCC radiation exposure limits set forth for an uncontrolled environment. End users must follow the specific operating instructions for satisfying RF exposure compliance. To maintain compliance with FCC exposure compliance requirement, please follow operation instruction as documented in this manual.

WARNING! This equipment must be installed and operated in accordance with provided instructions and the antenna(s) used for this transmitter must be installed to provide a separation distance of at least 20cm from all persons and must not be co-located or operating in conjunction with any other antenna or transmitter.
Compliance Statement of Innovation, Science and Economic Development Canada (ISED)
This device complies with Innovation, Science and Economic Development Canada licence exempt RSS standard(s). Operation is subject to the following two conditions: (1) this device may not cause interference, and (2) this device must accept any interference, including interference that may cause undesired operation of the device.
Operation in the band 5150-5250 MHz is only for indoor use to reduce the potential for harmful interference to co-channel mobile satellite systems.
CAN ICES-3(B)/NMB-3(B)
Radio Frequency (RF) Exposure Information
The radiated output power of the ASUS Wireless Device is below the Innovation, Science and Economic Development Canada radio frequency exposure limits. The ASUS Wireless Device should be used in such a manner such that the potential for human contact during normal operation is minimized.
This equipment should be installed and operated with a minimum distance of 20cm between the radiator any part of your body.
This device has been certified for use in Canada. Status of the listing in the Innovation, Science and Economic Development Canada's REL (Radio Equipment List) can be found at the following web address: http://www.ic.gc.ca/eic/site/ceb-bbst.nsf/eng/h_tt00020.html
Additional Canadian information on RF exposure also can be found at the following web: https://www.ic.gc.ca/eic/site/smt-gst.nsf/eng/sf08792.html
2,4Γι:802.11b,802.11g,802.11n (HT20),802.11n (HT40),
5 Γιu: 802.11a, 802.11n (HT20), 802.11n (HT40), 802.11ac (VHT20), 802.11ac (VHT40), 802.11ac (VHT80).
Yactota,pexkim makcmaJIbHa BnIpomHIOBaHa NotyXHICTdIyKpaIHn:
2412-2472 MΓι: 19,98 ΜΜ;
5180-5240MΓι:19,98ДБΜ;
5260-5320 MΓι:19,98 ΜΜ;
5500-5670 MΓι: 19,98 ΜΜ.
Ipnctpi npn3naheNo dny BnKOpncTahnra TInbKn y npmiieneHHi niJ uac po6OTN B cactOTHomy diaNa3oHi 5150-5350 M.


Precautions for the use of the device
a. Pay particular attention to the personal safety when use this device in airports, hospitals, gas stations and professional garages.
b. Medical device interference: Maintain a minimum distance of at least 15cm (6 inches) between implanted medical devices and ASUS products in order to reduce the risk of interference.
c. Kindly use ASUS products in good reception conditions in order to minimize the radiation's level.
d. Keep the device away from pregnant women and the lower abdomen of the teenager.
UK support e-mail: network_support_uk@asus.com
- For more information, visit the ASUS support site at: https://www.asus.com/support/
English
CE statement
Simplified EU Declaration of Conformity
ASUSTek Computer Inc. hereby declares that this device is in compliance with the essential requirements and other relevant provisions of Directive 2014/53/EU. Full text of EU declaration of conformity is available at https://www.asus.com/Networking/RTAC59UV2/HelpDesk/.
Declaration of Conformity for Ecodesign directive 2009/125/EC
Testing for eco-design requirements according to (EC) No 1275/2008 and (EU) No 801/2013 has been conducted. When the device is in Networked Standby Mode, its I/O and network interface are in sleep mode and may not work properly. To wake up the device, press the Wi-Fi on/off, LED on/off, reset, or WPS button.
This equipment complies with EU radiation exposure limits set forth for an uncontrolled environment. This equipment should be installed and operated with minimum distance 20cm between the radiator & your body.
All operational modes:
2.4GHz: 802.11b, 802.11g, 802.11n (HT20), 802.11n (HT40), 802.11ac (VHT20), 802.11ac (VHT40)
5GHz: 802.11a, 802.11n (HT20), 802.11n (HT40), 802.11ac (VHT20), 802.11ac (VHT40), 802.11ac (VHT80)
The frequency, mode and the maximum transmitted power in EU are listed below:
2412-2472MHz (802.11g 6Mbps): 19.81 dBm
5180-5240MHz (802.11ac VHT20 MCSO): 20.1 dBm
5260-5320MHz (802.11ac VHT40 MCSO): 21.31 dBm
5500-5700MHz (802.11ac VHT80 MCSO): 27.48 dBm
The device is restricted to indoor use only when operating in the 5150 to 5350 MHz frequency range.
The adapter shall be installed near the equipment and shall be easily accessible.
| AT BE BG CZ DK EE FR | ||||||
| DE IS IE IT EL ES CY | ||||||
| LV | LI | LT | LU | HU | MT | NL |
| NO PL PT RO SI | SK TR | |||||
| FI | SE CH UK HR UA | |||||
Safety Notices
- Use this product in environments with ambient temperatures between 0^(32^) and 40^(104^) .
Refer to the rating label on the bottom of your product and ensure your power adapter complies with this rating.
DO NOT place on uneven or unstable work surfaces. Seek servicing if the casing has been damaged.
DO NOT place or drop objects on top and do not shove any foreign objects into the product.
DO NOT expose to or use near liquids, rain, or moisture. DO NOT use the modem during electrical storms. - DO NOT cover the vents on the product to prevent the system from getting overheated.
DO NOT use damaged power cords, accessories, or other peripherals. - If the Adapter is broken, do not try to fix it by yourself. Contact a qualified service technician or your retailer.
- To prevent electrical shock hazard, disconnect the power cable from the electrical outlet before relocating the system.
110
Bulgarian
U3aBVeHne OTHoCHO CE
OnpocTeHa DeKlapaun3a CbOTBeTcBHe Ha EC
C hacToaTO ASUSTeK Computer Inc.ДeКnapupa,уTe TOb yctpoiCTBO e B cBoTBeCTBne cbc CbIeCTBeHInTe n3NcKBaHn u npUIOxIMn noCTaHOBHeHn Ha IupeKTbBa 2014/53/EC.ПьнгТ TeKCT Na DeKnapaunTa 3a CboTBeTCTBne Ha EC e DocTbIeHn Ha aDpec https://www.asus.com/Networking/ RTAC59UV2/HelpDesk/.
Deknapaun3a CbOTBcTbne 3a DnpeKTHBa 3a eKoU3aHa 2009/125/EO
IpoBedeHn ca TcTObE 3a CbBMeCTMIOCT c N3NCKBaHnAra 3a eKoJn3aH NcRJaCHO (EO) No. 1275/2008 n (EC) No. 801/2013. Korato yctpOCTBOto e B Networked Standby Mode (PexmHa rTOBHOCT Ha mpeka), I/O n MpeKOBnT nHTepFeHc Ca B cPnI pExm H MoKe Da He pa6OT KaT0 TpR6Ba. 3a Da Cb6yDnTe YcTPOCTBOTo, HATNCHe Ti-Fi on/off (Wi-Fi Bk#./n3Kn.), LED on/off (LED Bk#./n3Kn.), reset (HynpaHe) nn 6yToHa WPS. ToBa yctpOCTBOe b CbOTBeTCTBne c rpaHnUte 3a paAnOueCTOTHO o6lbYBaHe, ycTaHOBeHn OT EC 3a HeKOHTpOINpHa cPeDa. ToBa O6OpYBaHe TpR6Ba Da ce nHCTaJInpa Nn3NON3Ba npn pa3CTOAHne Haimanko 20 cm 20 cm MeKdy n3JIbYBaUsoTO TnIo u YoBEWKOTO TnIo.
Bcnukenpeximna pa6ota:
2.4GHz: 802.11b, 802.11g, 802.11n (HT20), 802.11n (HT40), 802.11ac (VHT20), 802.11ac (VHT40)
5GHz: 802.11a, 802.11n (HT20), 802.11n (HT40), 802.11ac (VHT20), 802.11ac (VHT40), 802.11ac (VHT80)
IOn-DoNy ca nocoeyH uecToTa, peKIMbT mAKcMmaHOTo npedaHaHO 3axpaHaBe B EC.
2412-2472MHz (802.11g 6Mbps): 19.81 dBm
5180-5240MHz (802.11ac VHT20 MCS0): 20.1 dBm
5260-5320MHz (802.11ac VHT40 MCS0): 21.31 dBm
5500-5700MHz (802.11ac VHT80 MCS0): 27.48 dBm
YcTPOIcTBOTe o rpaHnueHo 3a n3PON3BaHe B NOMeUeHn eDINHCTBeHO, KOraTO OneepuBa YecToTeH dnaana3OH ot 5150 do 5350 MHz.
AanTepbT Tp86Ba da ce Hamipa B 6n30ct do obopydbaheTo n da 6bJe necho DoCTbneH.
Бelexkn 3a 6e3onachoct
- I3non3BaIte To3n npOdyKT npu TempepaTpa Ha OKoJIHata cpea ot 0^ (32^) do 40^ (104^) .
BnKTe eTKeTa Ha dOnHaTa cTpaHa Ha Baun npOyKT n ce yBepTe, Ye Baunr aanTep oTrobapHa H3NCKBaHnra.
HE noctabraIte Bbpxy HepaBnHnn HeCTa6nHn pa6oTHn NOBbpxHocTn. O6bpHeTe ce KbM cepBn3, aKO KopnycbT ce nobpei.
HE noctabraIte, He nuCKaIte OTrope n He nbXaIte HnKaBn YUkDn PpeMeTb B npOdyKta.
HE n3nlaarate Ha n He n3nnon3BaIte B 6n3ocT do TeuHocTN, bXk nnBna. HE n3no13BaIte Moema no BpeMe Ha rpbMoteBnuHn 6ypn.
HE npKpBaIe BENTnlaucnoHHnTe OTBOpH Na npOyKta, 3a da npEdoTbpaTne nperpaBaHe Ha cnCTeMaTa.
HE n3no3BaIe Tne nobpeHn 3axpaHbaIe Ka6eI, akcecoap nIy npn nepnepn yctpoiCTBA.
Ako aanTepbTe nOBpeH, He ce onnTbaIte da ro peMOHTnpaTe camn. CbpxKeTe ce c KBaIIuNupaH texHnk uin c Baunr doCTabuK.
3a da n36eHHepe pCK OT TOKOB ynap, n3KIOueTe 3axpaHbaunna Ka6en OT eIeKtpnueckaTa MpeKa npedn da npemecntte cnCTeMaTa.
Croatian
CE izjava
Pojednostavljena EU Izjava o sukladnosti
ASUSTek Computer Inc. ovime izjavluje da je uredjau sukladan s osnovnim zahtjevima i ostalim važnim odredbama directiveste 2014/53/EU. Cijeli tekst EU izjave o sukladnosti dostupan je na https://www.asus. com/Networking/RTAC59UV2/HelpDesk/.
Izjava o sukladnosti za direktivu o ekodizajnu 2009/125/EZ
Provedeno je testiranje zahtjeva na ekodizajn u skladu s (EC) No 1275/2008 i (EU) No 801/2013. Kada je uredj u umrezenom naclinu mirovanja, njegovi ulazi/izlazi i mreznu sucelje su takoder u naclinu mirovanja i mozda nece ispravno raditi. ZaPokretanje uredaja pritisnite tipku za uključivanje/isključivanje Wi-Fi uredaja, uključivanje/isključivanje LED-a, ponovno postavljanje ili gumb za WPS.
Ova oprema sukladna je EU ograničenjima o izloženosti zračenju u nekontroliranom okruženju. Ovaj uredaj se mora postaviti i koristiti na minimnoj udaljenosti od 20 cm izmedu radijatori i vašeg tijela. Svi načini rada:
2.4GHz: 802.11b, 802.11g, 802.11n (HT20), 802.11n (HT40), 802.11ac (VHT20), 802.11ac (VHT40)
5GHz: 802.11a, 802.11n (HT20), 802.11n (HT40), 802.11ac (VHT20), 802.11ac (VHT40), 802.11ac (VHT80)
U nastavku su navedeni frekvencija, način rada i maksimalna emitirana snaga u EU:
2412-2472MHz (802.11g 6Mbps): 19.81 dBm
5180-5240MHz (802.11ac VHT20 MCS0): 20.1 dBm
5260-5320MHz (802.11ac VHT40 MCS0): 21.31 dBm
5500-5700MHz (802.11ac VHT80 MCSO): 27.48 dBm
Urečaj je ograničen na uporabu u zavorenim prostorima samo pri radu u frekvencijskom rasponu od 5150 do 5350 MHz.
Adapter se mora instalirati blizu uredaja i mora biti lako dostupan.
Sigurnosne napomene
- Ovaj proizvod koristite u okruzjenima s temperaturom okruzena izmedu 0^ (32^) i 40^ (104^) .
- Pogledajte nazivnu oznaku na donjem dijelu proizvoda kako bist provjerili je li adapter sukladan.
- NE postavljaje uredaj na neravne i nestabilne radne povrsine. U slučaju ostecenja kucišta, zatražite pomoc servisera.
- NEMOJTE postavljati ili spustati predmete na gornji dio uredaja i nemojte umetati strane predmete u proizvod.
- NE izlažite i ne upotrebljavaje uredaj u blizini tekuciina, kise ili vlage. NEMOJTE koristiti modem tijekom elektricne oluje.
- NEMOJTE prekrivati otvore na proizvodu kako ne biste uzrokovali pregrijavanje sustava.
- Nemojte koristiti oštećene kabele za napajanje, dodatnu opremu i ostale vanjske ureðaje.
- Ako je adapter oštećen, nemojtge ga popravljati sami. Obratite se kvalificiranom servisnom tehnicaru ili dobavljacu.
- Kako biste sprijecili opasnost od elektricnog udara, iskopcajte kabel iz elektricne uticnice prije premjestanja sustava.