
DV9923CNM - Blu-ray player LG - Free user manual and instructions
Find the device manual for free DV9923CNM LG in PDF.
Download the instructions for your Blu-ray player in PDF format for free! Find your manual DV9923CNM - LG and take your electronic device back in hand. On this page are published all the documents necessary for the use of your device. DV9923CNM by LG.
USER MANUAL DV9923CNM LG
DVD PLAYER OWNER'S MANUAL MODEL LDA-530 Beforeconnecting,operatingoradjustingthisproduct,pleasereadthisinstructionbookletcarefullyandcompletely.
DV9923CNM_HA1CLL_ENG
http://www.lg.ca2 This lightning flash with arrowhead symbol within equilateral triangle
uninsulated dangerous voltage within the product's enclosure that may
sufficient magnitude constitute risk of electric shock persons. The exclamation point within equilateral triangle
important operating and maintenance (servicing) instructions
the literature accompanying the product.
not install this equipment
confined space such asa bookcase similar unit. CAUTION: This product employs Laser System.
this product, please read this owner
manual carefully and retain
for future reference. Should the unit require maintenance, contactan authorized service center. Performing controls, adjustments, carrying out procedures other than those specified herein may result
hazardous radiation exposure.
prevent direct exposure laser beam,
not try open the enclosure. Visible laser radiation when open.
exposed towater (dripping splashing) and objects filled with liquids, such asvases, should
This equipment may generate oruse radio frequency energy. Changes modifications this equipment may cause harmful interference unless the modifications are expressly approved
the instruction manual. The user could lose the authority operate this equipment
unauthorized change modification
This epuipment has been tested and found comply with the limits for Class
digital device, pursuant Part
the FCC Rules. These limits are designed provide reasonable protection against harmful interference when the product
residential installation. This product generates, uses, and can radiate radio frequency energy and,
not installed and used
accordance with the instruction manual, may cause harmful interference radio communications. However, there
guarantee that interference will notoccur
particular installation.
this product does cause harmful interference radio television reception, which can
turning the product off and on, the user
encouraged try tocorrect the interference
the following measures:? Reorient relocate the receiving antenna.? Increase the separation between the product and receiver. Connect the product into outlet ona circuit different from that which the receiver
connected. Consult the dealer oran experienced radio/TV technician for help. CAUTION concerning the Power Cord Most appliances recommend they
placed upon dedicated circuit; That is, single outlet circuit which powers only that appliance and has additional outlets branch circuits. Check the specification page
not overload wall outlets. Overloaded wall outlets, loose damaged wall outlets, extension cords, frayed power cords, damaged cracked wire insulation are dangerous. Any
these conditions could result
electric shock fire. Periodically examine the cord
its appearance indicates damage deterioration, unplug it, discontinue use
the appliance, and have the cord replaced with anexact replacement part
authorized servicer. Protect the power cord from physical mechanical abuse, such being twisted, kinked, pinched, closed
door, walked upon. Pay particular attention plugs, wall outlets, and the point where the cord exits the appliance. SERIAL NUMBER: You can find the serial number the back
unique this unit and not available others. You should record requested information here and retain this guide asa permanent record
your purchase. Model No.
NOT EXPOSE THIS PRODUCT
Dynamic Range Control (DRC)
Erasing the Complete Program List
this Manual The lightning flash symbol alertsyoutothepresenceof dangerous voltage withinthe product enclosurethatmayconstituteariskofelectricshock.Theexclamation point alertsyoutothepresenceof important operating andmaintenance/ servicing instructions.Indicateshazards likely tocauseharmtotheunititselforothermaterial damage. Note:Indicates special notesand operating features. Tip: Indicates tips andhintsfor making thetaskeasier.Asectionwhosetitlehasoneofthe following symbols applicable only tothedisc represented
mayappearonyourTV display during operation andindicatesthatthefunction explained inthisowner'smanualisnotavailableonthat specific DVDvideodisc. Notes
Discs Handling DiscsDonottouchthe playback sideofthedisc.Holdthedisc the edges sothat fingerprints donot get onthesurface.Neverstickpaperor tape onthedisc. Storing DiscsAfter playing, storethediscinitscase.Donotexposethedisctodirect sunlight orsourcesofheatandneverleaveitina parked car exposed todirect sunlight. Cleaning Discs Fingerprints anddustonthedisccancausepoor picture quality andsounddistortion.Before playing, cleanthediscwithacleancloth. Wipe thediscfromthecenterout.Donotuse strong solventssuchas alcohol, benzine, thinner, commercially available cleaners, oranti-staticsprayintendedforolder vinyl records. DivX JPEG WMA MP3 CDVCD DVD Introduction5 Types Playable Discs DVD (8cm/12cmdisc) VideoCD (VCD) (8cm/12cmdisc) AudioCD (8cm/12cmdisc) addition, thisunit plays DivX file, DVD -R, DVD +R, DVD -RW, DVD +RW, SVCD, andCD-R/CD-RWthatcontainsaudio titles, MP3, WMA, and/orJPEGfiles. Notes: Depending ontheconditionsofthe recording equipment ortheCD-R/RW (or DVD -R, DVD +R, DVD -RW, DVD +RW) disc itself, someCD-R/RW (or DVD -R, DVD +R, DVD -RW, DVD +RW) discscannotbe played ontheunit.?Donotattach any sealorlabeltoeitherside (the labeledsideortherecorded side) ofadisc.?Donotuse irregularly shaped CDs (e.g., heart- shaped octagonal) since they may resultinmalfunctions. Notes DVDs and Video CDs Some playback operations ofDVDsandVideoCDs may intentionally programmed
softwaremanufacturers.Thisunit plays DVDsandVideoCDs according todisccontent designed by thesoftware manufacturer, thereforesome playback features may notbeavailableorotherfunctions may beadded. Manufactured under license from Dolby Laboratories. "Dolby", "Pro Logic", and the double-D symbol are trademarks Dolby Laboratories. DTS and DTS Digital Out are trademarks Digital Theater Systems, Inc. Regional code ThisDVD player designed andmanufacturedfor playback region "1"encodedDVDsoftware.Thisunitcan play only DVDdiscslabeled"1"or"ALL". Notes Regional Codes ?MostDVDdiscshavea globe withoneormorenumbersinit clearly visibleonthecover.Thisnumbermustmatch your DVD player's regional codeorthedisccannot play. ?If you try play aDVDwithadifferent region codefrom your player, the message "Check Regional Code" appears ontheTVscreen. Notes Copyrights: Itisforbidden lawto copy, broadcast, show, broadcastvia cable, play public, orrent copyrighted materialwithout permission. This product featuresthe copy protection function developed
Macrovision. Copy protection signals arerecordedonsomediscs.When recording and playing the pictures ofthesediscs picture noisewill appear. This product incorporates copyright protection technology thatis protected
REPEAT Repeat chapter, track, titleall. A-B Repeat sequence.
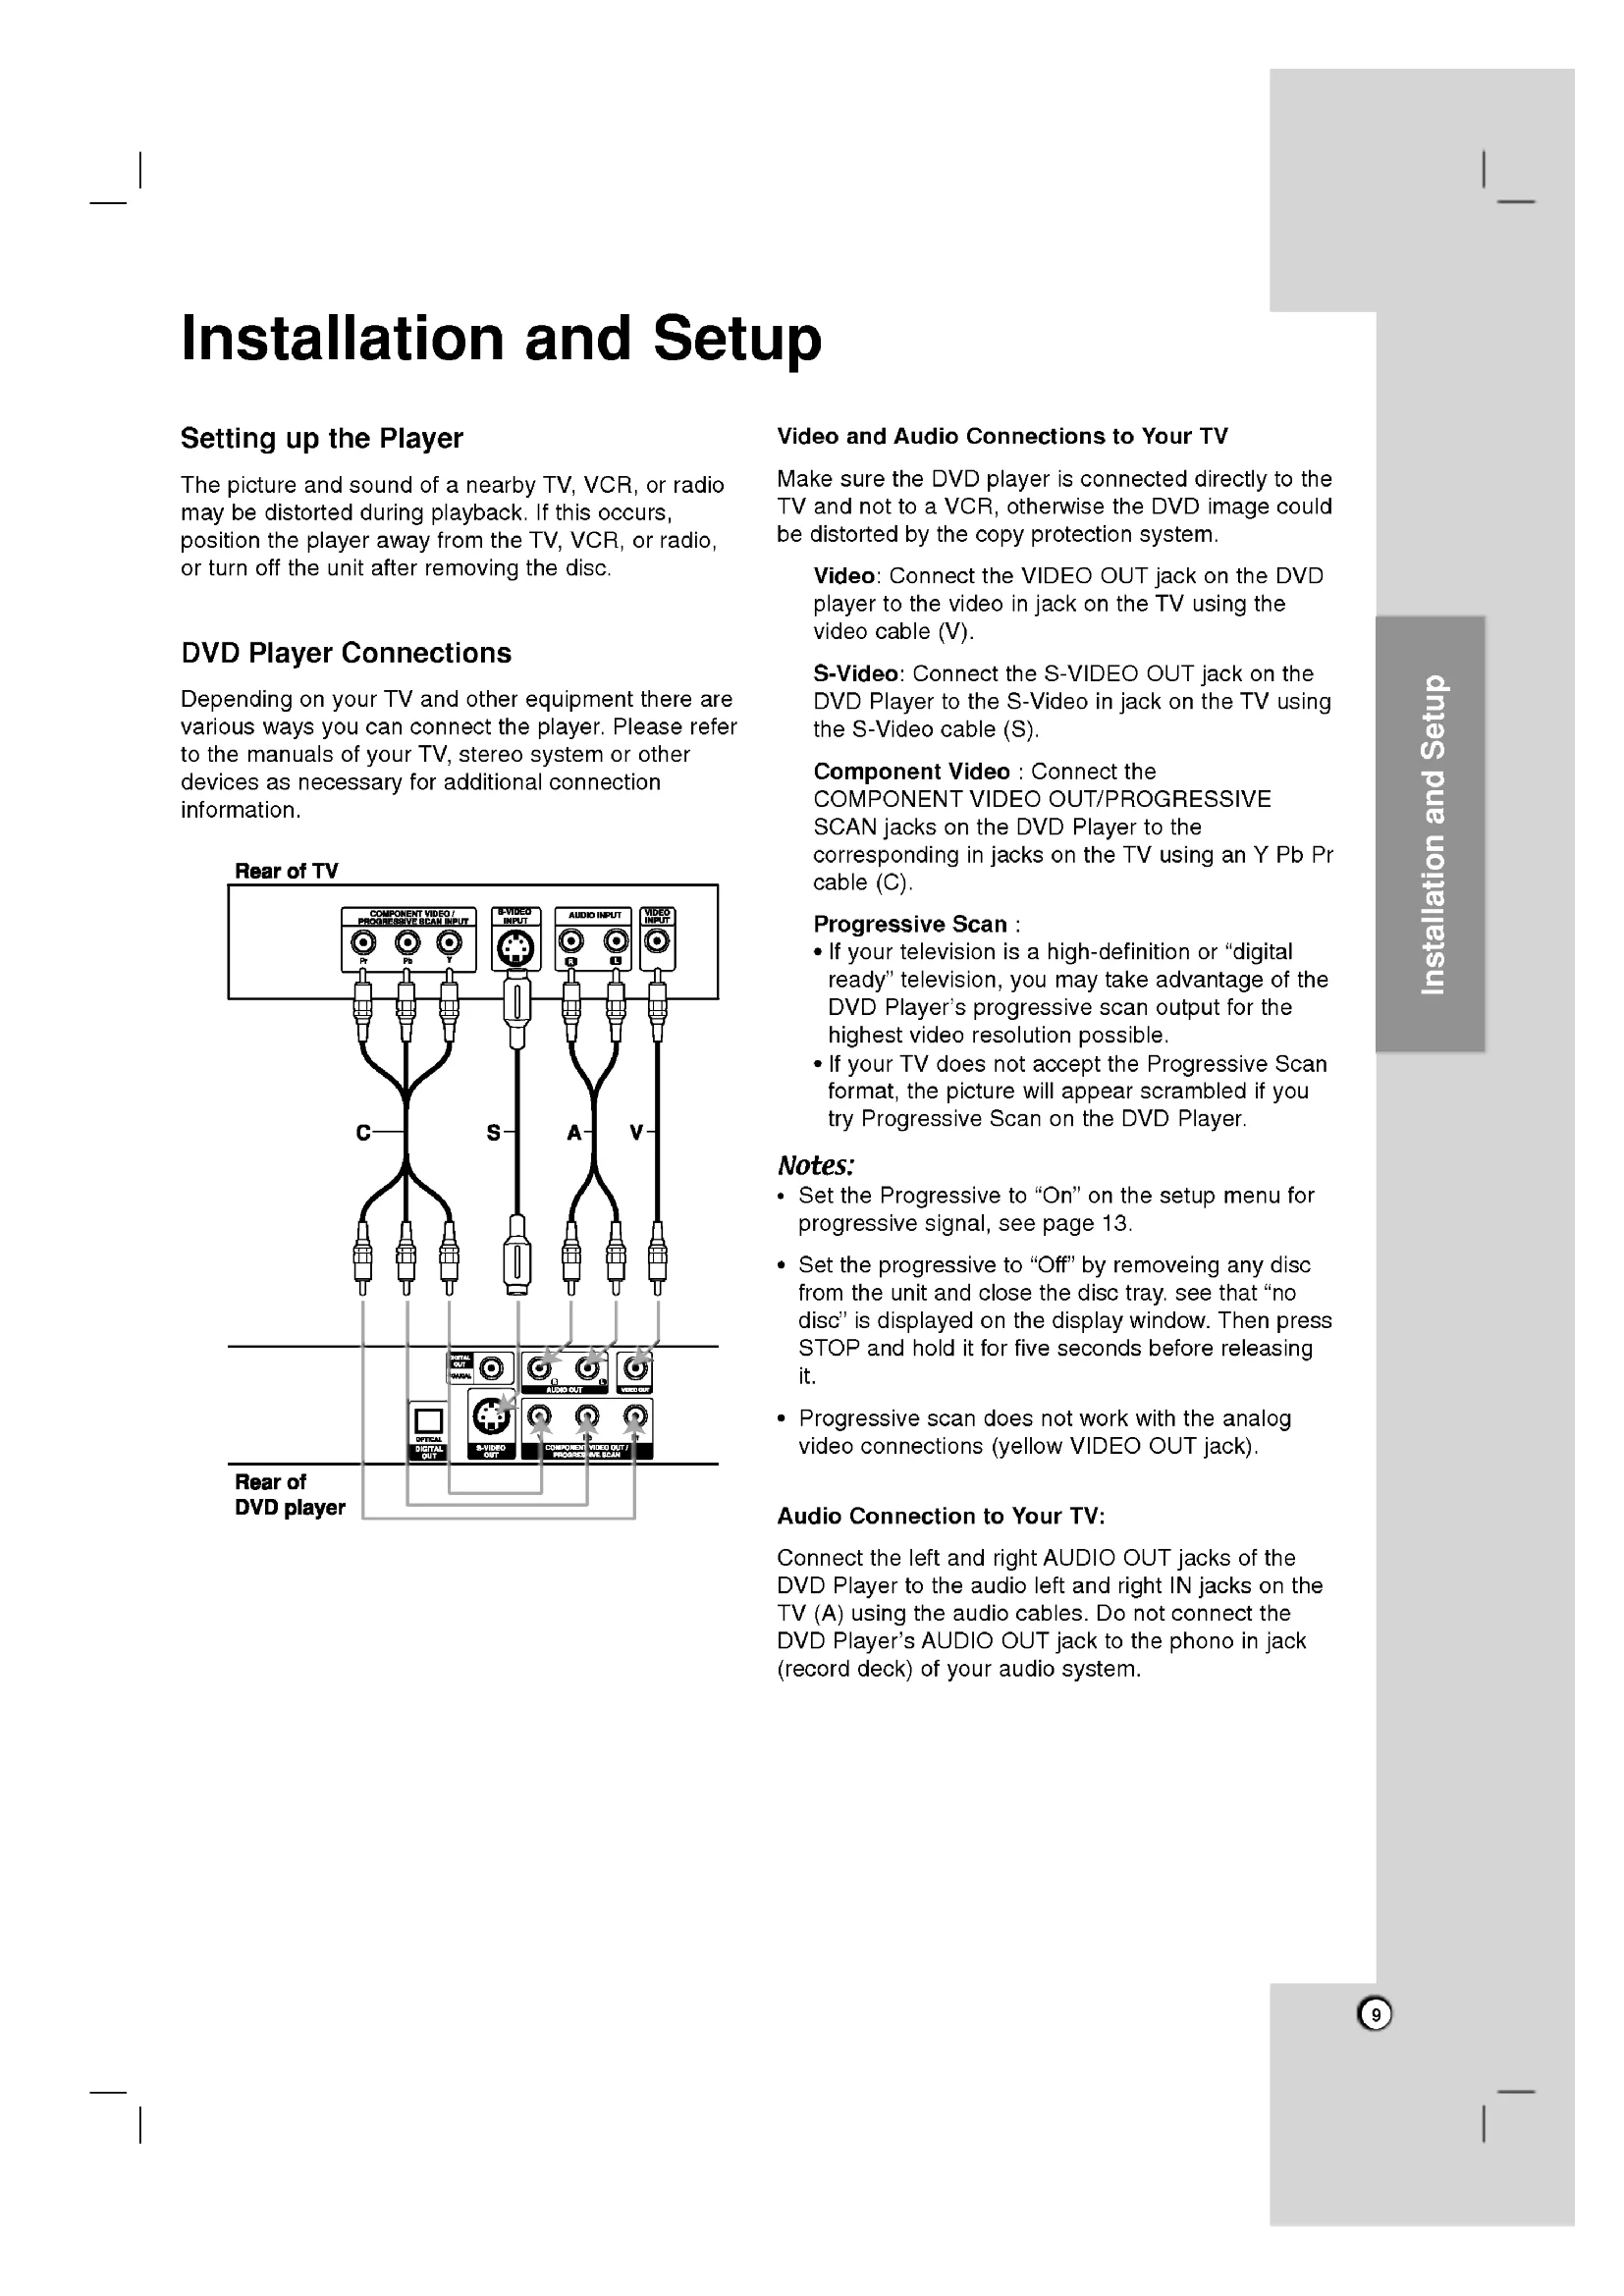
the Player The picture andsoundofa nearby TV,VCR,orradiomaybedistorted during playback. Ifthisoccurs, position the player awayfromtheTV,VCR,orradio,or turn offtheunitafter removing thedisc.DVD Player Connections Depending onyourTVandother equipment therearevariouswaysyoucan connect the player. Pleaserefer themanualsofyourTV, stereo systemorotherdevicesasnecessaryforadditionalconnectioninformation.VideoandAudioConnectionstoYourTVMakesuretheDVD player isconnected directly
Ifyourtelevisionisa high-definition "digital ready" television,youmaytake advantage oftheDVD Player's progressive scanoutputforthe highest videoresolution possible.
"On"onthesetupmenufor progressive signal, seepage13. Setthe progressive
Progressive scandoes not workwiththe analog videoconnections (yellow VIDEOOUT jack). AudioConnectiontoYourTV:Connecttheleftand right AUDIOOUT jacks oftheDVD Player
theaudioleftand right jacks ontheTV (A) using theaudiocables.Do not connect theDVD Player's AUDIOOUT jack
the phono jack (record deck) ofyouraudiosystem. Installation and Setup10 Audio Connection Optional Equipment ConnecttheDVD player toyour optional equipment foraudio output. Amplifier equipped with2-channel analog stereo Dolby Pro Logic ll/Pro Logic: Connecttheleftand right AUDIOOUT jacks
theDVD player totheaudioleftand right jacks
your amplifier, receiver,
stereo system, using theaudiocables (A). Amplifier equipped with2-channel digital stereo (PCM) oraudio/videoreceiver equipped with multi-channeldecoder (Dolby DigitalTM, MPEG
DTS): Connect one oftheDVD Player's DIGITALAUDIOOUT jacks (OPTICAL
coaxial audiocable. Digital Multi-channelsoundA digital multi-channelconnection provides thebestsound quality. Forthisyouneed multi-channelaudio/videoreceiverthat supports one
yourDVD player such MPEG2, Dolby Digital andDTS.Checkthereceivermanualandthe logos
thefrontofthereceiver.Notes: Iftheaudioformatofthe digital output doesnotmatchthe capabilities ofyour receiver, thereceiver produces
digital connection can only beobtainedifyourreceiveris equipped with
Digital Multi-channeldecoder.?T
see theaudioformatofthecurrentDVDinthe on-screen display, pressAUDIO. Amplifier (Receiver) RearofDVD player AXO AUDIO INPUT DIGITAL INPUT OPTICAL COAXIAL11 On-Screen Display Youcan display the general playback statusontheTVscreen.Someitemscanbe changed using themenu.Tousetheon-screen display: 1.PressDISPLAY during playback. 2.Pressv/Vtoselectanitem.Theselecteditemis highlighted. 3.Pressb/Bto change the setting. Youcanalsousethenumberbuttonsif appropriate (e.g. inputting thetitle number). Forsome functions, pressENTERtoexecutethe setting. Notes:
Somediscsmaynot provide allofthefeaturesshownbelow. Ifnobuttonis pressed for10 seconds, theon-screen display disappears. Playback Status/Restrictions Repeat title Repeat sequenceEnteraMarkerMarker SearchmenuResume play fromthis point Action prohibited ornotavailable MARKER SEARCH 1/9 A-B Title Example: On-Screen Display during playing VCD Items Title Number Chapter Number Time search Audio language and Digital Audio Output mode Subtitle language Angle Sound Selection Method
SUR Example: On-Screen Display during playing DVD Video Items Track Number (or PBC mode) Time search Audio Channel Sound Selection Method
SUR Installation and Setup Items Track Number Time search Audio language and Digital Audio Output mode Subtitle language Sound Selection Method
SUR Example: On-Screen Display during playing divx movie disc12 Initial Settings
Aspect Widescreen 16:9 Display Mode Off Progressive Scan Move Select13 Installation and Setup Progressive Scan Progressive ScanVideo provides the highest quality pictures with less flickering. you are using the Component Video jacks forconnectiontoaTVormonitorthatis compatible witha progressive scan signal, set Progressive ScantoOn.ToTurnON progressive scan:Connect component outoftheDVDtothe input your monitor/television, set your televisionormonitorto Component Input.
Select "Progressive Scan"ontheDISPLAYmenuthen press
Select"On" using thev/Vbuttons. PressENTERtoconfirm your selection.Theconfirmmenuwill appear. Note: your TVdoesnot accept the Progressive Scan format, the picture will appear scrambledif you try Progressive ScanontheDVD Player.
kHzso your system candecodethem.If your receiveror amplifier capable handling
kHz signals, select kHz.Whenthischoiceis made, thisunit passes each type signal through without any further processing. Checkthedocumentationfor your amplifier verify its capabilities. DVD DivX DVD DISPLAY
Vocal Move Select AUDIO14 Dynamic Range Control (DRC) With the DVD format, you can hear program's soundtrack
the mostaccurate and realistic presentation possible, thanks digital audio technology. However, you may wish compress the dynamic range
the audio output (the difference between the loudest sounds and the quietest ones). This allows you listen toa movie ata lower volume without losing clarity
for this effect. Vocal Set
playing. The karaoke channels the disc mix into normal stereo sound. OTHERS The PBC, Auto Play, B.L.E. and DivX(R) VOD settings can
changed. PBC Set Playback Control (PBC)
Off. On: Video CDs with PBC are played according the PBC. Off: Video CDs with PBC are played the same way Audio CDs. Auto Play You canset
the DVD Player so a DVD disc automatically starts playing whenever the DVD
setto On, this DVD player will search for title that has the longest playback time and then play back the title automatically. On: Auto Play function
active. Off: Auto Play function
not active. Note: The Auto Play function may not work for some DVDs. B.L.E. (Black Level Expansion)
playback pictures. Set your preference and monitor's ability. On: Expanded grey scale.
IRE cut off) Off: Standard grey scale. (7.5 IRE cut off) DivX(R) VOD You can display the DivX DRM (Digital Rights Management) Registration code for your unit only. The Registration code
used for VOD (Video-On- Demand) service agent. You can purchase orrentan encrypt movie file. Notes:
you rent the DivX VOD file,
viewing limits shown below. Display the number which you can watch the file. The rental has been expired. Display the authorization error.DivXDVDVCDDVDDivXDVD PBC Off Move Auto Play OTHERS
and select the video input source connected
the audio system (ifapplicable) and select the input source connected
the DVD player.3. Press OPEN/CLOSE
open the disc tray and load your chosen disc
the tray, with the playback side down. Press OPEN/CLOSE
close the tray. Press PLAY.
some cases, the disc menu might appear instead: Use the bBvVbuttons
select the title/chapter you want
select the track you want
view and press RETURN
the menu screen. Menu settings and operatingprocedures may differ. Follow the instructions
the each menu screen. You also may set PBC
not within the ratingsettings you must input the password.(See "Lock Menu"
region code. Your player does not play discs that have
region code different from your player. The region code for this player 1(one).GeneralFeatures Note: Unless stated otherwise, all operations described use the remote control. Some features may also
disc has more than one title, you can move
another title. Press DISPLAY while playback stopped then the appropriate number (0-9)
another title. You can play any title byinputting its number while playback stopped.Movingto another CHAPTER/TRACK When
disc has more than one chapter
disc has more than one track, you can move
another chapter/track
brieflyduringplayback
select the next chapter/track
the current chapter/track.
the previouschapter/track.
exit SEARCH mode, press PLAY. Changing the Audio Channel Press AUDIO repeatedlyduringplayback
different audio channel (Stereo, Left,
Right).17 Still Picture and Frame-by-Frame Playback 1.PressPAUSE/STEPontheremotecontrol during playback. Advancethe picture frame-by-frame
pressing PAUSE/STEP repeatedly. 2.Toexitstillmotion mode, press PLAY. Slow Motion 1.PressPAUSE/STEP (X) during playback. TheDVD player willnow intoPAUSEmode.2.UsetheSCAN
during random playback, the unit selects another title (track) and resumes random playback. Note:
with PBC, You must set PBC
page 14). Repeat A-BTo repeat sequence. 1.PressA-Bat your chosen starting point.
appears briefly ontheTVscreen.2.PressA-B again your chosenend point. "AB" appears briefly ontheTVscreenandthe repeat sequence begins. 3.PressA-B again tocancel. Repeat Youcan play title/chapter/all/track on adisc.PressREPEAT during playback toselectadesired repeat mode.DVD Video Discs
Chapter: repeats thecurrent chapter.
Title: repeats thecurrenttitle. Off doesnot play repeatedly. Video CDs, DivX discs
Repeat Track/All/Off
repeats thecurrenttrack All
repeats allthe tracksonadisc. Off doesnot play repeatedly. Notes:
once during Repeat Chapter (Track) playback, the repeat playback cancels. Surround produce a3Dsurroundeffectthatsimulatesmulti-channelaudiofromtwostereo speakers (instead ofthefive+ speakers normally required formulti-channelaudiofromahometheater system). 1.PressDISPLAY during playback. 2.Use
screen during scenes recorded different angles asan indication that angle switching
possible. Changing the Audio Language PressAUDIO repeatedly during playback tohearadifferentaudio language oraudiotrack. Subtitles PressSUBTITLE repeatedly during playback toseethedifferentsubtitle languages. Notes: ?ThesubtitlefileoftheDivXfileis displayed only smi, srtandsub.?IfthereisnoinformationorthereisacodethatcannotreadintheDivX file, "1"etcare displayed.19 Operation Playing Audio
When playing afile containing informationsuchastracktitles, you can seetheinformation
pressing DISPLAY. Title,Artist,Album,Year,Comment
the MUSIC menu and want
the Folder list, use the
with MP3/WMA and JPEG you can switch MP3/WMA and JPEG. Press TITLE and MUSIC
Sampling frequency: within
The player cannot readanMP3/WMAfilethathasafileextensionotherthan ".mp3" /".wma". CD-R physical formatshouldbeISO
They should not contain special letterssuchas/?*:"<>letc. Thetotalnumberoffilesonthediscshouldbelessthan ThisDVD player requires discsand recordings
meet certaintechnicalstandardsinorder achieve optimal playback quality. Pre-recordedDVDsare automatically set
thesestandards.Thereare many differenttypesofrecordablediscformats (including CD-R containing MP3orWMA files) andthese require certain pre-existing conditions (see above)
ensure compatible playback. Customers should note that permission
download MP3/WMA files and music from the Internet. Our company has right
grant such permission. Permission should always
sought from the copyright owner.20 Audio
disc. Off(Nodisplay):doesnotplayrepeatedly. Note:
once during Repeat Track playback, the repeat playback cancels. Search 1.PressSCAN(m M)duringplayback.2.PressSCAN(m M)repeatedlytoselecttherequiredspeed: X2, X4, X8backward forward.3.ToexitSEARCH mode, pressPLAY.Random1.PressRANDOMduringplayback.RandomPlaybackbeginsimmediatelyandRANDOMappears the menu screen. 2.Toreturntonormalplayback,pressRANDOMrepeatedlyuntilRANDOMdisappearsfromthe menu screen. Tip:
during random playback, the unit selects another track and resumes random playback. RepeatA-B1.To repeat
sequenceduringdiscplaybackpressA-Batyourchosenstartingpoint.TheRepeaticonand"A"appear the menu screen. 2.PressA-Bagainatyourchosenendpoint.TheRepeaticonand"A-B"appear the menu screen,andthesequencebeginstoplayrepeatedly.3.Toexitthesequenceandreturntonormalplay,pressA-Bagain.TheRepeaticondisappearsfromthe menu screen. Surround Toproduce 3Dsurroundeffectthatsimulatesmulti-channelaudiofromtwostereospeakers(insteadofthefive+speakersnormallyrequiredformulti-channelaudiofrom hometheatersystem).1.PressAUDIOduringplayback."3DSUR."appears the menu screen. 2.Toreturntonormalplayback,pressAUDIOrepeatedlyuntil"3DSUR."disappearsfromthe menu screen.21 Operation Programmed Playback The program functionenables you tostore your favoritetracksfrom any discinthe player memory. program cancontain30tracks.1.Insertadisc. Audio CDorMP3/WMA Discs: AUDIOCDorMUSICmenu appears. 2.PressPROGRAM.Themarkwill appear tothe right oftheword "Program" onthe right sideofthemenuscreen. Note: PressPROGRAM again, thenthemarkwill disappear toexitthe Program Editmode.AudioCDMenuMP3/WMAMenu Video CD:PressPROGRAM.while playback stopped. The program menu appears. PressPROGRAM again andholditdownforafewsecondstoexitthemenu. Note: OnaVideoCDwith PBC, you mustsetPBCtoOffonthe setup menutousethe programmed playback (See "PBC"on page 14). VideoCDMenu3.Selectatrackonthe "List", then press ENTERto place theselectedtrackonthe "Program" list. Repeat place additionaltracksonthelist.4.PressB.Selectthetrack you wanttostart playing onthe "Program" list.5.PressPLAYorENTERtostart. Playback begins intheorderinwhich you programmed thetracks. Playback stops afterallofthe tracksonthe "Program" listhave played once.6.Toresumenormal playback from programmed playback, selectatrackofAUDIOCD (or MUSIC) listandthen press PLAY. Repeat Programmed Tracks 1.PressREPEATwhen playing adisc.The repeat icon appears. 2.PressREPEATtoselectadesired repeat mode. Track: repeats thecurrenttrack All: repeats allthetrackson programmed list.
Off(No display): doesnot play repeatedly. Note: you press >once during Repeat Track playback, the repeat playback cancels. Erasing Track from "Program" List 1.UsevVBtoselectthetrackthat you wishtoerasefromthe Program list.2.PressCLEAR. Repeat toeraseadditionaltracksonthelist. Erasing the Complete Program List 1.PressBtomovetothe "Program" list.2.Usev/Vtoselect"Clear All", then press ENTER. Note: The programs arealsoclearedwhenthediscisremoved.
selecta folder, andpressENTER.Alistoffilesinthefolderappears.Ifyouareinafilelistand want
the previous Folder list, usethe
There are three Slide Speed options
select the option you want
disc with MP3/WMA and JPEG you can switch MP3/WMA and JPEG. Press TITLE and MUSIC
oncewhile viewing picture
advance the next previous file.ZoomUsezoom
enlarge the photo image. (see page) Torotate picture Press
during showing picture
PHOTO JPEGdisc compatibility withthis player islimited follows:
Depending uponthesizeandnumberofJPEG files, itcouldtakea long timefortheDVD player
readthedisc's contents. Ifyoudon'tseeanon-screen display afterseveral minutes, someofthefilesmaybe too large
reducetheresolutionoftheJPEGfiles lessthan2M pixels as2760x2048 pixels andburnanotherdisc. Thetotalnumberoffilesandfoldersonthediscshouldbelessthan650. Somediscsmaybe incompatible due adifferent recording formatortheconditionofdisc. Ensurethatalltheselectedfileshavethe ".jpg" extensionswhen copying intotheCD layout.
Ifthefileshave ".jpe" ".jpeg" extensions, please renamethemas ".jpg" file. Filenameswithout ".jpg" extensionwill not beable beread thisDVD player. Even though thefilesareshownasJPEG image filesinWindows Explorer.23 Maintenance and Service Refertotheinformationinthis chapter before contacting aservicetechnician. Handling the Unit When shipping theunitPleasesavethe original shipping cartonand packing materials.Ifyouneedto ship the unit, formaximum protection, re-pack theunitasitwas originally packed atthe factory. Keeping theexteriorsurfacesclean Donotusevolatile liquids suchasinsecticidesprayneartheunit. Donotleaverubberor plastic products incontactwiththeunitfora long period oftime.since they leavemarksonthesurface. Cleaning theunitTocleanthe player, usea soft, dry cloth.Ifthesurfacesare extremely dirty, useasoftcloth lightly moistenedwithamild detergent solution.Donotuse strong solventssuchas alcohol, benzine, thinner, asthese might damage thesurfaceoftheunit. Maintaining theUnitTheDVD player isa high-tech, precision device.Ifthe optical pick-up lensanddiscdrive parts are dirty worn, the picture quality couldbediminished. Depending onthe operating environment, regular inspection andmaintenancearerecommendedafterevery 1,000 hoursofuse.For details, please contactyournearestauthorizedservicecenter.24 Playing DivX Movie Disc Using thisDVD Player youcan play DivXdisc.1.Insertadiscandclosethe tray. TheMOVIEmenuappearsontheTVscreen.2.Press
selecta folder, andpressENTER.Alistoffilesinthefolderappears.Ifyouareinafilelistand want
theFolder list, usethe
with MP3/WMA, JPEG and MOVIE file, you can switch MUSIC, PHOTO and MOVIE menu. Press TITLE and MUSIC, PHOTO and MOVIE word
downloaded through the internet. List Movie Folder
MOVIE 0:00:00 DivX disc compatibility with this player
second, this unit may not operate normally.
the video and audio structure
recorded with GMC, the unit supports only 1-point
the acronym for Global Motion Compensation.
Xvid, have this option. There are different levels
GMC encoding,usually called 1-point,2-point, 3-point GMC. Playable DivX file
Sampling frequency: within
192kbps (WMA)25 Additional Features LastScene Memory This player memorizeslastscenefromthelastdiscthatisviewed.Thelastsceneremainsinmemoryevenifyouremovethediscfromthe player orswitchoffthe player. Ifyouloadadiscthathasthescene memorized, thesceneis automatically recalled.Note:This player does not memorizethe scene
discifyouswitchoffthe player before commencing
Withcertain discs, the playback picture maybe flickering orDotCrawlisshownon straight lines.ThatmeansVertical interpolation orDe-interlaceis not perfectly matchedwiththedisc.Inthis case, the picture quality maybe improved
changing thevideomode.
change thevideo mode, pressandholdDISPLAYabout seconds during disc playback. Thenewvideomodenumberselectedis displayed ontheTVscreen.Checkwhetherthevideo quality has improved. not, repeat theabove procedure until picture quality improved.
Videomode change sequence:MODE1 MODE2 MODE3 MODE1 Ifyou turn offthepower,thevideomodewillbeback initial state (MODE1). Tip: Detailed Descriptions for Video Modes MODE1:The source materialoftheDVDvideo (film material video material) isdeterminedfromdiscinformation.MODE2:Suitablefor playing filmbased content
videobasedmaterialrecorded the progressive scan method.MODE3:Suitablefor playing videobased content with comparatively littlemotion.Note:Thevideomode setting only workswhenthe Progressive Scanmodeis set
"On"inthe Setup menu.26 Reference This chapter includes important referenceinformationto help yousetyourDVD player. Controlling TVs Yourremotecontrol operates thecommonfeaturesof most, butnot all, modelsandbrandsofIR (infrared) controlledTVs. Inthe chart, findthecode corresponding toyourbrandof operational device. While holding downtheTVPOWER button, press numberbuttons
toenterthecode.Somemanufacturershavemorethanonecodenumber.Iftheremotecontroldoesnot operate theTVafter setting acode number, try adifferentcode.Buttonsused
operate theTV POWER, Number
oubleshooting Specifications General Power requirements:
Dimensions (Approx.): 430x35x242mm(WxHxD)withoutfoot Weight (Approx.):
System Laser: Semiconductor laser, wavelength
(ANALOG OUT connectors only) Harmonicdistortion: Less than 0.008% Dynamic range: More than