
DV163NZ - Blu-ray player LG - Free user manual and instructions
Find the device manual for free DV163NZ LG in PDF.
Download the instructions for your Blu-ray player in PDF format for free! Find your manual DV163NZ - LG and take your electronic device back in hand. On this page are published all the documents necessary for the use of your device. DV163NZ by LG.
USER MANUAL DV163NZ LG
DVD PLAYER OWNER'S MANUAL MODEL LDA-730 Beforeconnecting,operatingoradjustingthisproduct,pleasereadthisinstructionbookletcarefullyandcompletely.
http://www.lg.ca2 This lightning flash with arrowhead symbol within equilateral triangle
uninsulated dangerous voltage within the product's enclosure that may
sufficient magnitude constitute risk of electric shock persons. The exclamation point within equilateral triangle
important operating and maintenance (servicing) instructions
the literature accompanying the product. CAUTION:
not block any ventilation openings. Install
accordance with the manufacturer's instructions. Slots and openings
the cabinet are provided for ventilation and toensure reliable operation
the product and protect
from over heating. The openings should
placing the product ona bed, sofa, rug other similar surface. This product should not
built-in installation such asa bookcase rack unless proper ventilation
provided the manufacturer's instruction have been adhered to. CAUTION: VISIBLE AND INVISIBLE LASER RADIATION WHEN OPEN AND INTERLOCKS DEFEATED. CAUTION: This product employs Laser System.
this product, please read this owner
manual carefully and retain
for future reference. Should the unit require maintenance, contactan authorized service center. Use
controls, adjustments the performance
procedures other than those specified herein may result
hazardous radiation exposure.
prevent direct exposure laser beam,
not try open the enclosure. Visible laser radiation when open.
exposed towater (dripping splashing) and objects filled with liquids, such asvases, should
This equipment may generate oruse radio frequency energy. Changes modifications this equipment may cause harmful interference unless the modifications are expressly approved
the instruction manual. The user could lose the authority operate this equipment
unauthorized change modification
This epuipment has been tested and found comply with the limits for Class
digital device, pursuant Part
the FCC Rules. These limits are designed provide reasonable protection against harmful interference when the product
residential installation. This product generates, uses, and can radiate radio frequency energy and,
not installed and used
accordance with the instruction manual, may cause harmful interference radio communications. However, there
guarantee that interference will notoccur
particular installation.
this product does cause harmful interference radio television reception, which can
turning the product off and on, the user
encouraged try tocorrect the interference
the following measures:? Reorient relocate the receiving antenna.? Increase the separation between the product and receiver. Connect the product into outlet ona circuit different from that which the receiver
connected. Consult the dealer oran experienced radio/TV technician for help. CAUTION concerning the Power Cord Most appliances recommend they
dedicated circuit; That is,
single outlet circuit which powers only that appliance and has
branch circuits. Check the specification page
not overload wall outlets. Overloaded wall outlets, loose
damaged wall outlets, extension cords, frayed power cords,
cracked wire insulation are dangerous. Any
these conditions could result
fire. Periodically examine the cord
its appearance indicates damage
deterioration, unplug it, discontinue use
the appliance, and have the cord replaced with
exact replacement part
authorized servicer. Protect the power cord from physical
mechanical abuse, such
being twisted, kinked, pinched, closed
walked upon. Pay particular attention
plugs, wall outlets, and the point where the cord exits the appliance.
disconnect power from the mains, pull out the mains cord plug. When installing the product, ensure that the plug
NOT EXPOSE THIS PRODUCT
Read these instructions. All these safety and operating instructions should
read before the product
Keep these instructions. The safety, operating and use instructions should
retained for future reference.
Heed all warnings. All warnings the product and
the operating instructions should
Follow all instructions. All operating and use instructions should
not use this product near water. For example: neara bath tub, wash bowl, kitchen sink, laundry tub,
wet basement; orneara swimming pool; and other areas located near water.
Clean only with dry cloth. Unplug this product from the wall outlet before cleaning.
not use liquid cleaners.
not block any ventilation openings. Install
accordance with the manufacturer's instructions. Slots and openings
the cabinet are provided for ventilation and
ensure reliable operation
from over- heating. The openings should never
placing the product on a bed, sofa, rug other similar surface. This product should not
built-in installation such asa bookcase rack unless proper ventilation
provided the manufacturer's instructions have been adhered to.
not install near any heat sources such radiators, heat registers, stoves, other apparatus (including amplifiers) that produce heat.
not defeat the safety purpose
the polarized grounding-type plug.
polarized plug has two blades with one wider than the other.
grounding type plug has two blades and third grounding prong. The wide blade the third prong are provided for your safety.
the provided plug does not fit into your outlet, consult electrician for replacement
Protect the power cord from being walked onor pinched particularly
plugs, convenience receptacles, and the point where they exit from the product.
the manufacturer, sold with apparatus. When cart
avoid injury from tip-over.
Unplug this product during lightning storms when unused for long periods
qualified service personnel. Servicing
required when the product has been damaged
any way, such power-supply cord plug
damaged, liquid has been spilled objects have fallen into the product, the product has been exposed
rain moisture, does not operate normally, has been dropped. IMPORTANT SAFETY INSTRUCTIONS CAUTION: PLEASE READ AND OBSERVE ALL WARNINGS AND INSTRUCTIONS
THE PRODUCT. RETAIN THIS BOOKLET FOR FUTURE REFERENCE. This product has been designed and manufactured
assure personal safety. Improper use can result
electric shock fire hazard. The safeguards incorporated
this product will protect you
you observe the following procedures for installation, use, and servicing. This product does not contain any parts that can
InstallationandSetup.
Audio Connection Optional Equipment
SampleFreq.(Frequency).
B.L.E. (Black Level Expansion)
Track from Program List
Erasing the Complete Program List
Playable Discs DVD (8cm/12cmdisc) VideoCD (VCD/SVCD) (8cm/12cmdisc) AudioCD (8cm/12cmdisc) addition, thisunit plays DVD±R/RWandCD-R/RWthatcontainsaudio titles, DivX, MP3, WMA, and/orJPEGfiles. Notes: Depending ontheconditionsofthe recording equipment ortheCD-R/RW (or DVD±R/RW) disc itself, someCD-R/RW (or DVD±R/RW) discscannotbe played ontheunit.?Donotuse irregularly shaped CDs (e.g., heart- shaped octagonal) since they may resultinmalfunctions.?ThisDVD player requires discsand recordings tomeetcertaintechnicalstandardsinordertoachieve optimal playback quality. Pre-recordedDVDsare automatically settothesestandards.Thereare many different types ofrecordablediscformats (including CD-R containing MP3orWMA files) andthese require certain pre-existing conditions (see above) toensure compatible playback. Customers should note that permission
required inorder downloadMP3/WMA files and music from the Internet. Our company has right
grant such permission. Permission should always sought from the copyright owner. Regional Code Thisunithasa regional code printed ontherearoftheunit.Thisunitcan play only DVDdiscslabelledsameastherearoftheunitor"ALL". Notes Regional Codes ?MostDVDdiscshavea globe withoneormorenumbersinit clearly visibleonthecover.Thisnumbermustmatch your unit's regional codeorthedisccannot play. ?If you try play aDVDwithadifferent regional codefrom your player, the message "Check Regional Code" appears ontheTVscreen. Notes Copyrights: Itisforbidden lawto copy, broadcast, show, broadcastvia cable, play public, orrent copyrighted materialwithout permission. This product featuresthe copy protection function developed
Macrovision. Copy protection signals arerecordedonsomediscs.When recording and playing the pictures ofthesediscs picture noisewill appear. This product incorporates copyright protection technology thatis protected
(STOP) Stops playback.
SKIP Returnsto beginning ofcurrent chapter ortrackor
previous chapter ortrack. SKIP Gotonext chapter ortrack.
(OPEN CLOSE) Opens orclosesthedisc tray.
the Player ThepictureandsoundofanearbyTV,VCR,orradiomaybedistortedduringplayback.Ifthis occurs, positiontheplayerawayfromtheTV,VCR,orradio,or turn offtheunitafterremovingthedisc. DVD Player Connections DependingonyourTVandotherequipmenttherearevariouswaysyoucan connect theplayer.Pleaserefer themanualsofyourTV, stereo systemorotherdevicesasnecessaryforadditionalconnectioninformation. Video and Audio Connections Your
MakesuretheDVDplayerisconnecteddirectly theTVand not
Progressivescandoes not workwiththeanalogvideoconnections(yellowVIDEOOUTjack). Installation and Setup10 Audio Connection
Iftheaudio formatofthedigital output doesnotmatchthecapabilitiesofyour receiver, thereceiverproduces
pressing v/Vand change orselectthe setting
pressing b/B.Title (Track)
Currenttitle (or track). number/totalnumberoftitles (or tracks). Chapter
Current chapter number/totalnumberof chapters. Time
Elapsed playing time.Audio Selectedaudio language orchannel.Subtitle Selectedsubtitle. Angle
Selected angle/total numberof angles. Sound Selectedsoundmode. Note: Ifnobuttonis pressed forafew seconds, theon-screen display disappears. Initial Settings
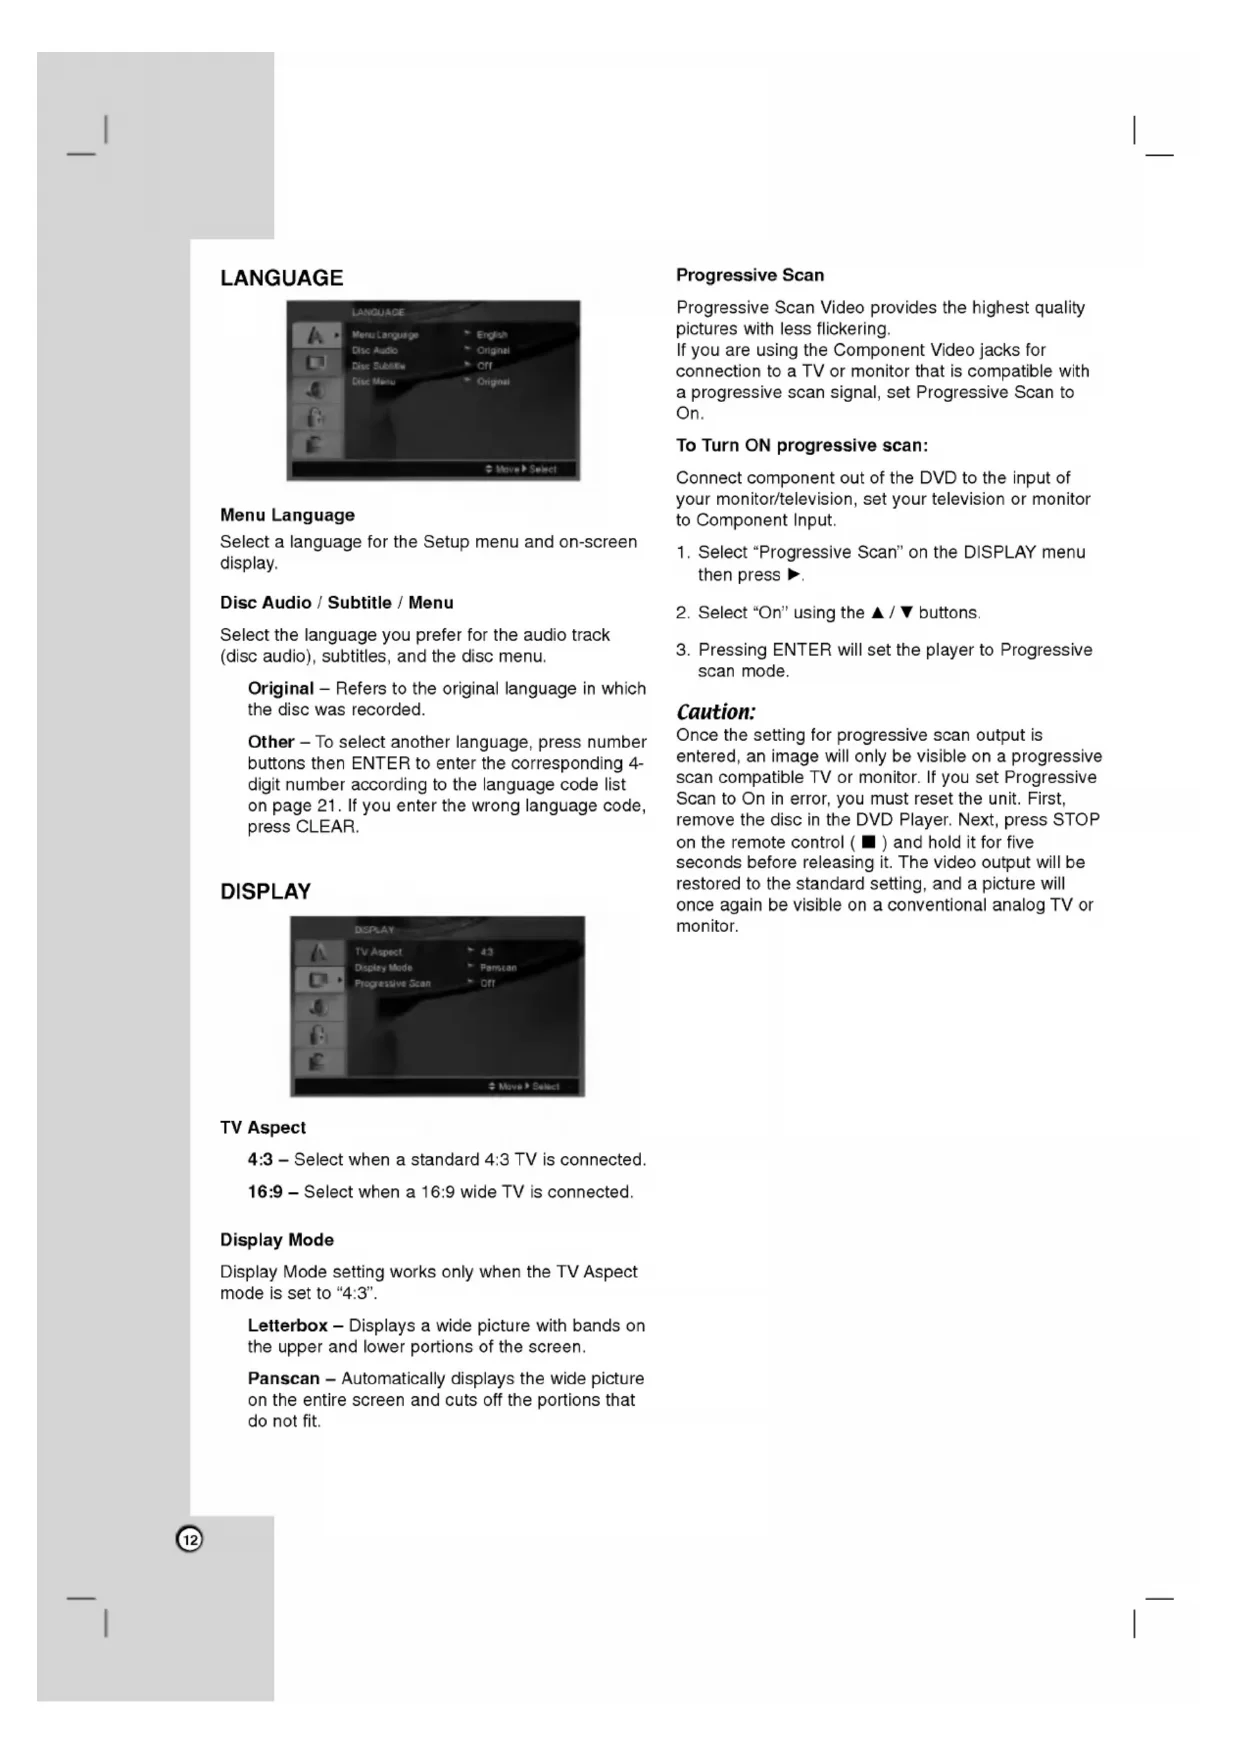
Menu Select the language you prefer for the audio track (disc audio), subtitles, and the disc menu. Original Refers the original language
which the disc was recorded. Other
digit number according the language code list page
you enter the wrong language code, press CLEAR. DISPLAY
connected. 16:9 Select when 16:9 wide
connected. Display Mode Display Mode setting works only when the
setto "4:3". Letterbox Displays wide picture with bands the upper and lower portions
the screen. Panscan Automatically displays the wide picture the entire screen and cuts off the portions that
not fit. Progressive Scan Progressive Scan Video provides the highest quality pictures with less flickering.
you are using the Component Video jacks for connection toa
compatible with progressive scan signal, set Progressive Scan On.
progressive scan: Connect component out
your monitor/television, set your television monitor Component Input.
Select "On" using the
Pressing ENTER will set the player Progressive scan mode. Caution: Once the setting for progressive scan output
entered, image will only
you set Progressive Scan
for five seconds before releasing it. The video output will
restored the standard setting, and picture will once again
monitor.13 Installation and Setup AUDIO Each DVD disc has variety
audio output options. Set the player's AUDIO options according the type
MPEG Bitstream Select "Bitstream"
you connect this unit's DIGITAL OUT jack toan amplifier other equipment with Dolby Digital, DTS MPEG decoder. PCM (for Dolby Digital
automatically downmixed two-channel PCM audio. Off (for DTS):
you select "Off", the DTS signal
not output through the DIGITAL OUT jack. Sample Freq. (Frequency)
your receiver amplifier
handling kHz signals, select kHz. When this choice
made, this unit automatically converts any kHz signals to48 kHz your system can decode them.
your receiver amplifier
handling kHz signals, select kHz. Check the documentation for your amplifier verify its capabilities. Dynamic Range Control (DRC) With the DVD format, you can hear program's soundtrack
the mostaccurate and realistic presentation possible. However, you may wish compress the dynamic range
the audio output (the difference between the loudest sounds and the quietest ones). This allows you listen toa movie ata lower volume without losing clarity
for this effect. Vocal Set
playing. The karaoke channels the disc mix into normal stereo sound. LOCK (Parental Control) Rating Blocks playback
rated DVDs based their content. Not all discs are rated. Select "Rating" the LOCK menu then press
access the LOCK options, you must input the password you have created.
you have not yet entered password, you are prompted
you make mistake before pressing ENTER, press CLEAR. Select rating from 1to8 using the
buttons. Rating 1-8: Rating one (1) has the most restrictions and rating eight (8)
the least restrictive. Unlock:
you select unlock, parental control
not active and the disc plays
you forget your password
you forget your password, you can clear
the area whose standards were used torate the DVD video disc, based the list page
Select the first character using
and select the second character using
Press ENTER confirm your Area code selection. OTHERS PBC Set Playback Control (PBC)
Off. On: Video CDs with PBC are played according the PBC. Off: Video CDs with PBC are played the same way Audio CDs. Auto Play You canset
the unit so a DVD disc automatically starts playing whenever the DVD
setto On, this unit will search for title that has the longest playback time and then play back the title automatically. Note: The Auto Play function may not work for some DVDs. B.L.E. (Black Level Expansion)
playback pictures. Set your preference and monitor's ability. On: Expanded grey scale.
IRE cut off) Off: Standard grey scale. (7.5 IRE cut off) DivX(R) VOD
Demand) registration code that allows you torent and purchase videos using the DivX VOD service. For more information, visit www.divx.com/vod.
selected and the registration code will appear. Use the registration code purchase orrent the videos from DivX VOD service www.divx.com/vod. Follow the instructions and download the video ontoa disc for playback this unit.
Press ENTER exit. Note: All the downloaded videos from DivX VOD can only
played back this unit.15 Operations General features Buttons Operations (OPEN CLOSE) Opens orclosesthedisc tray. (PAUSE) During playback, pressX pause playback. PressX repeatedly
play Frame-by-Frame. SKIP
During playback, pressSKIP
the next chapter/track
the beginning ofthe current chapter/track. PressSKIP.twice briefly
step back the previous chapter/track. SCAN
During playback, pressSCAN
steps Video CD, MP3, AudioCD
steps Whilethe playback paused, pressSCANM repeatedly
steps, forward only). REPEAT During playback, pressREPEAT repeatedly
point (End point). PressCLEAR exit.ZOOM During playback orpause mode, pressZOOM
enlarge thevideo image
selectadesired angle. (SUBTITLE) During playback, pressSUBTITLE repeatedly
selectadesiredsubtitle language. (AUDIO) During playback, pressAUDIO repeatedly
hearadifferentaudio language oraudiotrack.Discs16 Notes general features:
once during Repeat Chapter (Track) playback, the repeat playback cancels. Zoom may not work onsome DVDs. When you are playing DVD disc contains scenes recorded different camera angles, the angle indicator will blink the
screen during scenes recorded different angles asan indication that angle switching
the current track. Additional features
surround effect that simulates multi- channel audio from twostereo speakers (instead
the five+ speakers normally required for multi-channel audio from home theater system). Press DISPLAY during playback. Use
Surround effect, select "Normal". Press AUDIO during playback. "3D SUR." appears the menuscreen.2. returnto normal playback, press AUDIO repeatedly until "3D SUR." disappears from the menuscreen. Time Search
start playing any chosen time the disc: Press DISPLAY during playback. Press
Vto select the time clock icon and
appears. Input the required start time
hours, minutes, and seconds from left right.
you enter the wrong numbers, press CLEAR toremove the numbers you entered. Then input the correct numbers. Press ENTER confirm. Playback starts from the selected time. Marker Search
nine memorized points.
entera marker, press MARKER the desired point the disc. The Marker icon appears the
screen briefly. Repeat toenter
Recall Clear Marked Scene During disc playback, press SEARCH. The marker search menu appears the screen.2. Within seconds, press
select marker number that you wantto recall clear. Press ENTER and playback starts from the marked scene. Or, Press CLEAR and the marker number
erased from the list. You can play any marker
inputting its number the marker search menu. Last Scene Memory This player memorizes last scene from the last disc that
viewed. The last scene remains
you remove the disc from the player switch off the player.
you load disc that has the scene memorized, the scene
automatically recalled. Note: This player does not memorize the scene
you switch off the player before commencing play the disc. Screen Saver The screensaver appears when you leave the DVD player
Stop mode for about five minutes.
displayed for five minutes, the DVD Player automatically turns itself off.17 Playing Audio
During STOPmode,pressPROGRAMandthemarkwillappearNote:PressPROGRAM again
place additionaltracksonthelist. Selectthetrackyou want
start playing onthe "Program" list. PressPLAYorENTER
start. Playback begins intheorderinwhichyou programmed thetracks. Playback stopsafterallofthetracksonthe "Program" listhave played once. Toresumenormal playback from programmed playback, selectatrackonthelistandthenpressPLAY. Repeat Programmed TracksPressREPEAT selectadesiredrepeatmode. Track:repeatsthe current track All:repeatsallthetrackson programmed list.
Off(No display): does not play repeatedly. Note:Ifyoupress>once during Repeat Track playback, therepeat playback cancels. Erasing aTrackfrom "Program" List
During STOPmode,pressPROGRAMandthemarkwillappear UsevVbBtoselectthetrackthatyouwish erasefromthe Program list. PressCLEAR. Repeat step 1~3
MP3/WMAdisc compatibility withthis player islimitedasfollows:
Sampling frequency: within
The player cannot readanMP3/WMAfilethathasafileextensionotherthan ".mp3" /".wma". CD-R physical formatshouldbeISO
They should not contain special letterssuchas/?*:"<>letc. Thetotalnumberoffilesinafoldershouldbelessthan files. Operation18 Viewing
thePHOTOmenuwhile watching pictures, pressSTOP. Tips:
Ifyouareinafilelistand want
the previous Folder list, use
selectthe option you want
oncewhile viewing picture
advance the next previous file.Zoom During watching pictures, pressZOOM
enlarge thevideo image
steps). Youcanmove through thezoomed picture using bBvVbuttons.Torotate picture Press
during showing picture
readthedisc's contents. Ifyoudo not seeanon-screen display afterseveral minutes, someofthefilesmaybe too large
selecta folder, andpressENTER.Alistoffilesinthefolderappears. Ifyou want
Ifyouareinafilelistand want
the previous Folder list, usethe
play, thesubtitlemay not displayed properly. Noticefor displaying theDivXsubtitleIfthesubtitledoes not display properly during playback, pressandholdSUBTITLEabout secondsthenpress
Ifthenumberofthe screen frameisover30 per second, thisunit may not operate normally.
Sampling frequency: within
toenterthecode.Somemanufacturershavemorethanonecodenumber.Iftheremotecontroldoesnot operate theTVafter setting acode number, try adifferentcode.Buttonsused
operate theTV POWER, Number
input your desired language forthe following initial settings: Disc Audio, Disc Subtitle, DiscMenu.22 Symptom
on, but the DVD player does not work.
sound. The DVD player does notstart playback. The remote control does not work properly. Possible Cause The power cord
notsetto receive DVD signal output. The video cable
not connected securely. The equipment connected with the audio cable
notsetto receive DVD signal output. The power
the equipment connected with the audio cable
turned off. The AUDIO options aresetto the wrong position.
inserted. The rating level
set.? The remote control
not pointed the remotesensor on the DVD player. The remote control
too far from the DVD player. Correction Plug the power cord into the wall outlet securely. Insert disc. (Check the disc indicator
lit.) Select the appropriate video input mode the TV. Connect the video cable securely. Select the correct input mode
the audio receiver you can listen the sound from the DVD player. Turn the equipment connected with the audio cable. Set the AUDIO option the correct position, then turnon the DVD player again
pressing POWER. Insert playable disc. (Check the disc type and regional code.) Change the rating level. Point the remote control the remotesensor
the DVD player. Operate the remote control closer the DVD player. Troubleshooting Specifications General Power requirements:
Dimensions (Approx.): 430x35x242mm(17x1.4x9.5inches) (WxHxD)withoutfoot Weight (Approx.):
(ANALOG OUT connectors only) Harmonic distortion: Less than 0.008% Dynamic range: More than
(DVD/CD) Accessories: Video cable (1), Audio cable (1), Remote control (1), Batteries (2) Note: Design and specifications are subject change prior notice. P/NO.
PBC(Commandedelecture)