AE 33 H - Radio ALBRECHT - Free user manual and instructions
Find the device manual for free AE 33 H ALBRECHT in PDF.
| Product Type | Portable Frequency Scanner |
| Brand | Albrecht |
| Model | AE 33 H |
| Power Supply | 3 AA alkaline batteries (4.5 V DC) or 3 Ni-MH rechargeable batteries (3.6 V DC) |
| Number of Channels | 183 (180 preferences + 3 instant) |
| Frequency Range | 78 – 512 MHz (according to band plan) |
| Service Scan | 9 preprogrammed banks: Emergency, Freenet, PMR446, Marine, Low VHF, FM, Aviation, High VHF, UHF |
| Preference Scan | Up to 180 user-programmable frequencies |
| Instant Channels | 3 one-touch keys for favorite frequencies |
| LCD Backlight | Yes, orange color (30-second duration) |
| Key Lock | Yes, prevents accidental changes |
| Memory Backup | Maintains stored frequencies in case of power loss |
| Low Battery Alert | Yes, BATT icon displayed |
| Frequency Lockout | Up to 40 frequencies in service mode; channels in preference mode |
| Antenna | Flexible, BNC connector, 50 ohms impedance |
| Headphone Jack | 3.5 mm stereo jack |
| Speaker | 32 mm, 24 ohms, dynamic type |
| Audio Output | 490 mW maximum |
| Sensitivity | 0.4 µV to 0.9 µV (depending on band) |
| Scan Rate | 30 channels per second |
| Operating Temperature | -20 °C to +60 °C |
| Weight (without antenna and batteries) | 100 g |
| Maintenance | Clean with mild detergent; avoid abrasives and solvents |
| Safety | Use headset with impedance ≥ 2 × 32 ohms; avoid moisture |
| Recycling | Do not dispose of with household waste; take to collection point |
Frequently Asked Questions - AE 33 H ALBRECHT
User questions about AE 33 H ALBRECHT
0 question about this device. Answer the ones you know or ask your own.
Ask a new question about this device
Download the instructions for your Radio in PDF format for free! Find your manual AE 33 H - ALBRECHT and take your electronic device back in hand. On this page are published all the documents necessary for the use of your device. AE 33 H by ALBRECHT.
USER MANUAL AE 33 H ALBRECHT
natural_image
Line drawing of a mobile phone with a digital display and keypad (no text or symbols)AE33H

natural_image
Simple line drawing of a cylindrical object with a flanged base and top end (no text or symbols)Antenne

natural_image
Illustration of a medical or electronic device with coiled wires and two earphones (no text or symbols)Ohrhörer
natural_image
Three cylindrical batteries with positive charge markings, no text or symbols presentnatural_image
Simple line drawing of a showerhead with no text or symbolsGürtelclip

text_image
AE 33 H Scanner OWNER'S MANUALBedienungsanleitung
natural_image
Diagram of a device with a downward arrow and internal components, no text or symbols presentnatural_image
Diagram showing two cylindrical batteries and a multi-chamber battery pack (no text or symbols)natural_image
Diagram showing a mechanical component being inserted into a housing, with an inset close-up highlighting the base and shaft (no text or symbols present)natural_image
Technical line drawing of a mechanical device with circular components and an arrow indicating direction (no text or symbols)natural_image
Technical line drawing of a handheld device casing with mounting points and internal components (no text or symbols)Entriegelungs-Hebel
text_image
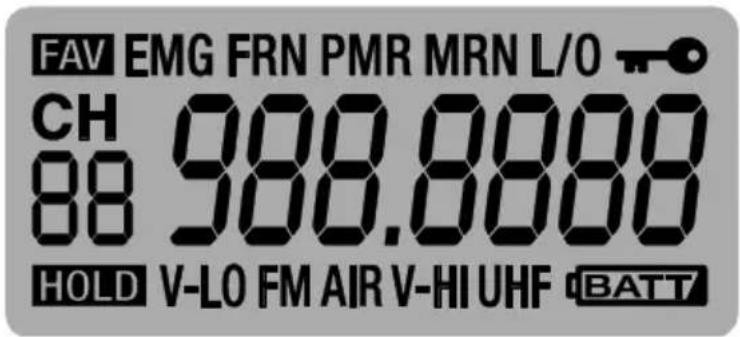
FAV EMG FRN PMR MRN L/O CH 988.8888 88 HOLD V-LO FM AIR V-HI UHF BATTtext_image
128.0898 AIRtext_image
128.0898 AIRtext_image
128.0750 HOLD AIRtext_image
128.0750 HOLD AIRtext_image
FAV CH 01 HOLD AIRtext_image
FAV CH 02 HOLD AIRtext_image
CH 03 160.7500 MRNZF-Frequenzen (nominal)
-
ZF....70.950 MHz
-
ZF 450 kHz
| Kanal | Frequenz MHz | Kanal | Frequenz MHz |
| 1 | 446.00625 | 5 | 446.05625 |
| 2 | 446.01875 | 6 | 446.06875 |
| 3 | 446.03125 | 7 | 446.08125 |
| 4 | 446.04375 | 8 | 446.09375 |
Seefunk: Internationales VHF-Marineband CH 01-88
© Alan Electronics GmbH, 2018
AE33 H Handheld Scanner

text_image
ALBRECHT 463.4625 AE 33H Fav Store Stp m0 Svc Hold Vol Clr L/O Pwr LightOwner's Manual
English
PRECAUTIONS
Before you use this scanner, please read and observe the following:
EARPHONE WARNING!
Use only the supplied Albrecht Stereo-Earphone or other standard Earphones with 2 x 32 Ohms (or higher impedance). An incorrect earphone may be hazardous to your hearing. Turn down volume before connecting the earphone and then adjust volume to suit.
WARNING!
Albrecht does not represent this unit to be waterproof. To reduce the risk of fire or electrical shock, do not expose this unit to rain or moisture.
IMPORTANT INFORMATION ....30
PRECAUTIONS 30
ABOUT YOUR AE33H SCANNER....32
TO CHANGE THE BAND PLAN 32
FEATURES 33
UNDERSTANDING SCANNING 35
WHAT IS SCANNING? 35
CONVENTIONAL SCANNING 35
WHERE TO OBTAIN MORE INFORMATION 35
INCLUDED WITH YOUR SCANNER 36
SETTING UP YOUR SCANNER 37
INSTALLING AND REPLACING BATTERIES 37
USING RECHARGEABLE BATTERIES 38
CONNECTING THE ANTENNA 39
CONNECTING AN OPTIONAL ANTENNA 39
CONNECTING THE EARPHONE 39
ATTACHING THE BELT CLIP 40
AE33H CONTROLS AND DISPLAY 41
A LOOK AT THE KEYPAD 42
A LOOK AT THE DISPLAY 44
OPERATION 45
TO TURN POWER ON OR OFF 45
TO ADJUST THE SQUELCH 45
TO ADJUST THE VOLUME 45
OPERATING MODES 45
INSTANT CHANNELS 46
SERVICE SCAN 46
FAVOURITES SCAN...... 47
SCANNING SERVICE & FAVOURITES 47
SELECT STEP FREQUENCY 48
LOCKOUT PREPROGRAM FREQUENCY 48
LOCKOUT FAVOURITE CHANNEL 48
STORING FREQUENCIES 49
EDITING FREQUENCIES 50
USING KEYLOCK 50
USING THE DISPLAY BACKLIGHT.... 50
TROUBLESHOOTING 51
RESETTING THE SCANNER 52
CARE AND MAINTENANCE 53
GENERAL USE 53
LOCATION 53
CLEANING 53
BIRDIES 53
SPECIFICATIONS....54
SIMPLIFIED EU DECLARATION OF CONFORMITY....56
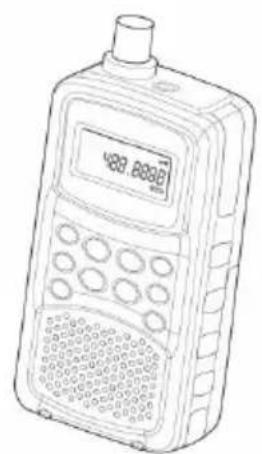
Thank you for purchasing a Albrecht AE33H Handheld Scanner. The scanner is versatile, compact and easy to use.
The AE33H comes pre-programmed with frequencies - organized into 9 pre-programmed Service banks for monitoring emergency, Freenet, PMR446, Marine, VHF-Low band, FM radio band, Air band, VHF-High band and UHF band frequencies.
Each Service bank has memory locations for storing your favourite frequencies. Up to 180 frequencies can be stored in Favourites banks.
Frequencies in Favourites can be copied from the Service bank.
Manually store your favourite sports or events frequencies found through the internet and other sources. The radio comes with often used specific frequencies
factory-programmed in the service bands (e.g. band plan 1 has religious broadcast frequencies used in UK, while band plan 2 offers the typical emergency frequency steps and parameters used in the German 4 m band)
Additionally you have 3 Instant channels which are one-touch keys to store your 3 most important frequencies.
TO CHANGE THE BAND PLAN
You can change the band coverage by band plan. While band plan 1 covers more the international frequency usage, band plan 2 is preconfigured for special needs in Germany.
To switch the band plan between 1 and 2.
- Make sure the power is turned off.
- While holding down (1) or (2) key, turn on the scanner.
Band Plan 1...(1) key
Band Plan 2...(2) key
Notice: Any Band Plan change will modify the factory preset channel steps settings of all bands and the memory contents of the Emergency bank.
Band Plan 1
| Range (MHz) | Step (kHz) | Mode |
| 78.0000 - 79.9950 | 5 | FM |
| 80.0000 - 82.9950 | 5 | FM |
| 83.0000 - 84.0100 | 5 | FM |
| 84.0150 - 87.2950 | 5 | FM |
| 87.3000 - 107.9500 | 50 | FM B^* |
| 108.0000 - 136.99166 | 8.33 | AM |
| 137.0000 - 137.99375 | 6.25 | FM |
| 138.0000 - 143.99375 | 6.25 | FM |
| 144.0000 - 145.99375 | 6.25 | FM |
| 146.0000 - 155.99375 | 6.25 | FM |
| 156.0000 - 157.43125 | 6.25 | FM |
| 157.4375 – 157.99375 | 6.25 | FM |
| 158.0000 - 160.59375 | 6.25 | FM |
| 160.6000 - 162.0250 | 6.25 | FM |
| 162.03125 - 162.59375 | 6.25 | FM |
| 162.6000 - 174.0000 | 6.25 | FM |
| 406.0000 - 439.99375 | 6.25 | FM |
| 440.0000 - 449.99375 | 6.25 | FM |
| 450.0000 - 465.99375 | 6.25 | FM |
| 466.0000 - 469.99375 | 6.25 | FM |
| 470.0000 - 512.0000 | 6.25 | FM |
Band Plan 2
| Range (MHz) | Step (kHz) | Mode |
| 78.0000 - 79.9950 | 5 | FM |
| 80.0000 - 82.9950 | 5 | FM |
| 83.0000 - 84.0100 | 5 | FM |
| 84.0150 - 87.2950 | 20 with 15 Offset | FM |
| 87.3000 - 107.9500 | 50 | FM B * |
| 108.0000 - 136.99166 | 8.33 | AM |
| 137.0000 - 137.9950 | 5 | FM |
| 138.0000 - 143.9950 | 5 | FM |
| 144.0000 - 145.9875 | 12.5 | FM |
| 146.0000 - 155.9900 | 10 | FM |
| 156.0000 - 157.4250 | 12.5 | FM |
| 157.4375 – 157.9875 | 12.5 | FM |
| 158.0000 - 160.5875 | 12.5 | FM |
| 160.6000 - 162.0250 | 12.5 | FM |
| 162.0300 - 162.5900 | 10 | FM |
| 162.6000 - 174.0000 | 10 | FM |
| 406.0000 - 439.99375 | 6.25 | FM |
| 440.0000 - 449.99375 | 6.25 | FM |
| 450.0000 - 465.9900 | 10 | FM |
| 466.0000 - 469.9900 | 10 | FM |
| 470.0000 - 512.0000 | 6.25 | FM |
“FMB” means FM Broadcast demodulation [WFM (Broadcast)].
PRE-PROGRAMMED SERVICE SCAN
9 banks of pre-programmed frequencies ready for scanning.
FAVOURITE SCAN
Up to 180 user programmable frequencies can be stored and scanned in Favourites scan mode. Each SERVICE has a FAVOURITES bank for storing and scanning up to 20 of your favourite frequencies.
INSTANT CHANNEL
3 one-touch keys to store your 3 most important frequencies.
DROPOUT DELAY
The scanner, during scan, pauses at the end of a transmission to wait for a reply. Delay time is 2 seconds.
LCD BACKLIGHT
You can turn the orange LCD back light on/off.
KEY LOCK
Lets you lock the scanner's keys to help prevent accidental changes to the scanner's programming.
MEMORY BACK UP
Keeps the frequencies stored in memory for an extended time if the scanner should not be powered.
BATTERY LOW ALERT
Warns you when the battery power gets low.
LOCK-OUT
Lets you set your scanner to skip over specified channels or frequencies when scanning.
This section provides you with background on how scanning works. You don't really need to know all of this to use your scanner, but some background knowledge will help you get the most from your AE33H.
WHAT IS SCANNING?
Unlike standard AM or FM radio stations, most two-way communications do not transmit continuously. Your AE33H scans programmed channels until it finds an active frequency, then stops on that frequency and remains on that channel as long as the transmission continues. When the transmission ends, the scanning cycle resumes until the scanner receives another transmission.
CONVENTIONAL (ANALOGUE) SCANNING
Conventional scanning is a relatively simple concept. Each group of users in a conventional system is assigned a single frequency (for simplex systems) or two frequencies (for repeater systems). Any time one of them transmits, their transmission always goes out on the same frequency. Up until the late 1980's this was the primary way that radio systems operated.
Even today, there are many 2-way radio users who operate using a conventional system:
• Emergency Services (Police/Fire/Ambulance)
- Freenet
- PMR 446
- Marine Radio
- Aircraft
- Many business radio users
When you want to store a conventional system, all you need to know is the frequencies they operate on. When you are scanning a conventional system, the scanner stops very briefly on each channel to see if there is activity. If there isn't, the scanner quickly moves to the next channel. If there is, then the scanner pauses on the transmission until it is over.
WHERE TO OBTAIN MORE INFORMATION
By itself, this manual really only provides part of what you need to know to have fun scanning – how to program and use the scanner.
natural_image
Line drawing of a handheld electronic device with a digital display and control buttons (no text or symbols)AE33H

natural_image
Simple line drawing of a cylindrical object with a flanged base and top end (no text or symbols)Antenna

natural_image
Illustration of a cord with two earphones and a small USB port (no text or symbols)Earphone

natural_image
Three cylindrical batteries with positive charge markings, no text or symbols present3x AA Alkaline Batteries
natural_image
Simple line drawing of a symmetrical object with a central oval and two protrusions (no text or symbols)Belt Clip

text_image
AE 33 H Scanner OWNER'S MANUALOwner's Manual
NOTE: If any of these items are missing or damaged, contact your place of purchase.
These guidelines will help you install and use your new scanner:
- If your scanner receives interference or electrical noise, move the scanner or its antenna away from the source.
- To improve the scanner's reception, use an optional external antenna designed for multiband coverage. (You can purchase this type of antenna at a local electronics store). If the optional antenna has no cable, use 50 ohm coaxial cable for lead-in. A mating plug might be necessary for the optional antennas.
- Do not use the scanner in high-moisture environments such as the kitchen or bathroom.
- Avoid placing the scanner in direct sunlight or near heating elements or vents.
INSTALLING AND REPLACING BATTERIES
You can power your scanner using three AA alkaline batteries.
- Make sure the power is turned off.
- If the belt clip is attached, remove it (See page 12).
- Slide the battery compartment cover.

natural_image
Diagram of a device with a black downward arrow inside, no text or symbols present- Install three batteries in the compartment as indicated by the polarity symbols (+ and -) marked inside.

natural_image
Illustration of three cylindrical batteries with positive charge markings (no text or symbols)
natural_image
Technical line drawing of a mechanical or electrical component with two labeled blocks (VV and AA) and mounting holes, no text or symbols present.- Replace the cover.
USING RECHARGEABLE BATTERIES
You can also use three rechargeable batteries (Ni-MH) to power your scanner. Before you use rechargeable batteries, make sure the batteries are fully charged.
CAUTIONS:
- Use only fresh batteries of the required size and recommended type.
• Always remove old or weak batteries. Batteries can leak chemicals that destroy electronic circuits.
- Do not mix old and new batteries, different types of batteries (standard, alkaline, or rechargeable), or rechargeable batteries of different capacities.
CONNECTING THE ANTENNA
To attach the supplied flexible antenna to the connector on the top of your scanner, align the slots around the antenna's connector with the tabs on the scanner's BNC connector. Then slide the antenna's connector down over the scanner's connector and rotate the antenna connector's outer ring clockwise until it locks into place.

natural_image
Diagram showing a mechanical component being inserted into a housing, with an inset magnified view of the component (no text or symbols present)CONNECTING AN OPTIONAL ANTENNA
The scanner's BNC connector makes it easy to connect a variety of optional antennas, including an external mobile antenna or outdoor base station antenna.
NOTE: Always use 50-ohm (RG-58 or RG-213) coaxial cable to connect an outdoor antenna. If the antenna cable is over 15 meters long, please use low loss coaxial cable (like RG-213 or similar). You can get a BNC adapter at your local electronics store.
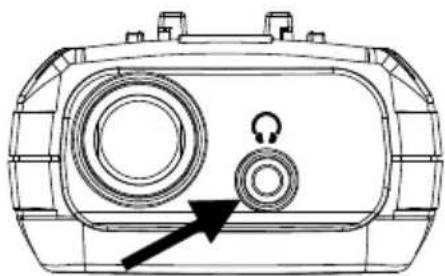
CONNECTING THE EARPHONE
natural_image
Technical line drawing of a mechanical device with circular components and an arrow indicating direction (no text or symbols)For private listening, you can plug the supplied earphones (or other headsets with at least 2 x 32 Ohms) into the 3.5 mm headphone jack on top of your scanner. This automatically disconnects the internal speaker.
WARNING!
If you connect an external speaker to the scanner's headphone jack, please take care that both of the 2 wires are insulated from any power supply or ground system (like car body). Double grounding might damage the scanner.
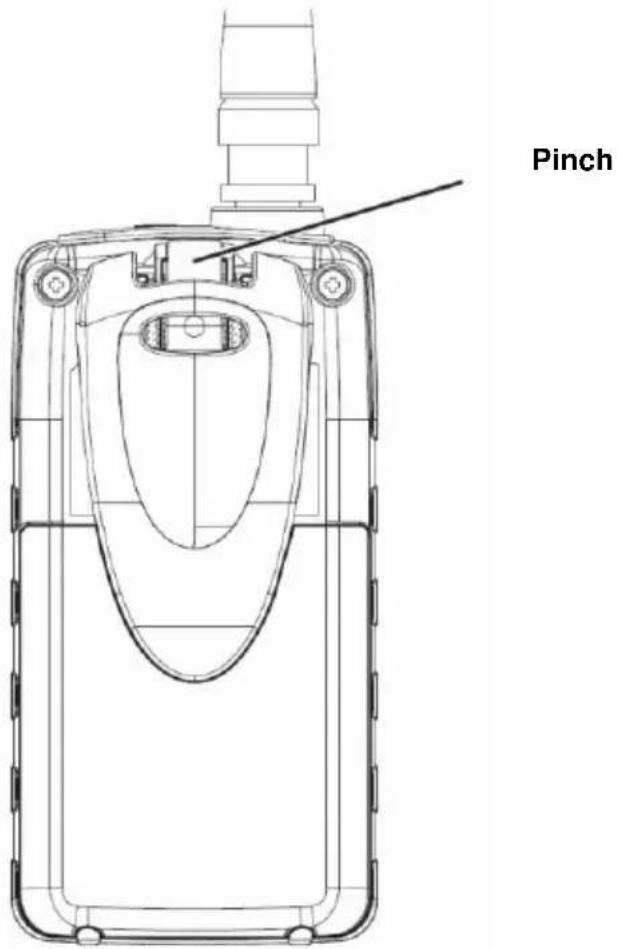
ATTACHING THE BELT CLIP
text_image
PinchTo make your scanner easier to carry when you are on the go, use the supplied belt clip. Slide the belt clip into the hanger piece on the back of the scanner. To remove, slide up the belt clip pulling the pinch at the middle of the belt clip.
text_image
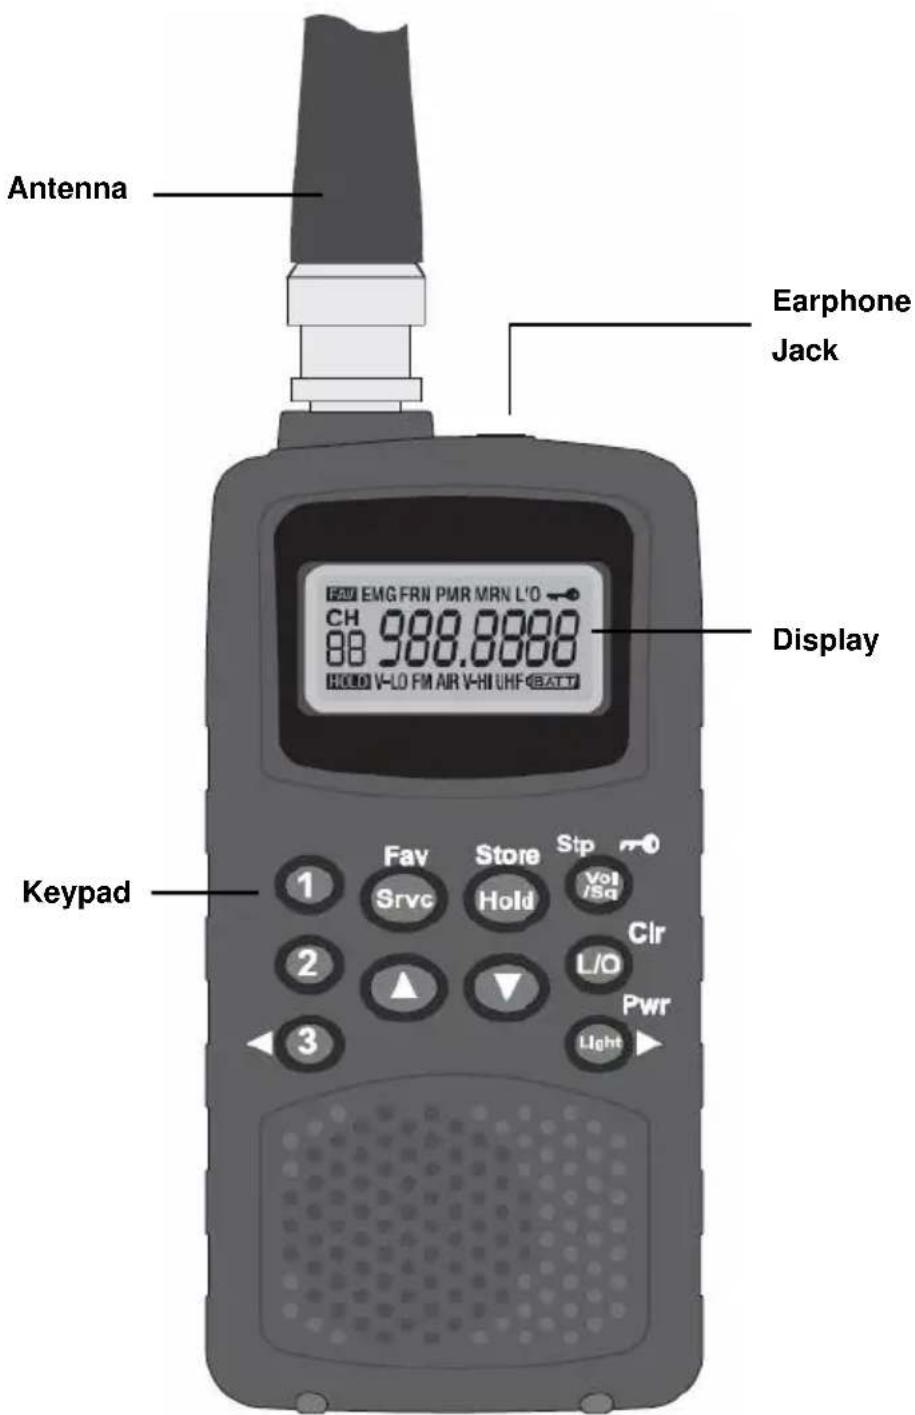
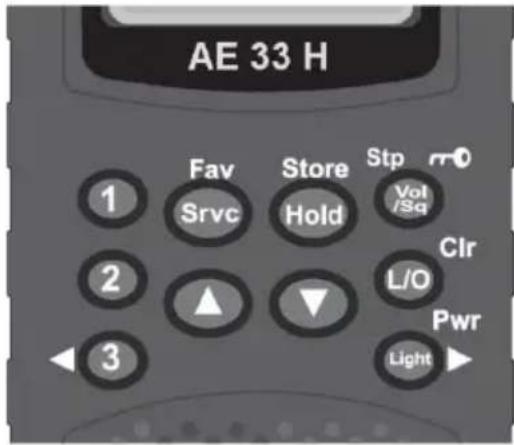
Antenna Earphone Jack Display Keypad 1 Fav Store Stp Srvc Hold Vol /Sq Clr 2 L/O Pwr 3 LightA LOOK AT THE KEYPAD
text_image
AE 33 H 1 Fav Store Stp r0 Srvc Hold Vol /Sq 2 ▲ ▼ CIr 3 Pwr LightYour scanner's keys have various functions labeled on the key tops and below the keys.
| Key Name | Description |
 | Press to go to volume control mode.Press to go to squelch control mode.Press to go to step mode for VHF-Low, FM, AIR, VHF-High and UHF bank.Press & hold this key to disable the keypad. |
 | Press to lock out a selected favourite channel or specified preprogram frequency.Press & hold to clear all lockout frequencies in Service Scan Mode (include hold mode).Press & hold to clear all lockout channels in Favourite scan mode (include hold mode).Press & hold to clear channel memory in Editing Favourite or Instant channel. |
 | Press to turn on/off the LCD back light.Press & hold to turn the power on/off.Press to move the digit to right in Edit Favourite / Instant Channel Mode. |
 | Press to select Instant channel 1.Press & hold to store Instant channel 1. |
 | Press to select Instant channel 2.Press & hold to store Instant channel 2. | |
 | Press to select Instant channel 3.Press & hold to store Instant channel 3.Press to move the digit to left in Edit Favourite / Instant Channel Mode. | |
 | Press to toggle change the service bank.Press & hold to toggle between Service Scan Mode and Favourite Scan Mode. (Or between Service Scan Hold Mode and Favourite Scan Hold Mode.) | |
 | Press to Start/Stop Scan Mode.Press & hold to go to Programming Channel Mode in Service Scan Hold Mode or while monitoring a frequency.Press & hold to store the frequency in Programming Channel Mode. | |
 | Press to change volume level in volume control mode.Press to change squelch level in squelch control mode.Press to change step in step mode.Press to change the direction of the scan.Press to resume scanning while monitoring a frequency.Press to select channels in Service / Favourite Scan Hold Mode or Programming Channel Mode.Press for more than one second to rapidly select channels upwards or downwards in Service / Favourite Scan Hold Mode or Programming Channel Mode.Press to edit frequencies in Edit Favourite / Instant Channel Mode.Press for more than one second to rapidly edit frequencies upwards or downwards in Edit Favourite / Instant Channel Mode. |
A LOOK AT THE DISPLAY
text_image
FAV EMG FRN PMR MRN L/O CH 988.8888 88 HOLD V-LO FM AIR V-HI UHF BATTThe display has indicators that show the scanner's current operating status. The display information helps you understand how your scanner operates.
FAV - appears when Favourites or Instant mode is selected.
EMG - appears when Emergency (EMG) bank is selected.
FRN - appears when Freenet (FRN) bank is selected.
PMR - appears when PMR bank is selected.
MRN - appears when Marine bank is selected.
L/O - appears when you manually select a Favourite channel or specified preprogram frequency you locked out.
- appears when keylock is activated.
HOLD - appears when Hold is selected during scanning modes.
- appears during Instant mode
V-LO - appears when VHF Low band is selected.
FM - appears when FM Radio band is selected.
AIR - appears when Aircraft band is selected.
V-HI - appears when VHF High band is selected.
UHF - appears when UHF band is selected.
BATT - appears when battery level is low.
TO TURN POWER ON OR OFF
- Press & hold (Pwr).
When power is turned on the band plan is displayed momentarily.

text_image
Store Hold Stp Vol /Sq Clr L/O Pwr LightTO ADJUST THE SQUELCH
What is the Squelch?
When there is no signal present on a particular frequency the radio only hears noise. The Squelch feature mutes the audio when there is no signal or no strong signal present. By adjusting the squelch level you control how strong a signal needs to be to open the squelch and unmute the audio.
- Press (Vol/Sq/Stp) until a squelch level appears and then adjust using the ▲/▼ keys. The squelch level can range from 0 (open squelch) to 10 (tight squelch).
TIP! Set the squelch level to 2 to start, you can always adjust it later.
TO ADJUST THE VOLUME
- Press (Vol/Sq/Stp).
- Then adjust using the ▲/▼ keys.
The volume level can range from 0 (no volume) to 30 (maximum).

text_image
Store Hold Stp Vol /Sq L/O Pwr LightOPERATING MODES
- INSTANT Channels (1), (2) and (3)
- SERVICE scan
• FAVOURITES scan
INSTANT CHANNELS
The INSTANT channels are 3 one-touch keys to store your 3 most important favourite frequencies. The channels remain empty until you store a frequency to them.
At any time press (1), (2) or (3) to select the instant channel.

text_image
1 2 3To store an Instant channel:
- Select the desired Instant channel (1), (2) or (3);
- Press & hold (Store) to enter the STORE mode. The editable digit flashes.
- Use the ◀/▲/▼/▶ keys to select the desired frequency.
- Press & hold (Store) to store the frequency to the instant channel.

text_image
Fav Srvc Store Hold
text_image
1 =78.0000Ex: Display instant channel number to a channel number indication segment.
To store a frequency that is displayed during SCAN mode to an Instant channel
- Press & hold (1), (2) or (3) to immediately store that frequency to the Instant key.
To clear the Instant channel
- Press & hold (Store) to enter the STORE mode in instant channel.
- Press & hold (Clr) to clear the frequency.
SERVICE SCAN
The Service mode scans the 9 pre-programmed SERVICE banks
EMG Emergency (EMG)
FRN Freenet (FRN)
PMR PMR 446
V-LO VHF Low Band
FM FM Radio Broadcast
AIR Aircraft Band
MRN Marine Band
V-HI VHF High Band
UHF UHF Band
FAVOURITES SCAN
Each SERVICE bank has a FAVOURITES bank which remains empty until you store your favourite frequencies to it.
SCANNING SERVICE & FAVOURITES
To go to scan mode or scan the next bank
- Press (Srvc/Fav) until the bank you want to scan displays.
- When HOLD icon appears, press (Hold) to resume scan. Scan starts automatically. When there are no frequencies stored in the Favourites bank then the display flashes "noCH".

text_image
128.0898 AIREx: Service scan, AIR bank

text_image
FAV no CH AIREx: Favourites scan, no channels
NOTE: Only one bank can be scanned at a time.
The banks can be changed in the following order:
$$ E M G > F R N > P M R > M R N > V - L O > F M > A I R > V - H I > U H F $$
To switch scan modes between Service scan and Favourite scan
- Press & hold (Srvc/Fav). In Service mode the FAV icon does not show on the display. In Favourites mode the FAV icon shows on the display.

text_image
128.0098 AIREx: Service scan
To pause scan:
- Press (Hold) at any time to pause scan on the current frequency. HOLD icon appears.
- Use the ▲/▼ keys to go to the previous/next frequency in the service bank or the previous/next channel in the favourites bank.
- Press (Hold) again to resume scan.

text_image
FAV CH 88 128.0000 AIREx: Favourites scan

text_image
HOLD 128.0750 AIREx: Service scan Hold
SELECT STEP FREQUENCY
You can change the steps of VHF-Low, FM, Aircraft, VHF-High and UHF bank.
- Press (Srvc) until a bank you want to change appears.
- Press (Stp) until a step mode appears.
- Use the ▲/▼ to select steps from Auto / 5.0 / 6.25 / 10.0 / 12.5 kHz (The Step for Aircraft bank is 8.33 or 12.5 kHz.)
- Press (Clr) or (Stp) or wait for 2 seconds to return to the mode you were in.
LOCKOUT PREPROGRAMMED FREQUENCY
You can skip up to 40 specified frequencies during a Service scan. This lets you avoid unwanted frequencies in Service Scan Mode.
To skip a frequency
- Press (L/O) when the scanner stops on the frequency in Service Scan Mode or when you have selected frequency manually in Service scan hold mode. L/O appears.
To cancel skip for a single frequency
• Manually select the frequency, then (L/O). L/O disappears.
To cancel all skip frequencies
- Press (Hold) to stop scanning in Service scan hold mode, then press & hold (L/O). A confirmation tone sounds.
LOCKOUT FAVOURITE CHANNEL
You can increase the scanning speed by locking out channels that you do not like or which have a continuous transmission for all the channels in favourite channel memory.
To lock out a channel
- Manually select the channel, then press (L/O). L/O appears.
Note: You can still manually select locked-out channels.
To remove the lockout from a channel
- Manually select the channel, then press (L/O). L/O disappears.
To unlock all channels in the bank
- Press (Hold) to stop scanning in favourite scan hold mode, then press & hold (L/O). A confirmation tone sounds.
STORING FREQUENCIES
To store a Service bank frequency to the Favourites bank
-
Go to service scan mode. When a desired frequency is found, press (Hold) to pause scan.
-
Press & hold (Store) to enter the STORE mode. The display toggles between frequency and the next available channel in the Favourites bank.
-
Use the ▲/▼ keys to select the desired favourites channel to store the frequency to.
-
Press & hold (Store) to store the frequency. The radio stays in the favourites mode.

text_image
128.0750 HOLD AIREx: Service scan Hold

text_image
FAV CH 01 HOLD AIREx: Store Favourites, CH 01 (AIR)
To manually store a frequency to the Favourites bank
- Go to favourites mode and select desired bank.
- Press (Hold) to pause scan.
- Use ▲/▼ to select desired channel.
- Press & hold (Store) to enter the STORE mode. The editable digit flashes.
- Use the ◀/▲/▼/▶ keys to select the desired frequency.
- Press & hold (Store) to store the frequency.

text_image
FAV CH 02 HOLD AIREx: Store Favourites, CH 02 (AIR)

text_image
CH 02 - 00.0000 AIREx: Store Favourites, Select Desired Frequency (AIR)
To store a frequency to an Instant Channel
See Instant Channels on page 18.
EDITING FREQUENCIES
-
Go to a desired Favourites or Instant channel.
-
Press & hold (Store) to enter the STORE mode. The editable digit flashes.
-
Use the ◀/▲/▼/▶ keys to edit the frequency.
-
Press & hold (Store) to store the frequency.

text_image
CH 03 150.7500 MRNEx: Edit Favourites, Select Desired Frequency CH 03 (MRN)
To clear the Favourite or Instant channel
-
Go to a desired Favourites or Instant channel.
-
Press & hold (Store) to enter the STORE mode. The editable digit flashes.
-
Press & hold (Clr) to clear the frequency.
USING KEYLOCK
Use the scanner's keylock to protect it from accidental program changes. When the scanner's keys are locked, the only controls that operate are (Vol / Sq / Stp /→), (Light / Pwr) and ▲/▼ when volume or squelch level is displayed.
- Press & hold (Vol / ) to turn key lock on/off.
A confirmation tone sounds. —appears while key lock is on.
NOTE: Using keylock does not prevent the scanner from scanning channels.
USING THE DISPLAY BACKLIGHT
- Press (Light/Pwr) to turn the backlight on/off. The backlight is off when power is turned on. The display lights for 30 seconds when backlight is turned on.
If your AE33H is not performing properly, try the following steps.
| Problem | Possible Cause | Suggestion |
| Improper reception. | The scanner's antenna might need to be adjusted. | Check the antenna connection or move or reposition the antenna. |
| Move the scanner. | ||
| You might be in a remote area that could require an optional multi-band antenna. Check with your dealer or local electronics store. | ||
| Scan won't stop. | The squelch might need to be adjusted. | Adjust the squelch threshold. See “To adjust the squelch” on page 17. |
| The antenna might need to be adjusted. | Check the antenna connection. | |
| The channel's frequency might not be stored in favourites. | Make sure the channel's frequency is stored in the scanner's favourites bank. | |
| The channel might not be active. | Wait for a transmission on the channel. | |
| Scan won't start. | The scanner must be in service or favourites mode. | Press (Srvc/Fav). If HOLD showing press (Hold) to resume. |
| The squelch might need to be adjusted. | Adjust the squelch threshold. See “To adjust the squelch” on page 45. | |
| The antenna might need to be adjusted. | Check the antenna connection. |
RESETTING THE SCANNER
If the scanner's display locks up or stops operating properly, you might need to reset the scanner.
CAUTION
This procedure clears all the information you have stored in the scanner. Before you reset the scanner, try turning it off and on to see if it begins working properly. Reset the scanner only when you are sure it is not working properly.
- Turn off the scanner.
• While holding down ▲ and ▼, turn on the scanner. - It takes about 1 second to initialize and CLEAR appears.
SERVICE ADDRESS & WARRANTY MATTERS
Alan Electronics GmbH provides special service partners for different kind of products. If you should not be able to solve any problem with your scanner, please contact our service Hotline first via phone or e-mail. According to our experience, in most cases technical problems are basing on interpretation problems of user manual or functions and can be solved already by a simple phone call.
If a problem continues, please call the Hotline and ask for the correct service address for this product. During the European 2 years warranty period, products sold in Germany will be repaired (or exchanged) by our service provider:
Download-Server for technical documentation:
www.service.alan-electronics.de
Manufacturer: Alan Electronics GmbH Daimlerstr. 1K 63303 Dreieich
Technical enquiries and repair matters:
e-mail: service@alan-electronics.de
Repair enquiries:
Phone (+49) (0)6103 94 81 66
Customers in other countries please contact the local distributor.
Keep the scanner dry. If it gets wet, wipe it dry immediately. Use and store the scanner only in normal temperature environments. Handle the scanner carefully: do not drop it. Keep the scanner away from dust and dirt, and wipe it with a damp cloth occasionally to keep it looking new.
GENERAL USE
- Always write down the programmed frequencies in the event of memory loss.
- If memory is lost, simply reprogram each channel. The display shows blank digits - - - - - in all channels when there has been a memory loss.
- Always press each button firmly until you hear the entry tone for that key entry.
LOCATION
- Do not use the scanner in high-moisture environments such as the kitchen or bathroom.
- Avoid placing the unit in direct sunlight or near heating elements or vents.
- If the scanner receives strong interference or electrical noise, move it or its antenna away from the source of the noise. If possible, a higher elevation might provide better reception.
- Also try changing the height or angle of the antenna.
CLEANING
- Clean the outside of the scanner with a mild detergent.
- To prevent scratches, do not use abrasive cleaners or solvents. Be careful not to rub the LCD window.
- Do not use excessive amounts of water.
BIRDIES
All radios can receive “birdies” (undesired signals). If your scanner stops during Scan mode and no sound is heard, it might be receiving a birdie. Birdies are internally generated signals inherent in the electronics of the receiver.
- Press ▲/▼ to resume scanning.
- Or press (L/O) to lock out the channel or frequency.
Channels (Favourites + Instant):....183
Frequency Range (in MHz) See page 5
Sensitivity (12 dB SINAD) (Nominal)
78.0000 MHz (FM)....0.5 μV
84.1250 MHz (FM)....0.4 μV
90.0000 MHz (FMB) 0.8 μV
107.5000 MHz (FMB) 0.9 μV
118.8000 MHz (AM) 0.4 μV
127.1750 MHz (AM) 0.4 μV
135.5000 MHz (AM) 0.4 μV
138.1500 MHz (FM)....0.3 μV
162.4000 MHz (FM)....0.3 μV
173.2250 MHz (FM)....0.3 μV
406.8750 MHz (FM)....0.3 μV
453.2500 MHz (FM)....0.3 μV
511.9125 MHz (FM)....0.3 μV
Operating Temperature Range
Normal....-20°C to +60°C
Scan Rate: 30 channels per second (Nominal)
IF Rejection (at 162.4 MHz)....60 dB (Nominal)
IF Frequencies (Nominal)
1st IF 70.950 MHz
2nd IF 450 kHz
Audio Output 490 mW maximum
Built-in Speaker....32 mm dia, 24 ohm
Dynamic Type
Current Drain
Squelched 60 mA
Full Audio Output (Light off) 180 mA
Power Requirements 3 AA Alkaline Batteries (4.5V DC),
or (optional) 3 AA Rechargeable Ni-MH Batteries (3.6V DC)
Antenna....50 ohms (Impedance)
External Sockets
Antenna Connector ....BNC Type
Ext. Earphone Jack 3.5 mm stereo/mono type
Size (without antenna and belt clip):
53mm (W) × 28mm (D) × 104mm (H)
Weight (without Antenna and battery): 100 g
Features, specifications, and availability of optional accessories are all subject to change without notice.
Band Plan 1: Special interest frequencies for religious transmission services (within EMG preprogrammed band, mainly used in UK)
| Channel | Frequency (MHz) | Channel | Frequency |
| 1 | 454.10000 | 18 | 454.57500 |
| 2 | 454.07500 | 19 | 454.78750 |
| 3 | 454.12500 | 20 | 454.79375 |
| 4 | 454.15000 | 21 | 454.80625 |
| 5 | 454.17500 | 22 | 454.82500 |
| 6 | 454.27500 | 23 | 456.72500 |
| 7 | 454.30000 | 24 | 459.80000 |
| 8 | 454.25000 | 25 | 459.90000 |
| 9 | 454.70000 | 26 | 460.37000 |
| 10 | 454.77500 | 27 | 460.37500 |
| 11 | 454.05000 | 28 | 460.96000 |
| 12 | 454.02500 | 29 | 462.12500 |
| 13 | 454.32500 | 30 | 462.57500 |
| 14 | 454.35000 | 31 | 86.45000 |
| 15 | 454.39375 | 32 | 453.57500 |
| 16 | 454.40625 | 33 | 453.22500 |
| 17 | 454.41250 | 34 | 447.63750 |
Special Interest Frequencies within Band Plan 2 (preferable for Germany):
4 m Band: BOS Band 84.015 MHz – 87.295 MHz Channel spacing 20 kHz, EMG Band
Freenet: 6 channels within 149.0250 – 149.1125 MHz Channel spacing 12.5 kHz
| Channel | Frequency MHz | Channel | Frequency MHz |
| 1 | 149.0250 | 4 | 149.0875 |
| 2 | 149.0375 | 5 | 149.1000 |
| 3 | 149.0500 | 6 | 149.1125 |
PMR 446 8 channels within 446.00625 – 446.09375 MHz Channel spacing 12.5 kHz with 6.25 kHz offset
| Channel | Frequency MHz | Channel | Frequency MHz |
| 1 | 446.00625 | 5 | 446.05625 |
| 2 | 446.01875 | 6 | 446.06875 |
| 3 | 446.03125 | 7 | 446.08125 |
| 4 | 446.04375 | 8 | 446.09375 |
Marine: international VHF marine band CH 01-88
Disposal and Recycling
This radio was manufactured low-emission according to the latest European RoHS directive. Please note that electronic and electric devices are not to be disposed of

with the household waste; return these devices to collection points.
Returning devices is free of charge for end users, since the industry is covering the disposal costs. By returning the device to a collection point you contribute to the recycling of valuable raw materials.
SIMPLIFIED EU DECLARATION OF CONFORMITY
Hereby, Alan Electronics GmbH declares that the radio equipment type AE 33 H is in compliance with Directive 2014/53/EU.

The full text of the EU declaration of conformity is available at the following internet address:
http://service.alan-electronics.de/CE-Papiere
© Alan Electronics GmbH, 2018
All rights reserved.
Printed in Vietnam
U01UB366BZB(0)

ALBRECHT®
natural_image
Line drawing of a mobile phone with a digital display and keypad (no text or symbols)AE33H

natural_image
Simple line drawing of a cylindrical object with a flanged base and top end (no text or symbols)Antenne

natural_image
Line drawing of a cord with two earphones and a connector (no text or symbols)Ecouteurs

natural_image
Three cylindrical batteries with positive and negative charge markings (no text or symbols)3x piles Alcalines AA

natural_image
Simple line drawing of a symmetrical object with a central oval and two protruding ports (no text or symbols)Attache ceinture

text_image
AE 33 H Scanner OWNER'S MANUALMode d'emploi
natural_image
Diagram of a device with a downward arrow and internal components (no text or symbols)natural_image
Illustration of three cylindrical batteries with different charge markings (no text or symbols)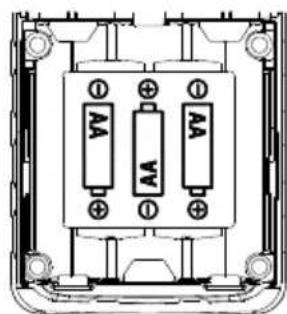
natural_image
Technical diagram of an electrical enclosure with two battery blocks and mounting feet (no text or symbols)natural_image
Diagram showing a mechanical component being inserted into a housing, with an inset close-up highlighting the base and shaft (no text or symbols present)LIAISON A UNE ANTENNE SUPPLEMENTAIRE
natural_image
Technical line drawing of a mechanical component with circular features and a pointer arrow (no text or symbols)natural_image
Technical line drawing of a device casing with internal components and mounting features (no text or symbols)Pince
text_image
FAV EMG FRN PMR MRN L/O CH 988.8888 88 HOLD V-LO FM AIR V-HI UHF BATTtext_image
128.0898 AIRtext_image
128.0898 AIRtext_image
128.0750 HOLD AIRtext_image
FAV CH 01 HOLD AIRtext_image
FAV CH 02 HOLD AIRtext_image
CH 03 160.7500 MRN118.8000 MHz (AM) 0.4 μV
127.1750 MHz (AM) 0.4 μV
135.5000 MHz (AM) 0.4 μV
138.1500 MHz (FM)....0.3 μV
162.4000 MHz (FM)....0.3 μV
173.2250 MHz (FM)....0.3 μV
406.8750 MHz (FM)....0.3 μV
453.2500 MHz (FM)....0.3 μV
511.9125 MHz (FM)....0.3 μV
53mm (l) × 28mm (P) × 104mm (H)
© Alan Electronics GmbH, 2018