
WPR 405E - Food Warmers Rommelsbacher - Free user manual and instructions
Find the device manual for free WPR 405E Rommelsbacher in PDF.

| Product type | Food warmer |
| Brand | Rommelsbacher |
| Model | WPR 405E |
| Country of manufacture | Germany |
| Rated voltage | 230 V ~ |
| Rated power | 400 W |
| Standby power consumption | 0 W |
| Control type | Continuously adjustable thermostat |
| Temperature range | Approximately 40 °C to 105 °C |
| Heating surface | High-quality glass |
| Operation indicator | Light indicator in the switch |
| Housing material | Plastic |
| Cleaning and maintenance | Damp cloth and dish soap, do not immerse |
| Safety | Do not use with an external timer |
| Usage | Domestic use for keeping warm |
Frequently Asked Questions - WPR 405E Rommelsbacher
User questions about WPR 405E Rommelsbacher
0 question about this device. Answer the ones you know or ask your own.
Ask a new question about this device
Download the instructions for your Food Warmers in PDF format for free! Find your manual WPR 405E - Rommelsbacher and take your electronic device back in hand. On this page are published all the documents necessary for the use of your device. WPR 405E by Rommelsbacher.
USER MANUAL WPR 405E Rommelsbacher
natural_image
Abstract geometric pattern with interlocking curved lines inside a circle (no text or symbols)ROMMELSBACHER
D Bedienungsanleitung Warmhalteplatten
GB Instruction manual Hot Trays
F Mode d'emploi Plaques accumulateur de chaleur
natural_image
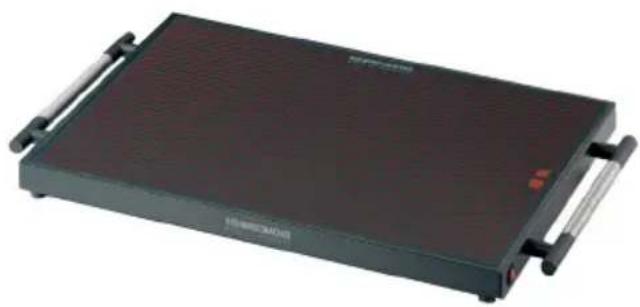
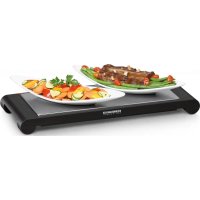
Exterior view of a black rectangular electronic device with dual side handles and a red indicator light (no visible text or symbols)WP 250
WP 350
natural_image
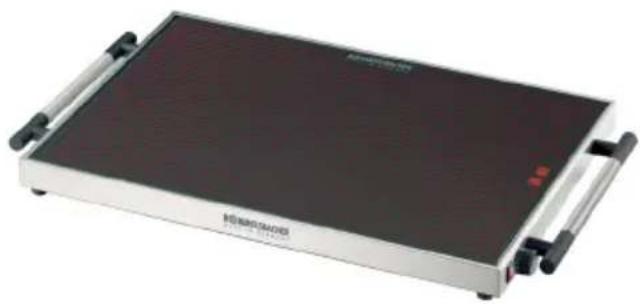
Exterior view of a modern office building (no signage)WPR 305/E
WPR 405/E
natural_image
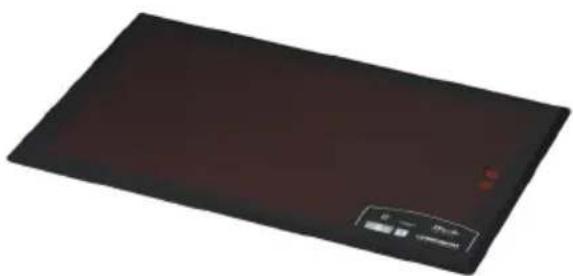
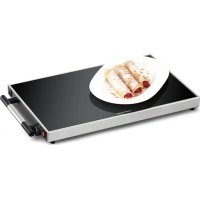
Dark rectangular electronic device with a small display label and red indicator lights (no readable text or symbols)WPE 308/TC
1. Einleitung
We are pleased that you decided for this superior product of German make. Its easy operation and the multitude of possible applications will certainly fi ll you, too, with enthusiasm. To make sure you will have lots of pleasure with your hot tray for a long time, please read the following notes carefully and observe them and hand them out to any future user.
1.1 Intended use
The appliance is suitable for keeping warm food in containers for domestic use, e.g. in the kitchen, at table, in the offi ce, and for use in areas like e.g. in kitchens for employees, customer are of hotels, motels, bed-and-breakfast places and other accommodation facilities. Other uses or modifi cations of the appliance are not intended and harbour considerable risks. For damage arising from not intended use, the manufacturer does not assume liability.
1.2 Technical data
Only connect the appliance to an isolated ground receptacle installed according to regulations. The rated voltage must comply with the details on the rating label. Only connect to alternating current.
| Model | Nominal voltage | Nominal power | Standby consumption |
| WP 250 | 230 V ~ 250 W | 0 W | |
| WP 350 | 230 V ~ 350 W | 0 W | |
| WPR 305/E | 230 V ~ 300 W | 0 W | |
| WPR 405/E | 230 V ~ 400 W | 0 W | |
| WPE 308/TC | 230 V ~ 300 W | 0.5 W |
1.3 Packing material
Do not simply throw the packing material away but recycle it. Deliver paper, cardboard and corrugated cardboard packing to collecting facilities. Also plastic packing material and foils should be put into the intended collecting basins.
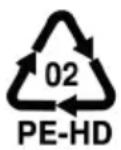

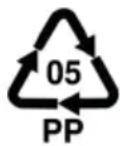
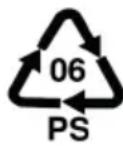
In the examples for the plastic marking: PE stands for polyethylene, the code figure 02 for PE-HD, 04 for PE-LD, PP for polypropylene, PS for polystyrene
1.4 Disposal
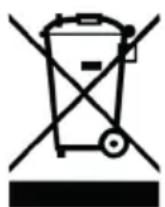
According to the Waste Electrical and Electronic Equipment Directive, this product must not be disposed of with your normal domestic waste at the end of its lifespan. Therefore, please deliver it at no charge to your appropriately licensed local collecting facilities (e.g. recycling yard) concerned with the recycling of electrical and electronic equipment. Please approach your local authorities for how to dispose of the product.
2. For your safety

Attention: Read all safety advices and instructions. Non-observance of the safety advices and instructions may cause electric shock, fire and/or bad injuries or burns!
2.1 General safety advices
- Always keep children under 8 away from the product and the power cord.
- Children from the age of 8 must be supervised when cleaning or maintaining the appliance.
- Children from the age of 8 and persons, not having the knowledge or experience in operating the appliance or having handicaps of physical, sensorial or mental nature must not operate the appliance without supervision or instruction by a person, responsible for their safety. Never leave the appliance unattended during operation.
- Children should be supervised in order to ensure that they do not play with the appliance.
- Packing material like e. g. foil bags should be kept away from children.
- Do not at all operate this unit with an external timer or a separate telecontrol system.
- Prior to each use, check the appliance and the accessories for soundness. It must not be operated if it has been dropped or shows visible damage. In these cases, the power supply must be disconnected and the appliance has to be checked by a specialist.
- When laying the power cord, make sure that nobody can get entangled or stumble over it so that accidentally pulling the appliance down can be avoided.
- Keep the power cord away from hot surfaces, sharp edges and mechanical forces. Check the power cord regularly for damage and deteriorations.
Damaged or entangled cords increase the risk of an electric shock. - For disconnecting the appliance from the mains, only use the plug, never the cord.
- Never immerse appliance, power cord or plug in water for cleaning.
- Do not store the appliance outside or in damp rooms.
- This electrical appliance complies with the relevant safety standards. In case of signs of damage to the appliance or the power cord, unplug the appliance immediately. Repairs may be executed by authorised specialist shops only. Improper repairs may result in considerable dangers for the user.
- Improper use and non-observance of the instruction manual will void warranty.
2.2 Safety advices for using the appliance
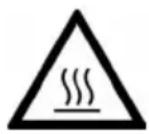
Warning: Hazard of injury and burns!
Casing surfaces and other parts become hot during use and firstly stay hot after switch-off!
Do not splash cold water on the hot glass surface!
Thus, act with caution:
• We recommend using pot cloths.
- Do not use the appliance's upper side as depositing rack or working top as it will get hot when operating the appliance! As protection against fire, do generally not put objects made of paper, plastic, fabric or other inflammable material on hot surfaces.
- Do not transport the hot appliance. Appliance and accessories must have cooled completely before cleaning or moving them.
- Observe the following when setting up the appliance:
- Place the appliance on a heat-resistant, stable and even surface (no varnished surfaces, no table cloths etc.).
- Place it beyond children’s reach.
Leave an appropriate ventilation distance to all sides to avoid damage by heat or fat splatters and to grant an unobstructed work area. Unhindered air supply has to be ensured. - Do not operate the appliance in the vicinity of sources of heat (oven, gas flame etc.) or in explosive environments, where inflammable liquids or gases are located.

Attention! Hazard of fire! Freestanding warming plates (like WP 250, WP 350, WPR 305/E, WPR 405/E) are not qualified for installation!
- Do not use the appliance as space heater.
- Pull the power plug after each use for safe switch-off.
3. Initial use and operation
Attention: The appliance has a high-quality glass surface. Please be sure to place kitchenware carefully onto the plate and not to slide it on. Hard china may cause scratches.
- For an effective keeping-warm it is sensible for the hot food to be placed in containers, which have been preheated already. For this purpose, place the heat-resistant containers and trays on the cold hot tray and turn it on.
- The preheating time should be at least 15 – 20 minutes.
- Ensure not to expose the glass to any excessively heavy temperature fluctuations. Therefore, put containers with hot foods only on the preheated appliance.
-
To keep food warm, kitchenware with bottoms resting well on the surface are particularly suitable. The bigger the surface, the better the heat transfer. The bottom edge to be placed on should not be too high, as this will otherwise induce more considerable heat losses. Covering the food allows for it to be kept warm yet more efficiently.
-
Larger quantities of food in a high container should be stirred and re-shifted time and again in order for the food to be kept warm evenly.
- The appliance is not suited for warming up, defrosting or cooking food.
3.1 Operating the types WP 250 & WP 350, WPR 305/E & WPR 405/E
- For a start, connect the safety plug to an earthed electrical outlet.
- Then switch the appliance on with the rocker switch. The pilot lamp integrated in the switch will illuminate, indicating that the hot tray is switched on.
- The models WPR 305/E and WPR 405/E are additionally equipped with a thermostat, which allows for an infinitely variable temperature regulation.
• After use, switch the appliance off and pull the mains plug!
3.2 Installing and operating type WPE 308/TC with 'Touch Control'
Installation
- The hot tray is designed for installation into work tops with a thickness of 3 – 4 cm.
- Installation as well as repairs of the appliance must be made by authorised specialists only. Otherwise there might be considerable danger for the user. Always unplug the appliance prior to each examination! The manufacturer does not accept any liability for faulty function caused by improper installation.
- The recessed gap must have a sufficient distance (at least 5 cm) to the back and side walls in order to avoid overheating. On one side, a high cabinet can be added, however at least two sides must be kept free in order to assure unhindered air-circulation. A distance of at least 1.5 cm must be left underneath the bottom edge of the appliance; access from the bottom must not be possible.
- Please take care that with built-in furniture the synthetic coating and the veneer respectively have to be affixed with heat resistant glue (100 °C).
- Before mounting, the recess in the work top has to be cut out according to illustration A (page 19).
- If two or more hot trays are installed side by side, a distance of at least 5 cm has to be left breadthways between the recesses.
- Please lay the enclosed sealing-tape on-end on the outermost border of the recess, then press on the appliance from the top.
- Under the galvanised bottom plate there are 4 rectangular gaps for mounting clamps. If the tabletop has a thickness of 3 cm, the clamps should be fastened according to illustration C (page 19). If the thickness is 4 cm, please fix the clamps according to illustration B (page 19).
- Finally tighten the screws on the clamps to fix the tray.
- The appliance comes delivered with a power cord equipped with a safety plug. Please provide for a fuse protection of at least 10 ampere.
Operating the Touch Control
This model is equipped with Touch Control sensors, which allow for easy and highly convenient operation.
- By lightly pressing the main button (POWER symbol), the appliance is switched on. The '0' flashing up in the 7-segment display above the +/- symbols shows you that the unit is switched on. By touching the POWER sensor once more, the appliance is switched off again.
- You may select the temperature by touching the field marked with the + and - symbols.
- Touching the + sensor for the first time, the appliance gets started at level 1. You may increase the setting up to level 9 by touching the + sensor repeatedly. If this sensor is activated permanently, the display changes at intervals of 0.5 seconds. If the – sensor is touched for the first time, the appliance gets started at level 9. Going on touching it you may reduce it down to level 1. If this sensor is activated permanently, the display changes at intervals of 0.5 seconds too.
- The hot tray is equipped with an automatic heating system. If this shall be used, heat level 9 has to be activated with the – sensor. Beside the display indicating heat level 9, an additional point
becomes visible. This shows that the automatic heating system has been triggered. If the heat level is reduced within 10 seconds by means of the – sensor, the automatic heating system remains activated for all settings. As long as the automatic heating system is on, the hot tray is operated with maximum power during the initial heating period, which is in return dependent on the heat level selected. Once the automatic heating peak is over, the luminous point will go out and the hot tray has reached the desired temperature.
Safety functions
The Touch Control technology features several safety functions so as to prevent any unintentional activation.
- If you do not trigger any further functions within 10 seconds after the appliance has been switched on, the hot tray will automatically switch off again.
- Beyond that, its electronics detects whether the sensors are touched purposefully. If you place a kitchen towel or similar on the appliance, it will not get triggered. The same goes for liquids that might run over the glass surface.
- The safety switch-off will also get triggered if one or several sensors are activated for more than 12 seconds. In this case the control system switches off the hot tray. In the heat level display, an 'F' flashes up. In this case, please switch off the appliance completely via the POWER sensor and start the keep warm procedure anew.
- When the appliance is switched on, the sensors adjust themselves automatically to the environmental conditions. During that adjustment the glass surface above the sensors must not be covered. Only if it is exposed to extreme external light, or if it is covered with a light object, an adjustment will not be possible. This will also be indicated through an 'F' in the heat level display. In this case too, please switch off the appliance completely via the POWER sensor, remove the external light and the cover respectively and start the keep warm procedure anew.
4. Temperatures
WP 250 and WP 350
Once switched on, these models heat up to the maximum temperature of about 105 °C and keep it until switch-off.
WPR 305/E and WPR 405/E
These models feature a continuous temperature regulation from about 40 °C to about 105 °C.
WPE 308/TC
There are 9 temperature levels which can be selected:
| 1 approx. 40 °C | 3 approx. 60 °C | 5 approx. 75 °C | 7 approx. 90 °C | 9 approx. 105 °C |
5. Cleaning and maintenance

Always unplug and let cool down the appliance before cleaning. Never immerse appliance, power cord or plug in water for cleaning. Make sure no water or steam may infiltrate the appliance from below!
- Clean the appliance with a damp cloth and some dishwashing detergent. Dry it thoroughly.
- Treat the surfaces with suitable care products from time to time.
- Never use abrasives, solvents, steel wool or pointed objects!
- Never treat the appliance with a steam cleaner!
1. Introduction

- ROMMELSBACHER
- Einleitung
- Intended use
- Technical data
- Packing material
- Disposal
- For your safety
- Attention: Read all safety advices and instructions. Non-observance of the safety advices and instructions may cause electric shock, fire and/or bad injuries or burns!
- General safety advices
- Safety advices for using the appliance
- Warning: Hazard of injury and burns!
- Thus, act with caution:
- Initial use and operation
- Operating the types WP 250 & WP 350, WPR 305/E & WPR 405/E
- Installing and operating type WPE 308/TC with 'Touch Control'
- Installation
- Operating the Touch Control
- Safety functions
- Temperatures
- WP 250 and WP 350
- WPR 305/E and WPR 405/E
- WPE 308/TC
- Cleaning and maintenance
- Always unplug and let cool down the appliance before cleaning. Never immerse appliance, power cord or plug in water for cleaning. Make sure no water or steam may infiltrate the appliance from below!
- Introduction
Brand : Rommelsbacher
Model : WPR 405E
Category : Food Warmers