PH122042 - Heating Emerio - Free user manual and instructions
Find the device manual for free PH122042 Emerio in PDF.

Download the instructions for your Heating in PDF format for free! Find your manual PH122042 - Emerio and take your electronic device back in hand. On this page are published all the documents necessary for the use of your device. PH122042 by Emerio.
USER MANUAL PH122042 Emerio
1. Read and save these instructions. Attention: pictures in
the IM are for reference only.
2. This appliance can be used by children aged from 8 years
and above and persons with reduced physical, sensory or mental capabilities or lack of experience and knowledge if they have been given supervision or instruction concerning use of the appliance in a safe way and understand the hazards involved.
3. Children shall not play with the appliance.
4. Cleaning and user maintenance shall not be made by
children without supervision.
5. Children of less than 3 years should be kept away unless
continuously supervised.
6. Children aged from 3 years and less than 8 years shall only
switch on/off the appliance provided that it has been placed or installed in its intended normal operating position and they have been given supervision or instruction concerning use of the appliance in a safe way and understand the hazards involved. Children aged from 3 years and less than 8 years shall not plug in, regulate and clean the appliance or perform user maintenance.
7. CAUTION — Some parts of this product can become very
hot and cause burns. Particular attention has to be given where children and vulnerable people are present.- 3 -
8. If the supply cord is damaged, it must be replaced by the
manufacturer, its service agent or similarly qualified persons in order to avoid a hazard.
9. This appliance is intended to be used in household and
similar applications.
10. The heater is not intended for use in bathrooms, laundry
areas or similar indoor locations. Never place the heater where it may fall into a bathtub or any other water container.
11. Do not use outdoors. Do not use to dry clothes or any
12. Do not place the heater on carpets with a very deep pile.
13. The heater must not be located immediately below a
14. Do not use the heater in areas where flammable liquids
are stored or where flammable fumes may be present.
15. Always unplug the heater when moving it from one
location to another.
16. Do not use the heater if the power cord is damaged.
17. Do not use this heater in the immediate surroundings of a
bath, a shower or a swimming pool.
18. WARNING: In order to avoid overheating, do not cover the
20. This heating device is not suitable for assembling in
vehicles and machines.
21. Means “DO NOT COVER“.
22. Regarding the information for FEET ASSEMBLY, please refer
to the below paragraph of the manual.
23. Always use the heater in an upright position. Keep
combustible material such as furniture, cushions, bedding,- 4 - paper, clothes, curtains etc. at least 100cm away from the heater.
24. This heater has hot and arcing or sparking parts inside. Do
not use it in the areas where gasoline, paint, or flammable liquids are used or stored.
25. To prevent overloading a circuit, do not plug the heater
into a circuit that already has other appliances working. Do not install the heater under the wall socket.
26. Always unplug the appliance when not in use.
27. The appliance is hot when in use. To avoid burned, do not
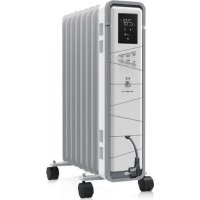
1. Place the free standing feet on the ground. Insert the appliance into the slots of the feet.
2. Screw firmly with the two bolts.
WALL MOUNTING There is a pack of accessories provided with the appliance. Please use it for wall mounting according to below illustrations.- 6 - Accessories pack 1 set: - 1 x drill bit (8mm) - 4 x rail fittings - 4 x screw bolts - 4 x caps for bolts
1. Mark the positions of the four holes to be drilled on the wall. (Better install the appliance in a height of
20cm – 100cm from the floor to get the best performance.)
2. Drill the holes with the drill bit.
3. Insert the plastic rail fittings into the holes.
4. Attach the appliance onto the four rail fittings through the four holes in the appliance.
5. Screw the four bolts into the plastic rail fittings.
6. Cover the bolts with the caps. It is recommended to use some glue to make the caps stick onto the bolts
firmly. NOTE: make sure the distance between the bottom of the appliance and the floor is no less than 20cm when the appliance is installed. OPERATION Plug the appliance into an appropriate electrical outlet. Turn on the appliance by pressing the power switch to position “I”. The power switch will be illuminated. The appliance is standby. Press the standby button “ ” to run your appliance.
1. Temperature setting
Press button “+” or “-” to set the desired temperature. You can choose from 0℃ to 37℃. When you set your desired temperature, the heater starts or stops heating automatically to maintain the room temperature. You can long press the button “+ “or “-” in the control panel for rapid adjustment.- 7 -
Press button “M” in the control panel, the timer 00 shows in the display. Press button “+” or “-” to set the desired working time from 0 hour to 24 hours. The appliance will shut itself off automatically when the time is up. You can long press the button “+ “or “-” in the control panel for rapid adjustment.
Press button “ ” again to turn off the appliance. Turn off the main power switch and unplug the power cord from the outlet. WI-FI FUNCTION This product is equipped with a Wi-Fi function. You can download APP in your mobile phones and use it like the remote control. You can control the appliance from long distance by setting the on/off, timer, temperature, and weekly schedule. Long press the standby button “ ” to turn on/off the Wi-Fi function, the blue indicator light will be blinking/off accordingly.
Open the “App store” software on your iPhone or iPad. Search “TuyaSmart” or “Smart Life” and download either of them. This is free of charge.
2) For Android system:
Open the “Google Play” software on your Android phone. Search “TuyaSmart” or “Smart Life” and download either of them. This is free of charge.
2. Open the APP and select “Register”. Enter your mobile phone number to get verification code. The country
code has already been filled in for you.
3. The verification code will send to your mobile phone within 60 seconds. Enter this verification code and
then set your password. Click “Done” to confirm the registration.
4. Select “Create Family” to enter family name, set location and rooms with smart devices. Click “Done” to
confirm the setting. Then, the home screen appears.- 8 -
5. Connect your heater and your mobile phone at the same WI-FI Internet.
1) Make sure the blue Wi-Fi indicator light is blinking rapidly.
a) Click “Add Device” to enter into the next screen. Select “Add Manually”, and then choose the correct product category (Small Home Appliance → Heater), then come into the next screen, click “Confirm indicator rapidly blink”. b) Type in the Internet password (the network name has already been filled in for you) and confirm. The connection begins.
2) If the “rapid blink” connection is failed, long press button “M” to get slow blink, then try again.
a) Click “Add Device” to enter into the next screen. Select “Add Manually”, and then choose the correct product category (Small Home Appliance → Heater), then come into the next screen; choose “AP Mode”, come to the next screen and click “Confirm indicator slowly blink”. b) Type in the Internet password (the network name has already been filled in for you) and confirm. c) You will get the hint “connect your mobile phone to the device’s hotspot”, click “Go to Connect”, you will come to WLAN settings, choose “SmartLife-XXXX”. Return to the APP. The connection will begin.- 9 -
3) When the connection is done, you will come to a screen write “Device added successfully”. Click “Done”,
then you will come to the screen like below picture A. Now you can use your mobile phone like the remote control to control your heater.
4) Click button “Power”, the appliance will be on. And you will come to the screen like picture B.
More information Touch “more information” button, you can change your basic device information, remove your device or restore factory defaults, etc. Normal working mode
1. Touch the button “Power” to turn on the appliance, then touch the button “+” or “-” to set your desired
temperature. The default startup temperature is 22℃.
2. Touch the button “Countdown Timer”, you can set the working time for 0-24 hours.
Weekly schedule Touch the button “Smart Timer” to come into the next screen; touch “Add Schedule”, you can make your weekly schedule here.
1. Set start time: Touch “Power” to choose ON, and touch “Temperature” to choose your desired
temperature, choose the time when you want to switch on the appliance, then touch the work days button to choose the work days of each week (you can have multiple choices). Touch “Save” to confirm the setting.
2. Set off time: Touch “Add schedule” to come to the add schedule screen, touch ”Power“ to choose OFF,
choose the time when you want to switch off the appliance, then touch the work days button to choose the work days of each week (you can have multiple choices). Touch “Save” to confirm the setting.- 11 - If you want to turn off the schedule, touch icon “ ”. This row of schedule will get grey. (Fig. C) If you want to cancel the schedule, long touch that schedule selection. Then the “Delete” screen will come; touch “Confirm” to delete the schedule. (Fig. D) If your heater fails to operate, please follow these instructions: Ensure that your circuit breaker or fuse is working properly. Be sure the heater is plugged in and that the electrical outlet is working properly. If the power switch is not illuminated, send it to a service center for reparation directly. SAFETY SYSTEM The appliance has a safety system which automatically switches the unit off when overheated.
Always un-plug the heater from the wall socket and allow it to cool down completely before cleaning. Clean the outside of the heater by wiping with a damp cloth and with a dry cloth. Do not use any detergents or abrasives and do not allow any water to penetrate the heater. To release the appliance from the wall, just open the screw bolt caps and unscrew the bolts to take off from the wall.
When the heater is not used for long time it should be protected from dust and stored in a clean dry place. TECHNICAL DATA: Operating voltage: 220-240V ~ 50/60Hz Power consumption: 425W Max. transmitting power: 15.1 dBm Frequency range: 2412MHz – 2472MHz Declaration of Conformity (DOC) We, Emerio FOB Limited, declare under our sole responsibility that the product: PH-122042 is in conformity with the essential requirements and other relevant requirements of the RED Directive (2014/53/EU) The complete CE declaration is available at the following address: www.emerio.eu- 12 -
GUARANTEE AND CUSTOMER SERVICE
Before delivery our devices are subjected to rigorous quality control. If, despite all care, damage has occurred during production or transportation, please return the device to your dealer. In addition to statutory legal rights, the purchaser has an option to claim under the terms of the following guarantee: For the purchased device we provide 2 years guarantee, commencing from the day of sale. If you have a defective product, you can directly go back to the point of purchase. Defects which arise due to improper handling of the device and malfunctions due to interventions and repairs by third parties or the fitting of non-original parts are not covered by this guarantee. Always keep your receipt, without the receipt you can’t claim any form of warranty. Damage caused by not following the instruction manual, will lead to a void of warranty, if this results in consequential damages then we will not be liable. Neither can we hold responsible for material damage or personal injury caused by improper use if the instruction manual is not properly executed. Damage to accessories does not mean free replacement of the whole appliance. In such case please contact our service department. Broken glass or breakage of plastic parts is always subject to a charge. Defects to consumables or parts subjected to wearing, as well as cleaning, maintenance or the replacement of said parts are not covered by the warranty and are to be paid.
ENVIRONMENT FRIENDLY DISPOSAL
Recycling – European Directive 2012/19/EU This marking indicates that this product should not be disposed with other household wastes. To prevent possible harm to the environment or human health from uncontrolled waste disposal, recycle it responsibly to promote the sustainable reuse of material resources. To return your used device, please use the return and collection systems or contact the retailer where the product was purchased. They can take this product for environmental safe recycling. Emerio Switzerland AG Sihlbruggstrasse 107 6340 Baar Switzerland
’- 13 - ERP information (EN) Supplier: Emerio Switzerland AG Sihlbruggstrasse 107 6340 Baar Switzerland Declare that the product detailed below: Information requirements for electric local space heaters Model identifier(s): Item Symbol Value Unit Item Unit Heat output
Type of heat input, for electric storage local space heaters only (select one)
manual heat charge control, with integrated thermostat
Minimum heat output (indicative)
manual heat charge control with room and/or outdoor temperature feedback
Maximum continuous heat output
electronic heat charge control with room and/or outdoor temperature feedback
Auxiliary electricity consumption
Type of heat output/room temperature control (select one) At minimum heat output
single stage heat output and no room temperature control
Two or more manual stages, no room temperature control
with mechanic thermostat room temperature control
with electronic room temperature control
electronic room temperature control plus day timer
electronic room temperature control plus week timer Yes
Other control options (multiple selections possible)
room temperature control, with presence detection
room temperature control, with open window detection
with distance control option Yes
with adaptive start control No- 14 -
with working time limitation Yes
with black bulb sensor