RTXSGP46TMSCE47 - Washing machine HAIER - Free user manual and instructions
Find the device manual for free RTXSGP46TMSCE47 HAIER in PDF.
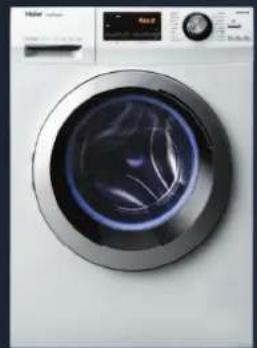
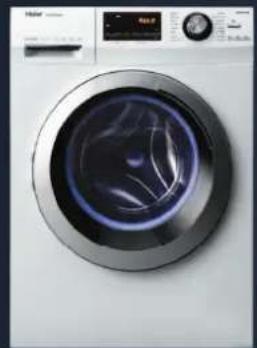
| Product type | Washing machine |
| Brand | Haier |
| Model | RTXSGP46TMSCE47 |
| Dimensions (H x W x D) | 85 cm x 60 cm x 60 cm |
| Net weight | 72 kg |
| Power supply | 220-240 V ~ 50 Hz |
| Washing capacity | 8 kg |
| Maximum spin speed | 1400 rpm |
| Wash programs | 14 programs including cotton, synthetics, delicates, quick |
| Additional options | Delayed start, cold wash, extra rinse |
| Noise level (wash/spin) | 56 dB / 74 dB |
| Energy class | C (according to EU regulations) |
| Annual water consumption | 10,500 liters |
| Annual energy consumption | 176 kWh |
| Door type | Glass door with reversible hinge |
| Drum material | Stainless steel |
| Child safety | Child safety with lock button |
| Adjustable feet | Front feet adjustable in height |
| Maintenance and cleaning | Regular cleaning of the filter, door seal, and detergent drawer |
| Spare parts | Door seal, door lock, hinge, detergent drawer available |
| Repairability | Repairability index: 7.5/10 |
Frequently Asked Questions - RTXSGP46TMSCE47 HAIER
User questions about RTXSGP46TMSCE47 HAIER
0 question about this device. Answer the ones you know or ask your own.
Ask a new question about this device
Download the instructions for your Washing machine in PDF format for free! Find your manual RTXSGP46TMSCE47 - HAIER and take your electronic device back in hand. On this page are published all the documents necessary for the use of your device. RTXSGP46TMSCE47 by HAIER.
USER MANUAL RTXSGP46TMSCE47 HAIER
ENGLISHEN | REPAIR INSTRUCTIONS
SERBIAN SR | UPUTSTVO ZA POPRAVAK
TURKISH TR | ONARIM TALIMATLARI
Haier
Люк-Враза
HCTPYKUN
JIIOK-BPATA|TIN1 INHCTPYMEHTN-RAEUEHKIIOU C BbPTAUMOMEHT25

1 OTBopete JIOK-BpaTata
KIOH C BPTA MOMENT 25, cBane TE BHTOBete, KOITO KpEIT NaHTaT KaM KOPNYCA
3 IHerIeIeIIOKa-BpataOT rohpHATA cTpaHa nro CBAIeTe
JIOK-BPATA|TIN2 INCHTPMEHTN-RAEUYKLNHOCBbPTAUMOMEHT25,FBKBABTPbEBENKLNQCBbPTAUMOMEHT7
1 OTBopete IIOK-Bpata
2 CbaIeTe KanaKa, cne,I KaTo CBAInTe BHTa My
3 CbaIe BnHTOBeOT nactmacobata naHTA
4 N3terlneIIOKA-BpataOT rohpata cTpaHa nro CbaTe

NAHTA|TIN1 INHCTPymEHTN-RAEUYKIOUcBbPTaM MOMEHT25

1
OTBopeteIIOK-BpataTa
4
CbaIeBCMHKNBHTOBEOTIOK-BpTaTAt

2
C NOMOHTA Ha Tp6eH KIOH C BbptTMMoENT 25 CBaTe BnHTOBete, KOITOKPENAT NaHTATA KbM KopIyCa
5
OTdenepe pamkata OTHOceuata pamka
3
NTERNEIHOKA-BpATAOTROPHATACTPAA HIOCBANTE

6
CmeheTe naHTata, KATO BHUMABATE da He 3aYbITE BTyJNITE
NAHTA|TIN2 INCHTPMENTN-TAEUEH KJIIOU C BbPTRAI MOMEHT 25,FBBKAB TpBbEH KJIIOU C BbPTRAI MOMEHT7
1
OTBopeTe IIOK-BpTaTa
4
I3TcnerTe Ioka-Bpata OT rohpata CtpaHa nro CbaIeTe

7
KORAto pemkBt c BaneH,OTdeneMaHweta OT yNbTHHeHMeTO,3a DaDOCTnHete DO bTpeHoHcCTA Hypeda
2
CbaIe KaIaKa, cIeI KaTO CbJIte BnHTa My

5
CbaIe uΦTa
8
CbaIeTe BbHWHTE BnHTOBe OT NaHTata
3
CbaIe BnHTOBTe OT nlaCTMaCoBaTa naHTA
6
CbaIe Cko6aHa BpaTata
9
Cbaletene BHTOBETe BBB BBTpeUHOCTTa Ha KOpNyCa TpBBeH KIOH C BbPTAA MmOENT 7. Cbaletene NaHrata

3AKIIOUaJIKA HABPATATA|TIN1 INHCTPymeHTN-OTBEPTKACKPBCTATAJIABA,KIEUIN,OTBEPTKACIIIOCKAJIABA

1
OTBOPETIIOK-BpataTAt
4
KATO 3N0N3BATE RAeH N KIOH, CBAJTe SAKPENBaUHTE BNHTOE O KIOHKAtA Ha BpATA H NATCHETe KNEMaT.
2
HnnoI3aTe nOCKATAOTBeptka 3a NOBUNrAHe HCBAAHHe HA BbHNAHTcKo6a
5
CbaIeTe KIOUaIKaTa Ha BpaTaTa
3
KORAtoCKobataeCAaIeHa,OTdIeNETe MAHwetaOYnIbTHHeHcTeo 3a Da CTINHcTe OdoBtpeWHOCTHa YpcaDe
6
OTDeIe C6bata, B cyuH Ha KOHEKTOPT TIN "faston", BHIMaBaiTe Ha pa3MeHITpe npabHnata CTpaHa Hc6bata
3AKIIOyAJIKA HABPATA|TIN2 INHCTPYMEHTN-OTBEPTKACKKpbCTATAJIABA,KJIELLI,OTBEPTKACTIIOCKAJIABA
1
OTBopete IIOK-BpataTAt
4
KATO h3no3BaTe raeHcH,cbJeTe 3aKpenBaunte BNTOBE OT KIOHcHkata Ha Bpata
7
CbaIeKIOHcKATAHaBpTaT
2
H3no13BaIte IIOCKaT OTBepTKa 3a IOBIMrHaHe N CBAIAHRe HA BbHnHaTa CKo6a
5
Pa3rno6epepa0THATAIIOCKOCTn 06NIOOBKNTE
8
CbaIe BoDnna3nte
3
KORA TO CKOBATA C BAEHHe,OTDEJETe MAHWEOTA YNBJTHEHMETO,3A DA CTNHETe DO BBTpeWHOCHTA Haypeda
6
Pa3rno6eTe Do3aTopa n rHe3doTo
9
CmeHeTe KIOUaIkaT aHa BpaTaT a, KATO BHIMABATE 3A MEXAHHCHO T CbPb3BaHc HApabnHOTO OTBapRc H eEeTPOYNECKNTe B0B3Kn

YINbTHNTEN HA BPATATA
HCTPYMEHTN - TAEYEN KIIOU, KJIeUN, OTBEPTKA C NIOCKA IJLABA, DBA TPbBHN KIIIOUCA BbPTT MOMEHT 7
1
OTBopeTe IIOK-BpTaTAtA
2
ИЗнлбайтп lockаТОВЕРТКА NOВДИНАн CBALANHE NBAHUNHATCCKO6A
3
Korato ckoBata e cbaneHa, OTDeHeTe MaHueta OT yIbTHHeHTo, 3a Da CTnHrte Do BbTpewHOCTTa Ha ypeDa
4
Kato H3noBate NIOCKA OTBePTKa, CBaIe TcKObTa BbOxy MAHUeta

CbaIe yIyIbTHHeHMeTe

6
IOCTABETHOBOTO
yINTBHEHNE,KATO
BHIMABAte3aPabINHOTO
IIOJIOJEHHe
BdIb6HaHTNHTE

7
HanbxaTe cko6aTa BbpxMaHweta
8
CteHTe yIbTHHeHaTa CkoBa Bbpy MaHHeTa C nOMoTa Ha HcHTpyMeHTnte
Hamectete ynlbtheHHeTo bpxy Kopnyca. Nocbatete BbHnHata ckOa n 3aterHete (ako e HeooXoDIMO, C NOMOuTa H Na KIeun)
9

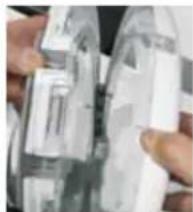
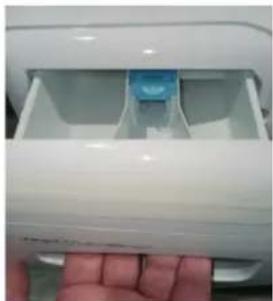
YEKMEDJE 3A IEPNIJEH IPNAPAT
1
OTBopete YekMeJKeTo 3a nepnien npenapat
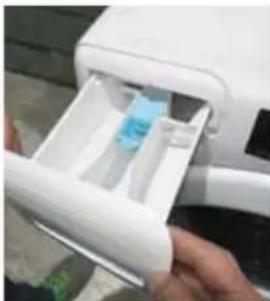
2
C nomoueta HaDbete pue IHO3dbpnaTe CnHIO
3
OTKaYeMaKkTa OT YekMeJKeT0 3a nepnIeH npenapat, KaTO BHmAbaTe Da He CuyNITe KYKITE

DVERE | TYP 1 NASTROJE - KLIC TORX 25
1 Otevierte dvefe

Apaepote to kaumu afo npot a apapeet n biia tou
5 Apaepoe tov neipo
8 Apaipae Tc, eWepukec, Bdec ano tv meVTEe
3 Apaepoe tC biEe cTou nAotukou eVteo
6 Apaepoe tov ouvderipca nnc npoc
9 Aphiote Tc BiDec moo oTo hao mu To uXavko kEidi ouJyuv api.7. Aphiote tov mevtde
Haier
Aoαεια πορτας
O△HΓIE∑
Anouuapmoayote tov slavoua Ka to naiia
9
Avikataaotne thv aodaleia noptac,
poodeovtac th npoxavkn ouvean tou
avoitmuoc kctakntc ovayknk kau tw
nakepkwuvuovdeuw

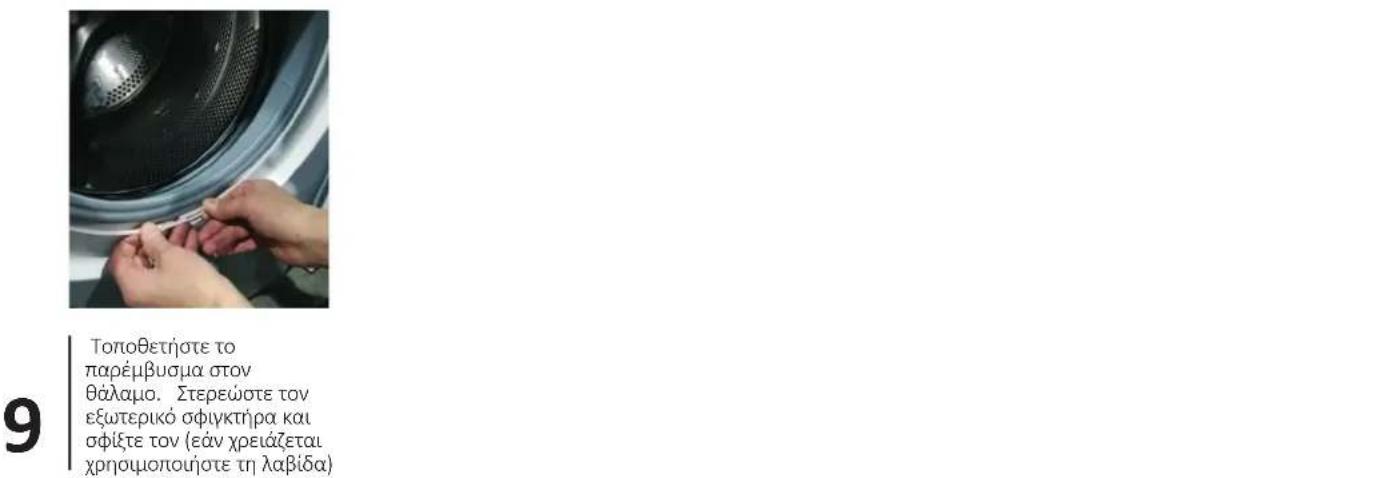
NAPEMBYMA NOPTA EPTAAEIA-MHXANIKOKAEIITORX,AAIBA,ENINEKO KATABI,AYOMHXANIAKAEIA ΣΩAHNONAPI.7

ΣYPTAPI ANOPPYIANTIKOY
1
Avoite to ouptapitou anoppunavko
2
Xpnoiouwvtac dvo Xepia,tpaBnTe to e Duvam
3
Anaykiotpwote tn
maoka ano to auptapu
anoppunavtku
npoeoxvtac va un
onatae ta aykotpa
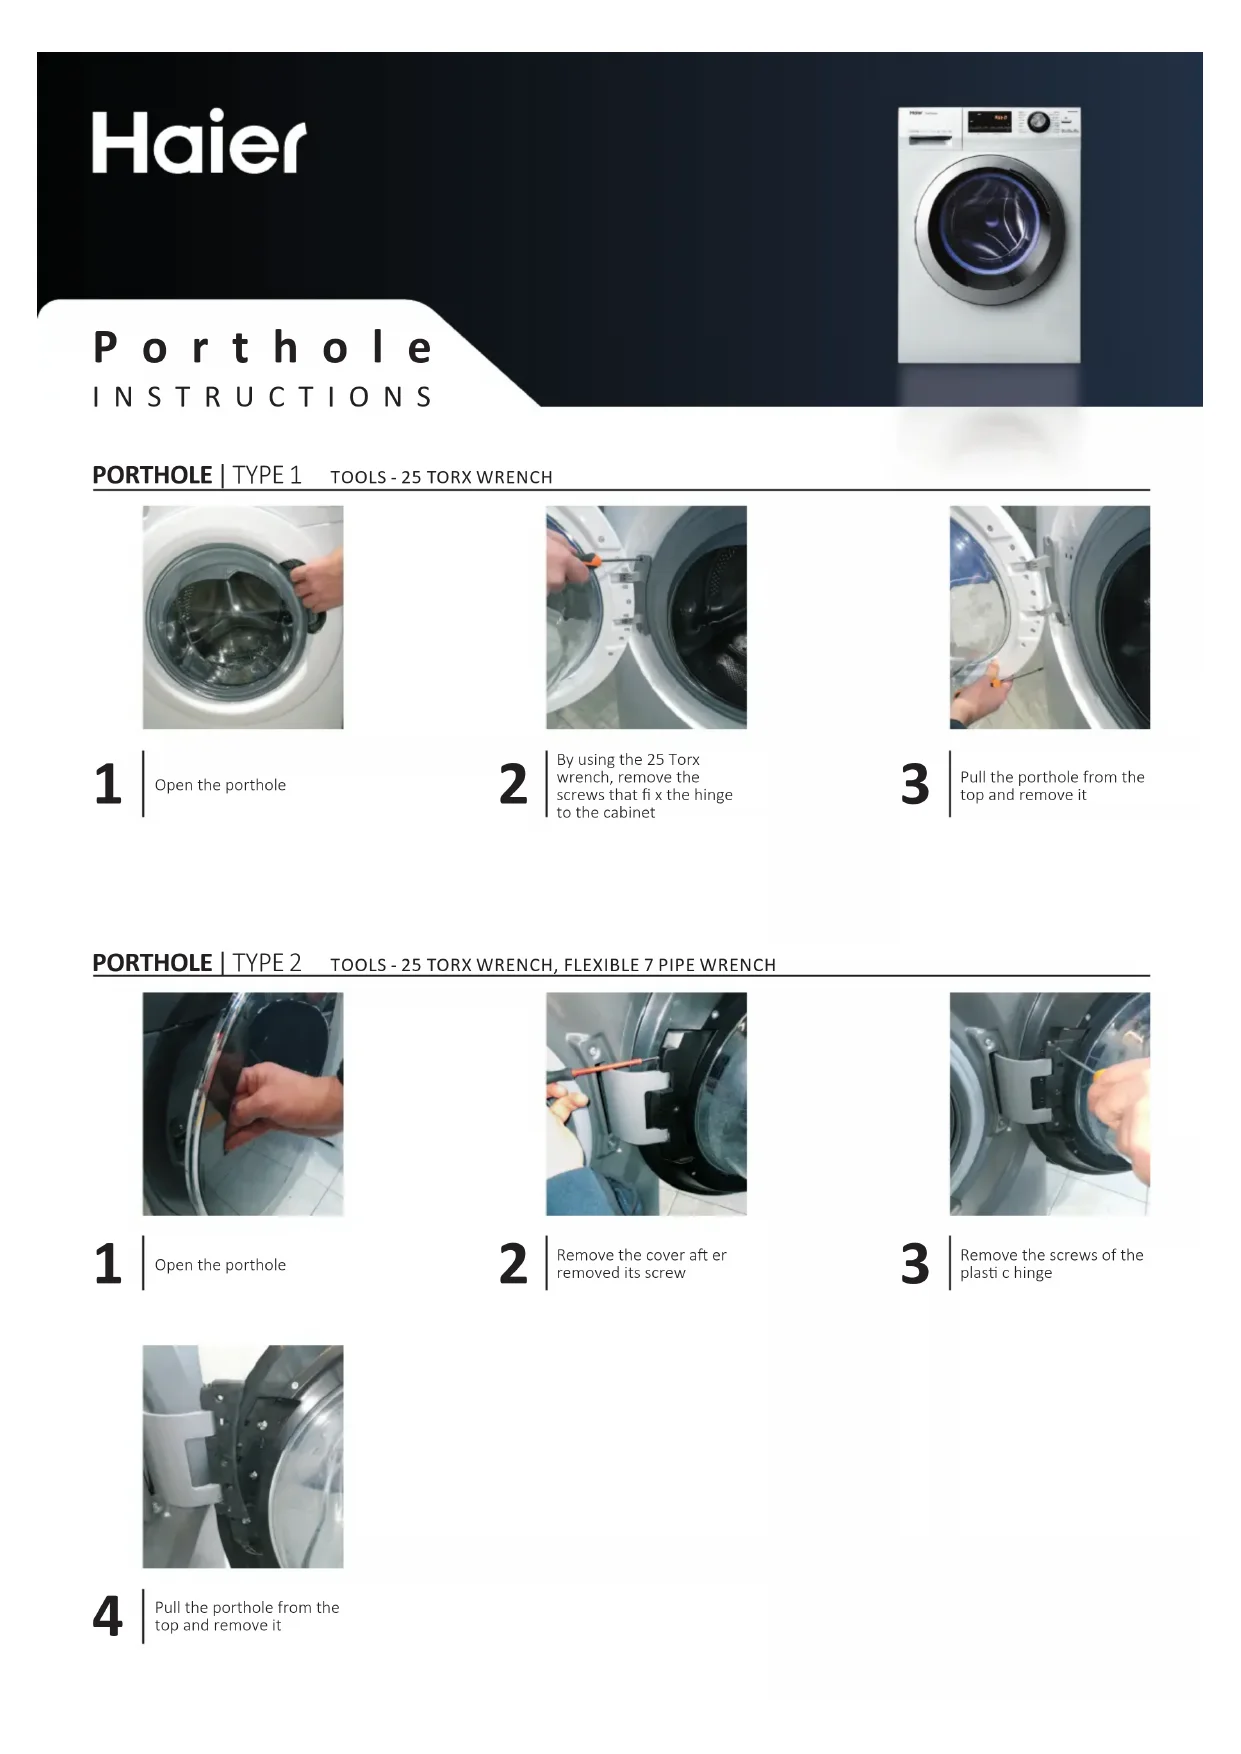
Haier
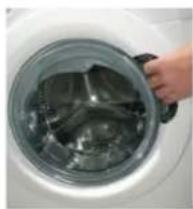
Porthole
INSTRUCTIONS
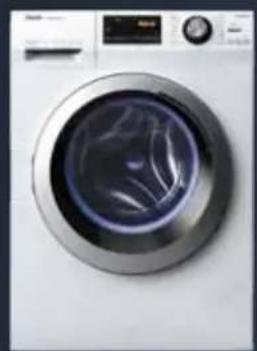
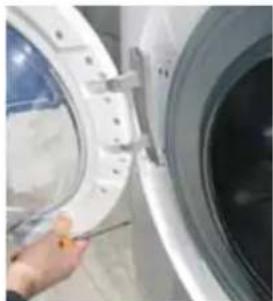
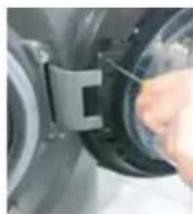
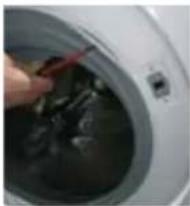
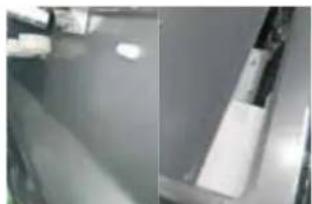
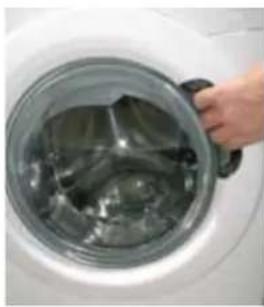
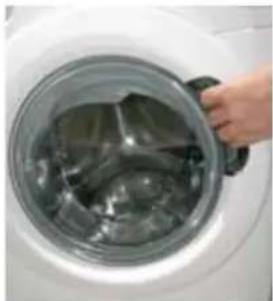
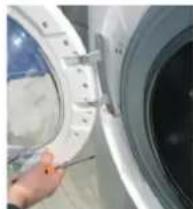
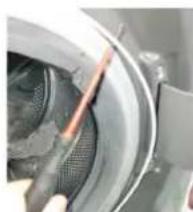
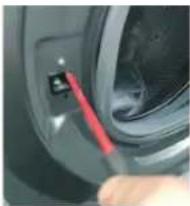
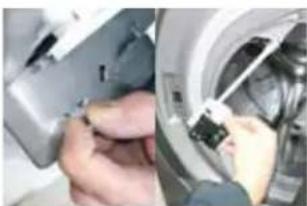
PORTHOLE | TYPE 1 TOOLS-25 TORX WRENCH
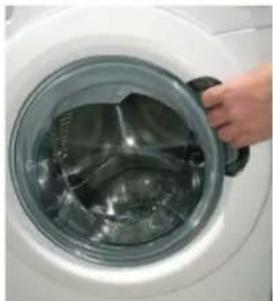
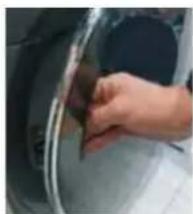
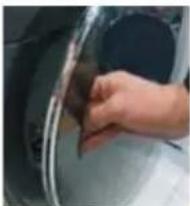
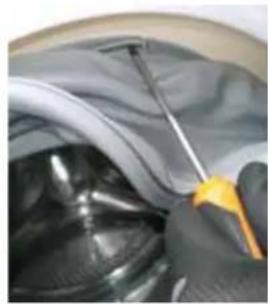
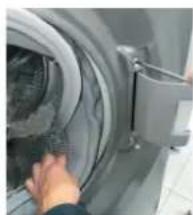
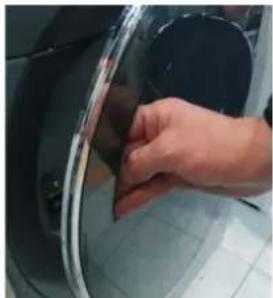
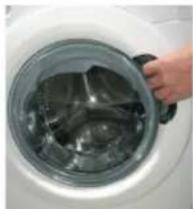
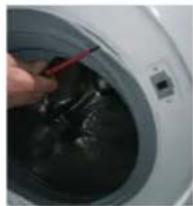
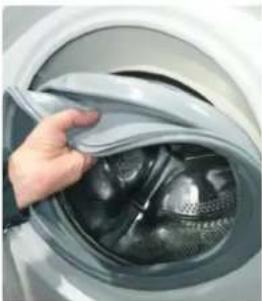
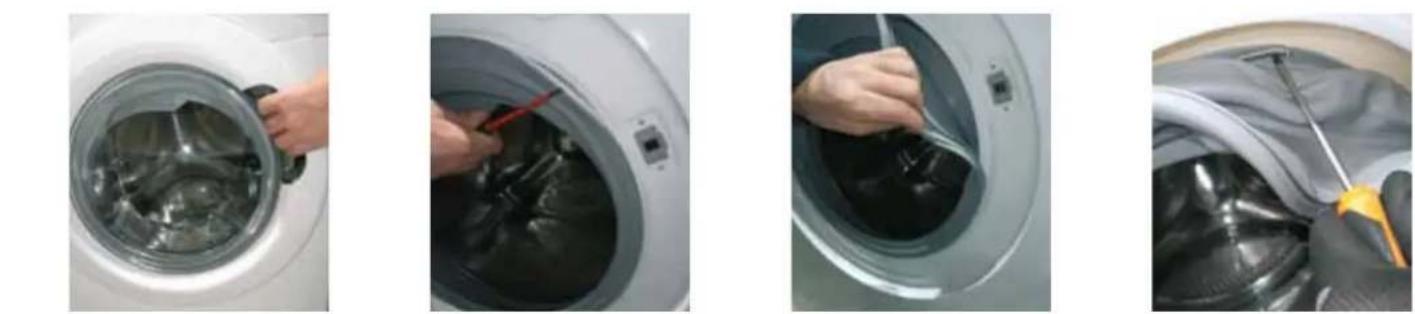
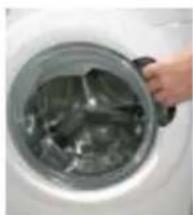
1 Open the porthole
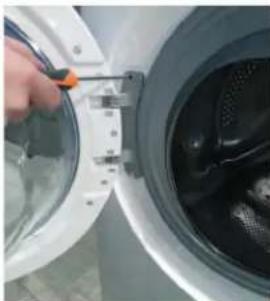
2 By using the 25 Torx wrench, remove the screws that fix the hinge to the cabinet
3 Pull the porthole from the top and remove it
PORTHOLE | TYPE 2 TOOLS - 25 TORX WRENCH, FLEXIBLE 7 PIPE WRENCH
1 Open the porthole
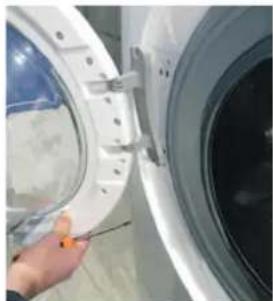
2 Remove the cover aft er removed its screw
3 Remove the screws of the plastic hinge
4 Pull the porthole from the top and remove it

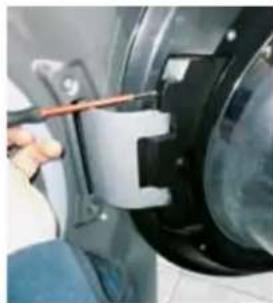
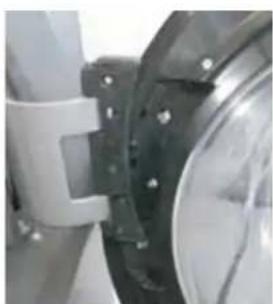
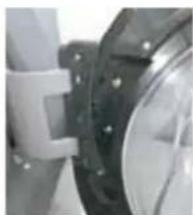
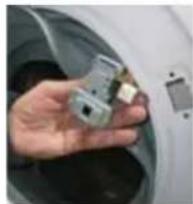
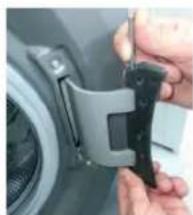
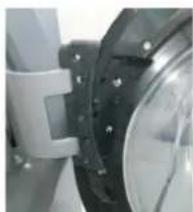
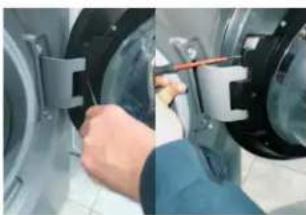
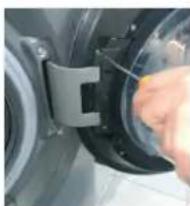
HINGE TYPE 1 TOOLS-25 TORX WRENCH
1 Open the porthole
4 Remove all the screws of the porthole
2 By using the 25 pipe wrench, remove the screws that fix the hinge to the cabinet
5 Separate the frame from the counter frame
3 Pull the porthole from the top and remove it
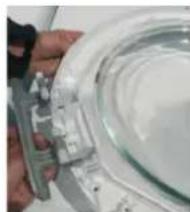
6 Replace the hinge, taking care not to lose the bushes
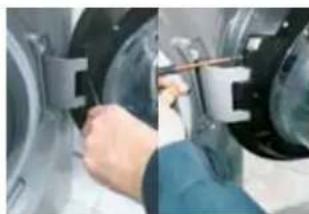
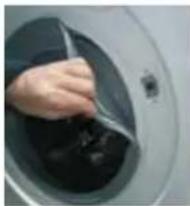
HINGE | TYPE 2 TOOLS - 25 TORX WRENCH, FLEXIBLE 7 PIPE WRENCH
1 Open the porthole
4 Pull the porthole from the top and remove it
Once the strap is removed, detach the flap from the gasket, to allow access to the inside of the product
2 Remove the cover aft er removed its screw

5 Remove the pin
8 Remove the external screws from the hinge
3 Remove the screws of the plastic hinge
6 Remove the door clip
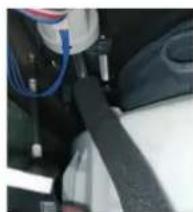
9 Remove the screws inside the cabinet with the 7 pipe wrench. Remove the hinge

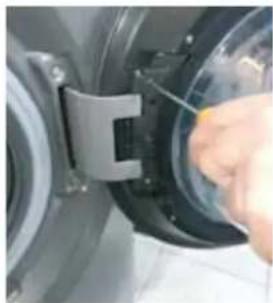
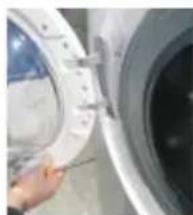
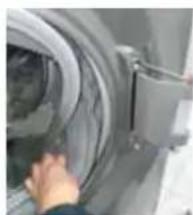
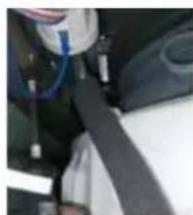
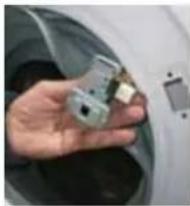
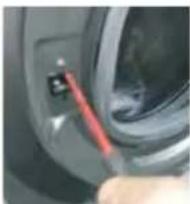
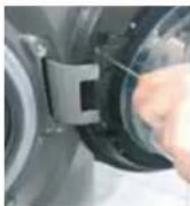
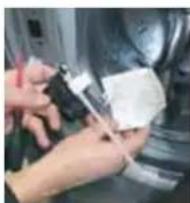
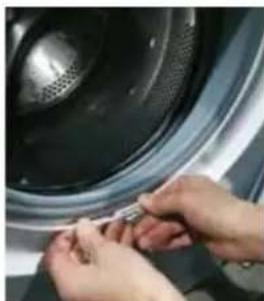
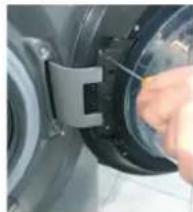
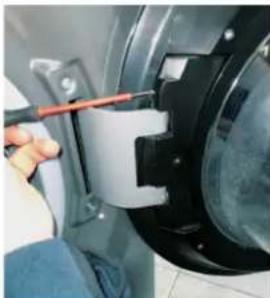
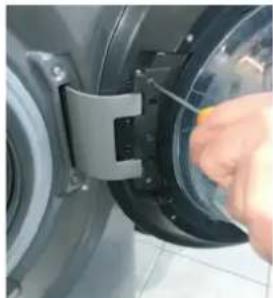
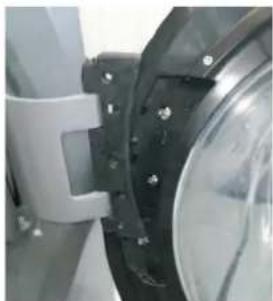
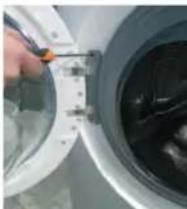
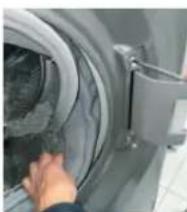
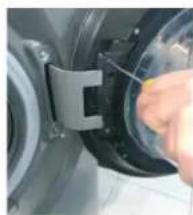
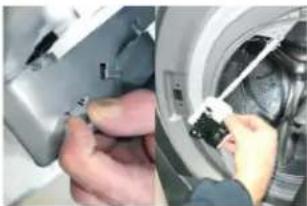
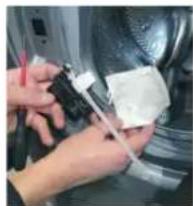
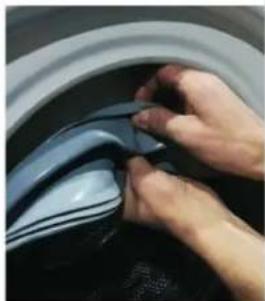
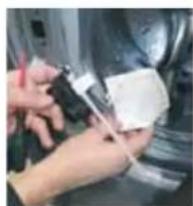
DOOR LOCK | TYPE 1 TOOLS-CROSS-HEADED SCREWDRIVER, TONG, FLAT SCREWDRIVER
1 Open the porthole
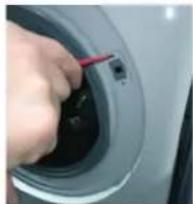
4 By using Torx wrench, remove the fixing screws of the door lock, and press its buckle.
Use the fl at screwdriver for leverage, and remove the external clamp

5 Remove the door lock
Once the clamp is removed, detach the flap from the gasket, to allow access to the inside of the product
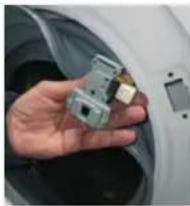
6 Disconnect the wiring, in case of "faston", pay att enti on to do not invert the wiring
DOOR LOCK | TYPE 2 TOOLS-CROSS-HEADED SCREWDRIVER, TONG, FLAT SCREWDRIVER
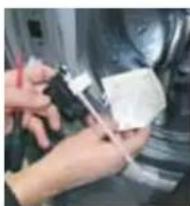
1 Open the porthole
4 By using Torx wrench, remove the fixing screws of the door lock
7 Remove the door lock.
Use the flat screwdriver for leverage, and remove the external clamp
5 Disassemble the work top and trims
8 Remove the water protection
Once the clamp is removed, detach the flap from the gasket, to allow access to the inside of the product
Disassemble the dispenser and bezel

9 Replace the door lock by paying att enti on to mechanical linkage of emergency opening and electrical connecti ons


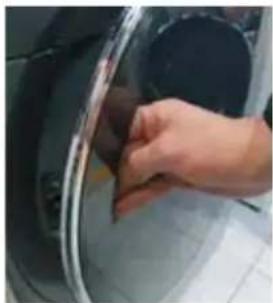
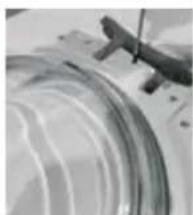
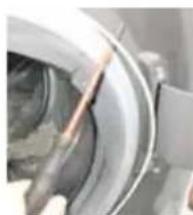
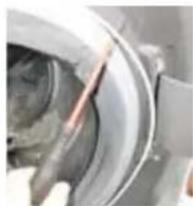
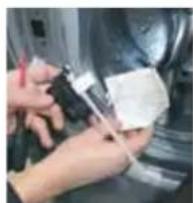
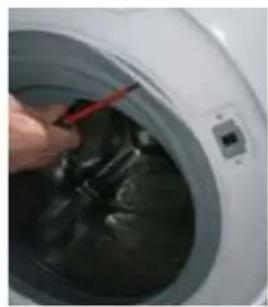
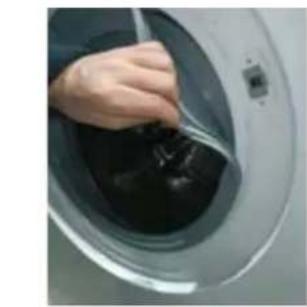
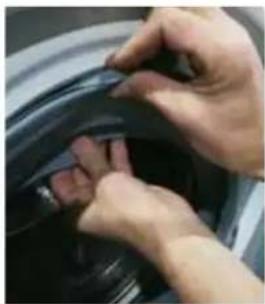
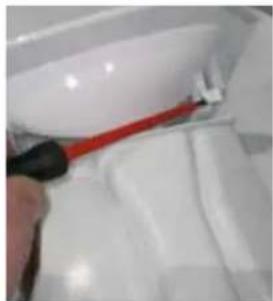
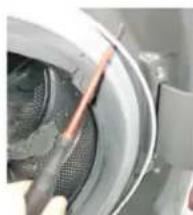
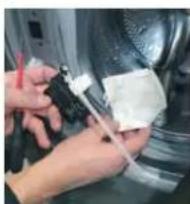
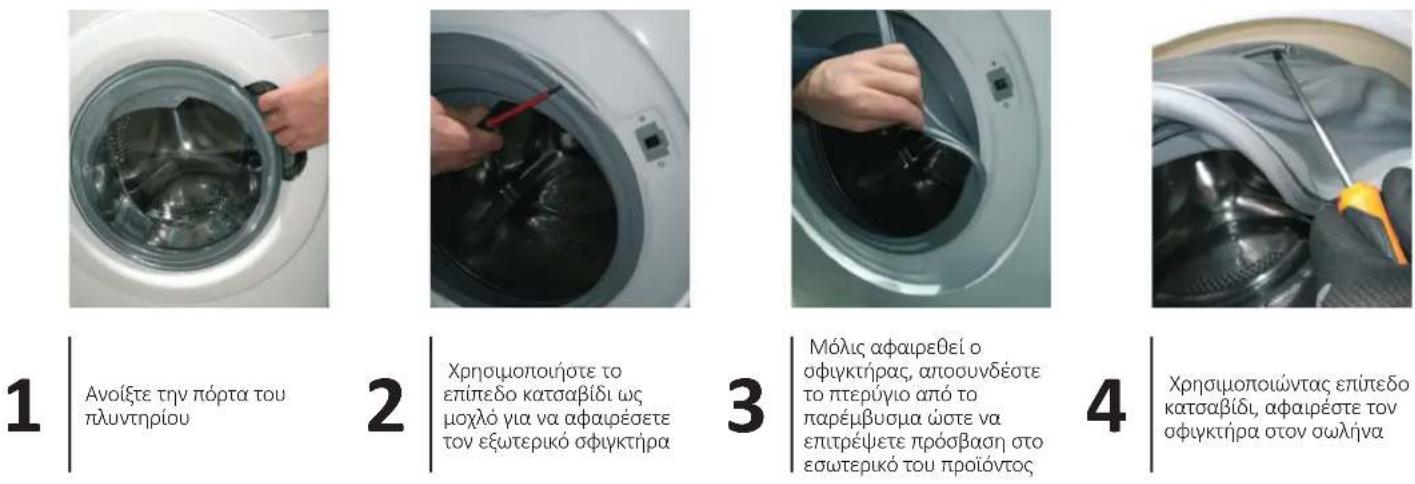
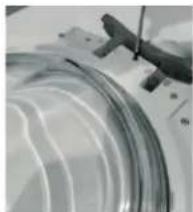
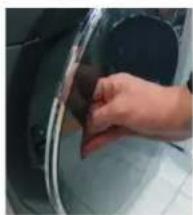
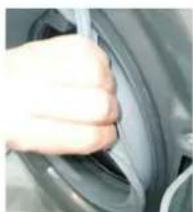
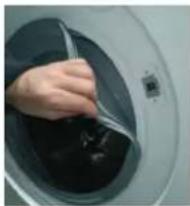
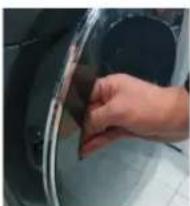
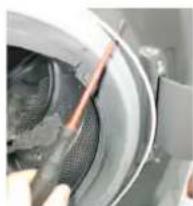
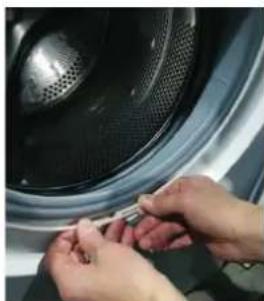
DOOR'S GASKET TOOLS - TORX WRENCH, TONG, FLAT SCREWDRIVER, TWO 7 PIPE WRENCHES
1
Open the porthole
2
Use the fl at screwdriver for leverage, and remove the external clamp
3
Once the clamp is removed, detach the flap from the gasket, to allow access to the inside of the product
4
By using fl at screwdriver, remove the clamp on the tube
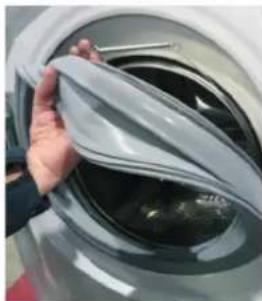
5
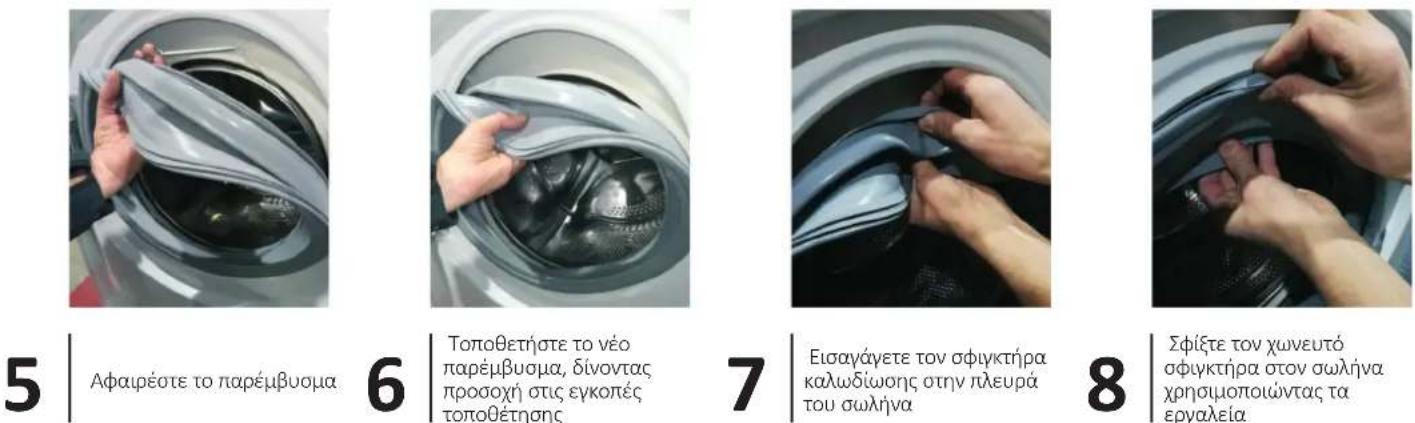
Remove the gasket
6
Place the new gasket, paying att enti on to the positi oning notches
7
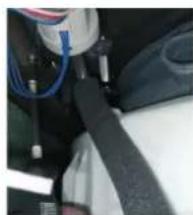
Insert wiring clamp on the tube side

- Tighten the clamp fl ush on the tube by using the tooling
9
Fit the gasket on the cabinet. Fix the external clamp and ti ghten it (if needed with tong)
Haier
Detergent drawer
INSTRUCTIONS
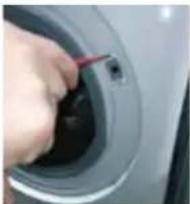
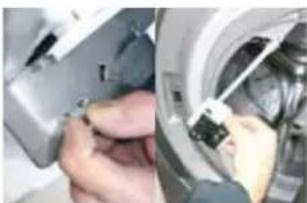
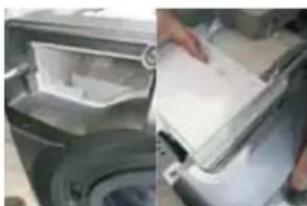
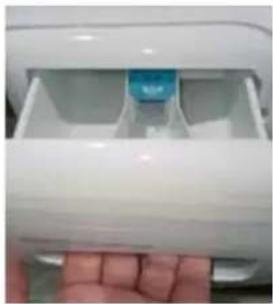
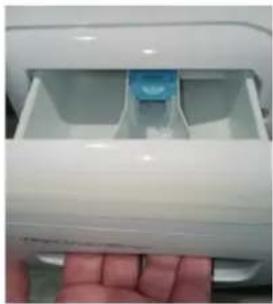
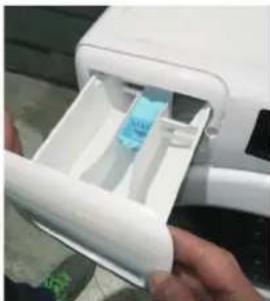
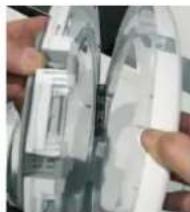
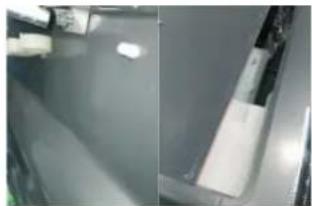
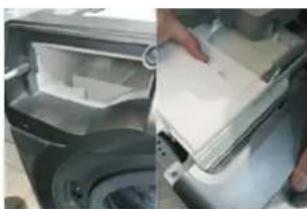
DETERGENT DRAWER
1
Open the detergent drawer
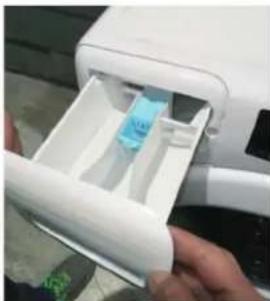
2
By using two hands, pull it out firmly

3
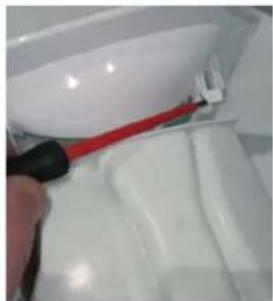
Unhook the mask from the detergent drawer, being careful not to break the hooks
Haier
Puertafrontal
INSTRUCCIONES
7 Uklonite bravu vrata
8 Uklonite zašitu od vode
9 Zamijenite bravu vrata i obratite pozornost na mehanicki spo otvora za slucaj nuze di elektriche prikljuce

BRTVA VRATA ALATI-TORX KLJUC, HVATALJKA, ODVIJAc, DVA CIJEVNA KLJUcA 7
1
Otvorite prozor
2
S pomocu ravnog odvija cnapravite polugu iuklonite vanjsku kopcu
3
Nakon sto se kopca ukloni, odvojite oblogu od brte kako biste omogucili pristup unutrasnjosti proizvoda
4
S a r k a U P U T S T V O
SARKA | TIP 1 ALAT - 25 IMBUS KLIJUC
1 Otvorite staklena vrata

4 Skinite sve srafove sa staklenih vrata

2 Pomocu vodoinstalateskog kjuca 25 ukonite Srafove koji priovscuju sarku za ormana