
Olivia - Oil press Klarstein - Free user manual and instructions
Find the device manual for free Olivia Klarstein in PDF.

| Brand | Klarstein |
| Model | Olivia |
| Product Type | Oil Press |
| Power Supply | 220-240 V~ 50/60 Hz |
| Power | 650 W |
| Article Number | 10034093, 10036343 |
| Package Contents | 1 oil container, 1 container, 1 brush, 1 black press screw, 1 red press screw, 1 instruction manual |
| Pressing Capacity | 200 g in 6 to 12 minutes |
| Compatible Seed Types | Sesame, sunflower seeds, rapeseed, peanuts, nuts, flax seeds (not recommended for soybeans) |
| Preheating Function | Yes, fast blinking red light then green |
| Reverse Function | Yes, REVERSE button |
| Overload Protection | Automatic shutdown after 45 min continuous operation or if no material for 1 min |
| Automatic Shutdown | Yes, in case of jamming or overheating |
| Preheating Temperature | Approximately 80 °C (to dry food) |
| Maintenance | Clean with a dry cloth, do not use water or detergent |
| Safety | Do not immerse in water, do not disassemble, keep out of reach of children |
| Use of Residues | The residues can be used for sauces or candies |
Frequently Asked Questions - Olivia Klarstein
User questions about Olivia Klarstein
0 question about this device. Answer the ones you know or ask your own.
Ask a new question about this device
Download the instructions for your Oil press in PDF format for free! Find your manual Olivia - Klarstein and take your electronic device back in hand. On this page are published all the documents necessary for the use of your device. Olivia by Klarstein.
USER MANUAL Olivia Klarstein
Unit 6 Riverside Business Centre
Brighton Road
Shoreham-by-Sea
BN436RE
United Kingdom
Dear Customer,
Congratulations on purchasing this device. Please read the following instructions carefully and follow them to prevent possible damages. We assume no liability for damage caused by disregard of the instructions and improper use. Scan the QR code to get access to the latest user manual and more product information.

CONTENTS
Safety Instructions 14
Scope of Supply 14
Device Description 15
Operation 16
Preparation Instructions 18
Care and Maintenance 19
Troubleshooting 20
Hints on Disposal 22
Producer 22
TECHNICAL DATA
| Item number 10034093, 10036 | 343 |
| Power supply 220-240 V~ 50/60 Hz | |
| Power rating 650 W | |
SAFETY INSTRUCTIONS
- Do not immerse the appliance in water.
- Do not disassemble the appliance.
- Do not fill the funnel with water.
- Keep the appliance away from fire.
- Place the appliance out of the reach of children.
- Be careful not to burn your hands.
- Only use the appliance for its intended purpose.
- If the power cord is damaged, have it replaced by qualified personnel for your own safety.
- This equipment may only be used to squeeze materials such as sesame seeds, sunflower seeds, rapeseed and peanuts.
- This equipment is intended for use in the home and similar facilities, such as kitchenettes in shops, offices, and other working environments in manor houses, hotels, motels, and other non-business catering facilities.
- This appliance is not intended for use by persons (including children) who have reduced physical, sensory or mental abilities or do not have sufficient experience and knowledge, unless they have received instructions for the use of the appliance from or are supervised by a person responsible for their safety.
SCOPE OF SUPPLY
| Accessory Qty | |
| Oil container 1 | |
| Container 1 | |
| Brush 1 | |
| Black pressing shaft for usual seed for common oily seeds, kernels and nuts. | 1 |
| Red pressing shaft for smaller oily seed. 1 | |
| Manual 1 |
DEVICE DESCRIPTION
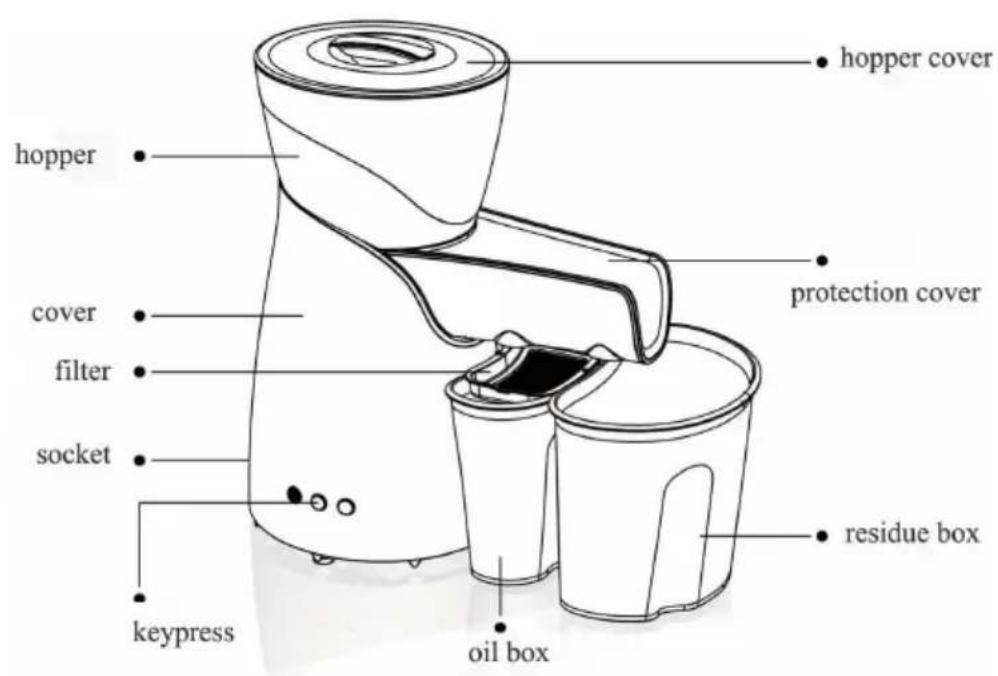
OPERATION
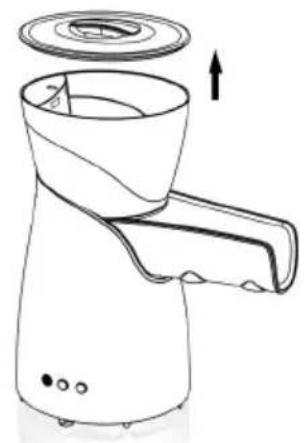
- Open the hopper cover.
- Put materials into hopper.
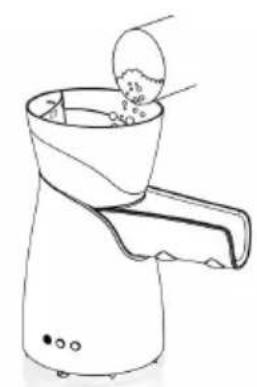
Note: Use good material, bad material will be harmful to health. Raw material should be cleaned without impurities, stones, metal drill, otherwise it will seriously damage the machine. Please smash the materials which sizes are bigger than peanut. Oil extraction rate of raw material after solarization and stir-frying(within 80^ ) will be higher.
- Put the oil box and residue box to the position shown in the picture. (Note: Please put hopper and hopper lid in right position, otherwise it would stop working. Please do not pull hopper out if there is still material in the hopper.)
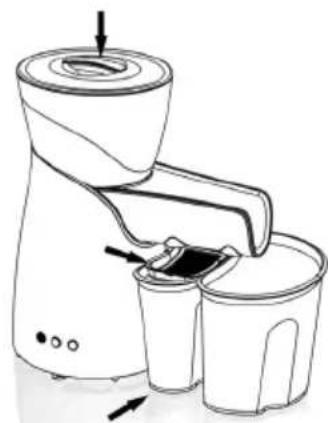
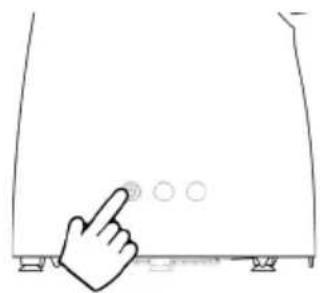
- Insert the mains plug into a 220 V socket. Press the power button and the PAUSE/START button (the operating light flashes red).
- It reaches setting temperature (guild lights turn to green if reached the setting temperature) in about one minute and starts to squeeze oil. Oil drops into container directly.
Note: It would not start to work if not press PAUSE/START button even reaches the setting temperature.
- After working 45 minutes continuously or the hopper without material over 1 minute, it will access to protection function and guild light turns slow sparkling red. Please press power button again to proceed.
Note: The appliance automatically stops working if the materials in the hopper are too large. If this happens, restart the machine, press the PAUSE/START button and shred the materials using the accessories provided with the machine (do not insert your hand or the shredding accessory inside the hopper as this may damage the machine). If material gets stuck in the hopper, the protection mode is activated immediately. Press the REVERSE button for a few seconds and then press the PAUSE/START button to resume operation.
Note: The oil content of soybeans is less than 10% and their use is therefore not recommended.
PREPARATION INSTRUCTIONS
Hints on production of peanut oil
To make high quality oil and avoid machine getting stuck .please fry the peanuts dry before pressing .Cause the size, hardness and quality are different in all cities.
General Notes
- Please choose well-stacked, normal color and high oil content qualified hygiene standards material .moldy and rotten Material is not allowed to use for pressing oil.
- To make sure machine work well and high oil extraction rate, please choose 90% dryness material, we suggest fry the material with low temperature for half hour or put in the sun for one hour.
- To make sure the pressing shaft is sterile, please use soft dry towel instead of water or scour for cleaning.
- To make sure machine service lifetime, please strictly refer to manual book.
- Please squeeze as much oil as you need. Take it in time after precipitation.(healthy quantity 25g /person everyday).
- It is the best choice for child, gravida and the old. Squeeze the oil with multi option according to different taste and nutritional requirement.
- Residue can be taken fully advantage of making into sauce or candy.
- To make the oil quality better, please make the peanuts dry (fry or dry in the sun).
| Raw material Oil content of raw material (%) | Oil extraction rate (%) |
| Peanut 40 – 45 36 – 42 | |
| Sesame 45 – 50 37 – 45 | |
| Rapeseed 30 – 35 23 – 30 | |
| Sunflower seed 45 – 50 40 – 46 | |
| Flaxseed 35 – 40 30 – 34 |
CARE AND MAINTENANCE
- Please wash the machine in case of residue going bad.
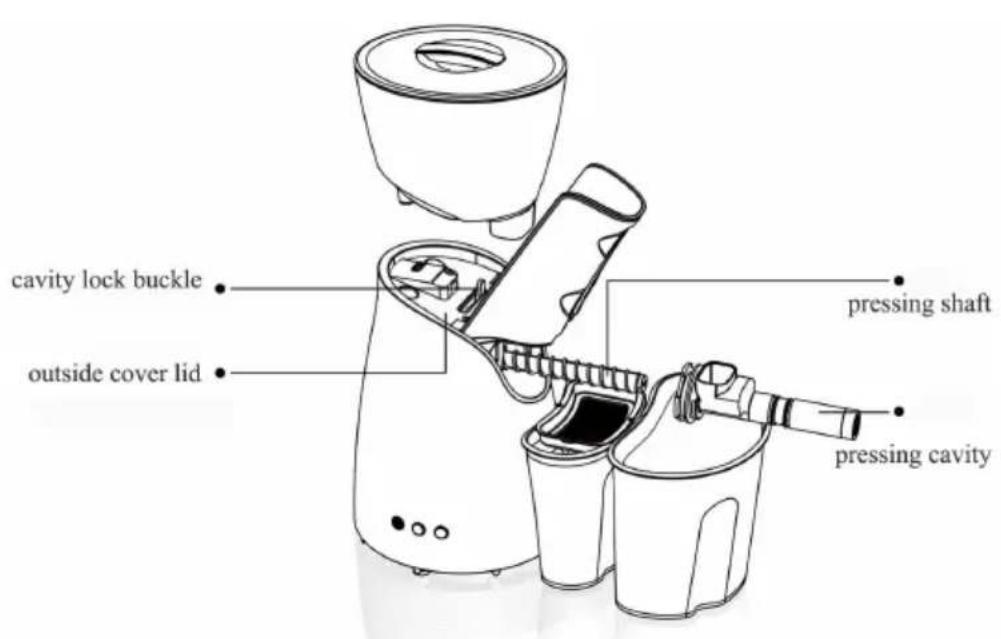
- Take the hopper away, move the cavity lock buckle to specify position (refer to printed guiding direction on top lid).
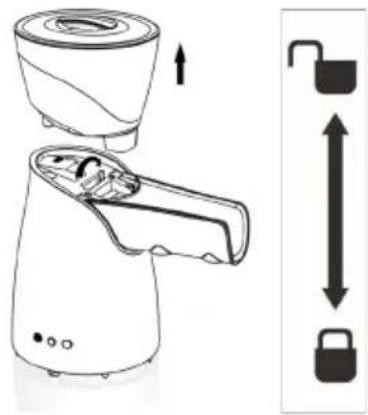
- Rotate the cavity to the biggest angle. (Note: Do not place your fingers on the cavity to avoid injury and keep children away.)
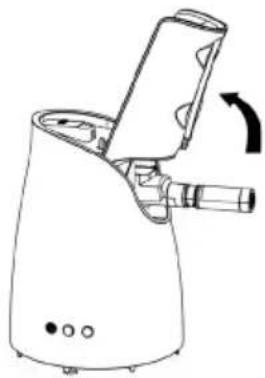
- Pull out the cavity parts and pressing shaft, clean it with soft dry towel.
Note: Do not use corrosive scour.
- Please clean the cavity, lock buckle and residue in time with attached tool.
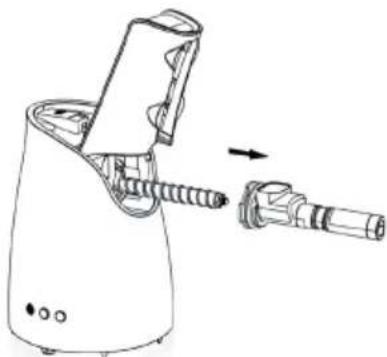
- Please set the pressing shaft first then cavity, make the cavity buckle lock the parts refer to the guiding note on the top lid, rotate the cavity protection cover off.
TROUBLESHOOTING
| Problem Possible Solution | |
| Pressing shaft get stuck. A: Press REVERSE button for 5-10 seconds, then press PAUSE/START button to work again.B: Pull off the plug, dismantle the cavity and pressing shaft, clean out the left residue from hopper and feeding hole, then assemble to restart again.. | |
| Motor stops working without oil coming out. | A: It needs 30 seconds for machine to be pre-heated.B: Check if hopper and hopper lid set rightly. (The hopper can be set rightly only if cavity lock buckle on the right position.) |
| Motor working without oil coming out. | A: Cavity protection cover has not rotated to the right position. |
| Motor stops by accident. A: check if the hopper without material over 1 minute, please press PAUSE/START button to restart again if in protection proceed.B: It would be in protection proceed if keep working over 45 minutesC: Check if big size material in the hopper got stuck over one minute, it would be in protection proceed with this case. please restart the machine, mix material with Muddle.D: Check if hopper or hopper cover in the right position. | |
| Hopper set at the wrong position. A: Check if cavity lock buckle in the right position. | |
| Cavity lock buckle cannot be set to right position. | A: Set the pressing shaft in the hexagon hole first then the cavity. |
Light Codes
| Guiding light reference Machine status | |
| Quick flashing red light Pre-heating | |
| Red light Power on but not started | |
| Slow flashing red light Pause | |
| Green light Working | |
| Quick flashing green light Rollback | |
| Flashing green and red light withnoise | Machine breakdown |
DISPOSAL CONSIDERATIONS

If there is a legal regulation for the disposal of electrical and electronic devices in your country, this symbol on the product or on the packaging indicates that this product must not be disposed of with household waste. Instead, it must be taken to a collection point for the recycling of electrical and electronic equipment. By disposing of it in accordance with the rules, you are protecting the environment and the health of your fellow human beings from negative consequences. For information about the recycling and disposal of this product, please contact your local authority or your household waste disposal service.
MANUFACTURER & IMPORTER (UK)
Manufacturer:
Chal-Tec GmbH, Wallstrasse 16, 10179 Berlin, Germany.
Importer for Great Britain:
Chal-Tec UK limited
Unit 6 Riverside Business Centre
Brighton Road
Shoreham-by-Sea
BN436RE
United Kingdom
Chere cliente, cher client,
Contenade I'emballage 24
Unit 6 Riverside Business Centre
Brighton Road
Shoreham-by-Sea
BN436RE
United Kingdom
Gentile cliente,
PRODUTTORE IMPORTATORE (UK)
Produto:
Chal-Tec GmbH, Wallstraße 16, 10179 Berlin, Germania.
Unit 6 Riverside Business Centre
Brighton Road
Shoreham-by-Sea
BN436RE
United Kingdom
Estimado cliente,
Unit 6 Riverside Business Centre
Brighton Road
Shoreham-by-Sea
BN436RE
United Kingdom


KLARSTEIN