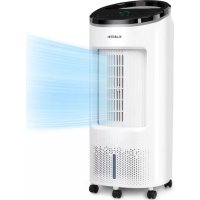
USER MANUAL IceWind Plus Klarstein
INHALTSVERZEICHNIS
Member of Berlin Brands Group
Handwerkerstr. 11
15366 Dahlwitz-Hoppegarten
Deutschland
natural_image
Symbol of a trash bin crossed with a diagonal line, no text or numbers present
Berlin Brands Group UK Ltd
PO Box 1145
Oxford, OX1 9UW
United Kingdom
Dear Customer,
Congratulations on purchasing this equipment. Please read this manual carefully and take care of the following hints to avoid damages. Any failure caused by ignoring the items and cautions mentioned in the instruction manual is not covered by our warranty and any liability. Scan the QR code to get access to the latest user manual and other information about the product.

CONTENTS
Safety Instructions 14
Product description 15
Control Panel and Key Functions 16
Installation 16
Operation 18
Cleaning and Care 19
Disposal Considerations 20
Manufacturer & Importer (UK) 20
TECHNICAL DATA
| Item number 10033433, 10035785 | |
| Power supply 220-240 V ~ 50-60 Hz | |
| Power consumption 65 W | |
SAFETY INSTRCUTIONS
- Connect to a main power supplier of 220-240V\~50-60 Hz only.
- Keep the appliance and cable away from sources of heat, sharp objects or anything that may cause damage.
- Do not place the cord under carpets. Do not cover the cord with small clothes, shirts or other similar elements. Place the cord away from traffic areas in order to avoid any risk of tripping over.
- Do not operate the appliance if the cable or plug damaged.
- If the supply cord is damaged, it must be replaced by the manufacturer, its service agent or similarly qualified persons in order to avoid a hazard.
- Indoor use only.
- Do not cover the machine during using.
• Always operate on a stable flat horizontal surface.
- Ensure the appliance is switched OFF before connecting to the mains power supply.
- Always ensure that hands are dry before operating or adjusting any switch on the product or touching the plug and mains supply connections.
- Do not leave this appliance unattended when it's in use. Turn off and disconnect the appliance when you leave the room for an extended period.
- Switch off the appliance and unplug from the mains socket when not in use, before filling, cleaning or other maintain.
- To disconnect the appliance, switch it "OFF", and then remove the plug from outlet. Do not pull the cord to disconnect the plug.
- This appliance can be used by children aged from 8 years and above and persons with reduced physical, sensory or mental capabilities or lack of experience and knowledge if they have been given supervision or instruction concerning use of the appliance in a safe way and understand the hazards involved. Children shall not play with the appliance.
- Cleaning and user maintenance shall not be made by children without supervision.
- Use the appliance only as described in this manual.
- Do not insert your fingers in the openings of the guard.
- Do not leave hair, tissue, tablecloths, clothes or curtains near all openings of the fan, they could be sucked into the fan and be taken within the internal moving parts that could cause injury or damage.
- Do not use the appliance in wet or damp locations such as bathrooms.
- Do not operate the appliance when it's not mounted on its wheels or if it's lying on the side.
• Make sure the cord is completely extended before use.
- Place the appliance on a flat horizontal surface. It must not be at an incline during use.
- When in operation, evaporative coolers moisturize the ambient air. Over-humidification of residential rooms should be avoided. Recommendation: 40 – 50 % relative humidity. (Excessive humidity of the air can damage the home and cause health problems.)
- The appliance may only be set up on water- and moisture-proof flooring materials (spilling some drops of water is unavoidable when the content of the tank is changed).
- With each and every change of tank content, completely remove residual water from the equipment. To prevent nucleation, remove residual water from the equipment and water tank every time after three days of use.
PRODUCT DESCRIPTION
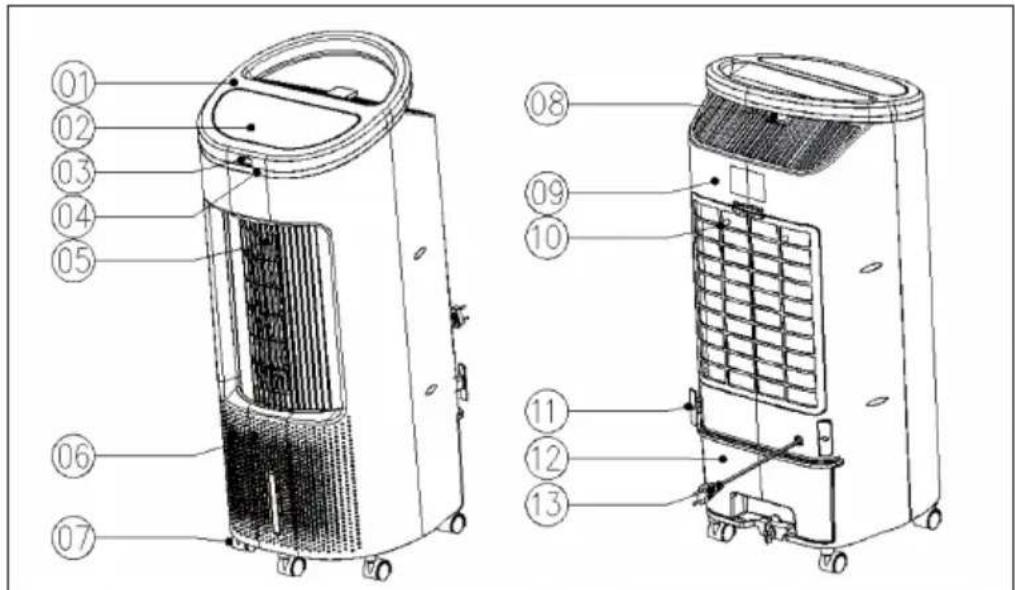
| 1 | Upper cover | 8 | Remote control |
| 2 | Control panel | 9 | Back |
| 3 | Remote sensor | 10 | Filters |
| 4 | Decorative ring | 11 | Filter frame |
| 5 | Air outlet | 12 | Water tank |
| 6 | Front bowl | 13 | Power cord |
| 7 | Rolls | | |
CONTROL PANEL AND KEY FUNCTIONS
| 1h 2h 4h 8h |
| On/Off |
| Timer setting: 1, 2, 4, 8 h (hours) |
| Air humidification |
| Swing |
| Mode: normal > natural ( ) sleep mode ( ) |
| Wing speed: high > medium > low > quiet |
INSTALLATION
Assembling the castors
Put the appliance on a flat surface, take out the wrench from foam box, then assemble the castors.
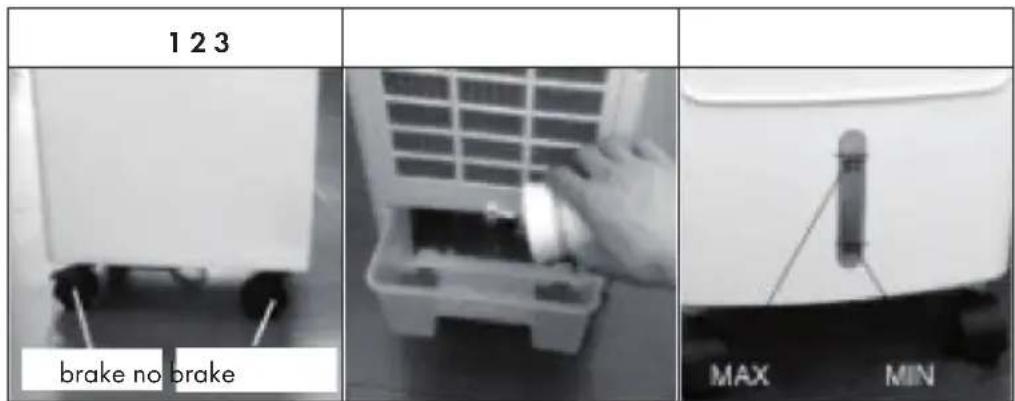
Note: The back castors are with brake, but the front ones are without (see map 1).
Filling the water tank
- Draw out half of the water tank, then add water (see map 2).
• Pay attention to the level of water tank when add water.(map 3)
- The level of water tank should not over "MAX" scale at any time, when humidifying, the total level of water tank should not below "MIN" scale.
- Add ice or the frozen cooling packs if you want to maximize the cooling effect of the device. Note that the water level indicator must still not exceed the maximum mark.
Note: The cooling pack has already been filled with water at the factory.
Use of the cooling packs
The cooling packs have a special cold holding function. They can absorb heat and lower the water temperature to a temperature below the ambient temperature. How to use the cooling packs:
1 Place the cooling packs in the freezer and wait until the cooling packs are completely frozen.
2 Pull out the water tank and place the cooling packs inside.
3 Two cooling packs are included in the scope of delivery so that they can be used alternately or together.
OPERATION
Before first use
Remove all packing material and read the instructions completely. The device is ready for use immediately.
Switching on the unit
As soon as the device is switched on, all displays light up briefly. A double signal sounds, the air outlet moves back from the current angle to 0^ and the unit switches to Standbx mode. If you do not take any action for more than 1 minute, the display will darken to 33% of the original brightness. Press any button to turn the display back on.
Operation via key on the control panel
- On/Off: Press the button to start the unit in normal wind mode. The air outlet opens automatically. Press the button again to return to standby mode. The fan stops and the outlet closes automatically. To turn the unit off completely, unplug the appliance from the wall outlet.
- Wind speed: After the device has been switched on, the device is in normal wind mode. Press the but-ton several times to set one of the following wind speeds: high > medium > low > quiet. If you select „low“, the fan will first run at medium speed and then change to low speed.
- Wind mode: Press the button repeatedly to select one of the following modes: Normal > Natural ( ) Sleep mode ( ). The corresponding indicator on the display will light. In natural mode, the wind speed changes regularly and the cool air is distributed throughout the room. In natural mode, the speed is automatically controlled and not manually adjustable. In sleep mode, the air is distributed to ensure a pleasant sleep. In sleep mode, all speeds are manually adjustable.
- Timer: Press the button several times to select one of the following settings:
1 hour > 2 hours > 4 hours > 8 hours. If the corresponding LED is off, no timer is active. After you have selected the desired time, the corresponding indicator lights up on the display. As soon as the time has elapsed, the unit switches off and the display goes out.
- Swing: Press the button to swing the unit to the right and left. Press the button again to stop the oscillation.
CLEANING AND CARE
Note: Ensure that the fan is switched off from the supply mains before removing the air filter screen.
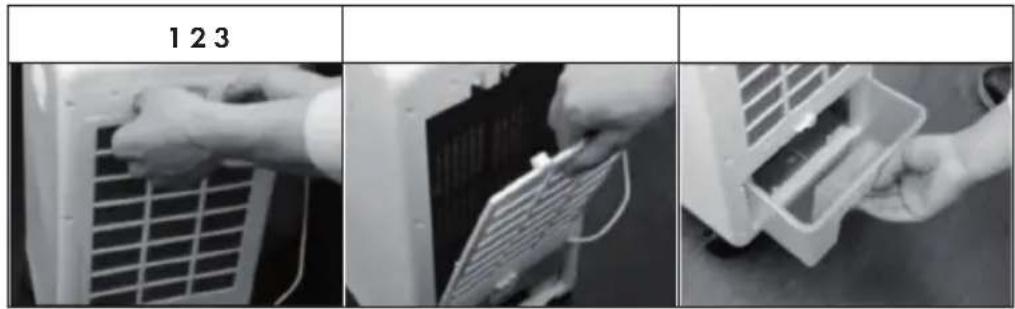
Before cleaning
- Turn the power off and unplug the power cord. Always disconnect the power plug before cleaning to avoid electric shock or mechanical damage.
- Use a commercially available cleaning agent and a soft brush for cleaning. Do not use chemical cleaners.
Cleaning the surface
- Wipe the surface with a damp cloth. Do not use water, as it may penetrate into the unit and damage the electronics.
- Do not use corrosive cleaning agents or solvents.
Storage
- If the product will not be used for an extended period of time, unplug the power cord and wrap the product to prevent dust from entering the housing.
• After packing, store in a dry, ventilated place.
DISPOSAL CONSIDERATIONS
natural_image
Symbol of a trash bin crossed with a diagonal line, no text or numbers present
If there is a legal regulation for the disposal of electrical and electronic devices in your country, this symbol on the product or on the packaging indicates that this product must not be disposed of with household waste. Instead, it must be taken to a collection point for the recycling of electrical and electronic equipment. By disposing of it in accordance with the rules, you are protecting the environment and the health of your fellow human beings from negative consequences. For information about the recycling and disposal of this product, please contact your local authority or your household waste disposal service.
This product contains batteries. If there is a legal regulation for the disposal of batteries in your country, the batteries must not be disposed of with household waste. Find out about local regulations for disposing of batteries. By disposing of them in accordance with the rules, you are protecting the environment and the health of your fellow human beings from negative consequences.
MANUFACTURER & IMPORTER (UK)
Manufacturer:
Chal-Tec GmbH, Wallstrasse 16, 10179 Berlin, Germany.
Importer for Great Britain:
Berlin Brands Group UK Ltd
PO Box 1145
Oxford, OX1 9UW
United Kingdom
Estimado cliente:
ÍNDICE
natural_image
Symbol of a trash bin crossed with a diagonal line, no text or numbers present
Berlin Brands Group UK Ltd
PO Box 1145
Oxford, OX1 9UW
United Kingdom
Chère cliente, cher client,
SOMMAIRE
natural_image
Symbol of a trash bin crossed with a diagonal line, no text or numbers present
Berlin Brands Group UK Ltd
PO Box 1145
Oxford, OX1 9UW
United Kingdom
Gentile Cliente,
INDICE
natural_image
Symbol of a trash bin crossed with a diagonal line, no text or labels present
PRODUTTORE E IMPORTATORE (UK)
Produttore:
Chal-Tec GmbH, Wallstraße 16, 10179 Berlino, Germania.
Berlin Brands Group UK Ltd
PO Box 1145
Oxford, OX1 9UW
United Kingdom

bar
| Category | Value |
|---|---|
| Category 1 | 100 |
| Category 2 | 100 |
| Category 3 | 100 |
| Category 4 | 100 |
| Category 5 | 100 |
| Category 6 | 100 |
| Category 7 | 100 |
| Category 8 | 100 |
| Category 9 | 100 |
| Category 10 | 100 |
| Category 11 | 100 |
| Category 12 | 100 |
| Category 13 | 100 |
| Category 14 | 100 |
| Category 15 | 100 |
| Category 16 | 100 |
| Category 17 | 100 |
| Category 18 | 100 |
| Category 19 | 100 |
| Category 20 | 100 |
| Category 21 | 100 |
| Category 22 | 100 |
| Category 23 | 100 |
| Category 24 | 100 |
| Category 25 | 100 |
| Category 26 | 100 |
| Category 27 | 100 |
| Category 28 | 100 |
| Category 29 | 100 |
| Category 30 | 100 |
| Category 31 | 100 |
| Category 32 | 100 |
| Category 33 | 100 |
| Category 34 | 100 |
| Category 35 | 100 |
| Category 36 | 100 |
| Category 37 | 100 |
| Category 38 | 100 |
| Category 39 | 100 |
| Category 40 | 100 |
| Category 41 | 100 |
| Category 42 | 100 |
| Category 43 | 100 |
| Category 44 | 100 |
| Category 45 | 100 |
| Category 46 | 100 |
| Category 47 | 100 |
| Category 48 | 100 |
| Category 49 | 100 |
| Category 50 | 100 |
| Category 51 | 100 |
| Category 52 | 100 |
| Category 53 | 100 |
| Category 54 | 100 |
| Category 55 | 100 |
| Category 56 | 100 |
| Category 57 | 100 |
| Category 58 | 100 |
| Category 59 | 100 |
| Category 60 | 100 |
| Category 61 | 100 |
| Category 62 | 100 |
| Category 63 | 100 |
| Category 64 | 100 |
| Category 65 | 100 |
| Category 66 | 100 |
| Category 67 | 100 |
| Category 68 | 100 |
| Category 69 | 100 |
| Category 70 | 100 |
| Category 71 | 100 |
| Category 72 | 100 |
| Category 73 | 100 |
| Category 74 | 100 |
| Category 75 | 100 |
| Category 76 | 100 |
| Category 77 | 100 |
| Category 78 | 100 |
| Category 79 | 100 |
| Category 80 | 100 |
| Category 81 | 100 |
| Category 82 | 100 |
| Category 83 | 100 |
| Category 84 | 100 |
| Category 85 | 100 |
| Category 86 | 100 |
| Category 87 | 100 |
| Category 88 | 100 |
| Category 89 | 100 |
| Category 90 | 100 |
| Category 91 | 100 |
| Category 92 | 100 |
| Category 93 | 100 |
| Category 94 | 100 |
| Category 95 | 100 |
| Category 96 | 100 |
| Category 97 | 100 |
| Category 98 | 100 |
| Category 99 | 100 |
| Total (Total) = [sum of bars] / [values] * (sum of bars + bars) * (sum of bars + bars) * (sum of bars + bars). The values in the table represent the sum of the bars and the corresponding sum of the bars. There is no additional data series or categories specified in the code.

KLARSTEIN