
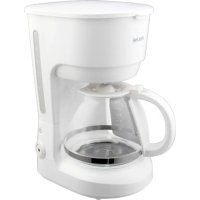
CBE16 - Coffee maker PROLINE - Free user manual and instructions
Find the device manual for free CBE16 PROLINE in PDF.
| Product type | Combined coffee maker (filter + espresso) |
| Brand | Proline |
| Model | CBE16 |
| Power supply | 220-240 V ~ 50 Hz, 1850 W |
| Water tank capacity | 1.2 L (about 10 cups) |
| Filter coffee function | With delayed programming and keep warm (30 min) |
| Espresso function | With portafilter and high-pressure pump |
| Cappuccino function | With steam wand for frothing milk |
| Hot water / steam function | For tea or hot chocolate |
| Control panel | On/off, programming, steam, pump buttons |
| Display | Digital clock and programming display |
| Safety | Automatic shut-off, overheating protection, do not immerse |
| Carafe material | Glass with insulating handle |
| Included filters | Nylon filter for drip coffee, metal filter for espresso |
| Cup warming tray | Integrated on top of the appliance |
| Cleaning | Regular descaling recommended (every 2-3 months) |
| Approximate dimensions | 30 x 20 x 35 cm |
| Approximate weight | 5 kg |
| Usage | Household only |
Frequently Asked Questions - CBE16 PROLINE
User questions about CBE16 PROLINE
0 question about this device. Answer the ones you know or ask your own.
Ask a new question about this device
Download the instructions for your Coffee maker in PDF format for free! Find your manual CBE16 - PROLINE and take your electronic device back in hand. On this page are published all the documents necessary for the use of your device. CBE16 by PROLINE.
USER MANUAL CBE16 PROLINE
Programming the Automatic Start 7
MAKING ESPRESSO. 7-8
MAKING CAPPUCCINO 9
MAKING % O+ WA+ER OR BEVERAGES. 9-10
CLEANING AND DESCALING 10-11
SPECIFICA+IONS. 11
WARNInaSrrrrrrrrrrrrrrrrrrrrrrrrrrrrr
+his appliance is intended for domestic household use only and should not be used for any other purpose or in any other application9 such as for non-domestic use or in a commercial environment.
If the supply cord is damaged9 it must be replaced by the manufacturer9 its service agent or similarly qualified persons in order to avoid a hazard.
+he appliance must not be immersed.
WARNING: +he filling aperture must not be opened during use.
+his appliance can be used by children aged from 8 years and above if they have been given supervision or instruction concerning use of the appliance in a safe way and if they understand the hazards involved. Cleaning and user maintenance shall not be made by children unless they are older than 8 and supervised. Keep the
appliance and its cord out of reach of children aged less than 8 years.
Appliances can be used by persons with reduced physical9 sensory or mental capabilities or lack of experience and knowledge if they have been given supervision or instruction concerning use of the appliance in a safe way and understand the hazards involved.
Children shall not play with the appliance.
+he surfaces are liable to get hot during use.
For the details on how to clean surfaces in contact with food and descaling please see section "Cleaning and descaling" on pages 10-11
WARNING: Risks of injuries if you don't use this appliance correctly.
IMPORTANTrSAóETYrINSTRUJTIONSr
- Switch off and unplug the appliance from the mains socket when not in use or before cleaning1
- Allow the appliance to cool before attaching accessories or cleaning 1
- +he use of accessory attachments not recommended by the manufacturer may result in fire9 electric shock or personal injury1
-e careful not to get scalded by steam1 - Never switch on the appliance without water in the water tank1
- )o not remove the metal funnel when the appliance is brewing coffee or when steam and hot water escape from the metal funnel1
- Only use the carafe supplied with this appliance1 Never use it on a cooking surface1
- ) do not use the carafe if it is cracked or the handle is loose1
- Jo not operate the appliance without water in the tank1
- Scalding may occur if the tank cover is opened during the brewing cycles1
- Never leave the empty carafe on the warming plate when the appliance is operating9 otherwise the carafe is liable to crack1
- o not remove the metal funnel during the brewing cycles or when steam and hot water escape from metal funnel1 'e sure to release the pressure in water tank before removing metal funnel1
DESjRPTIONr
r
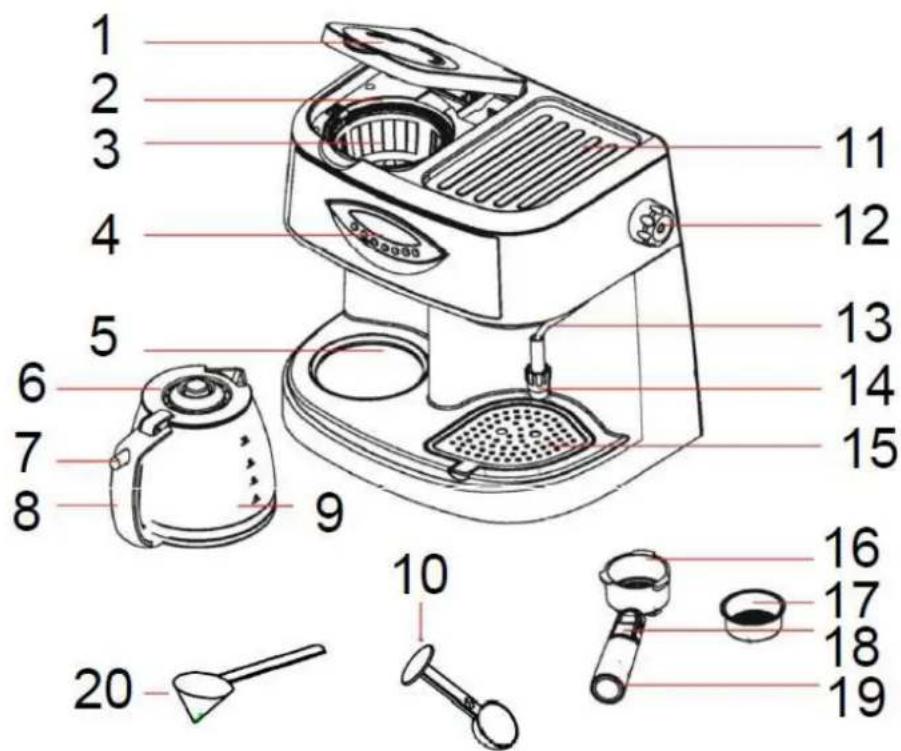
- Water tank cover
- Filter holder (for drip coffee)
- Nylon filter (for drip coffee)
- Control panel
- Warming plate
- Carafe lid
- Lid release button
- Carafe handle
- Carafe for drip coffee
-
Measuring spoon with tamper (for espresso)
-
Cup warming tray
- Steam control knob
- Frothing device
- Frothing nozzle
- Removable drip tray
- Metal funnel (for espresso)
- Mesh filter (for espresso)
- Lever
- Metal funnel handle
- Measuring spoon for drip coffee
Control panel
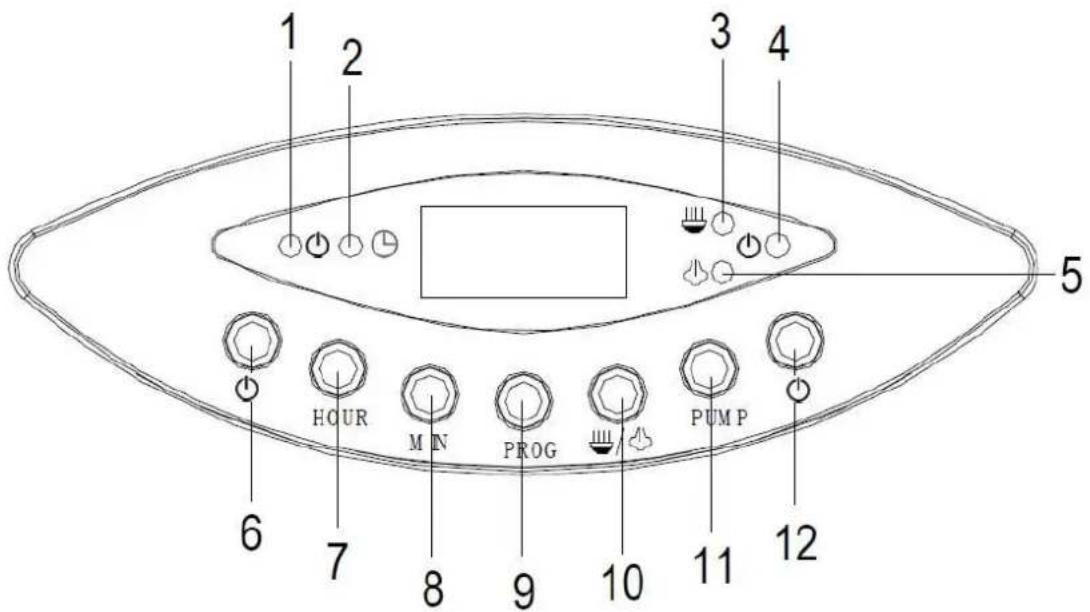
- On/off indicator light (red) for drip coffee
- +ime indicator light (yellow)
- ESPRESSO indicator light (green)
- On/off indicator light (red) for espresso
- Steam indicator light (green)
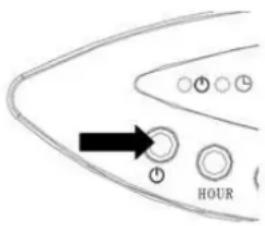
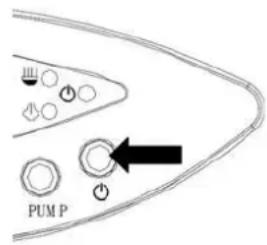
- On/off button for drip coffee
- OUR button
-
MIN button
9.PROG button -
/E s p r e s s o/ste a m b u t t o n
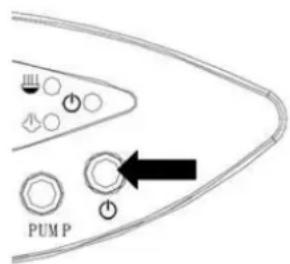
- PUMP button
- On/off button for espresso
BEFORE USING THE APPLIANCE FOR THE FIRST TIME
Carefully unpack the appliance and remove all packaging materials.
Wipe the appliance with a slightly damp cloth. Dry thoroughly.
It is recommended to wash both the drip coffee and espresso systems before first use.
- Drip coffee system: Fill the water tank with cold water and follow the directions for drip brewing to make at least two carafes of coffee without using ground coffee.
- Espresso system: Fill the water tank with cold water and follow the directions for making espresso and cappuccino to make at least four cappuccinos without using ground coffee and using water instead of milk.
MAKING DRIP COFFEE
Make sure the appliance is plugged in. the display will show "12:00".
- Open the water tank cover.
-
Fill the tank with water, referring to the height markings on the stair step water gauge inside the tank and taking care not to exceed the MAX 10 level.
-
+he height markings on the water gauge correspond to the level indicators on the carafe, representing the number of cups of coffee you want to prepare.
-
Be sure to add a small amount of extra water to account for the amount of water lost in wetting the ground coffee and lost as steam during the brewing cycle.
-
Place the nylon filter into the filter holder, making sure it is assembled correctly.
Otherwise the tank cover cannot be closed.
- Place a paper filter (not supplied) of 4-10 cup size into the nylon filter.
-
Add the desired ground coffee in the paper filter using the supplied measuring spoon.
-
Use a level spoon of ground coffee (approximately 5g) for every cup of coffee.
-
Close the tank cover and insert the carafe onto the warming plate.
-
Press twice. +he red indicator light ( ) will illuminate, indicating that the appliance is brewing coffee.
-
+he coffee will begin to flow from the filter holder after a short time.
-
During brewing, you can remove the carafe from the warming plate. +he brewing process does not stop during this period and only the flow of coffee from the filter holder stops. Do not remove the carafe for longer than 30 seconds or the coffee may overflow the filter holder.
- Although the coffee maker has the above feature, it is not recommended to pour coffee before the cycle has completed as do this may affect the flavour of the coffee.
- It is normal for the appliance to emit steam while it is brewing coffee.
-
+o keep coffee warm after the brewing process has finished, place the carafe on the warming plate.
-
+he appliance is designed to keep the coffee warm for approximately 30 minutes and then
the appliance will be turned off automatically.
- +o turn off the appliance press the red indicator light ( ) will go out.
Programming the Automatic Start
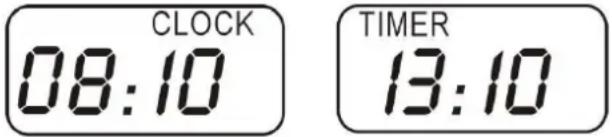
+he appliance can be programmed to make drip coffee automatically. For example9 it is 8:10 and you want to start brewing coffee at 13:10.
First9 make sure the time is set correctly.
To set the clock in 24-hour cycle
-
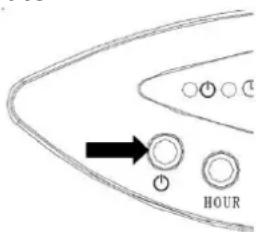
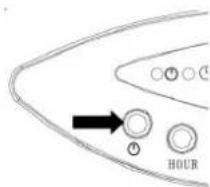
Press PROG once.
-
+he text "CLOCK" will be shown on the display.
-
While "CLOCK" is shown on the display9 repeatedly press HOUR and MIN to set the correct time.
- +o speed up time setting9 press and hold HOUR/MIN to scroll through numbers quickly.
- After setting the time9 press PROG to confirm.
- +he text "+"IMER" will be shown on the display.
To set the delayed start time
-
While "+"IMER" is shown on the display9 repeatedly press HOUR and MIN to set the desired time.
-
After you have set the delayed start time9 press once.
+he yellow indicator light () will illuminate.
- After a while the display will show the current time. You can check the set time by pressing PROG twice.
-
When the set time is reached9 the appliance will start brewing coffee.
-
+he text "+"IMER" will disappear from the display.
NOTE:
- You may cancel the automatic start function by pressing twice.
- If you want to change the start time after it has been set9 set a new time as described following steps 1 to 6 above.
MAKING ESPRESSO
Making espresso is different than making regular drip coffee. +he appliance works under pressure9 bringing the water to a boil and then forcing it through the ground coffee in a short period of time.
Caution: Do not leave the appliance unattended while making espresso.
Ensure that the steam control knob on the side of the appliance is set at the Off position by turning it clockwise until you cannot turn it any further.

- Make sure the appliance is plugged in and turned off.
-
Fill the water tank with water.
-
+o avoid overflow, make sure the water level is not over the MAX 10 line.
-
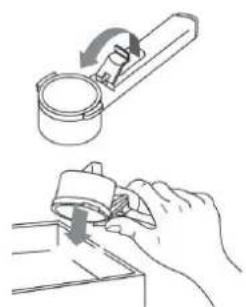
Fill the mesh filter with ground espresso powder using the supplied measuring spoon and then put the mesh filter into the metal funnel.
-
+he filter is marked with "2-cup" on the bottom, indicating that you can make two cups of espresso.
- Distribute the espresso powder evenly and press it tight together using the tamper.
-
A spoon (approximately 7g ) of espresso powder will make a cup (cup size corresponds to 35ml ) of espresso.
-
Insert the metal funnel into the boiler outlet from the Insert position ( ) then pushing upwards and turning it anticlockwise until it is in the Lock position ( )
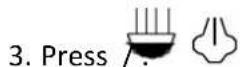
-
Press

-
+he red indicator light () will illuminate and the green espresso indicator light () will flash.
-
Wait until the green espresso indicator light stops flashing.
NOTE: During brewing, it is normal for the green indicator light to cycle on and flash, indicating that the heating element is heating up to maintain the water temperature is hot enough.
-
Place a cup (not supplied) on the shelf, making sure that the cup is under the boiler outlet.
-
It is recommended to heat the cup before use. You can place the cup on the cup warming tray while the espresso is prepared.
-
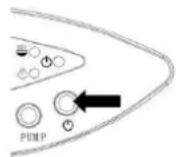
Press PUMP. After a while, the espresso will start to run out from the metal funnel spouts.
-
When you have enough espresso in the cup, press to stop the flow.
-
+he red indicator light (O) and the green indicator light (O) will go out.
-
Remove the cup and serve.
Helpful hints:
- An espresso is a far richer drink with a more intense taste than regular brewed drip coffee. It is recommended that espresso should be served immediately after brewing. If the espresso is too strong, you can add hot water. Add sugar to taste.
- Which coffee? Any coffee labelled "espresso" is suitable for making espresso. Any coffee with at least 80% Arabica beans is ideal for espresso preparation. Check with your local coffee store.
MAKING CAPPUCCINO
Cappuccino is a popular espresso-based coffee drink. Follow the steps below so that you may have enough steam pressure to froth and steam milk properly.
-
Prepare espresso first following steps 1 to 8 in the Making Espresso section above.
-
Press
-
+he green steam indicator light ( ) will flash while the green espresso indicator light ( ) will go out.
-
Wait until the green steam indicator light stops flashing.
-
Fill a pitcher (not supplied) with 100ml milk for cappuccino to be prepared and set aside.
-
It is recommended to use whole milk at refrigerator temperature.
-
When you choose the size of the pitcher, bear in mind that the milk volume will increase by 2 times.
-
Position the pitcher containing the milk on the drip tray.
-
Insert the frothing device into the milk by about 2cm.
-
Remember that the frothing nozzle is not submerged too deep, but just deep enough to stay below the surface of the milk and also prevent the milk from splattering around.
-
Slowly turn the steam control knob anticlockwise. +he steam will come out from the frothing nozzle.
NOTE: Never turn the steam control knob quickly, as the steam will accumulate rapidly in a short time, which may increase the potential risk of explosion.
-
Move the pitcher containing the milk up and down under the frothing device to create the desired milk froth.
-
When the milk has sufficient foaming, turn the steam control knob to the Off position by turning it clockwise until you cannot turn it any further.
-
Pour the frothed milk into the espresso and the cappuccino is ready. Add sugar to taste.
-
Press to turn off the appliance.
-
+he red indicator light ( ) and the green indicator light () will go out.
-
If more Cappuccino is required, follow the instructions above, allow the appliance to cool for at least 5 minutes after each brewing cycle.


IMPORTANT: Always clean frothing device with a wet sponge immediately after use- Be careful not to touch the steam wand- Remove the frothing nozzle and check that the steam wand is not blocked- If necessary use a needle to remove any solid milk
MAKING HOT WATER OR BEVERAGES
+he frothing device can be used to make hot water or beverages like drinking chocolate or tea.
-
Fill the water tank with the desired amount of water. +he water level should not exceed the MAX 10 line.
-
Plug in the appliance and press
- +he red indicator light (O) will illuminate and the green espresso indicator light (O) will flash.
-
the green steam indicator light ( ) will flash while the green espresso indicator light ( ) will go out.
-
Wait until the green steam indicator light to stop flashing.
-
Dip the frothing nozzle into the water to be heated. Slowly turn the steam control knob anticlockwise to start making steam.
-
When the required temperature is reached9 turn the steam control knob clockwise until you cannot turn it any further.
-
Press to turn off the appliance.
-
+he red indicator light (O) and the green indicator light (O) will go out.
For tea: Place one tea bag in the heated water.
For hot chocolate: Add specific amount of cocoa powder into the heated water and immediately whisk to blend well.
CLEANING AND DESCALING
+urn off and unplug the appliance from the mains socket. Allow the appliance to cool down before cleaning.
Clean the outside of the appliance with a slightly damp cloth. Dry thoroughly. Clean the removable parts in warm soapy water then rinse them thoroughly. Never immerse the appliance in water. Do not use abrasive or chemical cleaning agents.
+o dispose of the used espresso grounds9 unfasten the metal funnel from the boiler outlet.
Block the filter using the lever incorporated in the handle and empty the grounds by turning the metal funnel upside down and tapping.
Dscaling
Dscaling the drip coffee system
Regularly descale the drip coffee system using a specific descaler.
-
Fill the tank with water and descaler to the MAX 10 line. (Refer to the descaler instructions for the scale of water and descaler.)
-
Place the carafe onto the warming plate.
-
Press . Percolate the equivalent of a cupful and then
press again to switch off the appliance.
- Leave the solution in the system for 15 minutes. Repeat steps 3 and 4 again.
- Switch on the appliance and continue the brewing process until the tank is completely empty
- Rinse out by operating the appliance using water at least three times (3 full tanks of water).
Dscaling the espresso system
It is recommended to descale the espresso system every 2-3 months, depending on the hardness of the water and the frequency of use.
- Fill the tank with water and descaler to the MAX 10 line. (Refer to the descaler instructions for the scale of water and descaler.)
- Put the metal funnel (no coffee powder in it) and cup in place.
- Press the appliance will start heating.
- Wait until the green espresso indicator light stops flashing.
-
Press PUMP and fill two cups with water.
-
Press and wait until the green steam indicator light stops flashing.
-
Slowly turn the steam control knob anticlockwise to make steam for 2 minutes, then turn the steam control knob clockwise until you cannot turn it any further.
-
Press to turn off the appliance, then leave the appliance with the descaling solution in it for at least 15 minutes.
- Restart the appliance and repeat steps 3 to 8 for at least 3 times.
- Press and wait until the espresso green indicator light stops flashing.
- Press PUMP to brew until no descaler is left.
-
Brew coffee (with no coffee powder) with tap water at the MAX 10 line, repeating the steps of 3 to 8 for at least 3 time. Keep repeating until the water tank is left empty.
-
It is not necessary to wait for 15 minutes in step 8 again.
SPEjoljATIONS r
Ratings: 220-240V~ 50%z 1850W
We apologise for any inconvenience caused by minor inconsistencies in these instructions, which may occur as a result of product improvement and development.
Darty Plc UK: EC1N 6TE 29/07/2014
Table des matieres
ATTENTION 13-15
MISES EN GARDE IMPORTANTES: 15-16
DESCRIPTION 16
AVANT LA PREMIÈRE UTILISATION DE L'APPAREIL 17
PREPARATION DE CAFÉ FILTRÉ 18
MISES EN GARDE IMPORTANTES:
Darty Plc © UK: EC1N 6+E 29/07/2014
Inhoudsopgave
WAARSC%UWINGEN 25-27
BELANGRIJKE VEILIG%EIDSVOORZORGEN 27
BESC%RIJING VAN % E+ APPARAA+ 28-29
VOORDA+ U %E+ APPARAA+ VOOR %E+ EERS+ IN GEBRUK NEEM+ 29-30
FIL+ERKOFFIE ZE++EN 30
Darty Plc © UK: EC1N 6+E 29/07/2014
Índicér
r
r
ADVER+ENCIAS 37-39
INS+RUCCIONES SOBRE SEGURIDAD IMPOR+AN+ES 39
DESCRIPCION 40-41
AN+ES DE U+ILIZAR EL APARA+O POR PRIMERA VZ 41
ELABORACION DE CAFE POR GO+EO 42
Programar la Activacion Automática 42-43
ELABORACION DE EXPRESSO 43-44
ELABORACION DE CAPUC%INO. 44-45
ELABORACION DE AGUA O BEBIDAS CALIEN+ES 45-46
LIMPIEZA Y DESINCRUS+ACION DE CAL. 46-47
ESPECIFICACIONES 47
ESr
ADVERTENjIASrrr
Darty Plc © UK: EC1N 6+E 29/07/2014

- WARNInaSrrrrrrrrrrrrrrrrrrrrrrrrrrrrr
- IMPORTANTrSAóETYrINSTRUJTIONSr
- DESjRPTIONr
- Control panel
- BEFORE USING THE APPLIANCE FOR THE FIRST TIME
- MAKING DRIP COFFEE
- Programming the Automatic Start
- To set the clock in 24-hour cycle
- To set the delayed start time
- NOTE:
- MAKING ESPRESSO
- Helpful hints:
- MAKING CAPPUCCINO
- MAKING HOT WATER OR BEVERAGES
- CLEANING AND DESCALING
- Dscaling
- Dscaling the espresso system
- SPEjoljATIONS r
- Table des matieres
- MISES EN GARDE IMPORTANTES:
- Inhoudsopgave
- Índicér
- ESr
- ADVERTENjIASrrr
Brand : PROLINE
Model : CBE16
Category : Coffee maker