
G8P1AASSPSS - Food Processor GE - Free user manual and instructions
Find the device manual for free G8P1AASSPSS GE in PDF.

| Product Type | Food Processor |
| Brand | GE (General Electric) |
| Model | G8P1AASSPSS |
| Maximum Rated Power | 550 W |
| Bowl Capacity (slice/shred) | 10 cups |
| Bowl Capacity (chop) | 4 cups |
| Bowl Capacity (liquids) | 7 cups |
| Bowl Capacity (bread dough) | 2.5 cups of flour |
| Speeds | High, Low, Pulse |
| Included Accessories | Fine shredding/slicing disc, Medium shredding/slicing disc, French fry disc, Dough blade, Mini bowl, Grater disc, Mini S-blade, Emulsifying disc, Spatula |
| Bowl Material | SAN plastic (styrene/acrylonitrile) |
| Safety | Cover and bowl locking, Quick stop, Overheat protection |
| Cleaning | Bowl, cover, pusher, and accessories are dishwasher safe (top rack). Wipe the base with a damp cloth. |
| Warranty | 1 year limited |
Frequently Asked Questions - G8P1AASSPSS GE
User questions about G8P1AASSPSS GE
0 question about this device. Answer the ones you know or ask your own.
Ask a new question about this device
Download the instructions for your Food Processor in PDF format for free! Find your manual G8P1AASSPSS - GE and take your electronic device back in hand. On this page are published all the documents necessary for the use of your device. G8P1AASSPSS by GE.
USER MANUAL G8P1AASSPSS GE
SAFETY INFORMATION .... 3
PARTS INCLUDED 6
GETTING STARTED 8
CONTROLS 9
FUNCTIONS....9
CARE AND CLEANING ..... 10
TROUBLESHOOTING....11
LIMITED WARRANTY ....13
CONSUMER SUPPORT....14
OWNER'S MANUAL
G8POAASSPSS
G8P1AASSPSS
ENGLISH/ FRANÇAIS
Write the model and serial numbers here:
Model # ____
Serial # ____
Find these numbers on a label on the back of the unit.
THANK YOU FOR MAKING GE APPLIANCES A PART OF YOUR HOME.
Whether you grew up with GE Appliances, or this is your first, we're happy to have you in the family.
We take pride in the craftsmanship, innovation and design that goes into every GE Appliances product, and we think you will too.
Among other things, registration of your appliance ensures that we can deliver important product information and warranty details when you need them.

GE APPLIANCES
IMPORTANT SAFETY INFORMATION READ ALL INSTRUCTIONS BEFORE USING THE APPLIANCE
WARNING
THE CUTTING TOOLS HAVE VERY SHARP EDGES.
IMPORTANT SAFEGUARDS
Always follow these safety precautions when using this appliance.
Getting Ready
- Read all instructions.
- Blade and discs are sharp. Handle them carefully.
- Turn the appliance OFF, then unplug from the outlet when not in use, before assembling or disassembling parts and before cleaning. To unplug, grasp the plug and pull from the outlet. Never pull from the power cord.
- Do not use outdoors.
- Do not let cord hang over edge of table or counter.
- Do not let cord contact hot surface, including the stove.
- Do not operate any appliance with a damaged cord or plug or after the appliance malfunctions, or is dropped or damaged in any manner. Contact GE Appliances at the website listed in the Contact Us section for information on examination, repair, or adjustment.
Operation
- Keep hands as well as spatulas and other utensils away from moving blade or discs while processing food to reduce the risk of severe personal injury or damage to food processor. A plastic scraper may be used, but only when the food processor motor is stopped.
- Avoid coming into contact with moving parts. Never push food down by hand when slicing or shredding. Always use pusher.
- Make sure motor has completely stopped before removing cover. (If machine does not stop within 4 seconds after you remove the bowl cover assembly, call 1.866.907.6718 for assistance. Do not use the machine.)
- Never store any blade or disc on motor shaft. To reduce the risk of injury, no blade or disc should be placed on the shaft except when the bowl is properly locked in place and the processor is in use. Store blades and discs as you would sharp knives, out of reach of children.
- Be sure cover and feed tube are securely locked in place before operating food processor.
- Never try to override or tamper with cover interlock mechanism.
- Do not fill the bowl above the marked maximum fill line (or rated capacity) to avoid risk of injury due to damage to the cover or bowl."
Cleaning
■ To protect against risk of electrical shock, do not put base in water or other liquids
READ AND SAVE THESE INSTRUCTIONS
IMPORTANT SAFETY INFORMATION READ ALL INSTRUCTIONS BEFORE USING THE APPLIANCE
WARNING
THE CUTTING TOOLS HAVE VERY SHARP EDGES.
IMPORTANT SAFEGUARDS Continued
General
- This appliance is not intended for use by persons (including children) with reduced physical, sensory, or mental capabilities, or lack of experience and knowledge, unless they are closely supervised and instructed concerning use of the appliance by a person responsible for their safety. Close supervision is necessary when any appliance is used by or near children. Children should be supervised to ensure that they do not play with the appliance.
- Do not operate this, or any other motor-driven appliance, while under the influence of alcohol or other substances that affect your reaction time or perception.
- This food processor is for household use only. Use it only for food preparation as described in the accompanying recipe and instruction book. Do not use this appliance for anything but its intended use.
- The use of attachments not recommended or sold by the manufacturer may cause fire, electrical shock or personal injury, or damage to your food processor.
- To avoid possible malfunction of work bowl switch, never store processor with cover assembly in locked position.
- Maximum rating of 550 watts is based on chopping blade on food processor bowl as a food chopper draws greatest power. Other recommended attachments may draw significantly less power.
- Do not operate your appliance in an appliance garage or under a wall cabinet. When storing in an appliance garage always unplug the unit from the electrical outlet. Not doing so could create a risk of fire, especially if the appliance touches the walls of the garage or the door touches the unit as it closes.
READ AND SAVE THESE INSTRUCTIONS
IMPORTANT SAFETY INFORMATION READ ALL INSTRUCTIONS BEFORE USING THE APPLIANCE
WARNING
THE CUTTING TOOLS HAVE VERY SHARP EDGES.
IMPORTANT SAFEGUARDS Continued
Care and Cleaning
- Like all powerful electrical appliances a food processor should be handled with care. Follow these guidelines to protect yourself and your family from misuse that could cause injury.
- Handle and store metal blade and discs carefully. Their cutting edges are very sharp.
- Never put blade or discs on the motor shaft until the work bowl is locked in place.
• Always be sure that the blade or disc is down on the motor shaft as far as it will go.
• Always insert the metal blade in the work bowl before putting ingredients in bowl. - When slicing or shredding food, always use the pusher. Never put your fingers or spatula into feed tube.
- Always wait for the blade or disc to stop spinning before you remove the pusher assembly or cover from the work bowl.
- Always unplug the unit before removing food, cleaning or putting on or taking off parts.
- Always remove work bowl from base of machine before you remove the chopping/mixing/dough blade.
- Be careful to prevent the chopping blade from falling out of the work bowl when emptying the bowl. Remove it before tilting the work bowl.
NOTICE: This appliance has a plastic case, it has a polarized plug (one blade is wider than the other). To reduce the risk of electric shock, this plug will fit in a polarized outlet only one way. If the plug does not fit fully in the outlet, reverse the plug. If it still does not fit, contact a qualified electrician. Do not attempt to defeat this safety feature or modify the plug in any way.
WARNING

SK OF FIRE OR ELECTRIC SHOCK
■ TO REDUCE THE RISK OF FIRE OR ELECTRIC SHOCK, DO NOT REMOVE COVER (OR BACK).
- Do not attempt to repair or replace any part of your food processor unless it is specifically recommended in this manual. All other servicing should be performed by authorized service personnel.
READ AND SAVE THESE INSTRUCTIONS
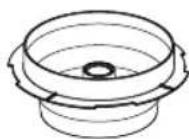
Parts Included
G8P0AASSPSS
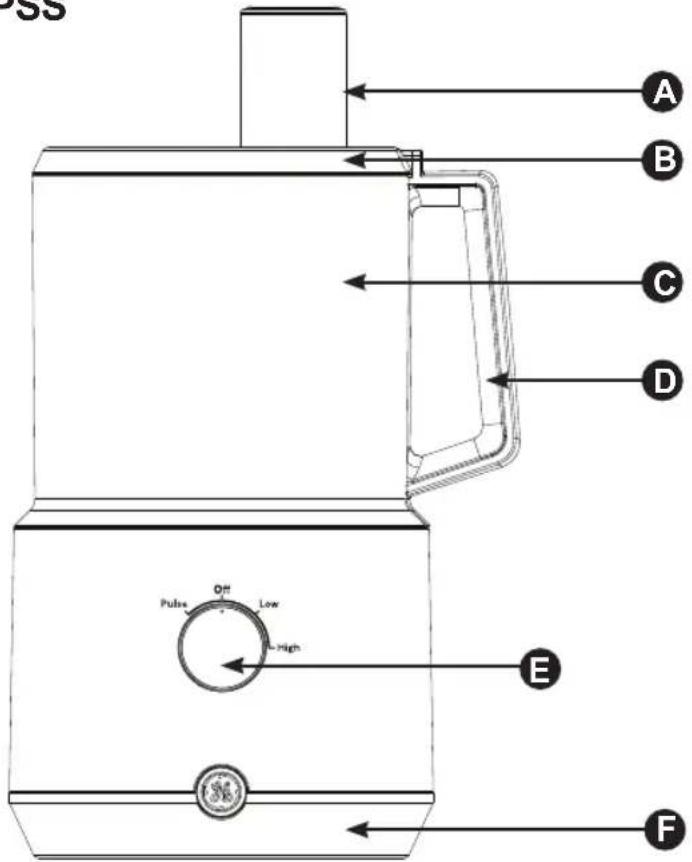
A Chute Plunger
D Handle
B Lid
E Control Knob
© Processing Chamber
F Base
Accessories
NOTE: Parts listed below are only included with model G8P0AASSPSS
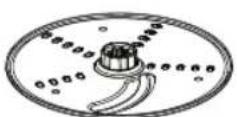
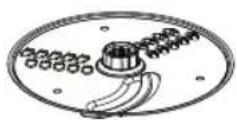
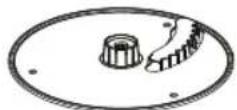
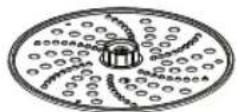
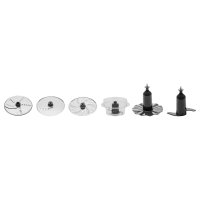
Fine shredding / Slicing disc Medium shredding / Slicing disc
Parts Included
G8P1AASSPSS
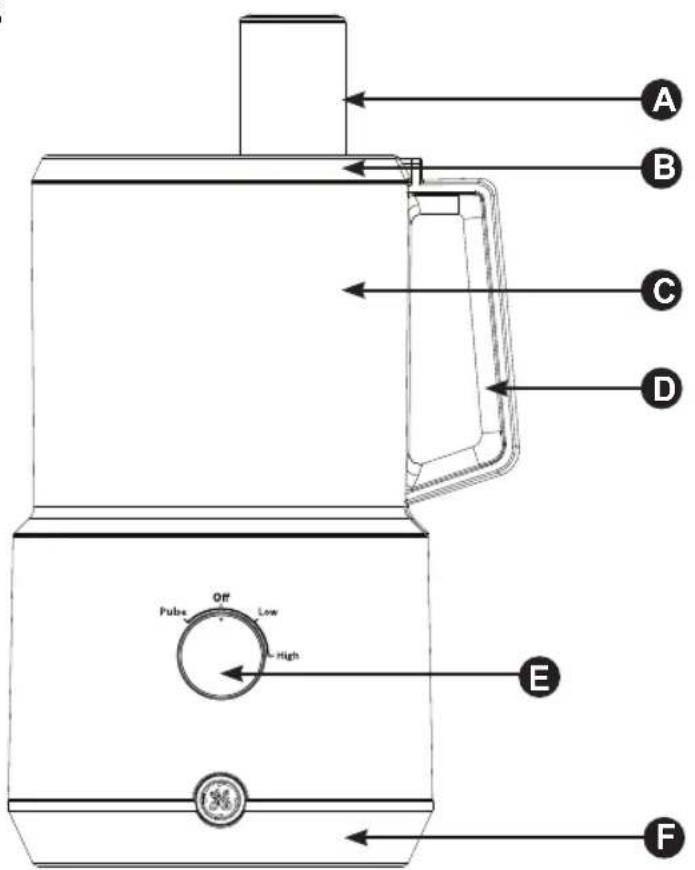
A Chute Plunger
B Lid
© Processing Chamber
D Handle
E Control Knob
F Base
Accessories
NOTE: Parts listed below are only included with model G8P1AASSPSS
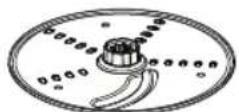
Fine shredding / Slicing disc
French fry disc Dough blade Mini-bowl
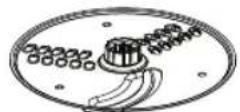
Medium shredding / Slicing disc
Grating disc
Mini S-blade

Emulsifying disc

Spatula
49-9000012 Rev. 1 7
Getting Started
Before First Use
Before using your food processor for the first time, wash the work bowl, work bowl cover, pusher, blade and discs in warm soapy water.
-
Place the food processor base on a dry, level countertop with the controls facing you. Do not plug the unit in until it is fully assembled.
-
With the bowl on the base, use the handle to turn the work bowl clockwise to lock it onto the housing base.
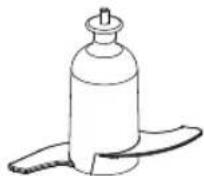
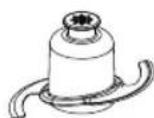
Chopping / Mixing / Dough Blade
-
Place the work bowl on top, with the work bowl handle just to the right of center. Turn the work bowl clockwise to lock it onto the housing base.
-
Add desired ingredients to work bowl.
-
Carefully lift and place the blade over the work bowl accessory adapter. Blade should rest on the bottom of the work bowl.
-
Place work bowl cover on work bowl, with the feed tube just to the right of center. Turn clockwise to lock onto work bowl.
-
Plug in the housing base.
-
Align pusher with the feed tube opening on the work bowl cover and slide down to the bottom.
-
You are now ready to operate the machine.
Slicing, Grating, French fry, and Reversible Shredding Discs
-
Place the work bowl on top of the base, with the work bowl handle just to the right of center. Turn the work bowl clockwise to lock it onto the housing base.
-
Place work bowl cover onto work bowl, with the feed tube just to the right of center. Turn clockwise to lock onto work bowl.
-
Choose desired disc.
-
Align pusher with the feed tube opening on the work bowl cover and slide down to the bottom.
-
Insert stem adapter.
-
Carefully place disc over stem adapter, with the side being used facing up.
-
Plug in the housing base.
-
You are now ready to operate the machine.
Mini Food Bowl
-
Place the work bowl on top of the base, with the work bowl handle just to the right of center. Turn the work bowl clockwise to lock it onto the housing base.
-
Add desired ingredients to work bowl.
-
Insert stem adapter.
-
Place work bowl cover on work bowl, with the feed tube just to the right of center. Turn clockwise to lock onto work bowl.
-
Carefully place mini-bowl over the stem adapter and turn until it locks into place.
-
Align pusher with the feed tube opening on the work bowl cover and slide down to the bottom.
-
Carefully place the mini s-blade over the stem adapter. Blade should rest on the bottom of the mini-bowl.
-
You are now ready to operate the machine.
Recipe: Honey with Almond
• 400g honey (direct from fridge)
• 15 sec (high speed)
- 300g almond
Recommended Maximum Work Bowl Capacity
| Food | Capacity |
| Sliced or shredded fruit, vegetable or cheese 10 cups | |
| Chopped fruit, vegetable or cheese 4 cups | |
| Pureed fruit of vegetable 3 cups cooked: 1 12 cups pureed | |
| Chopped or pureed meat, fish or seafood 1 12 pounds | |
| Thin liquid (e.g. dressings, soups, ect) 7 cups | |
| Cake batter 8 inch cheesecake batter; 1 box (15.25 oz) cake mix | |
| Cookie dough 2 12 dozen (based on average chocolate chip cookie recipe) | |
| White bread/pizza dough 2.5 cups (all-purpose or bread flour) | |
| Nuts or nut butter 3 cups | |
Controls
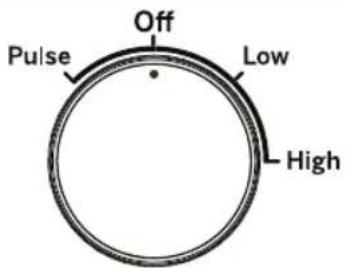
High and Low Buttons
The High and Low controls are buttons that allow the machine to run until Off is selected.
- Properly assemble and engage the machine.
- Add ingredients to the work bowl, either through the feed tube or directly into the bowl.
- Turn knob to the High or Low setting.
- Turn knob to upright Off position when finished to turn off the machine.
Functions
Pulse Button
The Pulse is a setting that allows the machine to run only while it is being engaged. This capability provides more accurate control of the duration and frequency of processing. Unless otherwise specified, a pulse should be about one second. With the machine properly assembled and engaged, and ingredients in the work bowl, turn the knob to the Pulse setting repeatedly as needed.
Using the Chopping/Mixing/Dough Blade Chopping
- For raw ingredients: Peel, core and/or remove seeds and pits. Food should be cut into even, 12 - to 1-inch pieces. Foods cut into same size pieces produce the most even results.
- Pulse food in 1-second increments to chop. For the finest chop, press High or Low to run the machine continuously. Watch ingredients closely to achieve desired consistency and scrape the work bowl as necessary. Low speed is recommended for making doughs and batters. High speed is recommended for most other chopping, processing and slicing/shredding tasks.
Puréeing
- To purée fresh fruits or cooked fruits/vegetables: Ingredients should be cut into 1-inch pieces; a smooth purée is best achieved when all the pieces are equal in size. Pulse to initially chop and then process High or Low until food is puréed; scrape the work bowl as necessary. Do not use this method to purée cooked white potatoes as the mixture can become too gummy to process.
- To purée solids for a soup or sauce: Strain the solids from the liquid and process the solids alone. Add cooking liquid and process as needed.
Using the Reversible Shredding/ Slicing Discs
- The slicing disc makes whole slices. It slices fruits and vegetables, cooked meat and semifrozen raw meat. The shredding disc shreds most firm and hard cheeses. It also shreds vegetables like potatoes, carrots and zucchini.
• Always pack food in the feed tube evenly for slicing and shredding. The food will dictate the amount of pressure: Use light pressure for soft foods, medium pressure for medium foods and firm pressure for harder foods. Always process with even pressure. - For round fruits or vegetables: Remove a thick slice on the bottom of the food so that it sits upright in the feed tube. If food does not fit in the feed tube, cut in half or quarter to fit. Process with even pressure.
- For small ingredients like mushrooms, radishes or strawberries: Trim the ends so the food sits upright in the feed tube.
- When slicing or shredding cheese, be sure that the cheese is well chilled.
- To shred leafy vegetables like lettuce or spinach: Roll leaves together and stand them up in feed tube. Process with even pressure.
NOTE: Always use the pusher when slicing or shredding. Never put your hands in the feed tube while unit is running.
Care and Cleaning
- Keep the blade and discs out of the reach of children.
- All parts except the housing base are dishwasher safe, and we recommend washing them in the dishwasher on the top rack only. Due to intense water heat, washing the work bowl, cover and accessories on the bottom rack may cause damage over time. Insert the cover with the feed tube facing up to ensure proper cleaning. Insert the work bowl and pusher upside down for drainage. Remember to unload the dishwasher carefully wherever you have placed sharp blades and discs.
- To simplify cleaning, rinse the work bowl, cover, pusher and blade or disc immediately after use so food won't dry on them. Be sure to position the pusher upside down for drainage. If food lodges in the pusher, remove it by running water through it, or use a bottle brush. Be sure to rinse out the underside of the removable stem to prevent any food lodging there.
- If you wash the blade and discs by hand, do it carefully. Avoid leaving them in soapy water where they may disappear from sight. To clean the metal blade, fill the work bowl with soapy water, hold the blade by its plastic center and move it rapidly up and down on the center shaft of the bowl. Use of a spray attachment is also effective. If necessary, use a brush.
- The work bowl is made of SAN plastic. It should not be placed in a microwave oven.
- The housing base may be wiped clean with a soapy, nonabrasive material. Be sure to dry it thoroughly.
- If the feet leave spots on the counter, spray them with a spot remover and wipe with a damp sponge.
- If any trace of the spot remains, repeat the procedure and wipe the area with a damp sponge and nonabrasive cleaning powder.
IMPORTANT: Never store any blade or disc on the motor shaft. No blade or disc should be placed on the shaft except when the processor is about to be used.
MAINTENANCE: Any other servicing should be performed by an authorized service representative.
CAUTION
FOR YOUR
SAFETY
- Like all powerful electrical appliances a food processor should be handled with care. Follow these guidelines to protect yourself and your family from misuse that could cause injury.
- Handle and store metal blade and discs carefully. Their cutting edges are very sharp.
- Never put blade or discs on the motor shaft until the work bowl is locked in place.
• Always be sure that the blade or disc is down on the motor shaft as far as it will go.
• Always insert the metal blade in the work bowl before putting ingredients in bowl. - When slicing or shredding food, always use the pusher. Never put your fingers or spatula into feed tube.
• Always wait for the blade or disc to stop spinning before you remove the pusher assembly or cover from the work bowl.
• Always unplug the unit before removing food, cleaning or putting on or taking off parts.
• Always remove work bowl from base of machine before you remove the chopping/mixing/dough blade. - Be careful to prevent the chopping blade from falling out of the work bowl when emptying the bowl. Remove it before tilting the work bowl.
Troubleshooting
Technical Data
The motor in your food processor operates on a standard line operating current. The appropriate voltage and frequency for your machine are shown on a label on the bottom of the base. An automatic, temperature-controlled circuit breaker in the motor ensures complete protection against motor burnout. If the processor runs for an exceptionally long time when chopping, mixing or kneading a thick or heavy mixture in successive batches, the motor may overheat. If this happens, the processor will stop. Turn it off and wait for the motor to cool before proceeding. It will usually cool within 10 minutes. In extreme cases, it could take an hour. Safety switches prevent the machine from operating when the work bowl or the cover is not locked into position. The motor stops within seconds when the motor is turned off; and when the pusher assembly is removed, a fast-stop circuit also enables the motor to stop within seconds.
Troubleshooting
Save time and money! Review the charts on the following pages first and you may not need to call for service.
| Problem Solution | |
| Food Processing | |
| The food is unevenly processed. | The ingredients should be cut evenly into 1/2- to 1-inch pieces before processing. |
| Process in batches to avoid overloading. | |
| Slices are uneven or slanted. | Place evenly cut food, cut side down, into the feed tube. |
| Apply even pressure on the pusher. | |
| Food falls over in feed tube. | Feed tube should be packed full for best results. |
| Some food remains on top of the disc. | It is normal for small pieces to remain; cut remaining bits by hand and add to processed ingredients. |
| Cheese is not shredding well. | Cheese should be processed immediately after being removed from the refrigerator. Soft cheese like mozzarella must be placed in the freezer for 30 minutes prior to processing to ensure it is firm enough for shredding. |
| Dough Kneading | |
| Motor slows down | Amount of dough may exceed maximum capacity of your food processor. Remove half and process in two batches. |
| Dough may be too wet (see number 8). If motor speeds up, continue processing. If not, add more flour, 1 tablespoon at a time, until the motor speeds up. Process until dough cleans the sides of the work bowl. | |
| Blade does not incorporate ingredients. | Always start the food processor before adding liquid. Add liquid in a slow, steady stream, or through the drizzle hole in the pusher, allowing the dry ingredients to absorb it. If too much liquid is added, wait until ingredients in the work bowl have mixed, then add remaining liquid slowly (do not turn off the machine). Pour liquid onto dough as it passes under feed tube opening; do not pour liquid directly onto bottom of the work bowl. |
| Blade rises in work bowl. | Excessively sticky dough can cause blade to rise. Carefully reinsert blade and immediately add 2 tablespoons of flour through feed tube while machine is running. |
| Dough doesn't clean inside of the work bowl. | Amount of dough may exceed maximum capacity of your food processor. Remove half and process in two batches. |
| Dough may be too dry. | |
| Dough may be too wet. | |
| Nub of dough forms on top of blade and does not become uniformly kneaded. | Stop machine, carefully remove dough, divide it into 3 pieces and redistribute them evenly in the work bowl. |
| Dough feels tough after kneading. | Divide dough into 2 or 3 pieces and redistribute evenly in bowl. Process 10 seconds or until uniformly soft and pliable. |
| Dough is too dry. | While machine is running, add water, 1 tablespoon at a time, until dough cleans the inside of the bowl. |
| Dough is too wet. | While machine is running, add flour, 1 tablespoon at a time, until dough cleans the inside of the bowl. |
| Technical | |
| The motor does not start. | There is a safety interlock to prevent the motor from starting if it is not properly assembled. Make sure the work bowl and work bowl cover are securely locked into position. |
| If the motor still will not start, check the power cord and outlet. | |
| The food processor shuts off during operation. | The cover may have become unlocked; check to make sure it is securely in position. |
| A safety protector in the motor prevents the motor from overheating, which is caused by excessive strain. Press the Off control button and wait 20 to 30 minutes to allow the food processor to cool off before resuming. | |
| The motor slowed down during operation. | This is normal as some heavier loads (e.g., slicing/shredding cheese) may require the motor to work harder. Simply reposition the food in the feed tube and try again. |
| The maximum load capacity may have been exceeded. Remove some of the ingredients and continue processing. | |
| The food processor vibrated/moved around countertop during processing. | Make sure the rubber feet at the bottom of the unit are clean and dry. Also make sure that the maximum load capacity is not being exceeded. |
| This is normal as some heavier loads (e.g., slicing/shredding cheese) may require the motor to work harder. | |
GE Appliances Limited Warranty
If your appliance fails to operate properly while in use under normal household conditions within the warranty period, visit geappliances.com/contact for product care/maintenance self-help.
To initiate a warranty claim, please visit geappliances.com/contact, or call 1-800-GECARES. Please have your model number and serial number available. Return and packing instruction information will be provided at that time.
For the Period of: GE Appliances Covers
| One YearFrom the date of the original purchase | If the food processor fails due to a defect in materials or workmanship, during the limited one-year warranty, GE Appliances will either repair your product, replace your product with a new or remanufactured product, or refund the purchase price of the product at GE Appliances sole discretion. |
What GE Appliances Will Not Cover:
■ Service trips to your home.
■ Improper installation, delivery or maintenance.
■ Failure of the product if it is abused, misused, or used for other than the intended purpose or used commercially.
■ Replacement of house fuses or resetting of circuit breakers.
■ Damage caused after delivery.
■ Damage to the product caused by accident, fire, floods or acts of God.
■ Incidental or consequential damage caused by possible defects with this appliance.
■ Labor and other charges to install and/or remove the product
EXCLUSION OF IMPLIED WARRANTIES
Your sole and exclusive remedies are product exchange or refund as provided in this Limited Warranty. Any implied warranties, including the implied warranties of merchantability or fitness for a particular purpose, are limited to one year or the shortest period allowed by law.
For US Customers: This limited warranty is extended to the original purchaser for products purchased for home use within the USA. In Alaska and Hawaii, the limited warranty does not include the costs of shipping units.
Some states do not allow the exclusion or limitation of incidental or consequential damages. This limited warranty gives you specific legal rights, and you may also have other rights which vary from state to state. To know what your legal rights are, consult your local or state consumer affairs office or your state's Attorney General.
Warrantor: GE Appliances, a Haier company Louisville, KY 40225
For Customers in Canada: This limited warranty is extended to the original purchaser and any succeeding owner for products purchased in Canada for home use within Canada. In-home warrant service will be provided in areas where it is available and deemed reasonable by Mabe to provide.
Warrantor Canada: MC Commercial, Burlington, Ontario, L7R 5B6
Consumer Support
Service and Registration
Register your new appliance on-line at your convenience! Timely product registration will allow for enhanced communication and prompt service under the terms of your warranty, should the need arise.
Register your appliance at GEAppliances.com/register.
Contact Us
If you are not satisfied with the service you receive from GE Appliances, contact us on our Website with all the details including your phone number, or write to:
In the US: General Manager, Customer Relations | GE Appliances, Appliance Park | Louisville, KY 40225
GEAppliances.com/contact
In Canada: Director, Consumer Relations, MC Commercial Inc. | Suite 310, 1 Factory Lane | Moncton, N.B. E1C 9M3
GEAppliances.ca/en/contact-us
ROBOT CULINAIRE
ROBOT CULINAIRE .... 3
PIÈCES INCLUDES 6
COMMENT DÉMARRER ..... 8
COMMANDES 9
FONCTIONS 9
ENTRETIEN ET NETTOYAGE ... 10
DÉPANNAGE....11
GARANTIE LIMITÉE .....13
SOUTIEN AU CONSOMMATEUR .14
Louisville, KY 40225
PIEZAS INCLUIDAS ....6
En Canadá: Director, Consumer Relations, MC Commercial Inc. | Suite 310, 1 Factory Lane | Moncton, N.B. E1C 9M3 GEAppliances.ca/en/contact-us


- OWNER'S MANUAL
- ENGLISH/ FRANÇAIS
- THANK YOU FOR MAKING GE APPLIANCES A PART OF YOUR HOME.
- IMPORTANT SAFETY INFORMATION READ ALL INSTRUCTIONS BEFORE USING THE APPLIANCE
- WARNING
- IMPORTANT SAFEGUARDS
- Getting Ready
- Operation
- Cleaning
- READ AND SAVE THESE INSTRUCTIONS
- IMPORTANT SAFEGUARDS Continued
- General
- Care and Cleaning
- SK OF FIRE OR ELECTRIC SHOCK
- Parts Included
- Accessories
- Getting Started
- Before First Use
- Chopping / Mixing / Dough Blade
- Slicing, Grating, French fry, and Reversible Shredding Discs
- Mini Food Bowl
- Recipe: Honey with Almond
- Recommended Maximum Work Bowl Capacity
- Controls
- High and Low Buttons
- Functions
- Pulse Button
- Using the Chopping/Mixing/Dough Blade Chopping
- Puréeing
- Using the Reversible Shredding/ Slicing Discs
- CAUTION
- FOR YOUR
- SAFETY
- Troubleshooting
- Technical Data
- GE Appliances Limited Warranty
- What GE Appliances Will Not Cover:
- EXCLUSION OF IMPLIED WARRANTIES
- Consumer Support
- Service and Registration
- Contact Us
- ROBOT CULINAIRE
Brand : GE
Model : G8P1AASSPSS
Category : Food Processor