
Freshboxx 3 - Air-conditioner OneConcept - Free user manual and instructions
Find the device manual for free Freshboxx 3 OneConcept in PDF.
| Product type | Air conditioner / evaporative air cooler |
| Brand | OneConcept |
| Model | Freshboxx 3 |
| Dimensions (W x D x H) | 290 x 230 x 610 mm |
| Weight | 4.8 kg |
| Power supply | 220-240 V ~ 50/60 Hz |
| Rated power | 65 W |
| Noise level (low speed) | ≤ 45 dB |
| Noise level (high speed) | ≤ 65 dB |
| Airflow | 966 m³/h |
| Nebulization capacity | 500 ml/h |
| Water tank capacity | Approximately 4 liters |
| Main functions | Cooling & humidification, 3-speed fan, oscillation, 1-12h timer, remote control |
| Included accessories | 2 ice packs, remote control (CR2032 battery included), casters |
| Cleaning and maintenance | Clean the nebulizer grid once a month; change water every 3 days; wipe the exterior with a damp cloth |
| Safety | Automatic shut-off via timer; do not use in a bathroom; do not cover; use on a stable and level surface |
| Recycling | Appliance and batteries must not be disposed of with household waste; follow local regulations |
| Warranty | Not specified in the manual |
Frequently Asked Questions - Freshboxx 3 OneConcept
User questions about Freshboxx 3 OneConcept
0 question about this device. Answer the ones you know or ask your own.
Ask a new question about this device
Download the instructions for your Air-conditioner in PDF format for free! Find your manual Freshboxx 3 - OneConcept and take your electronic device back in hand. On this page are published all the documents necessary for the use of your device. Freshboxx 3 by OneConcept.
USER MANUAL Freshboxx 3 OneConcept
text_image
QR code image containing encoded data, no visible human-readable textINHALTSVERZEICHNIS
natural_image
Technical line drawing of a rectangular electronic device with a small circular component on the left (no text or symbols)INSTALLATION
natural_image
Technical line drawing of a kitchen appliance with wheels and a door (no text or symbols)Wasser einfüllen
text_image
Diagram illustrating the process of a portable air conditioner system with heat transfer from a fan to a rack-mounted bed.Wassertankreinigung
natural_image
Symbol of a trash bin crossed with a diagonal line, no text or numbers presentCongratulations on purchasing this device. Please read the following instructions carefully and follow them to prevent possible damages. We assume no liability for damage caused by disregard of the instructions and improper use. Scan the QR code to get access to the latest user manual and more product information.

text_image
QR code image containing encoded data, no visible human-readable textCONTENT
Safety Instructions 15
Product Description 16
Control Panel and Displays 17
Installation 18
Operation 19
Cleaning and Care 20
Hints on Disposal 22
TECHNICAL DATA
| Item number 10034636, 10034637 | |
| Power supply 220-240 V ~ 50/60 Hz | |
| Nominal power 65 W | |
| Noise level | Low speed: ≤ 45 dB |
| High speed: ≤ 65 dB | |
| Air volume flow 966 m3/h | |
| Nebuliser performance 500 ml/h | |
| Dimensions (l*b*h) 290*230*610 mm | |
| Weight 4.8 kg |
SAFETY INSTRUCTIONS
- Check the voltage on the rating plate before use. Only connect the appliance to sockets which correspond to the voltage of the appliance.
- Keep the appliance and cable away from sources of heat, sharp objects or anything that may cause damage.
- Do not place the cord under carpets. Do not cover the cord with small clothes, shirts or other similar elements. Place the cord away from traffic areas in order to avoid any risk of tripping over.
- Do not operate the appliance if the cable or plug is damaged.
- If the supply cord or plug is damaged, it must be replaced by the manufacturer, its service agent or similarly qualified persons in order to avoid a hazard.
- Indoor use only.
- Do not cover the machine during using.
- Place the appliance on a stable flat horizontal surface. Make sure the appliance is in an upright position during use.
- Ensure the appliance is switched OFF before connecting to the mains power supply.
- Always ensure that hands are dry before operating or adjusting any switch on the product or touching the plug and mains supply connections.
- Do not leave this appliance unattended when it's in use. Turn off and disconnect the appliance when you leave the room for an extended period.
- Switch off the appliance and unplug from the mains socket when not in use, before filling, cleaning or other maintain.
- To disconnect the appliance, switch it "OFF", and then remove the plug from outlet. Do not pull the cord to disconnect the plug.
- This device may be only used by children 8 years old or older and persons with limited physical, sensory and mental capabilities and / or lack of experience and knowledge, provided that they have been instructed in use of the device by a responsible person who understands the associated risks.
- Use the appliance only as described in this manual.
- Do not insert your fingers in the openings of the guard.
- Do not leave hair, tissue, tablecloths, clothes or curtains near all openings of the fan, they could be sucked into the fan and be taken within the internal moving parts that could cause injury or damage.
- Do not use the appliance in wet or damp locations such as bathrooms.
- Do not operate the appliance when it's not mounted on its wheels or if it's lying on the side.
• Make sure the cord is completely extended before use.
- When in operation, evaporative coolers moisturize the ambient air. Over-humidification of residential rooms should be avoided. Recommendation: 40-50 % relative humidity. Excessive humidity of the air can damage the home and cause health problems.
- The appliance may only be set up on water- and moisture-proof flooring materials (spilling some drops of water is unavoidable when the content of the tank is changed).
- With each and every change of tank content, completely remove residual water from the equipment. To prevent nucleation, remove residual water from the equipment and water tank every time after three days of use.
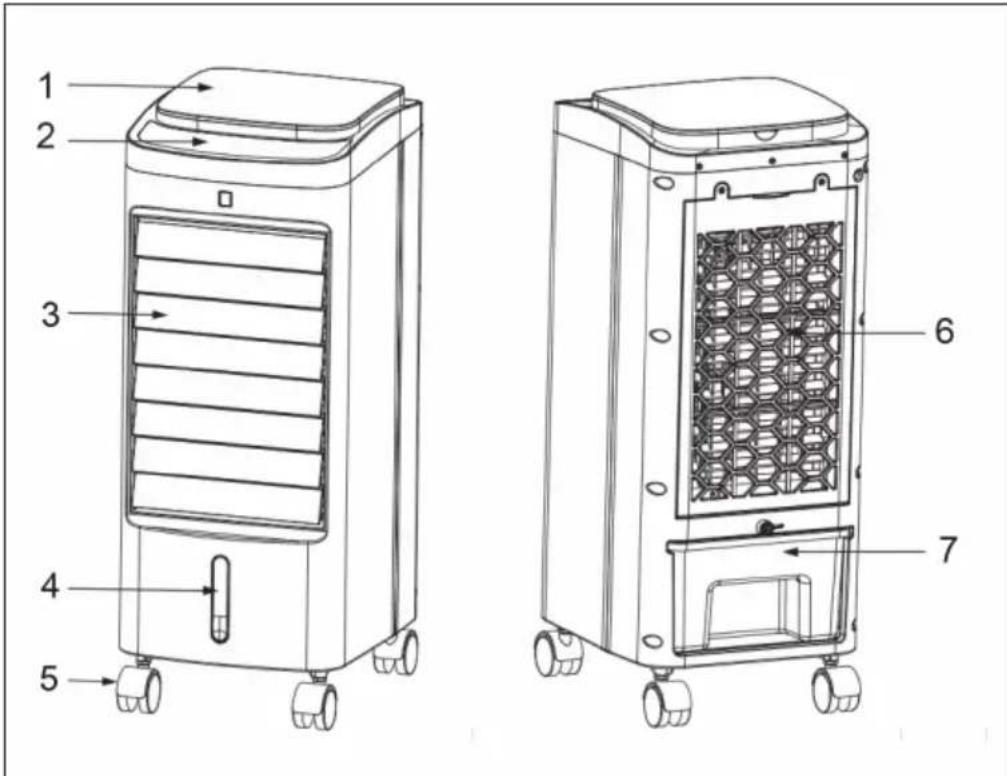
PRODUCT DESCRIPTION
text_image
1 2 3 4 5 6 7| 1 | Upper cover | 5 | Wheels |
| 2 | Display | 6 | Filters |
| 3 | Horizontal blades | 7 | Water tank |
| 4 | Water level indicator |
CONTROL PANEL AND DISPLAYS
| Displays | ||||||
| Control Panel | ||||||
 |  |  |  |  |  |  |
Key functions of the control panel and remote control
| ON/OFF Switch on/off the device. |
| SPEED Set speed: low > medium > high. |
| SWING Swing function left/right. |
| MODE Set wind mode. |
| TIMER Set timer: 1-12 hours |
| COOL Set cooling/air humidification. |
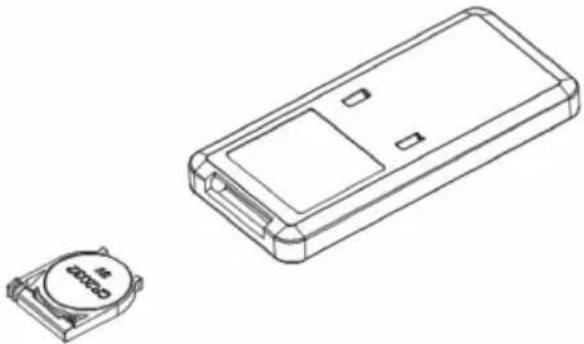
 | To insert the batteries:First, open the battery cover on the back of the remote and insert a CR2032 battery. |
 |
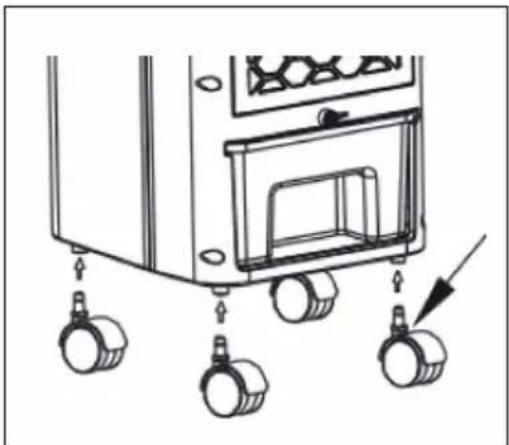
INSTALLATION
Remove the unit from its packaging and install the wheels as follows:
natural_image
Technical line drawing of a mechanical device with three wheels and an open door, showing no text or symbols.Fill with water
If you want to use the cooling and humidifying function, add water to the water tank. Open the tank lock button, pull out the tank and slowly fill the tank with water.
Note: The water level must be between the min mark and the max mark. Do not overfill the tank. Disconnect the plug from the socket before filling!
How to use the ice boxes
The ice box ensures that the water temperature in the water tank remains below the ambient temperature for several hours so that the air blown out by the fan is cooler.
- Place the ice box in the freezer compartment of the fridge until it is completely frozen.
- Place a frozen ice box in the water tank and slide the water tank back into position. After about ten minutes, the water temperature in the water tank will be lower than the ambient temperature.
Note: This unit is equipped with two ice boxes to ensure continuous operation. It is strictly forbidden to open the ice box and swallowing is fo
OPERATION
Connecting the device
Insert the plug into the socket. The unit beeps and switches to standby mode. Only the ON/OFF button is active.
Switching on the device
Press the ON/OFF button to turn on the unit. The following basic settings are set at the factory:
- Fan speed: low (if you switch on the device for the first time, the fan runs briefly at medium speed, but then changes to low speed)
- Cooling: off
• Wind mode: normal - Timer: off
- Swing function: off
Key functions
| SPEED When | the power is on, press the SPEED button to set the fan speed in the following order: low > medium > high > low. The corresponding indicator will light. |
| COOL When | on, press the COOL button to turn on the cooling/humidification function. The corresponding indicator lights up. Press the key again to deactivate the function. The corresponding indicator goes out. |
| TIMER In the | switched-on state, press the TIMER key to set the switch-off timer in the following sequence: 01 > 02 > 03 > 04 > ... > 12 > off > 01. As soon as the timer has expired, the unit switches off automatically. |
| SWING When | the timer is switched on, press the SWING key to switch on the left/right oscillation function. The corresponding indicator lights up. Press the key again to switch the function off. The corresponding indicator goes out. |
| MODE Press | the MODE button in the on state to set the wind mode in the following order: Normal > Natural > Sleep > Normal. The corresponding indicator will illuminate. |
CLEANING AND CARE
Note: Do not use chemicals when cleaning.
• Turn off the power and unplug the appliance.
- If there is dust on the outer surface, wipe with a soft cloth. If the surface is very dirty, use water (below 50°C) and a neutral detergent. Then wipe the outside with a soft cloth.
- Never use petrol, thinners or other substances that could damage the surface.
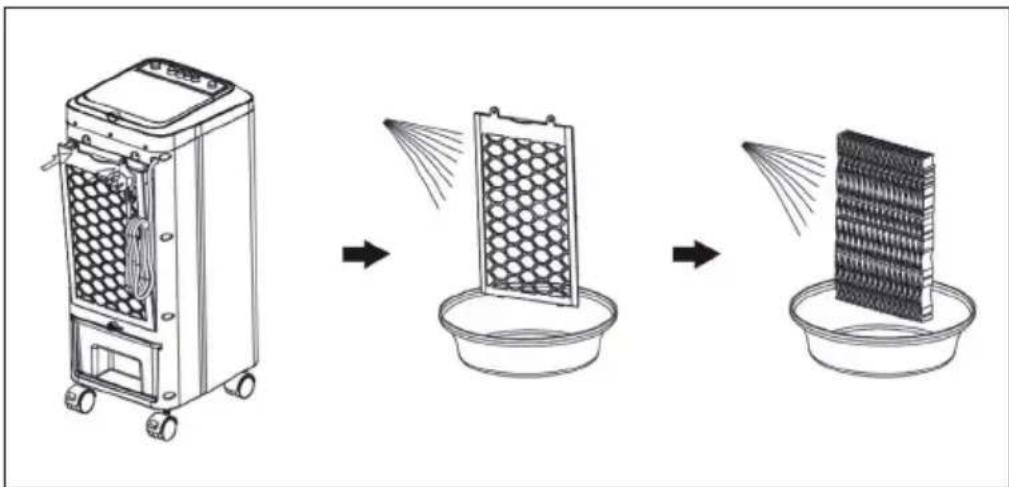
Cleaning the nebuliser grille
If too many foreign bodies adhere to the filter, this will affect the wind resistance, so clean it at least once a month.
• Turn off the unit and unplug it from the wall outlet.
- Open the rear cover and remove the nebuliser grille.
- Soak the nebuliser grille in soapy water for a few minutes, rinse under running water and then dry.
text_image
Diagram illustrating the process of a device's internal structure transformation, showing steps from air purifier to final container with visible heat emission.Water tank cleaning
- Disconnect the mains plug and turn the knob of the water tank to the horizontal position to pull out the water tank.
- Use a damp cloth and some detergent and wipe off any residue in the water tank. Then wash the tank with clean water and pour out the waste water.
Surface Cleaning
- Switch off the appliance and unplug it from the mains supply.
- Wipe the surface of the appliance with a damp cloth. It is strictly forbidden to clean the appliance under running water.
- Never use petrol, thinners or other substances that could damage the surface.
Installation and use after cleaning
• Install the nebuliser grille and the water tank in the correct position.
- Insert the plug into the socket and switch the unit on again.
Maintenance
- If the unit will not be used for a long time, unplug the power cord and pack the unit to prevent the ingress of dust.
- Before packing, make sure that the nebuliser grille is dry and that there is no more water in the water tank.
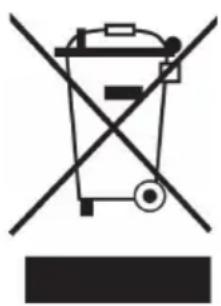
HINTS ON DISPOSAL
natural_image
Symbol of a trash bin crossed with a diagonal line, no text or numbers presentAccording to the European waste regulation 2012/19/EU this symbol on the product or on its packaging indicates that this product may not be treated as household waste. Instead it should be taken to the appropriate collection point for the recycling of electrical and electronic equipment. By ensuring this product is disposed of correctly, you will help prevent potential negative consequences for the environment and human health, which could otherwise be caused by inappropriate waste handling of this product. For more detailed information about recycling of this product, please contact your local council or your household waste disposal service.
Your product contains batteries covered by the European Directive. 2006/66/EC, which cannot be disposed of with normal household waste. Please check local rules on separate collection of batteries. The correct disposal of batteries helps prevent potentially negative consequences on the environment and human health.
DECLARATION OF CONFORMITY

Producer:
Chal-Tec GmbH, Wallstraße 16, 10179 Berlin, Germany.
This product is conform to the following European Directives:
2014/30/EU (EMC)
2014/35/EU (LVD)
2011/65/EU (RoHS)
206/2012/EU (ErP)
Estimado cliente,
text_image
QR code image containing encoded data, no visible human-readable textÍNDICE
natural_image
Technical line drawing of a rectangular electronic device with a smaller circular component (no text or symbols)INSTALACIÓN
natural_image
Technical line drawing of a kitchen appliance with wheels and a door (no text or symbols)Añadir agua
text_image
Diagram illustrating the process of a portable air conditioner system with heat transfer from a fan to a grid box.natural_image
Symbol of a trash bin crossed with a diagonal line, no text or numbers presenttext_image
QR code image containing encoded data, no visible human-readable textSOMMAIRE
natural_image
Technical line drawing of a kitchen appliance with wheels and a door (no text or symbols)text_image
Diagram illustrating the process of a portable air conditioner system with heat transfer from a fan to a grid box.natural_image
Symbol of a trash bin crossed with a diagonal line, no text or numbers presentDÉCLARATION DE CONFORMITÉ

text_image
C€Fabricant :
Chal-Tec GmbH, Wallstraße 16, 10179 Berlin, Allemagne.