
HF2006 - Range hood ASKO - Free user manual and instructions
Find the device manual for free HF2006 ASKO in PDF.
| Product type | Built-in kitchen hood |
| Brand | ASKO |
| Model | HF2006 |
| Energy efficiency class | A++ |
| Annual energy consumption (AEChood) | 35.3 kWh/year |
| Maximum airflow (Boost) | 727 m³/h |
| Airflow in normal use (min-max) | 319 - 413 m³/h |
| Acoustic emissions in normal use (min-max) | 51 - 57 dB(A) |
| Acoustic emissions in Boost mode | 70 dB(A) |
| Average illumination on cooking surface | 706 lux |
| Illumination efficiency | 235.3 lux/W |
| Dynamic efficiency index | 37.6% |
| Dynamic efficiency class | A |
| Grease filtering efficiency | 81.8% |
| Grease filtering efficiency class | C |
| Standby consumption (Ps) | 0.35 W |
| Rated motor power (WL) | 3 W |
| Lighting type | LED (bulbs replaceable by a technician) |
| Lighting colour temperature | Adjustable (warm to cold) |
| Main functions | 4 speeds + Boost, timer, Clean Air, remote control |
| Filters | Washable metal grease filter, regenerable charcoal filter |
| Grease filter maintenance | Clean every 30 h of use (manual or dishwasher) |
| Charcoal filter maintenance | Clean every 120 h of use, replace max. 3 years |
| Remote control | Wireless, AAA batteries (x2), range 30 m |
| Safety | Automatic stop by timer, protection against accidental activations |
| Operating modes | Extraction or recirculation (RMS kit optional) |
| Dimensions (W x D x H) | See manual for precise dimensions |
Frequently Asked Questions - HF2006 ASKO
User questions about HF2006 ASKO
0 question about this device. Answer the ones you know or ask your own.
Ask a new question about this device
Download the instructions for your Range hood in PDF format for free! Find your manual HF2006 - ASKO and take your electronic device back in hand. On this page are published all the documents necessary for the use of your device. HF2006 by ASKO.
USER MANUAL HF2006 ASKO
Informations, consels, astuces, ourecommendations

ATTENTION!
Attention-danger
Nousvousrecommandonsvivementdelireattentivementcettenotice.

ATTENTION!
Description user interface 52
Description remote control 53
Operation 54
Pairing the remote 54
Switching extraction on and off 54
Switch on the boost setting 55
Switching on the timer 55
Switching on recirculation mode 56
Switching off recirculation mode 56
Clean Air function 56
Switching the light on and off 57
Changing the colour lighting temperature 57
Maintenance 58
Cleaning 58
Filter indicator 60
Lighting 60
Battery of the remote 61
Technical data 62
EU Product Sheet 62
EU Product Fiche 64
Environmental aspects 65
Tips for energy-efficient cooking with hoods 65
Disposal of the appliance and packaging 65
Introduction
Onreadingtheseusermanualsyouwillsoonbecomefamiliarwiththefeaturesofthisappliance.
Please read the appliance's safety and maintenance instructions.
Complianceinformation
| Cookerhood(Built-inUnit)Radioequipmenttype | |
| 2402-2477MHz(16channels)Operatingfrequencyrange | |
| -5.2dBmEIRPaverage(calculated)Maximumoutputpower | |
| -7dBiMaximumantennagain |
Hereby, ATAGNederland B.V. declares that the radio equipment type Cookerhood (Ceilingunit) is in compliance with Directive 2014/53/EU.
Thefollowingsymbolsareusedthroughoutthemanualandtheyhavethefollowingmeanings:

INFORMATION!
Information,advice,tip,orrecommendation

WARNING!
Warning-generaldanger
Itisimportantthatyoucarefullyreadtheinstructions.

WARNING!
Beforeuse,readtheseparatesafetyinstructionsfirst!
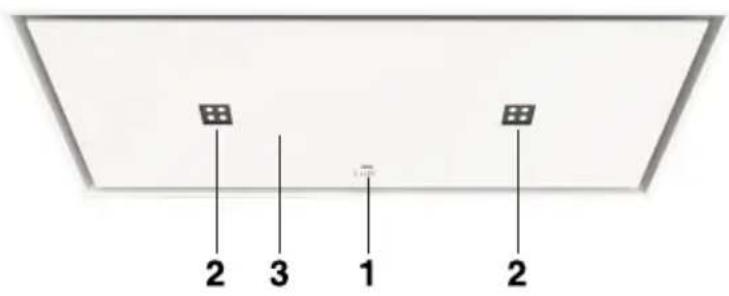
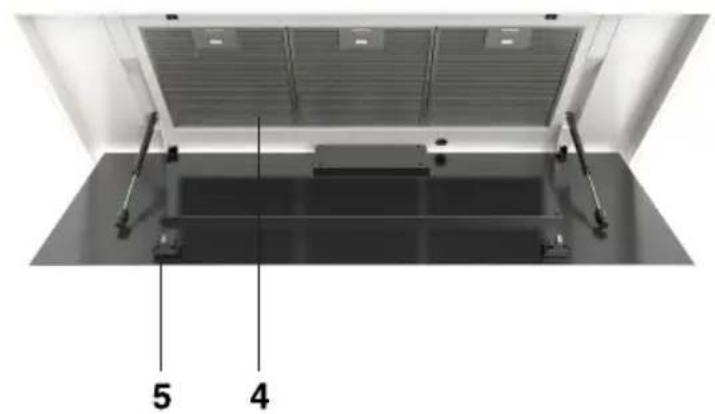
Descriptionhood
1.Userinterface
2. LEDbar
3.Edgeextraction panel
4.Greasefilter
5.Latch
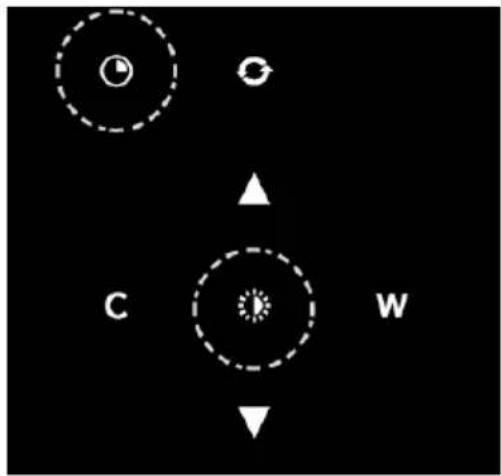
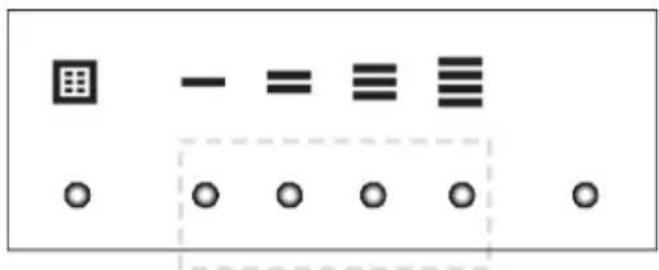
Descriptionuserinterface
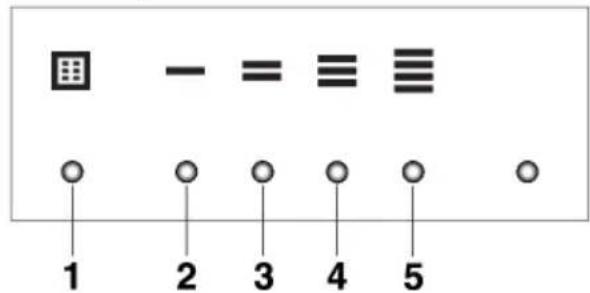
1.Filterresetbutton,signalswhenfiltersrequirecleaning
2.Speedlevel1indicator
3.Speedlevel2indicator
4.Speedlevel3indicator
5.Speedlevel4/boostindicator
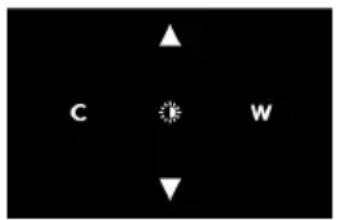
Descriptionremotecontrol
- Timerfunction
2.Increasinglightintensity
3.Colderlighttemperature
4.Decreaselightintensity - Decreaseairextractioncapacity
6.CleanAirfunction - Warmerlighttemperature
8.Switchon/offlighting
9.Increaseairextractioncapacity
10.Fanon/off
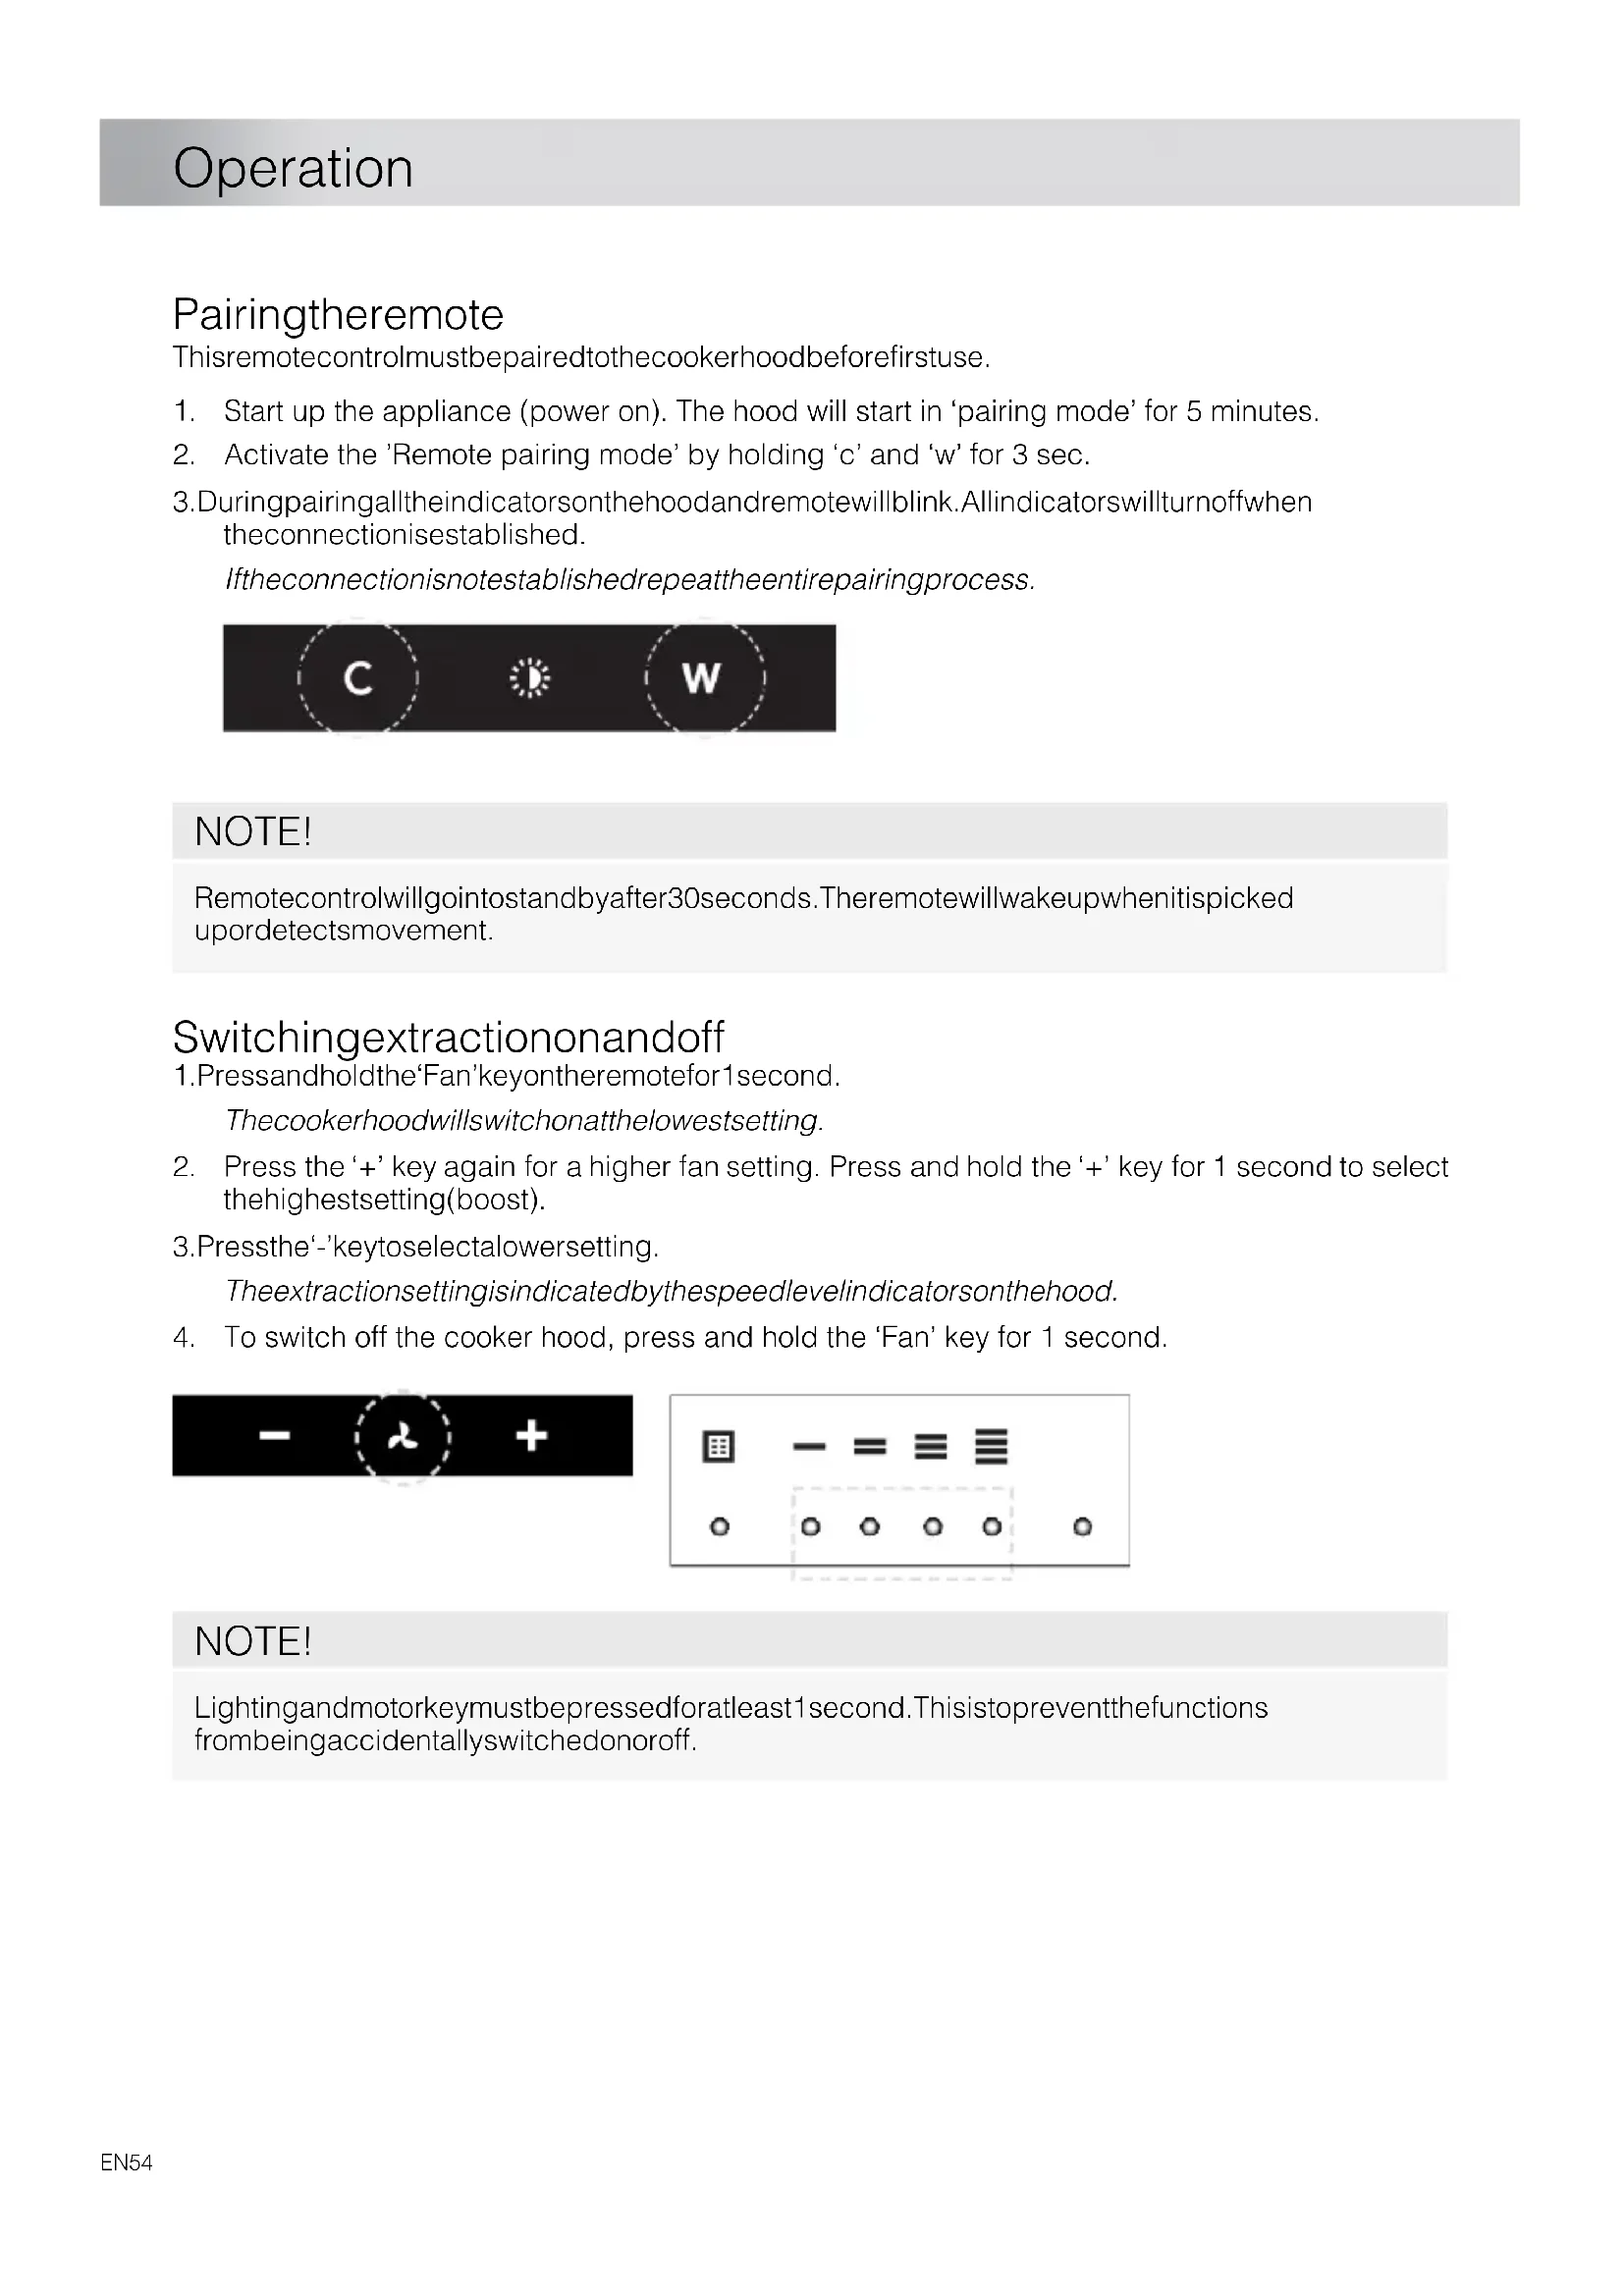
Pairingtheremote
Thisremotecontrolmustbepairedtothecookerhoodbeforefirstuse.
- Start up the appliance (power on). The hood will start in 'pairing mode' for 5 minutes.
- Activate the 'Remote pairing mode' by holding 'c' and 'w' for 3 sec.
3.Duringpairingalltheindicatorsonthehoodandremotewillblink.Allindicatorswillturnoffwhen theconnectionistablished.
If the connection is not established, repeat the entire repairing process.

NOTE!
Remotecontrolwillgointostandbyafter30seconds. Theremotewillwakeupwhenitispicked upordetectsmovement.
Switchingextractiononandoff
1.Pressandholdthe'Fan'keyontheremotefor 1second.
Thecookerhoodwillswitchonatthelowestsetting.
- Press the +^ key again for a higher fan setting. Press and hold the +^ key for 1 second to select the highestsetting(boost).
3.Pressthe'-keytoselectalowersetting.
The extraction setting is indicated by the speed level indicator on the hood.
- To switch off the cooker hood, press and hold the 'Fan' key for 1 second.

NOTE!
Lighting and motorkey must be pressed for at least 1 second. This stop prevents the functions from being accidentally switched on/off.
Switchontheboostsetting
- Pressandholdthe' + 'buttonforatleast1second.
Theboostsettingisswitchedonfor10minutes.thespeedlevel4indicatorwillflashduringthis period. Theoriginalextractionsettingwillbereactivatedafterthisperiod.
- Pressandreleasethe'-'keytoswitchchofftheboostsetting.


NOTE!
Iftheboostsettinghasbeenselected, the timerfunction cannot beactivated.
Switchingonthetimer
1.Pressthetimerkey.
Thetimerindicatorwillstarttoblink.
Thecookerhoodwillswitchoffautomaticallyafter10minutes.
2.Switchoffthetimerfunctionbypressingarandombutton(excepttheoneforlighting).

TIP!
Thecookerhoodcanbeusedinextractionmodeorrecirculationmode.Theairextractioncapacity isadaptedtotheselectcdmode.Thehoodwillstartupthedefaultextractionmode.Ishastoberesetforrecirculationmode.
WithanRMSkit(Recirculationmodificationset)theairwillfirstbecleanedbythegreasefilters andthenodourswillbefilteredbythecharcoalfilter. Thecleanedairisrecirculatedbackintothe kitchen.
Switchingonrecirculationmode
Whenthelightandfanareoff,simultaneouslyholdthetimerkeyandthelightkeyuntilthefilter indicatorflashes3times.
Thecarbonfilterindicatorisactivated.
Switchingoffrecirculationmode
Whenthelightandfanareoff,simultaneouslyholdthetimerkeyandthelightkeyuntilthefilter indicatorlightsupfor3secondsandthenturnsoff.
CleanAirfunction
TheCleanAirfunctionalallowsyoufreshentheairinyourkitchenenforamaximumof24hoursat level1.
1.Switchoffthecookerhood.
2. Pressandholdthe 'cleanair'keyforapproximately3seconds.
Thecookerhoodwillswitchonautomaticallyfor10minuteseveryhouratthelowestspeed setting. During extraction the display will show a fast moving 'snake'. When the hood switches off after 10 minutes, the display will show a slow moving 'snake' until the hood switches on again after50minutes.
- Switch off the Clean Air function by pressing the timer, clean air, '-' or '+' keys (any key other than the lightkey).
Switchingthelightandoff
- Pressandholdthelightkeyfor1second.
Thelightswitchesonatmaximumstrength.
- Press and hold the 'increase light' or 'decrease light' key to set the lighting intensity.
3.Toturnoffthelight,pressandholdthelightkeyfor1second.
NOTE!
Lighting and motorkey must be pressed for at least 1 second. This stop prevents the functions from being accidentally switched on/off.
Changing the colour lighting temperature
Youcanadjustthelightingtemperature.
- Press and hold the light key for 1 second.
Thelightswitchesonatmaximumstrength.
- Press the 'C' key to make the light 'colder' or press the 'W' key to makethelight'warmer'.
Cleaning
WARNING!
Important! For all maintenance, first switch off the remains power to the cookerhood by pulling the plugout of the socketor by turning off the home's masters switch. The hood needstobe cleaned regularly, both inside as well as outside (at least as often as the grease filter).
Donotuseabrasivecleaningproducts.Donotusealcohol!
If the instructions regarding cleaning of the appliance or replacing the filters are not followed, this can cause a fire. These instructions must be followed! Themanufacturer is not liable for damagetohoodor fired damageresulting from incompetent maintenance or from non-adherencetothesafetyinstruction above.
Cookerhood
Cleanthecookerhoodwithsoapywaterandasoftcloth.
Thenrinsewithcleanwater.Donotuseaggressivecleaningagentssuchascausticsoda.The cookerhoodfinishstaysingoodconditionifitisbuffedperiodicallyfollowingtheapplicationofwax.
NOTE!
Stainlesssteelcookerhoods
Donotusescouringpadsorotherabrasivecleanersonstainlesssteelcookerhoods.Finishwith anon-abrasive,non-polishingagentandbuffthestainlesssteelinthedirectionofthegrain.
Metalgreasefilters
Metalgreasefiltersshouldbecleanedoncea month(orwhenindicatedbythefiltercleaningindicator – if present on the model) using a neutral cleaning agent, either by hand or in the dishwasher on a short,low-temperatureprogram.Placethegreasefilterswiththeopeningsfacingdownwardsinthe dishwashersothewatercandrainoutofthefilter.Aluminiumgreasefiltersbecemedallasaresult ofdishwashercleaningagents.Thisisnormalanddoesnoteffecttheworking.
Removingcassettefilter
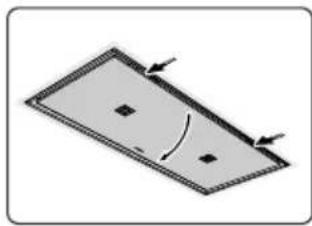
- Switchoffthemotorandlighting.
2.Pushinthelatchesandopenthepanel.
3.Openthefilter'saccesslatch.Supporttthefilterwithyourhand. - Removethefilterfromthehood.

Cleaning
The filterscanbecleanedinthedishwasher. Allow the filterstodrainwellbefore replacing.
The filterscanalsobecleanedbyhand.
Cleanthefiltersinsoapywaterwithwashingupliquidandrinse. Allow the filterstodrainwell. The underside of the cookerhood can be cleaned with a mild cleaning agent and dampcloth. Dry off with napertowel.
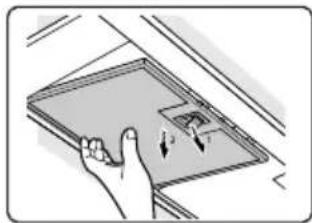
Replacingcassettefilter
Thefiltersshouldbeplacedwiththelockingmechanismonthefront.Openthefilteraccesslatch. Thenotchesatthefrontofthefilterwillthenslotin.Holdtheaccesslatchinthispositionwhenplacing thefilters.
1.Slotthenotchesatthebackofthefilterinthespeciallydesignedopeningofthecookerhood.
2. Tiltthefilterupwards.
3. Releasethefilteraccesshatch. Thenotchesatthebackofthefilterwillextendoutwardsand slotintothespeciallydesignedopeningsofthecookerhood. Thefilterisnowinpositionagain.
4.Presstheglassplatefirmlyinthesealagain(youwillhearaclick).

WARNING!
Theedgeextractionpanelcanberemovedforcleaning.Twopeoplearequiredwhenremoving theedgeextractionpanel(duetoitsweight)!
Activecarbonfilters
Theregenerableactivecarbonfiltermustbewashedbyhandwithneutralcleaningproducts,orin thedishwasheratamaximumtemperatureof 65^ (thewashingshouldbedonewithoutanyplates, dishes,cups,etc.inthemachine).Donotusewashingdetergent.
Removetheexcesswaterwithoutdamagingthefilter,removetheholderandletthefilterdryin the ovenforatleast40minutesatamaximumtemperatureof 70^ .
Tokeeptheregenerablecarbonfilterefficient, this actions shouldberepeatedevery2months or when indicated bythefilterindicator. The filter must replace afternomorethan 3 years, or if it has been damaged.

WARNING!
Itisimportantthatthegreasefiltersandtheregenerableactivecarbonfilterarethoroughlydry beforerepositioning.
Replacingthecarbonfilter
Toreplacetecarbonfilter,consultthemanualfortherecirculationkit.
Filterindicator
Saturationofgreaseandcarbonfilters
The filters should be replaced or cleaned when the filter indicator is lit. See 'Maintenance' chapter.
Greasefilter
Thefilterindicatorwilllightupafter30operatingshours.
- Thegreasefiltersshouldthenbecleaned.
- Reset the memory by pressing and holding the '-' key until the filter indicator goes off.
Carbonfilter
Thefilterindicatorwillflashafter120operatingshours.
- Thecarbonfiltersshouldthenbecleanedorreplaced.
- Reset the memory by pressing and holding the ' -' key until the filter indicator stops flashing.
Lighting

WARNING!
ThehoodisfittedwithLEDlights.Thesemustbereplacedbyanaauthorizedtechnician.Donot attemptloreplacetheLEDlightsyourself.
Batteryoftheremote
| TIP! |
| Whenthebatteriesarereplacedthepairingconnectionwillremain. |
| Replacethebatteriesintime,asthereceivingdistancewillbeshortenedifthevoltageofthebattery istoolow. |
| Don't forget to remove the batteries if you don't use the remote for a long time. |
| Don'tleavetheremotelyingupsidedownnonaconductivesurface. |
| Thewarantydoesn'tcoverthebatteries. |
| Thebatterymaydrainmorequicklyinconnectionwiththeliticons. |
| Batteryspecifications:TwoAAAbatteries. |
EUProductSheet
Datadeterminedaccordingo:
StandardEN61591andCommissionRegulations(EU)no.65/2014and(EU)no.66/2014.
| CU12711RMCU12511RMC | |||
| ATAGATAGATAGTradema | |||
| IC12BA-BCD01WC12BA-B | |||
| hood) [kWh/a] | 35.934.835.3AnnualEnergy | ||
| Energyefficiencyclass | A++ | A++ | A++ |
| hood)[%] | 38.937.937.6FluidDynamic | ||
| AAAFluidDynamicEfficienc | |||
| hood)[lux/W] | 178.3210.7235.3LightingEff | ||
| AAALightingEfficiencyclase | |||
| hood)[%] | 71.278.881.8GreaseFilterin | ||
| DCCGreaseFilteringEfficien | |||
| Air flow at minimum and maximum speed in normaluse[m 3/h] | 312 / 402 | 326 / 409 | 319 / 413 |
| Air flow at intensive or boost setting [m3/h] | 708 | 716 | 727 |
| Airborne acoustical A-weighted sound power emissions at minimum and maximum speed innormaluse[dB(A)] | 50 / 57 | 51 / 58 | 51 / 57 |
| Airborne acoustical A-weighted sound power emissionsatintensiveorboostsetting [dB(A)] | 70 | 69 | 69 |
| Powerconsumptionoffmode(P o) | - | - | - |
| W) [s) | 0.350.350.35Powerconsum |
| CU12755RMCU12555RMC | |||
| ATAGATAGATAGTradema | |||
| IC12BA-BCD01WC12BA-B | |||
| [kWh/a] | hood) | 35.934.835.3AnnualEnergy | |
| Energyefficiencyclass | A++ | A++ | A++ |
| hood)[%] | 38.937.937.6FluidDynamic | ||
| AAFluidDynamicEfficienc |
Tablecontinuedfromlastpage
| CU12755RMCU12555RMC | |||
| \(hood\)) [lux/W] | 178.3210.7235.3LightingEfficiencyclass | ||
| AAALightingEfficiencyclass | |||
| \(hood\)) [%] | 71.278.881.8GreaseFiltering | ||
| DCCGreaseFilteringEfficier | |||
| normaluse[m 3/h] | 319/413326/409312/402Air | ||
| \(3/h\)] | 727716708Airflowatintensiv | ||
| Airborne acoustical A-weighted sound power emissionsatminimum andmaximumspeed innormaluse[dB(A)] | 50 / 57 | 51 / 58 | 51 / 57 |
| Airborne acoustical A-weighted sound power emissionsatintensiveorboostsetting [dB(A)] | 70 | 69 | 69 |
| Powerconsumptionoffmode(P o) | - | - | - |
| \(s\)) [W] | 0.350.350.35Powerconsum |
Technicaldata
EUProductFiche
| CU12711RMCU12511RMC | |||
| 0.60.60.6Timeincreasefact | |||
| hood) | 35.335.335.3EnergyEfficier | ||
| point(Q BEP) [m3/h] | 449447433Measuredairflow | ||
| point(P BEP) | 480478472Measuredairpre | ||
| efficiencypoint(W BEP) | 154149151Measuredelectr | ||
| L) | 333Nominalpowerofthelight | ||
| onthecookingsurface(E middle)[lux] | 535632706Averageillumina |
| CU12755RMCU12555RMC | |||
| 0.60.60.6Timeincreasefacto | |||
| hood) | 35.335.335.3EnergyEfficier | ||
| point(Q BEP) [m3/h] | 449447433Measuredairflow | ||
| point(P BEP) | 480478472Measuredairpre | ||
| efficiencypoint(W BEP) | 154149151Measuredelectr | ||
| L) | 333Nominalpowerofthelight | ||
| onthecookingsurface(E middle)[lux] | 535632706Averageillumina |
Tipsforenergy-efficientcookingwithhoods
- Usealowextractorsettingandusethehighestsetting(boost)ifnecessary.
- Awell-ventilatedkitchenmaketherangehoodmoreefficient.
- Clean filters regularly and replace filters when needed to keep the filter efficiency high, as a saturated filter cannot perform standstolonger usagetimes.
Disposal of the appliance and packaging
Sustainable materials have been used during manufacture of this appliance. This appliance must be disposed responsibly at the end of its service life. Ask your local authorities for more information about how to do this.
Theappliancepackagingisrecyclable. Thefollowingmayhavebeenused:
cardboard;
polyethylenefilm(PE);
CFC-freepolystyrene(PSrigidfoam).
Disposeofthesematerialsinaresponsiblemannerandinaccordancewithgovernmentregulations.
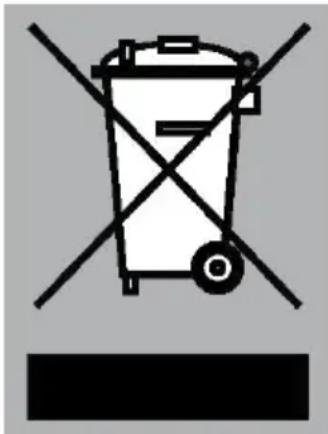
Theproducthasbeenmarkedwithacrossed-outdustbinssymbolto remindyouoftheobligationtodisposeofelectricalhousehold applianceseparately.Thismeansthatheappliancemaynotbe includedwithnormaldomesticrefuseattheendofitsservicelife.The appliancemustbetakentoaspecialmunicipalcentreforseparated wastecollectionortoadealerprovidingthisservice.
Separate collection of household appliances helpstopprevent any potential negative impact on the environment and human health caused by improper disposal. It ensures that materials of which the appliance is composed can be recovered to obtain significant savings in energy and raw materials.
C E
Declarationofconformity
Weherebydeclare that our productssatisfytheapplicableEuropean directives,ordersandregulations,aswellastherequirementsstated inthereferencedstandards.
ATAG
www.atag.nl
www.atag.be
- Operation 54
- Maintenance 58
- Technical data 62
- Environmental aspects 65
- Introduction
- Descriptionhood
- Descriptionuserinterface
- Descriptionremotecontrol
- Pairingtheremote
- NOTE!
- Switchingextractiononandoff
- Switchontheboostsetting
- Switchingonthetimer
- TIP!
- Switchingonrecirculationmode
- Switchingoffrecirculationmode
- CleanAirfunction
- Switchingthelightandoff
- Changing the colour lighting temperature
- Cleaning
- WARNING!
- Cookerhood
- Stainlesssteelcookerhoods
- Metalgreasefilters
- Removingcassettefilter
- Replacingcassettefilter
- Activecarbonfilters
- Replacingthecarbonfilter
- Filterindicator
- Saturationofgreaseandcarbonfilters
- Greasefilter
- Carbonfilter
- Lighting
- Batteryoftheremote
- EUProductSheet
- Technicaldata
- Tipsforenergy-efficientcookingwithhoods
- Disposal of the appliance and packaging
- Declarationofconformity
- ATAG
Brand : ASKO
Model : HF2006
Category : Range hood