
AC18BQ - Air conditioner LG - Free user manual and instructions
Find the device manual for free AC18BQ LG in PDF.
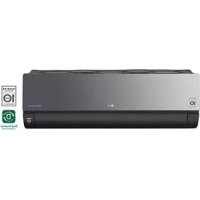



| Product type | Wall-mounted air conditioner |
| Brand | LG |
| Model | AC18BQ |
| Indoor unit dimensions (approx.) | 800 x 300 x 200 mm |
| Outdoor unit dimensions (approx.) | 800 x 600 x 300 mm |
| Indoor unit weight (approx.) | 12 kg |
| Outdoor unit weight (approx.) | 35 kg |
| Power supply | 220-240 V ~ 50 Hz |
| Refrigerant | R32 (flammable) |
| Operating modes | Cooling, heating, dehumidification, fan, auto |
| Main functions | Jet mode, on/off timer, sleep, energy control, Wi-Fi (LG ThinQ), auto restart, auto clean, ionizer, quiet |
| Fan speed | 5 speeds + natural ventilation |
| Airflow direction | Vertical and horizontal (oscillation) |
| Remote control | Wireless with AAA batteries |
| Maintenance and cleaning | Washable air filter every 2 weeks; ionizer to clean every 6 months; indoor unit with soft cloth; call a professional for outdoor unit |
| Safety | Dedicated circuit breaker, grounding, use of flammable R32, automatic shutdown in case of fault |
| Spare parts and repairability | Air filter, remote control, batteries; repair by authorized service |
| General information | Manual available in multiple languages, support via LG ThinQ app, sound diagnosis |
Frequently Asked Questions - AC18BQ LG
User questions about AC18BQ LG
0 question about this device. Answer the ones you know or ask your own.
Ask a new question about this device
Download the instructions for your Air conditioner in PDF format for free! Find your manual AC18BQ - LG and take your electronic device back in hand. On this page are published all the documents necessary for the use of your device. AC18BQ by LG.
USER MANUAL AC18BQ LG
Read this owner's manual thoroughly before operating the appliance and keep it handy for reference at all times.
TYPE: WALL MOUNTED
Original instruction
EN ENGLISH
FR FRANÇAIS
EL EAAHNIKA
NL NEDERLANDS
PL POLSKI
HU MAGYAR
BG BbIgAPCKN
HR HRVATSKI
CZ CESTINA
ET EESTI
MT MALTI
RO ROMÁNA
SK SLOVENCINA
SL SLOVENSCINA
LV LATVIESU
LT LIETUVIU
GA GAEILGE
SR SRPSKI
MK MAKEDONSKI
SQ SHQIP
BS BOSANSKI
TABLE OF CONTENTS
This manual may contain images or content different from the model you purchased.
This manual is subject to revision by the manufacturer.
SAFETY INSTRUCTIONS 3
IMPORTANT SAFETY INSTRUCTIONS 4
OPERATION 11
Notes for Operation 11
Parts and Functions 11
Wireless Remote Control 12
Restarting the Air Conditioner Automatically 17
Using the Mode Function 17
Using the Jet Mode Function 20
Using the Fan Speed Function 21
Using the Air Flow Direction Function 21
Setting the On/Off Timer 22
Using the Sleep Function (Optional) 23
Using the Simple Timer Function (Optional) 23
Using the Energy Display Function (Optional) 24
Using the Light Off Function (Optional) 24
Using the Comfort Air Function (Optional) 24
Using the Energy Control Function (Optional) 25
Using Special Functions 25
SMART FUNCTIONS 27
LG ThinQ Application 27
Smart Diagnosis 29
MAINTENANCE 30
Clean the Air Filter 32
TROUBLESHOOTING 33
The following safety guidelines are intended to prevent unforeseen risks or damage from unsafe or incorrect operation of the appliance.
The guidelines are separated into 'WARNING' and 'CAUTION' as described below.

This symbol is displayed to indicate matters and operations that can cause risk. Read the part with this symbol carefully and follow the instructions in order to avoid risk.

WARNING
This indicates that the failure to follow the instructions can cause serious injury or death.

CAUTION
This indicates that the failure to follow the instructions can cause the minor injury or damage to the product.
The following symbols are displayed on indoor and outdoor units. (for R32)

This symbol indicates that this appliance uses a flammable refrigerant. If the refrigerant leaks and is exposed to an external ignition source, there is a risk of fire.

This symbol indicates that the Operation Manual should be read carefully.

This symbol indicates that service personnel should handle this equipment with reference to the Installation Manual.

This symbol indicates that information is available, such as the Operating Manual or Installation Manual.
IMPORTANT SAFETY INSTRUCTIONS

WARNING
To reduce the risk of explosion, fire, death, electric shock, injury, or scalding to persons when using this product, follow basic precautions, including the following:
Children in the Household
This appliance is not intended for use by persons (including children) with reduced physical, sensory, or mental capabilities, or lack of experience and knowledge, unless they have been given supervision or instruction concerning use of the appliance by a person responsible for their safety. Children should be supervised to ensure that they do not play with the appliance.
For use in Europe:
This appliance can be used by children aged from 8 years and above and persons with reduced physical, sensory, or mental capabilities or lack of experience and knowledge if they have been given supervision or instruction concerning use of the appliance in a safe way and understand the hazards involved. Children shall not play with the appliance. Cleaning and user maintenance shall not be made by children without supervision.
Installation
- Do not install the air conditioner on an unstable surface or in a place where there is a danger of it falling.
- Contact an authorized service center when installing or relocating the air conditioner.
- Install the panel and the cover of the control box safely.
- Do not install the air conditioner in a place where flammable liquids or gases such as gasoline, propane, paint thinner, etc., are stored.
- Make sure that the pipe and the power cable connecting the indoor and outdoor units are not pulled too tight when installing the air conditioner.
- Use standard circuit breaker and fuse that conform to the rating of the air conditioner.
- Do not input air or gas into the system except with the specific refrigerant.
- Use non-flammable gas (nitrogen) to check for leak and to purge air; using compressed air or flammable gas may cause fire or explosion.
- The indoor/outdoor wiring connections must be secured tightly, and the cable should be routed properly so that there is no force pulling the cable from the connection terminals. Improper or loose connections can cause heat generation or fire.
- Install dedicated electric outlet and circuit breaker before using the air conditioner.
- Do not connect the ground wire to a gas pipe, a lightning rod, or a telephone ground wire.
- Keep any required ventilation openings clear of obstruction. (for R32)
- Means for disconnection must be incorporated in the fixed wiring in accordance with the wiring rules.
Operation
- Be sure to use only those parts listed in the service parts list. Never attempt to modify the equipment.
- Make sure that children do not climb on or hit the outdoor unit.
- Dispose of the batteries in a place where there is no danger of fire.
- Use only the refrigerant specified on the air conditioner label.
- Cut off the power supply if there is any noise, smell, or smoke coming from the air conditioner.
- Do not leave flammable substances such as gasoline, benzene, or thinner near the air conditioner.
- Contact an authorized service center when the air conditioner is submerged by flood waters.
- Do not use the air conditioner for an extended period of time in a small place without proper ventilation.
- In the event of a gas leak (such as Freon, propane gas, LP gas, etc.) ventilate sufficiently before using the air conditioner again.
- To clean the interior, contact an authorized service center or dealer. Using harsh detergents may cause corrosion or damage to the unit.
- Be sure to ventilate sufficiently when the air conditioner and a heating appliance such as a heater are used simultaneously.
- Do not block the inlet or outlet of air flow.
- Do not insert hands or other objects through the air inlet or outlet while the air conditioner is operating.
- Make sure that the power cable is neither dirty, loose, nor broken.
- Never touch, operate, or repair the air conditioner with wet hands.
- Do not place any objects on the power cable.
- Do not place a heater or other heating appliances near the power cable.
- Do not modify or extend the power cable. Scratches or peeling insulation on the power cables may result in fire or electric shock, and should be replaced.
- Cut off the power supply immediately in the event of a blackout or a thunderstorm.
- Take care to ensure that power cable could not be pulled out or damaged during operation.
- Do not touch refrigerant pipe, water pipe and any internal parts while the unit is operating or immediately after operation.
Maintenance
- Do not clean the appliance by spraying water directly onto the product.
- Before cleaning or performing maintenance, disconnect the power supply and wait until the fan stops.
Technical Safety
- Installation or repairs made by unauthorized persons can pose hazards to you and others.
- Any person who is involved with working on or breaking into a refrigerant circuit should hold a current valid certificate from an industry-accredited assessment authority, which authorizes their competence to handle refrigerants safely in accordance with an industry recognized assessment specification. (for R32) Servicing shall only be performed as recommended by the equipment manufacturer. Maintenance and repair requiring the assistance of other skilled personnel shall be carried out under the supervision of the person competent in the use of flammable refrigerants. (for R32)
- The information contained in the manual is intended for use by a qualified service technician who is familiar with the safety procedures and equipped with the proper tools and test instruments.
- Failure to read and follow all instructions in this manual can result in equipment malfunction, property damage, personal injury and/or death.
- The appliance shall be installed in accordance with national wiring regulations.
- When the power cord is to be replaced, the replacement work shall be performed by authorized personnel using only genuine replacement parts.
- This appliance must be properly grounded to minimize risk of electric shock.
- Do not cut or remove the grounding prong from the power plug.
- Attaching the earth wire to the power outlet cover screw does not ground the appliance unless the cover screw is metal, uninsulated, and the power outlet is grounded through house wiring.
- If you have any doubt whether the air conditioner is properly grounded, have the power outlet and circuit checked by a qualified electrician.
- The refrigerant and insulation blowing gas used in the appliance require special disposal procedures. Consult a service agent or a similarly qualified person before disposing of them.
- If the supply cord is damaged, it must be replaced by the manufacturer, its service agent or similarly qualified person in order to avoid a hazard.
- The appliance shall be stored in a well-ventilated area where the room size corresponds to the room area as specified for operation. (for R32)
- The appliance shall be stored in a room without continuously operating open flames (for example an operating gas appliance) and ignition sources (for example an operating electric heater). (for R32)
- The appliance shall be stored so as to prevent mechanical damage from occurring. (for R32)

CAUTION
To reduce the risk of minor injury to persons, malfunction, or damage to the product or property when using this product, follow basic precautions, including the following:
Installation
- Do not install the air conditioner in an area where it is directly exposed to sea wind (salt spray).
- Install the drain hose properly for the smooth drainage of water condensation. Exercise caution when unpacking or installing the air conditioner.
- Do not touch the leaking refrigerant during installation or repair.
- Transport the air conditioner with two or more people or use a forklift.
- Install the outdoor unit such that it is protected from direct sunlight. Do not place the indoor unit in a place where it is directly exposed to sunlight via the windows.
- Safely dispose of packing materials such as screws, nails, or batteries using proper packaging after installation or repair.
- Install the air conditioner in a place where the noise from the outdoor unit or the exhaust fumes will not inconvenience the neighbors. Failure to do so may result in conflict with the neighbors.
Operation
- Remove the batteries if the remote control is not to be used for an extended period of time.
- Make sure that the filter is installed before operating the air conditioner.
- Be sure to check if there is a refrigerant leak after installing or repairing the air conditioner.
- Do not place any object on the air conditioner.
- Never mix different types of batteries, or old and new batteries for the remote control.
- Do not let the air conditioner run for a long time when humidity is very high or when a door or a window has been left open.
- Stop using the remote control if there is a fluid leak in the battery. If your clothes or skin are exposed to the leaking battery fluid, wash off with clean water.
- Do not expose people, animals, or plants to the cold or hot wind from the air conditioner for extended periods of time.
- If the leaking battery fluid has been swallowed, rinse the inside of the mouth thoroughly and consult a doctor.
- Do not drink the water drained from the air conditioner.
- Do not use the product for special purposes, such as preserving foods, works of art, and etc. It is an air conditioner for consumer purposes, not a precision refrigeration system. There is risk of damage or loss of property.
- Do not recharge or disassemble the batteries.
Maintenance
- Never touch the metal parts of the air conditioner when removing the air filter.
- Use a sturdy stool or ladder when cleaning, maintaining, or repairing the air conditioner at a height.
- Never use strong cleaning agents or solvents when cleaning the air conditioner or spray water. Use a smooth cloth.
OPERATION
Notes for Operation
Suggestion for Energy Saving
- Do not over-cool the space. This may be harmful for your health and may consume more electricity.
- Block sunlight with blinds or curtains while you are operating the air conditioner.
- Keep doors or windows closed tightly while you are operating the air conditioner.
- Adjust the direction of the air flow vertically or horizontally to circulate indoor air.
- Speed up the fan to cool or warm indoor air quickly, within a short period of time.
- Open windows regularly for ventilation. The indoor air quality may deteriorate if the air conditioner is used for long durations.
- Clean the air filter once every 2 weeks. Dust and impurities collected in the air filter may block the air flow or reduce the unit performance.
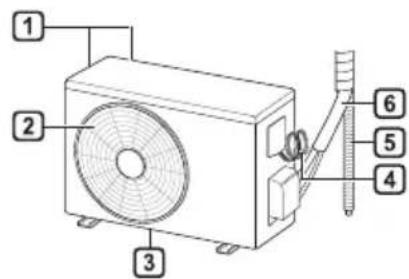
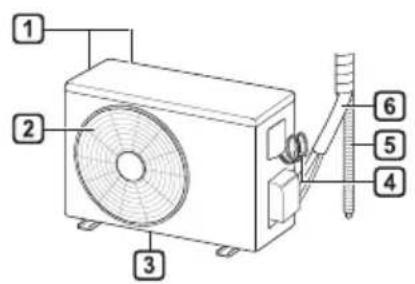
Parts and Functions Indoor Unit Outdoor Unit
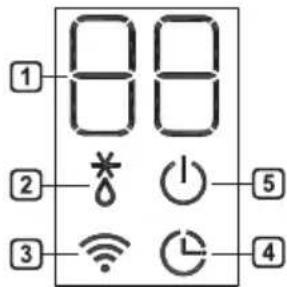
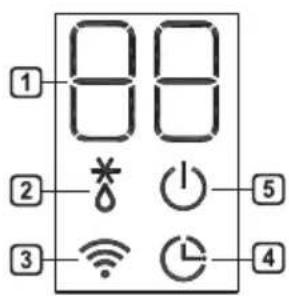
Indoor Unit Display
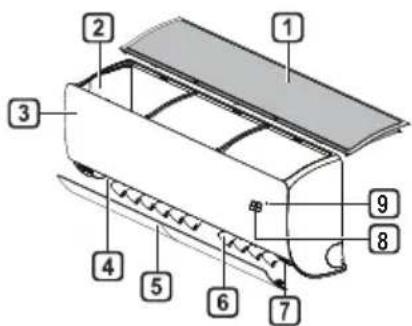
1 Air Filter 2 Air Intake 3 Front Cover 4 Air Outlet 5 Air Deflector (Horizontal Vane) 6 Air Deflector (Vertical Louver) 7 On/Off Button 8 Display 9 Signal Receiver
Air Intake Vents Air Outlet Vents 3 Base Plate 4 Power Supply Cable 5 Drain Hose 6 Refrigerant Pipes
1 Set-Point / Room Temperature 2 Defrost / Pre-Heat Operation 3 Wi-Fi 4 Timer 5 On/Off
NOTE
- The number and location of operation lamps may vary according to the model of the air conditioner. The feature may be changed according to the type of model.
Wireless Remote Control Inserting Batteries
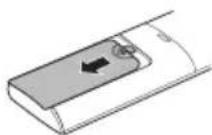
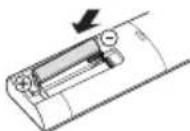
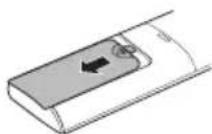
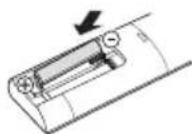
If the display screen of the remote control begins to fade, replace the batteries. Insert AAA (1.5 V) batteries before using the remote control.
1 Remove the battery cover.
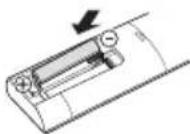
2 Insert the new batteries and make sure that the + and - terminals of the batteries are installed correctly.
Installing the Remote Control Holder
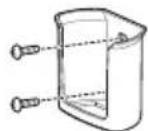
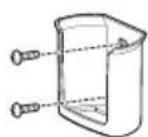
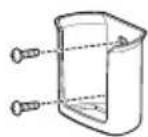
To protect the remote control, install the holder where there is no direct sunlight.
1 Choose a safe and easily accessible location. 2 Fix the holder by fastening 2 screws firmly with a screwdriver.
Operating Method
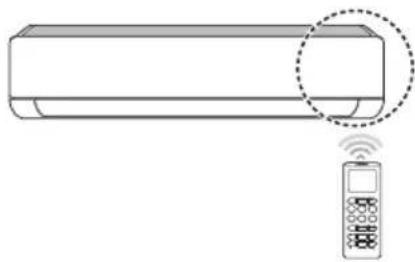
Point the remote control towards the signal receiver at the right side of the air conditioner to operate it.
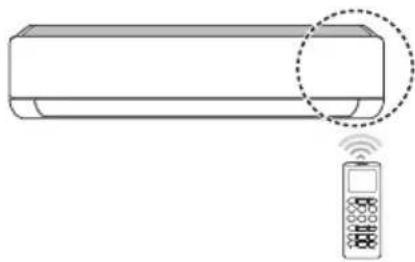
NOTE
- The remote control may operate other electronic devices if it is directed towards them. Make sure to point the remote control towards the air conditioner signal receiver.
- For proper operation, use a soft cloth to clean the signal transmitter and receiver. In case of a function not provided in the product, no buzzer sound occurs from the product when a button for such function on the remote control is pressed except for Air Flow Direction (SWING), Energy Display (kW[3s]), Air Purification function
Setting the Current Time
1 Insert batteries.
- The icon below blinks at the bottom of the display screen.

2 Press or button to select the minutes. 3 Press SET/CANCEL button to finish.
NOTE
- The On/Off Timer is available after setting the current time.
Using the °C/°F Conversion Function (Optional)
This function changes the unit between °C and °F.
Press and hold the button for about 5 seconds.
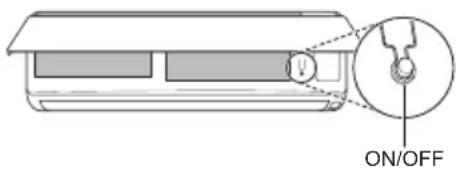
Operating the Air Conditioner without the Remote Control
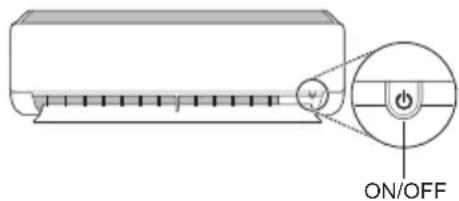
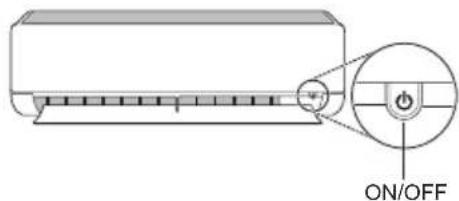
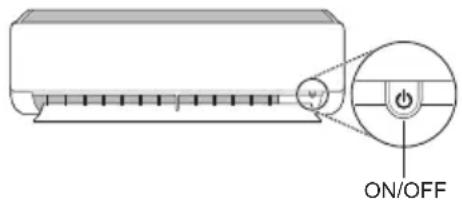
You can use the ON/OFF button on the indoor unit to operate the air conditioner when the remote control is unavailable.
1. Open the front cover (Type2) or horizontal vane (Type1). 2. Press the ON/OFF button.
Type1
Type2
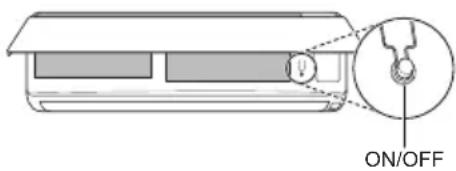
NOTE
- The stepping motor may be broken if the horizontal vane opens rapidly. The fan speed is set to high. The feature may change according to the model type.
- The temperature cannot be altered when using this emergency ON/OFF button.
- For cooling & heating models, the temperature is set from 22°C to 24°C.
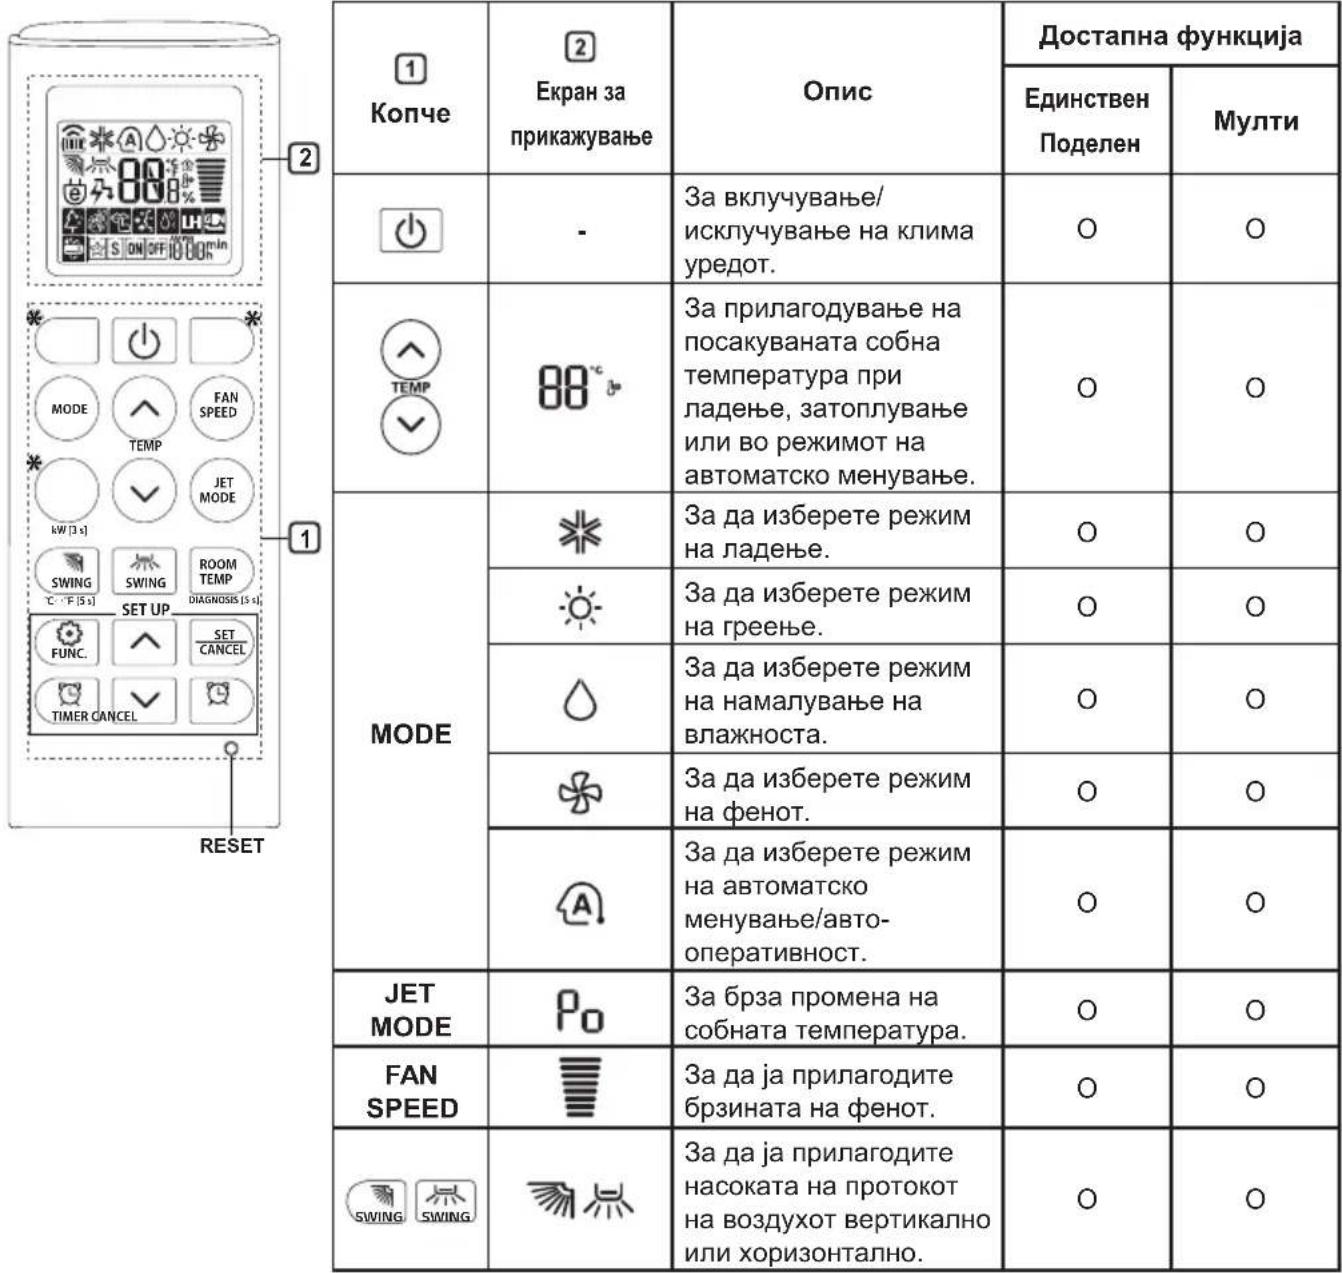
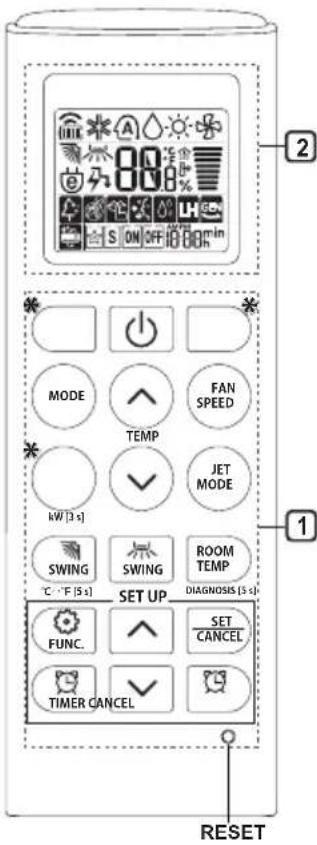
Using Wireless Remote Control
You can operate the air conditioner more conveniently with the remote control.
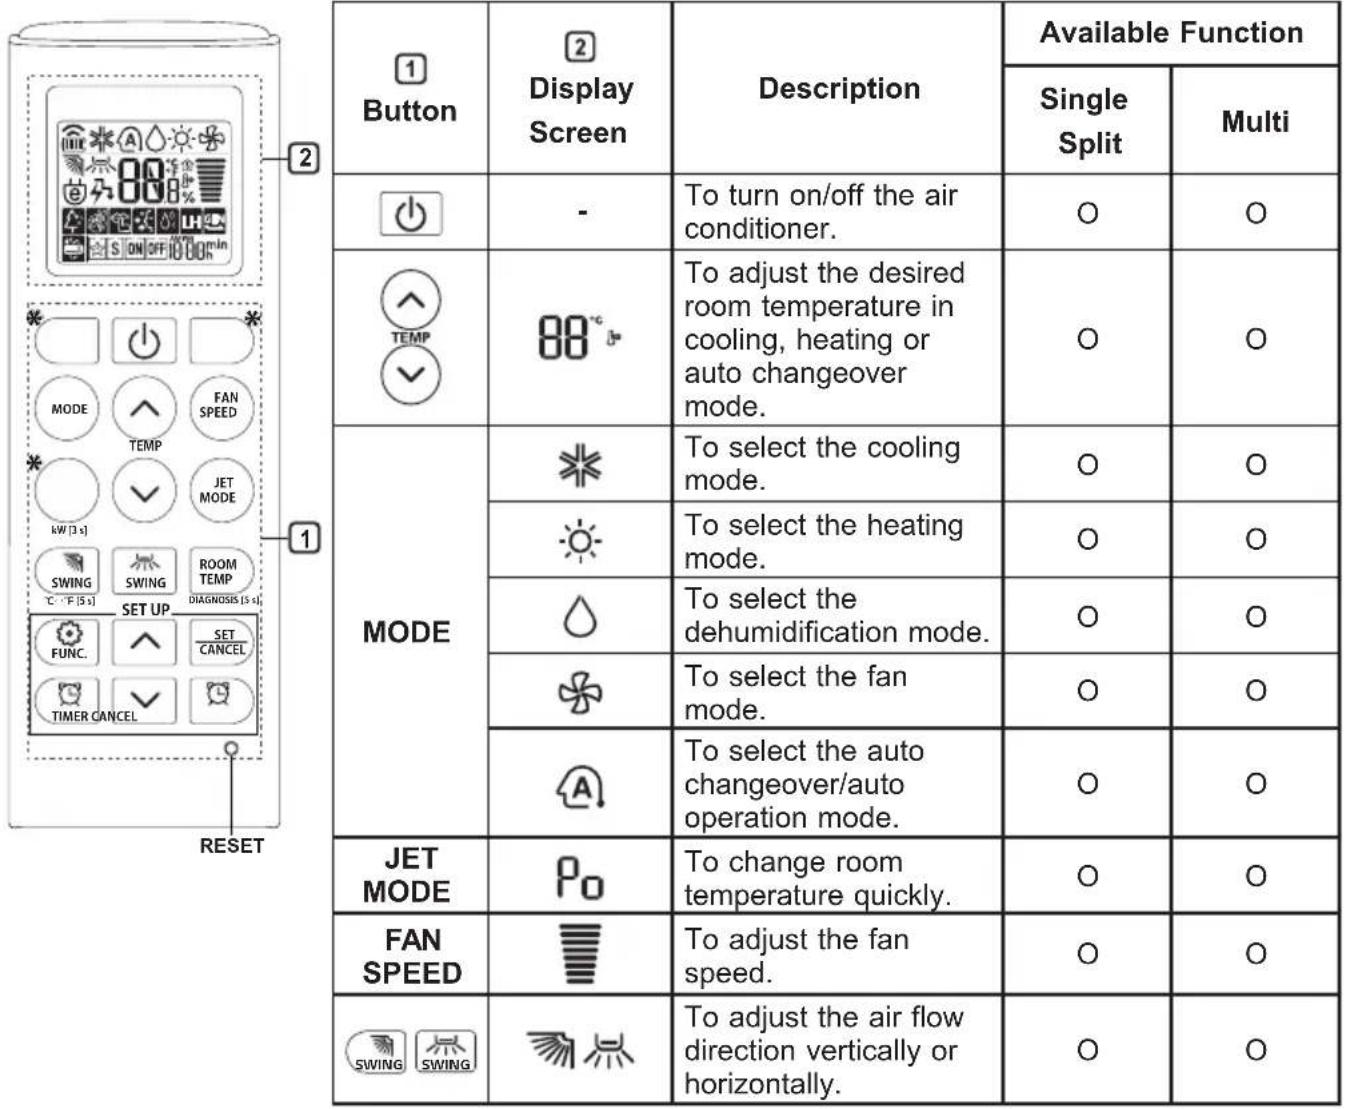
NOTE
- Buttons may vary depending on the model.
- When connected to the Multi Outdoor unit, the Energy Display, Energy Control, Silent, and Smart Diagnosis functions may not be supported.
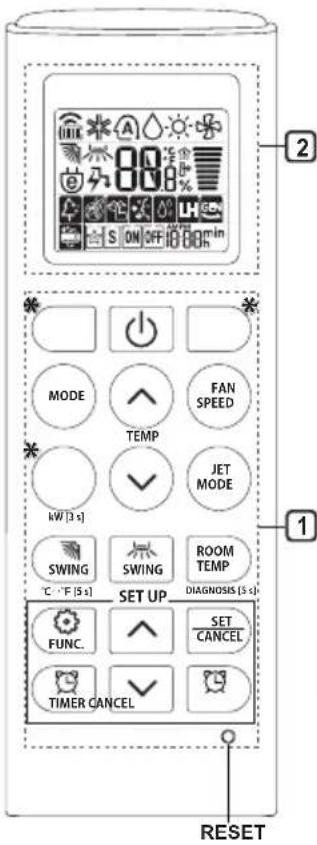
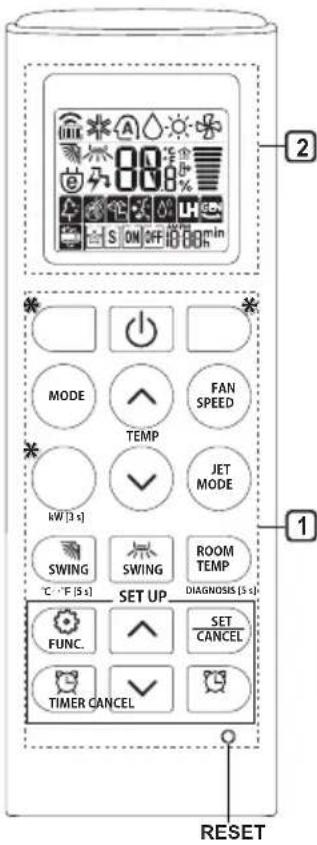
| 1Button | 2DisplayScreen | Description | Available Function | |
| SingleSplit | Multi | |||
| TIMER | ON OFF | To turn on/off air conditioner automatically at desired time. | ○ | ○ |
| SET/CANCEL | - | To set/cancel the special functions and timer. | ○ | ○ |
| CANCEL | - | To cancel the timer settings. | ○ | ○ |
| - To adjust time. ○○ | ||||
| *LIGHTOFF | - | To set the brightness of the display on the indoor unit. | ○ | ○ |
| ROOMTEMP | To display the room temperature. | ○ | ○ | |
| °C←°F[5 s] | °C°F | To change unit between °C and °F | ○ | ○ |
| *COMFORTAIR | To adjust the air flow to deflect wind. | ○ | ○ | |
| kW[3 s] | - | To set whether or not to display information regarding energy. | ○ | × |
| *ENERGYCTRL | 88 x | To bring the effect of the power saving. | ○ | × |
| DIAGNOSIS[5 s] | - | To conveniently check maintenance information of a product. | ○ | × |
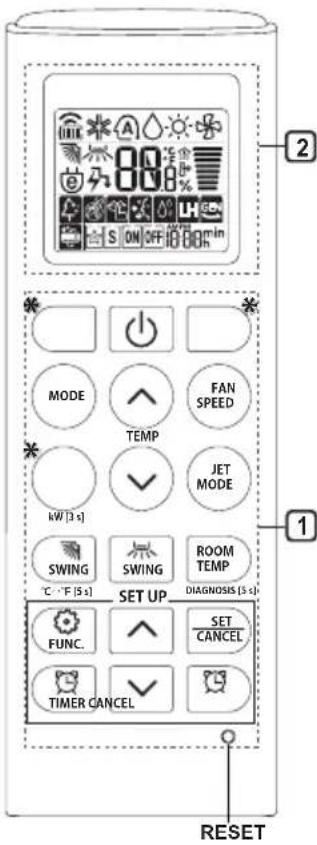
| 1 Button | 2 Display Screen | Description | Available Function | |
| Single Split | Multi | |||
| FUNC. | 4 | The Ion generator uses millions of ions to help improve indoor air quality. | O (Optional) | O (Optional) |
| 5 | To reduce noise from outdoor units. | O | X | |
| 6 | To remove moisture generated inside the indoor unit. | O | O | |
| RESET - | To initialize the remote control settings. | O | O | |
NOTE
- Some functions may not be supported, depending on the model.
- Buttons may vary depending on the model.
- Press the SET/CANCEL button to operate the selected function.
Restarting the Air Conditioner Automatically
When the air conditioner is turned on again after a power failure, this function restores the previous settings.
Disabling Auto Restart
1. Open the front cover (Type 2) or horizontal vane (Type 1).
2. Press and hold the ON/OFF button for 6 seconds. The unit will beep twice and the lamp will blink 4 times.
To re-enable the function, press and hold the ON/OFF button for 6 seconds. The unit will beep twice and the lamp will blink 4 times.
Type1
Type2
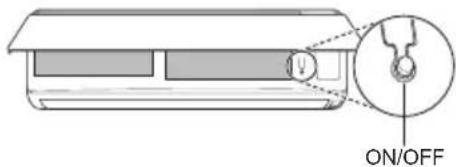
NOTE
The feature may be changed according to the type of model.
- If you press and hold the ON/OFF button for 3 - 5 seconds, instead of 6 seconds, the unit will switch to the test operation. In the test operation, the unit blows out strong cooling air for 18 minutes and then returns to factory default settings.
Using the Mode Function
This function allows you to select the desired function.
| * | Cooling Mode |
| ↓ | |
| A | Auto Changeover Mode / Auto Operation(Al) Mode |
| ↓ | |
| △ | Dehumidification Mode |
| ↓ | |
| Heating Mode | |
| ↓ | |
| * | Fan Mode |
Cooling Mode
1 Turn the appliance on.
2 Press MODE button repeatedly to select the Cooling Mode.
- is displayed on the display screen.
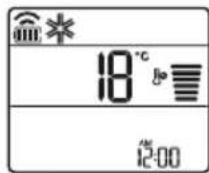
3 Press or button to set the desired temperature.
Auto Operation (Artificial Intelligence)
Multi Model
In this operation mode, the system is automatically operated by the electronic controls.
1 Turn the appliance on. 2 Press MODE button repeatedly to select the Auto Operation.
A is displayed on the display screen.
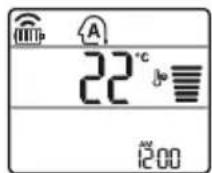
3 Press or button to set the desired temperature. 4 Press FAN SPEED button to adjust the fan speed.
Auto Changeover Mode
Single Split Model
This mode changes the mode automatically to maintain the set temperature at ±2°C.
1 Turn the appliance on. 2 Press MODE button repeatedly to select the Auto Changeover Mode.
A is displayed on the display screen.
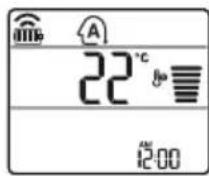
3 Press or button to set the desired temperature. 4 Press FAN SPEED button to adjust the fan speed.
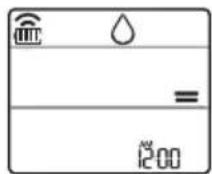
Dehumidification Mode
This mode removes excess moisture from a highly humid environment or during the rainy season, in order to prevent mildew from setting in. This mode adjusts the room temperature and the fan speed automatically to maintain the optimal level of humidity.
1 Turn the appliance on.
2 Press MODE button repeatedly to select the Dehumidification Mode.
is displayed on the display screen.
NOTE
- In this mode you cannot adjust the room temperature, it is adjusted automatically.
- The room temperature is not displayed on the display screen.
- In the dehumidification mode, compressor and indoor fan may not operate when the room temperature is below 24°C
Heating Mode
1. Turn the appliance on. 2. Press MODE button repeatedly to select the Heating Mode.
is displayed on the display screen.
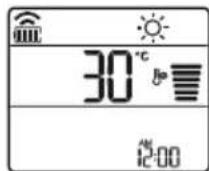
3. Press button to set the desired temperature.
NOTE
will be displayed on the indoor unit when defrosting is operating.
- Furthermore, this indication will be displayed on the indoor unit:
- When preheating is operating.
- When the room temperature has been reached to the set temperature.
Fan Mode
This mode only circulates the indoor air without changing the room temperature.
1 Turn the appliance on.
2 Press MODE button repeatedly to select the Fan Mode.
is displayed on the display screen.
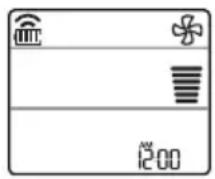
3 Press FAN SPEED button to adjust the fan speed.
Using the Jet Mode Function Changing Room Temperature Quickly
This function allows you to cool indoor air quickly during the summer or warm it quickly during winter.
- The Jet Mode function is available with Cooling, Heating and Dehumidification Mode.
1 Turn the appliance on. 2 Press MODE button repeatedly to select the desired mode. 3 Press JET MODE button.
is displayed on the display screen.
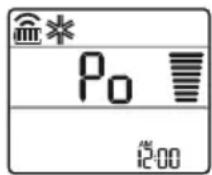
NOTE
- Jet Heating Mode is not available on some models.
- In Jet Cooling Mode, strong air blows out for 30 minutes. After 30 minutes later, setting temperature is maintaining 18°C. If you want to change the temperature, press
or button to set the desired temperature.
- In Jet Heating Mode, strong air blows out for 30 minutes. After 30 minutes later, setting temperature is maintaining 30°C. If you want to change the temperature, press
or button to set the desired temperature.
- This function may operate differently from the remote control display.
Using the Fan Speed Function
Adjusting the Fan Speed
- Press FAN SPEED button repeatedly to adjust the fan speed.
| Display Screen Speed | |
| High | |
| Medium - High | |
| Medium | |
| Medium - Low | |
| Low | |
| - Natural Wind | |
NOTE
- The fan speed of Natural Wind adjusts automatically.
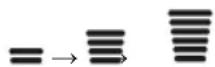
- The fan speed icons are displayed on some indoor units.

- Indoor unit display is displayed only 5 seconds and return to the setting temperature on some models.
Using the Air Flow Direction Function
This function adjusts the direction of the air flow vertically (horizontally).
- Press SWING (SWING) button repeatedly and select the desired direction.
-Select () to adjust the direction of the air flow automatically.
NOTE
- Adjusting the air flow direction horizontally may not be supported, depending on the model.
- Adjusting the air deflector arbitrarily may cause product failure.
- If you restart the air conditioner, it starts to operate with the previously set direction of air flow, so the air deflector may not match the icon displayed on the remote control. When this occurs, press SWING or SWING button to adjust the direction of the air flow again.
- This function may operate differently from the remote control display.
Setting the On/Off Timer
This function sets the air conditioner to turn on/off automatically at desired time.
On/Off Timer can be set together.
Setting the On Timer
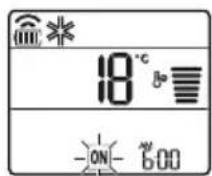
1 Press button repeatedly.
- The icon below blinks at the bottom of the display screen.
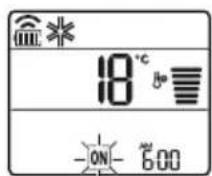
2 Press Yr button to select the minutes.
3 Press SET/CANCEL button to finish.
After setting the timer, current time and ON icon are displayed on the display screen indicating that the desired time is set.
Canceling the On Timer
1 Press button repeatedly.
The icon below blinks at the bottom of the display screen.
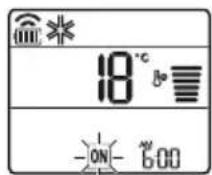
2 Press SET/CANCEL button to cancel the setting.
Setting the Off Timer
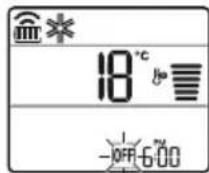
1 Press button repeatedly.
- The icon below blinks at the bottom of the display screen.
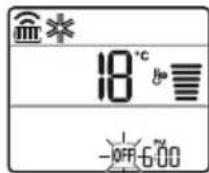
2 Press or button to select the minutes.
3 Press SET/CANCEL button to finish.
After setting the timer, current time and OFF icon are displayed on the display screen indicating that the desired time is set.
NOTE
- This function is disabled when you set Simple Timer.
Canceling the Off Timer
1 Press button repeatedly.
- The icon below blinks at the bottom of the display screen.
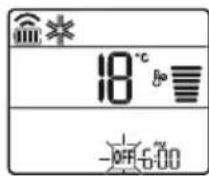
2 Press SET/CANCEL button to cancel the setting.
Canceling the Timer Setting
- Press button to cancel all timer settings.
Using the Sleep Function (Optional)
This function turns off the air conditioner automatically when you go to sleep.
1. Turn the appliance on.
2. Press the button repeatedly.
- The icon below blinks at the bottom of the display screen.
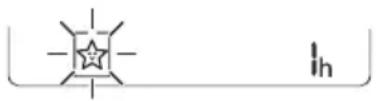
3. Press the Yr button to select the hour (up to 7 hours). 4. Press the SET/CANCEL button to finish. The setting is displayed on the display screen.
NOTE
H is displayed on some indoor units.
- The indoor unit display shows from 1H to 7H, which is displayed for only 5 seconds and then returns to the set temperature.
- In Cooling and Dehumidification Mode, the temperature increases by 1°C after 30 minutes and an additional 1°C after another 30 minutes for a more comfortable sleep.
- The temperature increases up to 2°C from the preset temperature.
- Although the fan speed remark on the display screen may change, the fan speed is adjusted automatically.
Using the Simple Timer Function (Optional)
This function turns off the air conditioner automatically when you go to sleep.
1. Turn the appliance on. 2. Press the button repeatedly.
- The icon below blinks at the bottom of the display screen.
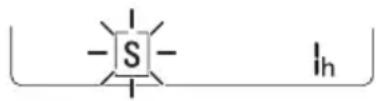
3 Press the or button to select the hour (up to 7 hours). 4 Press the SET/CANCEL button to finish. S is displayed on the display screen.
NOTE
- This function is disabled when you set the Off Timer.
Using the Energy Display Function (Optional)
This function displays the amount of electricity generated on the indoor display as the product operates.
Display the Current Energy Usage
1 Turn the appliance on.
2 Press the button and hold it for about 3 seconds.
The instantaneous power consumption (BB) is displayed for a while on some indoor units.
NOTE
It is not displayed on the wireless remote control. The unit of the displayed value is kW. If it is more than 99kW which is the range of expression, maintain it as 99kW. - Display wattage under 10kW with 0.1kW unit, and display one over 10kW with 1kW unit. - The actual power may differ from the power displayed. - When connected to the Multi Outdoor unit, this function may not be supported.
Using the Light Off Function (Optional)
Display Screen Brightness
You can set the brightness of the indoor unit display screen.
- Press LIGHT OFF button.
NOTE
- Turn on/off the Display screen.
Using the Comfort Air Function (Optional)
Comfort Vane Operation
This function conveniently sets the vane to a preset position to deflect the supply air away from blowing directly onto the occupants in the room.
1 Turn the appliance on. 2 Press COMFORT AIR button repeatedly and select the desired direction.
or is displayed on the display screen.
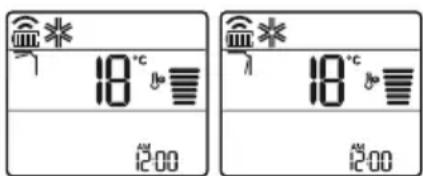
NOTE
or Lis displayed on some indoor units. This function is disabled when you press MODE or JET MODE button. - This function is disabled and auto swing of vertical direction is set up when you press
SWING button.
- When this function is off, the horizontal vane operates automatically depending on the set mode.
Using the Energy Control Function (Optional)
1 Turn the appliance on.
2 Press ENERGY CTRL button.
- Press ENERGY CTRL button repeatedly to select each step.
- 1 step: The power input is decreased by 20% compared to rated power input. 80 is displayed on the display screen.
- 2 step: The power input is decreased by 40% compared to rated power input. 60 is displayed on the display screen.
- 3 step (Optional): The power input is decreased by 60% compared to rated power input. 40 is displayed on the display screen. 80 (1 step), 60 (2 step), 40 (3 step) is displayed on some indoor units. (1 step), (2 step) is displayed on some indoor units.
- This function is available with Cooling Mode.
- Capacity may decrease when Energy Control mode is selected.
- Desired temperature is displayed about 5 seconds if you press FAN SPEED, or button.
- Room temperature is displayed about 5 seconds if you press ROOM TEMP button.
- When connected to the Multi Outdoor unit, this function may not be supported.
Using Special Functions
1 Turn the appliance on. 2 Press FUNC button repeatedly to select the desired function. 3 Press SET/CANCEL button to finish.
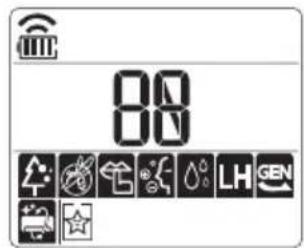
| Display Screen | Description |
| The Ion generator uses millions of ions to help improve indoor air quality. | |
| To reduce noise from outdoor units. | |
| To remove moisture generated inside the indoor unit. |
NOTE
Some functions may not be supported, depending on the model. Some functions may operate differently from the remote control display.
Canceling Special Functions
1 Press FUNC button repeatedly to select the desired function. 2 Press SET/CANCEL button to cancel the function.
Using the Air Purification Function
These functions supply clean and fresh air by ion particles and the filter.
| Function Display Description | |
| Ionizer | Ion particles from lonizer sterilize the aerial bacteria and other harmful substances. |
| Plasma | It removes microscopic contaminants from the intake air completely to supply clean and fresh air. |
NOTE
- You can use this function without turning the air conditioner on.
- Both the plasma lamp and the cooling lamp light up while Smoke Away/Plasma is in operation on some models.
- Do not touch ionizer during operation.
- This function may operate differently from the remote control display.
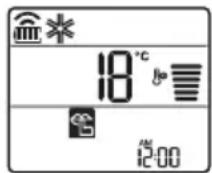
Using the Silent Function
This function prevents potential claims by neighbors, reducing noise from outdoor units.

is displayed on the display screen.
NOTE
- This function is disabled when you press MODE or ENERGY CTRL or JET MODE button.
- This function is available with Cooling, Heating, Auto Changeover, Auto Operation Mode.
- When connected to the Multi Outdoor unit, this function may not be supported.
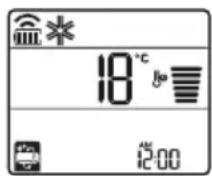
Using the Auto Clean Function
In the Cooling and Dehumidification Mode, moisture is generated inside the indoor unit. This function removes such moisture.

is displayed on the display screen.
NOTE
- Some functions cannot be used while the Auto Clean function is in operation.
- If you turn off the unit, the fan continues to run for 30 minutes and cleans the inside of the indoor unit.
LG ThinQ Application
This feature is only available on models with the or ThinQ logo.
The LG ThinQ application allows you to communicate with the appliance using a smartphone.
LG ThinQ Application Features
Communicate with the appliance from a smartphone using the convenient smart features.
Smart Diagnosis
- If you experience a problem while using the appliance, this smart diagnosis feature will help you diagnose the problem.
Settings
- Allows you to set various options on the appliance and in the application.
NOTE
If you change your wireless router, internet service provider, or password, delete the registered appliance from the LG ThinQ application and register it again. The application is subject to change for appliance improvement purposes without notice to users. Functions may vary by model.
Before Using LG ThinQ Application
1. Check the distance between the appliance and the wireless router (Wi-Fi network).
- If the distance between the appliance and the wireless router is too far, the signal strength becomes weak. It may take a long time to register or installation may fail.
2. Turn off the Mobile data or Cellular Data on your smartphone.
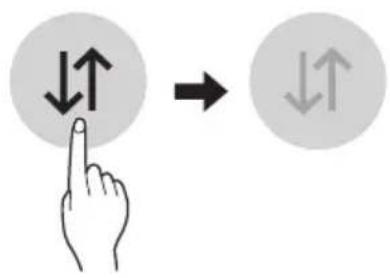
3. Connect your smartphone to the wireless router.
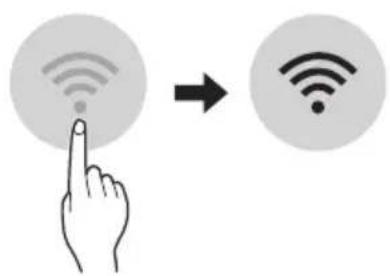
NOTE
To verify the Wi-Fi connection, check that the icon on the control panel is lit. The appliance supports 2.4 GHz Wi-Fi networks only. To check your network frequency, contact your Internet service provider or refer to your wireless router manual. LG ThinQ is not responsible for any network connection problems or any faults, malfunctions, or errors caused by network connection. If the appliance is having trouble connecting to the Wi-Fi network, it may be too far from the router. Purchase a Wi-Fi repeater (range extender) to improve the Wi-Fi signal strength. The Wi-Fi connection may not connect or may be interrupted because of the home network environment. The network connection may not work properly depending on the Internet service provider. The surrounding wireless environment can make the wireless network service run slowly.
- The appliance cannot be registered due to problems with the wireless signal transmission. Unplug the appliance and wait about a minute before trying again.
- If the firewall on your wireless router is enabled, disable the firewall or add an exception to it.
- The wireless network name (SSID) should be a combination of English letters and numbers. (Do not use special characters.)
- Smartphone user interface (UI) may vary depending on the mobile operating system (OS) and the manufacturer.
- If the security protocol of the router is set to WEP, you may fail to set up the network. Please change it to other security protocols (WPA2 is recommended) and register the product again.
Installing the LG ThinQ Application
Search for the LG ThinQ application from the Google Play Store or Apple App Store on a smartphone. Follow instructions to download and install the application.
Open Source Software Notice Information
To obtain the source code under GPL, LGPL, MPL, and other open source licenses, that is contained in this product, please visit http://opensource.lge.com.
In addition to the source code, all referred license terms, warranty disclaimers and copyright notices are available for download.
LG Electronics will also provide open source code to you on CD-ROM for a charge covering the cost of performing such distribution (such as the cost of media, shipping, and handling) upon email request to opensource@lge.com. This offer is valid for a period of three years after our last shipment of this product. This offer is valid to anyone in receipt of this information.
Smart Diagnosis
This feature is only available on models with the or logo.
Use this feature to help you diagnose and solve problems with your appliance.
NOTE
- For reasons not attributable to LGE's negligence, the service may not operate due to external factors such as, but not limited to, Wi-Fi unavailability, Wi-Fi disconnection, local app store policy, or app unavailability.
- The feature may be subject to change without prior notice and may have a different form depending on where you are located.
Using LG ThinQ to Diagnose Issues
If you experience a problem with your Wi-Fi equipped appliance, it can transmit troubleshooting data to a smartphone using the LG ThinQ application.
- Launch the LG ThinQ application and select the Smart Diagnosis feature in the menu. Follow the instructions provided in the LG ThinQ application.
Using Audible Diagnosis to Diagnose Issues
Follow the instructions below to use the audible diagnosis method.
- Launch the LG ThinQ application and select the Smart Diagnosis feature in the menu. Follow the instructions for audible diagnosis provided in the LG ThinQ application. Plug the power plug in the outlet properly. 2 Place the mouthpiece of your smartphone close to the or logo. 3 Press and hold the DIAGNOSIS [5 s] button for 5 seconds or longer while holding the smartphone mouthpiece to the logo until the data transfer is complete.
- Keep the smartphone in place until the data transfer has finished. Time remaining for data transfer is displayed.
4 After the data transfer is complete, the diagnosis will be displayed in the application.
NOTE
- For best results, do not move the phone while the tones are being transmitted.
- Be sure to keep ambient noise to a minimum or the phone may not correctly receive the buzzer beeps from the indoor unit.

WARNING
- Before cleaning or performing maintenance, disconnect the power supply and wait until the fan stops.
If the air conditioner will not be used for an extended period of time, dry the air conditioner to maintain it in best condition. Clean the product regularly to maintain optimal performance and to prevent possible breakdown.
- Dry the air conditioner in Fan mode for 3 to 4 hours and disconnect the power. There may be internal damage if moisture is left in its components.
- Before using the air conditioner again, dry the inner components of the air conditioner in Fan mode for 3 to 4 hours. This will help to remove the odor generated from moisture.
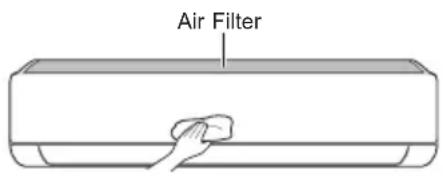
The feature may be changed according to the type of model.
| Type Description Interval | ||
| Air filter Clean with a vacuum or hand wash. 2 weeks | ||
| Ionizer (Optional) | Use dry cotton bud to remove any dust. Every 6 months | |
| Indoor unit | Clean the Indoor unit surface by using a soft, dry cloth. Regularly | |
| Have a professional clean the condensate drain pan. Once a year | ||
| Have a professional clean the condensate drain pipe. Every 4 months | ||
| Replace the remote control batteries. Once a year | ||
| Outdoor unit | Have a professional clean the heat exchanger coils and the panel vents. (Consult with technician.) | Once a year |
| Have a professional clean the fan. Once a year | ||
| Have a professional clean the condensate drain pan. Once a year | ||
| Have a professional verify that all the fan assembly is firmly tightened. | Once a year | |
| Clean the electric components with air. Once a year | ||
NOTE
- Never use water that is higher than 40°C when you clean the filters. It may cause deformation or discoloration.
- Never use volatile substances when you clean the filters. They may damage the surface of the product.
Clean the Air Filter
Clean the air filters once every 2 weeks, or more, if necessary.
NOTE
The air filter can be broken when it is bent. - When the air filter is not assembled correctly, dust and other substances can enter into the indoor unit.
Type1
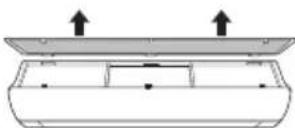
If you look at the indoor unit from above it, can assemble the top filter easily.
1 Turn off the power to the unit. 2 Hold the knobs of the air filter, lift it up slightly.
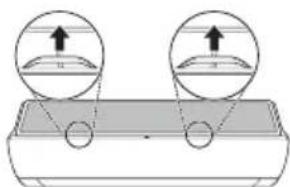
3 Remove it from the indoor unit.
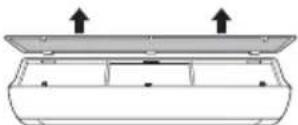
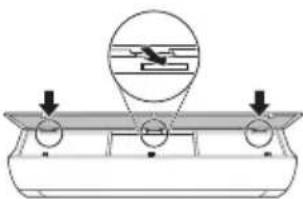
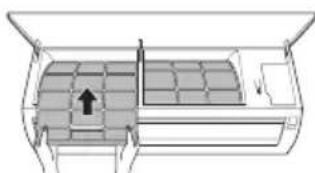
4 Clean the filter with a vacuum cleaner or with lukewarm water with neutral detergent. 5 Dry the filter in the shade. 6 Insert the hooks of the air filter into the front cover.
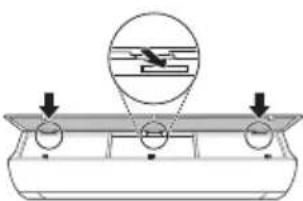
7 Push down hooks to assemble the air filter.
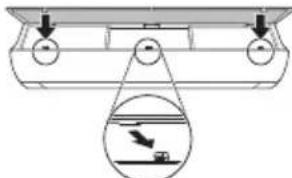
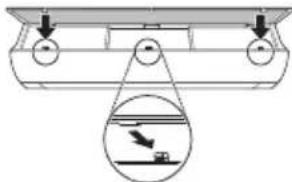
8 Check the side of the front cover for correct assembly of the air filter.
Type2
1 Turn off the power to the unit. 2 Open the front cover.
- Lift up both sides of the cover slightly.
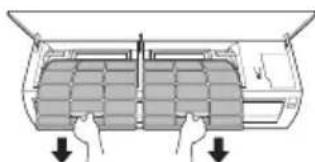
3 Hold the knobs of the air filters, pull them down slightly and remove them from the indoor unit.
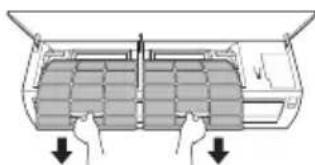
4 Clean the filters with a vacuum cleaner or with lukewarm water with neutral detergent. 5 Dry the filters in the shade. 6 Insert the hooks of the air filters into the front cover.
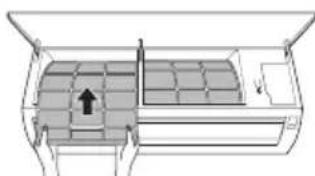
7 Check the side of the front cover for correct assembly of the air filters.
Self-diagnosis Function
This product has a built-in self-diagnosis function. If an error occurs, the lamp of the indoor unit will blink in 2 second intervals. If this occurs, contact your local dealer or service center.
Before Calling for Service
Please check the following before you contact the service center. If the problem persists, contact your local service center.
| Symptoms Possible Causes & Solution | |
| The air conditioner does not work normally. | Burning smell and strange sounds are coming from the unit. ·Turn off the air conditioner, switch OFF, or disconnect the power supply, and contact the service center. |
| Water leaks from the indoor unit even when the humidity level is low. ·Turn off the air conditioner, switch OFF, or disconnect the power supply, and contact the service center. | |
| The power cable is damaged or it is generating excessive heat. ·Turn off the air conditioner, switch OFF, or disconnect the power supply, and contact the service center. | |
| A switch, a circuit breaker (safety, ground), or a fuse is not operated properly. ·Turn off the air conditioner, switch OFF, or disconnect the power supply, and contact the service center. | |
| The unit generates an error code from its self-diagnosis. ·Turn off the air conditioner, switch OFF, or disconnect the power supply, and contact the service center. | |
| The air conditioner does not work. | The air conditioner is unplugged. ·Check whether the power cord is plugged into the outlet or the power isolators are switched on. |
| A fuse exploded, or the power supply is blocked. ·Replace the fuse or check if the circuit breaker has tripped. | |
| A power failure has occurred. ·Turn off the air conditioner when a power failure occurs. ·When the power is restored, wait 3 minutes, and then turn on the air conditioner. | |
| The voltage is too high or too low. ·Check if the circuit breaker has tripped. | |
| The air conditioner was turned off automatically at a preset time. ·Turn the air conditioner on. | |
| The battery setting in the remote controller is incorrect. ·Make sure that the batteries are inserted correctly in your remote controller. ·If the batteries are placed correctly, but the air conditioner still does not operate, replace the batteries and try again. | |
| Symptoms Poss | ble Causes & Solution |
| The air conditioner does not emit cool air. | Air is not circulating properly. • Make sure that there are no curtains, blinds, or pieces of furniture blocking the front of the air conditioner. |
| The air filter is dirty. • Clean the air filter once every 2 weeks. • See “Clean the Air Filter” for more information. | |
| The room temperature is too high. • In summer, cooling the indoor air fully may take some time. In this case, select the Jet Mode to cool the indoor air quickly. | |
| Cold air is escaping from the room. • Make sure that no cold air is escaping through the ventilation points in the room. | |
| The desired temperature is higher than the current temperature. • Set the desired temperature to a level lower than the current temperature. | |
| There is a heating source nearby. • Avoid using heat generators like electric ovens or gas burners while the air conditioner is in operation. | |
| Fan Mode is selected. • During Fan Mode, air blows from the air conditioner without cooling or heating the indoor air. • Switch the operation mode to cooling operation. | |
| Outside temperature is too high. • The cooling effect may not be sufficient. | |
| The fan speed cannot be adjusted. | The Jet Mode, or Auto Operation Mode is selected. • In some operation modes, you cannot adjust the fan speed. Select an operation mode in which you can adjust the fan speed. |
| The temperature cannot be adjusted. | The Fan Mode or Jet Mode is selected. • In some operation modes, you cannot adjust the temperature. Select an operation mode in which you can adjust the temperature. |
| The air conditioner stops during operation. | The air conditioner is suddenly turned off. • The Timer Function may have timed out, which turns the unit off. Check the timer settings. |
| A power failure has occurred during operation. • Wait for the power to come back. If you have the Auto Restart function enabled, your unit will resume its last operation several minutes after power is restored. | |
| Symptoms Possible Causes & Solution | |
| The indoor unit is still operating even when the unit has been turned off. | The Auto Clean function is being operated. ·Allow the Auto Clean function to continue since it removes any remaining moisture inside the indoor unit. If you do not want this feature, you can turn the unit off. |
| The air outlet on the indoor unit is discharging mist. | The cooled air from the air conditioner makes mist. ·When the room temperature decreases, this phenomenon will disappear. |
| Water leaks from the outdoor unit. | In the heating operations, condensed water drops from the heat exchanger. ·This symptom requires installing a drain hose under the base pan. Contact the installer. |
| There is noise or vibration. | A clicking sound can be heard when the unit starts or stops due to movement of the reversing valve. Creaking sound: The plastic parts of the indoor unit creak when they shrink or expand due to sudden temperature changes. Flowing or Blowing sound: This is the flow of refrigerant through the air conditioner. ·These are normal symptoms. The noise will stop. |
| The indoor unit gives off an odor. | Odors (such as cigarette smoke) may be absorbed into the indoor unit and discharged with airflow. ·If the smell does not disappear, you need to wash the filter. If this does not work, contact the service center to clean your heat exchanger. |
| The air conditioner does not emit warm air. | When Heating Mode starts, the vane is almost closed, and no air comes out, even though the outdoor unit is operating. ·This symptom is normal. Please wait until the unit has generated enough warm air to blow through the indoor unit. |
| The outdoor unit is in Defrosting Mode. ·In Heating Mode, ice/frost is built up on the coils when the outside temperature falls. This function removes a layer of frost on the coil, and it should finish in approximately 15 minutes. | |
| Outside temperature is too low. ·The heating effect may not be sufficient. | |
| Your home appliance and smartphone is not connected to the Wi-Fi network. | The password for the Wi-Fi that you are trying to connect to is incorrect. ·Find the Wi-Fi network connected to your smartphone and remove it, then register your appliance on LG ThinQ. |
| Mobile data for your smartphone is turned on. ·Turn off the Mobile data of your smartphone and register the appliance using the Wi-Fi network. | |
| The wireless network name (SSID) is set incorrectly. ·The wireless network name (SSID) should be a combination of English letters and numbers. (Do not use special characters.) | |
| The router frequency is not 2.4 GHz. ·Only a 2.4 GHz router frequency is supported. Set the wireless router to 2.4 GHz and connect the appliance to the wireless router. To check the router frequency, check with your Internet service provider or the router manufacturer. | |
| The distance between the appliance and the router is too far. ·If the distance between the appliance and the router is too far, the signal may be weak and the connection may not be configured correctly. Move the location of the router so that it is closer to the appliance. | |
NOTE
- Some functions may not be supported, depending on the model.
OWNER'S MANUAL
AIR CONDITIONER

Smart Diagnosis 29
MAINTENANCE 30
LG ThinQ Application
Smart Diagnosis
Smart Diagnosis
Translated from the original manual
This manual may contain images or content that differ from the model you purchased.
The manual is subject to revision by the manufacturer.
SAFETY INSTRUCTIONS. 3
Safety instructions. 4
OPERATION 11
6 Refrigerant piping
ACCESSORIES
- The location of the operation indicator lights may vary depending on the air conditioner model.
The functions may vary depending on the model.
WIRELESS REMOTE CONTROL
You can use the ON/OFF button on the indoor unit to control the air conditioner when the remote control is not available.
1 Open the front panel (Type 2) or the horizontal louver (Type 1). 2 Press the ON/OFF button.
Tun1

Tnn2
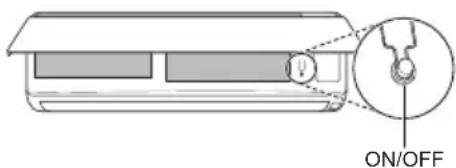
3ABEJIENKKA
-БьрзOTO OTBapRHe Ha XOpN3OHTaHTo KpINo MOKeДЯ NOBpeDn CTbNKOBnMOTOp. 3aandaHaTaCKOpOCTHaBeHTnIaTopa e TBbpDe BnCOKa. - Φύнкцятama MoKe Да ce pa3лчава B 3aBnCmOCT OT Tnna Ha MOneJa. Tempepatata He moke da ce perynapa npn 3no3BaHe Ha To3n 6yToH ON/OFF (6yToH 3a BKIOUbaHe/H3KIOUbaHe) 3a H3BbHpeHN CNTyaUN. 3a MoTeN, KOTo ca npedHa3HaueHn 3a oxJaDaHe n OTOpHeHne, TeMepaTypaTa ce HacTpoBb MeKdy 22°C n 24°C
I3noJ3BaHe Ha 6e3KNUHOTO DnCTaHNoHHO
Moxete da ynpablaBate KImatka C nctaHouHOTo 3a NO-TOJMAO ydoCTBO.
| 1 Бутон | 2 Ди检пел | Инструкции | Прелaria ce Function | |
| Едничень Сплит | Мулисис- Тема | |||
| - | Въючвае/Изъючвае на Климат尼克. | O | O | |
| 88° | Perugларе на желанatable Temпература В реким Ha oxлajданe, OTОльене ял авTomатуну преьлочвае. | O | O | |
| MODE | Избор Ha рекима Ha oxлajданe. | O | O | |
| Избор Ha рекима Ha OTОльенe. | O | O | ||
| Избор Ha рекима Ha Изсушавае. | O | O | ||
| Избор Ha рекима Ha Вechтунatop. | O | O | ||
| A | Избор Ha рекима Ha авTomатуну преьлочвае/ авTomатуну реким Ha разота. | O | O | |
| JET MODE | Po | Бърза помяна Ha стайнATER Temпература. | O | O |
| FAN SPEED | Perugларе Ha сокорсту Ha Вechтунатopa. | O | O | |
| SWING SWING | Perugларе Ha посокatinga Ha поток Вerteknakно ял хоризонтalinо. | O | O | |
3ABEJIEXKA
* ByToHInTe MoKe Da ce pa3NnUaBaT B 3aBnCmOcT OT TnHa HoMeJa. - Пи CBp3BaHe KBM BbHNo TЯNo Ha MyIITcNtEma Функinte Energy Display (Индикача 3a pa3xOda Ha eHepn), Energy Control (YnpabIneHne Ha pa3xOda Ha eHepn), Silent (Tnx pexm) and Smart Diagnosis (YMna DnarHoctika) MoKe Da He ce noDlbpxaT.
| Бутон | Ди检пел | Инструкции | Прелaria ce Function | |
| Еденичен Сплит | Муltисс-temа | |||
| ТIMER | SONOFF | АВТOMATИЧNO ВКЛЮЧBAнe/ИЗКЛЮЧBAнe Нa KЛIMаТИКa Bжелан чac. | O | O |
| SET/CANCEL | - | Настоюванe/OTмянa Ha спесиаJIнITE Функции N Таймера. | O | O |
| CANCEL | - | Оtmянa Ha habстюйКITE Ha Таймера. | O | O |
| √ ∧ | - Habстюванe Ha ча. O O | |||
| *LIGHT OFF | - | Perулиранe Ha ярковETа Ha ди检пелЯ Вьтpeшно TЯл. | O | O |
| ROOM TEMP | 8 | Показвае Ha StайнATERa Тайература. | O | O |
| °C←°F [5 s] | °C°F | Коньертуаре Ha Стой�ост можду °C и °F | O | O |
| *COMFORT AIR | 77 | Perулиранe Ha Вьзduшно NotOK дa праз havочь Вятыр. | O | O |
| kW [3 s] | - | Настоюванe Дали ИнформацьЯт a 3a eHerprigia dα ce nokazBa, ил И. | O | X |
| *ENERGY CTRL | 88x | Вкliюванe Ha ФункцияЯт a neceтени Ha eHerprigia. | O | X |
| DIAGNOSIS [5 s] | - | Уdiden пergлед Ha ИнформацьЯт a побрьжka Ha дадeH п探测к. | O | X |
HaTnCHHe 6yToHbAng (Swing) HeKoJIKOkPaTHo nI36peTe XeJHaHata Nocoka.
- H36peTe 1a da perynpaTe Nocokata Ha Bb3dyuHnI NOtOK aBTOMaTNoHO.
3A6EJIEXKA
- PerynpaHTo Ha Nocokata Ha Bb3dyuHnI NOtOK Do Xopn3oHTaIIHa No3uZnM OMe Da He Ce PoNDbPka B 3aBNCIMOCT OT MoJeNa.
- Поньното ретулране на Вьзуня
- Deфпектор може за довetedо поюраза на пordукта.
- Ako pectapntpate KINMaTnKa,Toi 3anOuBa da pa60tn C NOcNeIHO HAcTpoEHaTa Nocoka Ha Bb3dyuHnra NOTOK, Taka Ye Bb3dyuHnraT DeΦJIeKTop MoKe Da He CbOTBeTCTBa Ha IKoHaTa, NOKa3aHa Ha DnCTaHnOHHOTO. Korato TOBa ce cnUHy, HATNCHEte ByToHa SWING JIN SWING, 3a da peryInpate OTHOBO NOCOKaTa Bb3dyuHnra NOTOK. Pa6oTaHa Ta3nФyHKuM0Ke Da ce pa3NuaBa npu n3NoJ3BaHe OT dncnner Ha dNCTaHcNOHHOTO.
Switching the timer on and off
The timer function can be switched on/off automatically at the desired time.
The timer for switching on/off can be set together with this.
Setting the timer for switching on
1 Press the TIMER button several times.
- The icon is displayed in the lower part of the display.

2 Press the button to select the minutes.
3 Press the SET/CANCEL button to finish the setting.
The timer setting is displayed in the current time display, showing the desired time is set.
Cancelling the timer for switching on
1 Press the button several times.
- The icon is displayed in the lower part of the display.
2 Press the SET/CANCEL button to cancel the setting.
Setting the timer for switching off
1 Press the TIMER button several times.
- Press the button repeatedly until the desired part of the display appears.
2 Press the button to select the minutes.
3 Press the SET/CANCEL button to finish the setting.
The timer setting will be shown on the display, which shows that the desired time is set.
DELAY
This function is disabled when you set the "Standard Timer".
Canceling the timer for switching off
1 Press the TIMER button several times.
- Press the button repeatedly until the desired part of the display appears.

2 Press the SET/CANCEL button to cancel the setting.
Canceling the timer setting
Press the button to cancel all timer settings.
Using the sleep function (optional)
This function switches the appliance off automatically when you sleep.
1 Turn on the appliance.
2 Press the TIMER button repeatedly.
- The icon will appear on the lower part of the display.
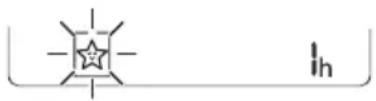
3 Press the + or - button to select the hour (up to 7 hours). 4 Press the SET/CANCEL button to finish the setting.

It will be shown on the display.
NOTE

It will be shown on the internal units.
- The display of the internal unit shows the temperature from 1 to 7, which is visible only for 5 seconds, after which it returns to the temperature setting.
The cooling and heating time increases by 1°C every 30 minutes, and the heating time increases by 1°C every 30 minutes for a more comfortable sleep. The temperature rises up to 2°C from the previously set temperature. - Despite the indication of the fan speed on the display, the fan speed may change, the fan speed is regulated automatically.
Using the function for standard timer (optional)
This function disables the automatic climate control when you sleep.
1 Turn on the device. 2 Press the TIMER button repeatedly.
- The icon will appear on the lower part of the display.
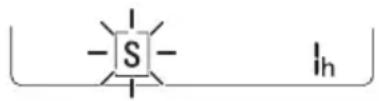
3 Press the + or - button to select the hour (up to 7 hours). 4 Press the SET/CANCEL button to finish the setting.
It will be shown on the display.
NOTE
- This function is disabled when setting the timer for shutdown.
Using the function to display consumed energy (optional)
This function shows the amount of electrical energy consumed by the indoor unit, while the product is operating.
Displaying current energy consumption
1 Turn on the device.
2 Press and hold the [ ] button for about 3 seconds.
The current power consumption ( ) is displayed briefly on the indoor unit display for some models.
NOTE
This is displayed on the wireless remote controller. - The unit of the value displayed on the display is kW. - If it exceeds 99 kW, which is the allowable range, it will be displayed as 99 kW. - Display power below 10 kW in 0.1 kW increments, and display power above 10 kW in 1 kW increments. - The actual power may differ from the displayed power. - When connected to a multi-system outdoor unit, this function may not be supported.
Using the function to turn off the display (optional)
- Step 1: Input power is reduced by 20% compared to rated input power.
Displayed on the remote controller
Step 2: Input power is reduced by 40% compared to rated input power.
Displayed on the remote controller
- Step 3 (optional): Input power is reduced by 60% compared to rated input power.
The current temperature is displayed (Column 1), (Column 2), (Column 3). (The current temperature is displayed (Column 1), (Column 2).)
This function is for cooling only.
The capacity may be reduced when the energy control mode is selected.
The current temperature is displayed for about 5 seconds when you press the FAN SPEED button.
- The current temperature is displayed for about 5 seconds when you press the ROOM TEMP button.
- When connected to the wired remote control of the multi-split system, this function may not be supported.
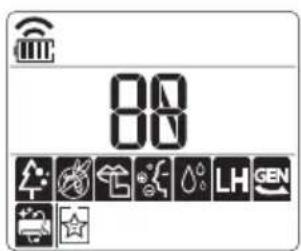
Using special functions
1 Turn on the device.
2 Press the FUNC button several times to select the desired position.
3 Press the SET/CANCEL button to finish setting.
LG ThinQ is not responsible for any network connection problems or any faults, malfunctions, or errors caused by the network connection.
If the device has difficulty connecting to Wi-Fi, it may be too far from the router. Purchase a Wi-Fi repeater (range extender) to improve the Wi-Fi signal strength. The Wi-Fi connection may not work or may be interrupted depending on the home network environment. - The network connection may not work properly due to the Internet service provider. - The surrounding wireless environment may cause slow wireless network communication.
- The device may not be able to restart properly after a power failure with the gasoline generator. Turn off the device and wait about one minute before trying again. If the protective wall of your generator is enabled, reactivate the power connection to it.
- The name of the wireless network (SSID) must be a combination of numbers and English letters. (Do not use special characters.)
- The user interface (UI) of the smartphone may differ depending on the mobile operating system (OS) and manufacturer.
- If the router's security protocol is set to WEP, it may be impossible to configure the network. Change the security protocol to another one (WPA2 is recommended) and register the product again.
Open Source Software
To obtain the source code under GPL, LGPL, MPL, and other open source licenses contained in this product, please visit the website http://opensource.lge.com.
You may also obtain the source code by contacting us and requesting it, subject to the license terms and conditions, and we will provide it in accordance with copyright laws.
LG Electronics will also provide open source code on CD-ROM for a charge covering the cost of performing such distribution (such as the price of the media, shipping, and handling) upon email request to opensource@lge.com. This offer is valid for a period of three years after the last shipment of this product. This offer is valid to anyone in receipt of this information.
- Before cleaning or wiping the surface, turn off the power and wait for the fan to stop.
If the air conditioner is to be used for an extended period, dry the air conditioner to keep it in the best possible condition. Clean the product regularly to ensure optimal performance and prevent possible damage.
- Dry the air conditioner in fan mode for 3-4 hours and turn off the power. Internal damage may occur if moisture remains in the components. - Before storing the air conditioner, dry the internal components of the air conditioner in fan mode for 3-4 hours. This will help prevent mold and odor.
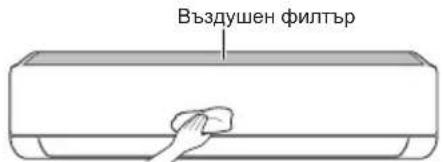
-The function may vary depending on the model.
| Тип Иструкшим Истравли | ||
| Въздуши фелтур | Почисте с прахосмужа ини поимлел ръчно. 2 седши | |
| Ионистор (по истор) | Изольайе сух有很大уен тамунота остразнывае на праха. | Ha的老диб 6 месца |
| Въстшко Тяло | Почисте поьгхостта на въстшоту, като исторы мека, сух有很大рna. | Рedingово |
| Оставе пофесионалостда посту ванчкatable на дрений kohtейнер. | Вedlyж в говината | |
| Оставе пофесионалostда посту trьбatable на дрений kohtейнер. | Ha的老диб 4 месца | |
| Смене батерпіte на дисс韫очионо. Вedlyж в говината | ||
| Въшко Тяло | Оставе пофесионалostда посту пошпtle на тоглобменка и вентлаль�п'te OTBOPи на панela. (Kонсултыраіte ce c Textник.) | Вedlyж в говината |
| Оставе пофесионалostда посту вentлatable на. Дрений kohtейнер. | Вedlyж в говината | |
| Оставе пофесионалostда посту вentлatable на. Дрений kohtейнер. | Вedlyж в говината | |
| Оставе пофесионалostда увера, чь вcentчkn мodyлі на вentлatable на здраво заетнати. | Вedlyж в говината | |
| Почисте селически�КOMПОЕNTСВьздух. Вedlyж в говината |
CAUTION
- Never use water with a temperature above 40°C when cleaning the unit. This may cause deformation or damage to the unit.
- Hikora He i3noi3BaIte IeTINBn BeIecTBA, KOrato nouchTbATE fIITpIte. Te Morat da nobpejrt NobbpxHOCTTa Ha npOdykTa.
3 OToTaPaHEToOT BbTpewHOTOrJIO.
4 Nounctete fuiTbpa c npaxocmyka uin C xnaKa Boda c HeyTpaneH nouNCTBaU npenapat. 5 N3cyweteΦnITbpaHa cAHHka. 6 BkapaTe KyKeTe Ha Bb3dyUHnA φnITbp B npeHNr KanaK.
7 HaTnCHete HAnOly KyKInTe, 3a Da NoCTaBnTe Bb3dyUHnA FInTbP.
8 IpoBepeTe OT cTpaHaTa Ha npEiHnKaIaK daII N Bb3dUwHnT pHJTbp e npaBnHnHO nOCTaBeH.
Tun2
1 3KIOUeTe 3axpaHbHeTo n 3BaTe 3axpaHbuaa Ka6eJ. 2 OTbopeTe npednnaKanak.
- NOBUNHHeIeKOuDBeTe CtpaHn HaKanaka.
3 3aDpBxTe KOnyEtata Ha Bb3dyuHnTe cHnItpn, DpbHHeTe Hn HADony JekO n npemaxheTe OT BbTpEshHOTOrJIO.
4 NocTePe nntbpa c npaxocmyka k a nn c XnAka Boda c Heytpaen NoocCTBaU npenapat. 5 乌3cyweteΦnntpntHa cHka. 6 BkapaTe KyKInTe Ha Bb3dUwHInTe fHnTpN B npedHnKaNAK.
7 IpoBepTe OT cTpaHaTa Ha npEiHnKaIaK DaII N B3dUshHnte pIuTPn Ca npaBUNHO NOCTaBeHn.
ФункцязаимогнocTKa
To3n npodukT nMa BrpaedeHa 9yHKuJra 3a cAmOdaHocTuKa. Ako Bb3HnKHe rpeUka, JAMnata Ha BbTpewHOTo TJIIO Ue 3aNoUHe da Mra C nHTepBaI OT 2 cekyHdN. Ako ToBa ce cIyuN, CBpXeTe ce C MeCTHnA DnCTPb6TyOp IIN cepBn3eH ueHTbp.
Ipei da ce o6aNTe Ha cepBn3HnueHTbp
IpoBepTe cIeHTo, npEi Da ce CbPKeTe C cepBn3HnA ueHTbp. Ako npo6JIembT npOdbJxaba, o6bpHeTe Ce KbM Baunr MeCTe H cepBn3HnA ueHTbp.
IMPORTANT SAFETY INSTRUCTIONS

WARNING
To reduce the risk of explosion, fire, death, electric shock, injury, or burns to persons when using this product, follow basic precautions, including the following:
Children in the household
This appliance should not be used by persons (including children) with reduced physical, sensory, or mental capabilities, or lack of experience and knowledge, unless they are supervised or given instructions concerning the use of the appliance by a person responsible for their safety. Children should be supervised to ensure that they do not play with the appliance.
For use in Europe:
Important safety instructions 4
USE 11
Important safety instructions

DANGER
Noti ghat-Thaddim 11
Remote Control Battery Replacement 12
To operate the air conditioner automatically. 17
Using the Mode Function 17
Using the Propulsive Mode Function (Jet Mode Function) 20
Fan Speed Function
Wireless Remote Control
When Inserting the Batteries
If the display screen of the remote control starts to fade, replace the batteries. Insert AAA (1.5 V) batteries before using the remote control.
1. Remove the battery cover.
2. Insert the new batteries and make sure that the + and - terminals of the batteries are installed correctly.
Installing the Remote Control Holder
To protect the remote control, install the holder where there is no direct sunlight.
1. Choose a safe and easily accessible location.
2. Attach the holder using two screws tightened securely with a screwdriver.
Operating Method
Point the remote control towards the signal receiver on the right side of the air conditioner to operate it.
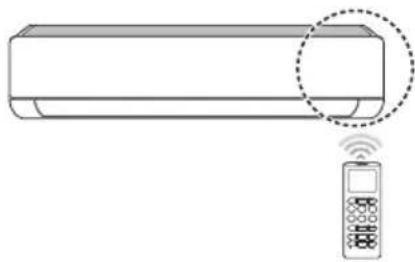
NOTE
- The remote control may operate other electronic devices if it is pointed at them. Make sure you are pointing the remote control at the signal receiver of the air conditioner.
For proper operation, use a soft cloth to clean the transmitter and the signal receiver.
Connect the smartphone to the wireless router.
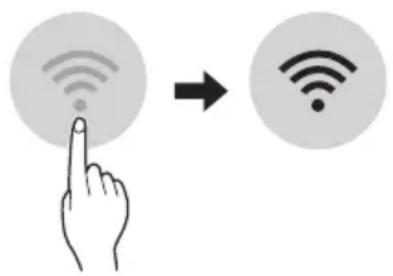
NOTE
- To verify the Wi-Fi connection, check that the icon on the control panel is lit. This device only supports 2.4GHz Wi-Fi networks. To check the router frequency, contact your internet service provider or refer to the wireless router manual.
LG ThinQ is not responsible for network connection problems, damages, or malfunctions caused by the network connection.
- If the device is far from the router, it may not be able to connect to the Wi-Fi network. Purchase a Wi-Fi repeater (range extender) to improve Wi-Fi strength.
- The Wi-Fi connection may be interrupted or fail due to the home network environment.
- The network connection may not work properly due to the internet service provider.
- The surrounding wireless environment may cause the wireless network service to run slowly.
- The device cannot be registered due to problems with wireless signal transmission. Disconnect the device and wait about a minute before trying again.
- If the firewall on your wireless router is enabled, disable the firewall or make an exception for this device.
- The wireless network name (SSID) should be a combination of English letters and numbers. (Do not use special characters.)
- The smartphone user interface (UI) may vary as it depends on the mobile operating system (OS) and the manufacturer.
- If the router's security protocol is set to WEP, you may not be able to operate the network. Please change it to other security protocols (WPA2 is recommended) and re-register the product.
How to install the LG ThinQ Application
TROUBLESHOOTING 33
"Smart Diagnosis" 29
MAINTENANCE 30
Cleaning the air filter 32
TROUBLESHOOTING 33
"LG ThinQ" program characteristics
Connect the device to your smartphone using the convenient smart functions.
Smart Diagnosis
OWNER'S MANUAL
AIR CONDITIONER

Read this owner's manual before operating the device and keep it nearby at all times.
Display Brightness
The brightness of the indoor unit's display can be adjusted.
- Press the LIGHT OFF button.
NOTE
Case of the display screen.
Using the Comfort Air function (optional)
Comfort Air Operation
This function easily sets the blade to a preset position to deflect the supplied air from blowing directly at people in the room.
1 Turn the device on. 2 Press the COMFORT AIR button several times to select the desired direction.
or as shown on the screen.
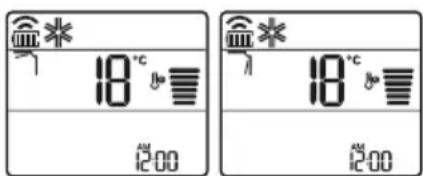
NOTE
-7 or as shown by several units inside. - This function is disabled when MODE or JET MODE is pressed. - This function is disabled and the automatic vertical direction change is set when SWING is pressed. - When this function is off, the horizontal blade operates automatically according to the set mode.
Using the Energy Control function (optional)
1 Turn the device on.
2 Press the ENERGY CTRL button.
- Press the ENERGY CTRL button several times to select each step.
| Céim 1 Céi | m 2 Céim 3 | |
| 80 % | 60 % | 40 % |
| 200 | 200 | 200 |
NOTE
- Step 1: The power input is reduced by 20% compared to the power input. 80 as shown on the screen.
- Step 2: Reduces the power input by 40% compared to the power input at 60, as shown on the display.
- Step 3 (optional): Reduces the power input by 60% compared to the power input at 40, as shown on the display. 80 (1 step), 62 step), (3 step) as shown by several units inside. (1 step), (2 step) as shown by several units inside.)
- This function is available with the Cooling Mode. The capacity may be reduced when the Power Control mode is selected. The desired temperature will be displayed for 5 seconds if FAN SPEED is pressed. The desired temperature will be displayed for 5 seconds if ROOM TEMP is pressed. This function may not be supported depending on the connected units in a multi-unit system.
Using special functions
1 Turn the unit on. 2 Press the FUNC button several times to select the desired function. 3 Press SET/CANCEL to finish.
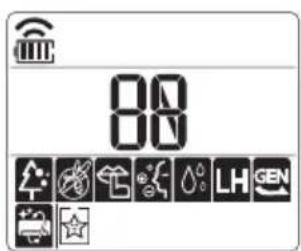
| Scáthlán C | ur sios |
| A | Baineann an gineadóir ian leas as na milliuin ian chun cuidiú le feabhsú na hearcháilíochta laistigh. |
| E | Chun torann a isliú on aonad amuigh. |
| D | Chun tais ginithe taobh istigh den aonad laistigh a bhaint. |
NOTE
Some functions may not be available depending on the model. This function may operate differently from the remote control display.

Table of contents 11
Purpose and functions 11
Safety instructions 12
Automatic restart after power failure 17
Using the timer function 17
Using the pause function 20
Using the fan speed function 21
Using the air flow direction function 21
Setting the ventilation/air extraction timer 22
Using the change function (optional) 23
Using the additional timer function (optional) 23
Using the energy recovery function (optional) 24
Using the night lighting function (optional) 24
Using the air supply function (optional) 24
Using the electric heater control function (optional) 25
Contents 25
Safety Instructions 27
Installation LG ThinQ 27
Smart Diagnosis 29
MAINTENANCE 30
Cleaning the air filter 32
TROUBLESHOOTING 33
Read the safety instructions carefully before using the product to prevent any risk of injury or property damage. The instructions are divided into 'WARNING' and 'CAUTION' as described below.

This symbol indicates items and activities that may cause risk. Read the part with this symbol carefully and follow the instructions to avoid risk.

WARNING
This indicates that failure to follow the instructions may cause serious injury or death.

CAUTION
This indicates that failure to follow the instructions may cause minor injury or damage to the product.
These symbols are displayed on the indoor and outdoor units. (For R32)

This symbol indicates that the appliance uses a flammable refrigerant. If the refrigerant leaks and is exposed to an external ignition source, there is a risk of fire.

Before using the device, please read the instructions carefully.

Indoor unit Outdoor unit
Remote control signal
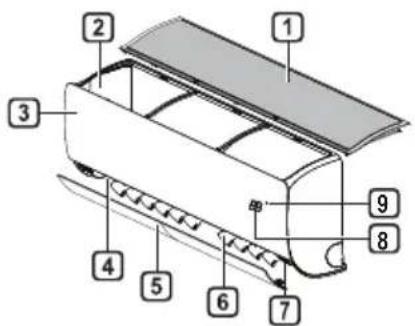
1 Air inlet 2 Air outlet 3 Front panel 4 Air outlet 5 Air deflector (horizontal louver) 6 Air deflector (vertical louver) 7 On/Off button 9 Signal receiver
1 Air inlet/outlet 2 Air inlet/outlet 3 Base plate 4 Power cord 5 Air outlet 6 Drain hose
1 Room temperature / Set temperature 2 Cooling/Heating 3 Wi-Fi 4 Timer 5 On/Off
NOTE
-The number and location of the indicator lights may vary depending on the climate type. -The function may vary depending on the model type.
Remote controller
Battery installation
If the remote controller screen starts to fade, replace the batteries. Install AAA (1.5 V) batteries before using the remote controller.
1 Remove the battery cover from the battery compartment.
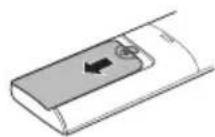
2 Insert new batteries and ensure that the + and - poles of the batteries are correctly positioned.
Installing the remote controller holder.
To install the remote controller, mount the holder in a place where it will not be exposed to direct sunlight.
1 There is enough space. 2 They hold it with a strong attachment to 2 screws, by screwing.
Method of operation
The remote control receiver is placed on the front side of the device, so that it can be controlled.
NOTE
-The remote control can control other electrical devices, if they are connected. Make sure that the remote control receiver is connected to the device. For proper functioning, use the cleaning cloth for the transmitter and receiver of the signal. In case the function is not provided for the product, there will be no sound signal from the product when it is used for that function of the remote control, except for the air direction (SWING), the energy saver (kw[3s]), the air purification function
Setting the current time
1 Insert the batteries
- The icon that appears on the display will flash on the display for setting.

2 Press the button to select the minutes. Press the SET/CANCEL button to finish.
NOTE
- The activation/deactivation of the time measure will become possible after you set the current time.
Use of the °C/°F conversion function (optional)
This function changes the units of measurement between °C and °F
- Press and hold the button for about 5 seconds.
Operation with the device without remote control
Use the remote controller ON/OFF button to operate the indoor unit with the air conditioner when the remote controller is not available.
1 Open the front panel (Type 2) or the horizontal louver (Type 1). 2 Press the ON/OFF button.
Type 1
Type 2
NOTE
- The fan motor may turn on when the horizontal louver is opened.
- The fan speed is set to High.
- The function may vary depending on the model.
- The temperature cannot be changed when using this button for ON/OFF operation. For heating and cooling modes, the temperature is set from 22°C to 24°C.
Using the wireless remote controller
You can conveniently operate the air conditioner using the remote controller.
NOTE
*The buttons may vary depending on the model. When connected to the multi outdoor unit, the energy display, energy control, and the quiet and smart diagnosis functions may not be supported.
| 1 Конч. | 2 Екраз 3a прикajьва. | Опс. | Достаима Функциja | |
| Еднchestвен Пореден | Мултс | |||
| 9 TIMER | S ON OFF | 3a ветоматско Вклочьаве/ Исклочьаве на Клима уреот, ВО посakувано Врeme. | O | O |
| SET/CANCEL | - | 3a заIGN поставиte/ OTекеTe спесиjsалниTe Функции и мерачот на Врeme. | O | O |
| CANCEL | - | 3a заIGN OTекеTe поставиte на мерачот На Врeme. | O | O |
| √ | - | 3a п祈祷аядува. | O | O |
| *LIGHT OFF | - | 3a постави. OCBETлочьeto Ekpanot kaj Внатушata релига. | O | O |
| ROOM TEMP | 3a п祈祷аяду? собнatinga TemпегаТура. | O | O | |
| °C←°F [5 s] | °C °F | 3a помета на eidицату Meу °C и °F | O | O |
| *COMFORT AIR | 3a п祈祷аядува. пожокот на ВОдунот, Здд se решаочи Дува; Бува; Бува. Дува. Дува. Дува. Дува. Дува. Дува. Дува. Дува. Дува. Дува. Дува. Дува. Дува. Дува. Дува. Дува. Дува. Дува. Дува. Дува. Дува. Дува. Дува. Дува. Дува. DA DA DA DA DA DA DA DA DA DA DA DA DA DA DA DA DA DA DA DA DA DA DA DA DA DA DA DA DA DA DA DA DA DA DA DA DA DA DA DA DA DA DA DA DA DA DA DA DA DA DA | O | O | |
| kW [3 s] | - | 3a постави. пдд. Дува; Бува; Бува; Врба co релига. DA DA DA DA DA DA DA DA DA DA DA DA DA DA DA DA DA DA DA DA DA DA DA DA DA DA DA DA DA DA DA DA DA DA DA DA DA DA DA DA DA DA DA DA DA DA DA DA DA Dy DA DA DA DA DA DA DA DA DA DA DA DA DA DA DA DA DA DA DA DA DA DA DA DA DA DA DA DA DA DA DA DA DA DA DA DA DA DA DA DA DA DA DA DA DA DA DA DA DA Df DA DA DA DA DA DA DA DA DA DA DA DA DA DA DA DA DA DA DA DA DA DA DA DA DA DA DA DA DA DA DA DA DA DA DA DA DA DA DA DA DA DA DA DA DA DA DA DA DA OA DA DA DA DA DA DA DA DA DA DA DA DA DA DA DA DA DA DA DA DA DA DA DA DA DA DA DA DA DA DA DA DA DA DA DA DA DA DA DA DA DA DA DA DA DA DA DA DA DA MA DA DA DA DA DA DA DA DA DA DA DA DA DA DA DA DA DA DA DA DA DA DA DA DA DA DA DA DA DA DA DA DA DA DA DA DA DA DA DA DA DA DA DA DA DA DA DA DA DA DN DA DA DA DA DA DA DA DA DA DA DA DA DA DA DA DA DA DA DA DA DA DA DA DA DA DA DA DA DA DA DA DA DA DA DA DA DA DA DA DA DA DA DA DA DA DA DA DA DA NA DA DA DA DA DA DA DA DA DA DA DA DA DA DA DA DA DA DA DA DA DA DA DA DA DA DA DA DA DA DA DA DA DA DA DA DA DA DA DA DA DA DA DA DA DA DA DA DA DA DMA DMA DMA DMA DMA DMA DMA DMA DMA DMA DMA DMA DMA DMA DMA DMA DMA DMA DMA DMA DMA DMA DMA DMA DMA DMA DMA DMA DMA DMA DMA DMA DMA DMA DMA DMA DMA DMA DMA DMA DMA DMA DMA DMA DMA DMA DMA DMA DMA DMA MA DMA DMA DMA DMA DMA DMA DMA DMA DMA DMA DMA DMA DMA DMA DMA DMA DMA DMA DMA DMA DMA DMA DMA DMA DMA DMA DMA DMA DMA DMA DMA DMA DMA DMA DMA DMA DMA DMA DMA DMA DMA DMA DMA DMA DMA DMA DMA DMA DMA DM DMA DMA DMA DMA DMA DMA DMA DMA DMA DMA DMA DMA DMA DMA DMA DMA DMA DMA DMA DMA DMA DMA DMA DMA DMA DMA DMA DMA DMA DMA DMA DMA DMA DMA DMA DMA DMA DMA DMA DMA DMA DMA DMA DMA DMA DMA DMA DMA DMA DMA DMA DMA DMA DMA DMA DMA DMA DMA DMA DMA DMA DMA DMA DMA DMA DMA DMA DMA DMA DMA DMA DMA DMA DMA DMA DMA DMA DMA DMA DMA DMA DMA DMA DMA DMA DMA DMA DMA DMA DMA DMA DMA DMA DMA DMA DMA DMA DMA DMA OM DMA DMA DMA DMA DMA DMA DMA DMA DMA DMA DMA DMA DMA DMA DMA DMA DMA DMA DMA DMA DMA DMA DMA DMA DMA DMA DMA DMA DMA DMA DMA DMA DMA DMA DMA DMA DMA DMA DMA DMA DMA DMA DMA DMA DMA DMA DMA DMA DMA EMA DMA DMA DMA DMA DMA DMA DMA DMA DMA DMA DMA DMA DMA DMA DMA DMA DMA DMA DMA DMA DMA DMA DMA DMA DMA DMA DMA DMA DMA DMA DMA DMA DMA DMA DMA DMA DMA DMA DMA DMA DMA DMA DMA DMA DMA DMA DMA DMA DMA DNA DMA DMA DMA DMA DMA DMA DMA DMA DMA DMA DMA DMA DMA DMA DMA DMA DMA DMA DMA DMA DMA DMA DMA DMA DMA DMA DMA DMA DMA DMA DMA DMA DMA DMA DMA DMA DMA DMA DMA DMA DMA DMA DMA DMA DMA DMA DMA DMA DMA USA USA USA USA USA USA USA USA USA USA USA USA USA USA USA USA USA USA USA USA USA USA USA USA USA USA USA USA USA USA USA USA USA USA USA USA USA USA USA USA USA USA USA USA USA USA USA USA USA USA WA WA WA WA WA WA WA WA WA WA WA WA WA WA WA WA WA WA WA WA WA WA WA WA WA WA WA WA WA WA WA WA WA WA WA WA WA WA WA WA WA WA WA WA WA WA WA WA WA WA WJ | ||
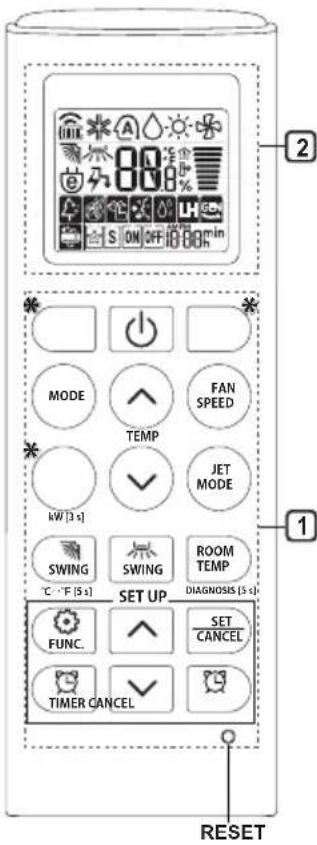
| 1 Кончe | 2 Екраз 3a прикожувае | Опс | Достаима Функциja | |
| Еднchestвен Пodeлен | Мульners | |||
| FUNC. | JOHSCNOT rehepatorop kopustn MIIINOHJ JOHN, За дa пOMorHe BO побрУBaJIte Na КВалITeTOT Na BO3dYxOT BO 3aTBOpEN ПСОТOP. | O (ОпцIHоЛно) | O (ОпцIHоЛно) | |
| За дa сe намал бухавATEROD надворшнаТа рEDINHIZA. | O | X | ||
| За намалУBaJIte Na ВлагATERA KoJAshTO ce СоЗДBA BO BHaTpeSHaTe ЕДИHIZA. | O | O | ||
| RESET - | За дa ГI ИнICIJIЯИЗИРаTE поставКITE Na ДалЧЕИНСКИOT уразывач. | O | O | |
NOTE
Some functions may not be supported, depending on the model. * The buttons may vary depending on the model. - Press the SET/CANCEL button to operate with the selected FUNC.
When the unit is switched on again after the power supply is restored, this function will automatically restore the previous settings.
Enabling the automatic restart function
1. Set the selector switch (Type 2) or the horizontal lever (Type 1) to the desired position. 2. Press and hold the ON/OFF button for 6 seconds. The unit will emit a beep, and the indicator light will flash 4 times. To disable the function again, press and hold the ON/OFF button for 6 seconds. The unit will emit a beep, and the indicator light will flash 5 times.
Type 1
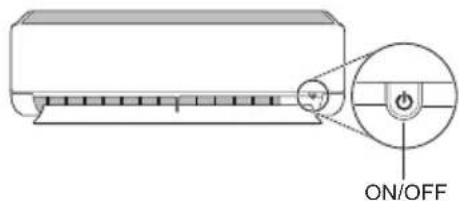
Type 2
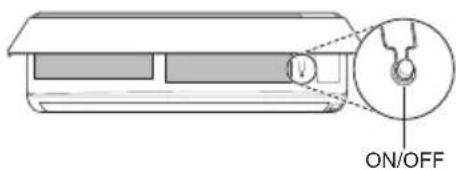
NOTE
-The function may vary depending on the model type. -If you press and hold the ON/OFF button for 3-5 seconds instead of 6 seconds, the unit will enter test operation mode. In test operation mode, the unit blows out air for 18 minutes, then returns to the previously set operation.
Using the mode function
This function allows you to select the desired operation mode.
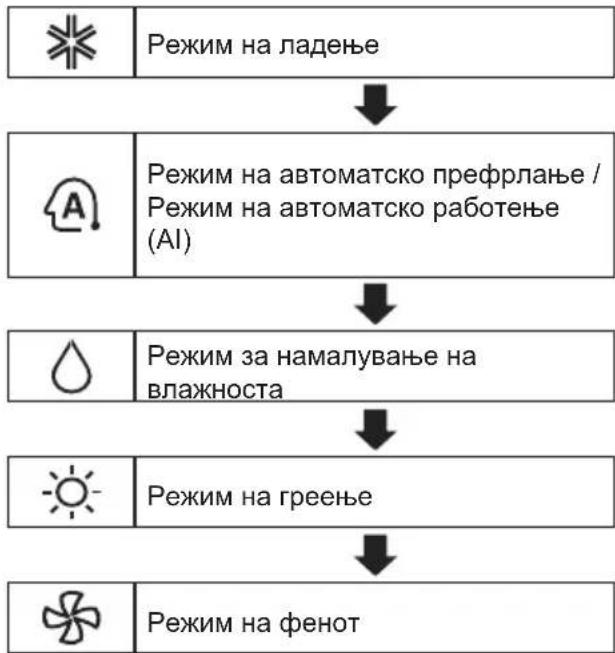
Cooling mode
1. Turn on the unit. 2. Press the MODE button repeatedly to select the cooling mode.
- It is displayed on the display screen.
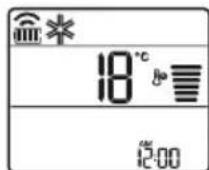
3. Press the button to set the desired temperature.
Automatic operation (Intelligent fan)
Before operation, the system automatically controls the electronic control.
1. Turn on the appliance.
2. Press the MODE button repeatedly to select the automatic operation.
Follow the instructions on the screen.
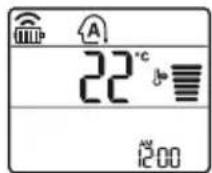
3. Press the button to set the desired temperature.
4. Press the FAN SPEED button to adjust the fan speed.
Automatic fan mode
Possible operation
This mode automatically changes the fan mode to maintain the set temperature at ±2°C.
1. Turn on the appliance.
2. Press the MODE button repeatedly to select the automatic fan mode.
Follow the instructions on the screen.
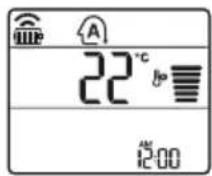
3. Press the button to set the desired temperature.
4. Press the FAN SPEED button to adjust the fan speed.
Dehumidification mode
This mode is used to remove moisture from highly humid environments, especially during the rainy season, to prevent mold and mildew. This mode automatically adjusts the fan speed and temperature to maintain the optimal humidity level.
1 Turn on the appliance. 2 Press the MODE button repeatedly to select the dehumidification mode.
It is displayed on the display screen.
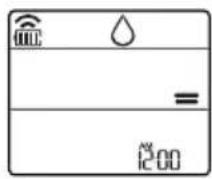
NOTE
In this mode, you cannot adjust the temperature; it will be adjusted automatically. The temperature is not displayed on the display screen. In dehumidification mode, the compressor and indoor fan may not operate until the room temperature reaches 24 °C.
Heating mode
1 Turn on the appliance. 2 Press the MODE button repeatedly to select the heating mode.
It is displayed on the display screen.
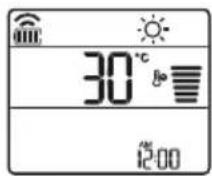
3 Press the button to set the desired temperature.
NOTE
The indoor unit will display the temperature when heating is operating.
- The display will show the indoor temperature:
When preheating is in operation. When the room temperature reaches the set temperature.
Fan mode
It recirculates the indoor air without changing the room temperature.
1 Turn on the appliance. 2 Press the MODE button repeatedly to select the desired operation mode.
It is displayed on the display screen.
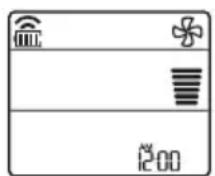
3 Press the FAN SPEED button to adjust the fan speed.
Using the Sleep Mode function
Adjusting the fan speed
- Press the FAN SPEED button repeatedly to adjust the fan speed.
Features of the LG ThinQ application
When you connect with the appliance through your mobile phone, you can use the useful features.
Smart Diagnosis
If you experience a problem while using the application, the Smart Diagnosis feature will help you diagnose the problem.
Processing
You can set various options on the appliance and in the application.
NOTE
- If you change your wireless router, internet service provider, or password, select the registered appliance in the LG ThinQ application and register it again. The application will notify you of any changes to the appliance without prior notice to users.
- The operation of this device depends on the model.
Before using the LG ThinQ application
1. Check the distance between the appliance and the wireless router (Wi-Fi transmission).
If the distance between the appliance and the wireless router is too far, the signal may weaken. It may take longer to register, or installation may fail.
2. Turn off mobile data or internet on your smartphone.
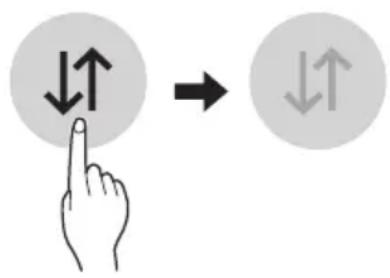
3. Connect your smartphone to the wireless router.
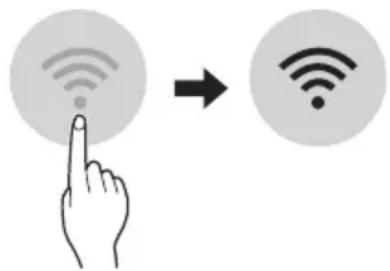
NOTE
To verify that you are connected to Wi-Fi, check the LED indicators in the control table. The appliance supports only 2.4 GHz Wi-Fi networks. To check the frequency of your network, contact your internet service provider or the manufacturer of your wireless router.
LG ThinQ is not responsible for any network connection problems or any failures, defects, or errors caused by the network connection. - If the appliance has problems connecting to the Wi-Fi network, it may be far from the router. Move the Wi-Fi router (router) closer to improve the Wi-Fi signal strength. The Wi-Fi connection may not connect or may be interrupted due to the surrounding home network. - The connection may not work depending on the internet service provider. - The wireless connection may require the wireless network service to work properly.
The appliance cannot be registered, problems with the wireless signal transmission. Unplug the appliance and wait about a minute before trying again. - If the firewall on your wireless router is enabled, disable it and add an exception for it. - The name of the wireless network (SSID) should be a combination of English letters and numbers. (Do not use special characters) - The smartphone user interface (UI) may vary depending on the mobile operating system (OS) and manufacturer. - If the security protocol on the router is set to WEP, you may not be able to connect to the network. You can change to other security protocols (WPA2 is recommended) and try registering the product again.
Installing the LG ThinQ application
Download the LG ThinQ application from Google Play Store & Apple App Store via your smartphone. Follow the instructions for downloading and installing the application.
Open Source Software Notice
To obtain the source code under GPL, LGPL, MPL, and other open source licenses used in this product, please visit http://opensource.lge.com. In addition to the source code, all referenced license terms, warranty disclaimers, and copyright notices are available for download.
You can obtain a copy of the code on CD-ROM for a fee that covers the shipping costs (such as for media, shipping, and handling) upon request via e-mail to opensource@lge.com. This offer is valid for a period of three years after the last shipment of this product. This offer applies to any recipient of this information.
Smart Diagnosis
This function is available only on models with the logo.
Use this feature to help diagnose or solve problems with your appliance.
NOTE
- If you cannot resolve the issue due to circumstances not caused by LGE, the service may not work due to external factors, including but not limited to Wi-Fi unavailability, Wi-Fi disconnection, the service provider's application policy, or application unavailability.
- This function may be subject to change, and the form may vary depending on the circumstances.
Using LG ThinQ to diagnose problems
If you experience problems with your Wi-Fi equipped appliance, you can transmit data about the problem to your smartphone using the LG ThinQ application.
- Launch the LG ThinQ application and select the Smart Diagnosis feature from the menu. Follow the instructions in the LG ThinQ application.
Using Audible Diagnosis to diagnose problems
Follow the instructions below to use the Audible Diagnosis method.
Launch the LG ThinQ application and select the Smart Diagnosis feature from the menu. Follow the instructions for Audible Diagnosis given in the LG ThinQ application. 1 Turn on the power by plugging in the power cord. 2 Place the phone's mouthpiece over the logo. 3 Press and hold the DIAGNOSIS button for 5 seconds or longer while holding the phone's mouthpiece to the logo until the data transfer is complete.
Do not move the phone until the data transfer is complete. The transfer time may vary depending on the data.
After completing the transfer, the diagnosis is performed in the application.
NOTE
For best results, do not interrupt the device during the transfer. - Make sure you have the minimum required free space, otherwise the phone may not receive the correct signal from the internal unit.
CLEANING AND MAINTENANCE
- Before cleaning or performing maintenance, turn off the device and wait until the fan stops working.
If the device will not be used for a long period of time, unplug it to keep it in the best condition. Regularly clean the device to maintain optimal performance and prevent potential defects.
- Clean the device in a dry mode for 3 to 4 hours, then turn it off. Internal damage may occur if moisture remains in its components.
- Dry the internal components of the device using a dry mode for 3 to 4 hours before its repeated use. This will help remove any moisture that has accumulated.
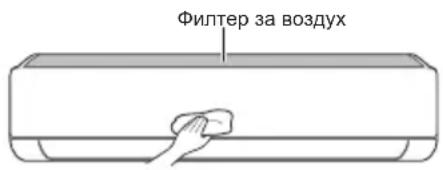
-Function may vary depending on the model type.
| Тип Опис Иntервал | |
| Фильпер за ВОЗдух | Исучтete со правосмICALа ил рачно Исторе. 2 недени |
| JOизатор(оштоналho) | УлOTребete сУВа памуна вata за за ja otst相对较п'te пашинatable. |
| Виатrelша edиница | Исучтete ja повшинatable на Виатrelша та edиница, корисейки мека, сУВа крna. |
| Пробесионално Исучтete го садот каде ШTO се собра konданзиранatable влara. | |
| Пробесионално Исучтete ja севкatingа на ЗоюшTo се собра konданзиранatable влara. | |
| Заменete Гьбатрines на далочинскnot уравувач. Edини�юшно | |
| Надворша edиница | Пробесионално Исучтete ГьКалемпente 3a оддваJBe толина и tabлata co OTbори. (Посobетувajte ce co Тхничар.) |
| Пробесионално Исучтete ГфенOT. Edинишно | |
| Пробесионално Исучтete ГадOT каде ШTO се собра konданзиранatable влara. | |
| Пробесионално Лице НЕа NotВрди ДЕа составнITE DeLOВИ на ФенOT сцВРСТо 3aTeгнatable. | |
| Исучтete ГьЕКТричнite KomПОЕNTN co ВОЗдух. Edинишюшно |
NOTE
- Never use water with a temperature higher than 40°C when cleaning the filters. This may cause deformation or damage.
- Never use evaporative materials when cleaning the filters. They may damage the surface of the product.
Cleaning the filter
Clean the air filters once every 2 weeks, and replace them if necessary.
NOTE
- The air filter can be cleaned if it is dirty. If the air filter is not properly installed, the parts and other materials may be sucked into the indoor unit.
Type 1
If the indoor unit is dirty, you can remove the upper filter.
1 Turn off the appliance and unplug the power cord. 2 Hold the filter handle and pull it down.
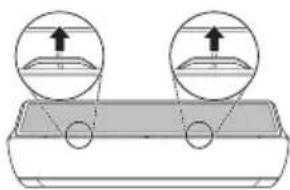
3 Remove it from the indoor unit.
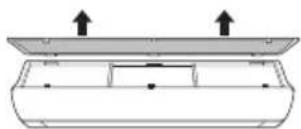
4 Clean the filter with a vacuum cleaner or with lukewarm water containing a neutral detergent. 5 Dry the filter in the shade. 6 Replace the filter hooks in the original position.
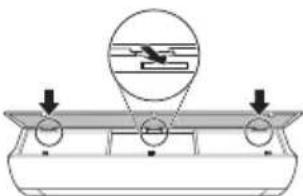
7 Press the handle hooks to install the air filter.
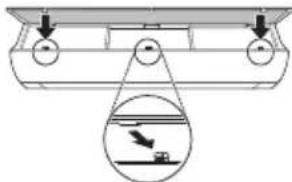
8 Check the front panel side for proper installation of the air filter.
Type 2
1 Turn off the appliance and unplug the power cord. 2 Open the front panel.
- Pull the handle and remove the panel.
3 Hold the air filter handle, pull it down, and remove it from the indoor unit.
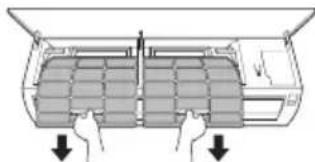
4 Clean the filters with a vacuum cleaner or with lukewarm water containing a neutral detergent. 5 Dry the filters in the shade. 6 Replace the filter hooks in the original position.
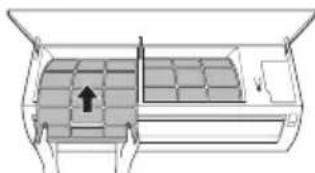
7 Check the front panel side for proper installation of the filters.
Function of self-diagnosis
The product is designed to perform its function automatically. If an error occurs, the internal unit will retry after a few seconds. If this does not happen, contact your local distributor or service center.
To request service
Please check the following items before contacting the service center. If the problem persists, contact your local service center.
| Симптоми можни | Прочны и рeshенье |
| Клиma урекот неpbотиHopмлно. | Мирзба на ИЗrogenи и чуdenи 3Вуци доагаат od_edиницatura.ISCКУЧЕТЕ РКлиma урекот, ИЗваде тг КабелOT 3a стура щьдддддддддддддддддддддддддддддддддддддддддддддддддддддддддддддддддддддддддддддддддддддддддддддддддддд徳. ИсккУЧЕТЕ РКлиma урекот, ИЗваде тг КабелOT 3a стура щьддддддддддддддддддддддддддддддддддддддддддддддддддддддддддддддддд徳. ИсккУЧЕТЕ РКлиma урекот, ИЗваде тг КабелOT 3aстура щьддддддддддддддддддддддддддддддд徳. ИсккУЧЕТЕ РКлиma урекот, ИЗваде тг КабелOT 3a стура щьдддддддддддддддд徳. ИсккУCHYBAчOT, пскнHyВач Na StprjHOTO KOLO (6e36eDnOCTa,3a3emJyBaJIeTO), пьocrypyBaJOT He habOTAT npabINHO.ISCKUChE To Klinma урекот, ИЗваде тг КабелOT 3a стура щьдддддд徳. ИсккУCHYBAчOT, пскнHyВач Na StprjHOTO KOLO (6e36eDnOCTa,3a3emJyBaJIeTO), пьocrypyBaJOT He habOTAT npabINHO.ISCKUChE To Klinma урекот, ИЗваде тг Кабелot 3a стура щьддд徳. ИскнHCuTAta coZdAba KaD Na rpeShka od conctBeHOTOCamodinjarHoctNtucpaIbe.ISCKUChE To Klinma урекот, ИЗваде тг КабелOT 3a стура щьдд徳. ИскнHCuTAta coZdAba KaD Na rpeShka od conctBeHOTOCamodinjarHoctNtucpaIbe.ISCKUChE To Klinma урекот, ИЗваде тг КабелOT 3a стура щьд徳. ИскнHCuTAta coZdAba KaD Na rpeShka od conctBeHOTOCamodinjarHoctNtucpaIbe.ISCKUChE To Klinma урекот, ИЗваде тг КабелOT 3a стура щьд徳. ИскнHCuTAta coZdAba KaD Na rрocrypAOT He habOTAT npakNPyOcOT 3a cTpyja, пьmoЖeБи ce BkLnyeHи n3OJatopNTe 3a habOH. |
| Клиma урекот неpbotи. | Клиma урекот не e prinkluyen.IproBepete Далу Ka6elenOT 3a habOjVbAJIe b e BmETHaT BO prnkNPyOcOT 3a cTpyja, пьmoЖeБи ce BkLnyeHи n3OJatopNTe 3a habOH. |
| Има ИЗбен Осигуразч, пь e bokInparANO habOjVbAJIeTo co cTpyja.3aMeHete ro osigupaOT пьoproBepete Далу пkeKINHyBaJOT Na cTpyjHOTOKOLO ce BkLnyeHIL. | |
| Се сFlyu ПяЕКIN Ha eNeKTPrUHATA eHepRnJa.IscKUChE To Klinma урекот,aKOce SchyHn Ha eNeKTPrUHATA eHepRnJa.Kora habOjVbAJIeTo nobTOpNo Ke ce BocnoCTaBn, nouekajTe 3 mHyTu, na notoa BkLnyeTe ro Klinma урекOT. | |
| Волтaxа tse Или пremHory BvCoKa, пь пremHory HnCKa.IproBepete Далу ce BkLnyeHп pkeKINHyBaJOT Na cTpyjHOTOKOLO. | |
| Клиma урекот АВТOMATСКI ce NsKluyu Bo OBOJ MOMENT.BkLnyeTe ro Klinma урекOT. | |
| БatePinte Bo dalechNcknot uypaBvBaH Ce ep nabInHo hameCTeH.N.Iocrypete ce deka batePinte ce npabINHOb BmETHaTn BO bAsnOT daLeuHncknUpaBvBaU.Ако batePinte ce npabINHOb hameCTeH, a Klinma урекOT и поHamTu He paBOTN, toraah 3aMeHete ng batePinte ng obundet e ce NobTOpNo. | |
| СимпTomи Рожни | Прочны и рeshенье |
| Клиma уреот не ( искneyта ладен Воздун. | Воздунот не циркулера правлино. • Осигурete се дeca Нем за вescи, ралетни, ялдегов од мебел, Што го 6лokираат пroduнот ду на клиma уреот. |
| Фильтерот за Воздун e валдан. • Устende ту Фильтерот за Воздун сднаш на секон 2 недени. • Видete BO "Чистende на Фильтерот" за по breaste Информаши. | |
| Собнаты Temnéратура有很大penmогу виска. • 3a сеньocно ладене на винату СОДУв Вели в体现在е востоку в {@химь Враимь Враимь Враимь Враимь Враимь НВраимь Враимь Враимь Враимь Враимь Враимь Враимь Враимь Враимь Враимь Враимь Враимь Враимь Враимь Враимь Враимь Враимь Враимь Враимь Враимь Враимь Враимь Враимь Враимь Враимь Враимь Враимь Вра姆ь Враимь Враимь Враимь Враимь Враимь Враимь Враимь Враимь Враимь Враимь Враимь Враимь Враимь Враимь Враимь Враимь Враимь Враимь Враимь Враимь Враимь Враимь Враимь WEDAN Враимь WEDAN Враимь WEDAN Враимь WEDAN Враимь WEDAN Враимь WEDAN Враимь WEDAN Враимь WEDAN Враимь WEDAN Враимь WEDAN Враимь WEDAN Враимь WEDAN Враимь WEDAN Враимь wEDAN Враимь wEDAN Враимь wEDAN Враимь wEDAN Враимь wEDAN Враимь wEDAN Враимь wEDAN Враимь wEDAN Враимь wEDAN Враимь wEDAN Враимь wEDAN Враимь wEDAN Враимь wEDAN B�боггота: В�боггота: В�боггота: В�боггота: В�боггота: В�боггота: В�боггота: В�боггота: В�боггота: В�боггота: В�боггота: В�боггота: В�боггота: В�богьота: В�богьота: В�богьота: В�богьота: В�богьота: В�богьота: В�богьота: В�богьота: В�богьота: В�богьота: В�богьота: В�богьота: В�богьота: B�богьота: B�богьота: B�богьота: B�богьота: B�богьота: B�богьота: B�богьота: B�богьота: B�богьота: B�богьота: B�богьота: B�богьота: B�богвота: B�богьота: B�богьота: B�богьота: B�богьота: B�богьота: B�богьота: B�богьота: B�богьота: B�богьота: B�богьота: B�богьота: B�богьота: В�богьота: B�богьота: B�богьота: B�богьота: B�богьота: B�богьота: B�богьота: B�богьота: B�богьота: B�богьота: B�богьота: B�богвота: B�богвота: B�богьота: B�богьота: B�богьота: B�богьота: B�богьота: B�богьота: B�богьота: B�богьота: B�богьота: B�богьота: B�богьота: В�богьота: В�богьота: B�богьота: B�богьота: B�богьота: B�богьота: B�богьота: B�богьота: B�богьота: B�богьота: B�богьота: B�богвота: B�богьота: B�богвота: B�богьота: B�богьота: B�богьота: B�богьота: B�богьота: B�богьота: B�богьота: B�богьота: B�богьота: B�богьота: В�богьота: B�богьота: В�богьота: B�богьота: B�богьота: B�богьота: B�богьота: B�богьота: B�богьота: B�богьота: B�богьота: B�богьота: B�богвота: B�богвота: B�богвота: B�богьота: B�богьота: B�богьота: B�богьота: B�богьота: B�богьота: B�богьота: B�богьота: B�богьота: B�богьота: В�богьота: В�богьота: В�богьота: B�богьота: B�богьота: B�богьота: B�богьота: B�богьота: B�богьота: B�богьота: B�богьота: B�богвота: B�богьота: B�богьота: B�богвота: B�богьота: B�богьота: B�богьота: B�богьота: B�богьота: B�богьота: B�богьота: B�богьота: B�богьота: В�богьота: B�богьота: B�богьота: В�богьота: B�богьота: B�богьота: B�богьота: B�богьота: B�богьота: B�богьота: B�богьота: B�богьота: B�богвота: B�богьота: B�богвота: B�богвота: B�богьота: B�богьота: B�богьота: B�богьота: B�богьота: B�богьота: B�богьота: B�богьота: B�богьота: В�богьота: B�богьота: В�богьота: В�богьота: B�богьота: B�богьота: B�богьота: B�богьота: B�богьота: B�богьота: B�богьота: B�богьота: B�богвота: B�богвота: B�богьота: B�богвота: B�богьота: B�богьота: B�богьота: B�богьота: B�богьота: B�богьота: B�богьота: B�богьота: B�богьота: В�богьота: В�богьота: B�богьота: В�богьота: B�богьота: B�богьота: B�богьота: B�богьота: B�богьота: B�богьота: B�богьота: B�богьота: B�богвота: B�богвота: B�богвота: B�богвота: B�богьота: B�богьота: B�богьота: B�богьота: B�богьота: B�богьота: B�богьота: B�богьота: B�богьота: В�богьота: В�богьота: В�богьота: В�богьота: B�богьота: B�богьота: B�богьота: B�богьота: B�богьота: B�богьота: B�богьота: B�богвота: B�богьота: B�богьота: B�богьота: B�богвота: B�богьота: B�богьота: B�богьота: B�богьота: B�богьота: B�богьота: B�богьота: B�богьота: В�богьота: B�богьота: B�богьота: B�богьота: В�богьота: B�богьота: B�богьота: B�богьота: B�богьота: B�богьота: B�богьота: B�богьота: B�богвота: B�богьота: B�богьота: B�богвота: B�богвота: B�богьота: B�богьота: B�богьота: B�богьота: B�богьота: B�богьота: B�богьота: B�богьота: В�богьота: B�богьота: B�богьота: В�богьота: В�богьота: B�богьота: B�богьота: B�богьота: B�богьота: B�богьота: B�богьота: B�богьота: B�богвота: B�богьота: B�богвота: B�богьота: B�богвота: B�богьота: B�богьота: B�богьота: B�богьота: B�богьота: B�богьота: B�богьота: B�богьота: В�богьота: B�богьота: В�богьота: B�богьота: В�богьота: B�богьота: B�богьота: B�богьота: B�богьота: B�богьота: B�богьота: B�богьота: B�богвота: B�богьота: B�богвота: B�богвота: B�богвота: B�богьота: B�богьота: B�богьота: B�богьота: B�богьота: B�богьота: B�богьота: B�богьота: В�богьота: B�богьота: В�богьота: В�богьота: В�богьота: B�богьота: B�богьота: B�богьота: B�богьота: B�богьота: B�богьота: B�богьота: B�богвота: B�богвота: B�богьота: B�богьота: B�богвота: B�богьота: B�богьота: B�богьота: B�богьота: B�богьота: B�богьота: B�богьота: B�богьота: В�богьота: В�богьота: B�богьота: B�богьота: В�богьота: B�богьота: B�богьота: B�богьота: B�богьота: B�богьота: B�богьота: B�богьота: B�богвота: B�богвота: B�богьота: B�богвота: B�богвота: B�богьота: B�богьота: B�богьота: B�богьота: B�богьота: B�богьота: B�богьота: B�богьота: В�богьота: В�богьота: B�богьота: В�богьота: В�богьота: B�богьота: B�богьота: B�богьота: B�богьота: B�богьота: B�богьота: B�богьота: B�богвота: B�богвота: B�богвота: B�богьота: B�богвота: B�богьота: B�богьота: B�богьота: B�богьота: B�богьота: B�богьота: B�богьота: B�богьота: В�богьота: В�богьота: В�богьота: B�богьота: В�богьота: B�богьота: B�богьота: B�богьота: B�богьота: B�богьота: B�богьота: B�богьота: B�богвота: B�богвота: B�богвота: B�богвота: B�богвота: B�богвота: B�богвота: B�богвота: B�богвота: B�богвота: B�богвота: B�богвота: B�богвота: В�богьота: В�богьота: B�богьота: B�богьота: B�богьота: B�богьота: B�богьота: B�богьота: B�богьота: B�богьота: B�богьота: B�богьота: В�богьота: B�богвота: B�богвота: B�богвота: B�богвота: B�богвота: B�богвота: B�богвота: B�богвота: B�богвота: B�богвота: B�богвота: B�богьота: B�богьота: B�богьота: B�богьота: B�богьота: B�богьота: B�богьота: B�богьота: В�богьота: В�богьота: В�богьота: В�богьота: В�богьота: B�богьота: B�богьота: B�богьота: B�богьота: B�богьота: B�богьота: B�богвота: B�богвота: B�богьота: B�богьота: B�богьота: B�богвота: B�богьота: B�богьота: B�богьота: B�богьота: B�богьота: B�богьота: B�богьота: В�богьота: B�богьота: B�богьота: B�богьота: B�богьота: В�богьота: B�богьота: B�богьота: B�богьота: B�богьота: B�богьота: B�богьота: B�богвота: B�богьота: B�богьота: B�богьота: B�богьота: B�богвота: B�богьота: B�богьота: B�богьота: B�богьота: B�богьота: B�богьота: B�богьота: В�богьота: В�богьота: B�богьота: B�богьота: B�богьота: В�богьота: B�богьота: B�богьота: B�богьота: B�богьота: B�богьота: B�богьота: B�богвота: B�богвота: B�богвота: B�богвота: B�богвота: B�богьота: B�богьота: B�богьота: B�богьота: B�богьота: B�богьота: B�богьота: В�богьота: B�богьота: B�богьота: B�богьота: В�богьота: В�богьота: B�богьота: B�богьота: B�богьота: B�богьота: B�богьота: B�богьота: B�богвота: B�богвота: B�богвота: B�богвота: B�богьота: B�богвота: B�богьота: B�богьота: B�богьота: B�богьота: B�богьота: B�богьота: B�богьота: В�богьота: B�богьота: B�богьота: В�богьота: B�богьота: В�богьота: B�богьота: B�богьота: B�богьота: B�богьота: B�богьота: B�богьота: B�богвота: B�богвота: B�богьота: B�богьота: B�богвота: B�богвота: B�богьота: B�богьота: B�богьота: B�богьота: B�богьота: B�богьота: B�богьота: В�богьота: B�богьота: B�богьота: В�богьота: В�богьота: В�богьота: B�богьота: B�богьота: B�богьота: B�богьота: B�богьота: B�богьота: B�богвота: B�богьота: B�богьота: B�богьота: B�богвота: B�богвота: B�богьота: B�богьота: B�богьота: B�богьота: B�богьота: B�богьота: B�богьота: В�богьота: В�богьота: B�богьота: B�богьота: В�богьота: В�богьота: B�богьота: B�богьота: B�богьота: B�богьота: B�богьота: B�богьота: B�богвота: B�богьота: B�богьота: B�богвOTOH В�богьOTOH В�богьOTOH В�богьOTOH В�богьOTOH В�богьOTOH В�богьOTOH В�богьOTOH В�богьOTOH В�богьOTOH В�богьOTOH В�богьOTOH В�богьOTOH В�богьOTOH B�богьOTOH B�богьOTOH B�богьOTOH B�богьOTOH B�богьOTOH B�богьOTOH B�богьOTOH B�богьOTOH B�богьOTOH B�богьOTOH B�богьOTOH B�богьOTOH B�богвOTOH B�богвOTOH B�богвOTOH B�богвOTOH B�богвOTOH B�богвOTOH B�богвOTOH B�богвOTOH B�богвOTOH B�богвOTOH B�богвOTOH B�богвOTOH B�богвOTOH В�богьOTOH В�богьOTOH B�богьOTOH B�богьOTOH B�богьOTOH B�богьOTOH B�богьOTOH B�богьOTOH B�богьOTOH B�богьOTOH B�богьOTOH B�богьOTOH В�богьOTOH B�богьOTOH B�богьOTOH B�богьOTOH B�богьOTOH B�богьOTOH B�богьOTOH B�богьOTOH B�богьOTOH B�богьOTOH B�богьOTOH B�богвOTOH B�богьOTOH B�богьOTOH B�богьOTOH B�богьOTOH B�богьOTOH B�богьOTOH B�богьOTOH B�богьOTOH B�богьOTOH B�богьOTOH B�богьOTOH B�богьOTOH В�богьOTOH В�богьOTOH B�богьOTOH B�богьOTOH B�богьOTOH B�богьOTOH B�богьOTOH B�богьOTOH B�богьOTOH B�богьOTOH B�богьOTOH B�богвOTOH B�богвOTOH B�богьOTOH B�богьOTOH B�богьOTOH B�богьOTOH B�богьOTOH B�богьOTOH B�богьOTOH B�богьOTOH B�богьOTOH B�богьOTOH B�богьOTOH В�богьOTOH B�богвOTOH B�богьOTOH B�богьOTOH B�богьOTOH B�богьOTOH B�богьOTOH B�богьOTOH B�богьOTOH B�богьOTOH B�богьOTOH B�богьOTOH B�богвOTOH B�богьOTOH В�богьOTOH В�богьOTOH B�богьOTOH B�богьOTOH B�богьOTOH B�богьOTOH B�богьOTOH B�богьOTOH B�богьOTOH B�богьOTOH B�богьOTOH В�богьOTOH В�богьOTOH B�богвOTOH B�богьOTOH B�богьOTOH B�богьOTOH B�богьOTOH B�богьOTOH B�богьOTOH B�богьOTOH B�богьOTOH B�богьOTOH B�богвOTOH B�богьOTOH B�богьOTOH В�богьOTOH В�богьOTOH B�богьOTOH B�богьOTOH B�богьOTOH B�богьOTOH B�богьOTOH B�богьOTOH B�богьOTOH B�богьOTOH В�богьOTOH В�богьOTOH B�богьOTOH B�богвOTOH B�богьOTOH B�богьOTOH B�богьOTOH B�богьOTOH B�богьOTOH B�богьOTOH B�богьOTOH B�богьOTOH B�богьOTOH B�богвOTOH B�богвOTOH B�богьOTOH В�богьOTOH В�богьOTOH B�богьOTOH B�богьOTOH B�богьOTOH B�богьOTOH B�богьOTOH B�богьOTOH B�богьOTOH B�богьOTOH В�богьOTOH B�богьOTOH B�богьOTOH B�богвOTOH B�богьOTOH B�богьOTOH B�богьOTOH B�богьOTOH B�богьOTOH B�богьOTOH B�богьOTOH B�богьOTOH B�богвOTOH B�богьOTOH B�богьOTOH B�богьOTOH В�богьOTOH В�богьOTOH B�богьOTOH B�богьOTOH B�богьOTOH B�богьOTOH B�богьOTOH B�богьOTOH B�богьOTOH В�богьOTOH B�богьOTOH B�богьOTOH B�богьOTOH B�богвOTOH B�богвOTOH B�богвOTOH B�богвOTOH B�богвOTOH B�богвOTOH B�богвOTOH B�богвOTOH B�богьOTOH B�богьOTOH B�богьOTOH B�богьOTOH B�богьOTOH B�богьOTOH B�богьOTOH B�богьOTOH B�богьOTOH B�богьOTOH В�богьOTOH В�богьOTOH В�богьOTOH B�богьOTOH B�богьOTOH B�богьOTOH B�богьOTOH B�богьOTOH B�богьOTOH B�богьOTOH B�богьOTOH B�богвOTOH B�богвOTOH B�богвOTOH B�богьOTOH B�богьOTOH B�богьOTOH B�богьOTOH B�богьOTOH B�богьOTOH B�богьOTOH B�богьOTOH B�богьOTOH В�богьOTOH В�богьOTOH В�богьOTOH В�богьOTOH В�богьOTOH В�богьOTOH В�богьOTOH В�богьOTOH В�богьOTOH В�богьOTOH В�богьOTOH В�богвOTOH В�богвOTOH В�богвOTOH В�богвOTOH В�богвOTOH В�богвOTOH В�богвOTOH В�богвOTOH В�богвOTOH В�богвOTOH В�богвOTOH В�богвOTOH В�богвOTOH B�богьOTOH B�богьOTOH B�богьOTOH B�богьOTOH B�богьOTOH B�богьOTOH B�богьOTOH B�богьOTOH B�богьOTOH B�богьOTOH B�богьOTOH B�богвOTOH В�богвOTOH В�богвOTOH В�богвOTOH В�богвOTOH В�богвOTOH В�богвOTOH В�богвOTOH В�богвOTOH В�богвOTOH В�богвOTOH В�богвOTOH В�богьOTOH В�богьOTOH В�богьOTOH В�богьOTOH В�богьOTOH В�богьOTOH В�богьOTOH В�богьOTOH В�богьOTOH В�богьOTOH В�богьOTOH В�богвOTOH B�богвOTOH B�богвOTOH B�богвOTOH B�богвOTOH B�богвOTOH B�богвOTOH B�богвOTOH B�богвOTOH B�богвOTOH B�богвOTOH B�богвOTOH B�богьOTOH B�богьOTOH B�богвOTOH B�богвOTOH B�богвOTOH B�богвOTOH B�богвOTOH B�богвOTOH B�богвOTOH B�богвOTOH B�богвOTOH B�богвOTOH В�богвOTOH В�богвOTOH В�богвOTOH В�богвOTOH В�богвOTOH В�богвOTOH В�богвOTOH В�богвOTOH В�богвOTOH В�богвOTOH В�богвOTOH B�богвOTOH B�богвOTOH B�богвOTOH B�богвOTOH B�богвOTOH B�богвOTOH B�богвOTOH B�богвOTOH B�богвOTOH B�богвOTOH B�богвOTOH В�богвOTOH В�богвOTOH B�богвOTOH B�богвOTOH B�богвOTOH B�богвOTOH B�богвOTOH B�богвOTOH B�богвOTOH B�богвOTOH B�богвOTOH B�богьOTOH B�богьOTOH B�богьOTOH B�богвOTOH B�богвOTOH B�богвOTOH B�богвOTOH B�богвOTOH B�богвOTOH B�богвOTOH B�богвOTOH B�богвOTOH В�богвOTOH В�богвOTOH В�богвOTOH B�богвOTOH B�богвOTOH B�богвOTOH B�богвOTOH B�богвOTOH B�богвOTOH B�богвOTOH B�богвOTOH B�богьOTOH B�богьOTOH B�богвOTOH B�богьOTOH B�богвOTOH B�богвOTOH B�богвOTOH B�богвOTOH B�богвOTOH B�богвOTOH B�богвOTOH B�богвOTOH B�богвOTOH B�богвOTOH B�богвOTOH В�богвOTOH B�богвOTOH B�богвOTOH B�богвOTOH B�богвOTOH B�богвOTOH B�богвOTOH B�богвOTOH B�богвOTOH B�богвOTOH B�богвOTOH B�богьOTOH B�богвOTOH B�богвOTOH B�богвOTOH B�богвOTOH B�богвOTOH B�богвOTOH B�богвOTOH B�богвOTOH B�богвOTOH B�богвOTOH В��сдун В��сдун В��сдун В�мсдун В�мсдун В�мсдун В�мсдун В�мсдун В�мсдун В�мсдун В�мсдун В�мсдун В�мсдун В�мсдун В�мсдун В�мсду区 В�мсду区 В�мсду区 В�мсду区 В�мсду区 В�мсду区 В�мсду区 В�мсду区 В�мсду区 В�мсду区 В�мсду区 В�мсду区 В�мсду区 В�mсду区 В�mсду区 В�mсду区 В�mсду区 В�mсду区 В�mсду区 В�mсду区 В�mсду区 В�mсду区 В�mсду区 В�mсду区 В�mсду区 В�mсду区分 В�mсду区 В�mсду区 В�mсду区 В�mсду区 В�mсду区 В�mсду区 В�mсду区 В�mсду区 В�mсду区 В�mсду区 В�mсду区 В�mсду区 В�мсду区 В�mсду区 В�mсду区 В�mсду区 В�mсду区 В�mсду区 В�mсду区 В�mсду区 В�mсду区 В�mсду区 В�mсду区 В�mсду区分 В�mсду区分 В�mсду区 В�mсду区 В�mсду区 В�mсду区 В�mсду区 В�mсду区 В�mсду区 В�mсду区 В�mсду区 В�mсду区 В�mсду区 В�мсду区 В�мсду区 В�mсду区 В�mсду区 В�mсду区 В�mсду区 В�mсду区 В�mсду区 В�mсду区 В�mсду区 В�mсду区 В�mсду区分 В�mсду区 В�mсду区分 В�mсду区 В�mсду区 В�mсду区 В�mсду区 В�mсду区 В�mсду区 В�mсду区 В�mсду区 В�mсду区 В�mсду区 В�мсду区 В�mсду区 В�мсду区 В�mсду区 В�mсду区 В�mсду区 В�mсду区 В�mсду区 В�mсду区 В�mсду区 В�mсду区 В�mсду区 В�mсду区分 В�mсду区分 В�mсду区分 В�mсду区 В�mсду区 В�mсду区 В�mсду区 В�mсду区 В�mсду区 В�mсду区 В�mсду区 В�mсду区 В�mсду区 В�мсду区 В�мсду区 В�мсду区 В�mсду区 В�mсду区 В�mсду区 В�mсду区 В�mсду区 В�mсду区 В�mсду区 В�mсду区 В�mсду区分 В�mсду区 В�mсду区 В�mсду区分 В�mсду区 В�mсду区 В�mсду区 В�mсду区 В�mсду区 В�mсду区 В�mсду区 В�mсду区 В�mсду区 В�мсду区 В�mсду区 В�mсду区 В�мсду区 В�mсду区 В�mсду区 В�mсду区 В�mсду区 В�mсду区 В�mсду区 В�mсду区 В�mсду区 В�mсду区分 В�mсду区 В�mсду区分 В�mсду区分 В�mсду区 В�mсду区 В�mсду区 В�mсду区 В�mсду区 В�mсду区 В�mсду区 В�mсду区 В�mсду区 В�мсду区 В�mсду区 В�мсду区 В�мсду区 В�mсду区 В�mсду区 В�mсду区 В�mсду区 В�mсду区 В�mсду区 В�mсду区 В�mсду区 В�mсду区分 В�mсду区分 В�mсду区 В�mсду区分 В�mсду区 В�mсду区 В�mсду区 В�mсду区 В�mсду区 В�mсду区 В�mсду区 В�mсду区 В�mсду区 В�мсду区 В�мсду区 В�mсду区 В�мсду区 В�mсду区 В�mсду区 В�mсду区 В�mсду区 В�mсду区 В�mсду区 В�mсду区 В�mсду区 В�mсду区分 В�mсду区分 В�mсду区分 В�mсду区分 В�mсду区 В�mсду区 В�mсду区 В�mсду区 В�mсду区 В�mсду区 В�mсду区 В�mсду区 В�mсду区 В�мсду区 В�мсду区 В�мсду区 В�мсду区 В�mсду区 В�mсду区 В�mсду区 В�mсду区 В�mсду区 В�mсду区 В�mсду区 В�mсду区分 В�mсду区 В�mсду区 В�mсду区 В�mсду区分 В�mсду区 В�mсду区 В�mсду区 В�mсду区 В�mсду区 В�mсду区 В�mсду区 В�mсду区 В�мсду区 В�mсду区 В�mсду区 В�mсду区 В�мсду区 В�mсду区 В�mсду区 В�mсду区 В�mсду区 В�mсду区 В�mсду区 В�mсду区 В�mсду区分 В�mсду区 В�mсду区 В�mсду区分 В�mсду区分 В�mсду区 В�mсду区 В�mсду区 В�mсду区 В�mсду区 В�mсду区 В�mсду区 В�mсду区 В�мсду区 В�mсду区 В�mсду区 В�мсду区 В�мсду区 В�mсду区 В�mсду区 В�mсду区 В�mсду区 В�mсду区 В�mсду区 В�mсду区 В�mсду区分 В�mсду区 В�mсду区分 В�mсду区 В�mсду区分 В�mсду区 В�mсду区 В�mсду区 В�mсду区 В�mсду区 В�mсду区 В�mсду区 В�mсду区 В�мсду区 В�mсду区 В�мсду区 В�mсду区 В�мсду区 В�mсду区 В�mсду区 В�mсду区 В�mсду区 В�mсду区 В�mсду区 В�mсду区 В�mсду区分 В�mсду区 В�mсду区分 В�mсду区分 В�mсду区分 В�mсду区 В�mсду区 В�mсду区 В�mсду区 В�mсду区 В�mсду区 В�mсду区 В�mсду区 В�мсду区 В�mсду区 В�мсду区 В�мсду区 В�мсду区 В�mсду区 В�mсду区 В�mсду区 В�mсду区 В�mсду区 В�mсду区 В�mсду区 В�mсду区分 В�mсду区分 В�mсду区 В�mсду区 В�mсду区分 В�mсду区 В�mсду区 В�mсду区 В�mсду区 В�mсду区 В�mсду区 В�mсду区 В�mсду区 В�мсду区 В�мсду区 В�mсду区 В�mсду区 В�мсду区 В�mсду区 В�mсду区 В�mсду区 В�mсду区 В�mсду区 В�mсду区 В�mсду区 В�mсду区分 В�mсду区分 В�mсду区 В�mсду区分 В�mсду区分 В�mсду区 В�mсду区 В�mсду区 В�mсду区 В�mсду区 В�mсду区 В�mсду区 В�mсду区 В�мсду区 В�мсду区 В�mсду区 В�мсду区 В�мсду区 В�mсду区 В�mсду区 В�mсду区 В�mсду区 В�mсду区 В�mсду区 В�mсду区 В�mсду区分 В�mсду区分 В�mсду区分 В�mсду区 В�mсду区分 В�mсду区 В�mсду区 В�mсду区 В�mсду区 В�mсду区 В�mсду区 В�mсду区 В�mсду区 В�мсду区 В�мсду区 В�мсду区 В�mсду区 В�мсду区 В�mсду区 В�mсду区 В�mсду区 В�mсду区 В�mсду区 В�mсду区 В�mсду区 В�mсду区分 В�mсду区分 В�mсду区分 В�mсду区分 В�mсду区分 В�mсду区分 В�mсду区分 В�mсду区分 В�mсду区分 В�mсду区分 В�mсду区分 В�mсду区分 В�mсду区分 В�мсду区 В�mсду区 В�mсду区 В�mсду区 В�mсду区 В�mсду区 В�mсду区 В�mсду区 В�mсду区 В�mсду区 В�mсду区 В�mсду区 В�мсду区分 В�mсду区分 В�mсду区 В�mсду区 В�mсду区 В�mсду区 В�mсду区 В�mсду区 В�mсду区 В�mсду区 В�mсду区 В�mсду区 В�mсду区分 В�mсду区分 В�мсду区 В�mсду区 В�mсду区 В�mсду区 В�mсду区 В�mсду区 В�mсду区 В�mсду区 В�mсду区 В�mсду区 В�мсду区 В�mсду区 В�mсду区分 В�mсду区分 В�mсду区 В�mсду区 В�mсду区 В�mсду区 В�mсду区 В�mсду区 В�mсду区 В�mсду区 В�mсду区分 В�mсду区分 В�mсду区 В�mсду区 В�мсду区 В�mсду区 В�mсду区 В�mсду区 В�mсду区 В�mсду区 В�mсду区 В�mсду区 В�mсду区 В�mсду区 В�мсду区 В�mсду区 В�мсду区分 В�mсду区分 В�mсду区 В�mсду区 В�mсду区 В�mсду区 В�mсду区 В�mсду区 В�mсду区 В�mсду区 В�mсду区分 В�mсду区分 В�mсду区分 В�mсду区 В�мсду区 В�mсду区 В�mсду区 В�mсду区 В�mсду区 В�mсду区 В�mсду区 В�mсду区 В�mсду区 В�mсду区 В�mсду区 В�мсду区 В�mсду区分 В�mсду区分 В�mсду区 В�mсду区 В�mсду区 В�mсду区 В�mсду区 В�mсду区 В�mсду区 В�mсду区 В�mсду区 В�mсду区分 В�mсду区分 В�mсду区 В�мсду区 В�mсду区 В�mсду区 В�mсду区 В�mсду区 В�mсду区 В�mсду区 В�mсду区 В�mсду区 В�мсду区 В�mсду区 В�mсду区 В�mсду区分 В�mсду区分 В�mсду区 В�mсду区 В�mсду区 В�mсду区 В�mсду区 В�mсду区 В�mсду区 В�mсду区分 В�mсду区分 В�mсду区 В�mсду区 В�mсду区 В�мсду区 В�mсду区 В�mсду区 В�mсду区 В�mсду区 В�mсду区 В�mсду区 В�mсду区 В�mсду区 В�мсду区 В�mсду区 В�мсду区 В�mсду区分 В�mсду区分 В�mсду区 В�mсду区 В�mсду区 В�mсду区 В�mсду区 В�mсду区 В�mсду区 В�mсду区分 В�mсду区分 В�mсду区分 В�mсду区 В�mсду区 В�мсду区 В�mсду区 В�mсду区 В�mсду区 В�mсду区 В�mсду区 В�mсду区 В�mсду区 В�мсду区 В�mсду区 В�mсду区 В�mсду区 В�mсду区分 В�mсду区分 В�mсду区 В�mсду区 В�mсду区 В�mсду区 В�mсду区 В�mсду区 В�mсду区分 В�mсду区分 В�mсду区 В�mсду区 В�mсду区 В�mсду区 BOLmCIFLWUWYUWYUWYUWYUWYUWYUWYUWYUWYUWYUWYUWYUWYUWYUWYUWYUWYUWYUWYUWYUWYUWYUWYUWYUWYUWYUWYUWYUWYUWYUWYUWYUWYUWYUNA | |
| Симпоми можни | Прочны и ршени |
| Внатрeshнatable единиca сеушто ке разоти, дури и по пекиnot на еелкtripинatable еергija. | РабOTи Функцилatable воватско чир themselves. ДобOTи ВОзOTe и Нa Функцилatable воватско чир themselves Дд подOLЖИ, БИдЕКИ ja OTcTpaHbYа пeoctaHaTaТа ВЛага оД ВНaTpeShnOCTa на ВНaTpeShnAte EDINHua. Ако He ja cacate obaa Функцилja, можete Дд ja ИСКПУчITE ЕДINHua.Ta. |
| ИзлесOTа BOЗдух на Внатрeshнatable.edinHиca ис neuropstama marla. | ЛадноТВОздух od Клиma у畴OT создава магla. Оьо щehOMeH ce cIvyBa KORA doaЯdo Ha HAMaLByaHe Na co6Hata TemNepaTpya. |
| ИстEVув BA ODA od надВорeshнatable единиca. | 3a Врeme Ha onepaunite Ha rpeebe DoaЯdo Калеы Ha KOнDEH3riPahа ВODA od EMITyBaQOT Ha TOnLIHnA. Оьо сIMNTOM bapa ИнстALIPAhe Ha OДВODINO cpeBO IOd b3HNOT caD. KontakTnpajTe ja LInHOC7a RaHCTaJIIPAJBe. |
| ПостOTиБув Ад небраци. | 3ВуК Ha KLINKHyBaJIe Може Дд ceЧуе КORA edINHuaTA 3anOChyBa IIN Злару, Зардд ВИнжeTo Ho OБрathNtВ BeHTNl. 3ВуК Ha shkpineJE: Пл actTychNte DeIOBn Ha BHaTpeShnAte edINHua шkpINA附 KORA doaЯdo DO HINBHO CTechyBaJIe IIN ПroширУBaJIe 3apadi ненаджнite TepepatUPhI npomEHn. 3ВуК Ha teeuHBe IIN duBaJIe: Toa e teeuHBeTO Ha cpeCTBOTO 3a laJeHBe H3 Klinma у畴OT. Тoa ce HopMaJIHn CImNTOMn. БухаТа Ke 3anpe. |
| Внатрeshнatable единиca ondabva mprn36a. | МирзбITE (kaKo Na primeper Ha dInMOT od zuRapn) можат Дд boJAT ancopbupani Bo BHaTpeShnAte edINHua I da ce ocIobodyBaAT co пpoTOKOT Ha BOZdYxOT. Ако МирзбATA He nCye3He, Ke Mopa Дд ro N3MnTe ФиNTepOT. Ако He paBOTи, КонтakTnpajTe ro cEpBnCHNt Ocentap, 3a Дд ro ИСчNTITE emITepOT Ha TOnLIHnA. |
| Клиma у畴OT He ис neuropstata toponl BOZduyx. | Kora pexIMOT Ha rpeeJIe ke 3anOChE, OTBOPOT e cKopo 3aTBopeHи requSs нe ИЗлergуВа BOZduyx, Иako HauBopseShnAte edINHua pa6OTn. Toa e HopMaJIEN CImNTOM. Be moJIme nouekajte сe ДОдЕа edINHuaTа He COZdaDE DOBOJHNO TOONI BOZduyx, KojIStO ke cde DuBa HIN 3 BHaTpeShnAta eDINHua. |
| НадВорeshнatable.edinHua e BO pexIMOT 3a Odmp3HyBaJIe. Когу畴OT e BO pexIMOT Ha rpeeJIe, leedOT/mpa3OT ce sobpaatВp3 КалeMITE, akо доide do naRaJIe Ha HauBopseShnAte TemNepaTpya. Obaa ФункциJA ro OTcTpaHvBa cNoJot od Mpa3 KoJStO ce HAOrA Bp3 KaJIeMOT, И SF Травалда завши за Okoly 15 mInuTy. | |
| НадВорeshнatable Tempepatура e ремногу Hncka. ЕфektOT Ha rpeeJIe можe Дд He bide doBOJen. | |
| Симпоми можни | Прочны и рeshени |
| Вашnot Кужен anapatи смартфонот He ce порзано co Wi-Fi мрека. | Лоб生态系统а 3a Wi-Fi на кoeшто ce обидуне дуа ce поврзete, e неточна. • Нajдente ja Wi-Fi мрека на ловзана co вшиот смартфони отстранete ja, a поюа ренисторajte ro вшиот anapat на LG ThinQ. |
| Мышино падатои 3a вшиот смартфонс ce вklучени. • Исклuchete Ги Мбшино падатои на вшиот смартфони ренисторjetro anapatot, koprasteyки ja Wi-Fi мрека. | |
| И métета на бeзшино на мрека (SSID), He e правлино поесен. • И métета на bезшино на мрека (SSID) trpeba дa bide komбihuшиja od anглески bukви и sboеви. (He koprastete Ги спeциалнite karakтети) | |
| Ф��вени jo大自然а на рутетор He e 2,4 GHz. • Пodedжаян ecame 2,4 GHz Ф��вени jo на рутетор. Поставete ro bезшино рутетор 2,4 GHz и повзete ro anapatot co bезшино рутет. 3aда ja пobерпite Ф��вени jo大自然а на рутетор, рobерпete кaj вшиот снабдувач на снерnet услуги, пик кaj пози BodиелOT на рутетор. | |
| Пэропеме e pactojahнeto noméгу anapatot и рутетор. • Ако e пэропеме pactojahнeto noméгу anapatot и рутетор, сигданot можеда bide садь и кonekuшиа можеда He bide правлино конфигурирана. Поменete ja лokашиа на рутетор, заudence пobлися до anapatot. |
NOTE
Some functions may not be available, depending on the model.
USER MANUAL
AIR CONDITIONER

IMPORTANT SAFETY INSTRUCTIONS

WARNING
To reduce the risk of explosion, fire, death, electric shock, injury, or burns to persons when using this product, follow basic precautions, including the following:
Children in the household
This appliance is not intended for use by persons (including children) with reduced physical, sensory, or mental capabilities, or lack of experience and knowledge, unless they are under constant supervision or have been instructed on the use of the appliance by a person responsible for their safety. Children should be supervised to ensure that they do not play with the appliance.
- TABLE OF CONTENTS
- SAFETY INSTRUCTIONS
- OPERATION
- SMART FUNCTIONS
- MAINTENANCE
- TROUBLESHOOTING
- IMPORTANT SAFETY INSTRUCTIONS
- WARNING
- CHILDREN IN THE HOUSEHOLD
- FOR USE IN EUROPE
- INSTALLATION
- TECHNICAL SAFETY
- CAUTION
- NOTES FOR OPERATION
- SUGGESTION FOR ENERGY SAVING
- PARTS AND FUNCTIONS INDOOR UNIT OUTDOOR UNIT
- INDOOR UNIT DISPLAY
- NOTE
- WIRELESS REMOTE CONTROL INSERTING BATTERIES
- INSTALLING THE REMOTE CONTROL HOLDER
- OPERATING METHOD
- SETTING THE CURRENT TIME
- USING THE °C/°F CONVERSION FUNCTION (OPTIONAL)
- OPERATING THE AIR CONDITIONER WITHOUT THE REMOTE CONTROL
- TYPE
- USING WIRELESS REMOTE CONTROL
- RESTARTING THE AIR CONDITIONER AUTOMATICALLY
- DISABLING AUTO RESTART
- USING THE MODE FUNCTION
- COOLING MODE
- AUTO OPERATION (ARTIFICIAL INTELLIGENCE)
- MULTI MODEL
- AUTO CHANGEOVER MODE
- SINGLE SPLIT MODEL
- DEHUMIDIFICATION MODE
- HEATING MODE
- FAN MODE
- USING THE JET MODE FUNCTION CHANGING ROOM TEMPERATURE QUICKLY
- USING THE FAN SPEED FUNCTION
- ADJUSTING THE FAN SPEED
- USING THE AIR FLOW DIRECTION FUNCTION
- SETTING THE ON/OFF TIMER
- SETTING THE ON TIMER
- CANCELING THE ON TIMER
- SETTING THE OFF TIMER
- CANCELING THE OFF TIMER
- CANCELING THE TIMER SETTING
- USING THE SLEEP FUNCTION (OPTIONAL)
- USING THE SIMPLE TIMER FUNCTION (OPTIONAL)
- USING THE ENERGY DISPLAY FUNCTION (OPTIONAL)
- DISPLAY THE CURRENT ENERGY USAGE
- USING THE LIGHT OFF FUNCTION (OPTIONAL)
- DISPLAY SCREEN BRIGHTNESS
- USING THE COMFORT AIR FUNCTION (OPTIONAL)
- COMFORT VANE OPERATION
- USING THE ENERGY CONTROL FUNCTION (OPTIONAL)
- USING SPECIAL FUNCTIONS
- CANCELING SPECIAL FUNCTIONS
- USING THE AIR PURIFICATION FUNCTION
- USING THE SILENT FUNCTION
- USING THE AUTO CLEAN FUNCTION
- LG THINQ APPLICATION
- LG THINQ APPLICATION FEATURES
- SMART DIAGNOSIS
- SETTINGS
- BEFORE USING LG THINQ APPLICATION
- INSTALLING THE LG THINQ APPLICATION
- OPEN SOURCE SOFTWARE NOTICE INFORMATION
- USING LG THINQ TO DIAGNOSE ISSUES
- USING AUDIBLE DIAGNOSIS TO DIAGNOSE ISSUES
- CLEAN THE AIR FILTER
- SELF-DIAGNOSIS FUNCTION
- BEFORE CALLING FOR SERVICE
- OWNER'S MANUAL
- AIR CONDITIONER
- ACCESSORIES
- WIRELESS REMOTE CONTROL
- TUN
- TNN
- ABEJIENKKA
- I3NOJ3BAHE HA 6E3KNUHOTO DNCTAHNOHHO
- ABEJIEXKA
- A6EJIEXKA
- SWITCHING THE TIMER ON AND OFF
- SETTING THE TIMER FOR SWITCHING ON
- CANCELLING THE TIMER FOR SWITCHING ON
- SETTING THE TIMER FOR SWITCHING OFF
- DELAY
- CANCELING THE TIMER FOR SWITCHING OFF
- USING THE FUNCTION FOR STANDARD TIMER (OPTIONAL)
- USING THE FUNCTION TO DISPLAY CONSUMED ENERGY (OPTIONAL)
- DISPLAYING CURRENT ENERGY CONSUMPTION
- USING THE FUNCTION TO TURN OFF THE DISPLAY (OPTIONAL)
- OPEN SOURCE SOFTWARE
- ФУНКЦЯЗАИМОГНOCTKA
- IPEI DA CE O6ANTE HA CEPBN3HNUEHTBP
- USE
- DANGER
- WHEN INSERTING THE BATTERIES
- HOW TO INSTALL THE LG THINQ APPLICATION
- LG THINQ" PROGRAM CHARACTERISTICS
- DISPLAY BRIGHTNESS
- COMFORT AIR OPERATION
- INDOOR UNIT OUTDOOR UNIT
- REMOTE CONTROL SIGNAL
- REMOTE CONTROLLER
- BATTERY INSTALLATION
- INSTALLING THE REMOTE CONTROLLER HOLDER
- METHOD OF OPERATION
- INSERT THE BATTERIES
- USE OF THE °C/°F CONVERSION FUNCTION (OPTIONAL)
- OPERATION WITH THE DEVICE WITHOUT REMOTE CONTROL
- USING THE WIRELESS REMOTE CONTROLLER
- ENABLING THE AUTOMATIC RESTART FUNCTION
- AUTOMATIC OPERATION (INTELLIGENT FAN)
- AUTOMATIC FAN MODE
- POSSIBLE OPERATION
- USING THE SLEEP MODE FUNCTION
- FEATURES OF THE LG THINQ APPLICATION
- PROCESSING
- BEFORE USING THE LG THINQ APPLICATION
- OPEN SOURCE SOFTWARE NOTICE
- USING LG THINQ TO DIAGNOSE PROBLEMS
- USING AUDIBLE DIAGNOSIS TO DIAGNOSE PROBLEMS
- CLEANING AND MAINTENANCE
- CLEANING THE FILTER
- FUNCTION OF SELF-DIAGNOSIS
- TO REQUEST SERVICE
- USER MANUAL
Brand : LG
Model : AC18BQ
Category : Air conditioner