
S09ET - Air-conditioner LG - Free user manual and instructions
Find the device manual for free S09ET LG in PDF.
| Product Type | Wall-mounted split air conditioner |
| Brand | LG |
| Model | S09ET |
| Refrigerant | R32 (flammable) |
| Power Supply | 220-240 V ~ 50 Hz (standard estimate) |
| Remote Control Batteries | 2 AAA batteries (1.5 V) |
| Operating Modes | Cooling, heating, dehumidification, fan, auto |
| Special Functions | Jet mode, sleep, On/Off timer, swing, air comfort, energy control, silence, auto-clean, ionizer, plasma |
| Air Filter Cleaning Interval | Every 2 weeks |
| Anti-Allergen Filter Cleaning Interval | Every 6 months |
| Connectivity | Wi-Fi 2.4 GHz, LG ThinQ app, Smart Diagnosis |
| Auto Restart | Yes (restores settings after power failure) |
| Self-Diagnosis | Yes (flashing indicator if error) |
| Safety | Grounding mandatory, emergency stop, overcurrent protection (circuit breaker) |
| Installation | Must be performed by a certified professional |
| Annual Professional Maintenance | Cleaning coils, fan, condensate pan, checking connections |
| Dimensions (Indoor Unit) | Not specified in the manual |
| Weight (Indoor Unit) | Not specified in the manual |
| Included Accessories | Remote control, batteries, remote control holder (optional) |
| Repairability | User-accessible filters; internal repairs by a professional |
Frequently Asked Questions - S09ET LG
User questions about S09ET LG
0 question about this device. Answer the ones you know or ask your own.
Ask a new question about this device
Download the instructions for your Air-conditioner in PDF format for free! Find your manual S09ET - LG and take your electronic device back in hand. On this page are published all the documents necessary for the use of your device. S09ET by LG.
USER MANUAL S09ET LG
Read this owner's manual thoroughly before operating the appliance and keep it handy for reference at all times.
TYPE: WALL MOUNTED
Original instruction
EN ENGLISH
FR FRANÇAIS
EL EAAHNIKA
NL NEDERLANDS
PL POLSKI
HU MAGYAR
BG BbIgAPCKN
HR HRVATSKI
CZ CESTINA
ET EESTI
MT MALTI
RO ROMÁNA
SK SLOVENCINA
SL SLOVENsCINA
LV LATVIEŠU
LT LIETUVIU
GA GAEILGE
SR SRPSKI
MKMAKEIOHCKN
SQ SHQIP
BS BOSANSKI
TABLE OF CONTENTS
This manual may contain images or content different from the model you purchased.
This manual is subject to revision by the manufacturer.
SAFETYINSTRUCTIONS 3
IMPORTANT SAFETY INSTRUCTIONS 4
OPERATION 11
Notes for Operation 11
Parts and Functions 11
Wireless Remote Control. 12
Restarting the Air Conditioner Automatically 17
Using the Mode Function 17
Using the Jet Mode Function 20
Using the Fan Speed Function 21
Using the Air Flow Direction Function. 21
Setting the On/Off Timer 22
Using the Sleep Function (Optional) 23
Using the Simple Timer Function (Optional) 23
Using the Energy Display Function (Optional) 24
Using the Light Off Function (Optional) 24
Using the Comfort Air Function (Optional) 24
Using the Energy Control Function (Optional) 25
Using Special Functions 25
SMART FUNCTIONS 27
LG ThinQ Application 27
Smart Diagnosis 29
MAINTENANCE 30
Clean the Air Filter 32
Clean the Allergy Filter (Optional) 33
TROUBLESHOOTING 34
The following safety guidelines are intended to prevent unforeseen risks or damage from unsafe or incorrect operation of the appliance.
The guidelines are separated into 'WARNING' and 'CAUTION' as described below.

This symbol is displayed to indicate matters and operations that can cause risk. Read the part with this symbol carefully and follow the instructions in order to avoid risk.

WARNING
This indicates that the failure to follow the instructions can cause serious injury or death.

CAUTION
This indicates that the failure to follow the instructions can cause the minor injury or damage to the product.
The following symbols are displayed on indoor and outdoor units. (for R32)

This symbol indicates that this appliance uses a flammable refrigerant. If the refrigerant is leaked and exposure to an external ignition source, there is a risk of fire.

This symbol indicates that the Operation Manual should be read carefully.

This symbol indicates that a service personnel should be handling this equipment with reference to the Installation Manual.

This symbol indicates that information is available such as the Operating Manual or Installation Manual.
IMPORTANT SAFETY INSTRUCTIONS

WARNING
To reduce the risk of explosion, fire, death, electric shock, injury or scalding to persons when using this product, follow basic precautions, including the following:
Children in the Household
This appliance is not intended for use by persons (including children) with reduced physical, sensory or mental capabilities, or lack of experience and knowledge, unless they have been given supervision or instruction concerning use of the appliance by a person responsible for their safety. Children should be supervised to ensure that they do not play with the appliance.
For use in Europe:
This appliance can be used by children aged from 8 years and above and persons with reduced physical, sensory or mental capabilities or lack of experience and knowledge if they have been given supervision or instruction concerning use of the appliance in a safe way and understand the hazards involved. Children shall not play with the appliance. Cleaning and user maintenance shall not be made by children without supervision.
Installation
- Do not install the air conditioner on an unstable surface or in a place where there is danger of it falling.
-
Contact an authorized service center when installing or relocating the air conditioner.
-
Install the panel and the cover of the control box safely.
-
Do not install the air conditioner in a place where flammable liquids or gases such as gasoline, propane, paint thinner, etc., are stored.
-
Make sure that the pipe and the power cable connecting the indoor and outdoor units are not pulled too tight when installing the air conditioner.
-
Use standard circuit breaker and fuse that conform to the rating of the air conditioner.
-
Do not input air or gas into the system except with the specific refrigerant.
-
Use non-flammable gas (nitrogen) to check for leak and to purge air; using compressed air or flammable gas may cause fire or explosion.
- The indoor/outdoor wiring connections must be secured tightly, and the cable should be routed properly so that there is no force pulling the cable from the connection terminals. Improper or loose connections can cause heat generation or fire.
- Install dedicated electric outlet and circuit breaker before using the air conditioner.
- Do not connect the ground wire to a gas pipe, a lightning rod, or a telephone ground wire.
- Keep any required ventilation openings clear of obstruction. (for R32)
-
Means for disconnection must be incorporated in the fixed wiring in accordance with the wiring rules.
-
Do not install the unit in potentially explosive atmospheres.
Operation
-
Be sure to use only those parts listed in the service parts list. Never attempt to modify the equipment.
-
Make sure that children do not climb on or hit the outdoor unit.
- Dispose of the batteries in a place where there is no danger of fire.
-
Use only the refrigerant specified on the air conditioner label.
-
Cut off the power supply if there is any noise, smell, or smoke coming from the air conditioner.
-
Do not leave flammable substances such as gasoline, benzene, or thinner near the air conditioner.
-
Contact an authorized service center when the air conditioner is submerged by flood waters.
-
Do not use the air conditioner for an extended period of time in a small place without proper ventilation.
-
In the event of a gas leak (such as Freon, propane gas, LP gas, etc.) ventilate sufficiently before using the air conditioner again.
-
Be sure to ventilate sufficiently when the air conditioner and a heating appliance such as a heater are used simultaneously.
-
Do not block the inlet or outlet of air flow.
-
Do not insert hands or other objects through the air inlet or outlet while the air conditioner is operating.
-
Make sure that the power cable is neither dirty, loose, nor broken.
-
Never touch, operate, or repair the air conditioner with wet hands.
-
Do not place any objects on the power cable.
-
Do not place a heater or other heating appliances near the power cable.
-
Do not modify or extend the power cable. Scratches or peeling insulation on the power cables may result in fire or electric shock, and should be replaced.
-
Cut off the power supply immediately in the event of a blackout or a thunderstorm.
-
Take care to ensure that power cable could not be pulled out or damaged during operation.
- Do not touch refrigerant pipe, water pipe and any internal parts while the unit is operating or immediately after operation.
Maintenance
- Do not clean the appliance by spraying water directly onto the product.
- Before cleaning or performing maintenance, disconnect the power supply and wait until the fan stops.
Technical Safety
- Installation or repairs made by unauthorized persons can pose hazards to you and others.
-
Any person who is involved with working on or breaking into a refrigerant circuit should hold a current valid certificate from an industry-accredited assessment authority, which authorizes their competence to handle refrigerants safely in accordance with an industry recognized assessment specification. (for R32)
Servicing shall only be performed as recommended by the equipment manufacturer. Maintenance and repair requiring the assistance of other skilled personnel shall be carried out under the supervision of the person competent in the use of flammable refrigerants. (for R32) -
The information contained in the manual is intended for use by a qualified service technician who is familiar with the safety procedures and equipped with the proper tools and test instruments.
-
Failure to read and follow all instructions in this manual can result in equipment malfunction, property damage, personal injury and/or death.
-
The appliance shall be installed in accordance with national wiring regulations.
-
When the power cord is to be replaced, the replacement work shall be performed by authorized personnel using only genuine replacement parts.
- This appliance must be properly grounded to minimize risk of electric shock.
-
Do not cut or remove the grounding prong from the power plug.
-
Attaching the earth wire to the power outlet cover screw does not ground the appliance unless the cover screw is metal, uninsulated, and the power outlet is grounded through house wiring.
- If you have any doubt whether the air conditioner is properly grounded, have the power outlet and circuit checked by a qualified electrician.
- The refrigerant and insulation blowing gas used in the appliance require special disposal procedures. Consult a service agent or a similarly qualified person before disposing of them.
- If the supply cord is damaged, it must be replaced by the manufacturer, its service agent or similarly qualified person in order to avoid a hazard.
- The appliance shall be stored in a well-ventilated area where the room size corresponds to the room area as specified for operation. (for R32)
- The appliance shall be stored in a room without continuously operating open flames (for example an operating gas appliance) and ignition sources (for example an operating electric heater). (for R32)
- The appliance shall be stored so as to prevent mechanical damage from occurring. (for R32)

CAUTION
To reduce the risk of minor injury to persons, malfunction, or damage to the product or property when using this product, follow basic precautions, including the following:
Installation
- Do not install the air conditioner in an area where it is directly exposed to sea wind (salt spray).
- Install the drain hose properly for the smooth drainage of water condensation.
Exercise caution when unpacking or installing the air conditioner. -
Do not touch the leaking refrigerant during installation or repair.
-
Transport the air conditioner with two or more people or use a forklift.
-
Install the outdoor unit such that it is protected from direct sunlight. Do not place the indoor unit in a place where it is directly exposed to sunlight via the windows.
-
Safely dispose of packing materials such as screws, nails, plastic bag or batteries using proper packaging after installation or repair.
-
Install the air conditioner in a place where the noise from the outdoor unit or the exhaust fumes will not inconvenience the neighbors. Failure to do so may result in conflict with the neighbors.
Operation
-
Remove the batteries if the remote control is not to be used for an extended period of time.
-
Make sure that the filter is installed before operating the air conditioner.
- Be sure to check if there is a refrigerant leak after installing or repairing the air conditioner.
- Do not place any object on the air conditioner.
- Never mix different types of batteries, or old and new batteries for the remote control.
- Do not let the air conditioner run for a long time when humidity is very high or when a door or a window has been left open.
- Stop using the remote control if there is a fluid leak in the battery. If your clothes or skin are exposed to the leaking battery fluid, wash off with clean water.
- Do not expose people, animals, or plants to the cold or hot wind from the air conditioner for extended periods of time.
- If the leaking battery fluid has been swallowed, rinse the inside of the mouth thoroughly and consult a doctor.
- Do not drink the water drained from the air conditioner.
- Do not use the product for special purposes, such as preserving foods, works of art, and etc. It is an air conditioner for consumer purposes, not a precision refrigeration system. There is risk of damage or loss of property.
- Do not recharge or disassemble the batteries.
Maintenance
-
Never touch the metal parts of the air conditioner when removing the air filter.
-
Use a sturdy stool or ladder when cleaning, maintaining, or repairing the air conditioner at a height.
- Never use strong cleaning agents or solvents when cleaning the air conditioner or spray water. Use a smooth cloth.
- To clean the interior, contact an authorized service center or dealer. Using harsh detergents may cause corrosion or damage to the unit.
OPERATION
Notes for Operation
Suggestion for Energy Saving
- Do not over-cool the space. This may be harmful for your health and may consume more electricity.
- Block sunlight with blinds or curtains while you are operating the air conditioner.
- Keep doors or windows closed tightly while you are operating the air conditioner.
- Adjust the direction of the air flow vertically or horizontally to circulate indoor air.
- Speed up the fan to cool or warm indoor air quickly, within a short period of time.
- Open windows regularly for ventilation. The indoor air quality may deteriorate if the air conditioner is used for long durations.
- Clean the air filter once every 2 weeks. Dust and impurities collected in the air filter may block the air flow or reduce the unit performance.
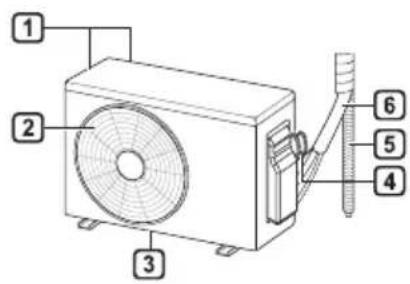
Parts and Functions
Indoor Unit Outdoor Unit
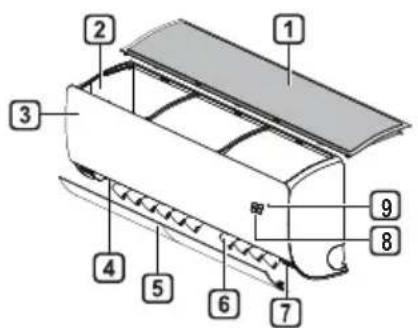
Air Filter
Air Intake
3 Front Cover
4 Air Outlet
5 Air Deflector (Horizontal Vane)
6 Air Deflector (Vertical Louver)
7 On/Off Button
8 Display
9 Signal Receiver
Air Intake Vents
Air Outlet Vents
3 Base Plate
4 Power Supply Cable
5 Drain Hose
6 Refrigerant Pipes
NOTE
- The number and location of operation lamps may vary according to the model of the air conditioner.
The feature may be changed according to the type of model.
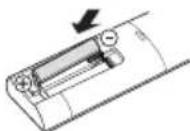
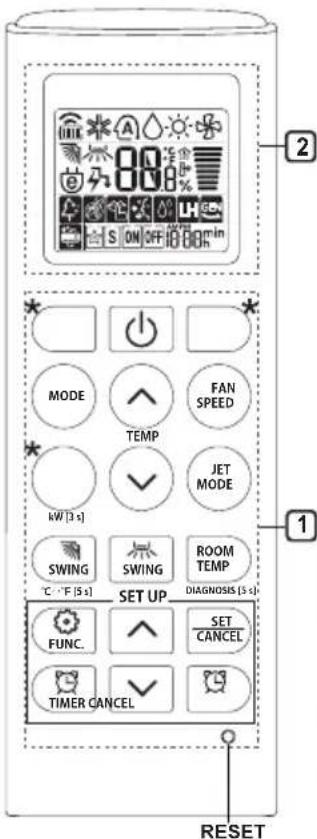
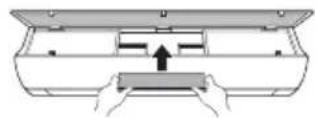
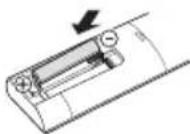
Wireless Remote Control Inserting Batteries
If the display screen of the remote control begins to fade, replace the batteries. Insert AAA (1.5 V) batteries before using the remote control.
1 Remove the battery cover.
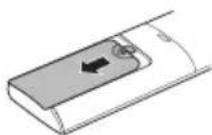
2 Insert the new batteries and make sure that the + and - terminals of the batteries are installed correctly.
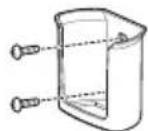
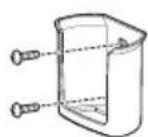
Installing the Remote Control Holder (Optional)
To protect the remote control, install the holder where there is no direct sunlight.
1 Choose a safe and easily accessible location.
Fix the holder by fastening 2 screws firmly with a screwdriver.
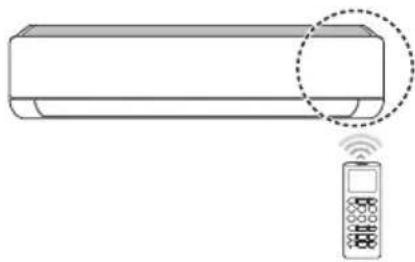
Operating Method
Point the remote control towards the signal receiver at the right side of the air conditioner to operate it.

NOTE
- The remote control may operate other electronic devices if it is directed towards them. Make sure to point the remote control towards the air conditioner signal receiver.
- For proper operation, use a soft cloth to clean the signal transmitter and receiver.
In case of a function not provided in the product, no buzzer sound occurs from the product when a button for such function on the remote control is pressed except for Air Flow Direction (SWING), Energy Display (kW[3 s]), Air Purification function
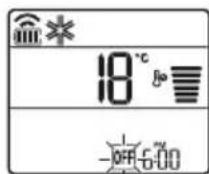
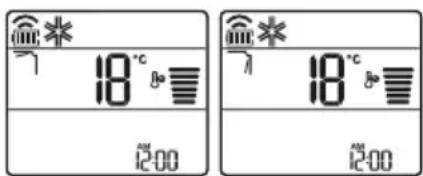
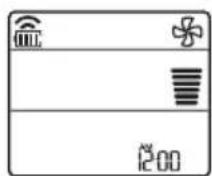
Setting the Current Time
1 Insert batteries.
- The icon below blinks at the bottom of the display screen.

2 Press or button to select the minutes.
3 Press SET/CANCEL button to finish.
NOTE
- The On/Off Timer is available after setting the current time.
Using the ^ C / ^ F Conversion Function (Optional)
This function changes unit between ^ C and ^ F
Press and hold button about 5 seconds.
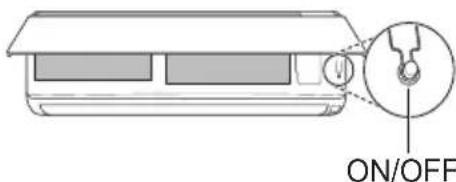
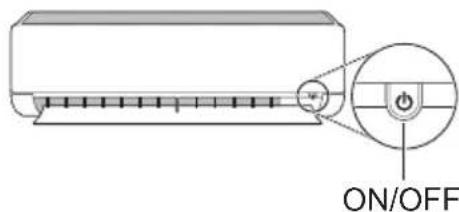
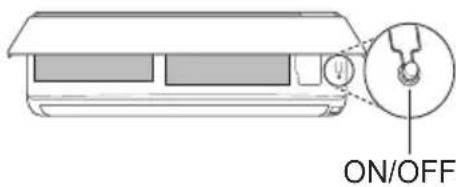
Operating the Air Conditioner without the Remote Control
You can use the ON/OFF button of the indoor unit to operate the air conditioner when the remote control is unavailable.
1 Open the front cover (Type2) or horizontal vane (Type1).
2 Press the ON/OFF button.
Type1
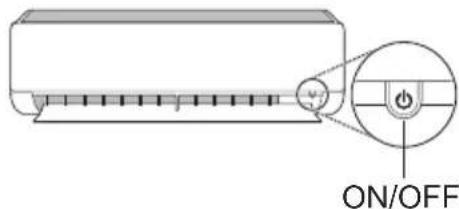
Type2
NOTE
- The stepping motor may be broken, if the horizontal vane opens rapidly.
The fan speed is set to high.
The feature may be changed according to the type of model.
The temperature cannot be altered when using this emergency ON/OFF button. - For cooling & heating models, the temperature is set from 22^ to 24^
Using Wireless Remote Control
You can operate the air conditioner more conveniently with the remote control.
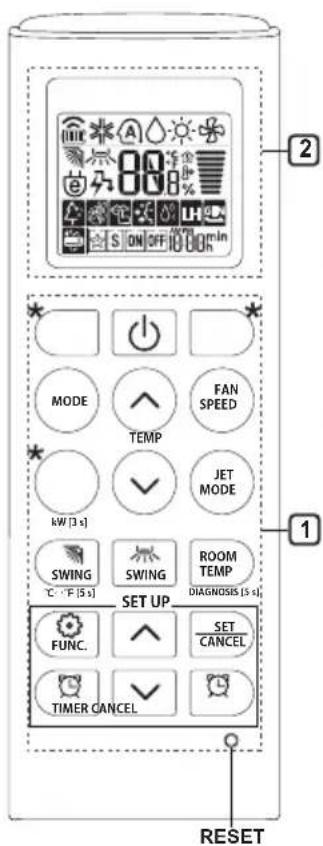
| 1Button | 2DisplayScreen | Description | Available Function | |
| SingleSplit | Multi | |||
| - | To turn on/off the air conditioner. | ○ | ○ | |
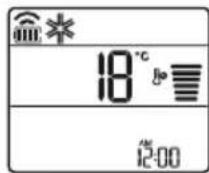
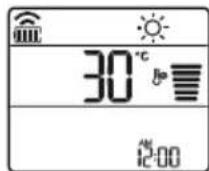
| TEMP | 88°C | To adjust the desired room temperature in cooling, heating or auto changeover mode. | ○ | ○ |
| MODE | ※ | To select the cooling mode. | ○ | ○ |
| ○ | To select the heating mode. | ○ | ○ | |
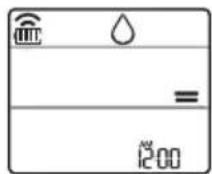
| △ | To select the dehumidification mode. | ○ | ○ | |
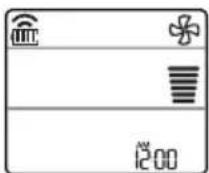
| ○ | To select the fan mode. | ○ | ○ | |
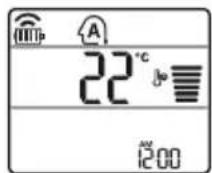
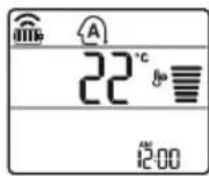
| A | To select the auto changeover/auto operation mode. | ○ | ○ | |
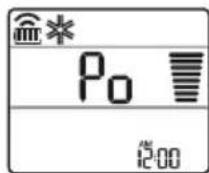
| JET MODE | Po | To change room temperature quickly. | ○ | ○ |
| FAN SPEED | || | To adjust the fan speed. | ○ | ○ |
| SWING SWING | To adjust the air flow direction vertically or horizontally. | ○ | ○ | |
NOTE
-
- buttons may be changed according to the type of model.
- When connected to the Multi Outdoor unit, the Energy Display, Energy Control, Silent and Smart Diagnosis function may not be supported.
| 1Button | 2DisplayScreen | Description | Available Function | |
| SingleSplit | Multi | |||
| TIMER | ON OFF | To turn on/off air conditioner automatically at desired time. | ○ | ○ |
| SET/CANCEL | - | To set/cancel the special functions and timer. | ○ | ○ |
| CANCEL | - | To cancel the timer settings. | ○ | ○ |
| - To adjust time. ○○ | ||||
| *LIGHTOFF | - | To set the brightness of the display on the indoor unit. | ○ | ○ |
| ROOMTEMP | To display the room temperature. | ○ | ○ | |
| °C←°F[5 s] | °C°F | To change unit between °C and °F | ○ | ○ |
| *COMFORTAIR | To adjust the air flow to deflect wind. | ○ | ○ | |
| kW[3 s] | - | To set whether or not to display information regarding energy. | ○ | × |
| *ENERGYCTRL. | 88 x | To bring the effect of the power saving. | ○ | × |
| DIAGNOSIS[5 s] | - | To conveniently check maintenance information of a product. | ○ | × |

| 1 Button | 2 Display Screen | Description | Available Function | |
| Single Split | Multi | |||
| FUNC. | The Ion generator uses millions of ions to help improve indoor air quality. | O (Optional) | O (Optional) | |
| To reduce noise from outdoor units. | O | X | ||
| To remove moisture generated inside the indoor unit. | O | O | ||
| RESET - | To initialize the remote control settings. | O | O | |
NOTE
- Some functions may not be supported, depending on the model.
-
- buttons may be changed according to the type of model.
- Press the SET/CANCEL button to operate the selected FUNC..
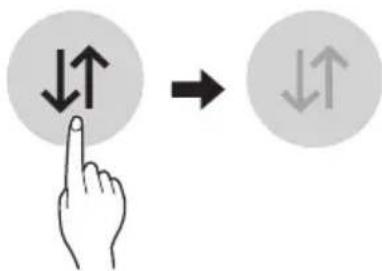
Restarting the Air Conditioner Automatically
When the air conditioner is turned on again after a power failure, this function restores the previous settings.
Disabling Auto Restart
1 Open the front cover (Type2) or horizontal vane (Type1).
2 Press the ON/OFF button and hold it for 6 seconds, then the unit will beep twice and the lamp will blink twice 4 times.
To re-enable the function, press the ON/ OFF button and hold it for 6 seconds. The unit will beep twice and the lamp will blink 4 times.
Type1
Type2
NOTE
The feature may be changed according to the type of model.
- If you press and hold the ON/OFF button for 3 - 5 seconds, instead of 6 seconds, the unit will switch to the test operation. In the test operation, the unit blows out strong cooling air for 18 minutes and then returns to factory default settings.
Using the Mode Function
This function allows you to select the desired function.
| * | Cooling Mode |
| ↓ | |
| A | Auto Changeover Mode / Auto Operation(AI) Mode |
| ↓ | |
| ○ | Dehumidification Mode |
| ↓ | |
| - | Heating Mode |
| ↓ | |
| * | Fan Mode |
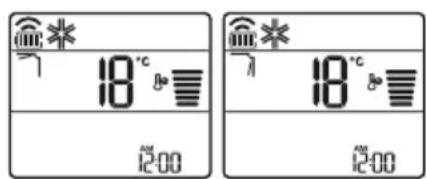
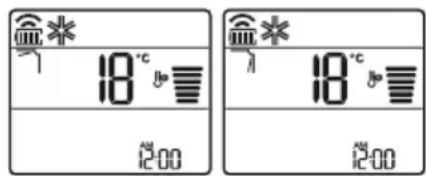
Cooling Mode
1 Turn the appliance on.
2 Press MODE button repeatedly to select the Cooling Mode.
- is displayed on the display screen.
3 Press button to set the desired temperature.
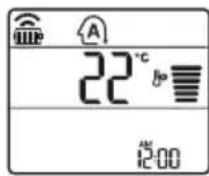
Auto Operation (Artificial Intelligence)
Multi Model
In this operation mode, the system is automatically operated by the electronic controls.
1 Turn the appliance on.
2 Press MODE button repeatedly to select the Auto Operation.
A is displayed on the display screen.
3 Press or button to set the desired temperature.
4 Press FAN SPEED button to adjust the fan speed.
Auto Changeover Mode
Single Split Model
This mode changes the mode automatically to maintain the set temperature at ± 2^
1 Turn the appliance on.
2 Press MODE button repeatedly to select the Auto Changeover Mode.
A is displayed on the display screen.
3 Press or button to set the desired temperature.
4 Press FAN SPEED button to adjust the fan speed.
Dehumidification Mode
This mode removes excess moisture from a highly humid environment or during the rainy season, in order to prevent mildew from setting in. This mode adjusts the room temperature and the fan speed automatically to maintain the optimal level of humidity.
1 Turn the appliance on.
2 Press MODE button repeatedly to select the Dehumidification Mode.
is displayed on the display screen.
NOTE
- In this mode you cannot adjust the room temperature, it is adjusted automatically.
- The room temperature is not displayed on the display screen.
- In the dehumidification mode, compressor and indoor fan may not operate when the room temperature is below 24^
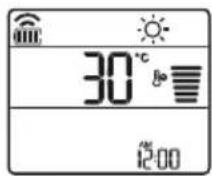
Heating Mode
1 Turn the appliance on.
2 Press MODE button repeatedly to select the Heating Mode.
is displayed on the display screen.
3 Press or button to set the desired temperature.
NOTE
will be displayed on the indoor unit when defrosting is operating.
-
Furthermore, this indication will be displayed on the indoor unit:
-
When preheating is operating.
- When the room temperature has been reached to the set temperature.
Fan Mode
This mode only circulates the indoor air without changing the room temperature.
1 Turn the appliance on.
2 Press MODE button repeatedly to select the Fan Mode.
is displayed on the display screen.
3 Press FAN SPEED button to adjust the fan speed.
NOTE
or will be displayed on the indoor unit when fan mode is operating.
Using the Jet Mode Function Changing Room Temperature Quickly
This function allows you to cool indoor air quickly during the summer or warm it quickly during winter.
- The Jet Mode function is available with Cooling, Heating and Dehumidification Mode.
1 Turn the appliance on.
2 Press MODE button repeatedly to select the desired mode.
3 Press JET MODE button.
_0 is displayed on the display screen.
NOTE
- Jet Heating Mode is not available on some models.
- In Jet Cooling Mode, strong air blows out for 30 minutes.
After 30 minutes later, setting temperature is maintaining 18^ If you want to change the temperature, Press
or button to set the desired temperature.
- In Jet Heating Mode, strong air blows out for 30 minutes.
After 30 minutes later, setting temperature is maintaining 30^ If you want to change the temperature, Press
or button to set the desired temperature. - This function may operate differently from the remote control display.
Using the Fan Speed Function
Adjusting the Fan Speed
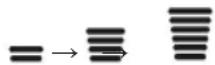
- Press FAN SPEED button repeatedly to adjust the fan speed.
| Display Screen Speed | |
| High | |
| Medium - High | |
| Medium | |
| Medium - Low | |
| Low | |
| - Natural Wind | |
NOTE
- The fan speed of Natural Wind adjusts automatically.
- The fan speed icons are displayed on some indoor units.

- Indoor unit display is displayed only 5 seconds and return to the setting temperature on some models.
Using the Air Flow Direction Function
This function adjusts the direction of the air flow vertically (horizontally).
- Press SWING (SWING) button repeatedly and select the desired direction.
-Select () to adjust the direction of the air flow automatically.
NOTE
- Adjusting the air flow direction horizontally may not be supported, depending on the model.
- Adjusting the air deflector arbitrarily may cause product failure.
- If you restart the air conditioner, it starts to operate with the previously set direction of air flow, so the air deflector may not match the icon displayed on the remote control. When this occurs, press SWING or SWING button to adjust the direction of the air flow again.
- This function may operate differently from the remote control display.
Setting the On/Off Timer
This function sets the air conditioner to turn on/ off automatically at desired time.
On/Off Timer can be set together.
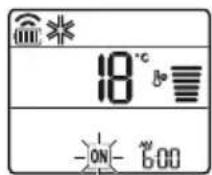
Setting the On Timer
1 Press button repeatedly.
- The icon below blinks at the bottom of the display screen.

2 Press or button to select the minutes.
3 Press SET/CANCEL button to finish.
After setting the timer, current time and ON icon are displayed on the display screen indicating that the desired time is set.
Canceling the On Timer
1 Press button repeatedly.
- The icon below blinks at the bottom of the display screen.
2 Press SET/CANCEL button to cancel the setting.
Setting the Off Timer
1 Press button repeatedly.
- The icon below blinks at the bottom of the display screen.
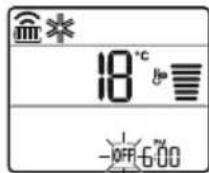
2 Press or button to select the minutes.
3 Press SET/CANCEL button to finish.
After setting the timer, current time and OFF icon are displayed on the display screen indicating that the desired time is set.
NOTE
- This function is disabled when you set Simple Timer.
Canceling the Off Timer
1 Press button repeatedly.
- The icon below blinks at the bottom of the display screen.
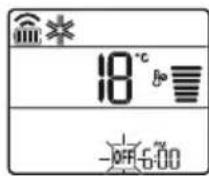
2 Press SET/CANCEL button to cancel the setting.
Canceling the Timer Setting
- Press button to cancel all timer settings.
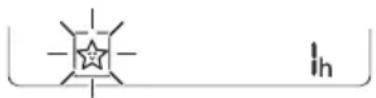
Using the Sleep Function (Optional)
This function turns off the air conditioner automatically when you go to sleep.
1 Turn the appliance on.
2 Press button repeatedly.
- The icon below blinks at the bottom of the display screen.
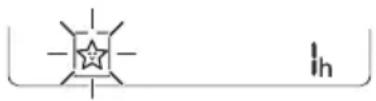
3 Press Yr button to select the hour (up to 7 hours).
4 Press SET/CANCEL button to finish.
is displayed on the display screen.
NOTE
is displayed on some indoor units.
- Indoor unit display is displayed from 1H to 7H which is displayed only 5 seconds and then return to the setting temperature.
- In the Cooling and Dehumidification Mode, the temperature increases by 1^ after 30 minutes and additional 1^ after another 30 minutes for a more comfortable sleep.
- The temperature increases up to 2^ from the preset temperature.
- Although the remark for fan speed on the display screen may be changed, the fan speed is adjusted automatically.
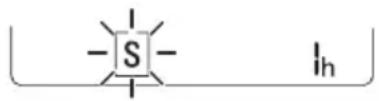
Using the Simple Timer Function (Optional)
This function turns off the air conditioner automatically when you go to sleep.
1 Turn the appliance on.
2 Press button repeatedly.
- The icon below blinks at the bottom of the display screen.
3 Press or button to select the hour (up to 7 hours).
4 Press SET/CANCEL button to finish. is displayed on the display screen.
NOTE
- This function is disabled when you set Off Timer.
Using the Energy Display Function (Optional)
This function displays the amount of electricity generated on the indoor display as the product operates.
Display the Current Energy Usage
1 Turn the appliance on.
2 Press button and hold it about 3 seconds.
The instantaneous power consumption (BB) is displayed for a while on some indoor units.
NOTE
The unit of the displayed value is kW.
It is not displayed on the wireless remote control.
If it is more than 99kW which is the range of expression, maintain it as 99kW .
- Display wattage under 10kW with 0.1kW unit, and display one over 10kW with 1kW unit.
- The actual power may differ from the power displayed.
- When connected to the Multi Outdoor unit, this function may not be supported.
Using the Light Off Function (Optional)
Display Screen Brightness
You can set the brightness of the indoor unit display screen.
- Press LIGHT OFF button.
NOTE
- Turn on/off the Display screen.
- If the brightness of an indoor appliance's display is set to OFF, pressing a button on the remote control automatically turns the display on for a while.
- This function may operate differently, depending on the model.
Using the Comfort Air Function (Optional)
Comfort Vane Operation
This function conveniently sets the vane to a preset position to deflect the supply air away from blowing directly onto the occupants in the room.
1 Turn the appliance on.
2 Press COMFORT AIR button repeatedly and select the desired direction.

NOTE
or Lis displayed on some indoor units.
- This function is disabled when you press MODE or JET MODE button.
This function is disabled and auto swing of vertical direction is set up when you press button.
- When this function is off, the horizontal vane operates automatically depending on the set mode.
Using the Energy Control Function (Optional)
1 Turn the appliance on.
2 Press ENERGY CTRL. button.
- Press ENERGY CTRL. button repeatedly to select each step.
- 1 step : The power Input is decreased by 20% compared to rated power input.
80 is displayed on the display screen. - 2 step : The power Input is decreased by 40 % compared to rated power input.
60 is displayed on the display screen. - 3 step (Optional): The power Input is decreased by 60% compared to rated power input.
40 is displayed on the display screen.
80 (1 step), 62 step), (3 step) is displayed on some indoor units.
(1 step), (2 step) is displayed on some indoor units.) - This function is available with Cooling Mode.
- Capacity may decrease when Energy Control mode is selected.
- Desired temperature is displayed about 5 seconds if you press FAN SPEED, or button.
- Room temperature is displayed about 5 seconds if you press ROOM TEMP button.
- When connected to the Multi Outdoor unit, this function may not be supported.
Using Special Functions
1 Turn the appliance on.
2 Press FUNC. button repeatedly to select the desired function.
3 Press SET/CANCEL button to finish.
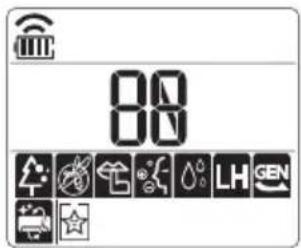
| Display Screen | Description |
| The Ion generator uses millions of ions to help improve indoor air quality. | |
| To reduce noise from outdoor units. | |
| To remove moisture generated inside the indoor unit. |
NOTE
Some functions may not be supported, depending on the model.
Some functions may operate differently from the remote control display.
Canceling Special Functions
1 Press FUNC. button repeatedly to select the desired function.
2 Press SET/CANCEL button to cancel the function.
Using the Air Purification Function
These functions supply clean and fresh air by ion particles and the filter.
| Function Display Description | |
| Ionizer | Ion particles from lonizer reduce the surface bacteria and other harmful substances. |
| Plasma | It removes microscopic contaminants from the intake air completely to supply clean and fresh air. |
NOTE
- You can use this function without turning the air conditioner on.
- Both the plasma lamp and the cooling lamp light up while Smoke Away/Plasma is in operation on some models.
- Do not touch ionizer during operation.
- This function may operate differently from the remote control display.
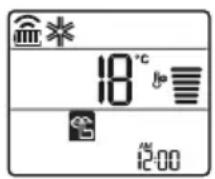
Using the Silent Function
This function prevents potential claims by neighbors, reducing noise from outdoor units.

is displayed on the display screen.
NOTE
- This function is disabled when you press MODE or ENERGY CTRL. or JET MODE button.
- This function is available with Cooling, Heating, Auto Changeover, Auto Operation Mode.
- When connected to the Multi Outdoor unit, this function may not be supported.
Using the Auto Clean Function
In the Cooling and Dehumidification Mode, moisture is generated inside the indoor unit. This function removes such moisture.

is displayed on the display screen.

NOTE
- Some functions cannot be used while the Auto Clean function is in operation.
- If you turn off the unit, the fan continues to run for 30 minutes and cleans the inside of the indoor unit.
is displayed on some indoor units, depending on the model.
LG ThinQ Application
This feature is only available on models with the or ThinQ logo.
The LG ThinQ application allows you to communicate with the appliance using a smartphone.
LG ThinQ Application Features
Communicate with the appliance from a smartphone using the convenient smart features.
Smart Diagnosis
If you experience a problem while using the appliance, this smart diagnosis feature will help you diagnose the problem.
Settings
Allows you to set various options on the appliance and in the application.
NOTE
If you change your wireless router, internet service provider, or password, delete the registered appliance from the LG ThinQ application and register it again.
- The application is subject to change for appliance improvement purposes without notice to users.
- Functions may vary by model.
Before Using LG ThinQ Application
1 Check the distance between the appliance and the wireless router (Wi-Fi network).
- If the distance between the appliance and the wireless router is too far, the signal strength becomes weak. It may take a long time to register or installation may fail.
2 Turn off the Mobile data or Cellular Data on your smartphone.
3 Connect your smartphone to the wireless router.
NOTE
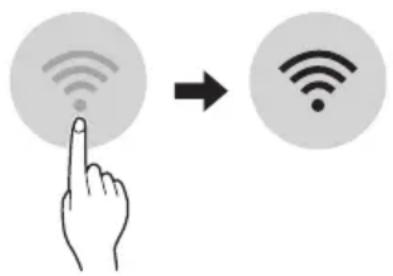
To verify the Wi-Fi connection, check that icon on the control panel is lit.
- The appliance supports 2.4 GHz Wi-Fi networks only. To check your network frequency, contact your Internet service provider or refer to your wireless router manual.
- LG ThinQ is not responsible for any network connection problems or any faults, malfunctions, or errors caused by network connection.
- If the appliance is having trouble connecting to the Wi-Fi network, it may be too far from the router. Purchase a Wi-Fi repeater (range extender) to improve the Wi-Fi signal strength.
- The Wi-Fi connection may not connect or may be interrupted because of the home network environment.
- The network connection may not work properly depending on the Internet service provider.
-
The surrounding wireless environment can make the wireless network service run slowly.
-
The appliance cannot be registered due to problems with the wireless signal transmission. Unplug the appliance and wait about a minute before trying again.
- If the firewall on your wireless router is enabled, disable the firewall or add an exception to it.
- The wireless network name (SSID) should be a combination of English letters and numbers. (Do not use special characters.)
- Smartphone user interface (UI) may vary depending on the mobile operating system (OS) and the manufacturer.
- If the security protocol of the router is set to WEP, you may fail to set up the network. Please change it to other security protocols (WPA2 is recommended) and register the product again.
Installing the LG ThinQ Application
Search for the LG ThinQ application from the Google Play Store or Apple App Store on a smartphone. Follow instructions to download and install the application.
Open Source Software Notice Information
To obtain the source code that is contained in this product, under GPL, LGPL, MPL, and other open source licenses that have the obligation to disclose source code, and to access all referred license terms, copyright notices and other relevant documents please visit https:// opensource.lge.com.
LG Electronics will also provide open source code to you on CD-ROM for a charge covering the cost of performing such distribution (such as the cost of media, shipping, and handling) upon email request to opensource@lge.com.
This offer is valid to anyone in receipt of this information for a period of three years after our last shipment of this product.
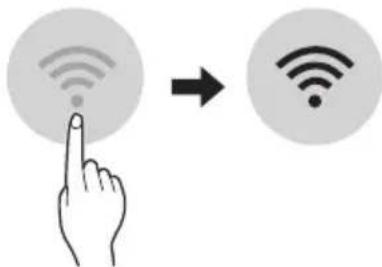
Smart Diagnosis
This feature is only available on models with the or logo.
Use this feature to help you diagnose and solve problems with your appliance.
NOTE
- For reasons not attributable to LGE's negligence, the service may not operate due to external factors such as, but not limited to, Wi-Fi unavailability, Wi-Fi disconnection, local app store policy, or app unavailability.
- The feature may be subject to change without prior notice and may have a different form depending on where you are located.
Using LG ThinQ to Diagnose Issues
If you experience a problem with your Wi-Fi equipped appliance, it can transmit troubleshooting data to a smartphone using the LG ThinQ application.
- Launch the LG ThinQ application and select the Smart Diagnosis feature in the menu. Follow the instructions provided in the LG ThinQ application.
Using Audible Diagnosis to Diagnose Issues
Follow the instructions below to use the audible diagnosis method.
-
Launch the LG ThinQ application and select the Smart Diagnosis feature in the menu. Follow the instructions for audible diagnosis provided in the LG ThinQ application.
Plug the power plug in the outlet properly.
2 Place the mouthpiece of your smartphone close to the or logo.
3 Press and hold the DIAGNOSIS [5 s] button for 5 seconds or longer while holding the smartphone mouthpiece to the logo until the data transfer is complete. -
Keep the smartphone in place until the data transfer has finished. Time remaining for data transfer is displayed.
4 After the data transfer is complete, the diagnosis will be displayed in the application.
NOTE
- For best results, do not move the phone while the tones are being transmitted.
- Be sure to keep ambient noise to a minimum or the phone may not correctly receive the buzzer beeps from the indoor unit.

WARNING
- Before cleaning or performing maintenance, disconnect the power supply and wait until the fan stops.
If the air conditioner will not be used for an extended period of time, dry the air conditioner to maintain it in best condition. Clean the product regularly to maintain optimal performance and to prevent possible breakdown.
- Dry the air conditioner in Fan mode for 3 to 4 hours and disconnect the power. There may be internal damage if moisture is left in its components.
- Before using the air conditioner again, dry the inner components of the air conditioner in Fan mode for 3 to 4 hours. This will help to remove the odor generated from moisture.

The feature may be changed according to the type of model.
| Type Description | Option Interval | |
| AirFilterClean | with a vacuum or hand wash. 2 weeks | |
| Allergy Filter Clean | clean with a vacuum or brush. Every 6 months | |
| Ionizer (Optional) | Use dry cotton bud to remove any dust. Every 6 months | |
| IndoorUnit | Cleantheindoorunitsurfacebyusingasoft, drycloth.Regularly | |
| Have a professional clean the condensate drain pan. Once a year | ||
| Have a professional clean the condensate drain pipe. Every 4 months | ||
| Replace the remote control batteries. Once a year | ||
| OutdoorUnit | Have a professional clean the heat exchanger coils and the panel vents. (Consult with technician.) | Once a year |
| Have a professional clean the fan. Once a year | ||
| Have a professional clean the condensate drain pan. Once a year | ||
| Have a professional verify that all the fan assembly is firmly tightened. | Once a year | |
| Clean the electric components with air. Once a year |
NOTE
- Never use water that is higher than 40^ when you clean the filters. It may cause deformation or discoloration.
- Never use volatile substances when you clean the filters. They may damage the surface of the product.
- Do not wash the allergy filter with water, because the filter can be damaged (Optional).
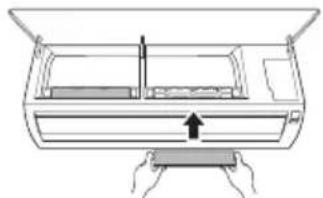
Clean the Air Filter
Clean the air filters once every 2 weeks, or more, if necessary.
NOTE
The air filter can be broken when it is bent.
- When the air filter is not assembled correctly, dust and other substances can enter into the indoor unit.
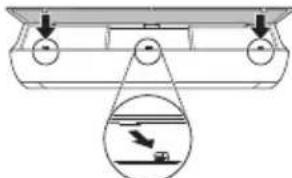
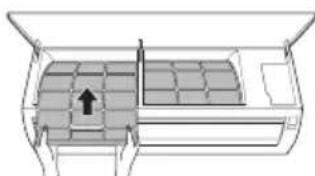
Type1
If you look at the indoor unit from above it, can assemble the top filter easily.
1 Turn off the power to the unit.
2 Hold the knobs of the air filter, lift it up slightly.

3 Remove it from the indoor unit.
4 Clean the filter with a vacuum cleaner or with lukewarm water with neutral detergent.
5 Dry the filter in the shade.
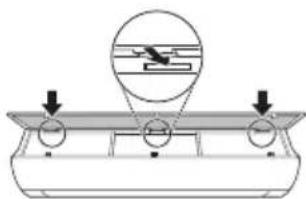
6 Insert the hooks of the air filter into the front cover.
7 Push down hooks to assemble the air filter.
8 Check the side of the front cover for correct assembly of the air filter.
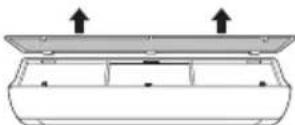
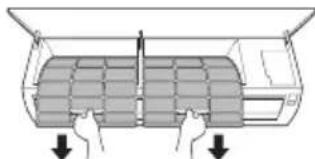
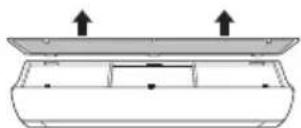
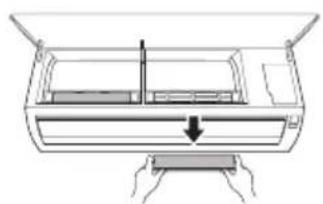
Type2
1 Turn off the power to the unit.
2 Open the front cover.
- Lift up both sides of the cover slightly.
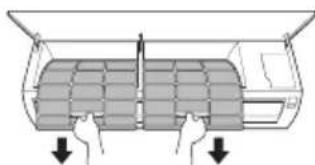
3 Hold the knobs of the air filters, pull them down slightly and remove them from the indoor unit.
4 Clean the filters with a vacuum cleaner or with lukewarm water with neutral detergent.
5 Dry the filters in the shade.
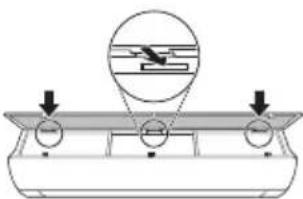
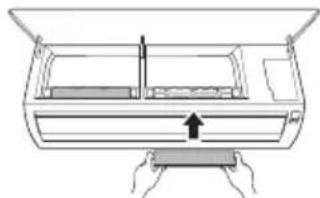
6 Insert the hooks of the air filters into the front cover.

7 Check the side of the front cover for correct assembly of the air filters.
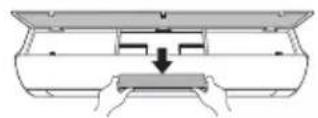
Clean the Allergy Filter (Optional)
1 Turn off the power to the unit.
2 Remove the air filter from the indoor unit.
3 Remove the allergy filter from the indoor unit.
Type1
Type2
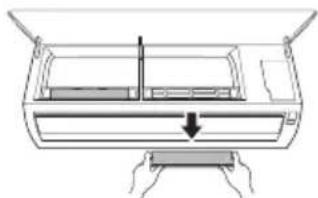
4 Clean the filter with a vacuum cleaner.
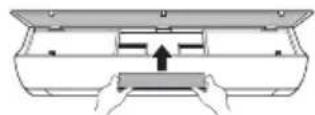
5 Inserttheallergyfilter.
Type1
Type2

6 Assemble the air filter.
7 Check the side of the front cover for correct assembly of the air filter.
NOTE
The feature and location of allergy filter may vary according to the type of model.
Self-diagnosis Function
This product has a built-in self-diagnosis function. If an error occurs, the lamp of the indoor unit will blink in 2 second intervals. If this occurs, contact your local dealer or service center.
Before Calling for Service
Please check the following before you contact the service center. If the problem persists, contact your local service center.
| Symptoms Possible Causes & Solution | |
| The air conditioner does not work normally. | Burning smell and strange sounds are coming from the unit. ·Turn off the air conditioner, switch OFF, or disconnect the power supply, and contact the service center. |
| Water leaks from the indoor unit even when the humidity level is low. ·Turn off the air conditioner, switch OFF, or disconnect the power supply, and contact the service center. | |
| The power cable is damaged or it is generating excessive heat. ·Turn off the air conditioner, switch OFF, or disconnect the power supply, and contact the service center. | |
| A switch, a circuit breaker (safety, ground), or a fuse is not operated properly. ·Turn off the air conditioner, switch OFF, or disconnect the power supply, and contact the service center. | |
| The unit generates an error code from its self-diagnosis. ·Turn off the air conditioner, switch OFF, or disconnect the power supply, and contact the service center. | |
| The air conditioner does not work. | The air conditioner is unplugged. ·Check whether the power cord is plugged into the outlet or the power isolators are switched on. |
| A fuse exploded, or the power supply is blocked. ·Replace the fuse or check if the circuit breaker has tripped. | |
| A power failure has occurred. ·Turn off the air conditioner when a power failure occurs. ·When the power is restored, wait 3 minutes, and then turn on the air conditioner. | |
| The voltage is too high or too low. ·Check if the circuit breaker has tripped. | |
| The air conditioner was turned off automatically at a preset time. ·Turn the air conditioner on. | |
| The battery setting in the remote controller is incorrect. ·Make sure that the batteries are inserted correctly in your remote controller. ·If the batteries are placed correctly, but the air conditioner still does not operate, replace the batteries and try again. | |
| Symptoms Poss | ble Causes & Solution |
| The air conditioner does not emit cool air. | Air is not circulating properly. • Make sure that there are no curtains, blinds, or pieces of furniture blocking the front of the air conditioner. |
| The air filter is dirty. • Clean the air filter once every 2 weeks. • See “Clean the Air Filter” for more information. | |
| The room temperature is too high. • In summer, cooling the indoor air fully may take some time. In this case, select the Jet Mode to cool the indoor air quickly. | |
| Cold air is escaping from the room. • Make sure that no cold air is escaping through the ventilation points in the room. | |
| The desired temperature is higher than the current temperature. • Set the desired temperature to a level lower than the current temperature. | |
| There is a heating source nearby. • Avoid using heat generators like electric ovens or gas burners while the air conditioner is in operation. | |
| Fan Mode is selected. • During Fan Mode, air blows from the air conditioner without cooling or heating the indoor air. • Switch the operation mode to cooling operation. | |
| Outside temperature is too high. • The cooling effect may not be sufficient. | |
| The fan speed cannot be adjusted. | The Jet Mode, or Auto Operation Mode is selected. • In some operation modes, you cannot adjust the fan speed. Select an operation mode in which you can adjust the fan speed. |
| The temperature cannot be adjusted. | The Fan Mode or Jet Mode is selected. • In some operation modes, you cannot adjust the temperature. Select an operation mode in which you can adjust the temperature. |
| The air conditioner stops during operation. | The air conditioner is suddenly turned off. • The Timer Function may have timed out, which turns the unit off. Check the timer settings. |
| A power failure has occurred during operation. • Wait for the power to come back. If you have the Auto Restart function enabled, your unit will resume its last operation several minutes after power is restored. | |
| Symptoms Possible Causes & Solution | |
| The indoor unit is still operating even when the unit has been turned off. | The Auto Clean function is being operated. ·Allow the Auto Clean function to continue since it removes any remaining moisture inside the indoor unit. If you do not want this feature, you can turn the unit off. |
| The air outlet on the indoor unit is discharging mist. | The cooled air from the air conditioner makes mist. ·When the room temperature decreases, this phenomenon will disappear. |
| Water leaks from the outdoor unit. | In the heating operations, condensed water drops from the heat exchanger. ·This symptom requires installing a drain hose under the base pan. Contact the installer. |
| There is noise or vibration. | A clicking sound can be heard when the unit starts or stops due to movement of the reversing valve. Creaking sound: The plastic parts of the indoor unit creak when they shrink or expand due to sudden temperature changes. Flowing or Blowing sound: This is the flow of refrigerant through the air conditioner. ·These are normal symptoms. The noise will stop. |
| The indoor unit gives off an odor. | Odors (such as cigarette smoke) may be absorbed into the indoor unit and discharged with airflow. ·If the smell does not disappear, you need to wash the filter. If this does not work, contact the service center to clean your heat exchanger. |
| The air conditioner does not emit warm air. | When Heating Mode starts, the vane is almost closed, and no air comes out, even though the outdoor unit is operating. ·This symptom is normal. Please wait until the unit has generated enough warm air to blow through the indoor unit. |
| The outdoor unit is in Defrosting Mode. ·In Heating Mode, ice/frost is built up on the coils when the outside temperature falls. This function removes a layer of frost on the coil, and it should finish in approximately 15 minutes. | |
| Outside temperature is too low. ·The heating effect may not be sufficient. | |
| Your home appliance and smartphone is not connected to the Wi-Fi network. | The password for the Wi-Fi that you are trying to connect to is incorrect. ·Find the Wi-Fi network connected to your smartphone and remove it, then register your appliance on LG ThinQ. |
| Mobile data for your smartphone is turned on. ·Turn off the Mobile data of your smartphone and register the appliance using the Wi-Fi network. | |
| The wireless network name (SSID) is set incorrectly. ·The wireless network name (SSID) should be a combination of English letters and numbers. (Do not use special characters.) | |
| The router frequency is not 2.4 GHz. ·Only a 2.4 GHz router frequency is supported. Set the wireless router to 2.4 GHz and connect the appliance to the wireless router. To check the router frequency, check with your Internet service provider or the router manufacturer. | |
| The distance between the appliance and the router is too far. ·If the distance between the appliance and the router is too far, the signal may be weak and the connection may not be configured correctly. Move the location of the router so that it is closer to the appliance. | |
NOTE
- Some functions may not be supported, depending on the model.
Memo
MANUEL DU PROPRIÉTAIRE
CLIMATISATION

Smart Diagnosis (Diagnostic intelligent) 29
MAINTENANCE 30
Application LG ThinQ
Smart Diagnosis (Diagnostic intelligent)
Smart Diagnosis (Diagnostic intelligent)
- TnV oOvN Emuavicetai
ZHMEIΩSH
Autn n aeitoupyia attevepyoioietai otav opioetev Xpovodiaakottn Atevepyooinan.
XpnoTnS AetoupyiaS PpoBoLnS EvepyiaS (ProaipTeiko)
Me autn tn aeitoupyia evarici t n nooorta peuatoC Tou npayetai otyn oovtnc eoepikns movadac evw aeitoupye to pioiov.
PpOBoLn Tns TpExouoac XpnOns EvepyEiaC
1 EvpyoToinTe Tn oukeun.
2 NaTnOte To KouuPTi O kai KpatnoTe To yia 3 δeutepoλeTTa.
HOTiyiaia katavaawon evepyeic 8) eupavicieta iia liyo oe opioevesc movaoec eoTEPIKOU xwpou.
ZHMEIΩsH
H movada tnc eupaviizoevns tiin civai kW.
- ev εμφαviζεται στο ασύρματο τηλεχειριόπίρι.
Eav evai eyaalute np aTio 99 kW, Tou Ppoketai ia to Eupoc ekppaonS, diatnpnoTe tn 99 kW.
- Eμφáviən iαxúoc kατω από 10 kW με μováδa 0,1 kW, kα εμφáviən μiaç πανω από 10 kW με μováδa 1 kW.
Htpaymuatikn ixus evexetai va diapepei aTTO nV epaaviocuevn ixu.
Kata tn ouvdoon me tny eWTEpiKn movada TtllaaTlauu tuTou, autn n aeitoupyia mtopei va uny uttoptpietai.
XpnoTnG AeioupyiaC O s (Piopaipetiko)
IpeBOD Ha opnHnHaHnHOTo pKOBODCTBO
Toba pkoBOcTO BO MOKe Da cbDbpKa
H3o6paKHeNn CbDbPkaHne, pa3nUHO OT
MoEJa, KOITO CTe 3aKyNil.
PbKOBOIDCTBOTO NOJIeKHa peJaKUa O T npOn3BOIDNTeJIa.
MHCTPYKUN 3A BE3OJACHOCT. 3
Baxkni nHctpykuin 3a 6e3oNaChocT 4
EKCPILOATAU 11
Belenkno ekcnnoataaeta 11
Uactn n fynkun 11
Baxnn nHctpyKu nn 3a 6e30nacnoct
I PEPdUYPEXKeHNE
3a Да Намал ntepncka OT noxap, eJekTpueckn ydap nHapaHЯBaHnHa Xopa npu ynoTpe6bHa npoDyKta, Tpr6Ba Da ce Cna3BaT OCHOBnTe ppeDna3HN MepKN, BKJIIOHTeJHoN i Cnejnte :
HaTnCHHeTe 6yToHbAng (Swing) HeKoJIKOkPaTHO nI36peTe XeJHaHata Nocoka.
- 136epeTcTa da perynnpaTe NocokataHa Bb3dyuHnI NOtOK aBTOMaTHUHO.
3A6EJIEXKA
- PerynpaHTo Ha Nocokata Ha Bb3dyuHnI NOtOK Do Xopn3oHTaIIHa No3uZnM OMe Da He Ce PoNDbPka B 3aBNCIMOCT OT MoJeNa.
- Поньното ретулране на Вьзуня
- Deфпектор може за довetedо поюраза на пordукта.
- Ako pectapntpate KINMaTnKa,Toi 3anOuBa da pa60tn C NOcNeIHO HAcTpoEHaTa Nocoka Ha Bb3dyuHnra NOTOK, Taka Ye Bb3dyuHnraT DeΦJIeKTop MoKe Da He CbOTBeTCTBa Ha IKoHaTa, NOKa3aHa Ha DnCTaHnOHHOTO. Korato TOBa ce cnUHy, HATNCHEte ByTOHa SWING JIN SWING, 3a da peryInpate OTHOBO NOCOKaTa Bb3dyuHnra NOTOK.
Pa6oTaHa Ta3nФyHKuM0Ke Da ce pa3NuaBa npu n3NoJ3BaHe OT dncnner Ha dNCTaHcNOHHOTO.
BkIIOUBaHe n N3KJIIOUBaHe Ha TaMepa
Ta3nФункцин HabcpoьВаКЛIMaTHkaДа ce N3KJIIOUBa/BKJIIOUBA aBTOMaTNUHOBKeJHaHOTo BpeMe.
TaimepbT 3a BkI./n3KJI. MoKe Ia 6bJe 3aJaDeH 3aEHO C TOBa.
3aandaBaHe Ha TaIMeP 3a BKNIOUcBaHe
1 HaTnCHHe 6yToHa TIMER HEKOJIKKpaTHO.
- IKoHaTa no-dOJy Mura BdoJHaTa YacT Ha DnCnIe.

2 HaTnCHTe 6yToHa ,3a da n36epTe MNHyTnte.
3 HaTnCHTe 6yToHa SET/CANCEL, 3a da 3aBbPunTe HAcTpOuBaHeTO.
CneHacrpoBaHeToHaTainMepaTekyuToBpeMeNkoHaTa NOKa3BaHTeKpaHa,KOeTOPOKa3Ba,YeXeJAHOTOBpeMe e3aJaDeHO.
OTMЯHa Ha TaMepa 3a BkIIOUBaHe
1 HaTnCHHe 6yToHa HEKoJIKOKpaTHO.
- IKoHaTa no-dOJy MraBdoJHata Yact Ha DnCnne.

2 Hatachete 6yToHa SET/CANCEL 3a OTMaHa Ha HactpoKaTa.
3aandaBaHe Ha TaIMeP 3a N3KIIuOyBaHe
1 HaTnCHeTe 6yToHa TIMER heKOJIKKpaTHO.
- IKohata no-dony Mura B doJHata yact Ha dncnne.

2 HaTnCHHe 6yToHa nn ,3a da n36epTe MNHyTnte.
3 HaTnchTe 6byToHa SET/CANCEL, 3a da 3aBbPunTe HAcTpOuBaHeTo.
CneHacTpoBaHeToHa TaMepaTekyoTO BpeMe INKoHaTa Oe NOKa3BaT Ha ekpaHa, KOeTO NOKa3Ba, Ye XeJaHOTo BpeMe e 3aandaHo.
3ABEJIEXKA
Ta3nФyHKuIe 3a6paHeHa, KOraTo HAcTpoBbTe ,CtAndapTeH TaMep".
OTMЯHa Ha TaɪMepa 3a N3KNIOUbaHe
1 HaTnchete 6yToHa TIMER heKOJIKKpaTHO.
- IKohata no-dony Mura BdoJHata yact Ha dncnne.
2 HataChete 6yToHa SET/CANCEL 3a OTMaHa Ha HacTpoiKaTa.
OTMЯHa Hactpo'kaTa Ha TaMepa
HaTnCHHe 6yToH,3a Da OTMeHnTe BCnKn HAcTpOuKn Ha TaMepa.
N3noJ3BaHe Ha yHKuYTa 3a 3acnBaHe (no n36op)
Ta3nФyHKUryN3KIIuYBa KJIIMaTtKa aBTOMaTtHuHO, KOraTO CN JIraTe.
1 BkIIOUte ypeia.
2 HaTnCHeTe 6yToHa TIMER HEKOJIKKpAHO.
- IKohata no-dony Mra B doHaTa Yact Ha DnCnIe.
3 HaTnCHeTe 6yToHa nn , 3a da n36peTe yaca (do 7 yaca).
4 HaTnchete 6yToHa SET/CANCEL,3a Da 3aBbPunTe HAcTpOuBaHeTo.

ce noka3Ba Ha ekpaHa.
3A6EJIEXKA

Ce NOKa3Ba Ha HЯKoBbTpewHn TeJa.
- Диспелгов На ВьтpeшOTO ТANO NOKA3BA OT 1 уdo 7 у Което ce Вижда само за 5 сек, сnéдКоето ce Врьша до Habстpoикata HaTemпература.
BpeKIM Ha oxJaXdAne n 3CyJbAbe TeMnepaTpata ce yBeJIuYabac 1 ^ C cIe30 MNHTN IOnbJIHNTeIeH 1 ^ C cIeO OSe 30 MNHTN 3a NO-KOMOpTeH cbH.
Tempepatypata ce noBuaBa cdo 2^ ot npedbapntelno 3aanaeHaTa Tempepatypa.
- Bbnpekn ye ot6eJ3BaHeto Ha ckopocTtHa BeHTnIaTopa Ha dinCpIe MoKe Da ce npomEn, CKOpocTtHa BeHTnIaTopa ce perynipa ABTomatNo.
N3noJ3BaHe Ha yHKunra 3a cTaHdapTeH TaMep (no n36Op)
Ta3nФyHKUryN3KNIOvBa KJIMaTnKa aBTOMaTnHOr, KOraTO CN JIraTe.
1 BkIIOUte ypea.
2 HATINCHETe 6yToHa TIMER HEKOKOKpaTHO.
- IkoHaTa no-dOJy Mura BdoJHaTa YacT Ha DnCnIe.
3HaTnchHeTe 6yToHa nn,3a da n36epTe yaca (do7yaca).
4 HataHcHeTe 6yToHa SET/CANCEL,3a da 3aBbPUnTe HaCTpoiBaHeto.
S ce noka3Ba Ha ekpaHa.
3A6EJIEXKA
- Ta3n ΦyHKUe 3a6paHeHa, KOraTo HAcTpoBAte TaIMepa 3a N3KIIIOvBaHe.
I3noJ3BaHe Ha cyHKcnaTa 3a noka3BaHe Ha n3pa3XoJeHaTa eHepn (no n36op)
Ta3nФункия nOKa3Ba KOnIueCTBOTO
H3pa3xoDbaHa eNEKtpuYecka eHeprna Ha DIncPnpe
Ha BbTppeShOTo TAno, DOKaTo npOdyKTbT pa6OTn.
Ioka3BaHe Ha TeKyuatau3pa3XoDbHa eHepnra
1 BkIIOUte ypea.
2 HataHcHeTe 3aApbXTe 6yToHa 0 Kw[3s] 3a oKoNo 3 ceKyuHn.
MomeHTHaTakOHcMaunHa eHepn ) ce NOKa3Ba 3a KpaTKO Bbpxy DnCnner Ha HAKo MoeJN BbTpEHN TeNa.
3ABEJIENKKA
- EdnHncaTa MpaKa 3a CToHocCTTa, KOrTO ce noka3Ba Ha dncnpe, e kW.
THe ce noka3Ba Ha 6e3xHHTO DnCTaHIOHOH. - Ako TЯ e noBueye ot 99 kBТ, KoETo e DoNyCTMnIaT duana3OH,Я PodlbpkaIte Ha 99 kBТ.
- POKaXeTe MoUHocTTa NOd 10 KBT c 0,1 KBT eINHnI N POKaXeTe EINH NaD 10 KBT c 1 KBT eINHnI.
-ДeИCTBNTeJIHATA MOUHOCT MOKeJa ce pa3nuaBa OT NOKa3HaTa MOUHOCT. - Pn CbBp3BaHe KbM BbHNo TЯJIO Ha MyTTncIcTeMa Ta3N ΦyHKUma MoKe Da He Ce NOdIbpxka.
N3noJ3BaHe Ha yHKuIra 3a N3KJIIOUBAHe Ha OCBeTJeHneTo (no n36Op)
ApkocHaekpHaHaDnCnJeA
Mokete da hactpoite rpkocTtHa dncnier Ha BbTpewHOTO TNO.
- HatncheTe 6yToHa LIGHT OFF.
3A6EJIEXKKA
BkIIOUeTe/IN3KIOUeTe ekpaHa Ha dIcnnne.
- Ako npkocTt ha dinncnner Ha Bbtpeweh ypeed hacptoeha Ha V3KJI, HataNcKaHeTo Ha 6yToH Ha dntaHcHOnHOTo ynpabJIeHne ABTomATuHO BKJIOUBy DnCnIe 3a MaJIKO.
TaaHcHKnma MoKe da pa6OTn no pa3JnueH hauHH B 3aBcIMoCT OT MoeJa.
N3noJ3BaHe Ha yHKuYTa 3a yDObHa N03nUHa Bb3dUHnI NOTOK (No n36Op)
Ydo6Ha n03nua Ha nepkata np pa6ota
Tasn cyHKnna 3aaba no ydo6en HauHH No3nna Ha nepkata, KOrTO ce 3anametra npeDbapnteHNO, 3a da OTKIOH NodabAHn Bb3dyx, Taka Ye da He dya DnpekTHo Cpeu ObnTaTeNtE B ctaTa.
1 BkIIOUeTe ypea.
2 HaTnchete 6yToHa COMFORT AIR HeKoJIkoKpaTHO n 36epete XeJahata No3u.
Haekpana ce noka3Ba nn.
3A6EJIEXKKA
HaHЯKoBbTpewHnTeNa ce noka3Ba
TatayHKua e 3a6paheHa, KOrato HATnckate 6yToHa MODE JIINJET MODE.
Ta3nФyHKUe e 3a6paHeHa n aBtOMaTHHOTOBbPTeHE BBBBepTKaJIHa NOcOKa ce 3aJaBa, KOraTO HATNCHEte bTyOHa SWING
Korato Ta3n Функия e n3KJIIOUeHa, XOpu3OHTaHATA nepka ce 3aIeICTBa aBTOMaTHUHO B 3aBNCIMOCT OT pexima Ha NaCTpoIBaHe.
I3noJ3BaHe Ha cyHKuJaTa 3a ynpabJeHne Ha eHeprJaTa (no n36op)
1 BknHoyTe ypeHa.
2 HaTnchTe 6yToHa ENERGY CTRL..
- HatucheTe 6yToHa ENERGY CTRL. HeKOJIOKKpaTHo 3a n36op Ha BCraKa CTbKnka.
Ta3nXapaKTePncTnKa eHaJIuHa cMo B MoJeIN C JIoroTO HIN
I3noJI3BaIte Ta3n ФункцЯ,3aДa dnaHocTnCupate n pa3peuNTe npo6JIemn C BaIInypeI.
3A6EJIEXKA
- По пчини, кочTo He ce Дьлжат Ha nponyckn ha LGE, усугага можеда He e akTINbHa nopadn BbHsHn ФakTopu, KaTo Hanpimep, Ho He caMo, HeHaJIuHocT Ha Wi-Fi,пркьс hematврьзka c Wi-Fi, MeCTha nonITuka Ha app store, Ин HeHaJIuHocT Ha npINOxKeHneTo.
XapakTepcntkata MoKe Da noDneKn Ha npomHa 6e3 npeBapntEnHO yBeDoMJeHne I MOKe Da NMa pa3NUnHa fOpMa B 3aBNCIMoCT OT MeCTOHAXOXDeHHeTO BN.
I3noJ3BaHe Ha LG ThinQ 3a DnaHOctnucipaHe Ha npo6JeMn
AkoBb3HnKHe npo6nem C Baunna Cha6deh C Wi-Fi ypei,ToM MoKe Da npedae daHHN 3a OTkpNBaHe m OTcpaHBAHe Ha npo6nema KbM cMapTfoH nocpeDCTBOM npuJIOxEHNeTo LG ThinQ.
CTapTnpaIte npJIOxKeHneTo LG ThinQ n 136epTe xapaKTepeNtKaTa Smart Diagnosis B MEHIO.To. CJIeDbaIte INHCTpyKUnTe, PpeOCTaBeHNB pNJIOxKeHneTo LG ThinQ.
I3noJ3BaHe Ha Audible Diagnosis 3a DnaarHocTnCnpaHe Ha npo6JeMn
CneIaBaiTe HNCTpyKuINTE NO-DOny, 3a da n3nON3BaTe MeToDa Ha cnlyXoBA DnaIraH03a.
CTapTupaIte npINOxKeHneTo LG ThinQ n36epTe xapaKTepeNtKaTa Smart Diagnosis B MeHIOTo. CNeBaIe INcTpkyCnITe 3a 3ByKOba DnaarHocTnKa, npEOCTaBeHn B npINOxKeHneTo LG ThinQ.
1 BkIIOyTe UeNceJa B KOHTaKTa.
2 IocTabete MyHdUka Ha cMapTfoHa cn 6n30 do JIorOTO
3 HaTncheTe n 3aDpBxKTe 6byToHa DIAGNOSIS [5 s] 3a 5 cekyHnn nn no-dbIro, KaTo cbueBpeMeHHo DbpXkTe MyHdUka Ha CmapTOHa CN KbM IOROTO, DOKaTO 3aBbPm npedabAHeto Ha daHHN.
-ДрьктecмapTфОнTO3nHaunH,DOKaTo He npKJIIOUnpeJaBaHaTeOHa daHHN.
IinCnJIeT NOKa3Ba OCTaBAuTo BpeMe 3a npedabaHTo Ha daHHN.
4 CneI KaTo 3aBbPm npedabaHcTo Ha daHHnTe, dnaarHO3ata ue ce nokae B npnIOKeHneTo.
3ABEJIENKKA
3a Hau-Dobpnpeyntn He DnHexe TepeoHa, DOKaTO ToHOBeTe Ce npdaat.
- YBepTeCe, Ye OKONHnT WmE CBeDen Do MmHmym, 3a Da MoKe TeIefohBt Be3npo6nemHo Da NOJyU 3ByKOBInTe CNHaJI N OT BbTpewHOTO TIAIO.
PPEyPExEHeN
3 OToTaPaHEToOT BbTpewHOTOrJIO.
4 Nounctete fuiTbpa c npaxocmyka uin C xnaKa Boda c HeyTpaneH nouNCTBaU npenapat.
5 N3cyweteΦnITbpaHa cAHHka.
6 BkapaTe KyKeTe Ha Bb3DyUHnA φnIITbp B npeHNr KanaK.
7 HaTnCHete HAnOly KyKInTe, 3a Da NoCTaBnTe Bb3DyUHnA FInTbP.

8 IpoBepTe OT cTpaHaTa Ha npEiHnKaIaK daII N B3dUwHnT pIuNTbpe npabunHO nOCTaBeH.
Tun2
1 3KIOUeTe 3axpaHbHeTo n 3BaTe 3axpaHbuaa Ka6eJ.
2 OTbopeTe npednnaKanak.
- NOBUNHHeIeKOuDBeTe CtpaHn HaKanaka.
3 3aDpBxTe KOnyEtata Ha Bb3dyuHnTe cHnItpn, DpbHHeTe Hn HADony JekO n npemaxheTe OT BbTpEshHOTo TnIO.
4 NocTePe nntbpa c npaxocmyka k a nn c XnaKa Boda c Heytpaen NoocCTBaU npenapat.
5 乌3cyweteΦnntpntHa cHka.
6 BkapaTe KyKInTe Ha Bb3dUwHInTe fHnTpN B npedHna Kaak.
7 IpoBepTe OT cTpaHaTa Ha npedHna Kaak DaII N B3dUwHnTe pInTpN ca npabunHO nocTaBeH.
NoCTeTne npOTnBOaJIeprUHnA #ntbp (no n36op)
1 ɪəkʌŋoʊte 3axpaHbaHoTo nɪsBaɪdTe 3axpaHbaɪŋ Kaβeɪ.
2 OToTpaHETe Bb3dyuHHTe cHJTPn OT BbTpEwHOTo TAnO.
3 OTCpaHete npOTnBOaJIeprHnA qNTbP OT BbTpeuHOT TAnO.
Tun1

Tun2
4 Nounctete qnntptte c npaxocmykaika.
5 NocTabete npotnboaaneHHn qHJtbp.
Tun1

Tnn2

6 MoHTnpaTe Bb3dUwHnTe cHnTpN.
7 IpoBepete ot cTpaHaTa Ha npedHnKa nak daNN Bb3dUwHnT pInIbTp e npabnHo noctaBeH.
3ABEJIENKKA
-ФункцяТа IMecTOnOJIOxEHnETo Ha npOTnBOaJIepRnHnI ΦnITbP MoKe Ja ce pa3NnUaBA B 3aBnCIMoCT OT TnHa Ha MOneJa.
Функцязаимогнoctnka
To3n npodukT nMa BrpaedeHa 9yHKuJra 3a cAmOdaHocTuKa. Ako Bb3HnKHe rpeUka, JAMnata Ha BbTpewHOTo TJIIO Ue 3aNoUHe Da Mra C INTEpBaI OT 2 cekyHdN. Ako ToBa ce cIyuN, CBpbXeTe Ce C MeCTHnA DnCTPb6TyOp IIN cepBn3eH ueHTbp.
Ipei da ce o6aIte Ha cepBn3Hna eHTbp
IpoBepTe cIeHTo, npEi Da ce CbPKeTe C cepBn3HnA ueHTbp. Ako npo6JeMbT npOdbJxaba, o6bpHeTe Ce KbM Baunr MeCTe H cepBn3HnA ueHTbp.
VAŽNE SIGURNOSNE UPUTE

UPOZORENJE
Kako biste smanjili opasnost od eksplozije, požara, smrti, strujnog udara, ozljede ili opekotina osoba prilikom upotrebe ovog proizvoda, slijedite osnovne mjere opreza, uključujuci sljedeće:
Djeca u kućanstvu
Ovim se ureðajem ne bi trebale koristiti osobe (uključujuci djecu) smanjenih tjelesnih, osjetilnih ili mentalnih sposobnosti, ili s manjkom iskustva i znanja, osim ako ih osoba koja je odgovorna za njihovu sigurnost ne nadzire ili im daje upute u vezi's upotrebom ureðaja. Djecu treba naggledati kako bi se osiguralo da se ne igraju s ureðajem.
Za uporabu u Europa:
Olulised ohutusjuhised 4
KASUTAMINE 11
Olulised ohutusjuhised

OHT
5 Sisestage allergiafilter.
Tuup 1
Tuup 2
6 Paigaldage ohufiltrid.
7 Kontrollige filtri oigit kinnitumist eesmise katte kulgedelt.
TÄHELEPANU
Noti ghat-Thaddim 11
Remote Control Bla Wajar 12
Terga' Tixghel il-Kundizzjonatur tal-Arja Awtomatikament. 17
L-Uzu tal-Funzoni tal-Modalita 17
L-Uzu tal-Funzoni tal-Modalita Propulsiva (Jet Mode Function) 20
L-uzu tal-Funzjoni tal-Velocita tal-Fann 21
Remote Control Bla Wajer
Meta Ddahhal il-Batteriji
Jekk I-iskrin tal-wiri tar-remote control jibda jicara, ibdel il-batteriji. Dahhal batteriji AAA (1.5 V) qabel ma tuza r-remote control.
1 Nehni I-ghatu tal-batteriji.

2 Daññal il-batteriji l-godda u aghmel cert li t-terminals + u - tal-batteriji huma installati tajbeb.
Installazzjoni tal-Holder tar-Remote Control (Fakultattiv)
Biex tipprotegi r-remote control, installa I-holder fejn ma hemmx dawl tax-xemx dirett.
1 Aghzel post sigur u fejn tilhqu faciliment.
2 Wahhal il-holder permezz ta'zewg viti mwahhla sew b'tornavit.
Metodu ta'hidma
Ipponta r-remote control lejn ir-ricevitur tas-sinjal fuq in-naha leminija tal-kundizzjonatur tal-arja sabiex thaddmu.
NOTA
- Ir-remote control jista' jhaddem apparti elettronici ohrajn jegk ikun IPPunat lejhom. Aghemel cert li qed tipponta r-remote control lejn ir-ricevitur tas-sinjal tal-kundizzjonatur tal-arja.
Ghal thaddim tajbeb, uza carruta ratba biex tnaddaf it-trazmettitur ur r-ricevitur tas-sinjal.
F'kaz li funzoni ma tkunx provduta fil-proddott, I-ebda sinjal ta' hoss ma johrog mill-proddott meta buttuna ghal funzoni bhal din fuq ir-remote control tigi maghfusa ghajr ghall-funzionijiet tad-Direzzjoni tal-Fluss tal-Arja (SWING), Displej t'Energija () , Purifikazzoni tal-Arja
3 Qabbad I-ismarphone mar-router wireless.
NOTA
- Biex tivverifika I-konnessjoni tal-Wi-Fi, iccekkja li l-icon hemm fuq il-panew tal-kontroll hija mixghula.
Dan it-taghir jiflah Wi-Fi network ta' 2.4GHz biss. Biex ticckka I-frekwenza tar-router, ikkuntattja I-fornitur tas-servizz tal-internet tieghek jew irreferi ghall-manwal tal-wireless router.
LG ThinQ mhuwixx responsabbli ta' problemi, hsarat jew malfunzjonijiet fil-konnessjoni tan-network,ikkawzati mill-konnessjoni tannetwork.
- Jekk l-apparat ikun 'il boghod mir-router dan jaf ma jkunx jista' jaghmel konnessjoni man-network kal-Wi-Fi. Ixtri Wi-Fi repeater (range extender) biex ittejjeb is-sa-ha tal-Wi-Fi.
- Il-konnessjoni tal-Wi-Fi tista' tigi interrotta jew ma taqbadx minhabba I-ambient tan-networkt tad-dar.
- Il-konnessjoni tan-networktista' ma tahdimx kif suppost minhabba l-fornitur tas-servizz talinternet.
-
L-ambjent tal-wireless tal-madwar jista' jikkawza lis-servizz tal-wireless netwerk jahdem bil-mod.
-
It-taghmir ma jistax jigi rregistrar minhabba problemi fit-trasmissjoni ta' qawwa tal-wireless. Skonnettja t-taghmir u stenna madwar minuta qabel terga tipprova.
- Jekk il-firewall fuq ir-router wireless tieghek huwa attivat, skonnettja l-firewall jew aghmel ecezzjoni ghal dan.
- L-ism tan-network kal-wireless (SSID) ghandu jkun kombinazzjoni ta' ittri Ingliži u numri. (Tužax karattri spečjali)
- II-user interface (UI) tal-ismarphone tista' tvarjghax din tiddependi fuq is-sistema operattiva (OS) tal-mobajl u I-manifattur.
- Jekk il-protokoll ta' sigurta tar-router huwa stabbilit ghal WEP, jista' ma jirnexxilekx thaddem in-network. Jekk joghgbok ibdlu ghal protokolli ta' sigurta ohra (WPA2 huwa rakkomandat) u erga' rregistra l-proddott.
4 Naddaf il-filtri b'vacuum cleaner.
5 Dañhal il-Filtru tal-Allergiji.
Tip1

Tip2
6 Arma I-filtri tal-arja.
7 Iccekkja I-genb tal-ghatu ta' quddiem ghall- armar korrett tal-filtru tal-arja.
NOTA
RIESENIE PROBLEMOV 34
"Smart Diagnosis" 29
PRIEZIURA 30
Oro filtro valymas 32
Isvalykite antialerginj filtra (pasirinktinis) 33
TRIKCIU SALINIMAS 34
"LG ThinQ" programs characteristikos
Su jrenginiususiekite ismaniuoju telefonu, naudodamiesi patogiomis ismaniosiomis funkcjomis.
Smart Diagnosis
LÁMHLEABHAR AN ÚINÉARA
AERCHÓIRITHEOIR

Leigh an lamhleabhair uineara seo sula n-oibritear an glaes agus coinnigh in aice leat é an t-am ar fad.
Taispeain Gile Scathlain
Is féidir an gile a shocrú don scathlán an aonaid laistigh.
- Bruigh an cnaipe LIGHT OFF.
NOTE
Cas ar/as an scailean Taispeain.
- Ma dheantar cnaipe a bhru ar an gcianrialtán casann sé an taispeaint go huathoibrioch ar feadh tamaill. Ma ta gile taispeana fearais faoi dhion socraithe chun mucadh.
- Feadfaidh an fheidhm seo oibriu ar bhealach eagsuil, ag brath ar an tsamhail.
Ag uśáid an fheidhm aer compórdach(roghnach)
Oibriuchán Eite Compórd
Socraionnanfheidhmseoaneitegoheascago suiomh réamhshocraithe chun an aer solathraithe a sraonó dul direach go dtí na daoine sa seomra.
1 Casangéasair.
2 Brüigh an cnaipe COMFORT AIR cupla uair chun an treo ata uait a roghnú.
no mar a thaispeanann an scathlan.
NOTE
no mar a thaispeanann cuple aonaid laistigh.
- Ta an fheidhm seo dichumasaithe nuair a bhruitear MODE no JET MODE.
- Ta an fheidhm seo dichumasaithe agus socraitear an uath-athru treo ingearach nuair a bhruihear SWING.
- Nuair ata an fheidhm seo as, oibrionn an eite cothromanach go huathoibrioch de reir an mhodhsocraithe.
Ag uśáid an fheidhm smacht fuinnimh (roghnach)
1 Cas an gléas air.
2 Bruigh an cnaipe ENERGY CTRL...
- Bruigh an cnaipe ENERGY CTRL. cupla uair chun gach ceim a roghnú.
| Céim 1 Céim 2 Céim 3 | ||
| 80 % | 60 % | 40 % |
| 200 | 200 | 200 |
NOTE
- Céim 1: Isliónn an Ionchur cumhachta 20% i gcomparáid leis an ionchur cumhachta ann.
80 mar a thaispeanann an scathlan.
- Céim 2: Isliónn an Ionchur cumhachta 40% i gcomparáid leis an ionchur cumhachta ann.
60mar a thaispeanann an scathlan.
- Céim 3 (roghnach): Isliönn an lonchur cumhachta 60% i gcomparáid leis an ionchur cumhachta ann.
40mar a thaispeanann an scathlan.
80 (1 step), 62 step), (3 step) mar a thaispeanann cuple aonaid laistigh.
(1 step), (2 step) mar a thaispeanann
cúpla aonaid laistigh.)
- Ta an fheidhm seo ar fail leis an Mhodh Fuarthu.
D'heafadh leis an toilleadh isli nuair a roghnaitear an mhodh Smacht Cumhachta.
Taispeanfar an teocht ata uait 5 soic ma bhruiitear FAN SPEED,
Taispeanfar an teocht ata uait 5 soic mabhruitear ROOM TEMP
D'heafadh nach ndeanfar tacaiocht don feidhm seo agus rudai ceangailte don aonad lolrach Lasmaigh.
VAŽNA BEZBEDNOSNA UPUTSTVA

UPOZORENJE
PpeBOD Ha opnHnHaHnOT HacTaBa
Oba ynaTCTBO COdpKn CNIKN NIN COdpKHa nonHaKaBa OJ MOJeIOT wTO CTe rO KyNHe.
Oba ynpaTCTBO nOpIeKn Ha peBn3nja od npOn3BODNTeNOT.
БЕЗБЕДНОСИУПАТСТВА 3
BAKHN B3BEOCHN yIATCTBA. 4
PABOTeB E. 11
Hannomei 3a pa6oTeheTo 11
ДeноиФункш.. 11
Be3KuHdaneHHckn ynpaByBauch 12
ABTomatcko pectaptnpahe Ha KInma ypeIoT 17
KopncTeHe Ha cyHKunjata 3a pexm 17
KopncTeHe Ha cyHKunjata Mna3eH peKm. 20
KopncTeHe Ha cyHKunjata 3a 6p3nHa Ha ceHoT. 21
KopncTeHe Ha yHKunjata HAcKa Ha npOTOKoT Ha Bo3dyxO.. 21
IocTaByBaHe Ha BknyBaHe/ncknyBaHe Ha MepaOT Ha Bpeme. 22
KopncTeHe Ha cyHKjata cneHe (OnuHaHno) 23
KopncTeHe Ha cyHKunjata eHocTaBeH mepa Ha BpeMe (onCnoHaIHo) 23
KopncTeHe Ha fHyHKunjata PpikKaKyBaHbe Ha eHepnJaTa (OnCNoHaJIHo) 24
KopncTeHe Ha fHyHKnjuTa IVcknyeHo OCBetNyBaHe (OnuHaH) 24
KopncTeHe Ha cyHKunjata noroDen BO3nyx (OnuHaJHo) 24
KopncTeHe Ha cyHKunjata KoHTpOHa ha enektpuHata eHepnja (onCnoHaJIHO).....25
KopncTeHe Ha cneunjannn FyHKcnn 25
NAMETHN FyHKcUN 27
Anlkaunja LG ThinQ 27
Smart Diagnosis 29
OДРЖУBAHBE 30
YncteHe Ha cHntepoT 32
IcHCTeTe ro fntepot npotnB anepnn (onuohnoaHNO) 33
PEWABAHEPNOBJEMN 34
CJIeHnTe 6e36eHocn yNaTcTbA ce HameHeTn 3a da cnpeayat HepeBvIeHn pN3uCi nIi StTeTn OD He6e36eHNo nIi HepaBnHO KopncTeBe Ha npOn3BOIoT. YNaTcTBaTa ce noJeHn Ha 'PPEdUpPEdYBAHbE' n 'BHIMAHNE' KaKo 7To e OnnShaHo NDoJy.

Oboj cHm60J O3HaCyBa npedMeTu n aKTNBHOCTN wTO MoKe Da npedn3BnKaaT pN3NK. IpoyntajTe ro BHMaTeJIHo DeJOT CO OBOJ cHm60J N cJeDeTe rN yNaTcTBaTa 3a da n36eHHeTe pN3NK.

PPEyPENEYBAHe
Oba nokayBa deKa HeNoHTyBaIbeTo Ha yNaTCTBaTa MoKe Da npedn3Bnka cepno3Ha nobpeDa nIn Cmpt.

BHIMAHNE
Ова пokajува.Deka HeNoHTyBaHbeTo Ha yNaTCTBaTa можеда пpeДи3ВИКа Лесна NOВpeДа Ил МаЛ MaIa StTeТаHa npOn3BODOT.
CJIeHnTe Cm6oJn Ce npkaKyBaaT Ha BHaTpeShHaTa n HaDBopeShHaTa eDHHuca. (3a R32)

Овoj симбол укожува на Toa Deka anapatOT kopистп за паллво срдстBO 3a падеь. Ако срдстВОТо 3a падeь e Ист ueHo И n3IoXeHo Ha habВоршен n3BOP Ha палeь, пост ризИК od похар.

Oboj cmmboJ ykaJyBa DeKa PnpaunKOT 3a pa6oTa Tpeba Da ce npouHTa BnMaTeJIHO.

MoJeHa eDInHeuHa nOeI6a
Oboj peKIM aBtOMaTcKN rO MeHyBa peKIMOT, 3a da ja oDpKn NOCTaBeHaTa TemnepaTypa Ha ±2°C.
1 Nyutete ro anapatot.
2 IpnTnCHeTe ro konyeTo MODE noBeKeNaTu, 3a da ro n36epete pexmOT Ha aBTOMaTcKO MeHyBaHe.
Ace npikakyba Ha ekpaHOT 3a npikakyahe.
3 PnTnCHETe ro konyeTo 3a Ja ja noCTaBnTe nocakyBaHaTa Tempepatya.
4ПиТиСHTeToKoNHTO FAN SPEED3aJa ja npnlaOndTe6p3HnHaTaHaФeHOT.
Pexim 3a HamaIyBaIbe Ha BnaXHOCTa
Oboj pexim ro otctpaHyBa BnWokot Ha Bnara od BnCOKO BnaxHaTa CpeHnHa, INN 3a Bpeme Ha DoXIOBHaTa Ce30Ha, CO ueI da CnpeU n6JInkyBaHeTo Ha NoCTaByBaHeTo. Oboj pexim ABTomatCKn IIN PnIIaROdyBa Co6HaTa TemnepaTpyn 6p3HHata Ha pehOT, 3a Da ro 3aDpxn ONTUMaHHTO HnBO Ha BnaxHOCT.
1 NywTeTe ro anapatot.
2ПиTиСнeTe ro konYeTo MODE noBeKeNaTn,3a Da ro n36epeTe pexuMoT 3a haMaJyBaHbe Ha BJIaXHoCTa.
ce npkaKyBa Ha ekpaHOT 3a npkaKyBaHbe.

HANOMEHA
Bo oobj pexm He moKeTe da ja npnnaOndte co6hata TemepaTypa, Taa ABTomatckn Ke ce npnnaOdi.
Co6hata TempepaTpa He e npkaXaHa Ha ekpaHOT 3a npKaXyaHe.
Bo pexnmoT ha ODbnaXHyBaHbe, KOMnpecopOT H BHaTpeuHnot feh MoKe Da He pa6oTaT DoEka TemnepaTypata Ha co6aTa e 24 °C
PexnHa rpeeHe
1 NyuTeTe ro anapatot.
2 IpnTnCHeTe ro konyeTo MODE noBeKeNaTu, 3a Da ro n36epete peXIMOT 3a rpeHbe.
Ce npkaKyBa Ha ekpaHOT 3a npkaKyBaHe.
3 PnTnCHTe ro konyeTo 3a Ja ja nOCTaBnTe nocakyBaHaTa TempePaTypa.
HANOMEHA
ke 6nata npkaaHa Ha BHaTpeHHaTa eINHua, kora ke pa6oTu Odmp3HyBaHbeto.
- HoHaTamy, OoJ nokazateJ Ke 6nJe npKkaKaH Ha BHaTpeWHaTa eDHHa:
Kora pa6oTu nped3arpeBaHbTeo.
Kora co6hata temnepaTypa ke ja doctnrHne noCTabeHaTa TemnepaTypa.
PekimHaΦeHOT
Oboj pexm eHCTBeHO rnpkynapa BHaTpeuHnOT Bo3dyx, 6e3 da ja n3MeHn Co6HaTa TemepaTypa.
1 NywTeTe ro anapatot.
2 IpnTnchTe ro konyeTo MODE noBeKeNaTu, 3a da ro n36epeTe pexmOT Ha cehOT.
ce npkaKyBa Ha ekpaHOT 3a npkaKyBaHe.
3 IpnTucheTe ro konHeTo FAN SPEED 3a da ja npnilarOndte 6p3nHaTa Ha pehOT.
HANOMEHA
Onnnn K6nDat npkaKaHn Ha BHaTpeuHata edHHua kora pa6OTn peKIMOT Ha BEHTnlaTop.
KopncTeHbe Ha cyHKunjaTa mna3eH pekIM
PpnilarOdyBaHe Ha 6p3nHaTa Ha ΦeHOT
- PnTnchTe ro KOnyTo FAN SPEED noBeKeNaTu, 3a da ja npNlaOndte 6p3nHaTa Ha fehOT.
| Екраза прикajувае | БрзINA |
| Виска | |
| Медим - Виска | |
| МEDIUM | |
| МEDIUM - Н sticka | |
| Н sticka | |
| - Ригореден ветар | |
HANOMEHA
KopncTeHe Ha yHKunjaTa nOroDeH BO3dyx (OnuHaJIHo)
Iorodno pa6otebe Ha nepkata
ObaaФyHKnJa nOroHNo ja noCTabyBa nepKaTa BO 3aIaIeHaTAp03uNja,3aJaCeCBPTINIOBOHNOT BO3dyX OJ DInpeKTHOTO dyBaHe Na cTahapnte BO co6ata.
1 NywTeTe ro anapatot.
2 IpnTnCHete ro konyeto COMFORT AIR noBeKeNaTu, n 136epete ja nocakyBaHaTa Hacoka.
- nI ne npkaKyBa Ha ekpaHot 3a npkaKyBaHe.
HANOMEHA
-
HJI L ce npKakyBa Ha HeKoN OJ BHaTpeHHTe eHNHcN.
-
Obaa ФункиJA e OHeBO3MOxKeHa KOra Ke ro npTuNCHeTe KOnTuTe MODE nJN JET MODE.
Obaa cyHKuJa e OHeBO3MOxHa n ABTomATCKOTO 3AmabHyBaHBe NO BepTnKaJHa HAcOka ce NoCTaByBa, Kora Ke TO PnITnCHETe KOHTe SWING.
Kora obaa cyHKnja e ncknyeHa, XOpN3OHTaJHaTa nepKa aBTOMATCKn pa6OTn, BO 3aBnCHOCr OJ NOCTaBEHnot peXm.
KopncTeHe Ha yHkunjaTa KoHTpOHa Ha eIekTpnuHaTa eHeprna (OnznoHaJIHo)
1 NyuTete ro anapatot.
2 Ptunchete ro konqueto ENERGY CTRL..
-ПиТиСHTe ro konTuTo ENERGY CTRL. NOBeKeNaTn, 3a da ro n36peTe ceKoJ YekOp.
| 1 чекор 2_chokor 3_chekopr | |
| 80% | 60% |
| 200 | 200 |
HANOMEHA
1 Yekop: BnE3HOTo HanojyBaHe ce HaMaNyBa 3a 20 %, cnopeJeHO co HOMHaJIHOTo BnE3HO HanojyBaHe.
00 00000000000000000000000000000000000000000000000000000000
2uekop:BnE3HOTo HanojyBaHe ce HaMaanyBa 3a 40 %, cnopeJeHO CO HOMHaIHOTo BnE3HO HanoivBaHe.
60 60e npkaKyBa Ha ekpaHOT 3a npkaKyBaHe.
- 3 YeKOp (OnuHaJIHo): BHe3HTo HanoJyBaIbe Ce HAmanyBa 3a 60% , CnopeJeHO Co HOMHaJIHOTOBHe3HO HanoivBaIbe.
40 CexnpnkaKyBaHaekpaHOT3a npnkaKyBaHe.
(1uekop), (2eKop), (3epop) ce npkaKyBa Ha ekpaHOT 3a npkaKyBaHe.
(1uekop), (2uekop)ce npkaKyBaHa ekpaHOT 3a npkaKyBaHe.)
Obaa cyHKunja e doCTanHa co peXIMOT Ha nahebe.
KanaHTeTOT MOKe Da ce HAMaJIu, KOra e N36paH peXIMOT 3a KOHTpOJa Ha eJekTpUHaTa eHeprJa.
- IocaybaHata TemnepaTpe Ce npkaKyBa OKny 5 CEkyHau, aKO TO npHTncHEte KOnyeTo FAN SPEED.
- Co6HaTa TemnepaTypa ce npkaKyaBa OKny 5 CEkyHd, aKO To npNTCHeTe KOUYTO ROOM TEMP.
Kora e noBp3aH co MyTn HaBOpEuHaTa eDHHua, OBaa cyHKuJa MOKe6n Hema da 6n de NopdpkaHa.
KopncTeHe Ha cneuJaHn H yHKcnn
1 Nyutete ro anapatot.
2 PnTnCHTe ro konyeTo FUNC. noBeKeNaTn, 3a da ja n36epete nocakyBaHaT a yHKunja.
3 IpnTncHeTe ro konyeTo SET/CANCEL 3a Da 3aBpwnTe.
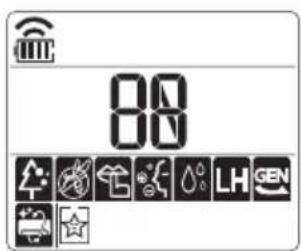
| Екран за прикaxesьаны | Опис |
| JOнскnot reнераTop користу Млнон joони, за за помоге BO поборчыны на КвалитetOT на Воздунот BO 3атборен постор. | |
| За за се hamали buyавata od Надворешнат рeditица. | |
| За hamалуваны на Влиагatura Коjaшто се создва BO Внатршнат рeditица. |
HANOMEHA
- Hekon ΦyHKun He MoKaT Da 6nDaT noDpKan, BO 3aBnCHOCT OJ MOeIOT.
HekonФункиMuKeJa pa6oTaPa3nHcOД npikakkaHOTHaekpaHOTHa daJIeHHCKNOT ynpaByBa.
OTkaJyBaHe Ha cneunjahnHnTe cyHKcnn
1ПиTиСHTe ro konTuTo FUNC. NOBeKeNaTn, 3a da ja n36epTe nocakyBaHaTaФункUnja.
2 Пптисе Г кочeto SET/CANCEL 3aда оTKажete Hekoja Функида.
KopncTeHe Ha yHKunjata 3a npouncTyBaHe Ha BO3dyXOT
Obne yHKnO6e36eYBaat NcT n CBex BO3dyx, npeky johcknte yeCTnKn n nnTepot.
| ФункциjaЕранОпис | |
| JOизаТор | JOHSCNITe ЧecTичКи OД JOиЗaТорOT Г намалУbaAT ПовршINHСКИTe Бakтepии N ДругИTe ШТНи Матери. |
| ПлaЗмa | |
| Целесно Г OTстранУВа МИКрОСКОпСКИTe ЗагадуВачи OД Вцицahnot ВОЗdух, за д обeзбediЧисти СВж ВОЗdух. |
HANOMEHA
- MojkeTe da ja kOpNCHTne OBaa yHKunja 6e3 da ro BknyuTE BaUNOT KnIMa ypei.
- I nla3Ma lam6nKata n lam6nKata 3a nahece BknyeHn,doKeKa pa6oTu OTcTpaHyBaHe yad/IIa3Ma,Ha HeKoN MoJeHn.
He donnpajte ro joHn3atopot 3a BpeMe Ha pa6oTeheTo. - ObaaФункиmaМоже pa3nHNo da pa6ToN oEkpahOT Ha daJIeHHCKNOT ynpaByBa.
KopncTeHe Ha yHKunjata TNBko.
ObaaФyHKuJa rN cnpeUyBa moXHnTe npo6IeMn co cOeIte, npeKy hAmanyBaHbeto Ha 6yUaBata oHaDBopeuHnTe eHNu.

ce npKkaKyBa Ha ekpaHOT 3a npKaKaYBaHe.
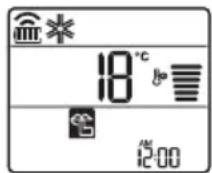
HANOMEHA
- Obaa Функида ke 6иde ONEBO3MOxHeHa Kora Ke ro npHTnCHeTe KOnYeTO MODE nIN ENERGY CTRL. nIN JET MODE.
- Obaa Функциja e дocтанha co peхимOT haJaideHe, rpeeHbe, abTomatcka npomeha npeximOT Ha aBTOMatcko pa6oTeHbe.
Kora e noBp3aH co MyItn HaDBopeuHaTa eINHua, OBaa yHKuJa moKe6n Hema da 6nde npdpkaHa.
KopncTeHbe Ha yHKnjuTa aBTOMaTcKO YnCTeHbe
3a BpeMe Ha pexmnte 3a IaIeHe i HamaIyBaIbe Ha BnaXHOCTa, ce C03daBbIra BO BHaTpeHHaTa eINHua. Obaa yHKunja ja OTcTpaHyBa TaKbata Bnara.

ce npkaKyBa Ha ekpaHOT 3a npkaKyBaHe.
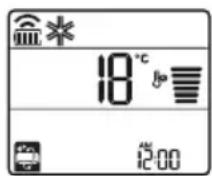
HANOMEHA
HeKoIyHKun He MoKaT da ce KopnctaT OdoKe paobTu yHKunjata ABtOMaTcKO YnCTeHe.
Ako ro ncknyuHTe hanojyBaHbeto,fehot Ke npoDolxn da pa60Tu yUTe 30 mHyTu, uNCTejKn ja BHaTpeuHocTa Ha BHaTpeuHaTa eHNHHua.
3aBnCHO OJ MOeIOT, Ha HeKoN BHaTpeHNeDINHnCe npKaJyBa Cm60JOT
Anlncauja LG ThinQ
Obaa yHKnja e DocTaHa cMo Co MoJeNte co INorOTo ThinQ.
Annkaunjata LG ThinQ Bn OBO3MOxyBa da KOMyHnucnPate CO ypeDTo CnOMoHa nameTeH TelefoH.
KapakTepeNCTnKn Ha anJnKaunjaTa LG ThinQ
Komyu npajte co ypeodT npeky Baunot MOnneH Tepeoh, KopncTejk n KOpncHnte naMeTHn ONUIN.
Smart Diagnosis
Ako nckycnte npo6nemdoeka ja kopncntte annkaujata, onujaTa 3a naMeTHa djuarHocTka Ke BN NOMORHe da ro DNjarHOCTUcapate npo6nEMOT.
POnecyBaHa
Bn OBO3MOxCyBa Da nocTaBnTe pa3JIuHn ONcHn Kaj anapatOT N BO anJIkaujata.
HANOMEHA
Ako ro npomeHnte cbojot 6e3Kuueh pyTeP, do6abvBaoyoT ha nHTepHET ycnyr nnno3nHKaTa, n36pniweTe ro pernctpupaHnot anapat oAnnnkaunjata LG ThinQ n nobTOpho pernctpupajte ro.
Anikajata noJnx Ha npomeH 3apani noobpyBaBe Ha anapaTOT,6e3 da mC ce daTe npedynpdyBaBe Ha KOpncnUte.
- KapakTePncTKeMoKe Da BapuPaAT Bo 3aBnCHoCT OJ MOJeNoT.
Пред Корисе на anлкацида LG ThinQ
1 IpoBepete ro pactojaHneTo nomery anapatot n 6e3xuHnO rpyTe (Wi-Fi mpejata).
Ako e npereJemopacTojaHneTo nomery anapatot n 6e3xNCHNOT pyTep,doara do cna6eehe Ha cnHaIOT. MoKe da 6nDe notpe6en noDOnBVPemEnckn nepno3a pernctpaunja,nn MoKe da doBeede No HeycneuHa HnctalauJa.
2 NcknyteTo MO6nHNOt INu HHTepHeTOT Ha BAHNOT NaMeTeH TeJeOH.

3 Nop3eTe ro Baunot nameTeH TeJeOHO 6e3KnHnOT pyTeP.
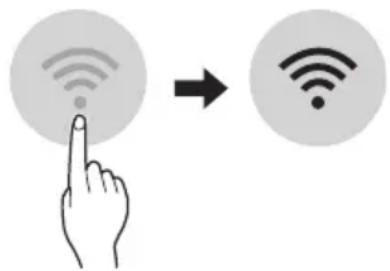
HANOMEHA
3a da notBpDnTe DeKa CTe NOBp3aHn CO Wi-Fi, npOBepTe DaJI N CBETN IKOHATA Ka KOHTPOHATA Ta6na.
AnapaTOn noDpKyBa eHnCTBeHo 2,4 GHz Wi-Fi MPexKn.3a da ja npOBepnte ppeKbeHunjata Ha BaWata MPexKa, KOHTaKTnpajTe ro BaWnot Ch6dyBauch CO INHTepHET ycnyr, INN NorIeHHeBO yNaTCTBOTO 3a BaWnOT 6e3KuHen pyTeP.
LG ThinQ He e OndroBopeH 3a 6nlo KaKbN npo6IeMn OkOJy KOHeKTnpaHBeTO Ha MpeXkaTa nn KaBn I da 6nlo rpeuKN, DepeKT nn rpeuKn npedn3BvKaHN oD KOHeKTnpaHBeTO Ha MpeXkata.
- Ako anapaTOT mma npo6nemn OKony KOHEKtnpaHBeTo Ha Wi-Fi mpeXaTa, moXe6n e npedaleky od pyTePoT. HababeTe Wi-Fi 3acnnyBauch (3acnnyBauch Ha DocTpeNoT) 3a da ja na noDo6pnte jaunHaTa Ha Wi-Fi cnirHaNoT.
Wi-Fi KOHeKunjata MoXe6n He ce NOBp3yBa HmMOx6n e npeknHaT a nopadn ONkpyyBaHbeto HaDOMaUHATA MPexa.
- Мржно NOBp3yBaHbe MOKe6n Hema da pa6oTn
- павино BO 3aBnCHOCT OД пobajdepot Ha
- Итepnet yCnyrnte.
- OkonHoto 6e3KnUHO NOBp3yBaHe MoXe6n
- npDoHecyBa 6e3KnUHNot MpeXeH cepBnC da
- pa60Tu 6abHo.
Anapatot He Moke Da ce peHnctpnpa, npaPioblemn Co npeHocOT Ha 6e3KnUHNOT CnHan. N3BneYeTe ro Ka6eJNot Od anapaTOn nNoyeKaJTe OKony eHa MNHyTa, PpeNIOBTOpHO da ce o6nndeTe.
- Ako e OBO3MOXeH 3aWTHTHnot Su, Ha BaWNot 6e3xMueH pyTeP, OHeBO3MOXeTe r Nn DoJaTe NCKnyOK BO Hero.
- Imeto ha 6e3xuHaTa Mpexa (SSID) Tpe6a da 6nde KOMbHaunja od aHrnnckn 6yKb n 6poEBn. (He KopncTeTe rncnjuAnHnTe kapaKtepn)
- SmartphonekopinchuKnot HHTeppejc (UI) MoKe Da Bapnpa, BO 3aBnCHoCT OJ MObHnHNot onepaTINBeH cnCTem (OS) n npOn3BOdnteIOT.
- Ako 6e36eHocnOT npoTOKoHa pyTePOte nocTaben Ha WEP, MoKe Da He ycneete BO nOdecyBaHBeTo Ha MpeKaTa. Be MOJIme npomeHeTe ro Ha dpyrN 6e36eHocn HpOToKoJN (Ce npenopayBa WPA2) n NobTopHo perncptpajte ro npOn3BODoT.
Инсталарые наапликцина за LG ThinQ
Побapajte ja anлkaцида LG ThinQ Ha Google Play Store & Apple App Store npeky Baunot cMaprfoH. CneTe rN INHCTpyKuNTe 3a npesemaBeиИнсталupaBeHa anlkaцида.
N3BecTyBaHe 3a coΦTBepeco OTBopeH KOD
3a da ro do6niete n3BOPHNOt KOD cornacho GPL, LGPL, MPL i npynte Iuueh 3a otbopen kO co kon nocto on o6Bpcka 3a pa30TkpNBabe Ha n3BOPHNO t KOd codpxhan BO npou3BOIOB u 3a npuctan do cnte cnomeHaTu ycNoBuHa IuueHcata, n3BeCTyBaHa 3a aBTOPCKn npaba N dpyrnpelEBAHTN DOKymeHTN, OTe Ha https:// opensource.lge.com.
LGE ncto taKa Ke Bn OBO3MOxN CNo6OeH KoJ Ha CD-ROM 3a ueHa Koja Tn NOKpNbA TpoOuHTe 3a TaKBOTo DocTaBvBaHe (kako Ha np. TpoOuN 3a MeDnymOT, npaTkata N MaHnPyNaTbHN TpoOuN) no 6apaBe npeky e-NowTa Ha opensource@Ige. com.
IohydaBa IMa BaxHoCT BO nepNoD OJ TpN rOaHn Haaata NocJeHa IcnpaKa BO Bpcka Co npo3BOoB 3a CeKoJ wTo rN do6uBa IHOpMaunBE.
Smart Diagnosis
Obaa yHKnja e nocTaHa cMo co MoJeIte co Joroto
YnoTpe6eTe ja Obaa onuJa 3a da
DnjaHocHTnucpaTe nn peWnte npoBneMn co
Baunot anapat.
HANOMEHA
- Od npuHn HTo He MoKe Da ce npenWat KaKo hemapnoct Ha LGE, ycnyrata MoKe da He pa60tn nopadn HndBopeuHn fakTopn, KaKo WTo ce, Ho HeorpaHnUyBajKn Ce Ha HeOCTaHNOCTa Ha Wi-Fi, r6beHe Ha Wi-Fi KOHEKunjata, NOJNTkata Ha npOdaBnUcTa 3a anNkaun NnN HeOCTaHNoCTa Ha anNkaunjata.
- Obaa Фуннкциja може да e предмет на поменабe3 пөгхODн Нajави може дa Ималораэлпчнфорma BO 3abuCHOCT OД Toa Kaide cte loцран.
KopncTeIbe LG ThinQ 3a dInjaraHocTnucipaIbe npo6JIeMn
Ako nckycnte npoblemn co Baunot anapat onpeMeH co Wi-Fi, toj moKe da rncnpaTn noDaTOUNTe 3a npobemOT Ha nameTe TeneoH npeky anlinaunjata LG ThinQ.
- Bknyute ja annkaunjata LG ThinQ n36epete ja onujata Smart Diagnosis BO MeHTo. CneTe r ynaTcTa BA TO annkaunjata LG ThinQ.
KopncTeHe 3ByuHa dNjarHo3a 3a dNjarHocTnucpaBe npo6Jemn
CneTe ryn ynatcTaT aOJy 3a da ro KOpIcTnte MeToDToHa 3ByHa dJaarHo3a.
Bknyute ja annkaunjata LG ThinQ n 36epete ja onujaTa Smart Diagnosis BO MeHTo. CneTe r yNaTcBaTa 3a 3ByHa DnjarHO3a daeHN BO annkaunjata LG ThinQ.
1 IpaBnHb BkIyUeTe ro npKnyOkoT 3a cTpyja BO wTEkePOT.
2 IocTaBeTe ro DeIOT Ha naMeTHNOT TeNeFOH 3a 36OpYBaHe 6nCKy Do IorOTo
3ПиTNCHeTe ro nДрЖeTe ro KOnYeTo DIAGNOSIS [5s] 5ceKHyn nIIN noDoJro DoJeKa ro DpXInTe DeNoT Ha NaMeTHNOT TeNeΦoH 3a 36OpYBaHc De INorOTo ce DoJeKa He 3aBpSi nIpeHocOT Ha NoDaTOuNTe.
He npemecTybajTe ro nameTHNOr TeneoHdoEka He 3aBpUnnpeHOCOT Ha NODaTOUHTe. Ce npikakjyBa npeocTaHaTOTO Bpeme Notpe6Ho 3a TpaHcpep Ha NODaTOU.
4 OTKako Ke 3aBpHn npehocot Ha noDaToU, DnjarHO3ata ce npKakjyBa BO anNkaujata.
HANOMEHA
3a Hajdo6pn pezytatn, He npemecTybajTe ro TepeohOTdoNeKa ce npehecybaaTToHOBNTe.
Ocnypete ce da ja odpxyBaTe am6nentanHaTa 6yaba Ha MNHmym, IIN MOKe da ce cnuyu TeNeFOHO T a He rN npima npabUNHO 3ByHNTe CnHaON BHaTpeWHaTa eHNua.
I P E D U N P E D Y B A H E
- Ppei YnCTe He nnn n3BpUyBaHbHe Ha oDpxyBaHbETo, NCKnyte To HanojyBaHbETo n NoyeKaTe DoNeKa ΦeHOT He npctTaHe co pa60Ta.
Ako KInma ypeoT HeMa Da Ce KopnCTn 3a NDoIg BpeMeHcN nepNoi, NcyuTe ro 3a Da ce OdpXn BO Hajdo6pa cocToj6a. PeobHo YnCTe Ro npOn3BoDoT, 3a Da ja OdpXnTe ONTMaJIHaTa n3BeD6a n da rncnPpeHTe MoKHNte DeΦeKTn.
- NcyuTe ro KnIMa ypeIOT BO peh peKIMOT, BO TEKOT Ha 3 Do 4 Yaca, n NCKnyTe ro HanojyBaHeto. MoKe da ce noJabN BhatpeUHO OWTeYBaHe aKO BnaRATA OCTaHE BO HerOBITE COCTABHn DeIOBn.
- Icuyete rBn BHaTpeHnTe COCTaBn DeIOBn Ha KInMa ypeoT, KopncTejkn ro peh peXIMOT BO TEKOT Ha 3 do 4 yaca, nped HerOBaTa NOBtOpHa ynoTpe6a. Oba ke nomorHe BO OTcpaHyBaHbeto Ha Mnpu36aTa co3daedeHa oD BnAraTa.
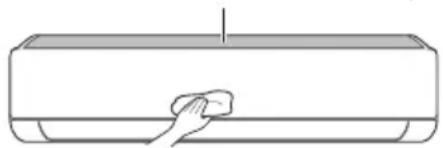
Φιπερ 3a Bɔ3dμx
-Функида можende ce MeHyBa BO 3aBnCHOCT OД TINOT Ha MOneJIOT.
| Тип Onис Иntервал | |
| Фильпер за ВОздух | Исучтete со правосмУкалka ил рачно Исторе. 2 недени |
| Фильпер поразв алергий | Исучтete со правосмУкалka ил четka. Секо 6 месени |
| Лонизатор (оштоналho) | Уnotpeбete сува памуна вata за ja отстарны прашината. |
| Виатрешина единица | Исучтete ja поsprината на виатрешина теминда, kopисейки мера, сува крпа. |
| Проблеменalloно Исучтete Г садот каде ШTO се собра Кондэнзиранота влara. | |
| Проблеменalloно Исучтete ja севкatingа НИЗ kojaшTO се сobра Кондэнзиранота влara. | |
| Заменete Г сбатерп'te на далechинскnot упавувач.Едною | |
| Надворецна единица | Проблеменalloно Исучтete Г салемп'te за оддаваль- торлina и tabлata co OTьори. (Посовету bajte ce co тунчар.) |
| Проблеменalloно Исучтete Г сфенOT.Едною | |
| Проблеменalloно Исучтete Г садOT каде ШTO се сobра Кондэнзиранота влara. | |
| Проблеменalloно Лицеmedia КСАСТРДМДЕССССССССССССССССССССССССССССССССССССССССССССССССССССССССССССССССССССССССССССССССССССССССССССССССССССCS | |
| Исучтete Г сеелкtripчнite komноенти со ВОздух.Едною |
HANOMEHA
- Hikorai He Kopinctete Boda Ito hma Tepepatya Nobucoka od 40^ Kora rH nCTnTe qntpnte. Toa MoKe da npedn3Bnka deopopmaunja nn o6e36oJyBaHe.
- HnKorau He KopncTe He nCnapInB MaTeepn npN YnCteHbETo Ha fInItpnte. Tne MoKat da ja oWTeTAT NOBpHHaHa npOn3BOJOT.
He nepete ro fntepot npotnb anepnn co BODa, 3aToa wTO MOKe da ce oWTeTn (onuohalHo).
YncteHe Ha qnItepoT
YnCTe Tn 0nIITPnTe 3a BO3dyx eHaaw Ha cekon 2 HeJeN, nIIOBKeNaTn aKo e nOTpe6Ho.
HANOMEHA
- Φιπτepοτ 3a BO3dμx MoKe Αa Ce cKpιn aKO ce npεβικα.
AkoΦntepot 3a Bo3dyx He e npabnHOCoCTaBeH, paaHHata N HeKOn dpyrMaTepeMOMKaT Da HABNe3aT BO BHaTepeuHaTa eHNHua.
Tun1
Ako oO3ropa nOrHeTe Ha BHaTpeHnHaTa eINHua, IecHO Ke MOKeTe da ro coCTaBnTe rOpHnot qnItep.
1 NcnyeTe ro HanojyBaHBeTo n 3BJeTe ro Ka6enot 3a cTpyja.
2ДpxkTe rpaKHTe HaФntepoT 3a BO3dyx mAnky noHrHeTe ro.
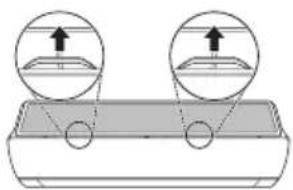
3 OToTpaHete ro od BHaTpeHHaTa eHNHua.

4 IcHCTeTe ro fIHTepOT co npaBocMykaJaKa nn Co MnaKa BOda, BO Koja Ima HeyTpaneH detepreH.
5 Icywete ro qnntepoB cehka.
6 BmTeHte rN KyKeTe HaΦnJItePoT 3a BO3dYx BO npeHnO T KanaK.
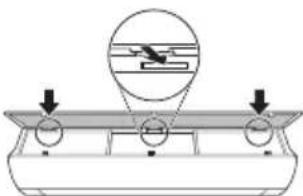
7 IpnTnucHete rHaOny KyKnte 3a da ro coCTaBnTe qnItePOT 3a BO3dyx.
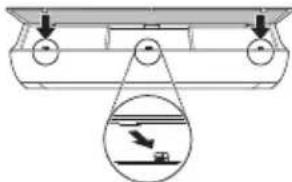
8 IpoBepTe Ha cTpaHaTa Ha npEiHnOT KanaK, 3a npaBnIHO COCTaByBaHe Ha qnlTepeoT 3a BO3dYx.
Tun2
1 NcnyeTe ro HanojyBaHbeTo n 3BneyeTe ro ka6enot 3a cTpyja.
2 OTbopeTe ro npedHnoT kanaK.
- POnnHHeTe mAnky nDbete cTpaHn Ha KaNakOT.
3Држete Г paKHTe HaФNTepOT 3a BO3dyx, NOBHeTe Г MaKy HAnOly N OTcPaHete Tn Od BHaTpeShHaTa eINHua.
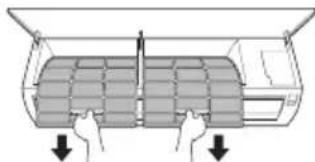
4 NcHCTeTe rH cHITpHrTe CO npaBocMykAnKa HnCmJaka Boda, BO Koja nMa HeyTpaneH detepreHT.
5 IcyweTe rH qnIITpnte BO ceHka.
6 BMeHTHe Tn KyKInTe HaΦuTTpTne 3a BO3dYX BO ppeHnOT KanaK.
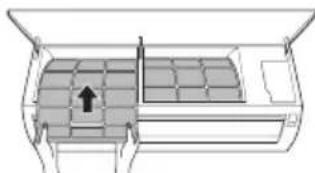
7 IpoBepTe Ha cTpaHaTa Ha npEiHnOT KanaK, 3a npaBnHcOcTaByBaHe Ha qnItpnte 3a BO3dyX.
Icunctete ro qnntepot npotnb aepnn (onuohalho)
1 NcnyeTe ro HanojyBaHBeTo n N3BneyeTe ro Ka6enot 3a cTpyja.
2 OTePaeHeTe nΦnTpnte oBHaTpeuHaTa eHnua.
3 OTepaHete ro fntepot npotnB aepnn oB HnatpeHaTa eHNHua.
Tun1
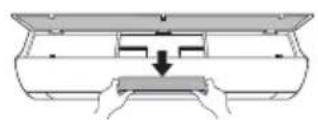
Tun2

4 IcHCTe Tn cHITpIte co npabOCMykaJIka.
5 BmTeTe ro qnItepot npotnb anepnn.
Tun1

Tun2

6 CoCTaBeTe rN BO3dUshHnTe pHTpn.
7 IpoBepete Ha cTpaHaTa Ha npEiHnOT KanaK, 3a npaBnHO COCTaByBaHe Ha qnItepot 3a BO3dYx.
HANOMEHA
-ФункиьаMuMeCTOnONoX6bataHaФИNTePOT npOTnB anepmMOKe Da Bapnpa BO corIacHOCT CO MOdEnot.
Функцина наCAMODиjarHOCnnpahe
Oboj npo3BOD mHa Brpaedha fynkunja Ha cAmOnjarHocTnnpaBe. Ako ce nojabn Hekoja rpeka, lam6nKata od BHaTePshata eDHHua Ke 3aTpEnKa BO nHTepBaJIn o2 cekyHnn. Ako TaKBOTo HeTo ce cnUHN, KOHTAKTupajTe n BaINOT IOKaEN dNCTpnbTyep nI IN cepBnCeHtap.
PpeI Da ro NOBnKaTe cepBnCoT
Be moJIHme npOBepe Tn CneIHNte HeWtA npE Ia ro KOHTaKTIpaTe cepBnCHNOT ueHTap. Ako npoJOnJx npo6JIemOT, KOHTaKTIpaJTe ro BaUNOT JOKaJIeH cepBnCeH ueHTap.
| Симптоми можни | Прочны и рeshенье |
| Клиma урекот неpbотиHopмлно. | Мирзба на ИЗrogenи и чуdenи 3Вуци доагаат od_edиницatura.ISCКУЧЕТЕ РКлиma урекот, ИЗваде тг КабелOT 3a стура щьдддддддддддддддддддддддддддддддддддддддддддддддддддддддддддддддддддддддддддддддддддддддддддддддддддд徳. ИсккУЧЕТЕ РКлиma урекот, ИЗваде тг КабелOT 3a стура щьддддддддддддддддддддддддддддддддддддддддддддддддддддддддддддддддд徳. ИсккУЧЕТЕ РКлиma урекот, ИЗваде тг КабелOT 3aстура щьддддддддддддддддддддддддддддддд徳. ИсккУЧЕТЕ РКлиma урекот, ИЗваде тг КабелOT 3a стура щьддддддддддддддд徳. ИсккУCHYБАЧТ, п reproнHyВач на стужНо кал (6e36eDnOCTa,3a3emjyBaHTo), пproа КOLTAKTIPajTe ro cebvchNtOT ceHTAP. |
| П repкувачт, п reproнHyВач на стужНо кал (6e36eDnOCTa,3a3emjyBaHTo), пproа КOLTAKTIPajTe ro cebvchNtOT ceHTAP. | |
| Единицатс coZdABA KaД Na rpeшka od conctBeHOTOCamodиjarHocTHuPahbe. | |
| ИсккУЧЕТЕ РКлиma урекот, ИЗваде тг КабелOT 3a стура щьддддддд徳. ИсккУCHYБАЧТ, п reproнHyВач на стужНо кал (6e36eDnOCTa,3a3emjyBaHTo), пproа КOLTAKTIPajTe ro cebvchNtOT ceHTAP. | |
| Клиma урекот неpbotи. | Клиma урекот не e prinKluyen.IproBepete Далу КабелOT 3a haboJyBaHBe e BmETHaT BO prnkLuyOKOT 3a cTpyja, пproа МОжеби се ВкLYчЕни ИЗЛаTopiTE 3a haboH. |
| Има ИЗbethен ocNrypauch, п le e boknapaso haboJyBaHBeTo co cTpyja.3aMeHete ro ocNrypauch ot пproBepete Далу prkeKHyBaUOT ha cTpyjHOTOkoLO ce BkLuyHIN. | |
| Се стучпп reprokin Ha elektprichnata eheprnja.IscKlyчete ro Kлиma урекот,aLoce стучпproekln Ha eletektprichnata eheprnja.Kora haboJyBaHBeTo nobTOpHKe ce Bocnoctabn, nouekajte 3 mInHyTN, na notoa BkLvyTe ro Klinma урекOT. | |
| Волтaxkata e Или пremHory BvCoka, пли пremHory HnCKa.IproBepete Далу се ВкLYчIN pReKHyBaVChT ha cTpyjHOTOkoLO. | |
| Клиma урекот abTomatcKnсс e nckLuyn BO OBOJ MOMENT.BkLvyTe ro Klinma урекOT. | |
| Бateprinfte Bo daleuHscknot uypaBvBaH Ce ep nabilho hameCTeH.N.OscHypete ce deka sbateprinfte ce npabunHb BmEThaTn BO BaShIO T daLeuHncknyuPabVbA.Ако sbateprinfte ce npabunHo hameCTeH, a Klinma урекOT и поharamy He paBOTN, toraah 3aemeHete ng sbateprinfte и obidete ce nobTOpHo. | |
| СимпTomи Рожни | Прочны и рeshенье |
| Клиma уреот не ( искneyта ладен Воздун. | Воздунот не циркулера правлино. • Осигурete се дeca Нем заеси, ралетни, ялдегов од мебел, Што го бл_OKираат пroduнот ду на клиma уреот. |
| Фильтерот за ВОздун e валдан. • Устete Го Фильтерот за ВОздун сднаш на секон 2 недени. • Видete BO "Чистende на Фильтерот" за по breaste Информаши. | |
| Собнatura Temnéратуа сpenMHORY BИСКOA. • 3a сеньocно ладене на ВНатrepoшноць ВОздун BO Летно Вс佩е сpentrpe bОве. Вс佩е BO takOB сdУaj, ИЗберete Го Млэзноць ржимь 3a порзо ладене ньнатrepoшноць ВОздун. | |
| Ладноць ВОздун ИЗлergува од собда. • Осигурete се дeca Нем заеси ИЗлergува сднан OT ВОздун пpenky ВЕNTINАЦИОнITE TOOKI OД собда. | |
| Посakуванata Temnéратуа сpenbicaka od сeraшнata Temnéратуа. • Поставete ja посayванata Temnéратуа на поиск� НИВО od сeraшнata temnéратуа. | |
| Во SFиЗинам Има ИЗВор на толлпи. • ИЗberнунайда koportstite ИЗвори на толлпи, како StTo ce сelen'tpruchнite пechулллгасп'te пал'mehiц, дodeka pa6otn Клиma уреот. | |
| Изbethан e ржимOT на сhen. • 3a Вс悔е на сhen ржимOT од Клиma уреот ДУВ ВОздун, кojшTO hHTU ro лади, НИТу ro 3aГревы ВНатrepoшноць ВОздун. • Постсрлente Го ржимOT на pбота BO рбота на падене. | |
| Надворшонata Temnéратуа сpenMHORY BИСКOA. •Ефektot на падене може ду не сиDE doBoilen. | |
| Брзинatable на сhenot небе до се прилагду. | Изbethан e млалзногт ржимлл ржимOT на АВТOMATСКО рбosteны. •Во сноки ржимы на рбosteны, He можete ду ѳ прпалогду Срзинatable на фenOT. ИЗbernete ржимы на рбosteны BO кojшTO кe можete ду ѳ прилагдупсрзинatable на сhenOT. |
| Temnépatурatura не може до сibe прилагдуна. | Изbethан e сhen ржимOT лим млалзногт ржим. •Во сноки ржимы на рбosteны, He можete ду ѳ прпалогду temnépatурatura. ИЗbernete ржимы на рбosteны BO кojшTO кe можete ду ѳ прилагдупсрзинatable на сhenOT. |
| Клиma уреот зanpe за Вс悔е на рбота. | Клиma уреот неаideйно с ecklnуч. •Можеби состechа phyн��ида на мерачт на Вс悔e, StTo ja Исклчува единцата. Прobерete Ги поставкипе на мерачт на Вс悔e. |
| Се сLnуч пжимн на селковпната сөрөгпяда за Вс悔e на рбosteны. •Почекajte ду срати селковпната сөрөгпя. Фун��ида АВТOMATСКО рбстарпаны, Вашата сөрөгпя, посл徳нatable ореташика, НкOLКУ мИнUTN оTKAKO кe сьрати STPyjata. | |
| Симпоми можни | Прочны и ршени |
| Внатрeshнatable единиca сеушто ке разоти, дури и по пекиnot на еелкtripинatable еергija. | РабOTи Функцилatable воватско чир themselves. ДобOTи ВОзOTe и Нa Функцилatable воватско чир themselves Дд подOLЖИ, БИдЕКИ ja OTcTpaHbYа пeoctaHaTaТа ВЛага оД ВНaTpeShnOCTa на ВНaTpeShnAte единиca. Ако He ja cacate obaa Функцилja, можete Дд ja ИСКПУчITE единиca.Ta. |
| ИзлесOTа BOЗдух на Внатрeshнatable.edinиca ис neuropstama marla. | ЛадноТВОздух od Клиma у畴OT создава магla. Оьо щehOMeн ce cIvyBa KORA doaЯdo Ha HAMaLyBaJIbe Na coBHaTа tempePATya. |
| ИстEVув BA ODA od надВорeshнatable единиca. | 3a Врeme Ha onepaunite Na rpeeJeBoaRa DoaЯdo KaNeБe Ha KOнDEH3riPаHa ВODa od EMITyBaQOT Na TOnLIIHa. Оьо сIMNTOM bapa ИNcTalipaJBe Ha OdВODHO cIpeBO PoD bA3HNoT caD. КontakTIPajTe ja LInCHoCTa 3a ИNcTalipaJBe. |
| ПостOTи buchavа пл Вибраци. | 3Byk Na KLINKHyBaJIe Може Дд ceЧуе КORA edINHuaTA ZanOChyBa Пл З苹ра, Зардд ВИнжeBJeTO Ha ObratNHOT BeHTINJ. 3Byk Na shkpIneJa: ПлacrTchNITE DeIOBn Ha BHaTpeShnAte edINHua шkpInaT KORA doaЯdo DO HINBHO CTechyBaJIe ПлproшИpyBaJIe 3apadi ненадeJHnTE TepePATypHn IprOmeHn. 3Byk Na TeeuHBe Пл duBaJIbe: Toa e TeeuHBeTo Ha cpeDCTBOTO 3a Лад? НИЗ Клиma у畴OT. ·Toa ce HopMaJIHn CImNTOMi. БухаТа Ke 3anpe. |
| Внатрeshнatable единиca ondabva mriu36a. | МирЗbITE (ΚΑΚΟ Na primeper Na idMOT od zuRapn) можат Дд boДмт anscopбианы BO HbATpeShnAte edINHua Na da ce ocIobodUbaaT co пpoTOKOT Na BOZdYxOT. ·Ако МирЗбATA He IncYe3He, Ke Mopa Дд ro N3MnTe ФиNTePOT. Ако He paBOTи, КонтakTIPajTe ro cEpBnCnHOT ZeHTAP, 3a Дд ro ИСчIcTITe emITePOT нATpONIIHa. |
| Клиma у畴OT He ис neuropstata toponl BOZdYx. | Kora pexIMOT Na rpeeJeKe 3anOChne, OTBOPOT e cSkopo 3aTBopeHи reчис нe ИЗЛergуВа BOZdYx, Иako HauBopeShnAte edINHua pa6OTn. Toa e HopMaJIen сIMNTOM. Be молиме поЕаTe сдОЕka edINHuaTa He coZdaide DoBOJIoH TOonl BOZdYx, KojISto Ke ce DuBa HIN3 BHaTpeShnAta edinHua. |
| Надворeshнatable.edinHua e BO pexIMOT 3a Odmp3HyBaJIe. ·Kora upeDor e BO pexIMOT Na rpeeJe, leiodOT/mpa3OT ce sobpaat Br3 КалemITE, akо додд do Na raJahle Na HauBopeShnAte TempePATya. Obaa Функциja ro OTcTpaHvBa cIooJot od Mpa3 KoJStO ce HAOrA Br3 kaJIeMOT, И SF Травалюда завши за Okoly 15 mInHyTu. | |
| Надворeshнatable TempePATya e npemHory Hncka. ·ЕфektOT Na rpeeJeMe BoMe Дд Neбдд do BOJen. | |
| СимпTomи можни | Прочны и рeshени |
| Вашnot Кужен anapatи смартфонот He ce порзано co Wi-Fi мрека. | Лоб生态系统а 3a Wi-Fi на кoeшто ce обидуне дуа ce поврзete, e неточна. • Нajдente ja Wi-Fi мрека на ловзана co вшиот смартфони отстранete ja, a поюа ренисторajte ro вшиот anapat на LG ThinQ. |
| Мышино падатои 3a вшиот смартфонс ce вklучени. • Исклuchete Ги Мбшино падатои на вшиот смартфони ренисторjetro anapatot, koprasteyки ja Wi-Fi мрека. | |
| И métета на бeзшино на мрека (SSID), He e правлино поесен. • И métета на bезшино на мрека (SSID) trpeba дa bide komбihuшиja od anглески bukви и sboеви. (He koprastete Ги спeциалнite karakтети) | |
| Ф��вени jo大自然а на рутетор He e 2,4 GHz. • Поблржана ecame 2,4 GHz Ф��вени jo на рутетор. Поставete ro bезшино рутетор 2,4 GHz и пени对接 go anapatot co bезшино рутет. 3aда ja пobеритe Ф��вени jo大自然а на рутетор, рobеретe кaj вшиот снабдувач на Interpnet услуги,有很大 кaj пoinizbodnitelot на рутетор. | |
| Пэрелеме e pactojahнeto noméгу anapatot и рутетор. • Ако e пэрелеме pactojahнeto noméгу anapatot и рутетор, сигданot можеда bide садь и кoneckциjsда можеда he bide правлино konфигурирана. Поменete ja lokaшида на рутетор, заudence пobлися до anapatot. |
HANOMEHA
HeKoIyHKuH He MoKaT Da 6uDat noDpKaHn, BO 3aBnCHocT OJ MoJeIoT.
Белейки
MANUALI PÉRDORUESIT
KONDICIONER

VAŽNA SIGURNOSNA UPUTSTVA

UPOZORENJE
Da biste smanjili opasnost od eksplozije, požara, smrti, strujnog udara, povrede ili opekotina za osobe prilikom korištenja ovog proizvoda, pridržavajte se osnovnih mjera prepostrožnosti, uključujuci sljedeće:
Djeca u domacinstvu
Ovaj urežajnosti namijenjen za upotrebu od strane osoba (uključujuci djecu) sa smanjenim fizickim, senzornim ili mentalnim sposobnostima, ili s nedostatkom iskustva i znanja, osim u slučaju da su te osobe pod stalnim nadzorom ili su instruirane po pitanju korištenja urežaja od strane osobe koja je odgovorna za njihovu sigurnost. Djeca trebaju biti pod nadzorom kako bi se osiguralo da se ne igraju s urežajem.