XHS1000XX - Dryer MAYTAG - Free user manual and instructions
Find the device manual for free XHS1000XX MAYTAG in PDF.
Download the instructions for your Dryer in PDF format for free! Find your manual XHS1000XX - MAYTAG and take your electronic device back in hand. On this page are published all the documents necessary for the use of your device. XHS1000XX by MAYTAG.
USER MANUAL XHS1000XX MAYTAG
Gather the required tools and parts before starting installation. #2 Phillips screwdriver Parts Included: Adjustable Clothes Rack main assembly (1) Hanger arms (2) Screws (4*)
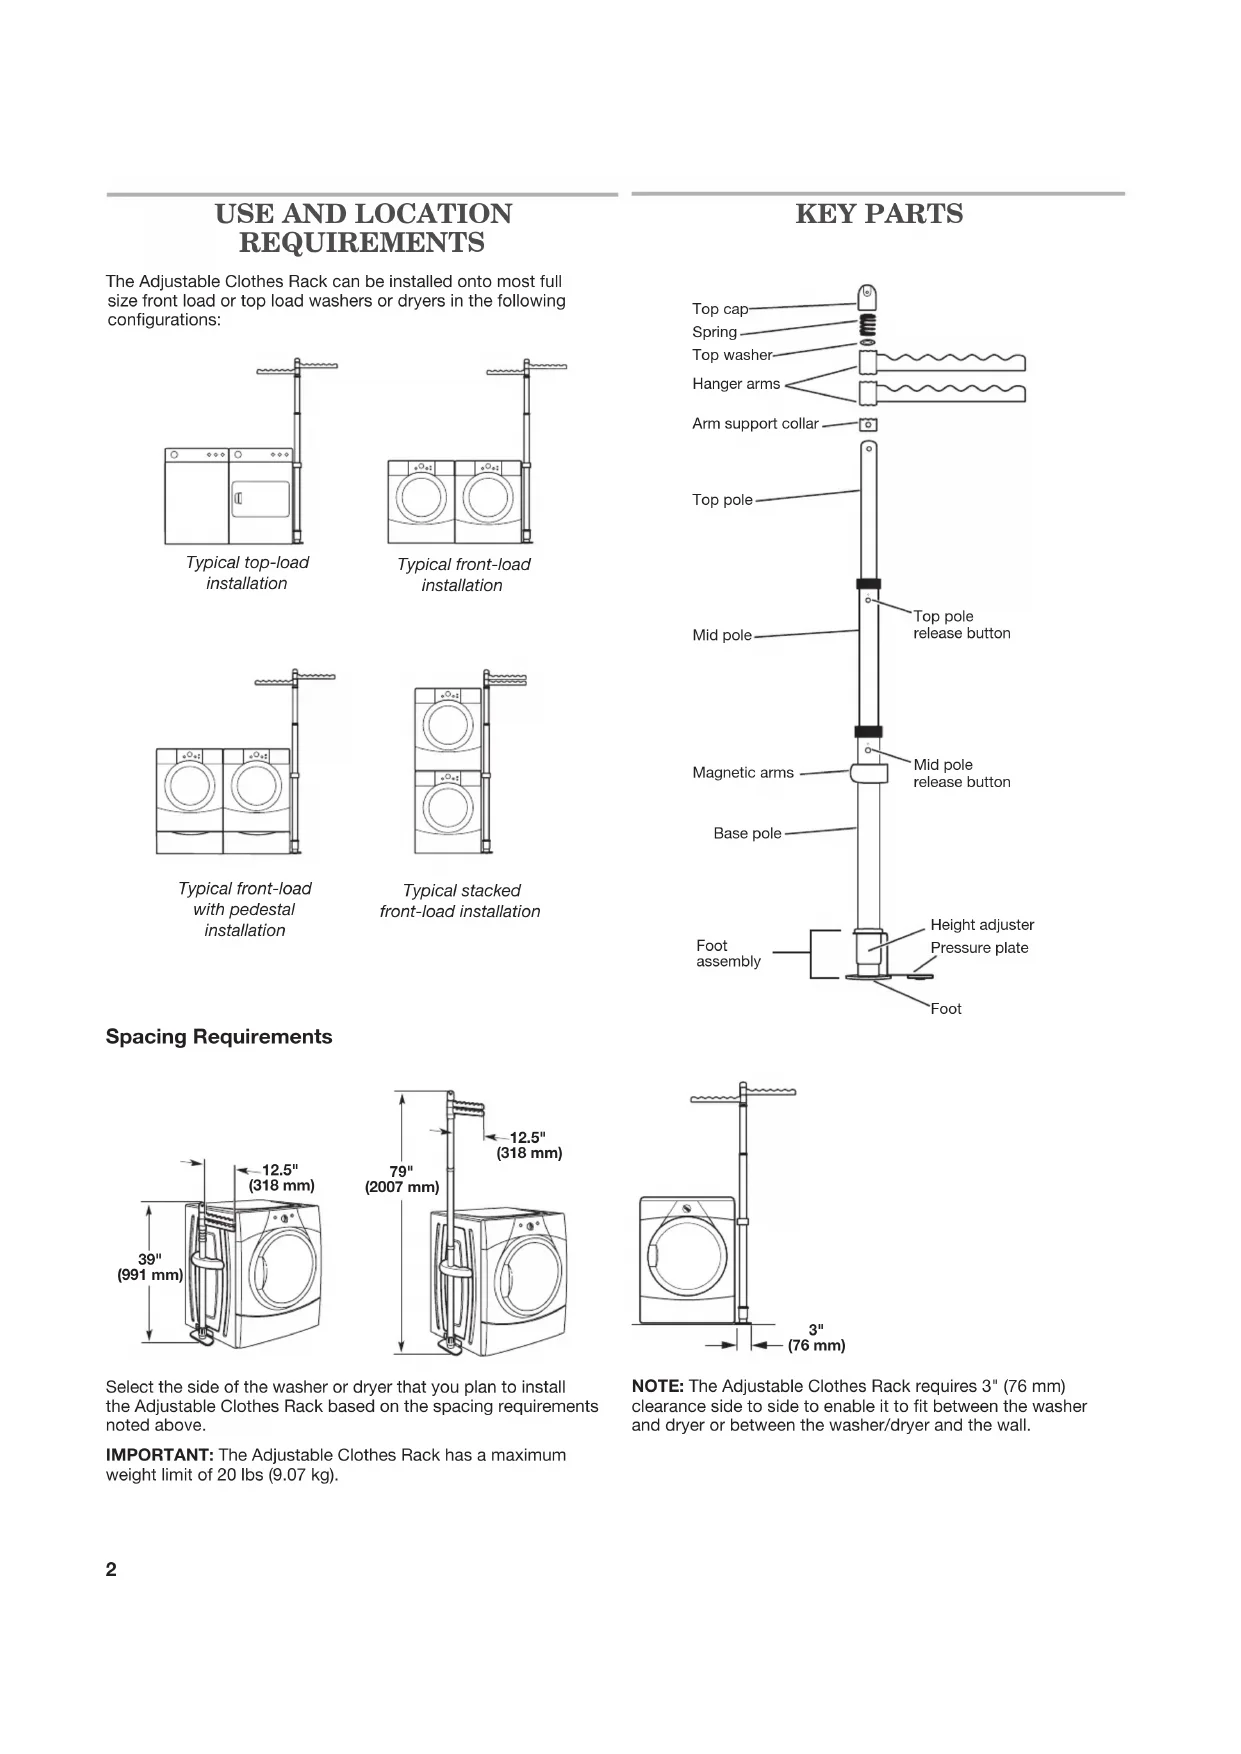
- 3 used for assembly + 1 spare Arm support collar (1) Top cap (1) Top washer (1) Top cap spring (1) Adjustable Clothes Rack foot assembly (1) Table des matières Tools needed: Bagged together Bagged together2 Top cap Spring Top washer Hanger arms Arm support collar Top pole Mid pole Base pole Magnetic arms Pressure plate Height adjuster Foot Foot assembly The Adjustable Clothes Rack can be installed onto most full size front load or top load washers or dryers in the following congurations: Select the side of the washer or dryer that you plan to install the Adjustable Clothes Rack based on the spacing requirements noted above. IMPORTANT: The Adjustable Clothes Rack has a maximum weight limit of 20 lbs (9.07 kg).
REQUIREMENTS Typical top-load installation Typical front-load installation Typical front-load with pedestal installation Typical stacked front-load installation KEY PARTS Top pole release button Mid pole release button Spacing Requirements 39" (991 mm) 12.5" (318 mm) 79" (2007 mm) 12.5" (318 mm)
(76 mm) NOTE: The Adjustable Clothes Rack requires 3" (76 mm) clearance side to side to enable it to t between the washer and dryer or between the washer/dryer and the wall.3 ASSEMBLY INSTRUCTIONS
Press the release buttons at the bottom of the base pole, and grasping the mid-pole, extend it upward until it locks into place.
2. Attach foot assembly to base pole
Insert the base pole into the foot assembly, as shown. Align the hole in the foot with the pilot hole in the base pole and secure with one of the included screws. If the hole in the foot is not visible, turn the Height Adjuster counterclockwise until the hole in the foot is visible. NOTE: There may be some resistance when the screw starts threading into the hole. This is normal.
4. Release and extend top pole
Press the release buttons on the mid pole and extend top pole until it locks into place.
5. Slide arm support collar onto
top pole Slide the arm support collar onto the top pole, and down past the release buttons on the top pole. Be sure the toothed end is facing UP, as shown. NOTE: To allow proper installation of the hanger arms, the arm support collar must be below release buttons until the rest of the hanger arm assembly is complete. Release buttonsBase poleBase polePilot hole Foot Screw
3. Lower mid-pole (optional)
To simplify assembly of the hanger arms to the top pole, you may want to lower the mid pole back into its lowered position. Press the release buttons at the top of the base pole, and slide the mid-pole into the base pole. Release buttonsRelease buttonsTop poleMid poleRelease buttonsArm support collarTop poleMid poleMid poleHeight adjuster4
8. Lock arm support collar into place
Press the release buttons on the top pole and slide the arm support collar over them to lock it into place. There will be some resistance from the spring as you slide it into place.
Fit the top cap onto the end of the top pole. Pressing down on the top cap, align the holes in the top cap with the pilot holes in the top pole, and secure in place with two screws.
6. Slide hanger arms onto top pole
Slide both the hanger arms, toothed side facing up, onto the top pole, allowing them to rest on the release buttons. Then, slide the top washer and spring onto the top pole above the hanger arms. Top washer Hanger arms Top pole Screws Top cap Top pole Pilot holes
9. Place Adjustable Clothes Rack
into storage mode To simplify installation of the Adjustable Clothes Rack, place it into storage mode by pressing the release buttons for the top pole and mid pole (if extended) and sliding them down into the base pole. The Adjustable Clothes Rack is now ready to be installed onto the washer or dryer. Release buttons Arm support collar Spring Release buttons Release buttons5
4. Adjust pressure plate
Once the Adjustable Clothes Rack is centered in the desired position, turn the height adjuster on the foot assembly counterclockwise to raise the pressure plate until it is rmly against the bottom of the washer or dryer. Make sure that the foot is in solid contact with the oor. NOTE: The pressure plate needs to press rmly against the bottom edge of the washer or dryer to avoid movement of the Adjustable Clothes Rack when the hanger arms are fully loaded. You can now extend the top and mid poles, and the hanger arms can be rotated to the desired location.
3. Move Adjustable Clothes Rack
into position Center the Adjustable Clothes Rack front to back against the side of the washer or dryer and slide the pressure plate under the edge of the washer or dryer. Then tilt the upper part of the Adjustable Clothes Rack toward the washer or dryer until the magnetic arms hold it in place on the metal side of the washer or dryer.
2. Adjust the pressure plate
Turn the height adjuster on the foot assembly clockwise to lower or counterclockwise to raise the pressure plate. The pressure plate should just t under the bottom edge of the washer or dryer. INSTALLATION INSTRUCTIONS Hold the Adjustable Clothes Rack a few inches away from the side of the washer or dryer so that the magnetic arms are not attached to the side of the washer or dryer. NOTE: Make sure the Adjustable Clothes Rack has the top and mid poles collapsed into the base pole prior to installing it onto the washer or dryer.
1. Determine the installation location
For 90 days from the date of this purchase, when this Adjustable Clothes Rack is installed, operated, and maintained according to instructions attached to or furnished with this product, Whirlpool Corporation or Whirlpool Canada LP (hereafter “Whirlpool”) will, at its sole option, deliver factory specied replacement parts to correct defects in materials or workmanship or replace the product. If replaced, your product will be covered by the remaining 90-day limited warranty of the original unit. YOUR SOLE AND EXCLUSIVE REMEDY UNDER THE LIMITED WARRANTY SHALL BE PRODUCT REPAIR OR REPLACEMENT AT OUR DISCRETION AS PROVIDED HEREIN. This limited warranty is valid in the United States and Canada and applies only when the Adjustable Clothes Rack is used in the country in which it was purchased. This limited warranty is effective from the date of the original consumer purchase. Proof of original purchase date is required to obtain service or replacement under this limited warranty.
ITEMS EXCLUDED FROM WARRANTY
This warranty does not cover: 1. In-home service including, but not limited to, service calls to correct the installation of your Adjustable Clothes Rack or to instruct you on how to use your product. 2. Factory specied replacement parts or product replacement when your Adjustable Clothes Rack is used for other than normal, single-family household use or when it is used in a manner contrary to published user or operator instructions and/or installation instructions. 3. Damage to the Adjustable Clothes Rack, garments or other property resulting from accident, alteration, misuse, abuse, re, oods, acts of God, improper installation not in accordance with local electrical and plumbing codes, or use of consumables or cleaning products not approved by Whirlpool Corporation. 4. Cosmetic damage, including scratches, dents, chips, or other damage to the nish of your Adjustable Clothes Rack, unless such damage results from defects in materials or workmanship and is reported to Whirlpool within 30 days from the date of purchase.
5. Factory specied parts or product replacement resulting from unauthorized modications made to the product.
6. Travel, transportation, or shipping expenses outside of the expenses specically designated in this Adjustable Clothes Rack limited warranty. The cost of repair or replacement under these excluded circumstances shall be borne by the customer. If you reside in the United States or Canada and need to submit a request for warranty service: 1. Customers in the U.S.A. should call our service ofce at 1-800-253-1301, from 8:00 a.m. to 8:00 p.m., Monday through Friday, Eastern Standard Time. Customers in Canada should call our service ofce at 1-800-807-6777, from 8:00 a.m. to 6:30 p.m., Monday through Friday, Eastern Standard Time.
2. Give the consultant your model, serial number, and shipping address (no P. O. Box numbers, please).
3. The consultant will advise whether the Adjustable Clothes Rack qualies for factory specied replacement parts or product replacement. 4. You may be directed to forward the product to a Whirlpool designated service center. You are responsible for insurance and freight to the designated service center. Please include your name and address on a piece of paper, along with a copy of the proof of purchase (register receipt, charge slip, etc.). The product should be properly packaged to avoid damage in transit, as we will not be responsible for any such damage. 5. Whirlpool will return the specied unit or, at our option, an identical or comparable Adjustable Clothes Rack, or factory specied replacement parts, to your door free of charge.
DISCLAIMER OF IMPLIED WARRANTIES
IMPLIED WARRANTIES, INCLUDING ANY IMPLIED WARRANTY OF MERCHANTABILITY OR IMPLIED WARRANTY OF FITNESS FOR A PARTICULAR PURPOSE, ARE LIMITED TO 90 DAYS OR THE SHORTEST PERIOD ALLOWED BY LAW. Some states and provinces do not allow limitations on the duration of implied warranties of merchantability or tness, so this limitation may not apply to you. This warranty gives you specic legal rights, and you also may have other rights that vary from state to state or province to province. LIMITATIONS OF REMEDIES; EXCLUSION OF INCIDENTAL AND CONSEQUENTIAL DAMAGES YOUR SOLE AND EXCLUSIVE REMEDY UNDER THIS LIMITED WARRANTY SHALL BE PRODUCT REPAIR OR REPLACEMENT AT OUR DISCRETION AS PROVIDED HEREIN. WHIRLPOOL SHALL NOT BE RESPONSIBLE FOR INCIDENTAL OR CONSEQUENTIAL DAMAGES. Some states and provinces do not allow the exclusion or limitation of incidental or consequential damages, so these limitations may not apply to you. This warranty gives you specic legal rights, and you also may have other rights that vary from state to state or province to province. Keep this warranty and your sales slip together for future reference. You must provide proof of purchase for in-warranty service. Write down the following information about your Adjustable Clothes Rack to better help you obtain assistance or service if you ever need it. Yo u will need to know your complete model number. Model Number 7/10 Purchase Date Serial Number7 OUTILLAGE ET PIèCES Rassembler les outils et pièces nécessaires avant d’entreprendre l’installation. Tournevis Phillips n° 2 Pièces inclus : Porte-vêtements réglable – composant principal (1) Bras d’accrochage (2) Vis (4*)