
4G185 - Router Tenda - Free user manual and instructions
Find the device manual for free 4G185 Tenda in PDF.
User questions about 4G185 Tenda
0 question about this device. Answer the ones you know or ask your own.
Ask a new question about this device
Download the instructions for your Router in PDF format for free! Find your manual 4G185 - Tenda and take your electronic device back in hand. On this page are published all the documents necessary for the use of your device. 4G185 by Tenda.
USER MANUAL 4G185 Tenda
Quick Installation Guide
4G LTE Mobile Wi-Fi 4G185
Package contents
-
Mobile Wi-Fi × 1
-
Li-ion Battery × 1
-
SIM Card Adapter × 1
USB Cable × 1
- User Manual × 1
Please read this guide before you start with the quick setup upon the first use. You can see the product name and model on the product label.
This guide instructs how to install and connect the device. For more information such as the description of symbols displayed on relevant materials, please visit www.tendacn.com.
01 / English
09 / Netherlands
15 / Melayu
21 / Pycckn
27 / Polski
33 / Čestina
39 / Deutsch
45 / Espanol
51 / François
57 / Italiano
63 / Româna
69 / nju
75 / Vietnamese
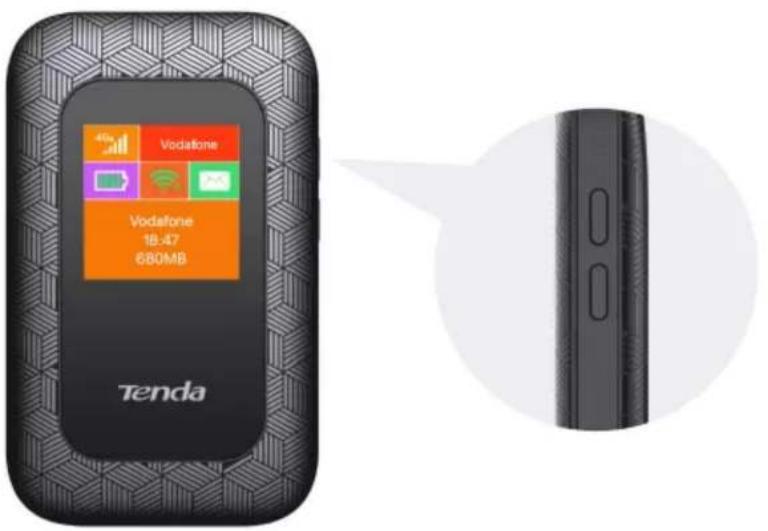
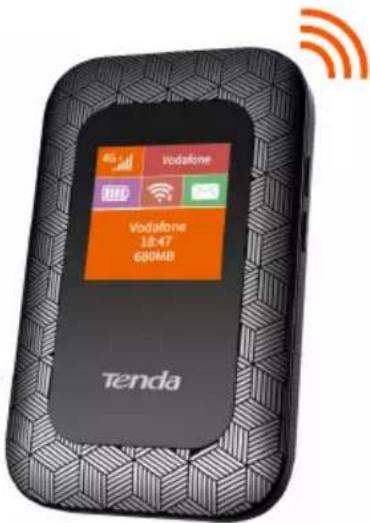
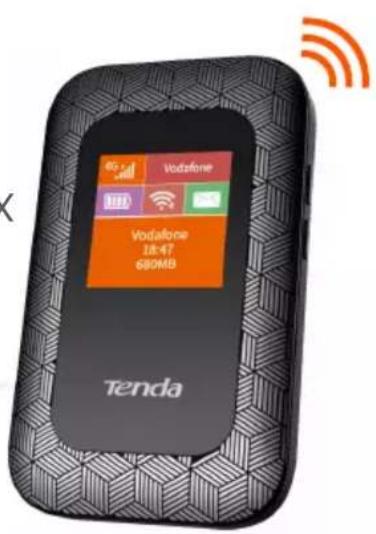
LCD screen
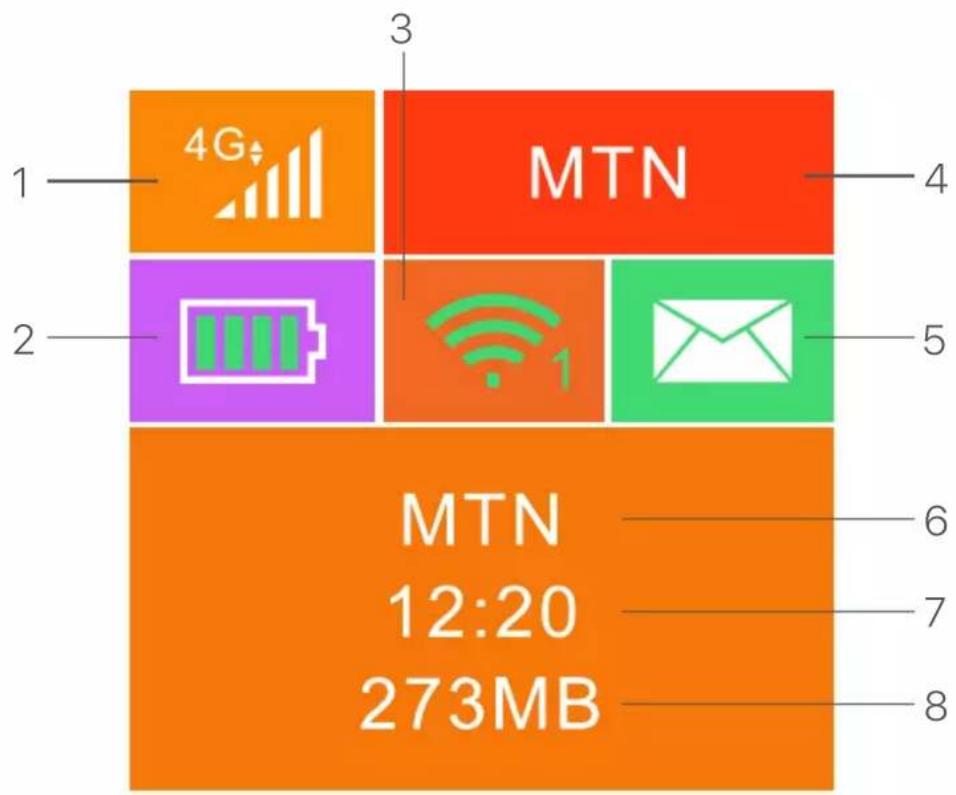
- Data type and signal strength
- Battery meter
- Wi-Fi status and connected Wi-Fi clients
- Operator name
- Message status
- Operator name/Tip information
- Internet connection duration
- Used data traffic
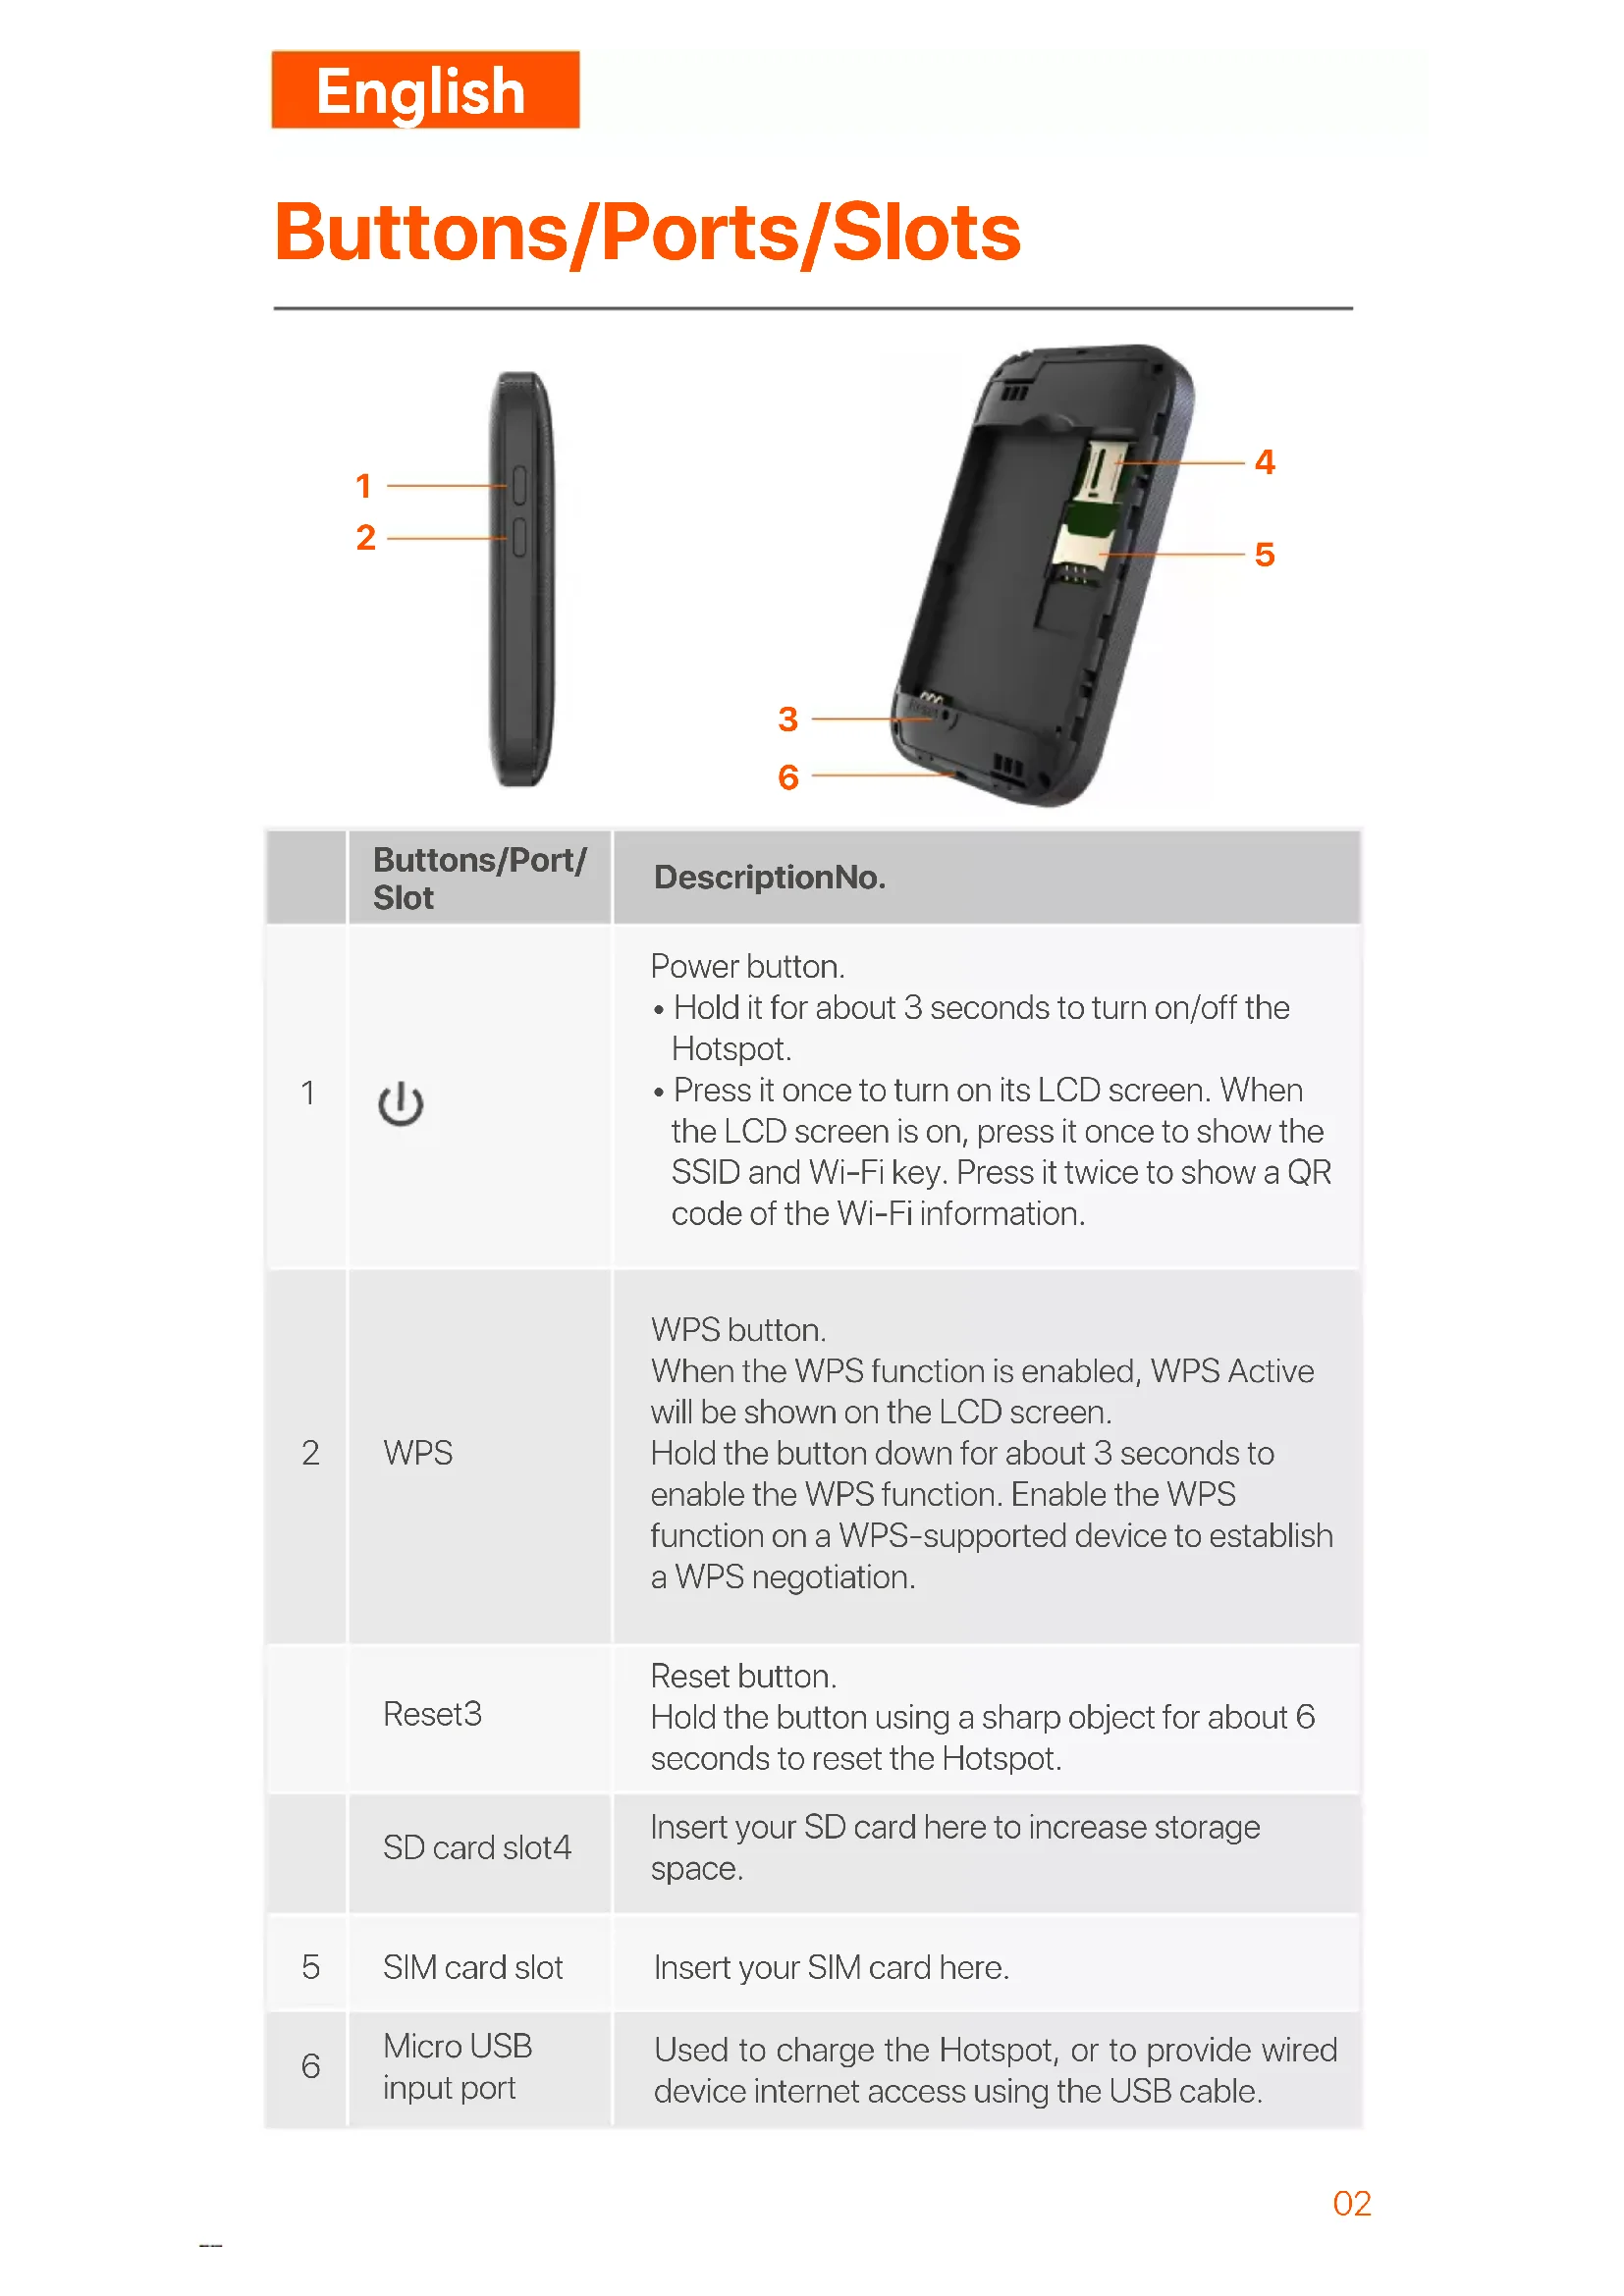
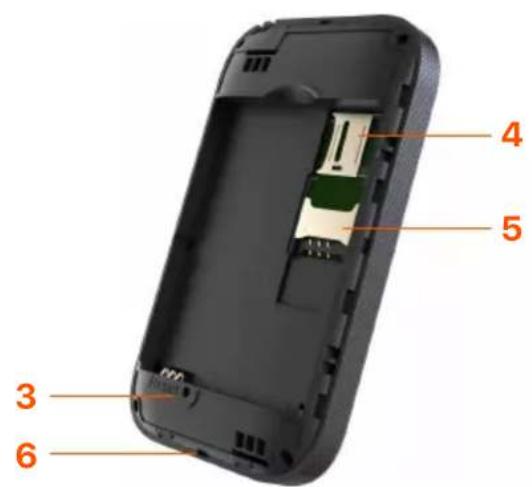
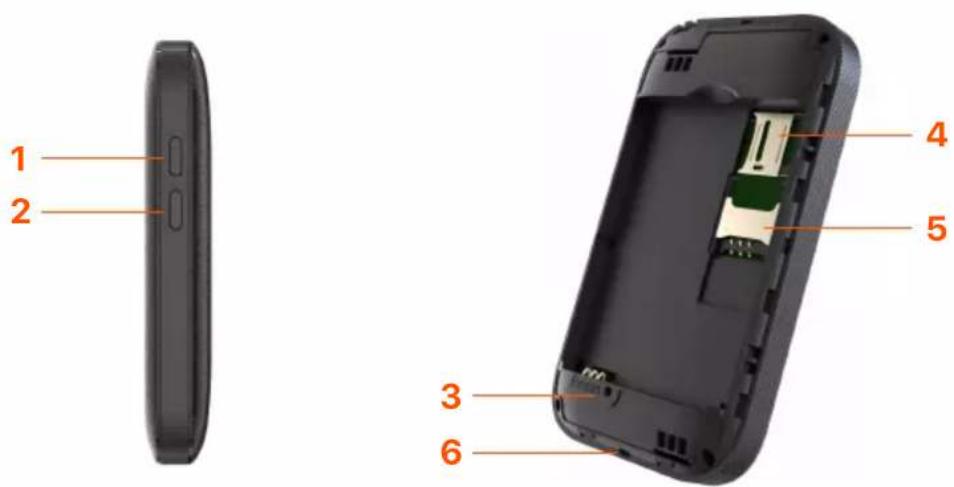
Buttons/Ports/Slots
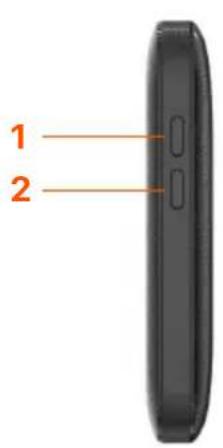
| Buttons/Port/Slot | DescriptionNo. | |
| 1 | USB | Power button. • Hold it for about 3 seconds to turn on/off the Hotspot. • Press it once to turn on its LCD screen. When the LCD screen is on, press it once to show the SSID and Wi-Fi key. Press it twice to show a QR code of the Wi-Fi information. |
| 2 | WPS | WPS button. When the WPS function is enabled, WPS Active will be shown on the LCD screen. Hold the button down for about 3 seconds to enable the WPS function. Enable the WPS function on a WPS-supported device to establish a WPS negotiation. |
| Reset3 | Reset button. Hold the button using a sharp object for about 6 seconds to reset the Hotspot. | |
| SD card slot4 | Insert your SD card here to increase storage space. | |
| 5 | SIM card slot | Insert your SIM card here. |
| 6 | Micro USB input port | Used to charge the Hotspot, or to provide wired device internet access using the USB cable. |
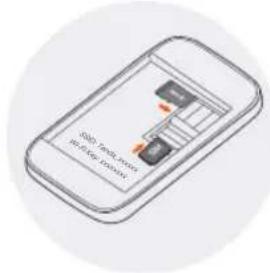
Install SIM card and battery
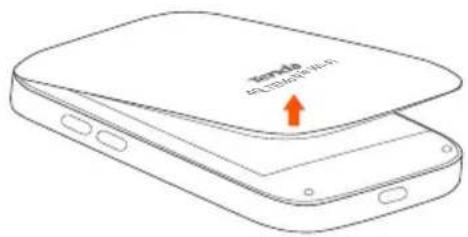

Open from the lower left corner
SSID: Tenda_xxxxxxxxx Wi-Fi Key:xxxxxxxx


Slide and flip to open, and then insert a micro SIM (3FF) card into the slot.
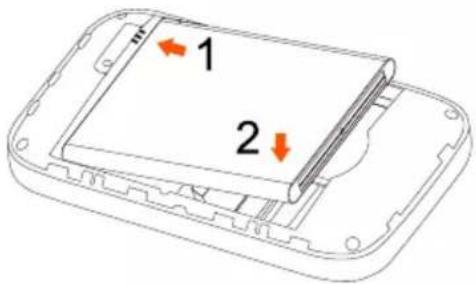

Metal connectors
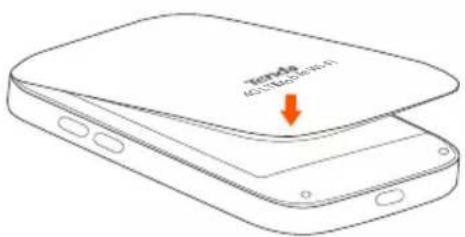

Turn on the Hotspot
Hold the button till the LCD screen lights up.
When the Hotspot is connected to the internet, you will find:

Access the internet
To access the internet through the Hotspot:
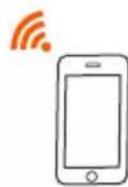
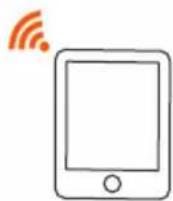
- Wireless: Connect your wireless device to the Wi-Fi network of the Hotspot with the SSID and Wi-Fi key at the top of the device after opening the back cover.
- Wired: Connect a PC or laptop to the Hotspot using the USB cable.
SSID: TendaXXXXXXXX
Wi-Fi Key:XXXXXXXX
You can log in to the web UI by visiting 192.168.0.1 to further configure the Hotspot.

Tips
- For the computer connected in a wired manner for the first time, you need to manually install the CD drive popped up on the computer before you can access the internet.
If you cannot access the internet, refer to Q2 in FAQ.
If you cannot log in to the web UI, refer to Q3 in FAQ.
Charge your Hotspot
Method 1: Connect to a power socket (5V --- 1A).

Method 2: Connect to a computer by using the USB cable.


Tips
- With no battery installed, 4G185 can still be powered on as long as it is connected to a power supply device (such as a power adapter, laptop or portable charger) with the USB cable.
- If you need to use 4G185 with a power supply device always connected, you can remove the battery for protection to extend its lifespan.
- After the battery is fully charged, you can remove the charger to avoid shorter battery lifespan caused by overcharge.
Q1: The Hotspot is not connected to the internet after a long time. What should I do?
A1: Try the following solutions:
- Ensure that your SIM card is pre-paid and has enough balance.
- Check if your SIM card is locked with a PIN code. If so, contact your ISP for the PIN code, visit the web UI (default: 192.168.0.1) on a connected device, and follow the instructions on the web UI to unlock the SIM card.
Try another SIM card. - Reset the Hotspot.
Q2: I cannot access the internet. What should I do?
A2: Try the following solutions:
- Ensure that the Hotspot is connected to the internet. If not, refer to Q1.
- Ensure that your wireless device is connected to the Wi-Fi network of the Hotspot.
- Try with your wireless device closer to the Hotspot.
- Ensure that your wired device is connected to the Hotspot properly and set to obtain an IP address automatically.
Q3: I cannot log in to the web UI. What should I do?
A3: Try the following solutions:
-
For wireless devices:
-
Ensure that you connect your device to the Wi-Fi network of the Hotspot.
-
Ensure that you have disabled the mobile data (if any) of your wireless device.
-
For wired devices: Ensure that the wired device, such as a computer, obtains an IP address automatically.
- Ensure that you entered 192.168.0.1 correctly in the address bar of a browser.
- Try another browser or with another device.
If the problem persists, reset the Hotspot and try again.
Q4: How to change the Wi-Fi name (SSID) and Wi-Fi key?
A4: Follow the steps below:
1 Start a web browser on a connected device and visit 192.168.0.1 to log in to the web UI.
Enter the login password (default: admin) and click Login.
3 Find Network Settings and choose Wi-Fi Settings.
Change Network Name (SSID) and Wi-Fi Key (or Pass Phrase) as required.
Q5: How to reset the Hotspot?
A5: Follow the steps below:
1 Remove the back cover.
2 Find the Reset hole in the lower part of the Hotspot.
Hold the button using a sharp object for about 6 seconds.
LCD scherm

SSID: TendaXXXXXXXXWLAN-Schlüssel:XXXXXX
Botones/Puertos/Ranuras
This is a Class B product. In a domestic environment, this product may cause radio interference, in which case the user may be required to take adequate measures.
This equipment should be installed and operated with a minimum distance 20cm between the device and your body.
NOTE: (1) The manufacturer is not responsible for any radio or TV interference caused by unauthorized modifications to this equipment. (2) To avoid unnecessary radiation interference, it is recommended to use a shielded USB cable.
Declaration of Conformity
Hereby, SHENZHEN TENDA TECHNOLOGY CO., LTD. declares that the device is in compliance with Directive 2014/53/EU. The full text of the EU declaration of conformity is available at the following internet address: https://www.tendacn.com/download/list-9.html
Operating Frequency/Max Output Power
This product bears the selective sorting symbol for Waste electrical and electronic equipment (WEEE). This means that this product must be handled pursuant to European directive 2012/19/EU in order to be recycled or dismantled to minimize its impact on the environment.
User has the choice to give his product to a competent recycling organization or to the retailer when he buys a new electrical or electronic equipment.
Espanol
HactoI, SHENZHEN TENDA TECHNOLOGY CO., LTD. 3aaybIeT, yTo
yctpoiCTBO COOTBeTCTByeT DnpeKtIbe 2014/53/EU. IoHbI TeKcT
deknapauncootbeTcBnE CdoctypeH no cJeDyUoMeMy
intepnet-adpecy:https://www.tendacn.com/download/list-9.html
Nederlandse
VEREENVOUDIGDE EU-CONFORMITEITSVERKLARING
English: Safety Precautions
Before performing an operation, read the operation instructions and precautions to be taken, and follow them to prevent accidents. The warning and danger items in other documents do not cover all the safety precautions that must be followed. They are only supplementary information, and the installation and maintenance personnel need to understand the basic safety precautions to be taken.
- Do not use the device in a place where wireless devices are not allowed.
- Operating environment: Temperature: 0^ - 40^ ; Humidity: (10% - 90%) RH, non-condensing; Storage environment: Temperature: -40^ - 70^ ; Humidity: (5% - 90%) RH, non-condensing.
- Keep the device away from water, fire, high electric field, high magnetic field, and inflammable and explosive items.
- Do not use the USB cable if its plug or cord is damaged.
- If such phenomena as smoke, abnormal sound or smell appear when you use the device, immediately stop using it and disconnect its power supply, unplug all connected cables, and contact the after-sales service personnel.
- Disassembling or modifying the device or its accessories without authorization voids the warranty, and might cause safety hazards.
- CAUTION
RISK OF EXPLOSION IF BATTERY IS REPLACED BY AN INCORRECT TYPE.
DISPOSE OF USED BATTERIES ACCORDING TO LOCAL REGULATIONS
Frequency bands and power
Some frequency bands in which the radio equipment operates may not be available in some countries or areas. Please contact your local ISP for more details.
The maximum radio-frequency power transmitted in the frequency bands in which the radio equipment operates is less than the highest limit value specified in the related Harmonized Standard.
The frequency bands and transmitting power (radiated and/or conducted) nominal limits applicable to this radio equipment are as follows:
Band:
4G LTE Band: B1/B3/B5/B7/B8/B20/B28/B38/B40/B41;
LTE Power: 23 ± 2 dBm

Caution:
Battery Model: 4G
Voltage: 3.8V
Capacity: 2100mAh 7.98Wh
Limited charge voltage: 4.35V
Manufacturer: Shenzhen Powercome Electronics Co., LTD
Technical Support
Shenzhen Tenda Technology Co., Ltd.
Floor 6-8, Tower E3, No.1001, Zhongshanyuan Road,
Nanshan District, Shenzhen, China. 518052
Website: www.tendacn.com
E-mail: support@tenda.com.cn
support.uk@tenda.cn (United Kingdom)
support.us@tenda.cn (North America)
Copyright
© 2023 Shenzhen Tenda Technology Co., Ltd. All rights reserved.
Tenda is a registered trademark legally held by Shenzhen Tenda Technology Co., Ltd. Other brand and product names mentioned herein are trademarks or registered trademarks of their respective holders. Specifications are subject to change without notice.
V3.0 Keep for future reference.