USER MANUAL BIK5 DP8FS2 ES BAUKNECHT
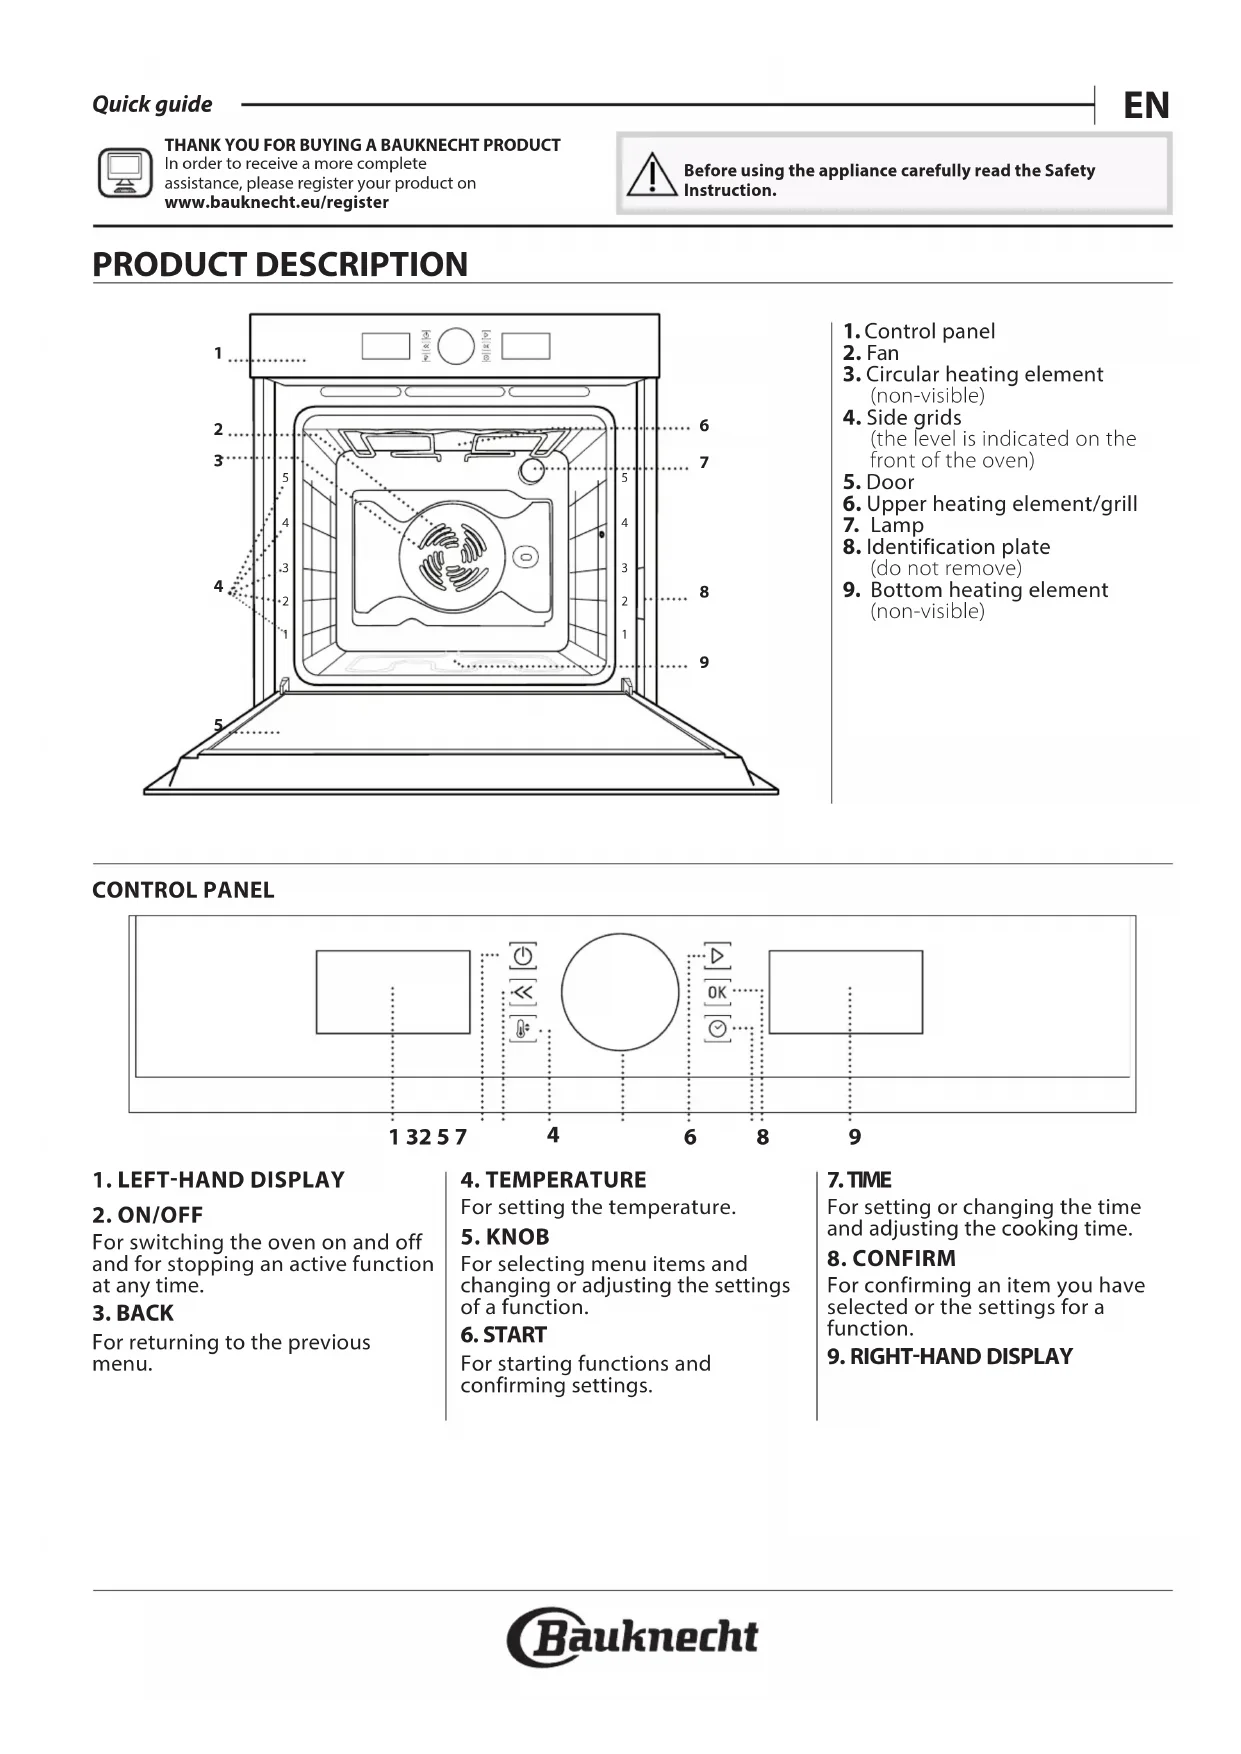
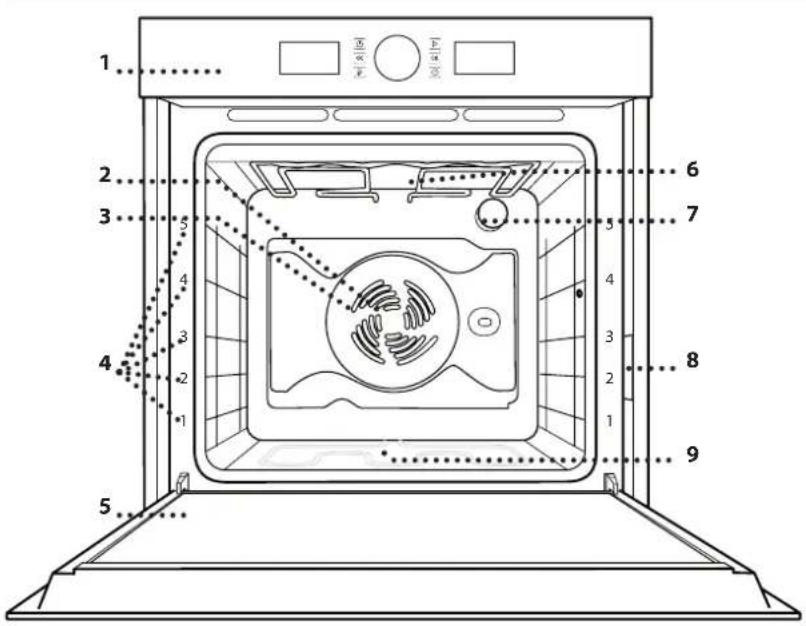
- Control panel
2.Fan
- Circular heating element (non-visible)
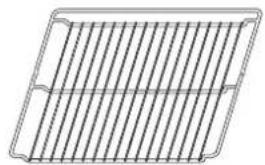
- Side grids (the level is indicated on the front of the oven)
- Door
- Upper heating element/grill
- Lamp
- Identification plate (do not remove)
- Bottom heating element (non-visible)
CONTROL PANEL
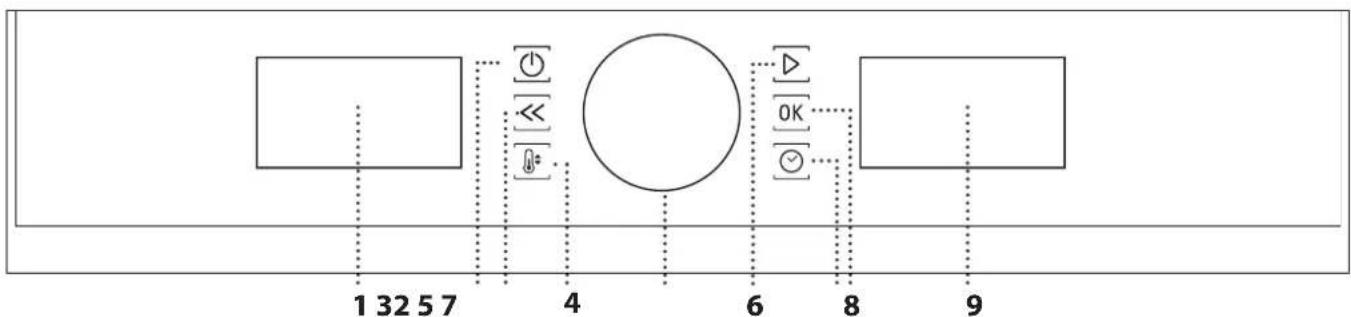
1. LEFT-HAND DISPLAY
2. ON/OFF
For switching the oven on and off and for stopping an active function at any time.
3. BACK
For returning to the previous menu.
4. TEMPERATURE
For setting the temperature.
5.KNOB
For selecting menu items and changing or adjusting the settings of a function.
6. START
For starting functions and confirming settings.
7. TIME
For setting or changing the time and adjusting the cooking time.
8. CONFIRM
For confirming an item you have selected or the settings for a function.
9. RIGHT-HAND DISPLAY
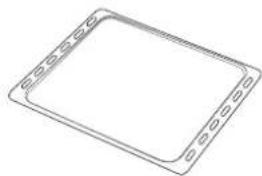
WIRE SHELF DRIP TRAY\*BAKING TRAY\*SLIDING RUNNERS\*
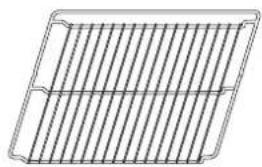
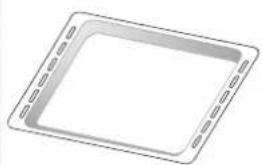

The number and type of accessories may vary depending on which model is purchased. Other accessories can be purchased separately from the After-sales Service.
INSERTING THE WIRE SHELF AND OTHER ACCESSORIES
Insert the wire shelf horizontally by sliding it across the shelf guides, making sure that the side with the raised edge is facing upwards.
Other accessories, such as the drip tray and the baking tray, are inserted horizontally in the same way as the wire shelf.
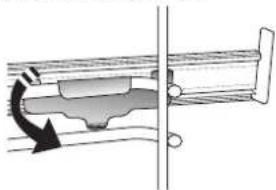
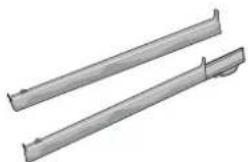
REMOVING AND REFITTING THE SHELF GUIDES
-
To remove the shelf guides, remove the fixing screws (if present) on both sides with the aid of a coin or a tool. Then, lift the guide and remove the lower components from their seating: the shelf guides can now be removed.
-
To refit the shelf guides, first fit them back into their upper seating. Keeping them held up, slide them into the cooking compartment, then lower them into position in the lower seating. Refit the fixing screws.
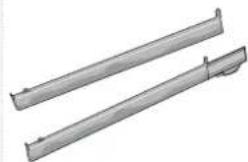
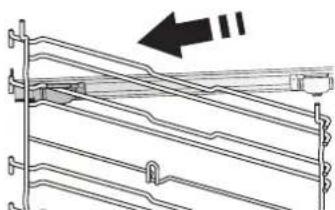
FITTING THE SLIDING RUNNERS (IF PRESENT)
Please note: The sliding runners can be already mounted on the shelf guides: to remove them, pull outward, releasing first the lower clip.
Remove the shelf guides from the oven and remove the protective plastic from the sliding runners.
Fasten the upper clip of the runner to the shelf guide and slide it along as far as it will go. Lower the other clip into position.
To secure the guide in place, firmly press the lower portion of the clip firmly against the shelf guide.
Make sure that the runners can move freely. Repeat these steps on the other shelf guide on the same level.
Please note: The sliding runners can be fitted on any level.

CONVENTIONAL
For cooking any kind of dish on one shelf only.

GRILL
For grilling steaks, kebabs and sausages, ng vegetables au gratin or toasting bread
When grilling meat, we recommend using a drip tray to collect the cooking juices: position the pan on any of the levels below the wire shelf and add 500 ml of water.

FORCED AIR
For cooking different foods that require the cooking temperature on several shelves
(maximum three) at the same time. This function can be used to cook different foods without odours being transferred from one food to another.

CONVECTION BAKE
For cooking meat, baking cakes with fillings or using stuffed vegetables on one shelf only. This option uses gentle, intermittent air circulation to prevent food from drying out excessively.

AUTOMATIC FUNCTIONS

CASSEROLE
This function automatically selects the best literature and cooking method for pasta dishe

MEAT
This function automatically selects the best literature and cooking method for meat. This ion intermittently activates the fan at low speed event the food from drying out too much.

MAXI COOKING
The function automatically selects the best cooking mode and temperature to cook large joints of meat (above 2.5kg ). It is advisable to turn the oven over during cooking, to obtain even browning in both sides. It is best to baste the meat every now to regain to prevent it from drying out.

BREAD
This function automatically selects the best literature and cooking method for all types of food.

PIZZA
This function automatically selects the best literature and cooking method for all types of

PASTRY CAKES
This function automatically selects the best literature and cooking method for all types of

SPECIAL FUNCTIONS

FAST PREHEATING
For preheating the oven quickly. Once preheating has finished, the oven will select the "Conventional" function automatically. Wait for preheating to finish before placing food in the oven.

TURBO GRILL
For roasting large joints of meat (legs, roast beef, chicken). We recommend using a drip tray to collect the cooking juices: position the pan on any of the levels below the wire shelf and add 500ml of water. The turnspit (if provided) can be used with this function.

ECO FORCED AIR*
For cooking stuffed roasting joints and fillets of meat on a single shelf. Food is prevented from drying out excessively by gentle, intermittent air circulation. When this function is in use, the ECO light will remain switched off throughout cooking but can be switched back on temporarily by pressing the OK button. To use the ECO cycle and therefore optimise power consumption, the oven door should not be opened until the food is completely cooked.

KEEP WARM
For keeping just-cooked food hot and crisp.
RISING
For optimal proving of sweet or savoury dough. To maintain the quality of proving, do not activate the function if the oven is still hot following a cooking cycle.

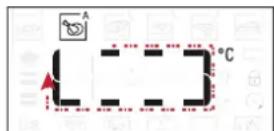
AUTOMATIC CLEANING - PYRO
For eliminating cooking residues with an extrahigh temperature cycle. Two self-cleaning cycles are available: a complete cycle (PYRO) and a shorter cycle (ECO). We recommend using the quicker cycle at regular intervals and the complete cycle only when the oven is heavily soiled.
- Function used as reference for the energy efficiency declaration in accordance with Regulation (EU) No. 65 / 2014
FIRST TIME USE
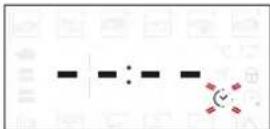
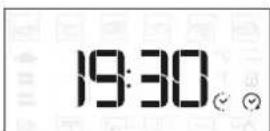
1. SETTING THE TIME
You will need to set the time when you switch on the oven for the first time.
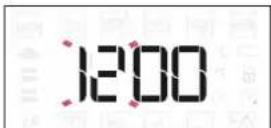
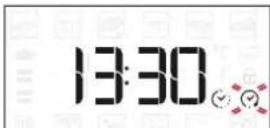
The two digits for the hour will start flashing: Turn the knob to set the hour and press OK to confirm.

The two digits for the minutes will start flashing. Turn the knob to set the minutes and press OK to confirm.
Please note: To change the time at a later point, press and hold for at least one second while the oven is off and repeat the steps above.
You may need to set the time again following lengthy power outages.
2. SETTINGS
If required, you can change the default unit of measurement, temperature (^) and rated current (16 A).
With the oven off, press and hold for at least 5 seconds.
SET
Turn the knob to select the unit of measurement, then press OK to confirm.
16 8
Turn the selection knob to select the power consumption, then press OK to confirm.
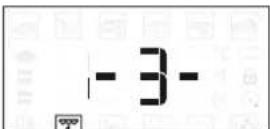
Please note: The oven is programmed to consume a level of electrical power that is compatible with a domestic network that has a rating of more than 3kW (16 A): If your household uses a lower power, you will need to decrease this value (13 A).
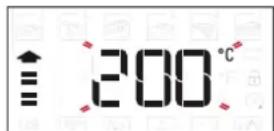
3. HEAT THE OVEN
A new oven may release odours that have been left behind during manufacturing: this is completely normal. Before starting to cook food, we therefore recommend heating the oven with it empty in order to remove any possible odours.
Remove any protective cardboard or transparent film from the oven and remove any accessories from inside it. Heat the oven to 200^ for around one hour, ideally using a function with air circulation (e.g. "Forced Air" or "Convection Bake").
Follow the instructions for setting the function correctly.
Please note: It is advisable to air the room after using the appliance for the first time.
DAILYUSE
1. SELECT A FUNCTION
When the oven is off, only the time is shown on the display. Press and hold to switch the oven on.
Turn the knob to view the main functions available on the left-hand display. Select one and press OK.

To select a sub-function (where available), select the main function and then press OK to confirm and go to the function menu.

Turn the knob to view the sub-functions available on the right-hand display. Select one and press OK to confirm.
2. SET THE FUNCTION
After having selected the function you require, you can change its settings.
The display will show the settings that can be changed in sequence.
TEMPERATURE/GRILL LEVEL
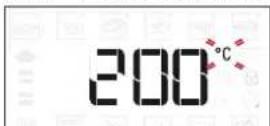
When the ^ C / F icon flashes on the display, turn the knob to change the value, then press OK to confirm and continue with altering the settings for all values that can be regulated.
You can also set the grill level (3 = high, 2 = medium, 1 = low) at the same time.
Please note: Once the function has been activated, you can change the temperature or the grill level by pressing or by turning the knob directly.
DURATION
When the icon flashes on the display, use the adjustment knob to set the cooking time you require and then press OK to confirm.
You do not have to set the cooking time if you want to manage cooking manually: Press to confirm and activate the function. In this case, you cannot set the end cooking time by programming a delayed start.
Please note: You can adjust the cooking time that has been set during cooking by pressing turn the knob to change the time, then press confirm.
SET THE COOKING END TIME DELAYED START
In many functions, once you have set a cooking time you can delay starting the function by programming its end time. Where it is possible to change the end time, the display will show the time the function set to finish while the icon flashes.
If necessary, turn the knob to set the time you want cooking to end, then press to confirm and activate the function.
Place the food in the oven and close the door: The function will start automatically after the period of time that has been calculated in order for cooking to finish at the time you have set.
Please note: Programming a delayed cooking start time will disable the oven preheating phase. The oven will reach the temperature you require gradually, meaning that cooking times will be slightly longer than those listed in the cooking table.
During the waiting time, you can use the knob to adjust the programmed end time. Press or change the temperature and cooking time settings: press confirm when finished.
Please note: Delay to start functionality is not available for Grill and Turbo Grill functions.
3. ACTIVATE THE FUNCTION
When the values correspond with the desired settings, press to activate the function.
Press and hold to stop the active function at any time.
4. PREHEATING
Some functions have an oven preheating phase: Once the function has started, the display indicates that the preheating phase has been activated.

Once this phase has finished, an audible signal will sound and the display will indicate that the oven has reached the set temperature.
At this point, open the door, place the food in the oven, close the door and start cooking by pressing. Please note: Placing the food in the oven before preheating has finished may have an adverse effect on the final cooking result. Opening the door during the preheating phase will pause it. The cooking time set does not include preheating. The temperature you want the oven to reach can always be changed using the knob.
5. END OF COOKING
An audible signal will sound and the display will indicate that cooking is complete.

To extend the cooking time without changing the settings, turn the knob to set a new cooking time and press
AUTOMATIC FUNCTIONS
TEMPERATURE RECOVERY
If the temperature inside the oven decreases during a cooking cycle because the door is opened, a special function will be activated automatically to restore the original temperature. While the temperature is being restored, the display will show a "snake" animation until the set temperature has been reached.
While a programmed cooking cycle is in progress, the cooking time will be increased according to how long the door was open in order to guarantee best results.
. SPECIAL FUNCTIONS
AUTOMATIC CLEANING - PYRO
Do not touch the oven during the Pyro cycle.
Keep children and animals away from the oven during and after (until the room has finished airing) running the Pyro cycle.
Remove all accessories from the oven before activating the pyro function.
If the oven is installed below a hob, make sure that all the burners or electric hotplates are switched off while running the self-cleaning cycle.
For optimum cleaning results, remove excessive residuals inside the cavity and clean the inner door glass before using the Pyro function.
Only run the Pyro function if the appliance contains heavy soiling or gives off bad odours during cooking.
Access special functions and turn the know to select from the menu. Then press to confirm selection.
Press to activate the cleaning cycle immediately, or turn the knob to select the short cycle (ECO).
Press to start the cleaning cycle immediately, or press OK to set the end time/delayed start. At the start of the cleaning cycle, the door will be locked automatically.
The oven door cannot be opened while pyrolytic cleaning is in progress. It will remain locked until the temperature has returned to an acceptable level. Air the room during and after running the Pyro cycle.
Please note: The duration and temperature of cleaning cycle cannot be set.
. KEY LOCK
To lock the keypad, press and hold for at least 5 seconds.
Do this again to unlock the keypad.
Please note: The key lock can also be activated during cooking.
For safety reasons, the oven can be switched off at all times by pressing and holding
HOW TO READ THE COOKING TABLE
The table lists the best function, accessories and level to use to cook different types of food. Cooking times start from the moment food is placed in the oven, excluding preheating (where required). Cooking temperatures and times are approximate and depend on the amount of food and the type of accessory used. Use the lowest recommended settings to begin with and, if the food is not cooked enough, then switch to higher settings. Use the accessories supplied and preferably dark-coloured metal cake tins and baking trays. You can also use Pyrex or stoneware pans and accessories, but bear in mind that cooking times will be slightly longer.
COOKING DIFFERENT FOODS AT THE SAME TIME
The "Forced Air" function enables you to cook different foods (such as fish and vegetables) on different shelves at the same time. Remove the food which requires a shorter cooking time and leave the food which requires a longer cooking time in the oven.
MEAT
- Use any kind of oven tray or pyrex dish suited to the size of the piece of meat being cooked. For roast joints, it is best to add some stock to the bottom of the dish, basting the meat during cooking for added flavour.
Please note that steam will be generated during this operation. When the roast is ready, let it rest in the oven for another 10-15 minutes, or wrap it in aluminium foil.
- When you want to grill meat, choose cuts with an even thickness all over in order to achieve uniform cooking results. Very thick pieces of meat require longer cooking times. To prevent the meat from burning on the outside, lower the position of the wire shelf, keeping the food farther away from the grill. Turn the meat two thirds of the way through cooking. Take care when opening the door as steam will escape.
To collect the cooking juices, we recommend placing a dripping pan filled with 200ml of drinking water directly underneath the wire shelf on which the food is placed. Top-up when necessary.
DESSERTS
Cook delicate desserts with the conventional function on one shelf only. Use dark-coloured metal baking pans and always place them on the wire shelf supplied. To cook on more than one shelf, select the "Forced Air" function and position the baking pans on different shelves to facilitate the circulation of hot air.
To check whether a leavened cake is fully cooked, insert a wooden toothpick into the centre of the cake. If the toothpick comes out clean, the cake is ready.
If using non-stick baking pans, do not butter the edges as the dessert may not rise evenly around the edges.
If the item "swells" during baking, use a lower temperature next time and consider reducing the amount of liquid you add or stirring the mixture more gently.
For desserts with moist fillings or toppings (such as cheesecake or fruit tarts), use the "Convection bake" function. If the base of the cake is soggy, lower the shelf and sprinkle the bottom of the cake with bread crumbs or biscuit crumbs before adding the filling.
PIZZA
Lightly grease the trays to ensure the pizza has a crispy base.
Scatter the mozzarella over the pizza two thirds of the way through cooking.
RISING
It is always best to cover the dough with a damp cloth before placing it in the oven. Dough rising time with this function is reduced by approximately one third compared to rising at room temperature (20 - 25^) . The rising time for pizza starts at around one hour for 1kg of dough.
COOKING TABLE
| RECIPE | FUNCTION | PREHEAT | TEMPERATURE (°C) | DURATION (Min) | LEVEL AND ACCESSORIES |
| Leavened cakes | A | -160 | -180 30 - 90 | | 2/3 | | |
| B | Yes 160 | -180 30 - 90 | | 4 | 1 | |
| Filled cake(chese cake, strudel, fruit pie) | A | -160 | -200 30 - 85 | | 3 | | |
| B | Yes 160 | -200 35 - 90 | | 4 | 1 | |
| Biscuits / tartlets | A | -170 | -180 | 15 - 45 | 3 | | |
| B | Yes | 160 - 170 | 20 - 45 | 4 | 1 | |
| B | Yes | 160 - 170 20 | -45*** | 5 | 3 | 1 |
| Choux buns | A | -180 | -200 | 30 - 40 | 3 | | |
| B | Yes 180 | -190 | 35 - 45 | 4 | 1 | |
| B | Yes 180 | -190 | 35 - 45*** | 5 | 3 | 1 |
| Meringues | B | Yes | 90 | 110 - 150 | 3 | | |
| B | Yes | 90 | 130 - 150 | 4 | 1 | |
| B | Yes | 90 | 140 - 160*** | 5 | 3 | 1 |
| Pizza (Thin, thick, focaccia) | A | -220 | -250 | 20 - 40 | 2 | | |
| B | Yes 220 | -240 | 20 - 40 | 4 | 1 | |
| B | Yes 220 | -240 | 25 - 50*** | 5 | 3 | 1 |
| Bread loaf 0.5 kg | A | -180 | -200 50 - 70 | | 2 | | |
| Rolls | A | -180 | -200 | 30 - 50 | 2 | | |
| Bread | A | Yes 180 | -200 | 30 - 60 | 4 | 1 | |
| Frozen pizza | A | - | 250 | 10 - 15 | 2 | | |
| B | Yes | 250 | 10 - 15 | 4 | 1 | |
| Salty cakes (vegetable pie, quiche) | B | Yes 180 | -190 45 - 60 | | 2 | | |
| B | Yes 180 | -190 | 45 -70*** | 4 | 1 | |
| B | Yes 180 | -190 | 45 -70*** | 5 | 3 | 1 |
| Vols-au-vents / puff pastry crackers | B | Yes 190 | -200 | 20 - 30 | 3 | | |
| B | Yes 180 | -190 20 - 40 | | 4 | 1 | |
| B | Yes 180 | -190 | 20 - 40*** | 5 | 3 | 1 |
| Lasagne/soufflé | A | -190 | -200 | 40 - 65 | 3 | | |
| Baked pasta/cannelloni | A | -190 | -200 | 25 - 45 | 3 | | |
| Lamb/veal/ beef/pork 1 kg | A | -190 | -200 | 60 - 90 | 3 | | |
| Roast pork with crackling 2 kg | A | - | 170 | 110 - 150 | 2 | | |
| Chicken / rabbit / duck 1 kg | A | -200 | -230 | 50 - 80 | 3 | | |
| Turkey / goose 3 kg | A | -190 | -200 90 - 150 | | 2 | | |
| Baked whole fish (fillet, whole) | | Yes | 180 - 200 40 | 60 | 3 | | |
| Stuffed vegetables (tomatoes, courgettes, eggplants) | | Yes | 180 - 200 50 | 60 | 2 | | |
| Toasted bread | | - | 3 (High) | 3 - 6 | 5 | | |
| Fish fillets/slices | | - | 2 (Medium) | 20 - 30* | 4 | 3 | |
| Sausages / kebabs / spare ribs / hamburgers | | - | 2 - 3 (Medium - High) | 15 -30* | 5 | 4 | |
| Roast chicken 1-1.3 kg | | - | 2 (Medium) 55 - 70** | 2 | 1 | |
| Roast beef rare 1 kg | | - | 2 (Medium) 35 - 50** | 3 | | |
| Leg of lamb/knuckle | | - | 2 (Medium) | 60 - 90** | 3 | | |
| Roast potatoes | | - | 2 (Medium) | 35 - 55 ** | 3 | | |
| Vegetable gratin | | - | 3 (High) | 10 - 25 | 3 | | |
| Lasagne and meat | | Yes 200 | 50 - 100 *** | 4 | 1 | |
| Meat and potatoes | | Yes 200 | 45 - 100 *** | 4 | 1 | |
| Fish and vegetables | | Yes 180 | 30 - 50 *** | 4 | 1 | |
| Complete meal: Fruit tart (level 5)/ lasagne (level 3)/meat (level 1) | | Yes | 190 | 40 - 120 *** | 5 | 3 | 1 |
| Stuffed roasting joints | | - | 200 | 80 - 120 *** | 3 | | |
| Cuts of meat (rabbit, chicken, lamb) | | - | 200 50 - 100 *** | 3 | | |
- Turn food halfway through cooking.
Turn food two-thirds of the way through cooking (if necessary).
* Estimated length of time: dishes can be removed from the oven at different times depending on personal preference.
www Download the Use and Care Guide from
Docs.bauknecht.eu for the table of tested recipes,
compiled for the certification authorities in accordance with the standard IEC 60350-1
| MANUAL
FUNCTIONS | Conventional | Grill | Turbo Grill | Forced Air | Convection Bake | Eco Forced Air |
| AUTOMATIC
FUNCTIONS | Casserole | Meat | Maxi Cooking | Bread | Pizza | Pastry cakes |
| A | A | A | A | A | A |
| ACCESSORIES | Rack | Baking tray or cake tin on the wire shelf | Drip tray / Dessert tray / Baking tray on wire shelf | Drip tray | Drip tray with 500 ml water | Baking tray |
Make sure that the appliance has cooled down before carrying out any maintenance or cleaning. Do not use steam cleaners.
Do not use wire wool, abrasive scourers or abrasive/corrosive cleaning agents, as these could damage the surfaces of the appliance.
Use protective gloves during all operations.
Disconnect the oven from the power supply.
EXTERIOR SURFACES
Clean surfaces with a damp microfibre cloth. If they are very dirty, add a few drops of pH-neutral detergent.
Finish off with a dry cloth.
. Do not use corrosive or abrasive detergents. If any of these products inadvertently comes into contact with the surfaces of the appliance, clean immediately with a damp microfibre cloth.
INTERIOR SURFACES
After every use, leave the oven to cool and then clean it, preferably while it is still warm, to remove any deposits or stains caused by food residues. To dry any condensation that has formed as a result of cooking
foods with a high water content, let the oven to cool completely and then wipe it with a cloth or sponge.
- If there is stubborn dirt on the interior surfaces, we recommend running the automatic cleaning function for optimal cleaning results.
Clean the glass in the door with a suitable liquid detergent.
- . The door can be easily removed and refitted to facilitate cleaning of the glass.
ACCESSIONS
Soak the accessories in a washing-up liquid solution after use, handling them with oven gloves if they are still hot. Food residues can be removed using a washing-up brush or a sponge.
CLEANING THE COOKING COMPARTMENT WITH THE PYRO CYCLE
Do not touch the oven during the Pyro cycle. Keep children and animals away from the oven during and after running the Pyro cycle (until the room has finished airing).
This function enables you to eliminate cooking spatters using a high temperature. At this temperature, food residues turn into deposits that can be easily wiped away with a damp sponge once the oven has cooled down.
If the oven is installed below a hob, make sure that all the burners or electric hotplates are switched off while running the self-cleaning cycle.
For optimum cleaning results, remove excessive residuals inside the cavity and clean the inner door glass before using the Pyro function.
The oven has two different pyrolytic cleaning functions:
the standard cycle (PYRO) provides thorough cleaning if the oven is heavily soiled, while the economic cycle (ECO) is shorter and consumes less energy than the standard cycle, which makes it suitable for use awt regular intervals.
Only run the Pyro function if the appliance contains heavy soiling or gives off bad odours during cooking.
Please note: The oven door cannot be opened while pyrolytic cleaning is in progress. It will remain locked until the temperature has returned to an acceptable level. Air the room during and after running the Pyro cycle.
REPLACING THE LIGHT
- Disconnect the oven from the power supply.
- Unscrew the lamp cover, replace the bulb, and screw the lamp cover back on.
- Reconnect the oven to the power supply.
Please note: Only use 20 -40W/230 V type G9, T300 °C halogen lamps.
The bulb used in the product is specifically designed for domestic appliances and is not suitable for general room lighting within the home (EC Regulation 244/2009).
Light bulbs are available from our After-sales Service.
- If using halogen bulbs, do not handle them with your bare hands as your fingerprints could cause damage. Do not use the oven until the light cover has been refitted.
REMOVING AND REFITTING THE DOOR
- To remove the door, open it fully and lower the catches until they are in the unlock position.
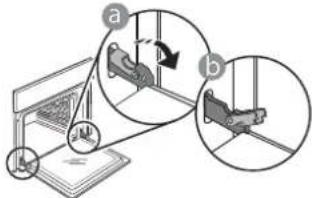
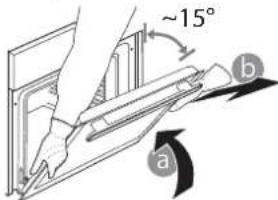
- Close the door as much as you can. Take a firm hold of the door with both hands - do not hold it by the handle. Simply remove the door by continuing to close it while pulling it upwards at the same time until it is released from its seating. Put the door to one side, resting it on a soft surface.
-
To refit the door, move it towards the oven, aligning the hooks of the hinges with their seating and securing the upper part onto its seating.
-
Lower the door and then open it fully. Lower the catches into their original position: Make sure that you lower them down completely.
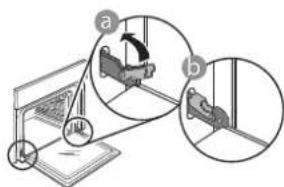
Apply gentle pressure to check that the catches are in the correct position.

- Try closing the door and check to make sure that it lines up with the control panel. If it does not, repeat the steps above: The door could become damaged if it does not work properly.
| Problem Possible cause Solution | |
| The oven is not working. | Power cut.
Disconnection from the mains. | Check for the presence of mains electrical power and whether the oven is connected to the electricity supply.
Turn off the oven and restart it to see if the fault persists. |
| The door will not open. | Fault with the door lock.
Cleaning cycle in progress. | Switch the oven off and on again to see if the fault persists. Wait for the function to finish and for the oven to cool down. |
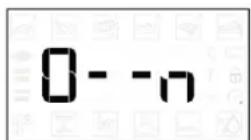
| The display shows the letter “F” followed by a number or letter. | Software problem. | Contact you nearest Client After-sales Service Centre and state the number following the letter “F”. |
DESCRIPTION DU PRODUIT
ROOSTER OPVANGBAK BAKPLAAT

SCHUIFRAILS
YctaHOBka NImMeHeHne BpeMeHN, YCTaHOBKa DnITeJIbHOCTN npIroTOBJIeHNA.
8. NOДТВЕРДNTb
IopTBePxJHHeN BbIpaHoro nyHKTa MeHIO NnBbINOnHeHHo HacTpOKn peKmMa.
9. PAPBbI INCJIeI

KoJIHueCTBOI TIN npiHaJIeXHoCTe MoKeT BApbIPoBaTcB 3aBNCIMOCtN OT pnpO6peTeHHoMoeJN. DOnONHTeNbHbIe IpiHaJIeXHOCTm MOxHO pnpO6peCTn B CepBnCHOM ueHTpe.
YCTAHOBKA PEWETKIN IpyTNX INPUHADJEKHOCTEN
BctaBte peWetky ropn3oHTaJIbHO B dePkaTeN, pacnonarag ee TaK, yTO6bl npINODHrTbe Kpa 6blnn o6pauehbl BBepx.
Ipyrne npHaJnEJXHOCTu, TaKne KaK NOdONH INPOTNBHeB, BCTaBnIOTcR TOpN3OHTaJIbHO TEM XeCnocobom, YTO n peWetKa.
YCTAHOBKA BbIDBnXHbIX HANPABJIOUX (IPN HANNYIN)
PpmeaHne:TeeckOnuYeCKne HappaBnIOUne MOryT 6bIb yKe yCTaHOBNeHb HaepKaTeNn NOLOK:INr CHrTIN HAppaBnIOUxN NotAHnTE INX B HAppaBnEHn HApxyK, OTOeDHHB HxkHn 3axkM.
BbInbTe DepeKaTeJIN NOJOK N3 DyXOBKN IN CHIMNTe
IIaCTNKOBYIO 3aUHTy C TeNECKONNueCKNX
HaIpaBIAIOxN.
3aKpeHnTe BepxHn 3axm HappaBIAUeH
depkaTeI NOJOK n CdBnHbTe ee Brlny6b Do ynpa. OnyCTnte BTOPO3axIMBnpeDyCMOTpeHHoe NOJoxHeIe.
CHATNE UYCTAHOBKA DEPKATEJEI NOJOK
.ДЯСНТЯДерхаTeEN NOLOK BbIBePHNte ydePKNBaIOUne BnHTbl (npn HAnuyn) C 06Enx CTOPOH, nCNoB3y MoHETy NIN NHCPTpMEnT. 3aTeM NOHNMTe DePkaTeJIb IN3BJIeKNTe eRO HNXHIOU qAcTb IN3 rHe3da.Tenepb DePkaTeJI NIOK MOXHO BbIHytb.
.ДЯ yctaHOBKn DepeXaTeNe NOJOK ChaJaNA BCTaBBTe INx B cepxHee rHe3Do.BdBuHbTe DepeXaTeN NOJOK B KaMepy DnyXOBKn B npINoHNrTOM NIOJOKeHN, a 3aTEM ONyCTnTe INx TaK, YTO6bl OHN 3aHARNI MeCTo B HNXHEm rHe3Je. YCTaHOBnTe Ha MeCTo ydePKNBaIOUne BNHTbl.
YTo6bI 3aKpeNtB DepeXaTeNb, CNbHO HaXMMte Ha
HnKIOU qACTb 3aXIMAb
HaPabIeHNOT DePkaTeJI
NoKn.Y6eITecb, YTO
NoBnKHaJyactb
HaPabIaIooJe MoKeT
CBO6oHO nepemeaTbcra.
PiBtOpTe 3Tu Jx Je DeiCTBna
IIN BTOPOTo DEpKaTeJI
NOLK Ha Tom Jx yPOBHe.
IpmeaHne: Teeckonueckne HnpaBnouu me MoryT KpeNtbcn Ha IIO6om yOBHe.

ObblHbI
PexnIMI npriTOBHeHn HIO6bIX 6JIIO TOnbKO Ha ODNOM yPOBHe.

TnIb
PexmДЯ npuROTOBHeHnHa rpnIe
6nΦwTeKCOB,waunbika,KoNbaCOK,OB
3aneKaHOK nXne6hblx TocTob. Pn npriroTOBHeHN Mca Ha rPnIe peKOMeHdyeTcN CNOJIb3OBA Tb NdoH dJa c6opa coka: Pa3MeCTte NDoH Na IIO6om ypOBHe NOpeWetKo, HAIIN B Hero 500 mI BObl.

KOHBEKLIIA
PexnIM nI npriroTOBneHna 6JIOp npn OAnHaKOBoT Tempeatype cpa3y Ha
HECKOJIbKINx yPOBHNx (He 60Jee Tpex).3TOT pEXIM N03BOJnEe OJHOBpeMeHHo rTOBHTb pa3HbIe 6JIouda 6e3 IpeHocca 3aJaxOB C OJHOrO Ha dpyroI.

ПОДРУМЯНBAHNE
PexnIMI3aneKaHnMaCa,BbIneKaHnI nporOBcHaunHKoNxkapKnΦapwnpoBaHHbIX
OBOUeToBkoHaOJHOMyOBHe.JIa3aunTbI npOdyKTOBOTpepcuWBAHnNcNOJb3yeTCa DeJINKaTHaPpepbIBnCTaBeHTnlaZn.

ABTOMATUHECKNE PEXKUMbl

3ANEKAHKU
TOT pexim aBtOMaTnueckn BbI6npaET HAnNyUyTo TEMpepaTy n MeToD nTobHeHn 6NIOuN3 MaKapOH.

MRO
3TOT pexn m ABTomatueckn Bbl6npaet HauNyuyu ToemepaTy n MeToD nIra
npiroTOBLeHna Mca. IpepbIBNCToe BkIoueHne BeHTnJIaTOpa Ha Hn3KoN CKOpOCTu IpeDOTBpaUaet nepecyunBaHne 6JIOda.

BOJIbIe IOPUIN
AbTomatnueckn BbI6Op HauyUwero pexmua TEmpeaTpybln npuroTO
60JIbIcx KycKOB Mca (6OJee 2.5 Kr). PekomeHdyetc
nepeBopaunBaTb Mco BO BpEm npuROTOBLeHn,
UTo6bl OHO paBHomePHO npoxkapuNocb C o6eNX
ctOpOH. NepNoDnueckn erO cNeJyET CmaUnBaTb,
UTo6bl MRC He OKa3AIOOC bCNIWKOM cyXIM.

XJIE6
TOT pexim aBtOMaTnueckn BbIbnpaET HauNyUTo Tempeatpy n MeToD dJa TOBHeHn BCex TnOB xle6a.

NULA
3TOT pexim aBtOMaTnueckn Bbl6npaET HauNyUTo TempeaTy u MeToD nIe TOBHeHNA BCEX TINOB Nnucbl.

CIAKNE KOH.13I
3TOT pexim aBtOMaTnueckn BbI6npaET HauNyUTo Tempeatypu MeTOd IIN TOBHeHNA BCEX TUNOB TOPTOB.

CNEUNAJIbHbIEΦYHKUN

BbICTpbHAGPEB
BbIcTpbl npEdbapnteHbHnHarpeB dYXOBKn. Iocne 3aBepWeHn nporpeBa dYxOBka
abTomatnueckn BbIbnpaet "ObbHb"pekIM. DoKdntecb 3aBepweHna nporpeBa nepeTem, Ka NOMEuTaB npOdyKTb I DyXOBKy.

TYP6O-ΓPUNb
Pexn mIy JapKn KpynhbIX KycKOB Mca (poCT6nΦ, 6apaHbN HOKKN, UblnlaTa).
PekomeHnyetcNcNoIb3OBA Tb NODOn dIra c6opa cokOB. Pa3MeCTnte NoDOnH Ha IIO6OM yPOBHe NOpeWetKo, HAIINB B Hero 500 Mn BObl. B ATOM peXmeme MoXHO NOLb3OBA TcBcBepTeNOM (pnp HAIuHn).

.ABTOMATUHECKNEPEXKIMbI
BOCCTAHOBJEHNE TEMINEPATyPbI
EcnBBOBpMa npnroTOBneHnra TeMnpaTpaBdyXOBKe CHN3nlaCb n3-3a OTKpbITnA DBepcbl, CneuHaHnay yHKunr ABToMaTuueckn BOCtHaBnBaet NxCoDHyU Toepeatpy. B npoucece BocctaHOBHeHH
TeMnepaTpybHaNcNlEeOTObpaXaETcA HnMnPOBaHHa "3MeIka".AnHMaunppeKpaauetcNoCne DoCTNXeHn 3aDaHHoT TeMnpaTpybl.
Hn Hauynuux pe3yIbTaOB dInTeJbHOCTb npuroTOBneHn yBeJIuHNaeTcHa BpeM, B TeueHne KOTOPoro 6bla OTKpbIta DBepa.
CNEUHAJIbHbIEPEXIMbl
.ABTOMATUHECKAR OYNCTKA-PYRO
He npikacaiTecb K dyXOBKe BO BpeMa cnKna npOpun3a.