
ZX3011CUU - Electric oven Atag - Free user manual and instructions
Find the device manual for free ZX3011CUU Atag in PDF.

| Product type | Electric oven |
| Brand | Atag |
| Model | ZX3011CUU |
| Interior dimensions (W x H x D) | 43 cm x 19 cm x 38 cm |
| Usable volume | 32 liters |
| Supply voltage | 220-240 V ~ 50 Hz |
| Cable cross-section | 1.5 mm² |
| Protection device rating | 16 A |
| Nominal grill power | 2.925 kW |
| Total power consumption during cooking | 2.65 kW |
| Energy consumption (rise to 175°C + hold 1h) | 0.615 kWh |
| Cooking modes | Fan-forced, Combined cooking, Turbo grill, Natural convection, Double grill, Single grill, Defrosting, Keep warm |
| Pyrolytic cleaning | 3 cycles: economy (1h30 + 2h), normal (1h45 + 2h15), super (2h + 2h30) |
| Child safety (control lock) | Yes |
| Automatic door locking during pyrolysis | Yes (after 2 minutes) |
| Interior lighting | 15 W bulb, 220-240 V, 300°C, E14 base |
| Included accessories | Reversible support grid, enamelled drip tray, rotisserie spit |
| Independent timer | Yes (max 59 min 50 s) |
| Display standby mode | Yes |
Frequently Asked Questions - ZX3011CUU Atag
User questions about ZX3011CUU Atag
0 question about this device. Answer the ones you know or ask your own.
Ask a new question about this device
Download the instructions for your Electric oven in PDF format for free! Find your manual ZX3011CUU - Atag and take your electronic device back in hand. On this page are published all the documents necessary for the use of your device. ZX3011CUU by Atag.
USER MANUAL ZX3011CUU Atag
HOE ZET IK DE DISPLAY "STANDBY"?
conventional oven introduction
Thanks you for choosing an Atag oven. You have made the right choice.
To get the most out of your new cooking aid we suggest you read and follow the advice contained in this manual.
Atag is continually improving its technology so that it can provide the best oven there is and the one you have chosen has the most innovative features. By combining the various functions and accessories you will get the greatest use out of your oven and produce the best results from your favourite recipes.
We hope you will find cooking with our oven an enjoyable experience that brings pleasure to all.
your oven, how it works
explanation of controls 52
how to use your oven
setting the time 53
cooking straightaway 54
customising the cooking temperature 55
programming the cooking 55
delaying the cooking 56
using the timer 56
using the child safety feature 57
setting the display to stand-by mode 57
different cooking methods
description of features 58
oven accessories
accessories 59
how to clean by pyrolysis 60-61
installer's information
connecting up 62
technical details 62
housing 63
general maintenance 64
changing the light bulb 64
troubleshooting 65
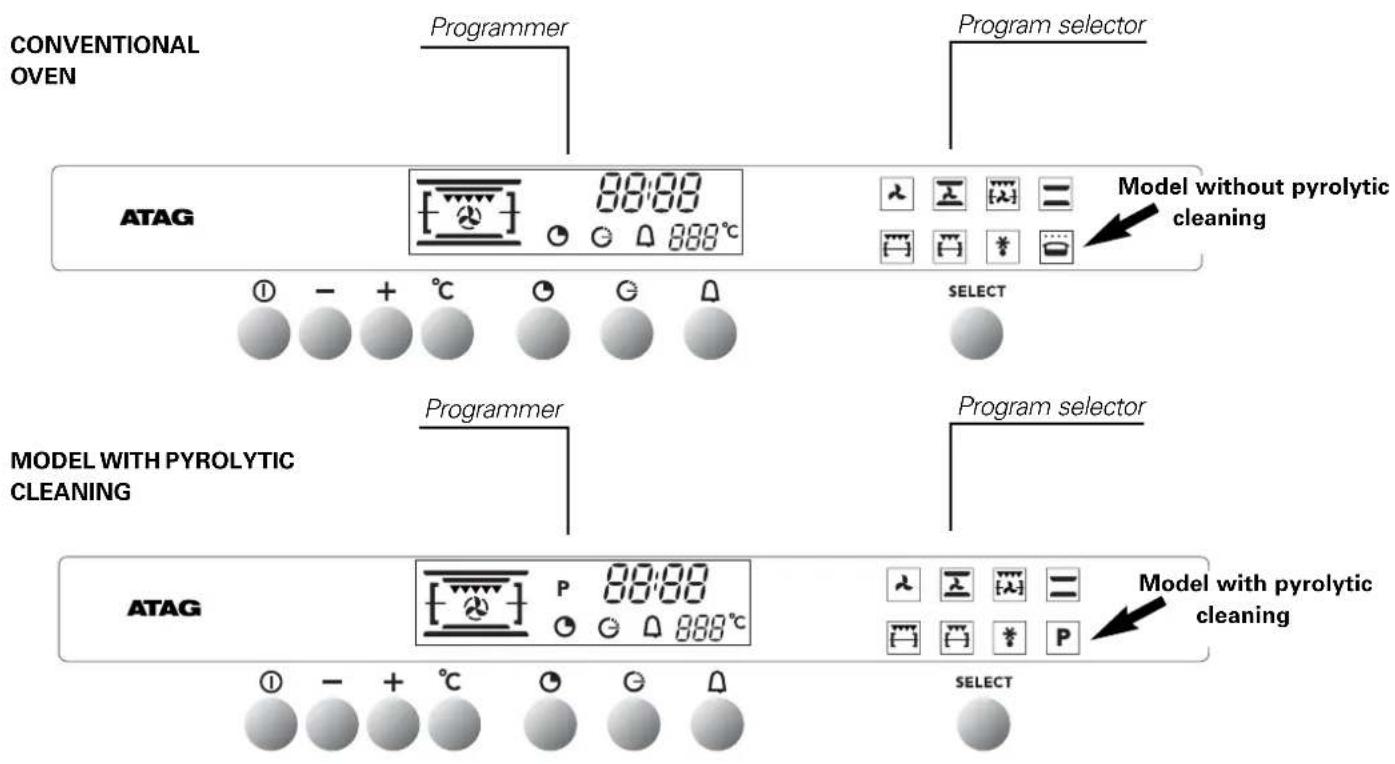
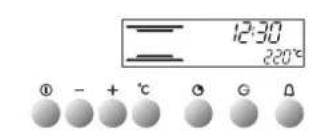
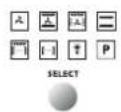
your oven, how it works explanation of controls
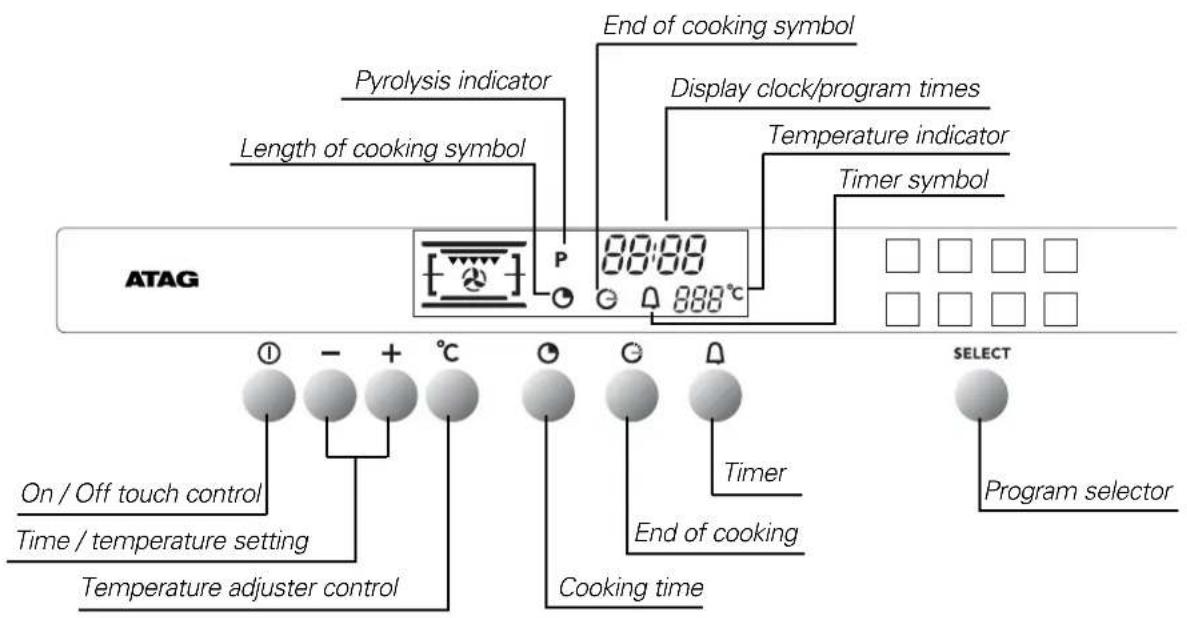
Your programmer in detail
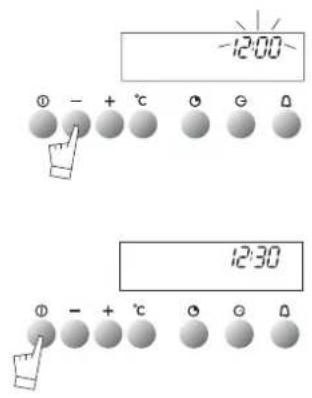
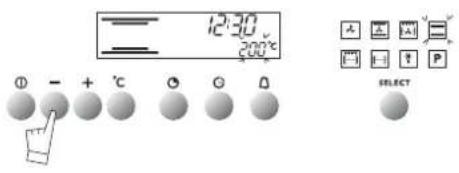
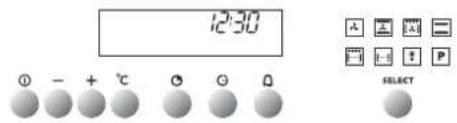
When the oven is installed
The time display flashes.
Set the time using ^+ or - (holding the touch control down makes the numbers move on more quickly).
Example: 12:30.
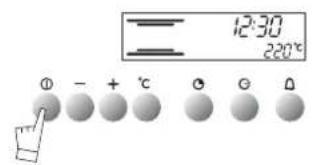
Press the START/STOP touch control to confirm your setting.
NOTE: If the time is not confirmed using the START/STOP control within a few seconds, it is automatically memorized.

Resetting the time on the clock
Press touch controls and at the same time for a few seconds until the time display flashes.
Set the time using the + or - touch controls.
Press the touch control to memorize.
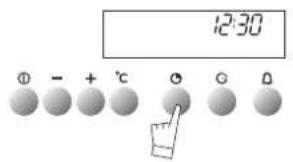
NOTE: If the time is not confirmed using the touch control within a few seconds, it is automatically memorized.
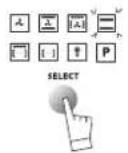

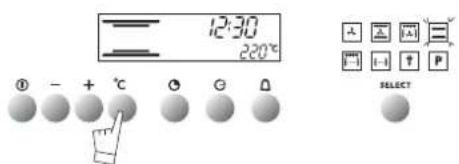
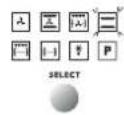
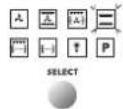
Select the cooking mode
Select the program of your choice with the control:
Example: position
You can scroll through the cooking programs by keeping your finger on the touch control. The proposed temperature is displayed:
Example: 220^
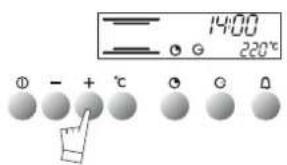
-
Push the START/STOP touch control to start cooking. Your oven proposes the most frequently used temperature. You may nevertheless adjust this temperature yourself.
-
Press the ^ C touch control. The ^ C symbol flashes.
- Adjust the temperature using the + or - touch controls.
- Confirm your choice by pressing the ^ C touch control.
(If the temperature is not registered using the ^ C , touch control within a few seconds, it is memorized automatically).
During cooking the temperature selected will continue to flash until the oven arrives at the temperature you have chosen. The selected temperature then remains steady.
- When the oven reaches the selected temperature, it will bleep for 3 seconds.
Exception: Variable power grill:

- Power level proposed: - 4 = 100%
- Can be adjusted from - 1 = 50% to - 4 = 100%
NOTE: The door should only be left open when the grill ( ) is used at maximum power (-4-).
When other settings are being used, the door should remain closed
- Stop cooking by pressing the START/STOP button for 1 second.
WARNING: During grilling, outside areas of the oven get much hotter than during normal use.
Keep young children away.
how to use your oven
customising the cooking temperature
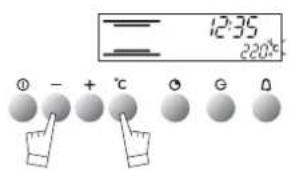
When you select your cooking mode, or during cooking, you can modify the temperature:
Press the ^ C touch control for about 2 seconds until the temperature figures start flashing.
Adjust the temperature setting using the + or - touch controls to indicate the temperature you wish to memorize.
Confirm your choice by pressing the ^ C touch control.
The next time you use your oven, the temperature you have just registered will memorized.
You may repeat this operation for personalizing cooking temperatures as often as you like.
how to use your oven
delaying the cooking
Set the mode of cooking required and adjust the temperature if necessary.
example: conventional cooking setting temperature 220^
- Press the "cooking time" touch control
The cooking time flashes as 0.00; the symbol also flashes to indicate that it may be adjusted.
Use the + or - touch controls to adjust the figure to the time required.
Example: 25 min. cooking.
The adjusted time is automatically validated after a few seconds or
may be confirmed by pressing on the touch control again.
The symbol then stops flashing. The oven then heats up.
At the end of the cooking time the oven bleeps for a few minutes and the symbol flashes.
Stop the bleeps by pressing on the START/STOP touch control for 1 second. You can consult or change the end of the cooking time at any time by
pressing the touch control.
To cancel your program, press the START/STOP touch control.
how to use your oven
delaying the cooking
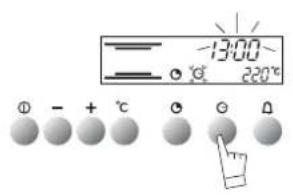
Carry out the same procedure as for programmed cooking. After setting the cooking time.
Press the "end of cooking", touch control; the time for the end of cooking is indicated and flashes, as does the symbol to indicate that it may be adjusted.
example: It is 12.30. You have programmed a cooking time of 30 min. The end of cooking time indicated is 1 pm (13.00).
Adjust the end of cooking time using the +or -touch controls. example: End of cooking time: 2 pm (14.00).
Once the end of cooking time has been programmed, the end of cooking symbol stops flashing.
The oven will now start heating up in time for cooking to be finished by 2 pm (14.00).
When cooking finishes the oven gives a series of beeps for a few minutes. To switch the beeps off, press the START/STOP touch control for one second.
NOTE: You may consult or change the end of cooking time at any time by pressing the G
To cancel your program, press the START/STOP touch control.
how to use your oven
using the timer
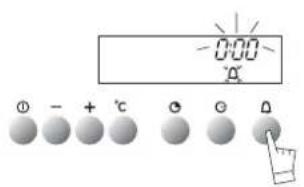

GB56
Your oven is fitted with an electronic timer for your use other than in conjunction with the oven.
ATTENTION: This program is separate from the oven. It cannot be used to stop automatic cooking. This program may never-theless be used even when the oven is in use. In this case, the timer display takes priority over the clock display.
Press the timer touch. The display flashes and the timer symbol appears and flashes.
Press the + or - touch controls to obtain the length of time required (up to 59 minutes and 59 seconds).
The display stops flashing after a few seconds and the timer starts, counting down the time in seconds. When the time is up, the timer bleeps to warn you and the symbol flashes.
Stop the bleeping by pressing the touch control or START/STOP. Normal time is now displayed.
NOTE: You may change the remaining time at any point by pressing the touch control and using the + or - touch controls. To cancel the timer program, set the time at 0.00 and press START/STOP.
using the child safety feature
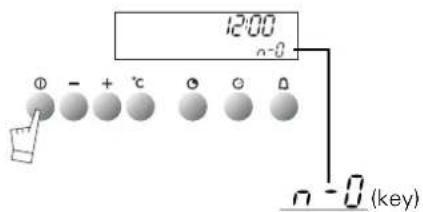
In order to prevent your oven being turned on unintentionally, you may lock the controls.
To do this:
- Press on the START/STOP touch control until it bleeps.
Keep pressing on the touch control until the bleep stops and a key appears on the indicator panel.
-To unlock the controls, repeat the operation.
-Press the START/STOP touch control until you hear a long bleep.
Keep your finger on the touch control until the bleep stops and
the key disappears from the display panel.
NOTE: Only the "separate timer" program remains operational.
how to use your oven setting the display to stand-by mode

To reduce your oven's power consumption to a minimum when it is not in use, you can put your readout system in STANDBY MODE.
To carry out this operation, proceed as follows:
GOING INTO STANDBY MODE:
- Your oven must be in normal time readout mode.
- Press both the + and - controls for five seconds at the same time.
- The display reads "Lcd off".
- Take your fingers off the two controls.
- 30 seconds later your readout will switch off.
Your oven is now in standby mode; whenever you are in the normal time readout mode, it will turn off automatically after 30 seconds.
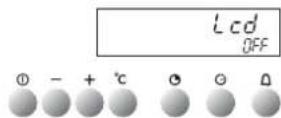
COMING OUT OF STANDBY MODE:
- Your oven must be in the normal time readout mode.
- Press the + and - controls for five seconds at the same time.
- The display will then read "Lcd on".
- Take your fingers off the two controls.
- You are now out of the STANDBY MODE; the readout is now permanently lit.
different cooking methods
description of features
| PROGRAMS | Parts of the oven in operation | DESCRIPTION OF THE OVEN'S PROGRAMS | Recommended positions |
| temperature: min./pre-selected/max. 40°/ 180°/250° FAN HEATING | The heat source comprises an element located at the bottom of the oven; the air is sucked up by a central fan and redistributed on the sides. There is no need to pre-heat the oven except for very short cooking times (e.g. biscuits on more than one level) or for foods, which need to be sealed (e.g. roast beef). Circulating heat is particularly suitable: - for keeping white meats tender; - for vegetables and fish; - for cooking on a number of shelves (up to 3) at once. | ||
| temperature: min./pre-selected/max. 40°/ 200°/250° COMBINATION MODE | Three heat sources are combined: a lot of heat from the bottom to cook pastry, some circulating heat for succulent cooking all the way through, and a bit of grill to brown the food nicely. - For quiches, pies, juicy fruit tarts. | ||
| temperature: min./pre-selected/max. 40°/ 195°/250° TURBO GRIL | This mode combines the fan effect and the grill, using them alternately. The grill cooks the food by infrared radiation, while the fan circulates the air so that the food does not burn. - For sealing and cooking through red and white meat; - For cooking poultry up to 1 kg gently; - Not suitable for very large pieces of meat, which would be too close to the grill, leaving them cooked on the outside but not cooked on the inside. | ||
| temperature: min./pre-selected/max. 40°/ 220°/275° CONVENTIONAL | This mode combines the upper and lower heat courses. Ideal for slow, delicate cooking. - For succulent game; - For gentle simmering; - For successful bread. | ||
| 1 to 4 DOUBLE GRILL | The double grill covers the full surface of the oven shelf. The single grill is equally efficient, but covers a smaller area. | ||
| 1 to 4 SINGLE GRILL | IMPORTANT: leave the door open when using setting 4. | ||
| temperature: min./pre-selected/max. 30°/ 40°/50° DEFROST | Defrosting is done by the fan circulating air around the food to be defrosted. The temperature never exceeds 50°C, so defrosting is perfect. - For defrosting meat and poultry, use the oven shelf placed above the drip pan or the baking sheet. Never use the liquid produced by defrosting; it is not fit for human consumption. | ||
| temperature: min./pre-selected/max. 35°/ 80°/100° KEPT WARM | The oven is kept warm by the fan, which circulates the hot air around the food. |
ONLY ON
MODEL
OX3011CU
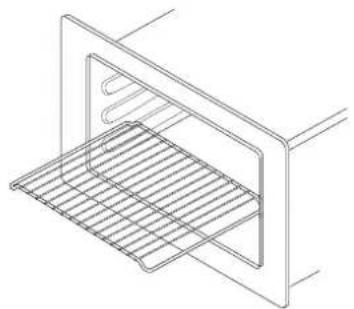
Reversible oven shelf
By using this shelf the other way up you gain extra height inside the oven.
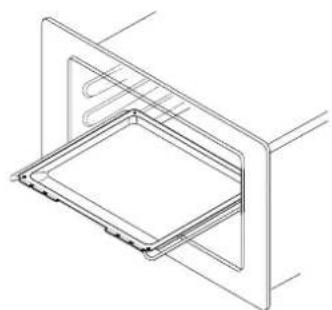
Enamelled drip-pan
This is used to collect cooking juices. Don't cook roasts actually in the drip pan, as this may produce consi-derable splashing and smoke.
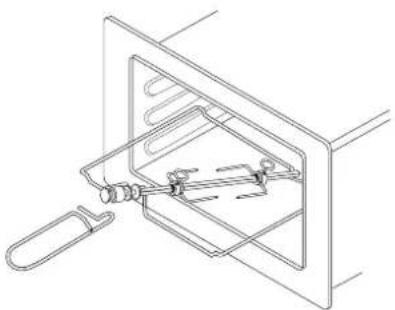
Rotisserie spit
This comprises a spit, 2 prongs, a removable handle and a cradle, which fits into the 3rd shelf level from the bottom. To use the rotisserie, fit the spit into the hole in the back wall of the oven.
Place the drip pan on the oven shelf placed in its lowest position in the oven.
Important recommendations:
Never cover the inside of the oven with aluminium foil to economize on cleaning. You may overheat the oven and damage the enamel.
- After cooking never touch your casseroles (grill, spit, dripping pan, spit cradle etc.) with bare hands.
Only on model 2X3011CU
What is pyrolysis?
- Pyrolysing involves cleaning the oven by heating to a high temperature (pyrolysis) in order to remove grime and dirt inside the oven caused by splashing or dripping during cooking. The smoke and smell this produces are removed by being passed through a catalyst.
- The oven has three pyrolysis cycles (Model UMP 50*) suited to all situations
- An economic cycle that lasts 1h30 (the oven is locked for 2 hours to allow for cooling down). This cycle consumes 25% less the standard pyrolysis cycle. When used regularly (every two or three times you cook meat) this cycle keeps the oven clean under any conditions.
A medium cycle that lasts 1h 45 (the oven is locked for 2hours 15m to allow for cooling down). This cycle cleans dirty ovens efficiently..
A super-cleaning cycle that lasts 2 hours (the oven is locked for 2 hours 30m to allow for cooling down). This cycle is for really dirty ovens.. - For safety reasons the door is automatically locked shut after about 2 minutes of pyrolysing.
Why use the pyrolysis program?
- Your oven smokes when you pre-heat it, or it smokes a lot during cooking.
- Your oven smells when it has cooled down after cooking certain types of food (lamb, fish, grills, etc).
- Don't wait until the oven is very grimy before carrying out pyrolysis.
- It is not necessary to use the program each time the oven is used; it depends on the amount of grime in the oven.
When to use the pyrolysis program
| COOKING PRODUCING NO GRIME | sponge cakes, vegetables, pastries, quiches, soufflés, etc. | Cooking without splashing; pyrolysing is not necessary. |
| COOKING PRODUCING SOME GRIME | meat, fish (in a dish), stuf- fed vegetables | pyrolysing may be necessary every three times the oven is used. |
| COOKING PRODUCING A LOT OF GRIME | large pieces of meat; cooking on the spit: duck, turkey, leg of lamb, etc. | pyrolysing may be carried out after cooking of this type if there has been a lot of splas- hing. |
A few hints
To reduce splashing, check that you are using:
- the right position advised in your instruction book;
- the right height inside the oven;
- the right temperature.
If the food still produces splashing and smoke, reduce the temperature on the thermostat.
How to use the pyrolysis program
Remove any accessories from the oven and wipe off any excess grime.
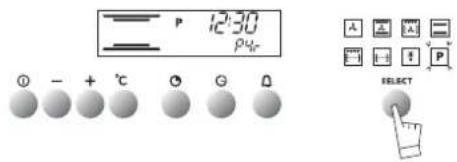
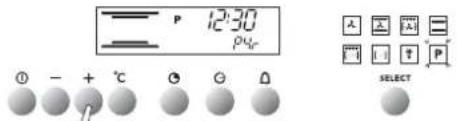
Check that the programmer displays normal time and that it is not flashing. Press the program selection touch control until the "pyrolysis" program appears.
Your oven displays the pyrolysis symbol that correspond to 1 two-hour pyro. (non-adjustable).
You can select the two other cycles 1h45, or 1h30 non-adjustable, by pressing the -or +.
The oven cannot be used for 2h, 2h 15 or 2h 30. These times allow for cooling down until the door is automatically unlocked.
Press the START/STOP touch control.
- The door is locked during pyrolysing (after about 2 minutes).
- You can consult the finishing time for the pyrolysis cycle by
pressing touch control At the end of pyrolysing the symbol remains lit until the door is automatically unlocked.
Stop the oven by pressing the START/STOP touch control.
Use a damp cloth for removing the white ash after the oven has cooled down.
The oven is now ready for use.
Note: The pyrolysing temperature cannot be altered. During the cleaning cycle the light is switched off. If your oven is still
not clean after pyrolysing you have delayed cleaning too long. Repeat the pyrolysis program.
IMPORTANT:
Do not hang any cloths or towels on the oven door handle.
During the pyrolysis cycle, the front of the oven gets hotter than during normal cooking.
Keep young children away.
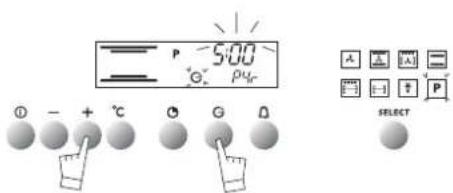
How to program your pyrolysis to start when you want
Follow the instructions given in the section entitled "How to use the pyrolysis program", then:
Press touch control the finishing time for the pyrolysis
program flashes and the symbol also flashes to show that this time can be modified.
Set the time the program is due to finish by pressing the
- or - touch controls..
example: End of the pyrolysis program at 5h00.
When the pyrolysis program is over, press the START/STOP touch control.
As a specialist, you alone are competent to install and connect up Atag appliances.
Our guarantee therefore applies only and exclusively to appliances which have been installed and connected up by you in accordance with the provisions of current regulations. Failure to meet this requirement would incur the fitter's liability and release the Atag company from any liability.
Electrical connections must be made as per the connection plate fixed to the back of the appliance, by an electrical fitter. Who must ensure that the appliance has been connected up in accordance with fitting instructions and local regulations.
Where the appliance is not connected to the mains electricity supply by a plug, an omni polar cutout device (with a contacts gap of at least 3 mm) must be fitted on the supply side of the connection to meet safety requirements.
NOTE: When power is connected, the electronics of the oven are initialised; this neutralizes the lighting for a few seconds.
If the oven is connected to the power supply by a plug, this must remain accessible once the oven has been fitted.
We cannot accept any liability in the event of an accident resulting from non-existent or faulty earthing.
If the power supply cable is damaged, it presents a potential hazard. It must be replaced by the manufacturer, its after-sales service or a qualified electrician.
installer's information
technical details
| network voltage connection | min. diameter of cable | tuse | |
| 220-240V-50Hz | 1 Ph + N | 1,5 mm² | 16 A |
Operating voltage. 220-240 V ~ 50 Hz
Nominal power of grill. 2,925 kW
Total power used in cooking. 2,65 kW
Energy consumption
- while heating to 175^ 0,205 kWh
to maintain 175^ for 1 hour. .0,410 kWh
Total 0,615 kWh
Inside dimensions of oven
Width. 43 cm
Height. 19 cm
Depth. 38 cm
Effective volume 32 litres
The oven has an high-performance air circulation system which gives remarkable results for cooking and cleaning, as long as the following points are applied:
-
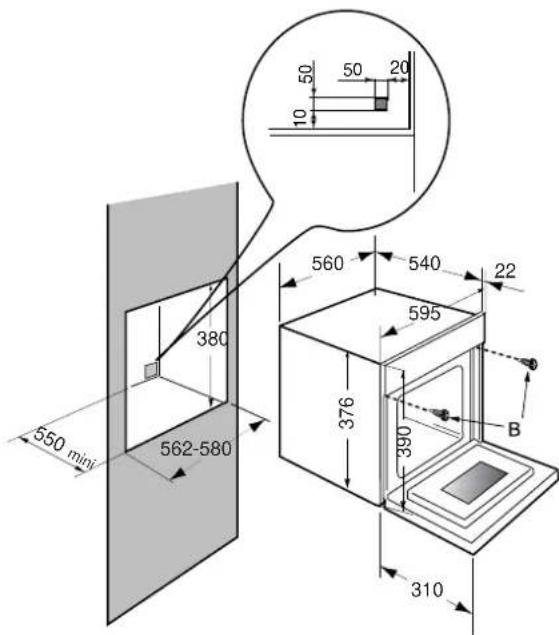
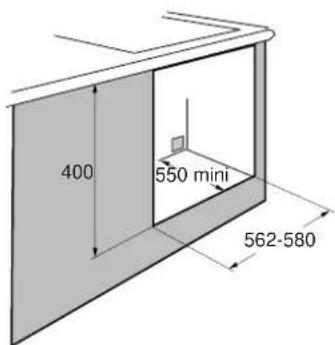
The oven may be fitted either underneath a work surface or in a suitable sized column unit. Cut a hole measuring 50mm × 50mm in the back wall of the insert space for the electric cable to pass through (See diagram, left).
-
Centre the oven in the unit, and make that it is at least 2mm from any other unit beside it.
The unit must be heat-resistant (or covered with heat-resistant material).
-
The oven must be disconnected from the power supply while it is being installed in the unit.
-
For greater stability, fix the oven in the unit with 2 screws in the holes on the side uprights (see diagram). Make a 3mm diameter hole in the side of the unit first to prevent the wood from splitting.
Leave the oven to cool down before cleaning it manually.
In general, don't use any type of scouring powder or metal-backed sponge, or any sharp objects for cleaning.
changing the light bulb
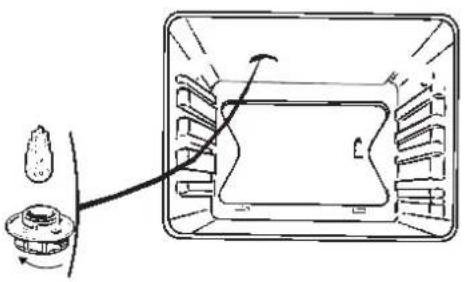
The bulb is located in the top of the oven.
WARNING! Disconnect the oven before touching the bulb; leave the oven to cool down if necessary.
- Turn the cover a quarter turn to the left.
- Unscrew the bulb, turning it to the left.
Type of bulb:
-15W
-220/240V
-300°C
-E14fitting
- Change the bulb, replace the cover and re-connect the oven to the power supply.
Hint: Using a rubber glove makes it easier to unscrew the cover and the bulb.
| IF YOU REALIZE THAT | POSSIBLE CAUSES | WHAT SHOULD YOU DO? |
| The oven isn't heating | The oven isn't connected to the power supply. The fuse has blown. The temperature selected is too low. Other causes. | - Connect to power supply. - Change the fuse, checking that it is 16A. - Contact the After-Sales Service. |
| The light inside the oven isn't working. | The lamp is unusable. The oven isn't connected to the power supply or the fuse has blown. | - Change the bulb. - Connect to power supply or change fuse. |
| The cooling fan keeps working after the oven is turned off. | The fan should stop after no longer than 1 hour, as soon as the temperature of the oven falls to approx. 125°C. If it has not stopped after 1 hour | - Nothing. - Contact the After-Sales Service. |
| Pyrolysing doesn't start | The door isn't shut properly. The clock time on the programmer is flashing. Other causes. | - Make sure the door is closed correctly. - Set the hour of the day before starting up the pyrolysis - Call the After-Sales Service |
| The door lock during pyrolysing isn't working. | The lock is not effective immediately. The door lock only becomes effective approx. 2 minutes after the start of the cycle.. | If it hasn't locked after 5 minutes, contact the After-Sales Service. |
| The rotisserie spit keeps turning after the end of cooking | The rotisserie spit motor keeps working until the selector is returned to the zero setting, or the door is opened, or 30 minutes after the end of the cooking time. This program avoids the food burning once the oven has stopped four. | - Nothing. |
| Smoke is being produced during cooking | 1.Cooking temperature too high 2. Dirty oven | 1. Reduce the cooking temperature 2. Clean the oven by pyrolysis if this program is available |
| There's no light inside the oven while the pyrolysis program is operating | The lighting is only meant to come on for the cooking programs. | The pyrolysis cycle produces temperatures, which are too high for the lighting to work properly. |
| There's a noise inside the oven after the end of cooking | The fan in the upper part of the oven (not visible) is working (even if the oven is set to the "off" position). | This is normal; the fan of a pyrolysis oven stays on until the oven has cooled down. |
In all cases, if you are unable to solve the problem yourself, please contact the After-Sales Service without delay.


- HOE ZET IK DE DISPLAY "STANDBY"?
- conventional oven introduction
- your oven, how it works
- how to use your oven
- different cooking methods
- oven accessories
- how to clean by pyrolysis 60-61
- installer's information
- general maintenance 64
- troubleshooting 65
- When the oven is installed
- Resetting the time on the clock
- Select the cooking mode
- customising the cooking temperature
- delaying the cooking
- using the timer
- using the child safety feature
- how to use your oven setting the display to stand-by mode
- GOING INTO STANDBY MODE:
- COMING OUT OF STANDBY MODE:
- description of features
- Reversible oven shelf
- Enamelled drip-pan
- Rotisserie spit
- Important recommendations:
- Only on model 2X3011CU
- What is pyrolysis?
- Why use the pyrolysis program?
- When to use the pyrolysis program
- A few hints
- How to use the pyrolysis program
- How to program your pyrolysis to start when you want
- Energy consumption
- Inside dimensions of oven
- changing the light bulb
Brand : Atag
Model : ZX3011CUU
Category : Electric oven