HI06471D1 - Cooker Atag - Free user manual and instructions
Find the device manual for free HI06471D1 Atag in PDF.
Download the instructions for your Cooker in PDF format for free! Find your manual HI06471D1 - Atag and take your electronic device back in hand. On this page are published all the documents necessary for the use of your device. HI06471D1 by Atag.
USER MANUAL HI06471D1 Atag
Description Induction hob 4 Control panel 4 Use Pans 5 Automatic shut-off 7 Operation Switching on and power setting 8 Switching off 8 Child lock 9 Residual heat indicator 9 Cooking-timer/alarm 10 Cooking Cooking settings 12 Maintenance Clean 13 Errors General 14 Fault list 14 Technical data
Environmental considerations Disposal of the appliance and packaging 17EN 4 DESCRIPTION Induction hob
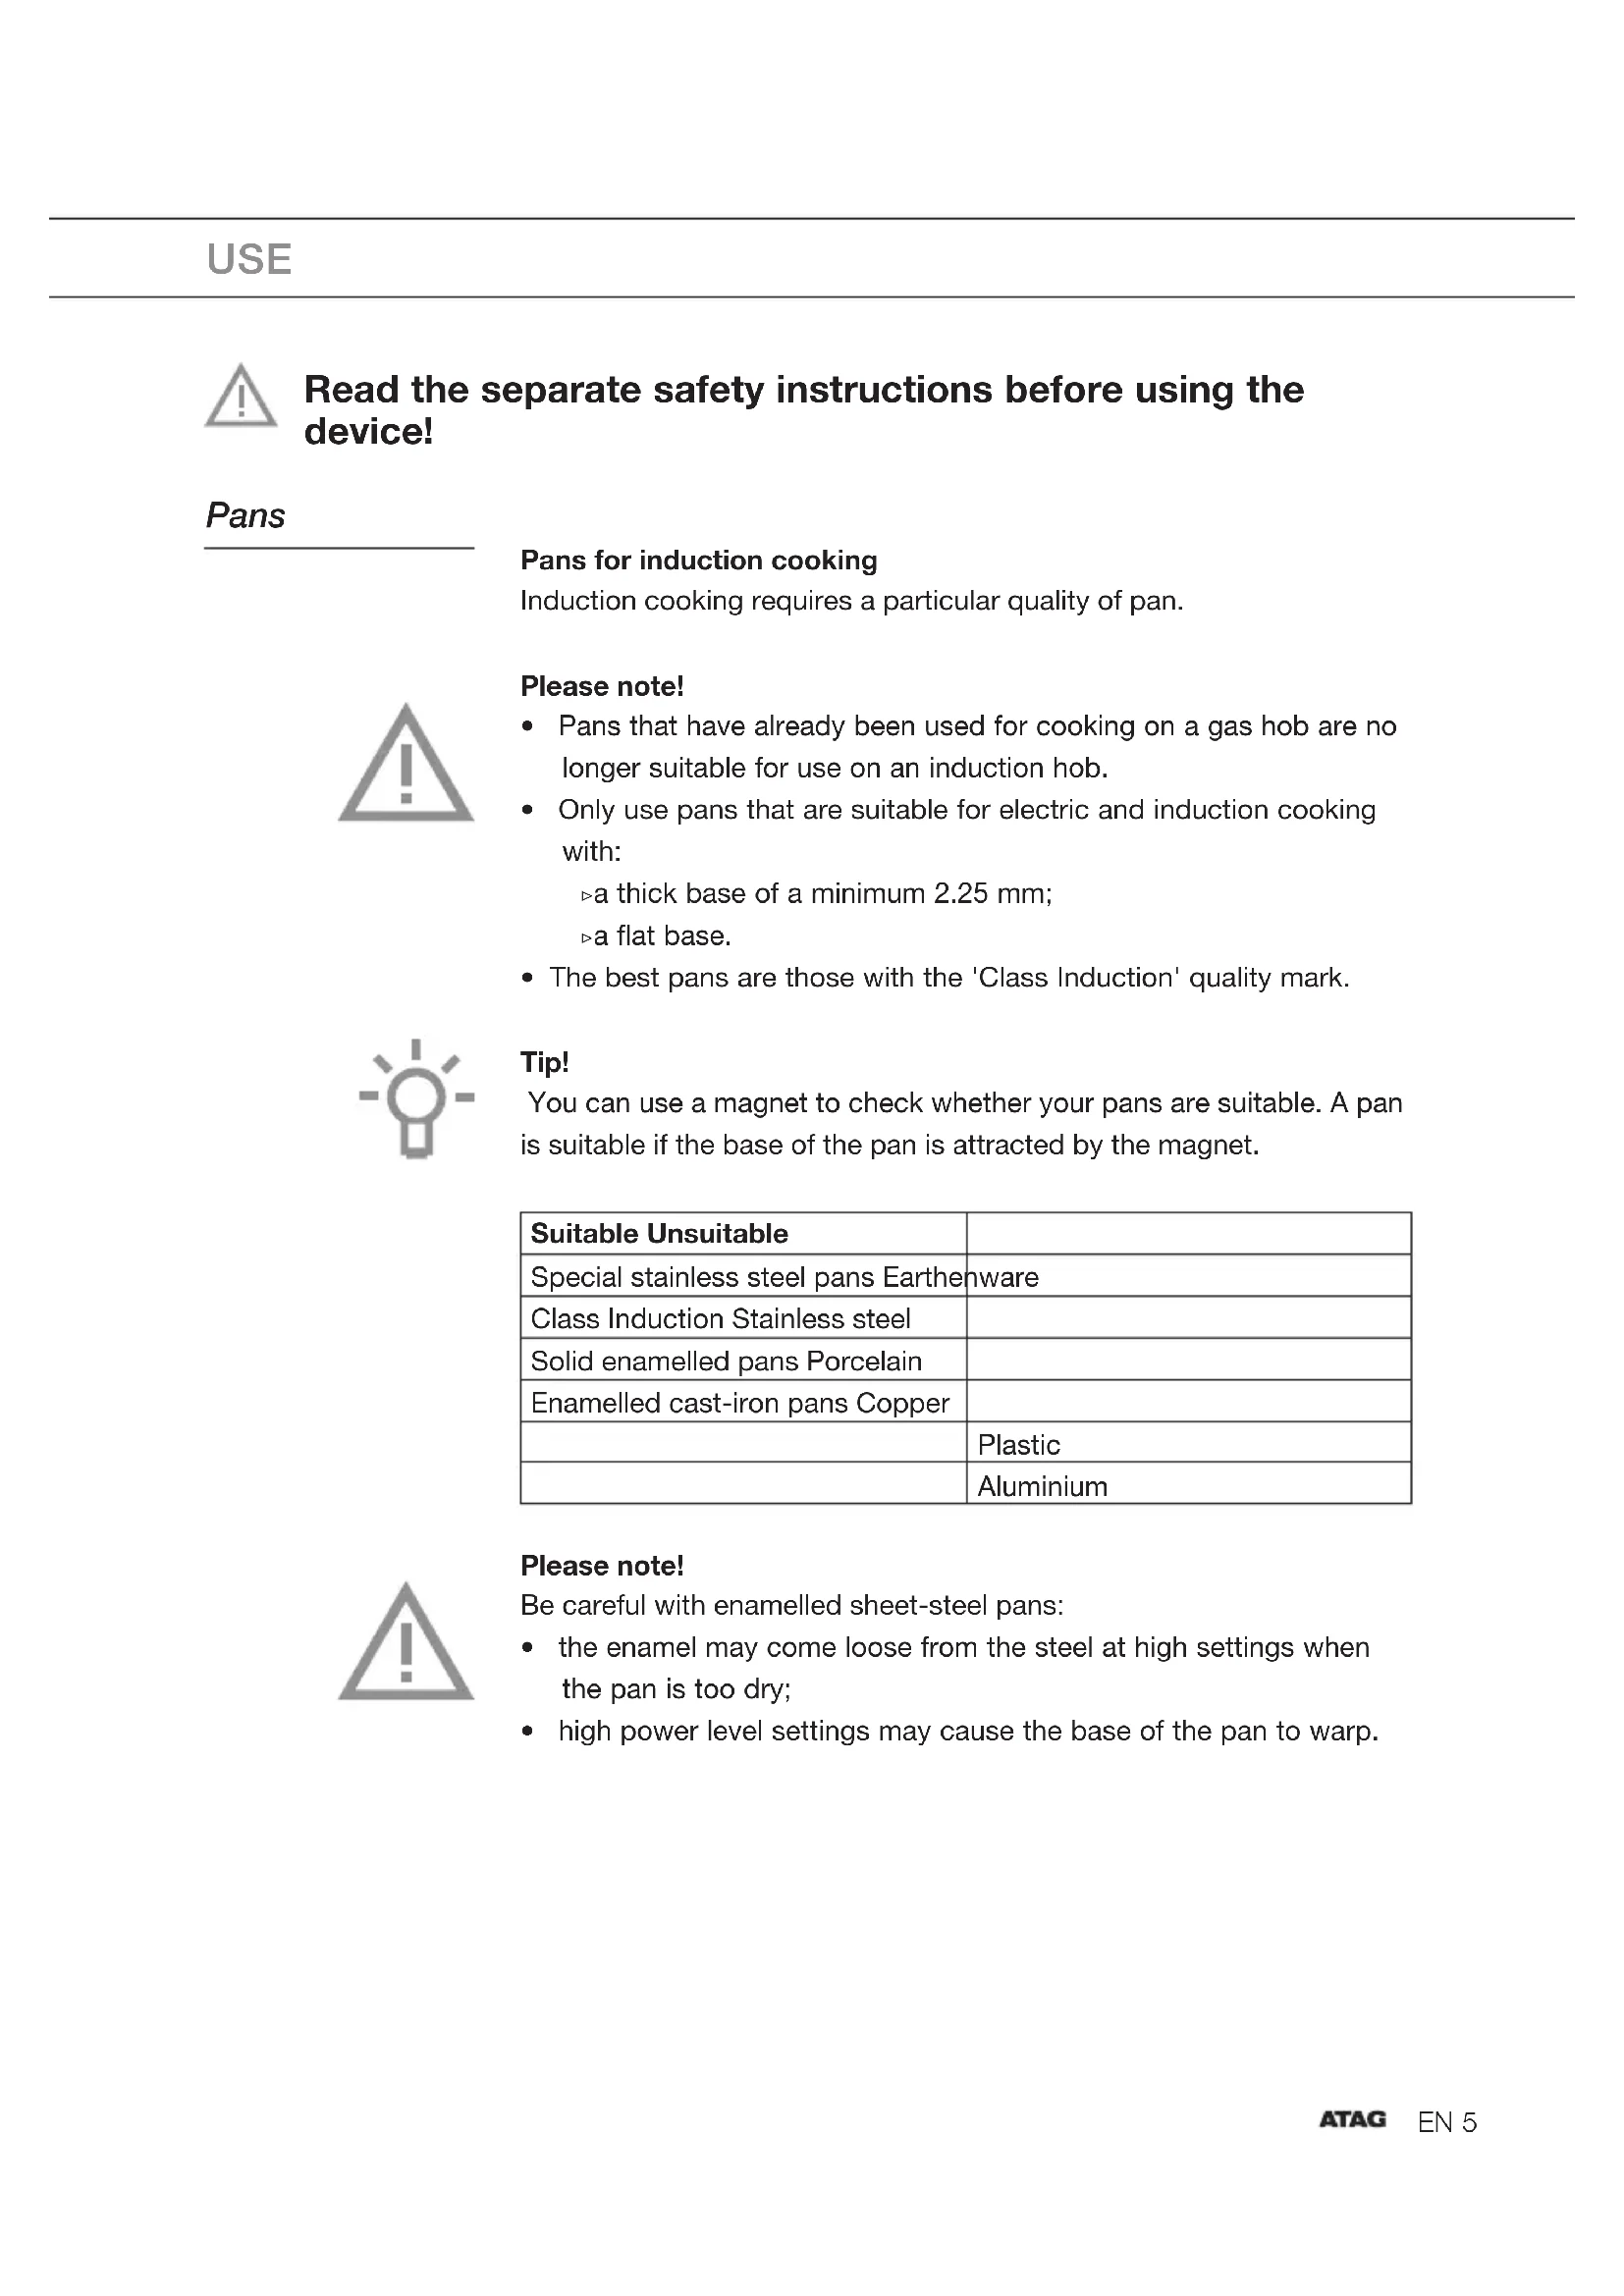
Control panel A. On/Off button B. Power/Residual heat indicator B1. Decimal point - for activated timer function C. Selection button cooking zone E. Power button H. Timer displayEN 5 USE Read the separate safety instructions before using the device! Pans Pans for induction cooking Induction cooking requires a particular quality of pan. Please note!
- Pans that have already been used for cooking on a gas hob are no longer suitable for use on an induction hob.
- Only use pans that are suitable for electric and induction cooking with: ▷ a thick base of a minimum 2.25 mm; ▷ a flat base.
- The best pans are those with the 'Class Induction' quality mark. Tip! You can use a magnet to check whether your pans are suitable. A pan is suitable if the base of the pan is attracted by the magnet. Suitable Unsuitable Special stainless steel pans Earthenware Class Induction Stainless steel Solid enamelled pans Porcelain Enamelled cast-iron pans Copper Plastic Aluminium Please note! Be careful with enamelled sheet-steel pans:
- the enamel may come loose from the steel at high settings when the pan is too dry;
- high power level settings may cause the base of the pan to warp.EN 6 USE Please note
- Grains of grit may cause scratches which cannot be removed. Only put pans with a clean base on the cooking surface and always pick pans up to move them.
- Do not use the hob as a worktop.
- To avoid energy loss, always keep the lid on the pan when cooking. Please note! Never use pans with a misshapen base. A hollow or rounded base can interfere with the operation of the overheating protection, causing the appliance to become too hot. This may lead to the glass top cracking and the pan base melting. Damage caused by using unsuitable pans or boiling dry is excluded from the guarantee. Minimum pan diameter
- The diameter of a pan must be at least 11 cm. The best results are achieved by using a pan with the same diameter as the cooking zone. If a pan is too small the zone will not work. Pressure cookers
- Induction cooking is very suitable for pressure cookers. The fast- reacting cooking zone brings the pressure cooker to pressure quickly. As soon as you switch a cooking zone off, the cooking process stops immediately. The power level adjusts itself
- In induction cooking, only the zone on which the pan in placed is used. If you use a small pan on a large zone, the power will be adjusted to the diameter of the pan. The power will thus be lower and it will take longer before the food in the pan comes to the boil.EN 7 Automatic shut-off
- The cooking-time limiter is a safety function of your hob. If a cooking zone is on for an unusually long time, this will be switched off automatically.
- Depending on the setting you have chosen, the cooking time will be limited as follows: Setting The cooking zone switches off automatically after: 1 8 hours 2 6 hours 3 5 hours 4 5 hours 5 4 hours 6 1.5 hours 7 1.5 hours 8 1.5 hours 9 1.5 hours USEEN 8 Switching on and power setting The power can be set to 9 different levels.
- Place the pan in the middle of a cooking zone.
- Press the On/Off button (A). You will hear a single beep and a '0' will appear in the display (B) next to each cooking zone. If you don't do anything else, the cooking zone will switch off automatically after 10 seconds.
- Press the on/off button (C) for the cooking zone concerned. The '0' next to the selected cooking zone will light up clearly.
- Using the – and + buttons (E) select the preferred power level. When you select the – button directly, the cooking zone will be switched on at power level 9. The set power is visible in the display (B). The appliance has been switched on with a 1 phase (3700 W) power limitation. With this, it is possible to use 4 cooking zones simultaneously at setting 8. If a higher setting is required for a cooking zone, the power of another zone must first be reduced or the zone must be switched off. If the power exceeds the permitted value, the appliance will beep and the set power level in the display will start to flash. In that case, set the zone/zones to a lower setting. Switching off Switching off one cooking zone One cooking zone is switched on. The display shows a power level between 1 and 9.
- Press the button (C) for the cooking zone to be switched off. Set the cooking zone to '0' with the – button (E). The cooking zone switches off The hob switches off after 20 seconds, if all cooking zones are set to '0' and no other process is being used. Switching off all cooking zones Several cooking zones are active.
- Press the On/Off button (A) to switch off all cooking zones. You will hear a beep. All displays are off. The hob is switched off. OPERATIONEN 9 Child lock Child lock activated
- Press the On/Off button (A). The hob is in stand-by mode. The cooking zone displays will display a '0'.
- Press simultaneously for a minimum of three seconds the RL cooking zone button (C) and the – button (E) until you hear a beep.
- Press again the RL cooking zone button (C). For a few seconds the cooking zone display will show 'L'. The child lock is activated. Child lock deactivated
- Press the On/Off button (A). The cooking zone displays will display 'L' for a few seconds.
- Press simultaneously for a minimum of three seconds the RL cooking zone button (C) and the – button (E).
- Press again the - button (E). The cooking zone display will display 'L'. The child lock is de-activated. Tip! Set the hob to child lock mode before starting to clean the hob. This will prevent you switching on the hob by accident. Residual heat indicator After intensive use, the cooking zone used may stay hot for several minutes. As long as the cooking zone is still hot an "H" will flash in the display. OPERATIONEN 10 OPERATION Cooking-timer/alarm A cooking-timer can be set for each cooking zone. The hob also has an alarm. Both the cooking-timer as well as the alarm can be set for a maximum of 99 minutes. The alarm works in the same way as the cooking-timer, but is not linked to a cooking zone. If the alarm has been set, it will continue counting down after the hob has been switched off. The alarm can only be switched off when the hob is switched on. Setting the cooking-timer
- Select desired cooking zone and set the power level.
- At the same time press the – and + button (E). The timer setting is displayed in the top two displays (H). The bottom two displays have been switched off.
- The timer setting is visible for 10 seconds, after which the power setting is displayed. Select the desired function:
1. Cooking-timer — the timer is linked to a cooking zone. After the
set time has elapsed, the cooking zone will switch off automatically.
2. Alarm — the alarm only beeps after the set time has elapsed.
The alarm works in the same way as the cooking-timer, but is not linked to a cooking zone. If the alarm has been set, it will continue running after the hob has been switched off. The alarm can only be switched off when the hob is switched on. Switching on the cooking-timer, activating and switching off
- Press simultaneously the – and + button (E). ▷ If you have switched on a cooking zone (C) prior to this, the accompanying display will be brighter. The cooking-timer that you have now set applies to this cooking zone. The decimal point next to the power level means that the time has been activated for this zone. ▷ The alarm can also be activated without a cooking zone being selected. Two flashing decimal points indicate that the alarm is counting down.
- Set the cooking time using the – or + button (E). (When you press '-', the time will be set for 30 minutes. If you keep the button pressed the time will run faster).EN 11
- The time can be set to a value between 01 and 99 minutes. The cooking-timer can be set for each cooking zone.
- Check the remaining time by selecting the cooking zone concerned (C) while simultaneously pressing the - and + button (E). Adjust the cooking time using the – or + button (E).
- After the set time has ended the '00' will flash in the display, as well as the timer's decimal point. Furthermore you will hear a repeated short beep. Switch off the timer and alarm signal by pressing a random button. If you don't do this, the signal will switch off automatically after three minutes. OPERATIONEN 12 COOKING Cooking settings Because the settings depend on the quantity and composition of the contents of the pan, the table below is intended as a guideline only. Use setting 9 to:
- bring food or liquid to the boil quickly;
- bring a pressure cooker up to pressure. Use setting 8 to:
- fry boiled potatoes;
- deep frying. Use setting 7 to:
- fry thick slices of breaded meat;
- fry breaded fish. Use setting 6 and 5 to:
- defrost hard vegetables;
- fry thin slices of meat. Use settings 1-4 to:
- melt cheese.EN 13 MAINTENANCE Clean Tip! Activate the child lock before cleaning the hob. Daily cleaning
- Although food spills cannot burn into the glass, we nevertheless recommend you clean the hob immediately after use.
- For daily cleaning a damp cloth with a mild cleaning agent is best.
- Dry off with kitchen paper or a dry tea towel. Stubborn stains
- Stubborn stains can also be removed with a mild cleaning agent, washing-up liquid, for example.
- Special products are available for this purpose.
- Traces of metals (caused by sliding pans) can be difficult to remove. Special products are available for this.
- Use a glass scraper to remove food spills. Melted plastic and sugar is also best removed with a glass scraper. Never use
- Never use abrasives. These leave scratches in which dirt and limescale can accumulate.
- Never use anything sharp such as steel wool or scourers.EN 14 General If you notice a crack in the glass top (however small), switch the hob off immediately, unplug the hob, turn off the (automatic) fuse switch(es) in the meter cupboard or, in the event of a permanent connection, set the switch in the power supply lead to zero. Contact the service department. Fault list When in doubt on the proper operation of your appliance, this does not automatically mean there is a defect. Try to address the problem yourself first by checking the points mentioned below or for more information visit the 'www.atag.nl' website. Symptom Possible cause Solution The fan runs on for several minutes after the hob has been switched off. The hob is cooling down. Normal operation. A slight smell is noticeable the first few times the hob is used. The new appliance is heating up. This is normal and will disappear once it has been used a few times. Ventilate the kitchen. You can hear a ticking sound in your hob. Ticking can also occur at lower settings. Normal operation. The pans make a noise while cooking. This is caused by the energy flowing from the hob to the saucepan. This is caused by the energy flowing from the hob to the saucepan. This is not harmful for the pans or hob. You have switched a cooking zone on but the display keeps flashing. A pan detection symbol (U) will appear in the display. The pan you are using is not suitable for induction cooking or has a diameter of less than 12 cm. Use a good pan. A cooking zone suddenly stops working and you hear a signal. The preset time has ended. Switch off the signal by pushing a random button. The hob is not working and nothing appears in the display. There is no power supply due to a defective cable or a faulty connection. Check the fuses or the electric switch (if there is no plug). ERRORSEN 15 Symptom Possible cause Solution A fuse blows as soon as the hob is switched on. The appliance is incorrectly connected. Check the electrical connections. Error code ER03. The control panel is dirty or has water on it. Clean the control panel. Error code E3. Unsuitable pan used. Use a pan suitable for induction cooking. Error code E2. Appliance over heated. The appliance has been switched off because of over heating. Fault code E6. The appliance has been connected incorrectly and/or the mains voltage is too high. Have your connection changed. Other fault codes. Defective generator. Contact the service department. ERRORSEN 16 Hob type HI6471D1 Induction x Connection 230 V - 50/60 Hz Maximum power cooking zones and diameters Front left 1400 W / Ø 16 cm Rear left 1400 W / Ø 16 cm Rear right 1400 W / Ø 16 cm Front right 1400 W / Ø 16 cm Load L1 3680 W Total connected load 3680 W Information according regulation (EU) 66/2014 Measurements according EN60350-2 Model identification HI6471D1 Type of hob Induction Number of cooking zones and/or areas 4 Heating technology Induction cooking zones For circular cooking zones: diameter of useful surface area per electric heated cooking zone in cm Ø 16.0 cm Front left Rear left Ø 16.0 cm Front right Ø 16.0 cm Rear right Energy consumption per cooking zone or area calculated per kg (EC electric hob ) in Wh/kg
Energy consumption for the hob calculated per kg (EC electric hob ) in Wh/kg
TECHNICAL DATAEN 17 Disposal of the appliance and packaging Sustainable materials have been used during manufacture of this appliance. This appliance must be disposed of responsibly at the end of its service life. The government can provide you with information about this. The appliance packaging is recyclable. The following may have been used:
- CFC-free polystyrene (PS-rigid foam). You should dispose of these materials responsibly and in accordance with government regulations. To designate the requirement for separate collection of household electrical appliances, the symbol of a dustbin with a cross through it is applied to the product. This means that the appliance may not be included with normal domestic refuse at the end of its service life. The appliance must be taken to a special municipal centre for separated waste collection or to a dealer providing this service. Separate collection of household appliances helps to prevent potential negative impact on the environment and on human health caused by improper disposal. It ensures that the materials that make up the unit can be recycled to achieve a significant saving in terms of energy and raw materials. Please note! Do not throw a broken ceramic glass plate in the glass recycling bin but take this to the Municipality's waste recycling centre. Declaration of conformity We hereby declare that our products satisfy the applicable European directives, orders and regulations, as well as the requirements stated in the referenced standards.