
KASA500 - Receiver KEF - Free user manual and instructions
Find the device manual for free KASA500 KEF in PDF.
| Product type | Receiver / Amplifier |
| Brand | KEF |
| Model | KASA500 |
| Output power (stereo mode) | 2 x 50 watts at 4 ohms |
| Output power (bridged mode) | 1 x 500 watts at 8 ohms |
| Audio inputs | RCA line, speaker input (high level) |
| Audio outputs | RCA line output, speaker outputs (binding posts) |
| Operating mode | 2 channels stereo or bridged mono |
| DSP settings | 8 DIP switches for amp EQ presets, 4 for line output |
| Power on control | Manual, music signal detection (Music Sense), 12V trigger |
| Firmware update | Via USB port (downloadable file at www.kef.com/kasa500) |
| LED indicators | Green (on), Yellow (standby), Red (protection) |
| Power supply | Mains, voltage selectable by country |
| Power consumption | Not specified |
| Dimensions (W x H x D) | Not specified |
| Weight | Not specified |
| Maintenance | Clean with a dry, lint-free cloth; avoid alcohol-based products |
| Protection | Protection mode in case of overheating or short circuit (red LED) |
| Safety | Do not open the device, disconnect before storms, use grounded outlet |
| Included accessories | Power cable, warranty card, user manual |
Frequently Asked Questions - KASA500 KEF
User questions about KASA500 KEF
0 question about this device. Answer the ones you know or ask your own.
Ask a new question about this device
Download the instructions for your Receiver in PDF format for free! Find your manual KASA500 - KEF and take your electronic device back in hand. On this page are published all the documents necessary for the use of your device. KASA500 by KEF.
USER MANUAL KASA500 KEF
User Manual
KASA500 System Amplifier
English
KASA500 System Amplifier
Introduction
Thank you for purchasing KEF KASA500 amplifier. We are confident that your KASA500 will provide reliable, high performance sound for many years to come. Please read this manual fully before you attempt any connection to the KASA500.
Table of contents
Introduction 2
Table of contents....2
Inside the box 2
Safety instructions....3
Controls and connections 4-5
KASA500 setting - LFE mode 26
KASA500 setting - stereo sub / sat 27
KASA500 setting – speaker input 28
Specification 29
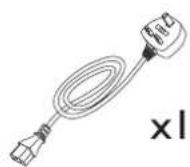
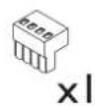
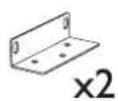
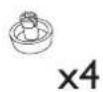
Inside the box


natural_image
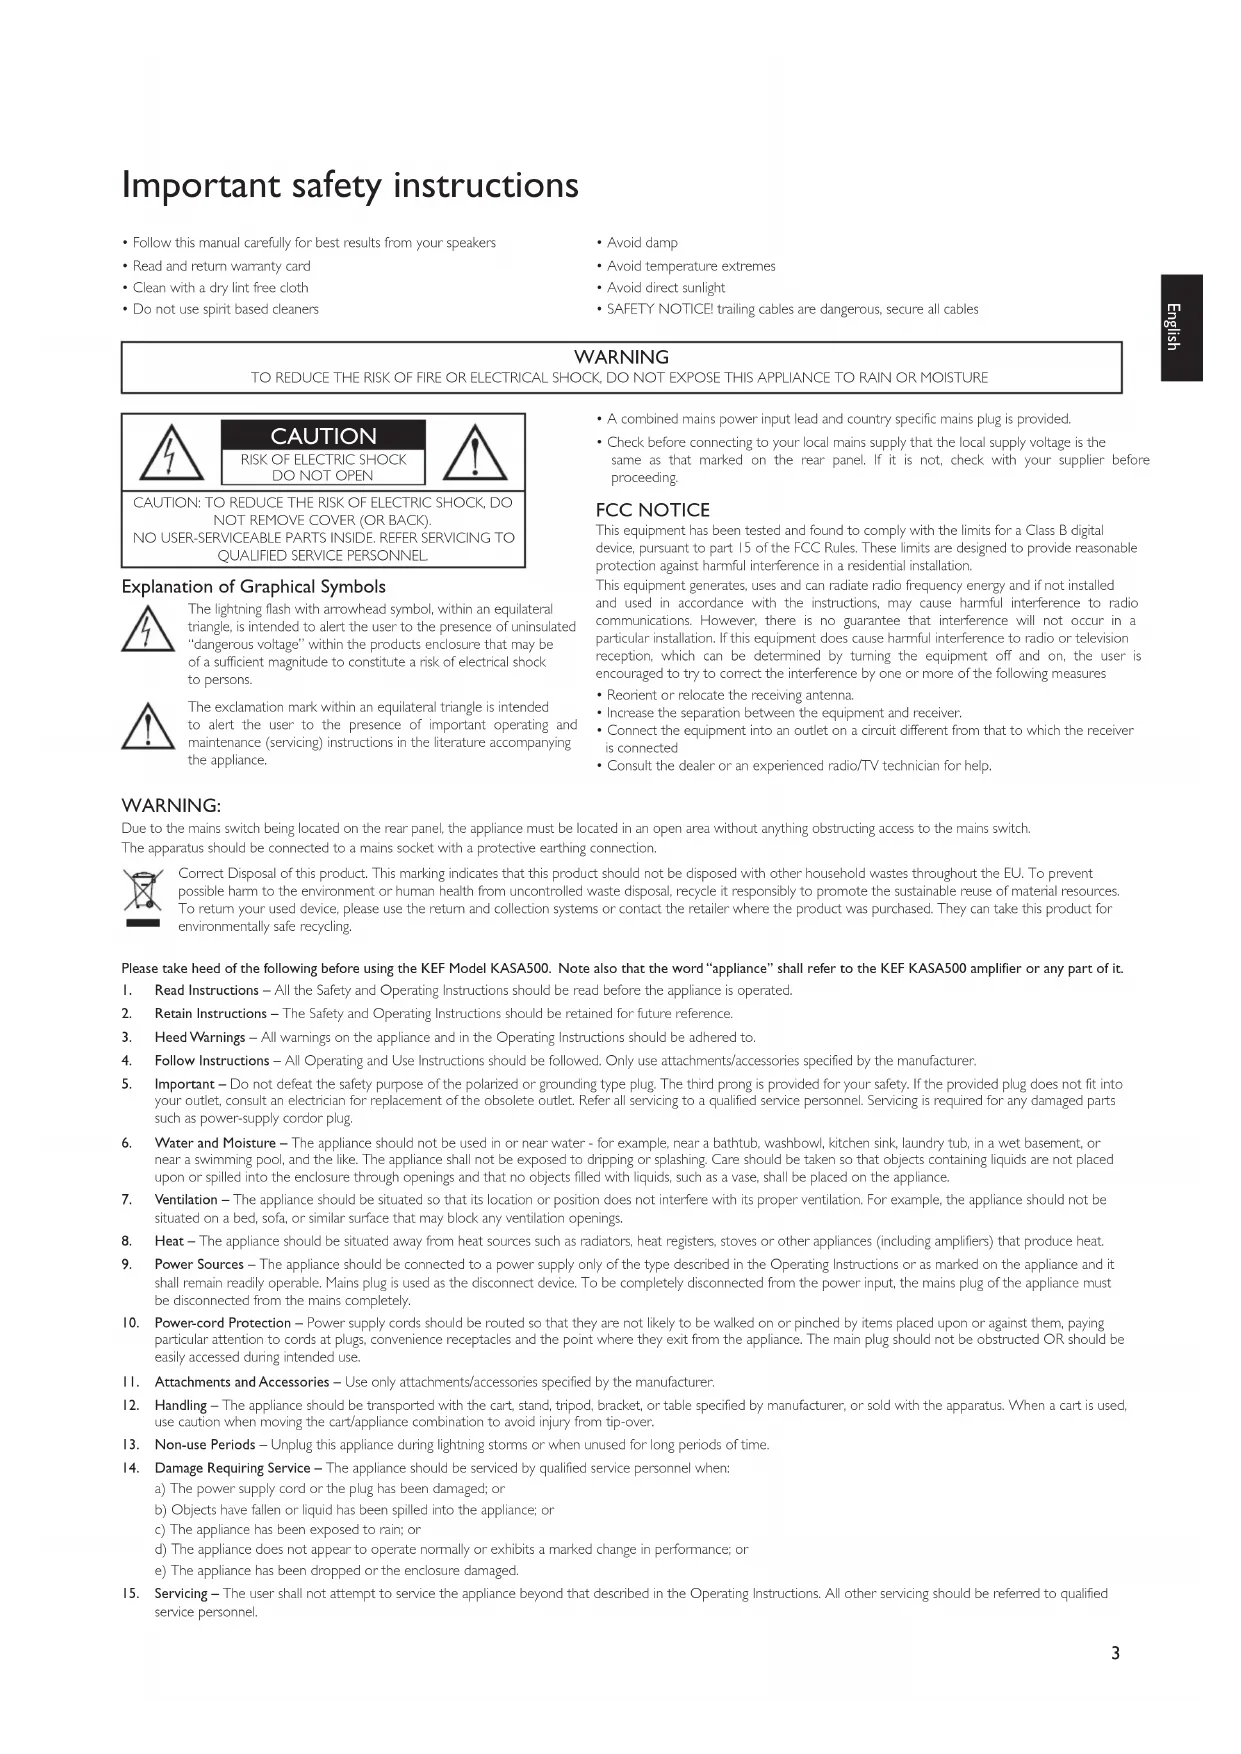
Four abstract line drawings: a document, grid, and two rectangular blocks with a 'x' label (no text or symbols on the shapes themselves)Important safety instructions
- Follow this manual carefully for best results from your speakers
- Read and return warranty card
- Clean with a dry lint free cloth
-
Do not use spirit based cleaners
-
Avoid damp
- Avoid temperature extremes
- Avoid direct sunlight
- SAFETY NOTICE! trailing cables are dangerous, secure all cables
WARNING
TO REDUCE THE RISK OF FIRE OR ELECTRICAL SHOCK, DO NOT EXPOSE THIS APPLIANCE TO RAIN OR MOISTURE

CAUTION
RISK OF ELECTRIC SHOCK DO NOT OPEN

CAUTION: TO REDUCE THE RISK OF ELECTRIC SHOCK, DO NOT REMOVE COVER (OR BACK). NO USER-SERVICEABLE PARTS INSIDE. REFER SERVICING TO QUALIFIED SERVICE PERSONNEL.
Explanation of Graphical Symbols

The lightning flash with arrowhead symbol, within an equilateral triangle, is intended to alert the user to the presence of uninsulated "dangerous voltage" within the products enclosure that may be of a sufficient magnitude to constitute a risk of electrical shock to persons.

The exclamation mark within an equilateral triangle is intended to alert the user to the presence of important operating and maintenance (servicing) instructions in the literature accompanying the appliance.
- A combined mains power input lead and country specific mains plug is provided.
- Check before connecting to your local mains supply that the local supply voltage is the same as that marked on the rear panel. If it is not, check with your supplier before proceeding.
FCC NOTICE
This equipment has been tested and found to comply with the limits for a Class B digital device, pursuant to part 15 of the FCC Rules. These limits are designed to provide reasonable protection against harmful interference in a residential installation.
This equipment generates, uses and can radiate radio frequency energy and if not installed and used in accordance with the instructions, may cause harmful interference to radio communications. However, there is no guarantee that interference will not occur in a particular installation. If this equipment does cause harmful interference to radio or television reception, which can be determined by turning the equipment off and on, the user is encouraged to try to correct the interference by one or more of the following measures
- Reorient or relocate the receiving antenna.
- Increase the separation between the equipment and receiver.
- Connect the equipment into an outlet on a circuit different from that to which the receiver is connected
- Consult the dealer or an experienced radio/TV technician for help.
WARNING:
Due to the mains switch being located on the rear panel, the appliance must be located in an open area without anything obstructing access to the mains switch.
The apparatus should be connected to a mains socket with a protective earthing connection.

Correct Disposal of this product. This marking indicates that this product should not be disposed with other household wastes throughout the EU. To prevent possible harm to the environment or human health from uncontrolled waste disposal, recycle it responsibly to promote the sustainable reuse of material resources. To return your used device, please use the return and collection systems or contact the retailer where the product was purchased. They can take this product for environmentally safe recycling.
Please take heed of the following before using the KEF Model KASA500. Note also that the word "appliance" shall refer to the KEF KASA500 amplifier or any part of it.
I. Read Instructions – All the Safety and Operating Instructions should be read before the appliance is operated.
2. Retain Instructions – The Safety and Operating Instructions should be retained for future reference.
3. Heed Warnings – All warnings on the appliance and in the Operating Instructions should be adhered to.
4. Follow Instructions – All Operating and Use Instructions should be followed. Only use attachments/accessories specified by the manufacturer.
5. Important – Do not defeat the safety purpose of the polarized or grounding type plug. The third prong is provided for your safety. If the provided plug does not fit into your outlet, consult an electrician for replacement of the obsolete outlet. Refer all servicing to a qualified service personnel. Servicing is required for any damaged parts such as power-supply cordor plug.
6. Water and Moisture – The appliance should not be used in or near water - for example, near a bathtub, washbowl, kitchen sink, laundry tub, in a wet basement, or near a swimming pool, and the like. The appliance shall not be exposed to dripping or splashing. Care should be taken so that objects containing liquids are not placed upon or spilled into the enclosure through openings and that no objects filled with liquids, such as a vase, shall be placed on the appliance.
7. Ventilation – The appliance should be situated so that its location or position does not interfere with its proper ventilation. For example, the appliance should not be situated on a bed, sofa, or similar surface that may block any ventilation openings.
8. Heat – The appliance should be situated away from heat sources such as radiators, heat registers, stoves or other appliances (including amplifiers) that produce heat.
9. Power Sources – The appliance should be connected to a power supply only of the type described in the Operating Instructions or as marked on the appliance and it shall remain readily operable. Mains plug is used as the disconnect device. To be completely disconnected from the power input, the mains plug of the appliance must be disconnected from the mains completely.
10. Power-cord Protection – Power supply cords should be routed so that they are not likely to be walked on or pinched by items placed upon or against them, paying particular attention to cords at plugs, convenience receptacles and the point where they exit from the appliance. The main plug should not be obstructed OR should be easily accessed during intended use.
II. Attachments and Accessories – Use only attachments/accessories specified by the manufacturer.
12. Handling – The appliance should be transported with the cart, stand, tripod, bracket, or table specified by manufacturer, or sold with the apparatus. When a cart is used, use caution when moving the cart/appliance combination to avoid injury from tip-over.
13. Non-use Periods – Unplug this appliance during lightning storms or when unused for long periods of time.
14. Damage Requiring Service – The appliance should be serviced by qualified service personnel when:
a) The power supply cord or the plug has been damaged; or
b) Objects have fallen or liquid has been spilled into the appliance; or
c) The appliance has been exposed to rain; or
d) The appliance does not appear to operate normally or exhibits a marked change in performance; or
e) The appliance has been dropped or the enclosure damaged.
- Servicing – The user shall not attempt to service the appliance beyond that described in the Operating Instructions. All other servicing should be referred to qualified service personnel.
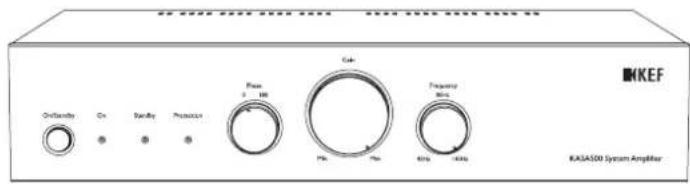
Controls and connections
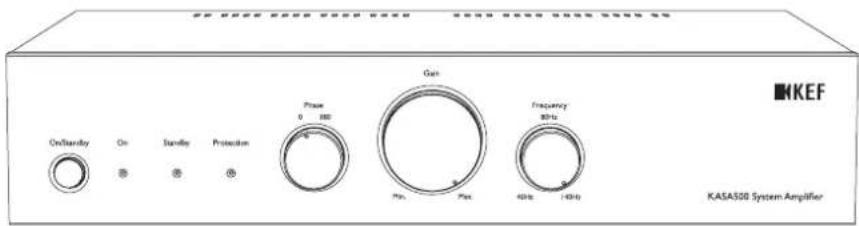
I. On/Standby Switch - On/Off
2. LED indicator
On - Green - KASA500 is on and ready to play music.
Standby – Yellow – KASA500 has power but is in standby.
Protection - Red - KASA500 is in protection. Switch off KASA500, let it cool down and check connections.
- Phase – Select Signal Phase for matching to Satellite speakers
- Gain - Input Gain (Volume)
- Frequency – Sets Low Pass Frequency
This control can be enabled or disabled by KASA500 DSP presets. Set to 140Hz if your surround amp has an internal subwoofer crossover (LFE out).
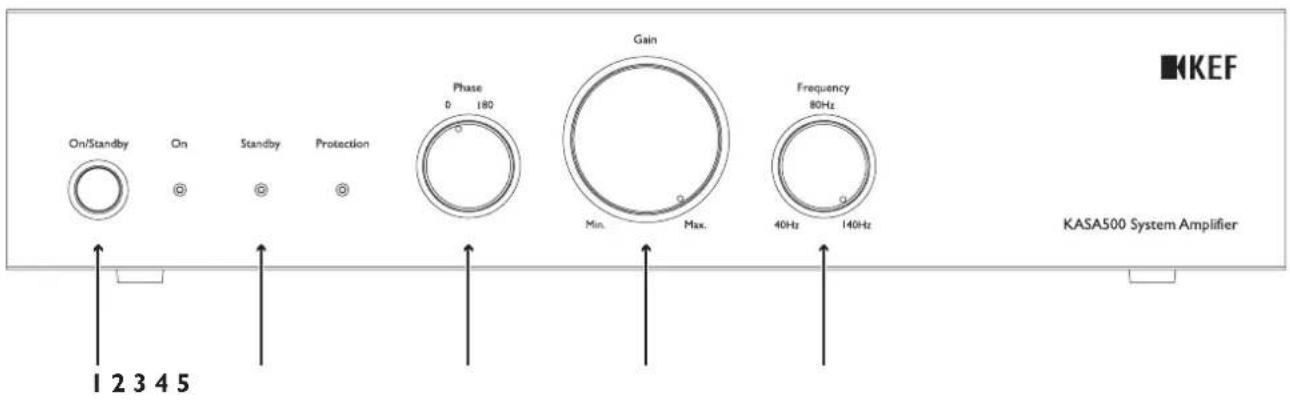
- Voltage Select – Select your AC voltage
- USB – For uploading new KASA500 DSP firmware KASA500 DSP firmware available for download at www.kef.com/kasa500
- Software Rev. – For recording software revision with the supplied labels when updating KASA500 DSP firmware.
- EQ-AMP - 8 Dip switches for selecting KASA500 DSP presets (Confirm software revision matches your preset selection).
- EQ-LINE OUT - 4 Dip Switches for selecting Line Output DSP presets (Confirm software revision matches your preset selection).
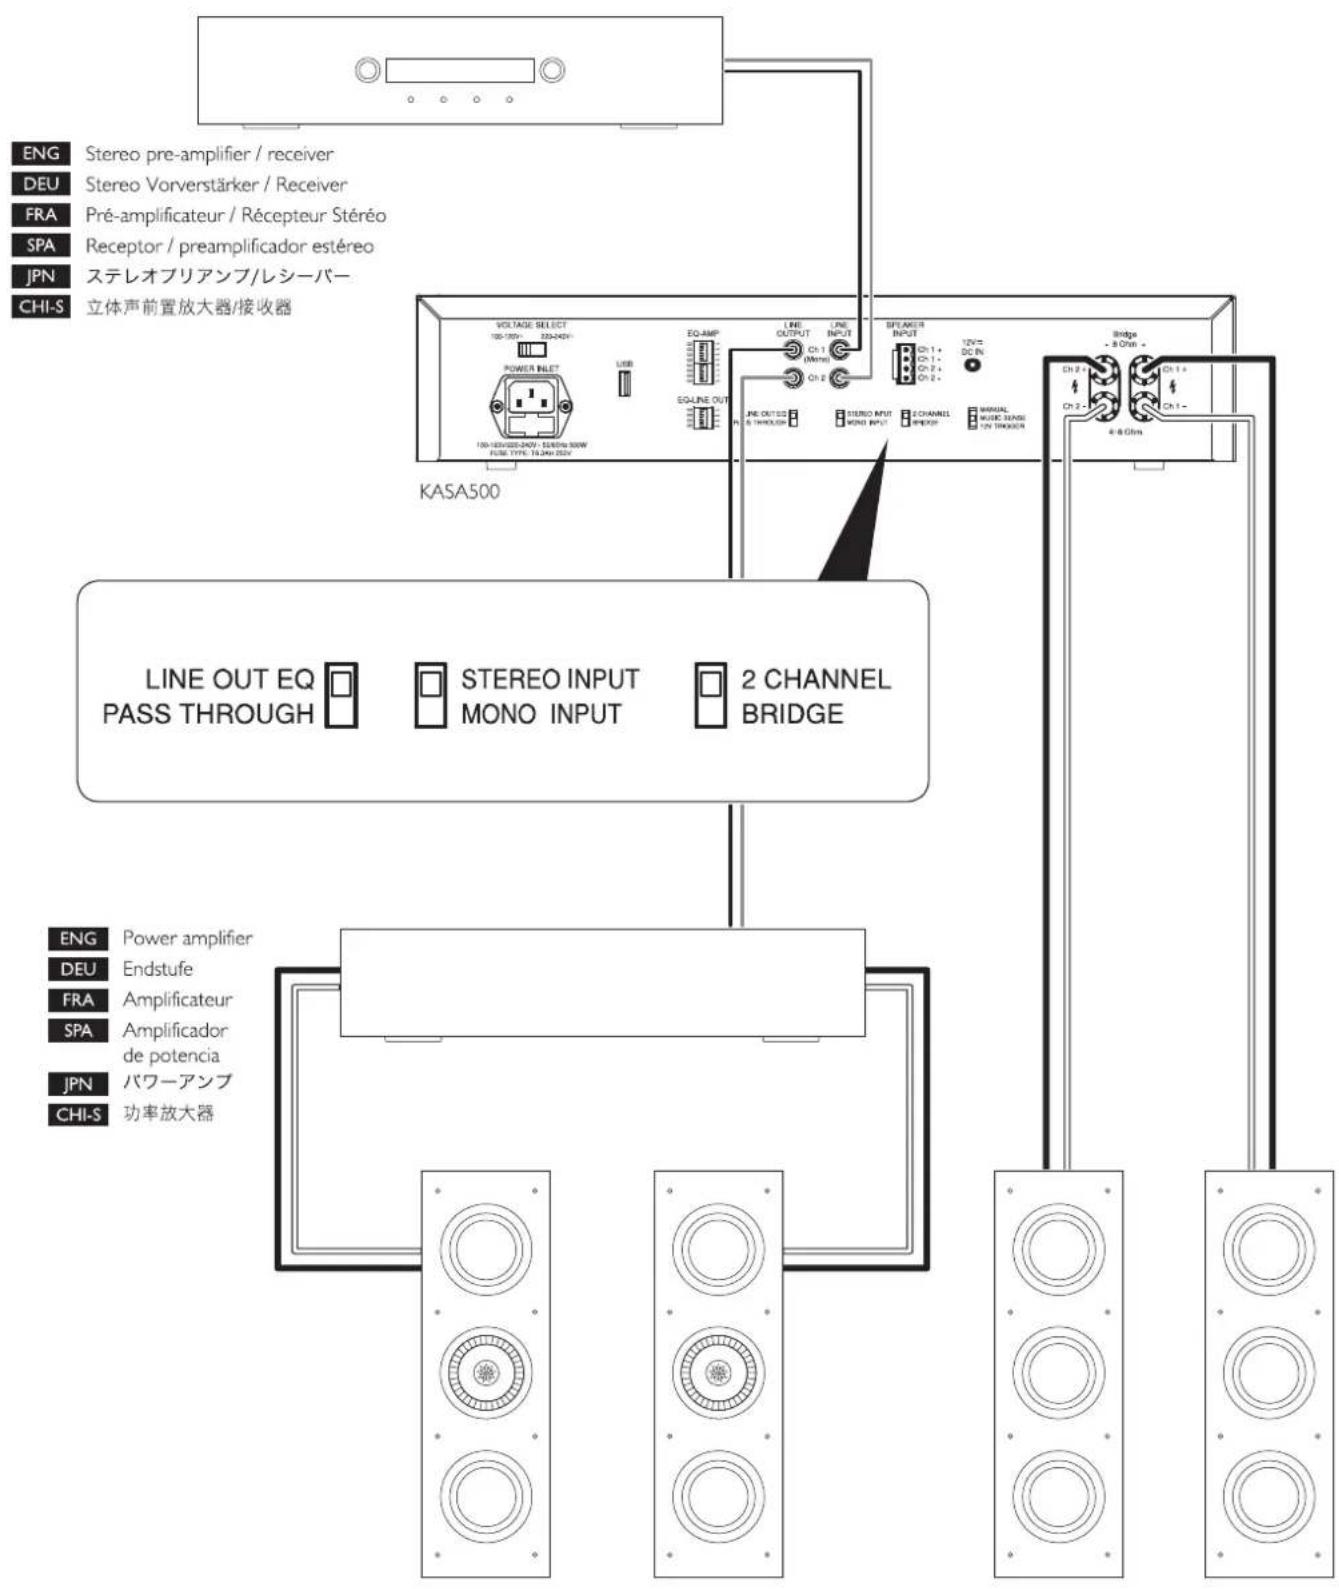
- Line Output – RCA Line level output to another KASA500 or power amplifier. When using single LFE input at "Line Input" (12) from receiver, connect to CHI and set "Stereo / Mono Input" (15) to Mono.
- Line Input – Use for connecting to line level input signal
- Speaker Inputs – Use for connecting to speaker level input signal
- Line Out EQ / Pass through – Line Out with DSP preset / Direct Bypass
- Stereo / Mono Input Stereo maintains stereo signal into DSP. Mono splits mono input into both DSP or amplifier channels.
- 2 Channel / Bridge – Converts the 2 × 250 watt into 4 Ohm amplifier into a monaural 500w x 1 into 8Ohm amplifier – Unless otherwise instructed – Must be left in 2 Channel Position!
- 12V DC IN – Input for "12V Trigger" (any polarity).
- Manual/Music Sense/12V Trigger – Sets KASA500 Tum on control Manual – KASA500 switches on with front panel On/Standby switch Music Sense – if On/Standby switch is on, KASA500 switches on with music signal 12V Trigger – if On/Standby switch is on, KASA500 switches on with 12V trigger.
- Speaker Outputs – Connect to subwoofer or speaker Use Ch 1 / Ch 2 markings for 2 Channel mode, amp is optimised for 4 Ohm speakers. Use Bridge marking when in bridge mode, amp is optimised for 8 Ohm speakers.
Deutsch
KASA500 Verstärker
Einleitung

natural_image
Four technical diagrams showing different document and sheet layouts (no text or symbols)Sicherheitshinweise


natural_image
Four abstract line drawings: a document, grid, and two rectangular blocks with a 'x' label (no text or symbols on the shapes themselves)
natural_image
Four abstract line drawings: a closed book, a grid, a document with a number 1, and a grid of rectangular boxes (no text or symbols)

警告・安全上のご注意


重要的安全注意事项
KASA500 setting – LFE mode
(DEU) KASA500 einstellung – LFE-modus (FRA) Réglages KASA500 – mode LFE (SPA) Configuración del KASA500 – modo LFE (JPN) KASA500の設定 - LFEモード (CHI-S) KASA500 设置 - LFE 模式
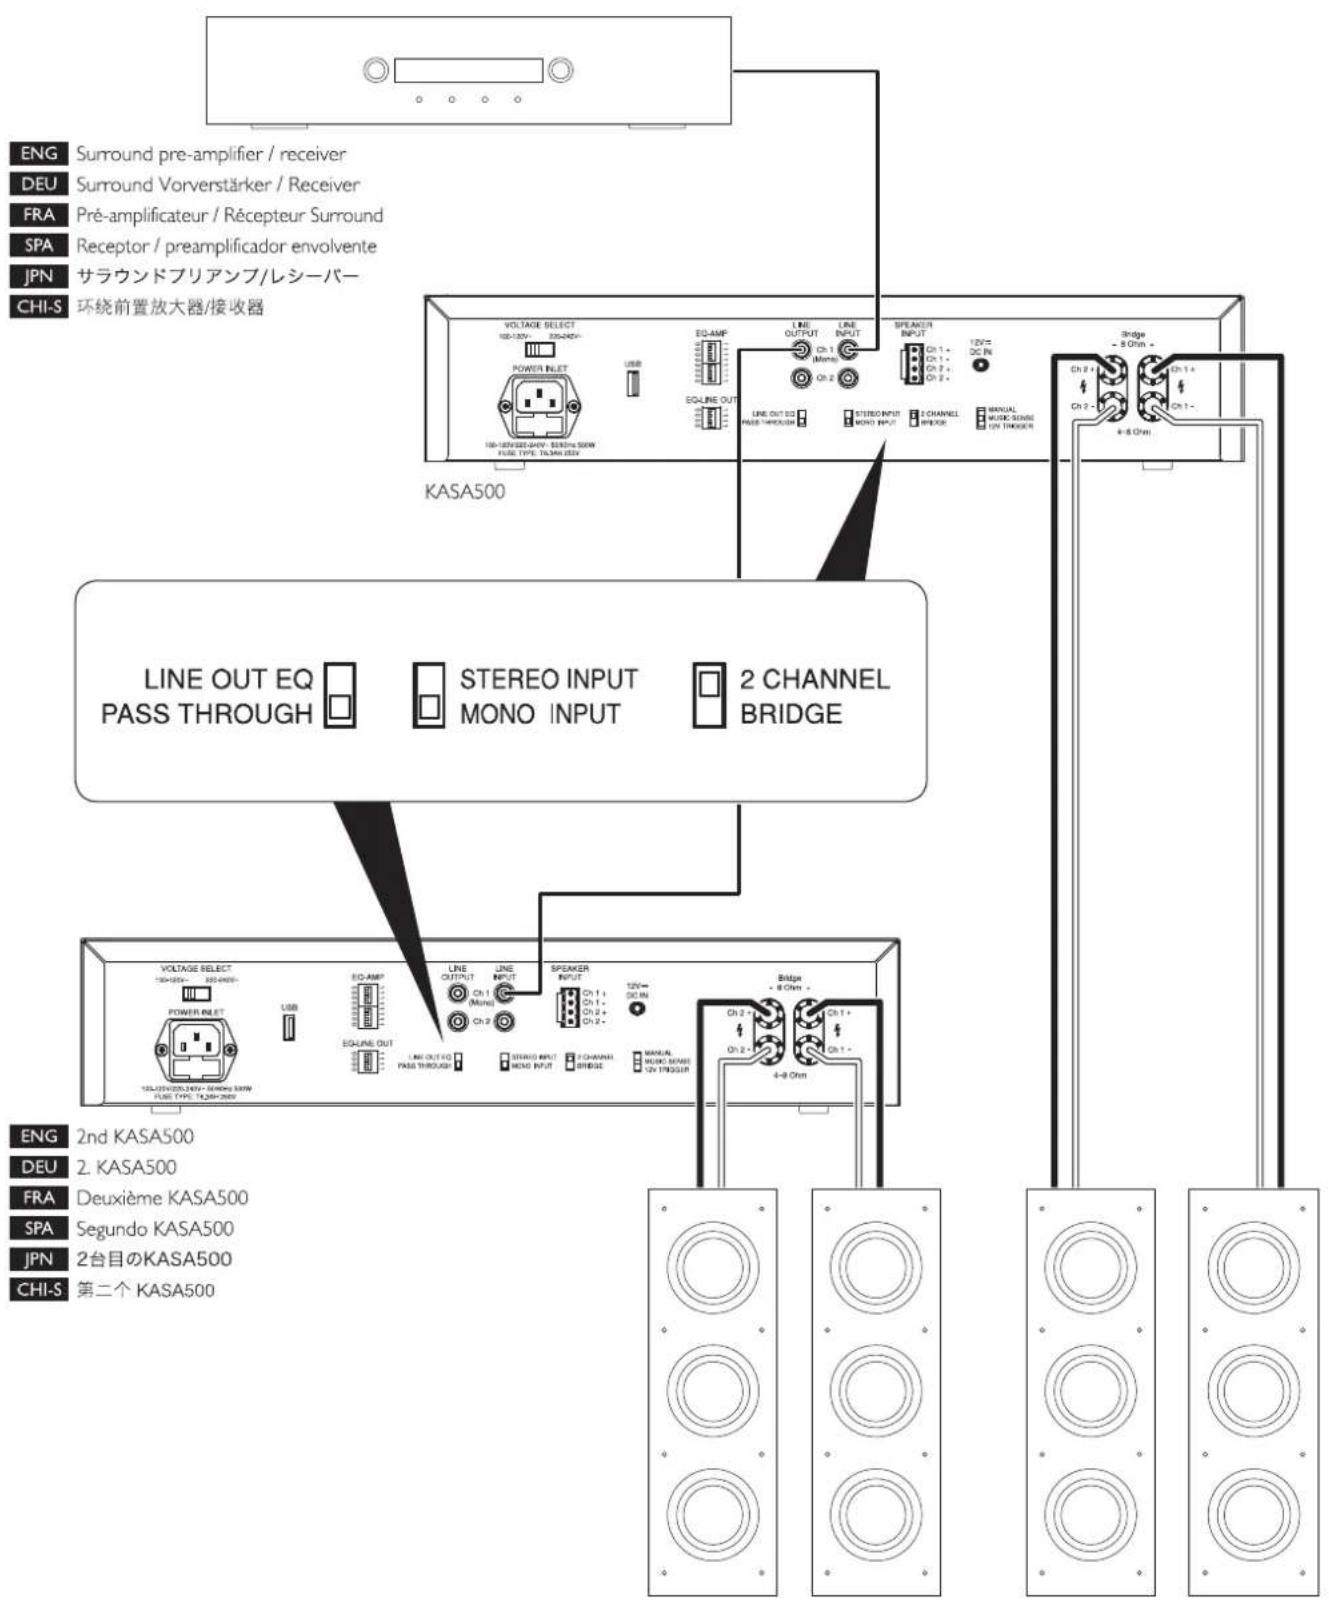
KASA500 setting – stereo sub / sat
(DEU) KASA500 einstellung - stereo sub / sat (FRA) Réglages KASA500 - sub / sat stereo (SPA) Configuración del KASA500 - estéreo sub / sat (JPN) KASA500の設定 - stereo sub / sat (ステレオサブ/サテライト) (CHI-S) KASA500 设置 - 立体声超低音音箱/卫星式音箱
KASA500 setting – speaker input
(DEU) KASA500 einstellung - lautsprechereingang (FRA) Réglages KASA500 - entrée enceinte (SPA) Configuración del KASA500 - entrada del altavoz (JPN) KASA500の設定 - speaker input (スピーカー入力) (CHI-S) KASA500 设置 - 扬声器输入

| Model | KASA500 |
| Amplifier Power (<1% THD) | 2 x 250watts 4ohms; Bridge 1x500watts 8ohms |
| Crossover Frequency | 40-140Hz or software bypass |
| Inputs | Selectable stereo RCA line level, or mono LFE RCA level; Stereo speaker level |
| 12-Volt trigger input voltage | 8 to 14 Volt DC@1.5mA max 1/8" diameter female plug (tip positive or tip negative) |
| External Dimensions(H x W x D) | 88 x 432 x 304mm (3 1/2 x 17 x 12 in.)92 x 432 x 304mm (3 5/8 x 17 x 12 in.) with feet88 x 483 x 304mm (3 1/2 x 19 x 12 in.) with rack ears (2 EIA rack space) |
| Weight | 4kg (9 lbs) |
| Finish | Black |

- User Manual
- English
- KASA500 System Amplifier
- Introduction
- Table of contents
- Inside the box
- Important safety instructions
- WARNING
- CAUTION
- Explanation of Graphical Symbols
- FCC NOTICE
- WARNING:
- Controls and connections
- Deutsch
- KASA500 Verstärker
- Einleitung
- Sicherheitshinweise
- 警告・安全上のご注意
- 重要的安全注意事项
- KASA500 setting – LFE mode
- KASA500 setting – stereo sub / sat
- KASA500 setting – speaker input
Brand : KEF
Model : KASA500
Category : Receiver